Banquette Seating Progress
As promised, I’m going to show you the progress on the banquette seating as of today.
I can’t tell you how much I wrestled with the design of this seat back. I wanted tufting (I thought), but traditional deep tufting just looked too…well…traditional. Too dressy for this space.

So then I thought I would do a simple tufting…possibly diamond or square. And even though the majority of you voted for diamonds in Friday’s poll, in my mind, I just couldn’t seem to make it work. With all of the lines it would create, in addition to all of the lines already in the space, I could just see it ending up looking way too busy–something like this:

See what I mean about all of the lines? It makes me feel anxious, which is the exact opposite of what a home should do.
And while the square tufting lost by a large margin on Friday’s poll, there were a few of you who were pretty adamant that I should do square tufting. I almost went for it, but there’s just something about the squares also that didn’t feel quite right.

In the end, I just decided that I was trying to force the whole “tufting” idea, and I abandoned it completely.
So what did I end up with?
The absolute simplest, most streamlined look possible, and I love it! The seat cushion isn’t made yet. I’m actually going to pawn that off on allow my mom to make that for me so that she can experience the joy of being involved in this project. 😀
But here’s the seat back. You’ll just have to imagine the white seat cushion there. The back will be mounted two inches off of the seat so that the cushion can just tuck up underneath the upholstered back. Until I get it mounted, it’s just resting on a 2 x 2 piece of wood. (And as you can see, caulking around the tile is still on the “to do” list.) 🙂


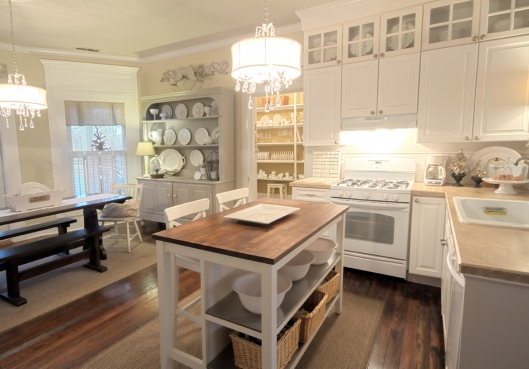
And do you remember how plain the banquette seat was originally?

I added some trim to the edge of the top and along the bottom to add some detail and beef it up a bit.

Aahhhh…much better.
That’s the progress so far. Now if only I could find a gorgeous (but cheap) table to use in the space!

This one’s from Pottery Barn, and a wee bit out of my price range. 😀 But I just love that rich stained wood. A girl can dream, right?
Hope you have a fabulous day!
**I’m linking this post to Metamorphosis Monday at Between Naps On The Porch, DIY Day at A Soft Place To Land, Transformation Thursday at Shabby Chic Cottage, and Feature Yourself Friday at Fingerprints on the Fridge.

Addicted 2 Decorating is where I share my DIY and decorating journey as I remodel and decorate the 1948 fixer upper that my husband, Matt, and I bought in 2013. Matt has M.S. and is unable to do physical work, so I do the majority of the work on the house by myself. You can learn more about me here.

I love it! Would've voted for it had there been an 'option 3' originally! 🙂
Oh, I know Anne. I'm sure many people would have voted for option 3. For some reason, I was just trying to force the tufting. I've had it in my head since the beginning that I wanted a tufted back, and once I get something in my head, it's hard for me to switch gears. 🙂 I'm glad I did, though. I'm very pleased with the outcome.
Hey Kristi – love your final decision!!
I was at Potterybarn yesterday and they were having a display model sale… you may want to check in with your local store to ask when they're having one. Another option is to look at discount stores – we have Value Village here in Toronto, perhaps you have something similar there. It's it or miss but sometimes you luck out with a piece you can bring new life to… all the best!!
Wendy
http://desire2decorate.blogspot.com/
I think it looks great! Option 3 by far fits the space the best! My only worry would be that if the seat cushion is very thick you might hit your head on the lights when you sit there…but it's hard to tell space from a picture. Looks great!
Looks good so far!
I love this! Especially the blue trim around the back cushion. I think it makes it look complete and not like you stuck something up there. Great work so far!!
Perfect! Good job. (And glad you went with white buttons. Not too busy, and not too matchy matchy.)
Very well done. I like the colors you chose and I'm glad you decided to shy away from the squares- just too much going on there. It's looking just right.
It looks fantastic! I absolutely love the crisp clean white. Well done!!
You made the right choice- It is going to look fabulous. You have to listen to your inner decorator.
Love love love it! The tile behind the bench is what makes your origianl idea too busy. (imho), but this is exactly what it needed. And I'm pulling for you to find a round metal table like that! That will be wonderful.
It looks so good! I agree that option 3 was the best. Isn't it funny how "plan b" often is the best?!
I like it! As for the table, have you thought about buying a table at an unfinished furniture place and then painting it? I got a small table at a store in Austin for super cheap. Some of the other design blogs I read have been doing things with pearlescent paint or gold/silver leafing. Maybe something like that? (I can't tell what's going on with the Pottery Barn table).
Beautiful!! Thanks for sharing. Cheers, Lia
That looks awesome! I love it. Very clean and pretty!
Rachelle
very well done.
Very well done. I like the colors you chose and I'm glad you decided to shy away from the squares- just too much going on there. It's looking just right.