Before & (In Progress):: Occasional Chairs For J & A Family Room
Exactly one year ago today, I showed you some (potentially) beautiful chairs that my mom gave me.

Well, it took a year, but I finally have the perfect spot for them. They’re going in John & Alice’s family room. Oh, believe me…I hate to part with these chairs!! I absolutely love them! But let’s face it…you can only fit so much furniture into 834 square feet, and (sadly) I just don’t have a place for these.
So yesterday, I dragged these chairs out into the courtyard, and got busy. I removed all of the old fabric and foam (never my favorite step when working with old furniture items…

And then after removing all of the staples and giving the chair a good sanding all over, I sprayed a coat of primer (Rustoleum…my favorite)…

I had planned to paint these chairs black, but Home Depot was out of black in a satin finish. All they had was glossy, and…well…I really dislike glossy paint, especially on old furniture that has dings and scratches, which would just be that much more visible with light reflecting off of glossy paint.
So instead, I opted for this gorgeous Dark Walnut…

I had never used this color before, and I love using new colors!! This one is really gorgeous. At a glance, it looks black. I mean, it’s really dark! So after two coats of paint, the chairs looked like this…

Sadly, I don’t think photos do it justice. Last night as I was looking through my photos, I thought, “Well gosh! All of that work, and it doesn’t look much different from the original color!!”
But in person, it does. I promise. The original finish was considerably lighter and had a lot of red in it, with specks of black all over. It was very much a “factory finish”.
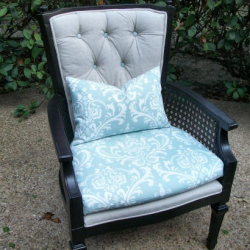
Now comes the hard part…deciding how I want to upholster it. I think I want to use two different fabrics—one solid and one patterned. That combo would look something like this…

The solid fabric would go on the tufted back and the seat, and the patterned fabric would go on the cushion and the back of the chair.
I might even have enough of the drapery fabric left over to use for the patterned fabric. Wouldn’t that fabric be beautiful against the dark painted wood?

So we’ll see what I end up with. If there’s not enough drapery fabric left over, then I’ll have to find a coordinating fabric. It’ll need to be fabulous, though, because the backs of these chairs will be the first part of the chairs that a person sees from the entryway of the family room.
Well, I’m off to spend another day outside enjoying our gorgeous weather. Today I MUST finish painting cabinet doors! If my neighbors don’t already think I’m crazy, they certainly will when they see 32 cabinet doors strewn about the courtyard and lining my condo. ![]()
Have a great day!

Addicted 2 Decorating is where I share my DIY and decorating journey as I remodel and decorate the 1948 fixer upper that my husband, Matt, and I bought in 2013. Matt has M.S. and is unable to do physical work, so I do the majority of the work on the house by myself. You can learn more about me here.
Dude, no way! Are you really going to make the "tufted" (is that what you call those button thingies?) seat? How?? I am really curious and excited to see the finished product, and I hope you'll explain how to do the "tufting" stuff! That's totally what keeps me away from re-upholstering my own chairs. It's going to look SO great, love your fabric choices.
I'm definitely going to keep the tufting!! That's one of my favorite features of these chairs…along with the caning on the sides. Anyway, the tufting isn't difficult at all. It's one of those things that looks intimidating, but once you take it apart and see how it's done, you realize there's really nothing to it. I'll definitely take photos along the way to explain the steps.
Can't wait for the reveal! Those are some beautiful chairs!
Great Chairs! I saw some on craigslist and now I'm inspired, too!
I am currently working on a project, and using the same spray paint! Great post! I can't wait to see how it turns out 🙂
http://www.dishesandsocks.com/
I almost snagged 2 chairs almost identical to this at our local thrift store for $19/chair! With baby #2 on the way I wasn't sure I would get to them or that I would decide what to do with them…now I regret not bringing them home. So excited to see the final product!
I can't wait to see them with fabric – love the blues with that dark walnut – it will be gorgeous!
Your off to a good start, I like the black finish.
When you use spray paint for a new finish, do you do anything with another color to give it more depth? I'm worried if I spray paint something it'll end up being flat with just one color. Your description of the original color had an undertone and a speckle thing goin' on for instance.
Those chairs are going to look AWESOME if you do them in that fabric. The colours are stunning together. Will be back to view the final results! HURRY! lol
I just cannot WAIT until you post about HOW to reupholster these chairs. I saw a super rad chair at good will yesterday for $8 with cane in perfect condition. Looked a lot like these chairs. I had no CLUE as to how to reupolster them though. I have a chair upstairs that I got from Goodwill for $6 that's waiting for some TLC..major TLC. I need to learn how to make piping and recover using my drop cloths that i already have. Do you have any tutorials you can point me to right now from other blogs? I'm ready to get this project rolling and get that smelly chair looking and smelling good!!
Also, you are JUST the person to ask. I bought these used french country dressers for my girls' room and they are A-DORABLE. Got them home and whew, they smell like smoke on the inside. I have a VERY sensitive nose and just CANNOT smell a trace of odor or else it's gone. Right now one dresser is outside in the sun with the drawers pulled out and vinegar water sprayed on it. I've tried baking soda, charcoal….anything else???? Just time?
Hollie, I'm afraid I'm going to be of no help to you today!!
Regarding the smoke smell, over time the smell should dissipate, but there's no guarantee that it'll go away completely. The only way I know of to get rid of it completely is to put a coat (or two) of oil-based Zinsser primer over it. That might be a pain, though, having to get all of the insides as well as the drawers. The problem is that the smoke penetrates INTO the bare wood, so you just have to seal it in there. I guess another (competely untested) option would be to purchase lots of those highly fragrant sachets (the paper ones that are really, REALLY fragrant), and put them in each drawer and in the back part of the dresser for a while to let the wood soak up a pleasant smell. But you might wind up with a dresser that smells like perfume sprayed over musty smoke, which would be horrible.
About the chair…I haven't seen any other tutorials (that I can remember). I'm generally disappointed to see other bloggers recover chairs like this because nobody wants to tacke tufting (which ISN'T that difficult!!), so they always end up just putting a smooth wrap-and-staple job on it. I'm not going to do that to these chairs. I'm actually going to re-tuft the backs. And I'll be taking plenty of pictures!!
I just refinished a chair exactly like those. I also found the cardboard and foam behind the material. Unlike yours, the foam and "insulation" in my chair was actually disintigrating. YUCK to the eye and touch. Good luck with your. You should check mine out sometime.
http://vickylovestodecorate.blogspot.com/2011/04/bear-of-chair.html
I want those chairs!!!
I can't wait to see how it turns out! I just bought an IDENTICAL chair at our Goodwill for $13 and am trying to decide how I want to redo it!
Tonya