DIY Pour In Place Concrete Countertops – Part 2
Disclosure: Concrete Countertop Solutions provided me with the materials to make my own concrete countertops using their products free of charge, but all opinions are my own.
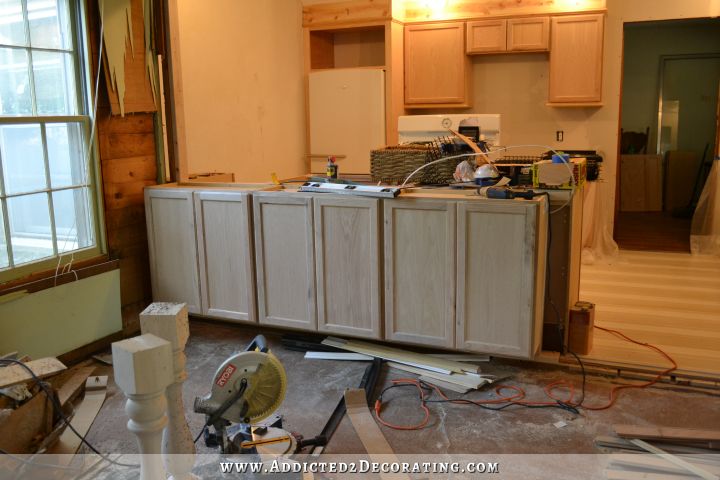
My DIY pour-in-place concrete countertops are almost finished! If you missed Part 1 of this process (which included building the edge forms for the concrete), you can check that out here…
It was a long and exhausting weekend, but I have actual countertops now!!! All of the countertops are poured, and I’ve removed the edge forms from three of the four countertops. And oh my gosh, they are beautiful!!
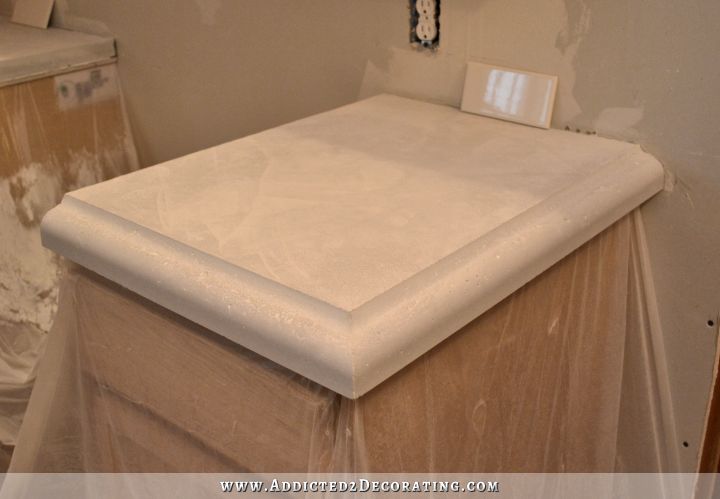
I honest to goodness think that I might like this even more than the carrara marble I had hoped to use originally. I love the subtle “movement” in the appearance of the concrete, and the ogee edges are even more beautiful than I had imagined.
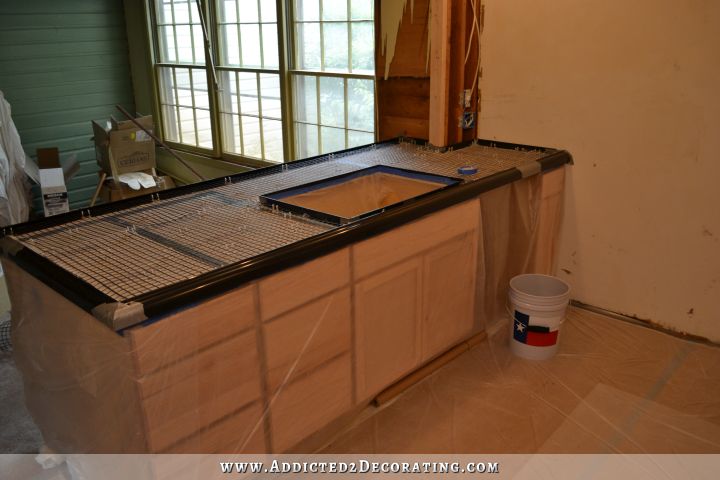
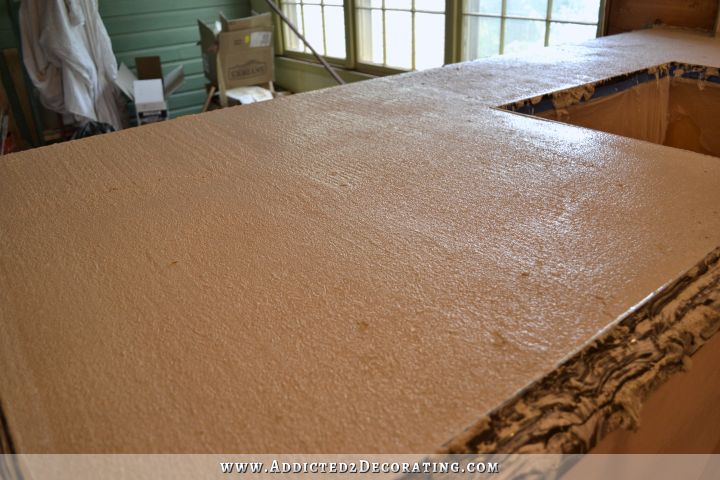
We poured the two small countertops, as well as the countertop on the wall of cabinets, on Saturday, and then we did the peninsula yesterday. So the peninsula still has the edge forms on it, but here’s how it looked last night when I went to bed.

I can’t wait to pull those edge forms off!!! 😀
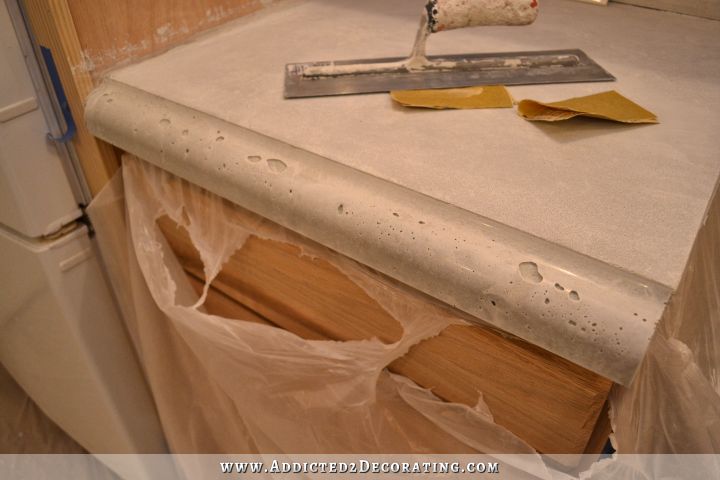
I did vibrate the edges, but I still ended up with air bubbles.
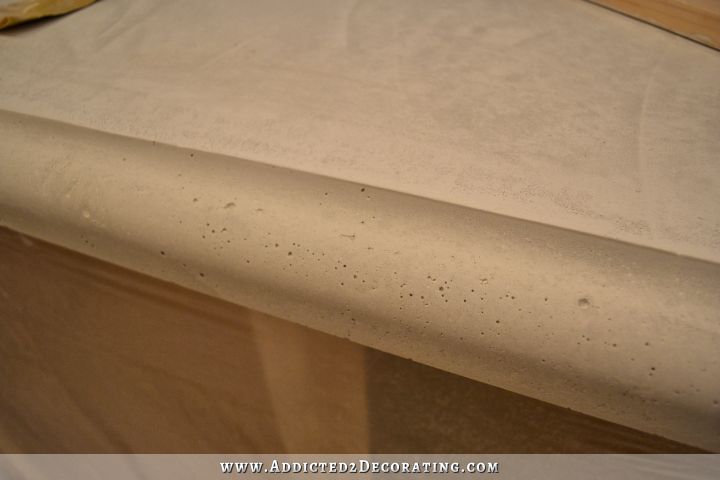
To be honest, I was kind of hoping that would happen. 🙂
When this project was in the planning stages and I was talking to Ed at Concrete Countertop Solutions, I mentioned that I wanted to use the ogee edge form. He warned me that the ogee edge form has a tendency to trap air bubbles more than any of the other forms they have. I was actually okay with that because I personally think those little air bubbles are beautiful. It reminds me of tumbled travertine, and I’ve always loved the look of natural tumbled travertine.
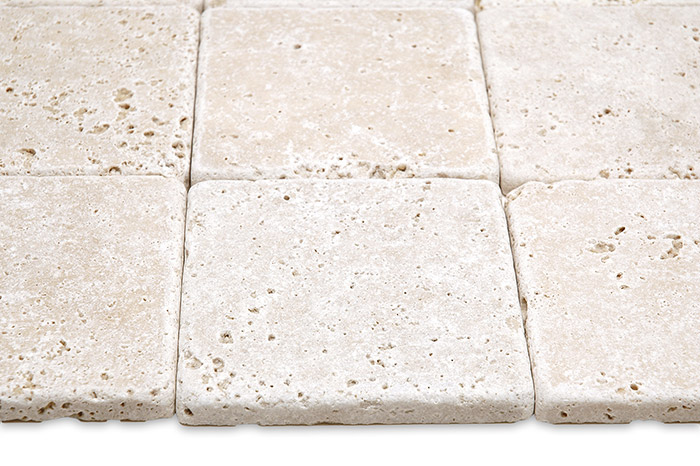
But with concrete you have the benefit of a solid top surface, while the little bubbles remain just on the edges. And if you don’t like the bubbles, they can be filled in so that you’re left with a completely solid, smooth edge.
Overall, I’m so unbelievably excited about how my countertops turned out. I did make some mistakes, and I also learned a few things along the way, so I wanted to share those with you. But first, let’s back up a bit.
When I left you on Friday, I still didn’t even have my peninsula completely built.
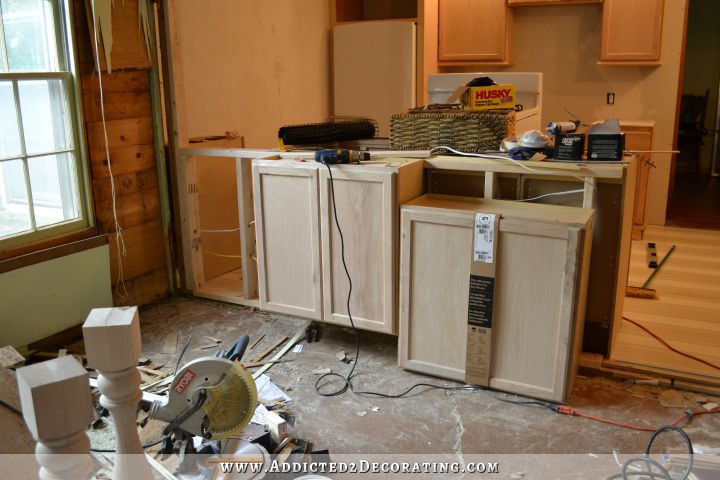
So my mom came over on Friday and helped me install the other two cabinets…
…and then finish up the corner and end of the peninsula. That was more challenging than I expected, but we finally figured it out. Then I continued prepping for countertops while she started cleaning up the breakfast room. Finally at around 10:00pm, she encouraged me to call it a day, and consider postponing the countertops until Sunday. I was so tired that I agreed that was the best decision.
But then on Saturday morning, I woke up bright and early and headed into the kitchen at 7:30 to start working with a glimmer of hope that we could still pour the countertops that day. My brother told me he would be on standby just in case. 🙂
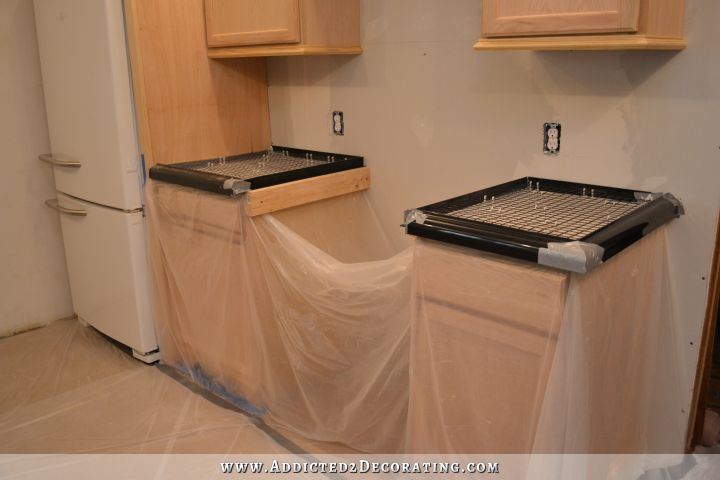
I finally had the forms ready to go, and my mom had our work space (the breakfast room) cleared out and the cabinets and floor covered. So my brother came over around 6:30 to start pouring the countertops.
This was my first time ever to work with concrete, so quite honestly, I was a bit nervous. I had watched so many videos, had sent emails filled with questions to Ed at Concrete Countertop Solutions, and even had a conversation on the phone with Dario at Concrete Countertop Solutions, who was incredibly helpful and went through the entire process start to finish with me, and answered even more of my questions.
So I felt like I knew what to expect for the most part. But still, until you actually experience it yourself, there are still some “unknown” factors there. Watching a video, reading about the process, and having someone explain it to you is quite different from actually doing it yourself.
We decided to start with the two little countertops just to get a feel for what we were doing. The first batch mixed up and poured out just like the videos. We were working so quickly that I didn’t stop to get a photo or video, but you can see on their website what the consistency of the mix is supposed to look like.
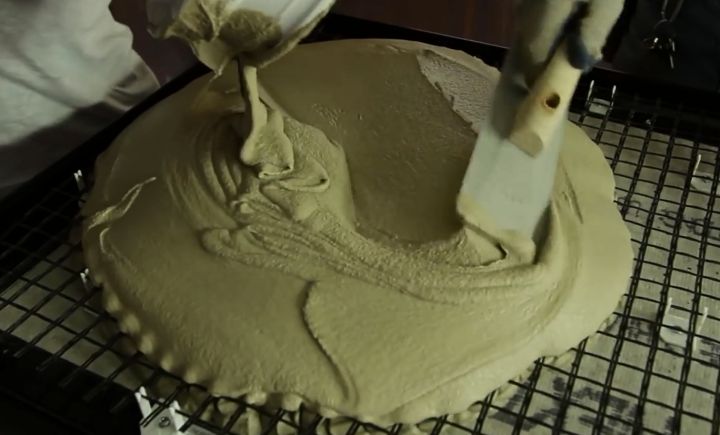
You can click here to see a video (cued to the right spot) of what it looks like as it’s being poured out.
So the very first batch was perfect. But we were just getting started, so that nervousness/anxiousness of doing this big, somewhat overwhelming project and not quite feeling like we knew what we were doing still hadn’t worn off, so when the second batch somehow didn’t have nearly enough water added and was super thick, none of us realized it until it was too late and it had already been poured into the form.
I freaked out. As you can see, the mix is supposed to just flow freely through the mesh and begin to spread out on its own, and then you can use something to spread it where it needs to go. But on our second batch was so thick I was having to force it through the mesh with my hands. And it was poured close to the front ogee edge so that when the next properly mixed batch was added, the too-thick batch kind of stubbornly blocked the way of the liquidy mix flowing freely into the ogee edge.
That too-thick mix, followed by my freaking out and trying to “fix” the problem with one fix after another, and each one leading to more problems, resulted in that countertop having some rough spots on the top, as well as some large air bubbles along the decorative edge.
So I’ll need to fill at least the four or five biggest holes. And I’ll possible end up having the rent a wet grinder for the top, although I’m still not sure if I want to bother. There are only two spots on the top that are rough, so I’m not sure if it’s worth it.
That frustrating experience kind of set the mood for the first two little countertops. Let’s just say that my mood wasn’t great. 🙂
So the main thing to take away from my mistake #1 is that you MUST mix until it’s the proper consistency. Mixing concrete isn’t like baking. Rather than following a specific “recipe”, it’s much more important to look at the consistency. If that means adding an additional 1/2 quart of water to one batch of concrete, then that’s what you need to do.
After those, we kind of regrouped, recognized our mistake (following a “recipe” too strictly rather than only going by consistency), and felt much more confident in moving forward to the next countertop.
Next we did the countertop on the wall of cabinets. That pour went so smoothly and perfectly. I mean, quite honestly, when you mix the concrete properly, it’s a dream to work with.
But there were some mistakes on this countertop as well. The first mistake was in trusting that my cat (the calico named Peeve) would stay out of the kitchen while we worked. 🙂
She had shown absolutely no interest in going in the kitchen all week long, even though I’ve been in there working every single day. And even on Friday, when my mom was over there, she still didn’t bother us. So it didn’t even dawn on me to lock her in a room while we worked. But as soon as we had poured the entire countertop, she came running. She ran into the kitchen, jumped up on the concrete, ran about 2/3 of the way down the concrete, jumped off, and ran out of the room.
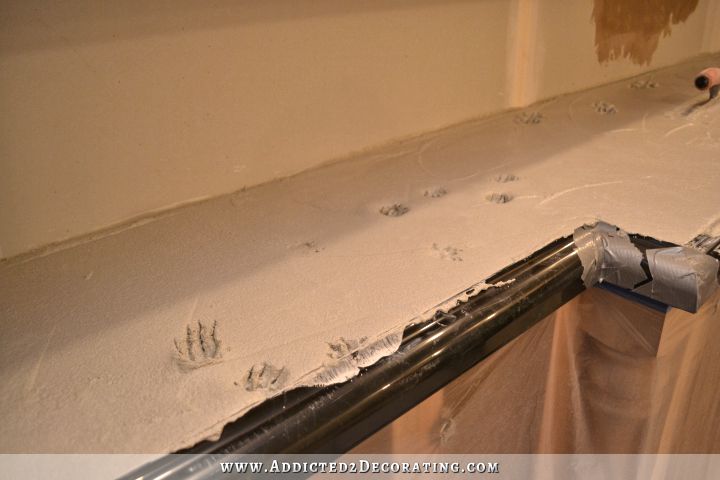
So please learn from my mistake #2!! I don’t care how well-behaved your animals are. Put them in a room behind a closed door while you’re working. 🙂
We got that smoothed out with no problem, and this countertop was looking pretty perfect. But there was one more mistake to be made.
After the concrete is poured, you’re supposed to vibrate the edges to remove the air bubbles. And to vibrate the edges, they suggest using a small rotary sander. You know…the kind of sander that every DIYer has, right? Well, this DIYer doesn’t have one because mine stopped working about four months ago and since I have the six-inch variable speed sander (a real bear to work with compared to the 5-inch sanders) I just haven’t felt the urgency to get a new 5-inch sander.
So I was using the behemoth sander to vibrate the edges. It was working fine, until I got to a spot where a really big air bubble came out. And then a couple of seconds later, another really big air bubble came out. Until then, I had only seen little tiny air bubble escaping as I vibrated the edges. So naturally I thought that area needed a bit more concentration with the sander. The problem is that I had that big sander turned up way too high, and I kept it in one place for far too long, and it messed up the form.
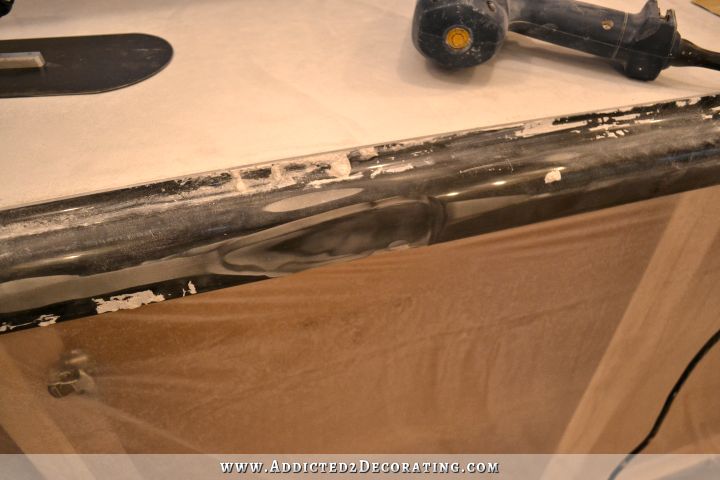
And let me tell you, when you’re using a big variable speed sander turned up way too high, it really doesn’t take long to do that to plastic — even thick, hard plastic like these forms, and even without a sanding disc on it. The friction alone is enough to cause that.
So that’s mistake #3. And unfortunately, that dent shows on the finished edge of the countertop.
Mark my work…I will find a way to fix that. And I’ll share the process and the results with you.
But of course, none of you will have that problem since you’ll learn from my mistake. I highly recommend that you don’t use anything more than a regular palm sander to do the vibrating. If your sander is big and heavy , requires two hands to hold, and has 10 speed settings (that of course, you always keep in the highest setting), it’s too much. If your sander fits in one hand and has one or two speed settings, it’s just right. But even then, keep the thing moving constantly.
That’s as far as we got on Saturday. Then yesterday, my brother came over at about 11:00 so we could pour the peninsula. And let me tell ya…we knocked that thing out in one hour. We had ten bags of concrete mixed, poured, and had the peninsula screeded in one hour. We felt so much more confident in what we were doing, we knew what to expect, and we knew to watch for the proper consistency. And we were like total pros. 🙂

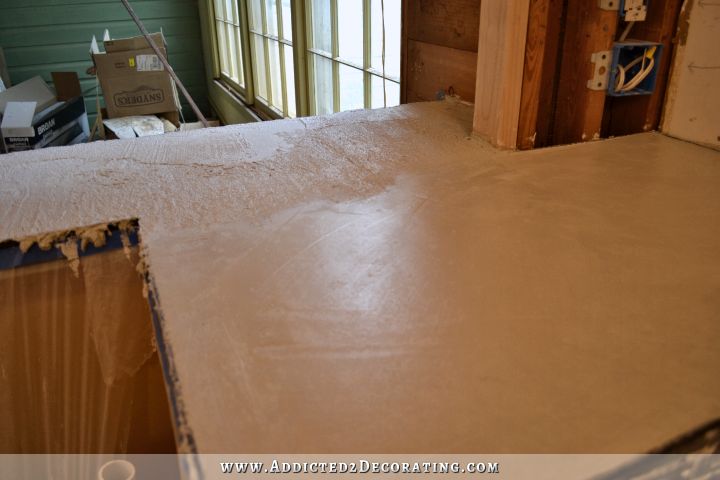
I also felt so much more confident with this one because by this point, I knew that the concrete would NOT look perfect after screeding it. On the first day, I kind of freaked out after screeding the wet concrete because I was expecting it to look smooth and close to perfect. But it doesn’t. And that’s okay. In fact, here’s what the peninsula looked like after we poured and screeded it.
Can you see how rough that looks? And we kept having trouble with that end (because…well…let’s just say that those corners aren’t perfect 90-degree angles) so we kept getting a dip in the concrete just before the left edge. So I went back and filled in some of that using a trowel. That resulted in it being even a bit rougher.
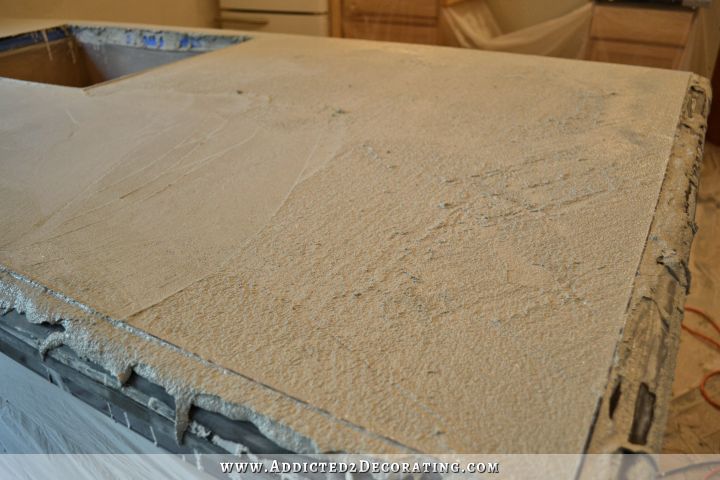
But again, by this point I knew what to expect, and I knew not to freak out about rough concrete this early in the process. Why? Because the magnesium float works magic.
Here are the two tools I used. The magnesium float is on the left, and the steel finishing trowel is on the right. Both are available at Home Depot, and you can also order them through Concrete Countertop Solutions and just have them arrive with all of your other supplies.
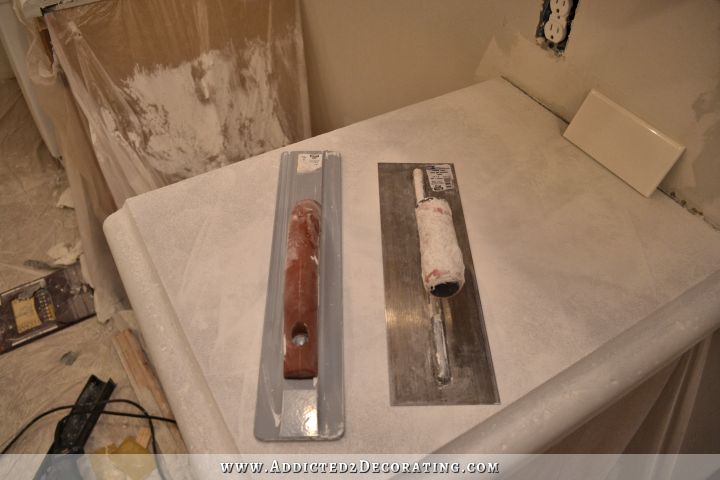
As I was saying, that magnesium float works magic. I left the concrete in that state as you see it two pictures above for about an hour, and then I came back and used the magnesium float. Again, here’s how it looked before (just after screeding, and after I hand troweled some additional concrete on the edge to fill in a dip).
And here’s how it looked after using the magnesium float an hour later.
Amazing, right?!
Here’s another look. The front section has been floated, while the back section is still rough.
Now here’s the thing about this step that I learned the day before. When you wait an hour after pouring and screeding, and then you come back to do the floating, at first it’ll feel like you’ve waited too long. If you have zero experience with concrete like me, you may even freak out a bit and panic (like I did) because you think you’ve waited too long.
Don’t panic. If it’s only been an hour, you’re fine. It just takes some muscle, quite a bit of pressure, and many passes over the surface to see the texture change. And the process is pretty amazing.
At first, it’ll sound like you’re running a trowel over gravel. The sound is really harsh and…well…gravelly. And it’ll feel really hard, and you’ll think that there’s no way this trowel is going to do any good. But then the more you trowel, you’ll start to see the texture change right before your eyes. It’s like the trowel pushes that rough granular sandy texture to the bottom, and brings the smooth “cream” to the top. And as that happens, the sound will change. It’ll go from a rough, harsh, gravelly sound, to a smooth sound that reminds me of that smooth, icy sound that a Slurpee makes as it’s being poured into a cup. 😀
About an hour or two after using the magnesium trowel, I followed up with the steel finishing trowel. And again, it takes quite a bit of muscle and force with the trowel to make any difference, but you’ll see a difference. You just have to be very careful with the corners of the steel trowel because the concrete can still be gouged at this point.
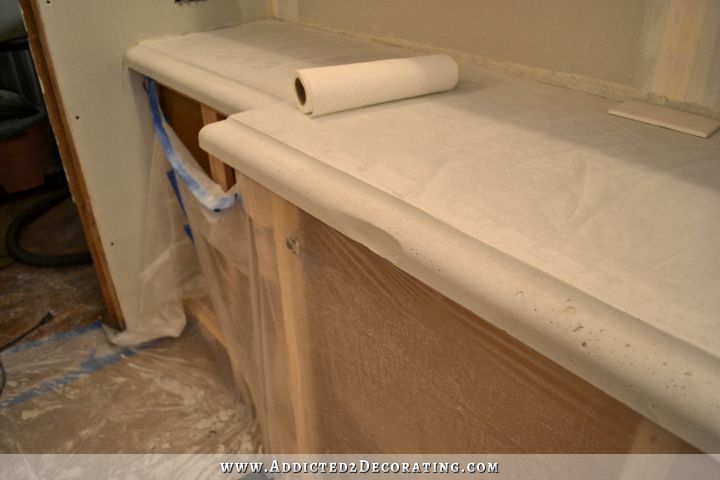
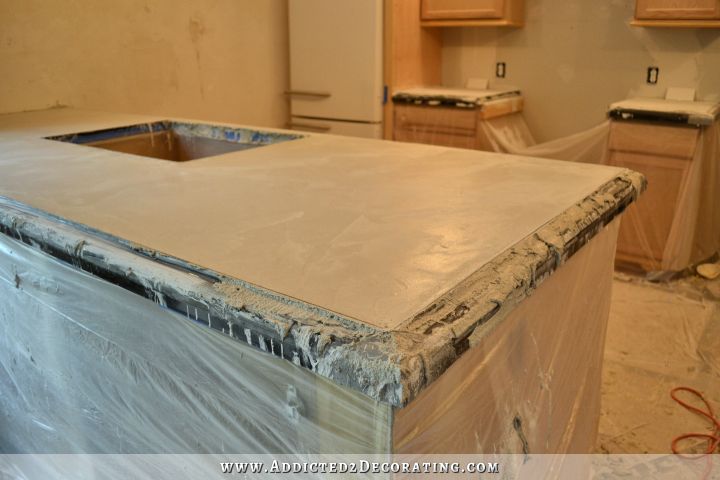
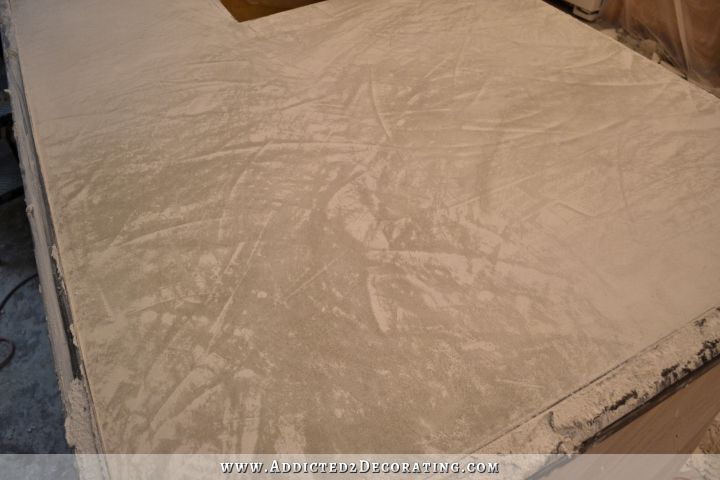
One other thing is that you want to be sure that your movements are random and organic. You don’t want to do straight lines from one end to another, because that’s not natural. And there’s no way to get those perfectly straight. And then it’ll be glaringly obvious that it’s not perfect. So stick with very random, very organic movements with the trowel. Here’s a look at the countertop after it had been drying for about three or four hours. Since it’s at varying stages of drying (the darker, grayer areas still have lots of moisture in them, while the whiter areas are much dryer), you can really see the randomness of the trowel strokes.
Of course, those become a lot more subtle as the whole thing dries more evenly. In fact, here’s what it looked like last night right before I went to bed.
I think those are all of the mistakes and tips I wanted to share with you.
And because some of you have expressed your interest in doing your own concrete countertops, the good folks at Concrete Countertop Solutions are offering my readers a 15% discount!! Just enter coupon code A2D123 at checkout. That discount is good through July 31, 2014.
The Z Counterforms White Countertop Mix that I used on my countertops is a brand new product, and isn’t yet available on their website. It will be available very soon, so if you’re interested in that, just contact them directly and let them know and they’ll help you out.
And here is my honest to goodness unsolicited opinion. After using this product, I would never consider pouring a concrete countertop any other way. The Liqui-Crete system (where you use the fiberglass mesh and the really liquid concrete mixture), when it’s mixed correctly and to the right consistency, and when you have an understanding of what to expect out of concrete in general, is so unbelievably easy to use.
After that one batch was mixed incorrectly and it came out so thick and difficult to work with, it made me fully realize how much more challenging and nerve-racking it would be to do a concrete countertop with just regular ‘ole thick concrete. I can’t imagine being able to mix and pour ten bags of regular concrete, and having it remain completely and easily workable that entire time. I can honestly say I wouldn’t want to try it.
The Liqui-Crete remains so wet and so workable that even though it took us an hour to mix and pour enough concrete for the peninsula, we had absolutely no problem screeding it. It was a very simple process.
So there’s more to come. Obviously this project isn’t finished. I still need to figure out how to fix my one sander mishap (and I will find a fix for it), and how to fill in four or five of those big air pocket holes. I need to remove the forms from the peninsula and get that sanded down, and then all of the countertop still need to be sealed.
If you have any questions in the meantime, I’ll do my best to answer them!
Update: I pulled the edge forms off of the peninsula and gave it a quick sanding. Here it is!
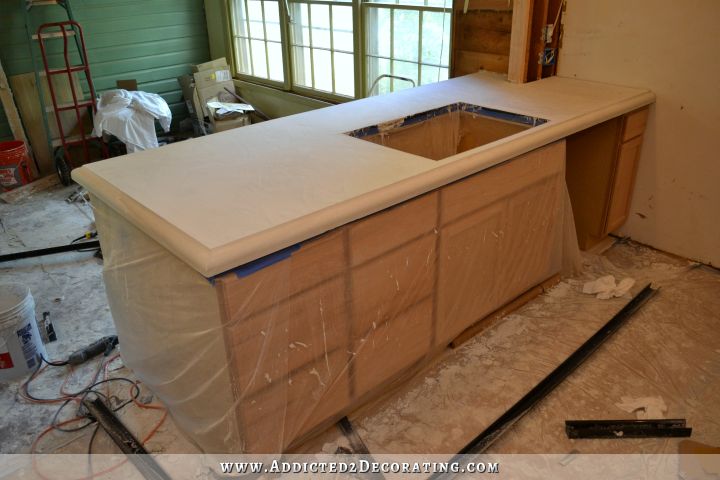
Now I just need to wait for them to cure, and then seal them.
Update:
The countertops are sealed and finished. You can see them here…

Addicted 2 Decorating is where I share my DIY and decorating journey as I remodel and decorate the 1948 fixer upper that my husband, Matt, and I bought in 2013. Matt has M.S. and is unable to do physical work, so I do the majority of the work on the house by myself. You can learn more about me here.

Your counter tops look awesome! But more importantly…THAT is just like a cat… OMG! I’m sorry but THAT is hilarious. I know… the horror you must have felt… Probably not a bit funny at the time, but seriously- that cat… I’m so glad you took pictures! At least that could be smoothed out. lol Crazy cat! lol Oh my…
Agree about the cat! What an adorable and apt name!
Haha! I kind of regret naming her that because I could swear it has become some sort of self-fulfilling prophecy. She tried her hardest to live up to it at every opportunity. 😀
If she had done that on the very first countertop we poured, i would have cried. Seriously. But since it was on the third one, and I kind of knew more what to expect (and knew that the concrete remained workable for quite some time), I knew it would be fine. 🙂 I was more concerned about her tracking it all over the house AND afraid that she might go hide somewhere and start licking it off of her paws. That scared me a bit. But I tracked her down and washed off her feet. She didn’t appreciate that one bit (you know…cats…baths…they don’t really mix), and she dug her claws into my shoulder trying to get away, so that wasn’t pleasant. But we all made it through. 😀
It is looking great even with the “oops”, and maybe when I get to my kitchen it will be an option.
Beautiful! Love the white! It really does look like tumbled marble. I showed my husband what you are doing and (of course) he said “how much?”. I’m sure I can find out from their website but being lazy I have to ask if you have a guess-timate? We once bought granite for less than $33 a square foot and now never want to pay more than that for counters.
I’ll do my best to figure how much all of this would have cost for my kitchen, and see if I can arrive at a square foot price. I’ll try to have that on my final countertop post.
I looooooooooooooove them. They do look like tumbled travertine (where you want them to).
And you know that the next design trend may just be custom paw-printed countertops 🙂
Kristi, could you please take a photo of the entire room from one of the corners? I love this project so much, actually it’s what I wanted to do too, but back then those edge forms weren’t available. Back then people were using wood to edge it out or leaving it blocked. Time certainly has improved this process dramatically.
BTW, I’m going to be sharing this on my fb timeline. You’re truly a woman to be admired. 😉
Yes, I can do that. 🙂 I keep meaning to do that, and then keep forgetting.
Thank you for sharing on your FB page!
Embrace the imperfections! I think when something is handmade it shouldn’t look like it came out of a factory, it should have unique qualities that make it an original! Very well done.
I can just see that cat leaving little concrete prints on your newly restored wood floor in other rooms. That would show that the cat owns the house. LOL. You did a really great job. When you showed the first pic with just a few tiny air bubbles in the molded edge, I fell in love with it. But then when you got bigger ones, I didn’t like it so much. I know you’ll figure out some solutions. Again, great job. Love the molded edges.
Great job…they look wonderful! I’ll be curious what how you will fix your ‘oops’. I almost leave it as the ‘birthmark’ it is. I would hate to see the fix make it look worse. I don’t think it looks that bad now but I know you want it to be perfect! Again, you Did It!!!
I agree – I like the little tiny air bubbles – they do give it the look of a natural stone!
My main take-away from reading this is if I ever get brave enough to try it, it might be worth building a small countertop form and getting used to the process before tackling a whole kitchen. LOL
Oh, and lock the cats away! Ha! I can see that happening so easily.
Look forward to reading how you resolve the little imperfections that are bugging you.
Amazing!! I didn’t think they would look like that. I love the edges!! You did a great job! (I would have locked the cat outside after that).
I wondered about Kristi’s Kitchen Kronicles all weekend and hoped you weren’t running in to any unmanageable issues. Fist pumps being sent your way from NC – YOU GO GIRL!
Ok, I am seriously more and more convinced that this is the way we should go when we (some day…) redo our kitchen. I sent my husband the link when you did your part 1 and he said he spent hours just looking at your kitchen redo… I think we’ve hooked him into concrete countertops…
With the DIY stuff y’all have done, you’d have absolutely no problem pouring your own concrete countertops. You should go for it!
I agree with some others…don’t sweat the imperfections! I think the countertops look great! I like the texture/weight of the concrete. I’m also interested in price per square foot. Clearly you are not a novice DIY’er…but would you recommend this project for a novice or do you feel it may be too challenging?
I honestly feel like the most challenging part of this whole process (as far as skill required) is cutting the mitered corners for the edge forms. If you (or someone you know) can cut mitered corners with a miter saw, you’ll have no problem.
Now don’t get me wrong. The actual mixing and pouring of the concrete is physically challenging in that it’s very messy, and the buckets of concrete are quite heavy. My brother and I carried and poured them together. I couldn’t have done it myself, and if he had done it himself it would have worn him out quickly since he was also doing the mixing. But those things are just physically tiring, but anyone can do it. Obviously carrying and dumping out buckets of concrete doesn’t really require any special skills. 🙂
So with that said…yes, I do think a novice can do it. Again, just as long as you (or a helper) can get the edge forms cut, especially making sure that the corners are lined up, and as long as you know what to expect (e.g., concrete will be rough after screeding, troweling with the magnesium trowel takes time and muscle but it’ll get there, etc.) then you should have no problem.
I feel like the main thing that can trip up a concrete novice (like myself) is not fully understanding the characteristics of concrete and how concrete “acts”, and expecting perfection way too soon in the process, resulting in overworking the concrete early on in order to achieve a perfectly smooth finish way before it’s time. That’s what happened on that one countertop (the one by the refrigerator) that ended up with two rough areas on it. I didn’t really know that after troweling it shouldn’t be smooth, and I started working and working, and really overworked the concrete, and it started to form rough areas that I just couldn’t get out.
Sorry for the long answer. I don’t want to sugar coat everything and just say, “Oh, it’s so easy! Try it!” But at the same time, it’s not a difficult process at all as long as you know what to expect. 🙂
Love the edge with the small air bubbles. Love the white. Love it all even with the Oops! places. Way to go!
Kristi, you are amazing!! Looks great so far, can’t wait to see the finished product. May have to try this in our kitchen!
Wow!! Absolutely love those edges (even the air bubble holes)!
Curious about the color-on my computer it looks a grayish white-which just may be my computer distorting the color. Will it dry pure white? I am really thinking about this for my 9 foot countertop in my master bath. Will you put a sealer on it and if so will it have any sheen to it or be matte?
Just think-you are so close to getting to enjoy all of your hard work!
Hmmm…let’s see if I can adequately describe the color. 🙂
It’s definitely not a pure, bright white. It’s definitely more of a warm white, but it also has some very subtle grayish streaks (but not really streaks…it’s more subtle than a streak) through it. They gray isn’t an “in your face” gray, and from far away, it’s not even noticeable. From a distance, it just reads as a warm white countertop. As time has gone by, the gray has diminished considerably, and the white has gotten brighter, but its still a warm white.
I have a plain white subway tile from Home Depot (the cheap ones that are about 22 cents each) leaned up against the countertop. I don’t know if you’ve ever seen those, but they’re not a bright, pure white. They are a slightly warm white. Anyway, right after we poured the concrete, the countertop looked gray (very gray) compared to the tile. As the concrete has cured, it has turned more and more white, and now they almost blend perfectly with the white subway tile. The peninsula still has quite a bit of gray in it, but that’s to be expected since it was poured a day later.
Not sure if that helps. It might help, though, if you check out one of those subway tiles the next time you’re at Home Depot. If that tile will match your room, then this concrete will also.
As far as the sealer, I’m using one that has a satin finish to it. I don’t think they have a matte finish available. They do have a glossy finish sealer, but I’m not really a glossy kind of person. 😉
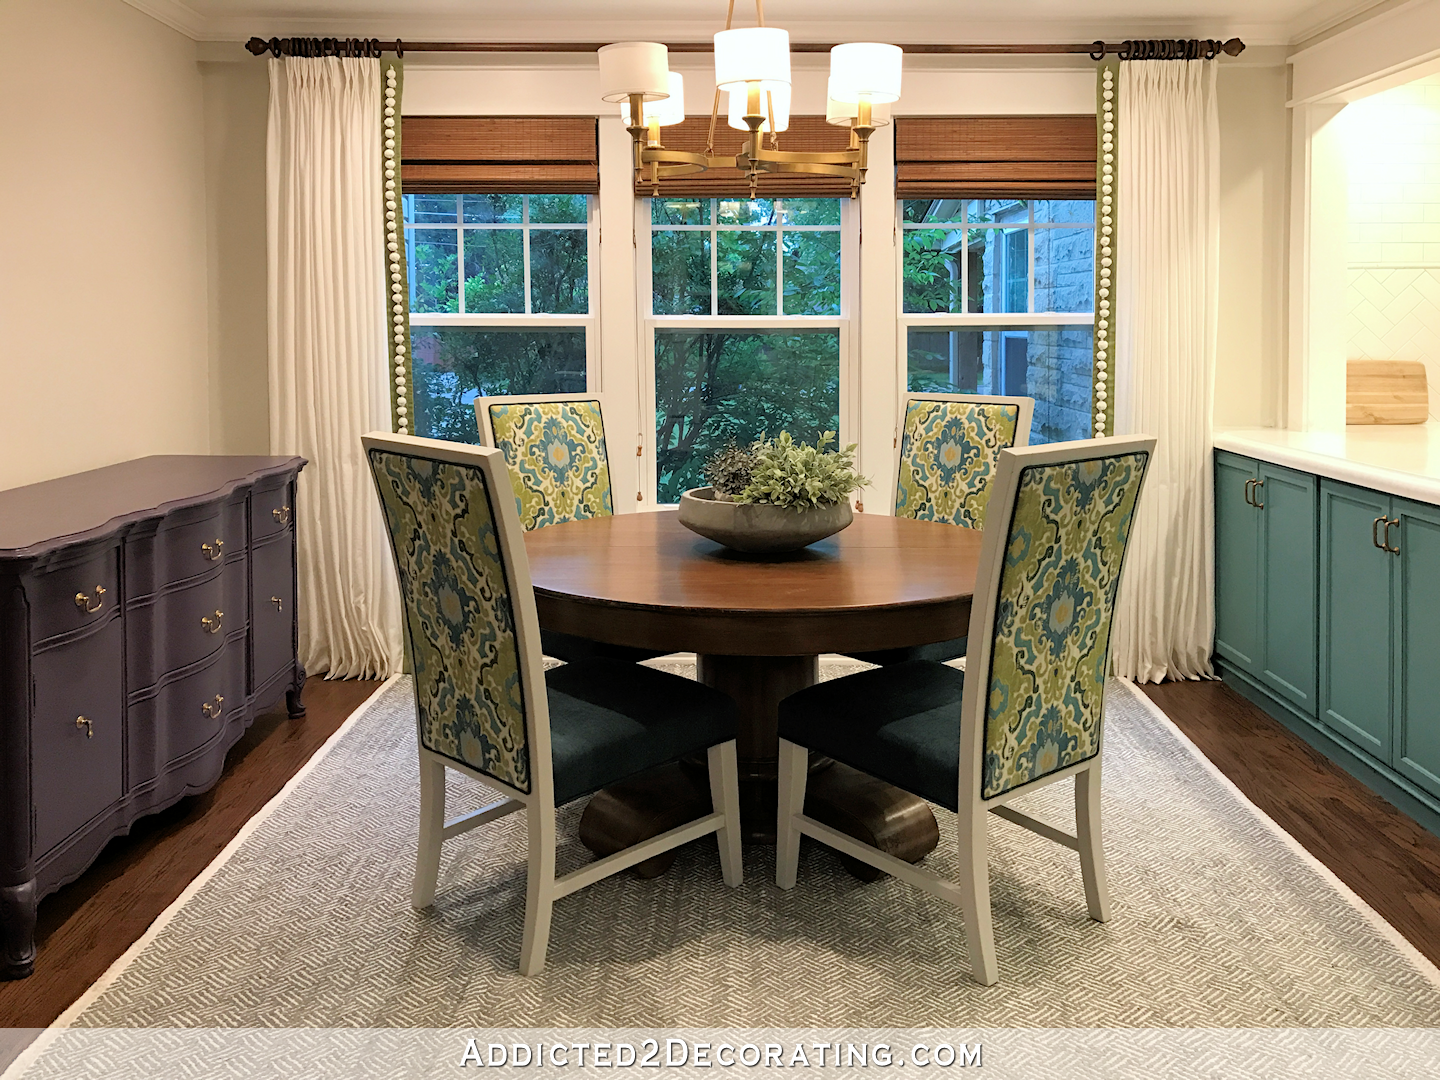
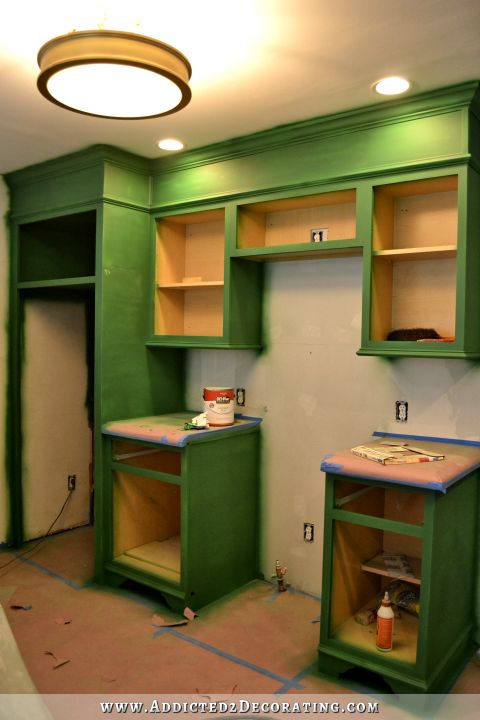
Love it! Love every single bit of all of it! I like that you included a couple shots of the full kitchen from standing in the breakfast room (on this post and the last one). Up until now, I still was never able to picture the room as a whole because we’ve only seen photos of each individual wall. But seeing the full room from the breakfast room really helped me understand how the three “areas” work together and how incredible your kitchen is going to look when it’s all done!
Nice job Kristi! Really nice job. Be proud of your work.
Kristi you are absolutely amazing! I wait with such impatience for your postings. Out of the hundreds and thousands there are online, your blog is unequaled in personality, originality and fun. You do things YOUR way, no matter what other people think or say, you do it graciously and don’t take offense, even when people are quite rude. You kindly reply to the same questions that you have already answered multiple numbers of times and don’t get annoyed. (I get quite a hoot out of your followers who do get frustrated, and reply for you!) You are such an inspiring role model. I sure hope the people who are lucky enough to live close to you and get to visit and enjoy you in person realize how beloved you are. And so many of us are total strangers, we’ve just been lit on fire by your inspirational posts and great ideas.
Sorry this is so long, your counter top (kitty feet!) experiences sent me ‘over the top’!
Susan, that’s so sweet of you! Thank you so much. 🙂
(I just discovered this blog) Very well said, Susan D!!
wowzers! I never would have imagined that it could look that GREAT! I’m wondering if you mix a batch of concrete up and pour it INTO a mold, if it could be then ‘applied’ to the bump in from the sander? Perhaps they may have a batch of premixed fixer for the holes and the bump in, and then put it into the mold and lay it against the slight boo-boo. I however don’t even mind the big bubbles. I think it looks pretty neat and earthen made.
I must ask though, as I must have missed it, in a past blog post. How are they going to be sealed, (If they even need sealing)?
Lookin’ GREAT though!! Hard to believe how frustrated you were just a few weeks ago – being able to look back at the album of this one woman makeover, is going to be EPIC when finished!!!!
I tried doing exactly what you described. (Great minds think alike! 😀 ) The problem was that the concrete is too grainy and granular, and no matter how much I worked it back and forth to get the extra concrete out, I just couldn’t get the edge form to sit flat against the countertop edge.
I do know that they sell a microtopping (which I’m assuming wouldn’t have the sand in like concrete does) that might be easier to squeeze out the extra.
They do have to be sealed. Concrete is very pourous, but there are some great sealers available. They one they sent me has a satin finish and should be very durable.
Hmmmmm – bummer that it didn’t work. I know that you’ve probably contacted them, as well. If all else fails, you may just have to chalk it up to a boo-boo that cannot be repaired (yeah, I know it woiuld make me NUTS too – but that is just the bump not the air bubbles) not sure what can be done without making a huge mess out of the edge, in trying to correct it.
I forgot to ask how long it took to clean up all of Peeve’s foot prints! How funny that was to see in the pictures! You always see concrete on the streets that has a set of foot prints set in it, but a kitchen I guess would have been out of place! Haha!
I’m so looking forward to seeing it finished!!!
Seriously this is wow! I love it. You are truly doing an amazing job. You sure are inspiring me. I am tiling my kitchen back splash all by myself. When I got out the wet saw my husband side eyed me thinking he was going to be roped in to help. I told him I was doing this myself. And I did! Thanks for showing me that I can do it. Cheers
Congratulations on tackling that by yourself!! 🙂
The Cat! Perfect! He had a plan and waited for the perfect moment to execute it. Kind of like a “streaker” only fur-covered. Here and gone. Nice job all around. I love the ogee edges.
Everything looks amazing! I’m so excited for you, and you have inspired me to do my own concrete countertops when we install our outdoor kitchen. Our original plans were to have concrete countertops in our kitchen (we just built a house and moved in last year), but we did stained concrete floors, and after that process, got a bit scared that it would not look how we had envisioned. I’m definitely doing them on the outdoor kitchen, and I will do them myself. I’ve been to the website and watched numerous videos, and with your post, I think I’m ready to tackle it. However, don’t know who I will get to help me mix and pour. That brings me to another question. I notice your brother helps you often, does your husband not care for the DIY projects, or is he like mine, and makes himself scarce when I start something really labor intensive like that??
My husband Matt has M.S. and is in a wheelchair, so he’s not physically able to help me with any projects, but he’s my biggest cheerleader! 🙂
Kristi, please accept my apology if my question seemed insensitive or just plain nosey. I admit to suffering from “foot in mouth” disease. My husband has no such physical limitations, and is my cheerleader as well, he just manages to stay on a distant sideline when I’m engrossed in a project.
You are such an inspiration, and I feel we share the same mindset of wanting to learn to do everything. However, I think you have a better attention to detail than I. That’s why I love following your blog, I learn so much! Thanks
Nope, I didn’t think even for a second that you were insensitive or nosy! 🙂 I completely understand that people might wonder why he doesn’t help me, and questions about it don’t offend me at all. )
I have been wondering why someone would choose concrete for counter tops when there are so many other “beautiful” options out there, and now I know. Yours look amazing! Now I want my own concrete counters. 🙂 Thanks for taking the time to share pictures and details with all of us, when I know it would be faster and easier for you to just get the work done.
I am squealing with excitement and the knowledge that I WILL be doing this to my bathroom countertops! And soon. Thanks for getting everyone a discount!
Kristi, you did it! A remarkable feat and they are beautiful. I look forward to the finishing aspect and they do look travertiny-limestoney – really love that!
I didn’t think I liked concrete countertops, but I have to say, these are beautiful! I love reading how you do these things. Hubby says I get too many ideas. I laughed out loud when I got to part about the cat! One of our cats jumped over a barrier when we were doing an outside patio.. Just a corner which left two paw prints. I wanted to leave them there, but I didn’t win on that one. Can’t wait to see this kitchen when finished!
FANTSTIC…….!!!!!!!!! Love them…!! I can see you freaking out, I would of too..!! They are going to look absolutely beautiful….!!!!
Kristie….you are amazing. I love your initiative and tenacity. i love your writing style and you really know how to put all the details and finish in every project. You are so inspiring!
I mentioned your project to a friend of mine who is under asking some renovations right now and he said that he had done concrete counter tops before and he said what they don’t tell you are how much maintenance they involve. I know you have researched this and must have found that the industry or manufacturer has come up with a sealant solution that is satisfactory. However, my question is does the sealing have to be repeated periodically to ensure that stains do not occur? Or are the sealing innovations matured past the stage of periodically reapplying? What is the scoop on that?
The sealing needs to be repeated every year or two, depending on how much wear and tear the countertops get. (So in my case, probably once every five or ten years. 😀 )
But keep in mind that marble and granite have to be sealed and then resealed periodically. So really, any natural solid surface countertop will require some degree of regular maintenance.
Seems like you could make a slurry (?)(I saw someone refer to something like that on the company’s site) to patch that one spot and attach a piece of the ogee trim while it’s drying to keep it in place to repair the gouge. Of course, i know nothing… just brainstorming possible solutions. I also like the air bubbles and would leave them.
Love, love, love it. I will absolutely be doing the same thing for my counters. I went on their site and priced out the cost. With the mixer machine, I estimate my counters will cost less than $1,000. Compared to granite or corian at $6,500, that’s a no-brainer. And I can stain them the color I want.
So glad you did this first- it gives me the confidence to think I can also do it!
Have you decided on an oven vent hood yet? Just curious what you planned to use over the stove.
Looks fantastic! You’re awesome, woman!!
I did get a vent hood — just a simple stainless steel one that matches the handles on my fridge, stove, and dishwasher. I didn’t want anything fancy to steal focus, and I found the perfect simple shaped one at a great price.
Wow, what a comprehensive post! The concrete company should add a monetary compensation as well. I imagine their business will improve quite a bit. We are retiring to Florida in a year or so, and most of the kitchens are straight out of the 80s. Granite has never been high on my list of wants so this is a viable alternative.
Again, thanks for taking the time to post so in depth.
Ps– did that danged cat use up one of his lives?
I’m pretty sure she used up at least three of her lives that day. 😀
I love these countertops; it’s gorgeous! I used the very same tumbled travertine for my backsplash but had to use laminate because anything else is too expensive. can’t wait to check out the site!
Kristi,
What about scratching the surface of the dent for adhesion, then attaching the moulding to the edge with the location of the dent marked. Have a hole drilled in the form large enough that you could inject some concrete through it to fill the cavity/dent. The only thing that I could think of that you could possible use to “inject concrete” was a turkey baster. Crazy idea I know, but it just may work. Use duct tape to seal the hole after filling with concrete. Good luck 🙂
I actually did something very similar. It didn’t work. 🙁
But I wrote to Dario at the company and asked for his input. He suggested that I use unsanded grout in a matching color. So that’s what I’ll be doing today!
Kristi that is FANTASTIC!!! I’ve been looking forward to reading this all weekend! Wow, wow, wow! I only wish I had a need for concrete counter tops so I could have a go! 🙂
I did have a really good laugh about the cat though! Ha ha ha. Sorry, but you’ve gotta laugh! (I have two cats so completely understand!). I can imagine what my reaction would have been, so…. chuckle. At least you saw it and could fix it.
Well done! That is just so brilliant!
Oh, and regarding adding to that edge piece… not sure if this will help, but in Australia we have a product called Bond crete, which helps adhesion between concretes. Might be tricky though. Might be easier to re-pour????
I am slack jawed and stunned at your diy awesomeness!
The counter tops look great! I have always loved concrete but I never realized you could get it so white. Very nice! I especially loved the photo after the cat ran through. But it does make me wonder, how do people install these in an outdoor kitchen? I would worry about all sorts of things ending up on them when they’re still wet– leaves, ants, birds, cats, and what-not.
I don’t think that things like leaves or insects could affect the concrete, but cats and other small animals certainly could, especially right after it’s poured. I think after about three hours, it would be hard enough so that even small animals wouldn’t affect the surface, so I supposed you could just pull up a chair, grab some iced tea and a magazine or book, and keep an eye on it for a while. 🙂
Awesomeness!
Amazing! You should have your own show! Love it all!
Wow! They turned out great, I love the look of them. The cat story made me chuckle. Fantastic job!
How about a little brass plaque on the gouge that says “Counters by Kristi 2014” you can always say you did it on purpose. Lol.
Absolutely stunning. I imagine pulling the plastic off that first counter was better than Christmas! Awesome!.
So what do you think? Kitchen sink by Friday?
I was so hoping that I could make that happen!!! But I’ve decided to get my plumber to install the sink, the garbage disposal, and the dishwasher rather than doing them myself (I paid my plumbing dues in the condo…LOL), and my dishwasher won’t even arrive until Friday. And of course, it’s one of those, “We’ll be there between 7:00am and 5:00pm” types of things, so I have no idea when exactly it’ll be here. Looks like it’ll be early next week before I can get them installed. But at least I see a light at the end of the tunnel!! 🙂
Fab.u.lous..!! Now l understand why you are a DIY diehard. The sheer satisfaction of some great results is just undescribable. Cant wait to see the whole thing come together..:)
I love your countertops. You did a fantastic job! I also love travertine so I prefer the holes left by the air bubbles- they give the countertops a more “organic” look! 🙂
All I can say is you got tenacity and a proactive drive. Your work shows personal pride and a devotion to perfection. Rock on girl, you got my admiration. My girl friend got me watching you and yes now I am addicted,
Um Huh…………….
I was never a fan of concrete counter tops, but I wasn’t aware of the ability to make decorative edges, or that you can make them a nice light color, like white. They came out fabulous! I would actually consider them now. You continue to wow!
Kristi–the counters look amazing and I love the white. I think your decision for white subway in herringbone will make the kitchen look so modern and contemporary. Against your green cabinets and it will be stunning! Goof …make that WONDERFUL job!!!
Kristi, you continue to amaze and inspire! The countertops are incredible, but your Spirit even more so. Thank you for being such an inspiration to me. Because of you, I built–all by myself–a linen closet in my bathroom. That seems minor, compared to what you do, but it would never have crossed my mind until I saw the built-ins you did in the condo living room. I now catch myself eyeballing things to see how they’re made, and can I do that, instead of just accepting that some houses are well-built and some needed a different designer. Oh, and in response to the cat/streaker post–“Boogety, boogety!” Bless you and Matt both! I recognize the teamwork God is building there. Well done.
What do you use to mix the concrete?
I am loving your counters and your step by step instructions are amazing! I think I have hubby convinced this is what we should do in our kitchen! Just need to figure out the cost.
We used a drill with a mixing paddle from Home Depot. We just mixed one bag at a time in a big 5-gallon bucket, also from Home Depot.
You are amazing! Those counters are absolutely gorgeous.You did your homework on the process. This helped you solve problems. It takes a brave person to take on such a detailed project. My hat’s off to you! You can construct and decorate. I love your blog. Thanks.
Hey Kristi, I’m just checing in to let you know I am up to date on the latest! I didn’t want you to miss me, LOL. I have no intention to sing your glories, I do think you have had plenty of that today. Sufice to say I am completely GOBSMACKED!!!!!!! As always, Blessings~
Simply beautiful.
Those look stunning! I love how they look and the ogee edge is beautiful. Great job!
Kristi – Your countertops look amazing. I’m impressed by your woman power. My husband and I are getting ready to try our hand at a pour-in-place concrete countertop, and it is against a wall as part of yours is. I am wondering how in the world you were able to screed with that thin form on the back of your countertop (the one that stayed in place between the countertop and the wall). I have helped my husband screed concrete before, and the back-and-forth motion that is needed seems nearly impossible with that thin back form. Any tips or tricks that you can share?
What impresses me as much as the countertops is the way you conveyed the whole project without video.
Fifteen years ago I produced a few pre-cast concrete countertops and backsplashes as a custom cabinetmaker. I wish I had your blog to read then because trying to get any information related to decorative concrete was literally “trial and error”. I believe you have done a real service for your readers with your efforts.
I actually stumbled onto your DIY concrete countertop series while I was reading your explanation of the SITE BUILD SCAM; which by the way, showed me that you were a person to be noticed. I learned more from you than countless hours of research. For which I thank you.
I didn’t see anything on your blog about the sink form. Was that purchased? It seems as though it remained after the job was complete. Is it a Z product?
Do you have any pictures of that portion of the process?
The sink form is from the same company. I have a drop in sink, so the sink form stayed. For an undermount sink, the sink form has to be removed.
How are the countertops holding up, now that it’s been a while? I’m especially concerned about grease marks and stains, etc. Thanks!
If you keep things wiped up, they’re just fine. I do have some stains. One was where I had a metal container of mineral spirits sitting on the countertop for quite a while (probably three weeks), and it left a rust ring. But I’ve found that stains can actually be bleached out. I use a gel bleach product (I think it’s meant for toilets) and let it sit for a few hours, and then the stains disappear. If you do that, it has to be resealed on those spots, but at least the stains go away!
Thanks for the quick reply! We are considering this product for our island, which also contains our sink (much like yours), only we have a family of 8 – six of whom are 12-and-under. Dishes and food and junk piles up on this counter in spite of me, even though I run the dishwasher more than daily. We just cook and eat a lot. 🙂 So you can see why I need to be concerned about staining! I love the white, but most things white end up blotchy grey here…
Hi Kristi,
How did you attach and remove the edging once the concrete was dry? It looks like it was screwed into the concrete backboard.
Thanks,
Danielle
Oh my goodness. You’re countertops look amazing! I used the same exact product about two weeks ago for our basement bar area and they have come out less than desired. 🙁 I wish I had found your blog sooner! We are having issues with the gravel of the concrete not having sunk. And now we are trying to polish it away. But as that continues we loose the beautiful white color we paid for!! I think our consistancy was WAY off when we mixed. We also burned through one and a half drills mixing. I guess bottom line I’m ever so envious that your countertops turned out so nice! How are they holding up now?
I am looking at kitchen sinks for the concrete tops we are getting ready to start on. I assumed I would have to buy an undermount sink, but when I watched the instructional video from concrete solutions they used a drop in sink, wrapped the sink form around it and dropped onto the dura rock. Then when they poured the concrete, it covered the lip and when revealed looked like an undermount. So, shoukd I buy an undermount or a drop in sink? I think the drop in sinks are cheaper.
Love the end result. I have a question, might be dumb, how did you remove the side edges? i thought i saw them screwed down.
You just bend it down and snap it off. The part on the very bottom stays (the part that’s screwed down) but it doesn’t show at all once the rest of it is snapped off.
This was a great step by step demonstration. I have a few questions for you…
Did you use stock cabinets or custom? Just wondering for weight loads how that was figured out.
What did you use to block off your sink area? Did you keep a boarder in there or did you let the concrete set and remove any edges?
How long did you let the concrete sit before you snapped off the sides?
How big were the dimensions of the countertops, just wanted to try and estimate the amount of mix to buy.
Thanks again for your tutorial, I really appreciate it, just wish Concrete Countertops Forms had their promo code working still 🙂
-Matt
I used stock oak cabinets from Home Depot. Any reasonably well-built cabinets should hold the weight of concrete countertops just fine without reinforcement. A 1.5-inch-thick slab of concrete weighs 18.75 pounds per square foot. That makes for a very heavy countertop overall, but that weight is distributed over a large area. To block off the sink, I used the same edge forms that are used against the wall. But notice that I have a drop-in sink. The edge forms around the sink area stay in place, and the sink is dropped in and covers the forms. If you want an undermount sink, Concrete Counterop Solutions sells a removable edge form specifically for undermount sinks. The reason I didn’t go with an undermount sink is because you actually install the sink on top of the concrete board, and then pour your concrete countertop over the top. So the sink is sandwiched between the concrete board and the concrete countertop. What if the sink breaks or cracks? How do you get it out to replace it? That was a risk I didn’t want to take.
I think I let the concrete sit for about 24 hours (maybe a bit longer) before snapping off the edges. My countertops are approximately 10 feet x 40 inches, 14 feet x 20 inches, 2 feet x 2 feet, and 18 inches x 2 feet.
Kristi, now that your counter has been in place for a couple of years, how well has it worn? Does it stain, can you roll out doughs and such? Would you do it again? I love the look, but am concerned about the maintinance. Thanks! Shelley
I love it, and I’d definitely do it again. It’s virtually indestructible. The only thing I’d do differently is use a different sealer. The one I used isn’t very durable, and I do have stain on my countertops. The good news is that stains can be removed from concrete. I plan to do that soon, and then reseal with a much better sealer. I don’t have the info on hand, but after doing quite a bit of research, I came to the conclusion that the very best sealer is the one that Chris & Julia (of the blog by that same name) used on their concrete countertops. When it comes to concrete, finding the best sealer is the most important thing, and I believe they used the very best one available.
Hi Kristi –
These look amazing and have inspired me to do the same!
I’m curious about the straight edges that aren’t by the wall – like those on either side of your range. Is it that the straight forms can be pulled off just like the decorative edge or did you do something different there?
I am also curious about this, were you able to use the same straight edges that you used along the wall, or did you need to get a separate set of the zforms in a straight edge?
HI Kristi. Throwing around the idea of making a concrete tabletop for our patio and referred back to this post since you did a fabulous job. The forms are kind of pricey. Do you think this product would work fine using the DIY form method? I don’t know how it would work since this is a pour in place product and normally when you DIY your own form, you remove the whole thing later, to include the bottom. Suggestions?
I love this post. I am helping someone come up with ideas on how to redo the bar they own on a tight budget. He needs a new bartop in a most desperate way and I thought concrete could be budget friendly and go with the modern rustic look we are going for. My question is about overhang. How would you provide temporary support for the approximately 1 foot of overhang where the patron would “belly up” to the bar? It would have to be poured in place since the bartop is like 30-35′ long. Any advice would be lovely! Thanks!
This is from the Z-Counterform website:
“You can do up to a 12” overhang without any additional support or reinforcement. You will need to temporarily support the cement board so it does not flex or crack under the weight of the wet concrete. To do this, we will usually just use some 2×4 legs. They should stay in for 2-3 days while the concrete sets up.”
So you’d just use temporary 2 x 4 legs underneath the concrete board that you pour the concrete onto.
Brava! Love your detailed description. This is exactly what I want to do in the kitchen of our newly acquired house and the white concrete (which I didn’t know existed) will be perfect! Thank you for all of the pics (especially loved the cat prints! and directions. Inspired!
Love this! I have been hesitant about concrete counters but this may change my mind. I love the edging which was part of my hesitation of having a big square grey block in my kitchen! I may have missed this part, but how did you go about removing the edging if it was screwed in underneath the concrete?
The plastic edges just snap off.
Did you use z countertop sink forms? I’m in the process of using the same product and their sink forms were hard to work with. I’ve got 2 more sinks to go and I’m wanting 90 degree corners for my remaining undermount sinks. Just wondering what you used and how you did yours to see if I can find a better solution. You’re countertops turned out beautiful!
I didn’t use a sink form. I used the regular forms that are used against the wall. I don’t have an undermount sink, and sink forms aren’t needed with drop in sinks.
I think this is the most honest post on concrete countertops. And i have seen many. Some are pretty good, but after trying on may own I felt they weren’t as honest. Unfortunately I live in Brazil and there isn’t the Liqui-Crete system or anything of the sort, just plain concrete. Also, no plastic profiles to do the wonderful finishing.
That said I really loved the way went through your mistakes and actually showed them. It’s kind of a comfort and inspiration.
Thank you and all the best!
I love the countertops but they are too thick for what I need. Can I make them thinner and how thin is too thin? I decided on black but seeing your white, I may change my mind.
Those are questions you’d probably need to ask the company, Concrete Countertop Solutions. They can tell you how thin you can make the countertops.
Kristi,
I know I’m kind of late to the party since you completed this project several years ago, but I used your post to get my wife hooked on the countertop idea! Are the z forms reusable or once you “break” them thats that?
Also, did you buys your concrete colored white from concrete solutions or did you dye it? Sorry if I missed those answers already in your posts…
The forms are a single use product. Once you break them, they’re unusable. I got my concrete from Concrete Countertop Solutions along with all of the other products and supplies. I highly recommend that, because the concrete that you use with their forms has a much more liquid consistency than the regular concrete you get at Home Depot. The white concrete from Concrete Countertop Solutions is specially formulated for countertops and for use with their forms and fiberglass mesh reinforcement.