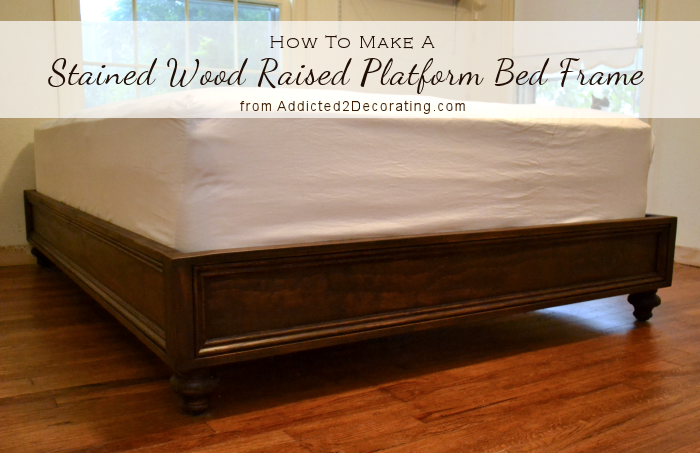
DIY Stained Wood Raised Platform Bed Frame – Finished!!
Well, in all honesty, the bed frame isn’t completely finished. I was putting on the first coat of polyurethane last night at 10:00 while Matt was already in bed. 😀 I still need to do some fine sanding and add probably two more coats of polyurethane to even out the sheen. (You’ll see what I mean in the pictures.)
But for now, I’m calling this project finished. Here’s how it turned out!
If you missed the “how to” part of this project, you can check out those posts here:
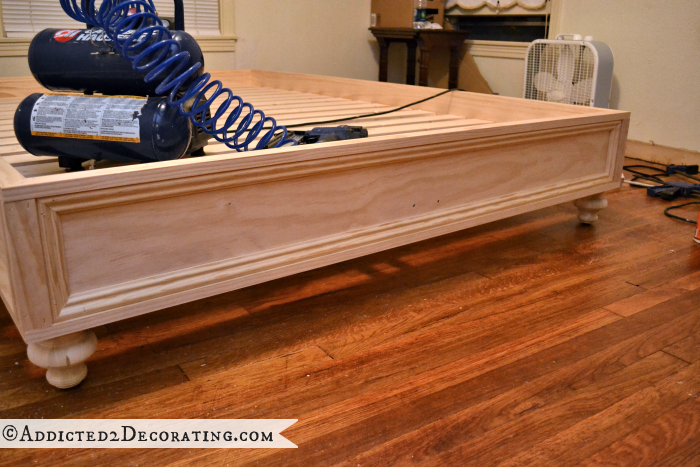
After adding the decorative trim on Monday, the bed looked like this…
I was so scared to stain this bed frame because I made it out of pine, and quite frankly, I hate the way that pine takes stain. I almost always use Minwax stain in a dark color on pine, and even when I use wood conditioner, I always end up with heavy, unsightly orange and yellow grain. Even when I think I’ve chosen a relatively “clear” piece of wood, once that stain goes on, the heavy orange and yellow grain appears. And yet, I continued to try Minwax each time. (What’s the definition of insanity?) 😀
To be honest, the only reason I kept using Minwax is because that’s what Home Depot carries, and I always shop at Home Depot. It’s just more convenient, there are two Home Depots in my city, and I’ve just always preferred it over Lowe’s.
But this time, I decided to try something different. Instead of Minwax, I used Rust-Oleum wood stain (which is available at Lowe’s) in one of their brand new colors called Carrington. And oh my goodness, it did the trick!! There’s none of that ugly yellow and orange grain in sight. And the most amazing thing is that I got this amazing color and coverage in just one coat.
I did still use wood conditioner. Just wanted to be sure that was clear. 🙂
Suffice it to say that I’m done with Minwax…for good. From now on, it’s Rust-Oleum wood stain for me even if it means a special trip to Lowe’s. Now let me emphasize, this is the only color of Rust-Oleum wood stain that I’ve used on pine, so I have absolutely no personal experience, and absolutely no idea, how the other colors would do on pine. But I know for sure that Carrington makes pine look like a million bucks. And it’ll look even better after I get all of the coats of poly on so that the sheen is completely even all over.
Now remember how I did the corners since I’m not a real woodworker with the proper tools?
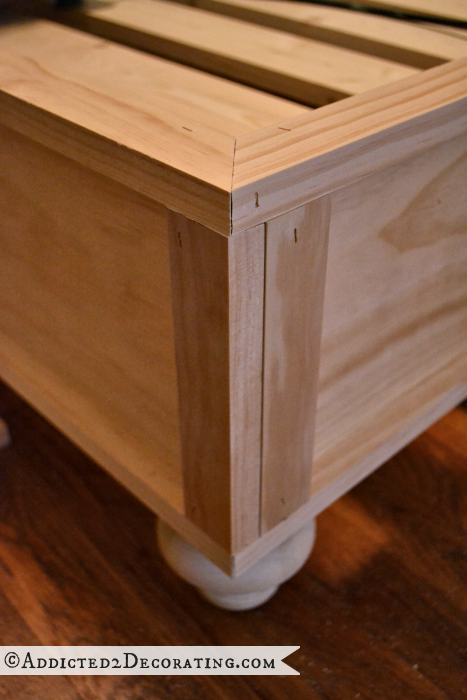
And remember how I said that wood filler is a DIYer’s best friend when doing a building project like this? Case in point…

It’s truly amazing what wood filler and a rotary sander can do.
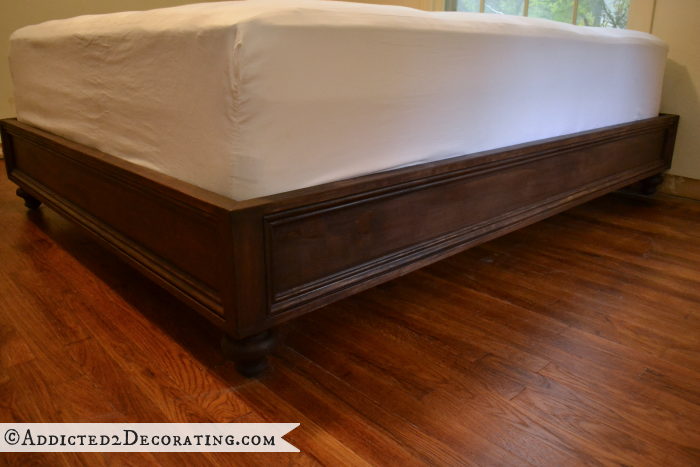
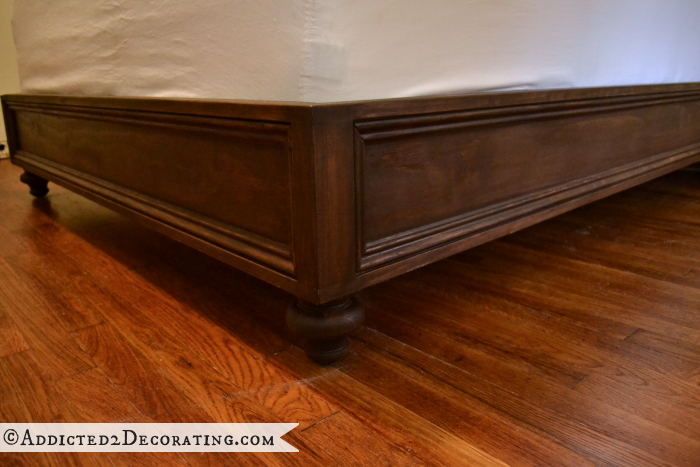
This is the side of the bed with the side window. In the sunlight, you can see what I mean about the sheen needing to be evened out with a couple more coats of polyurethane. I might wait until I build my headboard and do it all at the same time.
And here’s the other corner. Again, a beautiful example of the power of wood filler and a rotary sander for us non-professional, wannabe woodworkers who lack the fine skills and expensive tools.
I’m pretty darn happy with how it turned out!
Now to the main question…
How much did it cost?
The total cost of the bed frame was about $330.
There are two things that added to the cost that you could possibly leave out if you decide to build this bed and need to reduce the cost.
First, I had my heart set on pretty, curvy, turned feet. Those things add up pretty quickly. The four turned feet plus the mounting plates came in at about $50. If you want to avoid that cost, you can make your own legs out of 4″ x 4″ lumber, using a saw to taper the legs. That’s similar to what Kelly over at View Along The Way did when she built her upholstered bed, and they look great.
Second, I knew that I wanted a stained wood bed, so I purchased the Select Pine boards from Home Depot. They are really pretty, almost perfectly straight, incredibly smooth, and have less grain and no knot holes. They’re as perfect as lumber gets. And you pay quite a bit extra for that perfection. You can avoid that extra cost by using not-quite-so-perfect lumber, which isn’t a big deal at all if you prefer a painted bed over a stained bed. The lower grade pine will work just fine if you want to paint, and it’s quite easy to use wood filler and then sand down any imperfections before priming and painting the bed frame.
If I’ve left anything out and you have questions, just let me know in the comments! 🙂

Addicted 2 Decorating is where I share my DIY and decorating journey as I remodel and decorate the 1948 fixer upper that my husband, Matt, and I bought in 2013. Matt has M.S. and is unable to do physical work, so I do the majority of the work on the house by myself. You can learn more about me here.
Wow! This turned out amazing!! My husband had wanted to build us a bed frame like this a few months back & I declined not knowing how it was going to look & now after seeing yours I may just tell him to go ahead & build it… Great job!!!!!! You are truly inspiring!! xx Liz Marie
The bed turned out beautiful.
When my husband is using darker stains for his red oak mirrored coat hangers, he sands then dyes the wood, followed with a light sanding and then stain and the final top coats (of course with the necessary sanding in between). He finds it gives him a more uniform coverage without the light/dark areas that can develop in the candling grain of the 1/4 sawn oak. I don’t think he’s tried this process on pine though, so I don’t know if it would work.
Gorgeous! Love the color. I am about to make a work desk and was going to use ebony stain, but now I might have to reconsider. Hmmm. I am always amazed at how fast you work. It’s would have taken me weeks. 😀
Did you use wood staples rather than brad nails to hold the trim?
Nope, I just used 1 1/4-inch brad nails. In fact, I don’t think I’ve ever used the staples in my nail gun. I have a whole package, but I’ve never found a use for them.
Thanks for the response! They sort of looked like staples in the pictures and I assumed you would have used brads. Like you, I’ve never really found a use for the staples either. 🙂
So beautiful! I can’t wait to see it with the headboard!
Wow Kristi. What an amazing job on the bed. Great job!
Looks amazing Kristi! Your talent knows no limits…I am so jealous – working with power tools is something I leave to the hubby!
Fantastic! Congratulations on a great DIY.
Kudos to you! Just beautiful and that stain color looks so luxuriou!
You are one talented lady…and you post this at a time when I am sincerely craving good-old-fashioned wood furniture. My home remodel is about done…and I’m so ready for pieces like this to break up the monotony. This easily looks like a $3000 Arhaus furniture piece. Amazing work!
Great Job Kristi. I am like you and usually don’t like pine stained but your bed looks great. What are you doing for your headboard & did you use some plans for your bed?
I’m still undecided on the headboard. I have so many ideas swimming around in my head that I’m having a very hard time settling on just one.
I didn’t use any plans for the bed. I just kind of made it up as I went along. 😀 That’s pretty much how I do all of my projects.
That is absolutely gorgeous! That color is so rich and beautiful. Great job and now you and Matt have a lovely bed! Woot! Woot!
Wow! Turned out beautifully Kristy! I’m so excited to see the rest of your room come together!
I wasn’t sure how this would turn out, but oh my, it’s looks stunning! I can’t wait to see how the headboard turns out, too. Your bedroom is going to be gorgeous!
As always totally amazed by your work. You are definitely The Queen of DIY
I love your bed and your work is wonderful.
Oh my, that looks fabulous! Love it! Tell you what, if you ever have the inclination, try General Finishes products, such as their gel stain and prepare to fall completely in love. I have only found it at a specialty wood store or of course, on-line! You are so talented and fast, too! It cracked me up when you said you were working on it while your hubby was in bed, ha! I can. not. wait. to see it completed with the headboard!
Spectacular!
WOW! It looks gorgeous!!
OMG! I guffawed when you said you were putting on poly while Matt was in bed!!!! (I’m seriously still laughing) It’s gorgeous, Kristi. I’m just like you, make do with the tools that I have. But you have a talent, girlfriend. You don’t need those fancy tools. Bravo once again!!
A job’s gotta get done, and sacrifices have to be made. Am I right? 😀 The funny thing is that he didn’t seem bothered in the least. He’s just gotten used to my craziness. 🙂
STUNNING!! Holy cow this is awesome! Great job!!
xo, amy
First, I did a full-fledged coffee snort out the nose when I read you were poly-ing it while the poor hubby was in the bed! You are a girl after my own heart! And then I had to pop my chin so my mouth would close when I saw the reveal. I knew it was going to be purty but the stain elevated it to a whole new level. Dang… you better be darn proud!
Anxious to see what you choose to do next!
You know the crazy thing? It didn’t seem crazy to either of us that he was in bed and I was polyurethaning the bed. 😀 Stuff like that is just normal here in the Linauer household.
Love the color, Kristi. I am going to make a note of the stain because it is such a warm color as well as being a perfect “in between” color…not too light nor too dark. Just what I have been trying to find. Can’t wait till the final product. Congratulations!
This is totally amazing! Can’t wait to see more!
Wow, you never cease to amaze me. Thanks for sharing!
wait a minute! you were putting on the poly while Matt was in bed? In THAT bed? I’m sure he was not, but it kinda made me giggle! Great job, as always, Kristi! it’s a beauty!
Well, after eleven years of marriage, he’s pretty used to my particular brand of crazy. 😀 He was in bed, and I was polyurethaning the bed, and he didn’t seem to think anything of it. He’s perfect for me. There aren’t one five million men who would put up with my craziness. 😀
You’ve amazed us once again.
Beautiful bed, Kristi. I am having a hard time waiting on what the rest of the room is going to look like! What fun you must be having after each project is done.
You are freaking amazing! I LOVE your blog and your COURAGE!
This looks beautiful. I am so impressed with all your work on the new house, and this bed is fabulous!
Oh my goodness, just lovely, lovely, lovely…and classic too. 🙂
Gorgeous! Whenever we attempt a project we keep wood filler close by. 🙂
Wow – that looks like five million bucks! The wood trim details plus those curvy legs just take it over the top. (I’ve always had the same annoying issue with yellow/green stain on pine, and it *never occurred to me* to try a different brand of stain. Now I know!) Thanks for the share too! 🙂
A million bucks at least, but that includes your gorgeous construction as well as the stain. This is probably a rookie question but are there any fumes? I want to sand and restain a stairway and I was suspecting that I would have to figure in the cost of a hotel because my husband is sensitive to strong odor. I probably also will need to use some gel or liquid stripper and that may have fumes.
Any oil-based products will have fumes. I used oil-based stain. The fumes really bothered Matt, and he was in another room. Since he was actually IN the room (and in the bed 😀 ) when I polyurethaned the bed, I decided to use water-based polyurethane. I used the Rust-Oleum brand. It didn’t have any fumes.
Brenda, These Rustoleum “Ultimate” stains are Soy Based oil which has a much lower VOC.
Yep, you’re right. I actually didn’t smell much of anything when I was staining the bed. Matt complained about the fumes, but come to think of it, it could have been the pre-stain wood conditioner that he was smelling. That stuff has a very strong smell to it.
It looks beautiful Kristi 🙂
Kristi, your bed looks amazing. I so wanted to tell you about the “ultimate” stain when you mentioned pine+stain. I figured that you had not choosen it for a reason. Im actually in the process of building a bed and I’m planning on staining with that brand of stain. It has never failed me. I’ve stained my stairs The Carrington color you choose is actually a replacement for my favorite color “Early American” which has apparently been discontinued by Rustoleum. This stuff is awesome but it just sucks that it is only available at Lowes. Also I just want to say for the record that I’ve never used wood conditioner when using this productl. The can says that it isn’t necessary and I’ve never had an issue with it on Pine.
Good to know, Ayisha! I remember reading somewhere that wood conditioner wasn’t needed with the Rust-Oleum stain, but I decided not to chance it. I figured it wouldn’t hurt anything to go ahead with it.
When I was at Lowe’s yesterday, I saw that they had Walnut and Dark Walnut. I would imagine those would work beautifully on pine as well. Have you tried those? They’re probably considerably darker than the Early American, though. Too bad that’s been discontinued. It’s one of my favorite Minwax shades, and I would imagine the Rust-Oleum would be similar.
I’ve used the dark walnut by Rustoleum and love it. If you haven’t ever checked out the Shanty2Chic blog/website, please do so. Those sisters make all of their furniture and always use the Rustoleum stains in all the colors that you have mentioned.
Kristi, You did an awesome job on the bed…can’t wait to see what you have in store for a headboard.
Margo is right. The Shanty sisters use this brand on everything. The Dark Walnut & Kona do a fairly decent job on pine. Some of those really tight grains will stain much lighter though. I’ll definitely try the wood conditioner on my next pine project using the darker tones. Maybe it will help.
I am so jealous of your work ethic! You are such go-getter/get-done-r! I can’t seem to finish anything without moving on to the next thing and that is so frustrating. I am just going to live in your successes! LOL. This frame came out SO awesome. Congratulations and great job!!
Kristi, it really turned out great! You had a vision and you saw it through to the end. Great job!
It looks amazing!
AMAZING!!! Do you just wake up in the morning and say, “I think I will build a bed today?!”
You are one talented gal!
My thoughts exactly…
Well, close. 🙂 I was over at the condo last Saturday, and on my way home that evening, I stopped by Home Depot to look at something. Then I thought, “You know, I really should build the bed tomorrow.” So I grabbed a cart, started figuring what lumber and supplies I’d need, and loaded everything up. 🙂
I just go where my inspiration leads me.
VERY nice! I had no doubt it would be, but you surpassed my expectations. Looking forward
to your next project !
Great job on the bed, Kristi. Like everyone else, I admire your drive and vision—and most of all, your single-mindedness on getting the project completed. You don’t let much interfere with that. Oh, and thanks for the heads up on the Rustoleum. I’m definitely going to try that.
Beautiful job. Well done – I’m super-impressed!! 😀
WOW! What an awesome result! It really puts my ikea bed frame to shame! I think i’m going to have to get working on a new bed real soon! I can’t wait to see what your plan is for the headboard, I’m new to your blog but i’ve been coming back every day to see what you are up to next…i’m even going to attempt to paint my kitchen cabinets because of your inspiration! Can’t wait to see whats next!!!!!
Gorgeous!!! I love the color! I build a lot of small projects out of pine and am happy to hear your experience with Rustoleum’s stain. Keep up the great work!
Kristi, the bed is GORGEOUS! Wow, am I impressed! It is going to be even more beautiful once you get the headboard on there.
I laughed out loud when I read that Matt was IN the bed when you were polyurethaning it! 😀 He’s probably so used to stuff like that I bed he didn’t even bat an eye. LOL!
Best,
Kimberly
You did such a fantastic job. So great. 🙂
FOrget what I said yesterday about being inclined to paint it because of my fear of staining pine. This turned out beautifully! I always had the same problem with staining and guess what? I use minwax all the time too! I’m definitely trying Rustoleum next time. After 3 years of following your blog, I’m still so amazed and love to see what the latest project is that you’re working on. 🙂 Sharon
Beautifully done. Brava!!!!!
Kristi, I forgot to ask, what brand and color wood filler did you use? I ask because I know with certain brands, they don’t always take stain so well and yours looks seamless!
Oh, yes! I forgot to mention this!
The brand is Elmer’s (like the glue). Now here’s the strange thing. I always buy my wood filler from Home Depot. They carry the Elmer’s brand also, but they only have one kind. I’ve always been disappointed at how it took stain, and all of the areas where I used wood filler were very visible after staining.
This time I bought it from Lowe’s. Same brand, but Lowe’s carries two different kinds, and one of them states specifically on the package that it’s “stainable.” The other one states specifically that it’s “paintable.” So naturally I used the one that stated it was for staining, and I was absolutely amazed at the results!
So I guess that’s another thing I’ll start buying at Lowe’s. It’s very strange, because it’s all the same brand, but the Elmer’s Probond Professional Strength stainable wood filler from Lowe’s is far superior to the general-use Elmer’s wood filler from Home Depot.
I am a recent convert to this brand, too and I absolutely love it. I’ve read so many complaints about how the supposedly stainable filler wasn’t exactly that, but I believe they were using other brands. Good to know because I can’t believe how nicely it stained from the photos, either, so I had to ask. Thanx! 🙂
Hello again. After you shared your information on which stain you used, I looked at what I had and it was Elmer’s Carpenter’s glue. The label says it is both paintable and stainable. I wondered what the difference was between Probond and Carpenter’s, so I wrote to Elmers. Just thought I’d share their response: “The Probond wood fillers contain a ceramic ingredient that makes them more durable as well as more easily stainable than the regular Carpenter’s Wood Filler.” No wonder you got such awesome results. I will be heading to the store this weekend and picking up some because I have a bench my hubby built and I don’t want any filler showing through the stain! Thanx again!
Kristi, I can not overstate how amazing you are!
So that bed frame replaces a box spring? I still have my 30-year-old metal bed frame and box spring and mattress, so I’m new to this idea and I’m ready to purchase a new bed–I know, about time, right? I’m curious to know what mattress you purchased. It looks amazing by the way!
The final product is beautiful! Amazed that’s one coat of stain and very non-pine looking, too!
I have been following your posts on this project and the end result looks terrific!
Kristi, this turned out beautifully! You are so talented and skilled! Bet it’s as comfy as it looks too! Great job! Hugs, Leena
Wow! It is stunning Kristi! You did an amazing job:)
I was just at Joann’s and saw that they are now carrying 8-oz. cans of Rus-Oleum Ultimate Wood Stains. Normally $8.99 each (!), but today and tomorrow there is a 60%-off coupon, which makes them only $3.59. Good for small projects or trying out the different colors.
That’s actually the size I used on the bed frame, and I had about 1/4 of the can left over when I was finished. And that’s with staining the inside of the bed frame, and the slats in the corners (where my rounded-corner mattress doesn’t cover the slats completely). 🙂 That stain goes a lot further than I would have imagined.
You’ve really inspired me to try to build more of the furniture pieces I need. Your tutorials are great and the tips are so helpful. Great job!
This is sooo beautiful! Love the legs and all the pretty molding. And yes…wood filler is the BEST!
LOVE this!!!
WOW!!!!
Just gorgeous!
Hey Kristi,
Maybe I missed it in your posts. Where did you buy the feet for your bed?
Thanks.
Those are from Home Depot. They carry them in stock at my local store.
Thanks! I’m hoping to customize some unfinished nightstands and this leg shape matches my store bought bed. I appreciate your quick response.
Hi Kristi: Love, love the bed. I was just wondering if your bed was box spring and mattress or mattress only. I hope that doesnt sound silly, however I would like to build one of these and wanted to know if i need to lower it a bit to make up for the box spring. Thanks so much.
I only used the mattress, Peggy. If you want to use a boxspring, you’ll need to lower the supports. However, with a platform bed design, you really don’t need a boxspring, and my experience has been that the mattress moves a whole lot less without one.
In our condo, we originally had a mattress and boxspring. I could feel every little movement that Matt made during the night. Then when I built the platform bed and got rid of the boxspring, I was amazed at the difference. He would turn over during the night, and I wouldn’t feel it, and it wouldn’t wake me up.
Of course, I can’t guarantee that that would be everyone’s experience, but it has been mine. That’s one of the reasons I love platform beds so much, and prefer them over anything that utilized a boxspring. 🙂
Thanks for the heads-up on Rustoleum! I too have been so frustrated with the yellow grain problem of Minwax. I thought it was just a problem particular to pine. Thanks again!
Love the bed frame. I’m thinking of building one similar but am wondering if you ever catch your shins on th corners.
Nope, I haven’t had that happen even once…yet. 🙂
I really do appreciate what you do. Your site is like a bible for me, these days. Thank you for your detailed instructions that help women make their home more beautiful when they want, not when a man can get around to doing it. For a year now, my daily routine is quick Facebook, a half dozen moves in Words With Friends, then A2D to see what Kristi did yesterday. 🙂
How did you attach the new feet?
I used the metal plates that are made for that specific purpose. YOu screw the metal plate onto the bottom of the bed, and then screw the foot into the metal plate.
Hello Kristi what size mattress is the bed frame a have a queen mattress will it feat????
It’s a queen.
Would you happen to know (and be able to provide) measurements for a full size bed or even twin? Our guest room is on the smaller side and a Queen just would take up too much room, but this DIY is too gorgeous not to pass up and ask! 🙂
wow ! Planning to use your design with these square/turned 6″ tall legs I ordered. We’re going to drop the slats to hide our boxspring and attach to the gray velvet headboard we already have. Wish us luck and Thank you !
laura