Trying My Hand At Faux Grasscloth Painted Walls
It’s no secret that I have a slight obsession with grasscloth. I’ve been talking about using grasscloth in my living room for the past year. Unfortunately, I just don’t know if the real thing is going to be in the budget. I always seem to be drawn to the really pricey ones, and as much as I love it, I just don’t know if grasscloth is something that I want to splurge on.
When several of you mentioned that I could achieve a similar look with paint, that caught my attention. So a few days ago, I took a break from working at the condo, and decided to give the faux grasscloth paint technique a try in the music room before attempting to go “live” with it on the living room walls.
I don’t think I chose the right paint colors, so I’ll need more work on that. But I’m pretty excited about how the actual technique worked out! Here’s how it turned out…
I think it definitely has potential! It certainly has that “grassclothy” look to it, right?
So let me show you how I did it! First, I gathered my supplies…
Tools & Supplies:
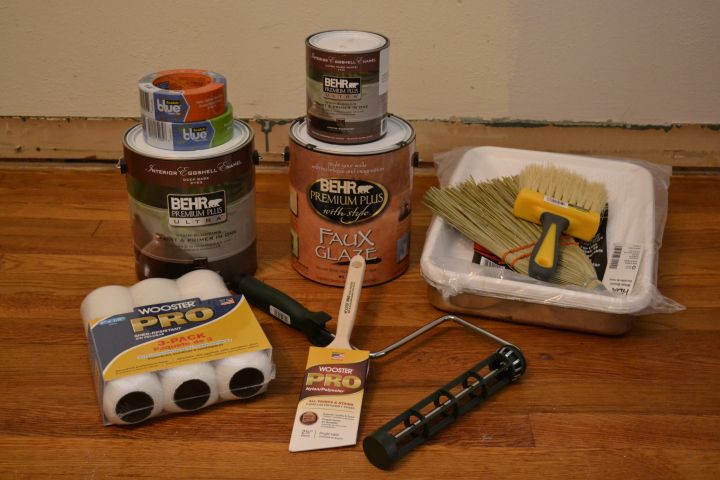
- Base coat paint color. I used a gallon of Behr® Premium Plus Ultra® Paint in Butternut Wood #710D-6.
- Top coat paint color. I used a quart of Behr® Premium Plus Ultra® Paint in Oyster #W-B-720.
- Behr® Premium Plus With Style® Faux Glaze
- Wooster® Pro 9″ x 1/2″ High Density Woven Rollers with 9″ Sherlock Roller Frame
- Wooster® Pro 2.5″ Nylon/Polyester Angle Sash Brush
- ScotchBlue™ Painter’s Tape Multi-Surface with Advanced Edge-Lock™ Paint Line Protector
- ScotchBlue™ Painter’s Tape Delicate Surfaces with Advanced Edge-Lock™ Paint Line Protector
- Paint pan with liners
- Various brushes to create the striae effect (I ended up preferring the little broom)
- Level
- Pencil
- Container and stir stick for mixing the glaze
The Process:
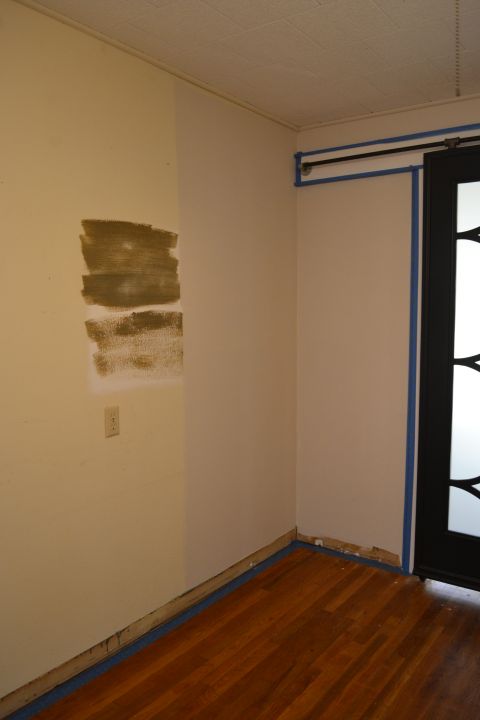
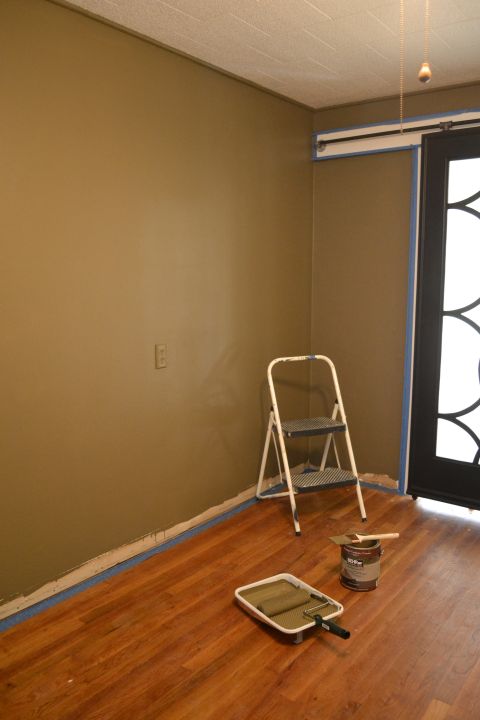
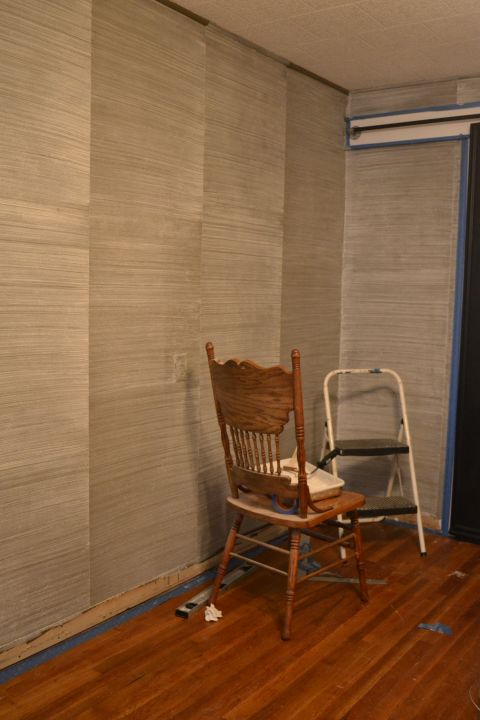
Here’s the music room wall before I got started. As you can see, I started painting it in the Oyster color (probably about two months ago) and that’s a far as I got. Then I used it to test a couple of other paint colors. So it was looking a bit sad and neglected.
I started off by using the ScotchBlue™ Painter’s Tape Multi-Surface with Advanced Edge-Lock™ Paint Line Protector to tape off the trim around the rolling doors, as well as the floor. I didn’t have baseboards to work around, but I decided to tape off the floor just because I wasn’t sure how messy the brush/broom would be when I started the striae design.
Note: I used the Multi-Surface painters tape on my floors, but I learned later that the Delicate Surface painters tape is actually designed to work best on hardwood floors, and it’s best to test it in an inconspicuous place first. Oops! 🙂
Then I gave the walls a coat of the base color. I painted just like I would any other wall, cutting in around the edges with a brush and then rolling on the rest of the paint.
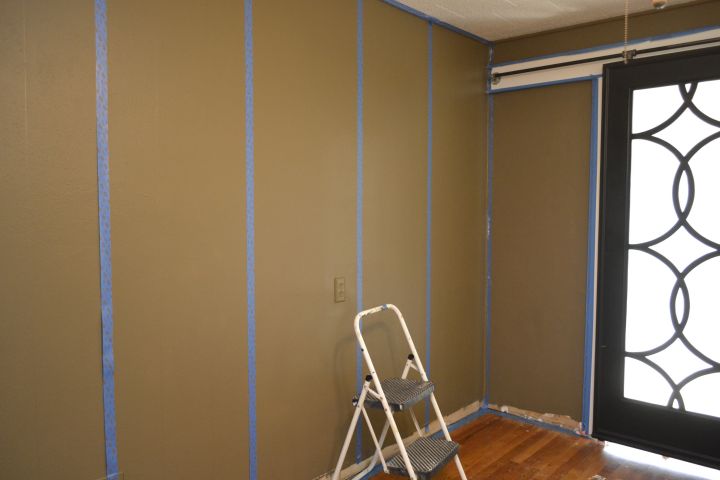
I let the base coat dry overnight [about 24 hours], and then the next day I marked off the design. I started by using a level and pencil to make vertical lines every 26 inches, about the width of wallpaper. Then I used the ScotchBlue™ Painter’s Tape Delicate Surfaces with Advanced Edge-Lock™ Paint Line Protector (since the wall was freshly painted) to tape off every other section.
After mixing my topcoat color with the glaze in a 1:4 ratio, I rolled it onto the wall in about the top third of the first section. I used a brush to cut in around the edges and around the door trim.
Then I created the striae pattern in the wet glaze using a small stiff bristle broom. I found this at The Home Depot in the section with the brooms and cleaning supplies, and it cost somewhere around $5.
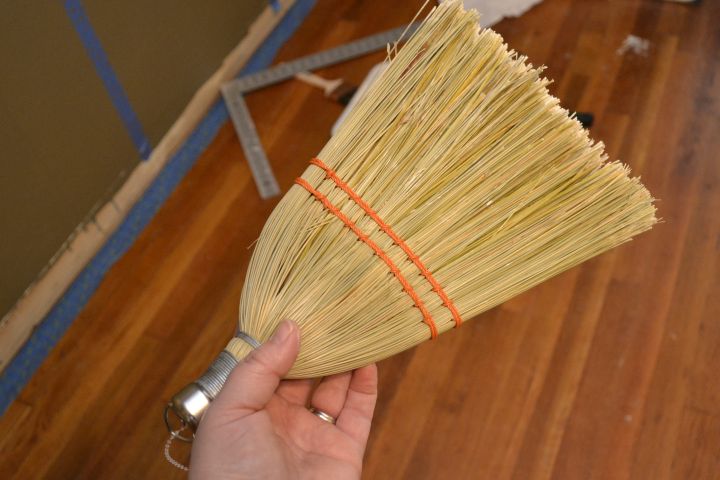
There are brushes made specifically for similar types of wall treatments, but I find that they leave such a fine striae pattern, almost more like linen than grasscloth. I also tried a mason brush (the gray and yellow brush shown with my supplies in the third pic), but I found that it was also too soft and fine to create a grasscloth pattern.
Starting at the top and working my way down, I dragged the broom through the wet glaze, trying to keep the lines as straight and horizontal as possible.
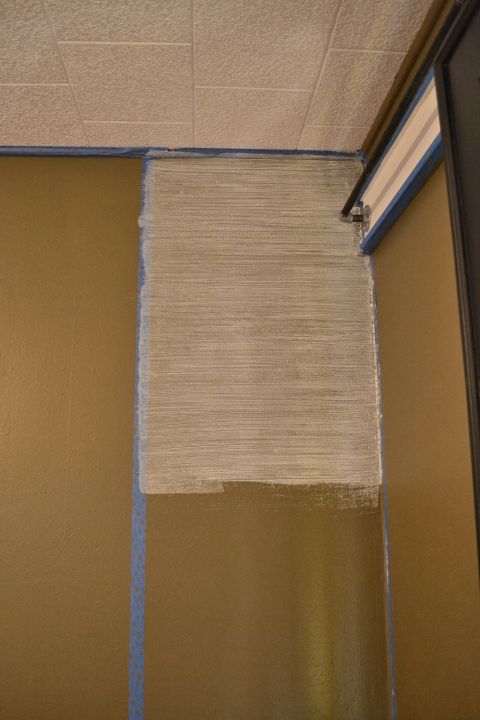
I continued working down the wall about 1/3 of the area at a time, rolling on more glaze (cutting in with a brush in the corners), and dragging the broom through the wet glaze.
With the first section done, I skipped the second one, and moved on to the third one. I continued working on every other section until I had them all finished.
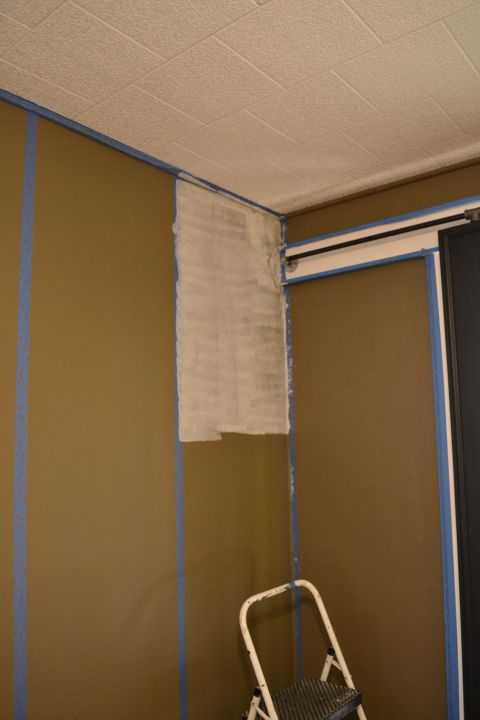
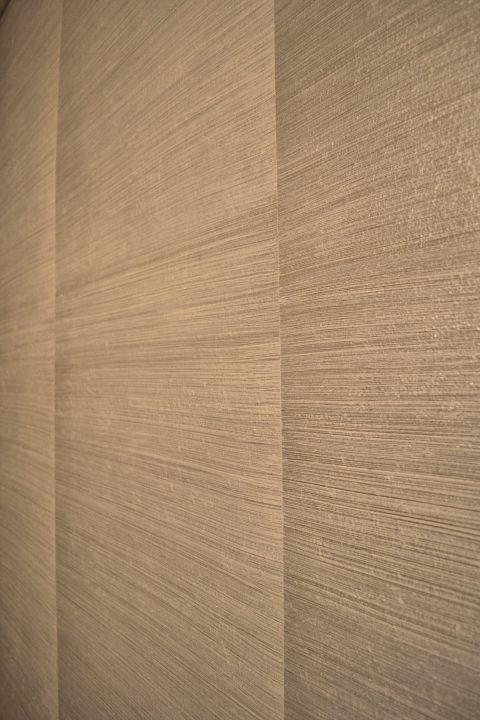
Here’s a close up view of what the wall looked like with this initial striae design.
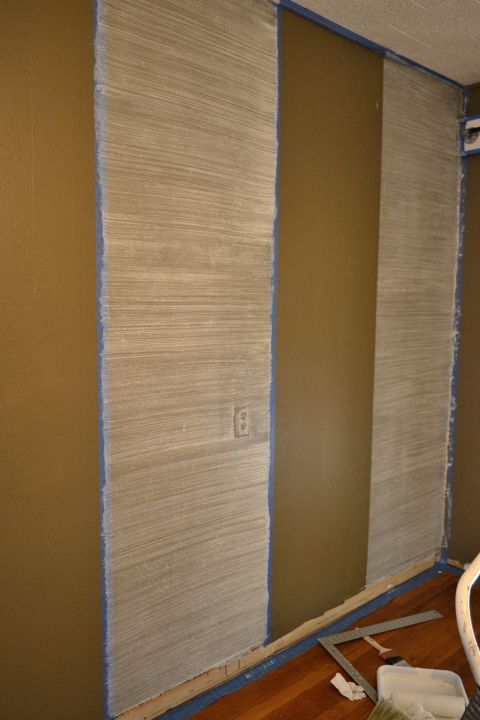
After allowing the first sections to dry thoroughly, I went back and taped off and completed the rest of the sections. At this point, the walls looked like this…
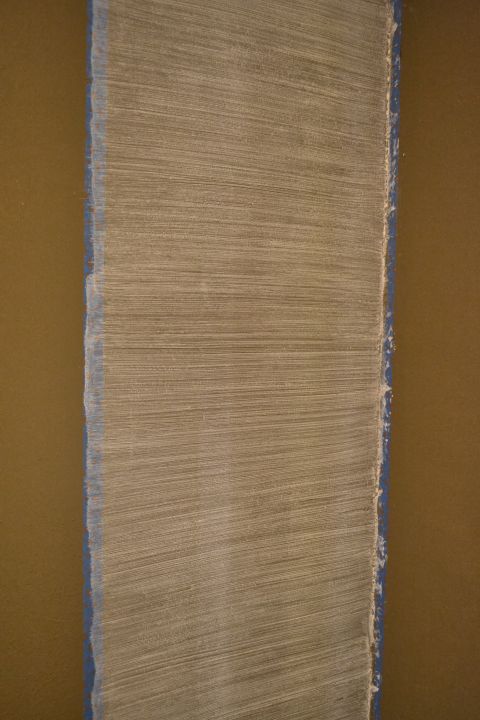
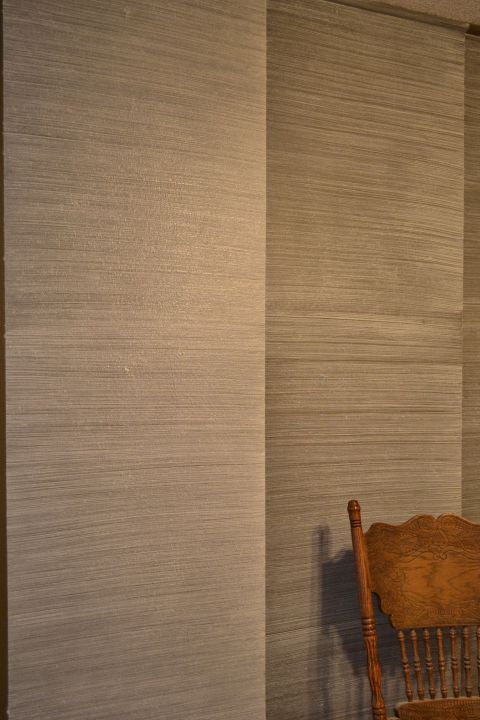
It was a good start, but the walls looked a bit dark for my taste. Plus, at this point, the wall treatment just looked like a striae design rather than grasscloth. So I repeated the exact same process on every section, adding a second coat of glaze, and using the broom to drag through the glaze. Here you can see the difference between the section on the left with two coats, and the section on the right with just one coat. The one with two coats not only has a more subtle look, which I prefer, but it also no longer has definite lines going all the way from one side to the other. It looks more random, like actual grasscloth.
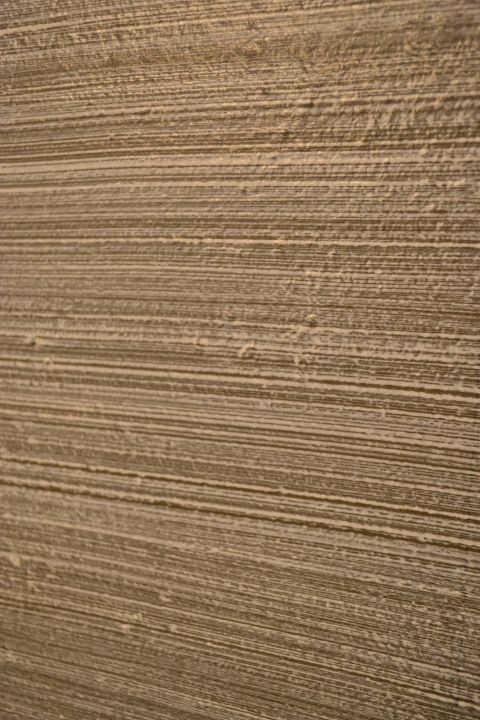
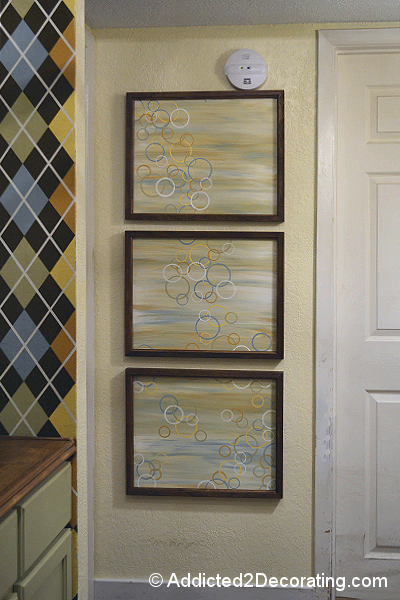
I really love how this looks, both up close and from a distance. Even standing pretty close to the wall, it looks like it has a great deal of texture to it, rather than just being paint.
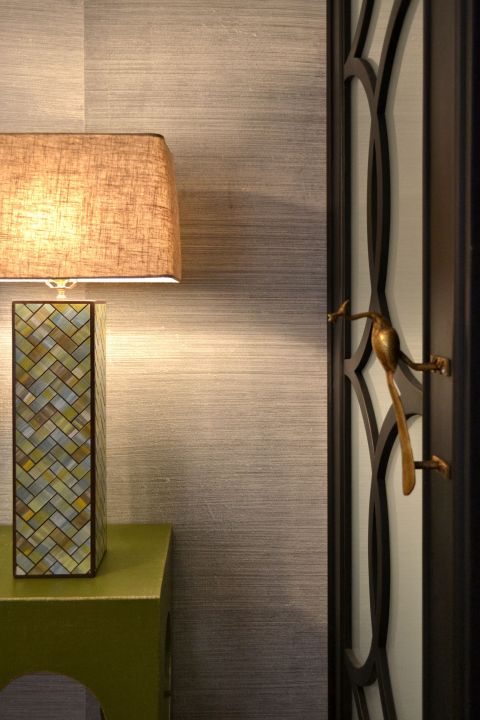
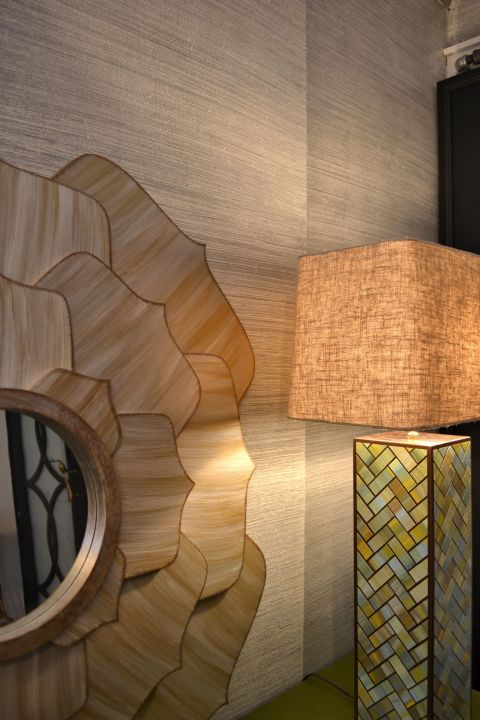
I’m very excited about the possibilities for using this wall treatment in my living room…and potentially saving the hundreds of dollars that real grasscloth would cost me. I don’t yet have my piano out of storage for the music room, so I went ahead and moved the console table and lamps from the entryway so that I could get an idea of what this wall treatment looks like as a backdrop rather than the main feature.
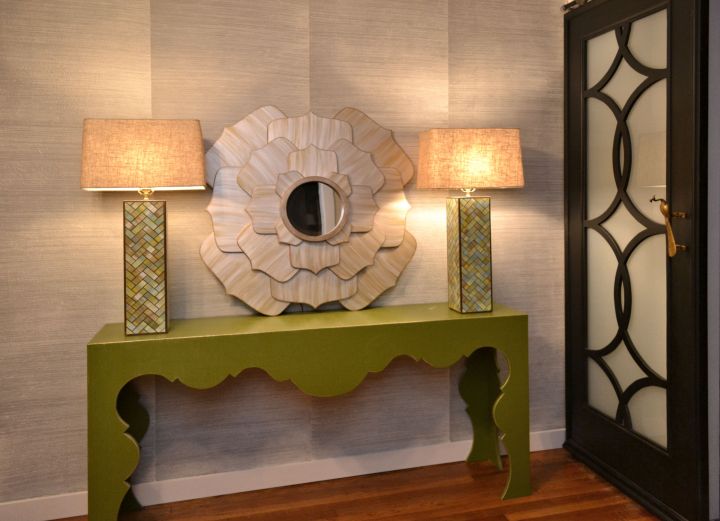
I really like it! I’m not sold on the colors that I chose for this practice wall, so if I do end up painting faux grasscloth in my living room, I’ll need to do quite a bit more testing and trying out other color combos to find just the right combination for my living room. I’d like a more natural color, and the top coat on this one is too white for my taste.
I think I’ll also do wider strips. If I remember correctly, I think I’ve seen grasscloth wallpaper up to 36 inches wide. I definitely want my living room walls to look like they’re covered with grasscloth wallpaper, but I think I’d be happier with fewer “pieces of wallpaper” so that I have fewer vertical lines.
What do you think? If I can find just the right color combo, does this treatment have potential in my living room? I think it could look great with my teal sofa and white wainscoting.

And the best part of it is that this faux grasscloth treatment is actually very easy to do. The hardest part about it is just making sure to drag the broom very straight and level through the glaze. But that’s really the only tricky part. The rest of it is very easy.
I am proud to be a 3M, Behr®, and Wooster® – sponsored blogger, and, as part of my responsibilities, I get the opportunity to evaluate products. Opinions are my own and additional product used in the project were selected by me.
Learn more about ScotchBlue™ on Facebook, Twitter, and Pinterest. And don’t forget to also follow The Home Depot on Facebook, Twitter, and Pinterest.


Pssttt…New personal post here. If you’re interested, read. If not, don’t. Simple as that. 🙂
.

Addicted 2 Decorating is where I share my DIY and decorating journey as I remodel and decorate the 1948 fixer upper that my husband, Matt, and I bought in 2013. Matt has M.S. and is unable to do physical work, so I do the majority of the work on the house by myself. You can learn more about me here.
That looks fantastic!!! Your lines are so straight too! Mine would be wobbly if I did that technique I think!
all i can say is WOW.
Great start! Thinking this will def be something I want to do. Hoping doing it on a rather steep stairwell is possible for me. My inspiration pic…
http://www.lonny.com/photos/Wall+Treatment/TpU2EGLi7XS
Your “grass cloth” look is wonderful. I think the color is perfect and it is nicely pulled together with the lamps, table and mirror. What a rich look. You’re really on to something very exciting. The music room is going to be one of my favorites I think.
Wow, Kristi, I’m not a fan of grasscloth, but that does look really authentic. I LOVE the colorway of Susan’s photo link. You never cease to amaze with your resourcefulness and ability to take everyday items and make them into something special.
If you do your living room in the grasscloth, what will you do in the music room? Have you built the dividing wall yet?
Onward and Upward!
It looks fabulous. Did you have to keep cleaning the broom off?
Seriously amaze balls!
Let me just say… I just looked at the first few pictures and haven’t finished reading the hole post…but that looks freaking awesome!!! I love it!! Okay I’m going back to reading.
Okay so I finished reading the post and looking at all the pictures. Its beautiful. If you were trying to go for the grass cloth effect …. you nailed it. I think you can totally use these colors with the teal. On a personal note, I love the grass cloth and would love to do it, but I’m not sure that I like the “lines” in between.
that is one thing i did not like too. the “lines” look to in your face or something like that.
I’ll admit I have no background with grass cloth, so maybe I just don’t “get it”, but I’d think the seams would be a natural downside to the real treatment and therefore when doing a faux treatment it would be a great opportunity to minimize or remove them all together. Why not have it look uber high end, as though you had a custom sheet of grass cloth made to the width of your wall! 🙂
I love grass cloth but my OCD keeps me from putting it up
BE AUSE of all the seems! Now I know this can be done without seems”…although tough to maintain that straight line!
Thanks for the tutorial’!
The one thing I dislike on grasscloth is the vertical lines, so I agree that the faux grasscloth is the perfect solution to be rid of those pesky vertical lines.
Hell YES it looks like grass cloth! You never cease to amaze me…it looks really really cool!
Beth 🙂
Amazing!!
YES…it certainly does have possibilities. Like a few others, I don’t care for grasscloth simply because of the too noticeable lines where the wallpaper butts up to the next section piece. Differing opinions make the world go ’round and it’s ironic that you want the look of each individual “wallpaper” piece. So I would go with the wider measurement strips. Love the texture you did. It will look amazing, I’m sure.
I love it! What a great idea! Do you think it may need 1 more layer of a slightly different shade to give it depth? Like reverse the ratio of white paint/glaze so it’s darker and light dry brush it over what you have? Just a thought! Love it!
This looks really great! The staged pictures look like advertisements for grasscloth. Will you still be going with a bold color for that part of the LR wall or will you go more neutral?
Amazing!! I love it too! Totally agree with you about going a little warmer with the colors. The end result on this looked a little bluish gray. I also totally agree with a tad wider. But it’s great looking!
Oh, yeah…looks great!
I certainly hope you leave that wall in your music room as is…it is beautiful. You really nailed the look of grasscloth. I have had grasscloth in every home I have ever owned dating back to the 70’s it is sophisticated and timelessly elegant ,which is perfect for the direction you are going. Amazing work lady so happy for you.
LOVE this. LOVE LOVE LOVE! You have totally inspired me with your technique. Gahhhhhhh love hearts dancing all around 🙂 🙂 🙂 🙂 🙂
It looks great, Kristi; I remember that one example that I sent you where the person went back and handpainted extra lines of larger “grass” pieces over the first ones. Did you do that yet? Do you plan to? They made it look really “real”. ;c)
The wall looks great. I did a wall like that for one of my clients and it came out great. Everyone thought it was wall paper. When I checked about the size of actual paper it said between 24 to 26 inches, but double check to make sure. You do fantastic work.
Love it!❤ It really does look like grass cloth. It’s just my opinion, but I like the look without the “wall paper” seems, like the link shown at the top of the comments.
The stairway in that photo has real grasscloth wallpaper. That’s one of the biggest differences between the paint treatment and the real stuff. On the real stuff, the seams are way less visible. On the paint treatment,the paint builds up at the edges as you drag the broom through it, so it makes the “seams” more visible. That’s definitely one advantage of having the real stuff over the paint treatment.
I am thrilled that you are playing with a grass cloth technique! Why? Because I had decided to do this on my long common wall in living room, dining room and kitchen. I have been playing with a gold metallic glaze so it looks more like a silk grass cloth with a subtle sheen. I love that you can blaze the way with your fearless attempts. . I agree with you that the widths need to be wider but I love the finished look and texture of your wall! Thanks for fine tuning my technique!
Jacqui
It is so classy I love it. You really are very talented!please don’ t change a thing it is just sooo perfect even the colour!
Kristi,
I love it! And I love how you staged the room to give us a realistic look! I think you will be very happy with your living room being done this way once you figure out the exact color you want. I think it looks amazing and I definitely would not spend the money on the real thing.
I was a decorative artist for many years and still do it occasionally but one technique I always disliked doing was anything strie. Why? Because I can’t keep a straight line, vertically or horizontally, to save my life! YOU have done a fine job of that! I am impressed! Hope you don’t mind a little tip and you prob already know it. IF you decide to increase the width of your faux grasscloth you may need to increase the ratio of glaze to paint so that you have a bit longer working time before it dries on you. Now who am I to talk, but if you ever fear going crooked, a good tip is to use an occasional white chalk line as a guide. Looks great!!!
Another option to ensure straight lines is the use of a laser level. Used such on a colour blocked wall (for a baby’s nursery) x 6 colours (numerous blocks) and you would swear it was wall-papered.
Seriously amazing. I can’t even!
That looks beautiful! The only thing is how strong the vertical edges “between sheets of wallpaper” are.
As someone else said, the edges are not as obvious in real grasscloth wallpaper – I looked up on google images and they are quite subtle.
What if you did a third layer, but this time went aaalll the way across the wall? So the vertical stripes would be covered up by the third layer, but still show through a little because of layers 1 and 2.
I love how much I learn from your blog, btw 🙂
“The hardest part about it is just making sure to drag the broom very straight and level through the glaze.” This sentence had me chuckle. There are those of us, Kristi, who would have an extremely hard time keeping anything level, let alone having to constantly do it to achieve this affect. 🙂 It looks amazing. Love it!
It’s fantastic!!! Honestly, in the photos I can’t tell the difference between it and the real thing. I’d love to try this in my bathroom. Seems small enough for me to handle and not get bored or distracted. I think I would have to add very light level pencil lines every 12 inches or so just to keep my lines straight and horizontal.
i absolutely love those lamps!!! I want to make one so badly but I’m scared….I’m not a “crafty” person. The walls look amazing!
That is totally incredible how even the slubs exist in your painted surface! From the looks on my computer you totally nailed it!!! I have grasscloth in my entry and it has a black background with a lineny color grass. And, any time I’ve shopped for it I’ve only seen it in pretty small widths. You should be very happy with that outcome.
Kristi – this really looks spectacular! I’m not that big a fan of grass cloth but, boy, you have me sold on the look and the process. Thanks
I think it looks good. Like you I am not thrilled with all the “wallpaper seams”. I can remember when grasscloth first came on the scene back in the early 80’s. It was very big in offices. I am sure it came in widths close to 48 and 54. So you can certainly go wider if you want. I like the color in the music room. It certainly is neutral. For that area of the house it is not bad since it is almost like a large hallway. I think you are on the right track, although I do not know what colors you would use to get the teal affect in the living room. I am sure you will figure it out. Blessings
It looks great, as I knew it would! Thanks for showing up how to do this, think I will try it in my entryway as soon as I get finished painting my bathroom!
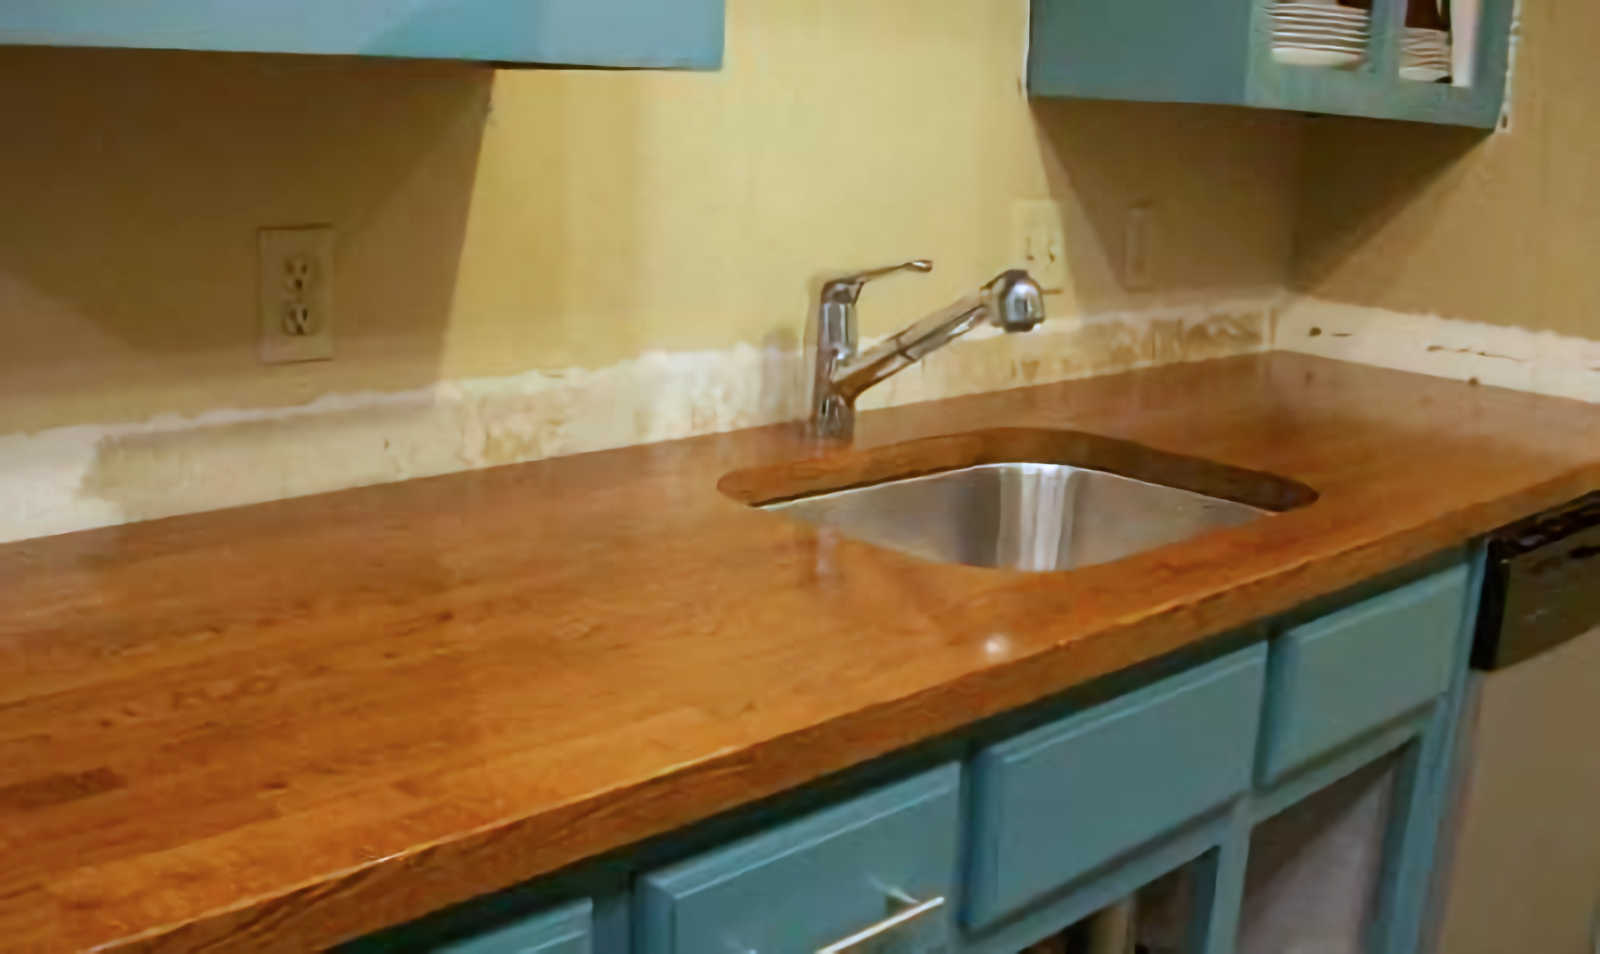
I think it looks like grass cloth. Since you were sponsored for the products you used, why not approach a wallpaper mfg. andsee about getting their product? You did this with your countertops and I would bet they got a lot of inquiries if not sales from that. I’m not a bother but it seems to me that that’s what bloggers do to get what they want in their home.
But if you want to do it with paint I think you nailed it!
Blogger, not “bother”
Maybe reverse the colors.
Love the grass cloth effect with your awesome table and lamp!
I like the grass look – have a question please – why have each section look different? When we hang wallpaper you are always careful to match and butt closely. Don’t understand.
Oh I do love the handles on your sliding doors – classy
This looks great! If you are experimenting you can try using texture paint, or jointcompound mixed with paint and caulk or weldbond glue. It gives even more texture. I really recommend using a professional glaze rather than a paint store glaze. I use Faux effects, but there are many that have glazes. Also, did you try a wallpaper brush? I like it for doing stries and fake grasscloth. I love your can do it attitude in all that you do!
WOW! the texture on that close-up picture looks so real, I’m thinking it IS!!! But I know you would never do that. Have to agree that I’m not crazy about the vertical “seams”, but I’m pretty sure you’ll figure that out. And I love it otherwise
Oh, and thanks for another peek at those lovely doors!!! Adore them!
Love, love! I have been looking at grasscloth! I’m obsessed with it and want to put it in my keeping room. This is a wonderful alternative!
Great job.
Shelia
LOVE IT!!!! It looks beautiful with your decor! So exciting to see the mirror, console, and lamps again- they are so gorgeous. You should just do the whole music room as your “stage one” and have one more pretty room to add to your collection:-)
Love it! and its so easy to get any look you want since it is color dependent. I generally test my color and techniques on a large poster board before beginning on my actual wall. I’ve found this to be extremely helpful especially when using any decorative technique but I also do the same thing when painting the wall with a single color. Just buy a sample of your color and some poster board (I cut my poster board in half at first and sometimes in quarters to see if the color is even a possibility) then paint a piece of poster board with a color you are considering. Let it dry, then apply it just as you would on your walls. Now its ready for me to take them to the room to be painted, tape to a wall and consider for at least 24 hours usually more. I attach the sample board to each wall (generally, if its good enough to be tried on the walls, I paint multiple boards). This lets you see the color on all walls at all times of day through sunlight and evening house lighting. However, this is a step you probably can skip by now with as much experience as you have.
I had grass cloth in my first house and loved it but it was difficult picking out the one I was going to use. There are so many different finishes and weaves as will as colors that you can hit overload.
Do you have a sample of the grasscloth you were thinking of using? If so, it can be a great help when looking for the colors you need and for the way the “weave” or striations look. Texture is so much of the pull of grasscloth. So, you might consider finding a grasscloth you love, get a sample and go from there. You have most of it already figured out. I can’t wait to watch the progress even if you decide not to use “grasscloth”. I’ve seen you start down one road and end up somewhere completely different before and the results are usually very creative and stunning. So, get on with weaving your magic.
Connie
I love the texture but the section breaks would make me nuts. If it were me (and it’s not), I would maybe make a scaffolding to do the glaze in level rows, a few feet at a time vertically joining each section before two dry. The vertical line breaks are what keep me from enjoying grass cloth. However, I’m digging the texture and see how those line breaks could be completely eliminated.
Wonderful job! I imagine this was much easier than putting up actual wallpaper—;plus reversing it will be a cinch. Thanks for sharing!
I love it. It’s such a great technique. Many years ago I did a similar technique using a wall paper brush and horizontal and vertical lines to mimic linen.
Wow!! I just love the way the wall came out. You do very good work. I just enjoy your work.
Kristi, this looks great! You did a wonderful job of explaining your process and I am sure that you will find the perfect color combo ( that’s always the hardest part ).
Fantastic job!!
I remember seeing Christopher Lowell (many years ago) use a wallpaper brush to accomplish a strie pattern. They might be easier to keep a straight line. Your example looks great!
I love it. Thanks for showing the steps and the difference between one and two coats. I will try this somewhere in my condo after I finish my current project. I think I will try green so it looks like “grass”
Why not try to make like a ruler with short ‘legs’ that would set it off from the wall for like half an inch, and then use it to make sure the broom goes straight? Because it seems to me that the seams are so visible also because you made just very slightly arched broom strokes, with the ends going ever so slightly downward (which, I think would be very instinctive for all of us). But I also could be wrong about it….
Either way, it looks really great, and your new music room look works well with your new strategy to have less chaos and more polished and finished spaces around you 🙂 If I were you, I’d make sure to do the other wall too. I am sure its beauty will bring you serenity and joy whenever you pass through the music room, which is probably quite a few times every day.
Am I the only one who LIKES the vertical lines separating the sections? I think it’s all beautiful… please don’t paint over it!
Although I am not a fan of grasscloth because of the vertical lines. I think you did an amazing job. I don’t think I could tell that it wasn’t grasscloth by the picture.
I. Love. It!! I am going to use your idea in our entryway! I’ve been stumped for an affordable yet elegant idea (it’s somewhat small and doesn’t have a lot of “wall”, and what wall it does have is placed so you can’t really hang pictures or anything), and this is PERFECT. I love it!
I love it! It looks great with your accessories so it should look great with your furniture/accent pieces, as well.
That first picture that shows a closeup of the door is fabulous! I liked them a lot in your posts about the doors when you first did them but the closeup is stunning. I am an impatient painter and I often thought how much more work you put into a job with filling, calking, sanding and priming but now I see why. Those doors have the look of fine furniture.
Your painted grass cloth is better than the real thing. Have you ever noticed how dusty the real thing gets? It is impossible to keep pristeen. Think cat hair blowing in the air. Much better to paint it and then when a new creative spark hits you just paint over it and you are good to go.
When my daughters were toddlers, we had a wall with grass cloth wallpaper. They found it great fun to pull the threads and unravel it to my dismay. I LOVE how this wouldn’t happen with this technique. Thank you for sharing. I think I might try this to a wall and keep grandchild from having mother’s tendencies. LOVE the look!
Your site was the 5th one viewed; so glad I didn’t give up looking. Love the total look of “real” grasscloth, including the ‘seam’ lines. I want to do my mstr. bdrm. in shades of gray. Carpeting is a medium-ish gray and bed linens ‘bluish gray-eige’. I’ll do test boards for sure. Do you think I can get away w/ using darker gray for the base of the grasscloth? Also, do you think I have to do all the walls in the bedroom? One wall is windows w/ ocean view and the other two are small. The longest wall (16′) is where I’m thinking of doing the faux grasscloth. Thank you for sharing your special talent!
I think the dark gray would be fine as a base color. As far as just doing one wall, that’s just a matter of personal taste. I don’t personally like feature walls, so I’d do all of the walls. But if you like feature walls, then just doing one wall is fine.
Your results look great! Comparable enough to grasscloth to not bother with it. I love the grasscloth look also; and was lucky enough to find ONE roll in a Savers store – only $3.00. Luckily, I only wanted to do one accent wall behind my bathroom sink. I consider myself an “expert” wallpaper hanger; and i read everything on how to do the grasscloth. A couple of things they didn’t say- grasscloth is ver “unforgiving” – once you put it up; it sticks to that spot – if it needs a little “massaging” to move it even slightly – it won’t budge – you have to peel it back down and reposition it! Also, try NOT to get too much extra paste along the edges because any that seeps out – if you happen to use a damp sponge and get the finished surface of the grasscloth wet/damp; it may discolor it permanently! (So you also do NOT want to use anything wet/damp to flatten it down so there are no “bubbles” behind- use a dry roller. The results look great; but personally; I’d never do it again – especially in a large room/area. your way is much more “forgiving” and the results are “close enough” – unless you’re really a purist!
LOVE THIS. Your faux grasscloth technique is the best tutorial I’ve found so far. I had thought of doing grasscloth on an accent bumpout wall around the fireplace but don’t want to turn potential future buyers off with the dread of grasscloth or wallpaper removal, should they not like it. But I worry, does this paint technique leave a rough texture on the wall that would make painting over it difficult. The old plaster walls are in very nice smooth condition. I don’t want to damage the walls in any way or force someone to sand it down if they wanted to paint over it. Appreciate your thoughts!
I didn’t notice the paint leaving a texture. If it did, I don’t think it would be enough to be noticeable once a new coat of paint was rolled on over it.
@Kristi: Vie experience glazes do create a slight texture, so regardless the faux technique you are using the area will have to be lightly sanded prior to repainting. -Brenda-
Hi, Kristi. While your post is nearly two years old, I just found it, along with your blog, which I’ve subscribed to. I love how your walls turned out and was especially interested as I did something along these lines, myself, years ago. I painted my bedroom a deep periwinkle blue (lovely color but hideous when used on walls – too much color). Then I rolled on a white glaze (20% paint or 1:5 ratio). I worked in sections of about 3′ square. Glazed and then went over with a wisk broom in BOTH directions and moved on to the next section while the glaze was still wet (I thin I used and extender, if memory serves) so the sections blended. Completed the whole room, let it dry and repeated the following day. What I ended up with was something that looked faintly blue and almost appeared to be layered over with gauze. Very ethereal and beautiful. Not as formal looking as what you did and no seams. Everyone loved it and a friend of mine repeated it over a gold-ish/khaki base color which was more of a grasscloth look because of natural color base. As you know, the more glaze you apply, the lighter the finished product so even dark, rich colors can be the basecoat. Too dark? Just do another layer of glaze until the base becomes a hint of color. I pre-tested my method inside of the closet to get it down but it was pretty straight forward and easy, if a little time consuming. It looked like this (linen) only the blue was VERY pale after two coats of glaze: https://s-media-cache-ak0.pinimg.com/236x/31/af/88/31af880364c791b274f0ccfaec9e988b.jpg
Great look but the definite, uninterrupted vertical lines are, for me, distracting & unnatural for the grass cloth look. It takes longer but you can prevent the buildup of paint at the tapes edges. For the first column, (starting from from a wall corner, tape off the non-corner side of the column to include a 6-12″ vertical band of plastic or heavy duty paper (sold to protect floors during remodeling). You have to use something that will prevent paint leaking to the wall underneath it. Make all brush strokes, starting from the corner. horizontally across and onto the paper. This ‘overpainting zone’ is the area you end your stroke. As long as you continue the stroke swiftly over the tape and into the ‘zone’ it should eliminate the paint buildup problem. Then, wait until that column is thoroughly dry and use the (yellow) tape specified for newly painted walls to tape and apply ‘overpainting zones’ to either side of the first finished column. Keep repeating until all columns are done. If you have enough columns you can do more than one at a time with this method. If you want the vertical lines even more subtle, use a super thin glaze and go over columns in continuous horizontal strokes. Make it random, varying continuing over 3 here, 2 there, high, low, straight across all, etc. Hope this helps someone. Good luck!
For a first attempt, job well done! Regarding the seams, I agree with D. Anderson’s tips re the technique. That said; with a little experimentation on your own, I guaranty you will have it down to a science in not time and don’t forget to arm yourself with plenty of masking tape….. HAPPY PAINTNG -Brenda-
P.S.: That should have read ‘no time’. Also, forgot to mention another thing you might wish to try is when taping off the sections; stagger the position of the masking tape. In others words place one within the line and the other adjacent one outside the line. For the unfinished sections, reverse the location of the masking tape. As this method works when doing a faux linen technique ; I don’t see whey it wouldn’t work for grass cloth but recommend you do a sample first as in all honesty I haven’t tried it for the latter. -Brenda-
Hi Kristi. This is my 1st visit to your blog and I love it! I’m preparing to do the grass cloth paint technique on my cabinet fronts and then trim them out. I love your walls! I think the vertical lines gives it a modern feel. You could try a nice trim painted the top paint color to cover the lines. And as for your living room, I’ve seen grass cloth paint techniques that don’t leave lines, by overlapping your ending and starting places. I hope this helps.
Wow! That’s a great look! Thanks for sharing this inspiring technique.
We painted our entire house about two years ago, prior to moving in, after a full interior rehab. I thought about adding a grasscloth to the wall behind our bed’s headboard, for texture and appearance. Grasscloth has such a calming appearance, in my opinion. However, due to our other rehab costs, we decided to forgo the grasscloth. This technique has given me great inspiration to get the look I desired.
To overcome the difficulty of keeping broom strokes horizontal, I may try using a laser level to project a line on the wall.
I am actually obsessed with grasscloth also, but my husband has told me no more wallpaper. I was so happy to see this because I will try it on the wall in back of our bed. Your “grasscloth” looks so amazing, it’s inspired me! thank you!
Did you do the 36″ pattern in your living room? If so, what color paint did you decide on? Any pictures?
Kristi, you hit a home run. I am always search for new decorating ideas and better techniques to something I’m familiar too. Recently I did this faux painting in our powder room. Actually I thought it came out pretty good. I used a comb, gave me the texture I was looking for… After seeing what you pulled off, I’m definitely redoing the bathroom. I spend way too much time checking out every post and never leave a comment. This would be my second… Years admiring, learning, and doing on my own from what i learn. Your faux wall paper, hit the ball out of the park. Thankyou, Gonna try your little broom thing this time!!! Your new fan, Denise
Faux grass clothe. Genius! I can’t stop looking at it. Thank you for sharing. I’m going to make a try.
❤️🌹Absolutely Wonderful 🌹❤️
Kristi,
You have given me the confidence to do this! I am going to use the Beher products you recommend too. I have read many articles and you, by far have the most complete information. You also provided the best photos in each step. You are saving my husband thousands on grass cloth, which I will gladly remind him as I head out to the paint store.
Thank you, Thank you!! (I hope to write again with photos)
This looks great. I wonder if dry brushing another subtle color over the second coat would add even more dimension. I’m going to give this a try.