Chalkboard Tags For Baskets
Psstt…If you’re looking for the Framed Magnetic Chalkboard Spice Rack, click here. Sorry for the confusion!
Remember my “roadmap” for the completion of my eating area that I showed you last Monday?

Well, I got Project #1 (Chalkboard Basket Tags) done this weekend. It’s not much, but it’s a start!
I started with a piece of beadboard that I had left over from this project.

Using my miter saw, I cut the board along the “beads” so that each tag would have a little decorative bead on the top and on the bottom.

This is what they looked like after cutting them to the correct length.

Next, I marked the center top with a Sharpie marker.

And then drilled a hole in each one.

The beadboard was pre-primed, but after cutting, it had raw edges. So I touched them up with some spray primer. After it dried, I gave them a quick sanding with 150 grit sandpaper.

I followed the primer with two coats of chalkboard spray paint.

After they dried completely, I used hot glue to adhere the tags to a scrap piece of fabric.


Then I used my pinking shears to give a little decorative edge to the fabric.

I cut a piece of jute and place it through the hole for the hanger. (Jute has so many uses!!)

After tying the tag to my basket, I covered the chalkboard surface with chalk.

After wiping the chalk off, it was ready to use!

It’s a small little detail, but I love the touch of color it adds to the baskets. (Please be so kind as to overlook the lack of molding at the ceiling, and the lack of caulk around the tile. Those are on the non-fun “to do” list.)
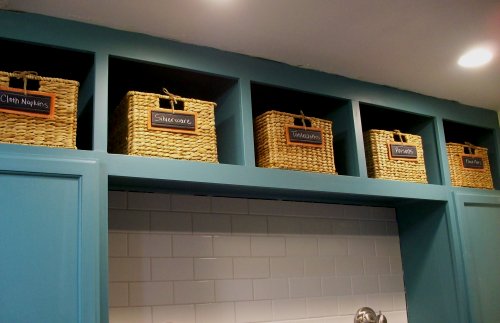
I have five baskets, and I could only come up with four labels, so I asked Matt for help. Can you guess which one was his idea? lol…

Ummmm…yeah…we really don’t have “poisons” that need storing away. 😀
By the way, the fabric I used for this project was a piece that I found at JoAnn Fabrics. It was one of their discontinued special order decorator fabric samples that they sell for about $1 each. If you’re needing a small piece of quality fabric for a project, this is a great place to look! They’re generally large enough to use as the face of a decorative pillow.
Next, I plan to tackle Project #3 (Family Name Sign), but who knows. I have a tendency to change my mind quite often. I did, however, purchase the paint for the project, so I’m a step ahead.
And now for our giveaway winner!
The winner of the Philips LivingColors LED Light is….

Congratulations, Kim P.! I’ve really enjoyed my light, so I think you’re really going to like it. We’ve used it as “mood lighting” for our evening meals, and it’s quite soothing. Just send me an e-mail at addicted2decorating[at]live.com and tell me where to send your new Philips LivingColors LED Light.
This project was for my condo breakfast room makeover. Click here to see the whole before and after of the breakfast room makeover.

Or click on the thumbnails below to see other DIY projects that I did for my condo breakfast room makeover.
[categorythumbnaillist 494]

Addicted 2 Decorating is where I share my DIY and decorating journey as I remodel and decorate the 1948 fixer upper that my husband, Matt, and I bought in 2013. Matt has M.S. and is unable to do physical work, so I do the majority of the work on the house by myself. You can learn more about me here.


A-Dor-A-Ble!!!
Very cute- love them.
That is the cutiest thing (idea) EVER
Wow Kristi…. great idea and I love your husbands humorous touch….
what a great little project to take on – love it!
I love those! I can not believe how many uses there are for chalkboard paint!
ADORABLE!!!!!!!!!!! I LOVE your chalk board tags!!! and your sarcastic hubby. (i have one of those) Hugs, Tara
This is a genius idea! I am adding this to my craft to-do file…and I definitely have a love affair w/ baskets, so this project will fit in nicely w/ my decor! Thanks for sharing:)
I like this idea. My hubby just finished putting in beadboard in a bathroom. I just hope he saved the scraps!!
Very nice post. I just stumbled upon your weblog and wanted to say
that I’ve really enjoyed browsing your blog posts. In any case I will be subscribing to your rss feed and I hope you write again very soon!
I’ve always enjoyed DIY, a friend recommended your site and I have loved browsing through your projects. Inspirational.