Fireplace Makeover — From Craftsman To Traditional
Once I finally had a clear vision of where I’m heading with my living room (more elegant and traditional with a few contemporary and modern touches), I knew that my fireplace needed some work. For those of you who may be new around here, I built my living room fireplace from scratch at the beginning of this year. You can find all of those details here. It’s an electric fireplace, so while there’s no real fire, it does put out heat. We used it quite a bit last February.
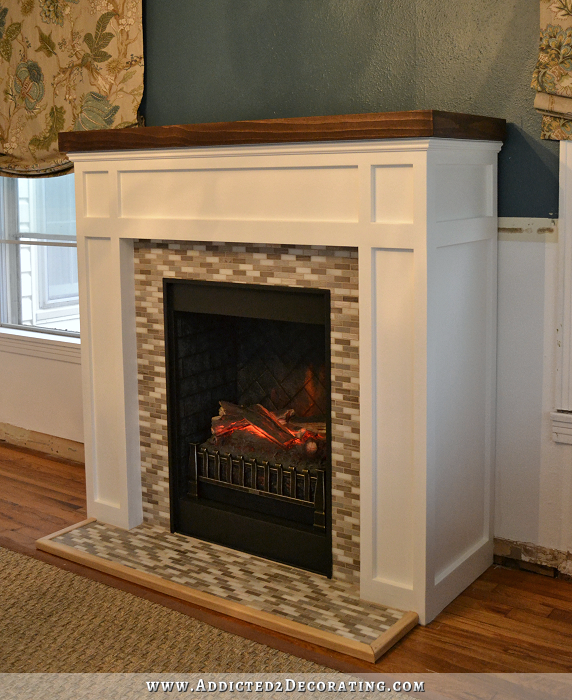
But the fireplace looked like this…
The fireplace that inspired my design was this one that had a contemporary look to it…
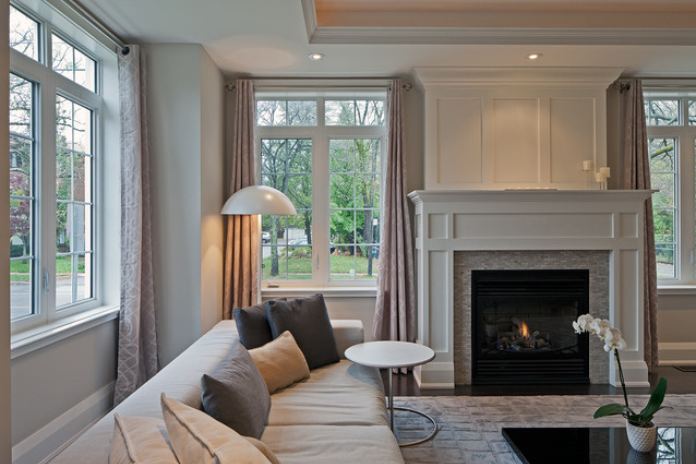 Contemporary Living Room by Toronto Photographers Peter A. Sellar – Architectural Photographer
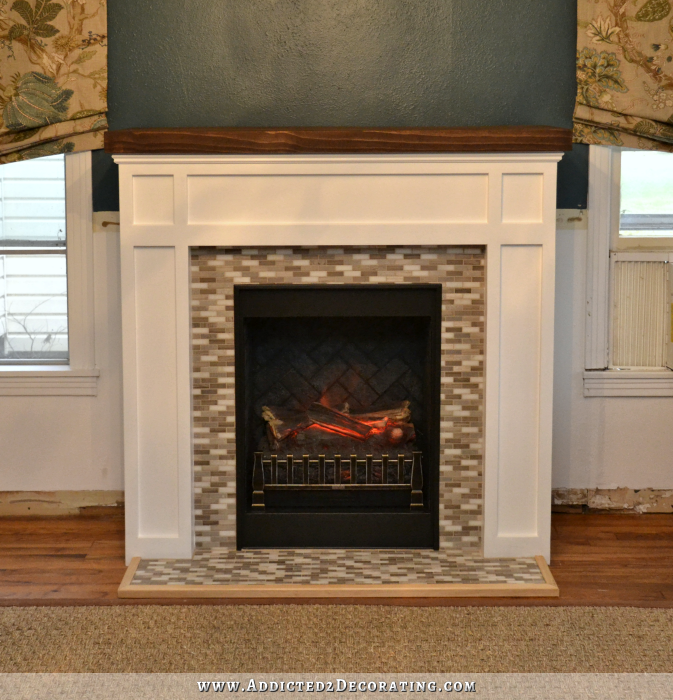
But when I put the stained wood mantel on mine, it took on a more Craftsman look. I liked it, but it just didn’t fit in with the new direction of my living room. So I spent the last three days adding trim (lots and lots of trim), wood filling, sanding, caulking, priming, and painting…

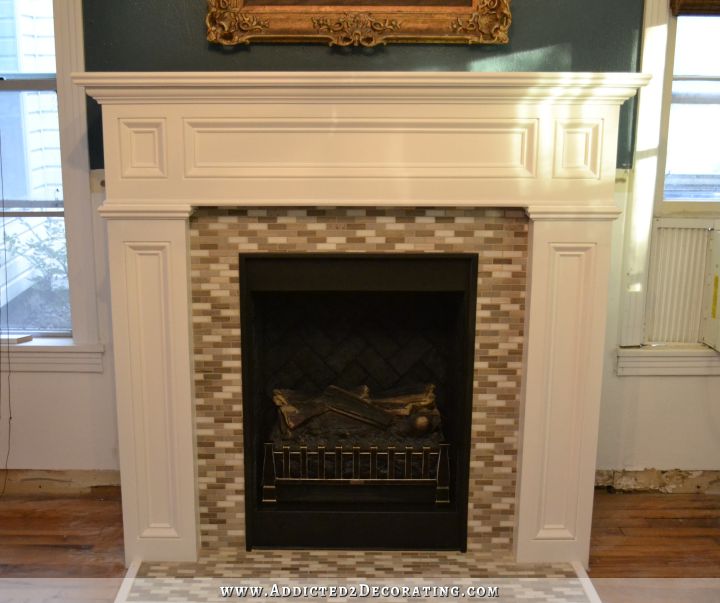
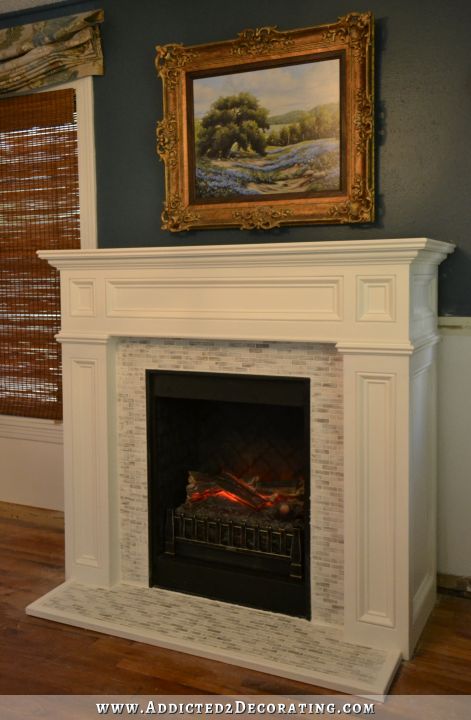
…and now my fireplace looks much more traditional. It’ll go so much better with what I have planned for the walls!
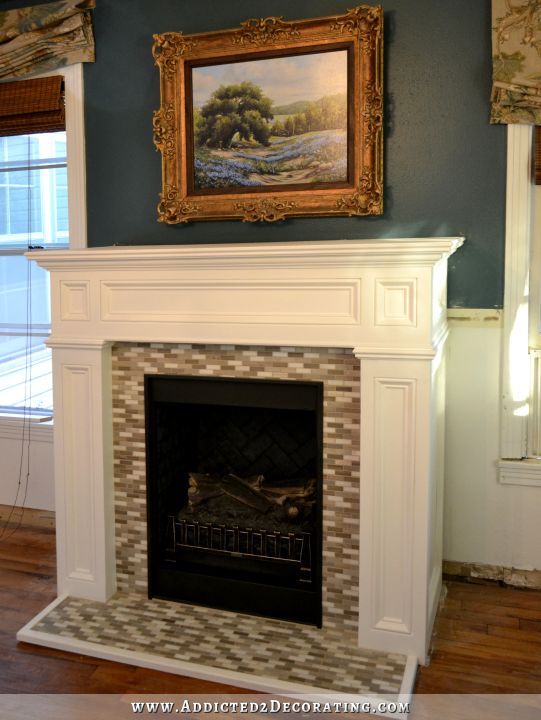
Except for the mantel, which I replaced completely, the rest of it really was just a matter of adding lots of trim.
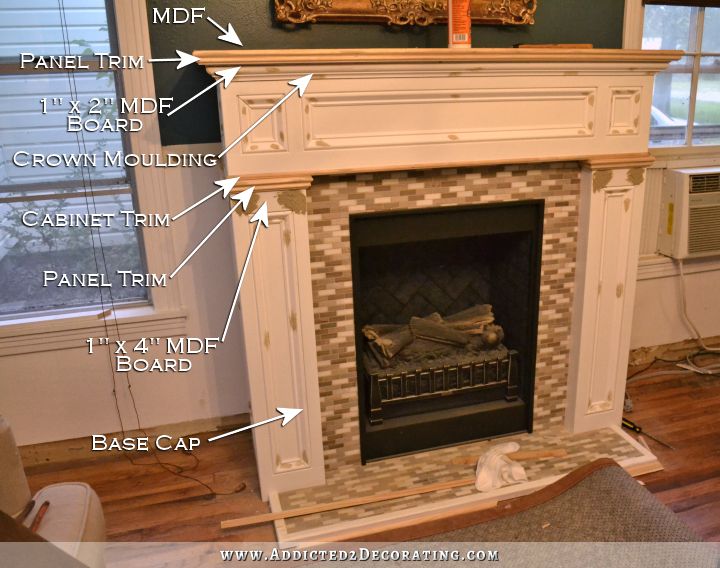
For the main trim around the frames, I used base cap trim. This is the stuff that’s made for dressing up plain baseboards, like if you have a house with simple 1″ x 4″ boards as baseboards. You can use base cap trim to dress those up so that they look like fancy baseboards. And then I added a little panel trim, cabinet trim, and crown moulding. The purpose of the 1″ x 4″ MDF board at the top of the side frames is to create a full frame on the sides once the panel moulding was added. Without that, the side frames would have only had three sides rather than four.
So, just a little detail on these trims. My Home Depot has two types of panel trim. One has a rabbet on the back, and the other is flat. For this, I used the one that’s flat. This trim is sold by the linear foot. They also have two sizes of trim labeled cabinet trim, and these are sold by the whole 8-foot piece. I used the smaller of the two.
The total cost of this makeover was about $80. Trim adds up! Especially when you need over 50 feet of base cap, plus other types of trim. But I think this will work much better in my living room. The original fireplace would have stuck out like a sore thumb.
But the new one will look right at home in my new living room.
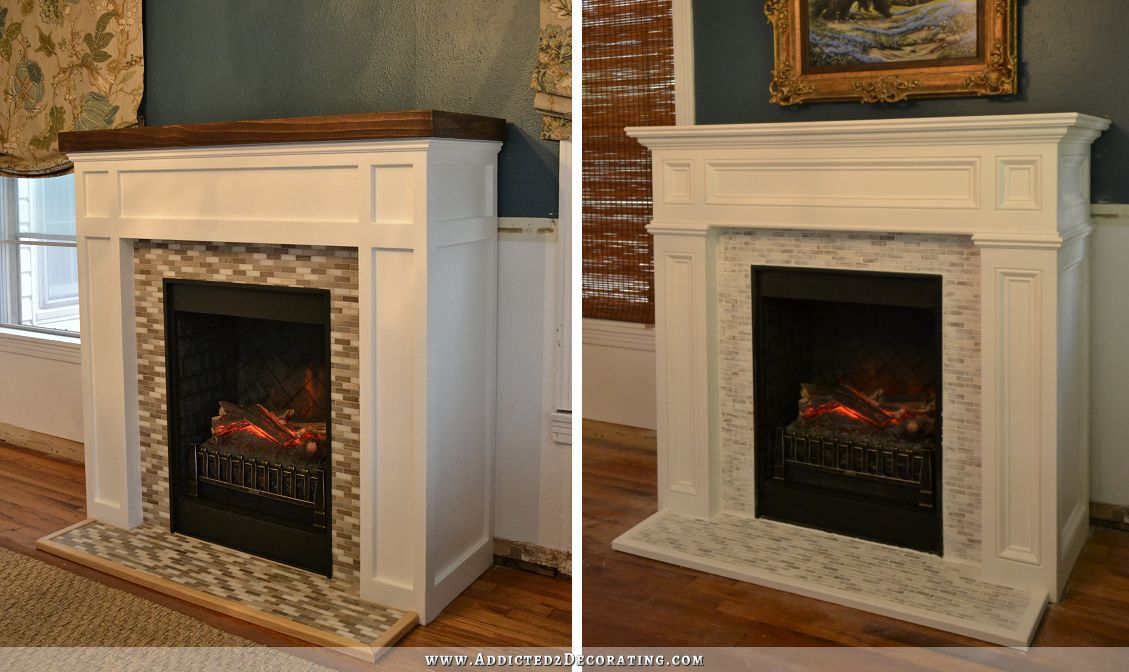
And here’s a look at the before and after side-by-side.
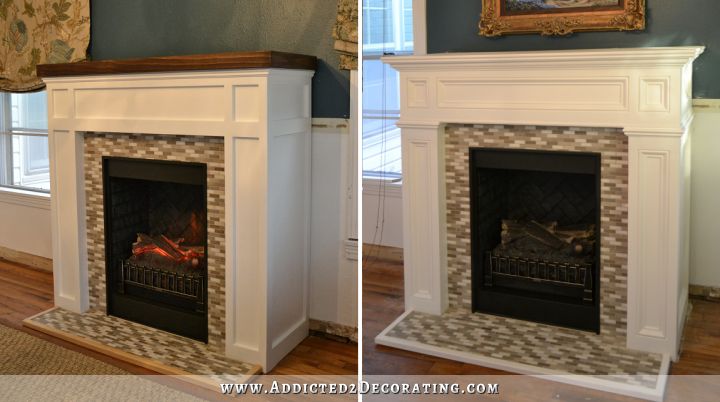
And all it took was just a little trim. 🙂
UPDATE: After looking at the pictures of my fireplace makeover, I decided that the stone tile also needed to be changed a bit. I didn’t want to remove and replace, so I decided to try toning it down with paint first. The tile is a stone (I think different types of marble) mosaic, and it was unsealed. (This is key, as this process never would have worked on sealed stone mosaic tile.) I used regular Behr latex paint in an eggshell finish, painted over the whole thing, left it to dry overnight, and then today (Saturday) I sanded it down using 15o-grit sandpaper until it looked like I wanted it to look. Here’s how it turned out.
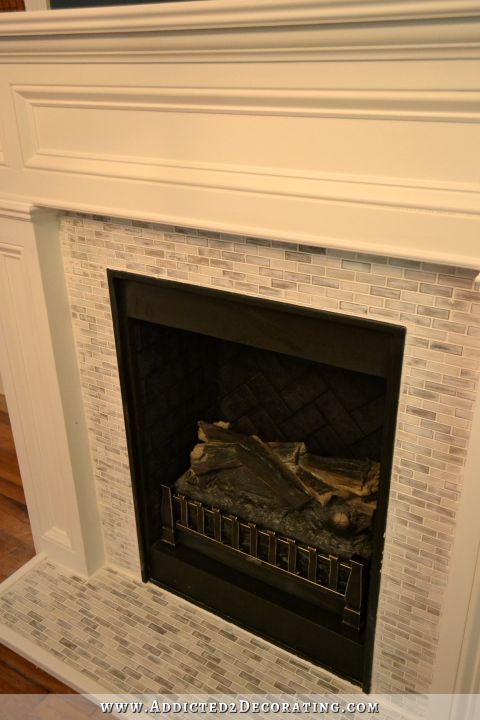
The more subtle look will fit the new style of my living room much better!
And here’s another before and after view, now with the new and improved tile.

Addicted 2 Decorating is where I share my DIY and decorating journey as I remodel and decorate the 1948 fixer upper that my husband, Matt, and I bought in 2013. Matt has M.S. and is unable to do physical work, so I do the majority of the work on the house by myself. You can learn more about me here.

Holy cow! Wow!
wow is all i can say. what a difference trim can make. can not wait to see the top part done and the rest of the room.
Oh yes! That looks fabulous! Amazing what a little trim can do!
This looks great! Really took it up a notch. Can’t wait to see what you do next. Good job
All I can say is WOW!! I liked the fireplace before, but now?!?!? This almost makes me want to find some place to put in a fireplace. I LOVE it!
my word, you are the queen of trim!!! It’s looking pretty amazing and I like the way the fireplace now matches the frame of the lovely picture much better now! I actually envy you the easy access to all that fancy trim – here in Germany I don’t seem to find any of that in the DIY shops and always end up with the boring, non-fancy varieties… Need to have a look online, I suppose!
I’m really looking forward to the new look of your walls – and the process as well. Have a great weekend!
Yes. This. It looks “at home” now.
You amaze me nearly every post Kirsti. Fantastic job!
Love the new look! A simple, yet eloquent transformation and definitely a better fit for your home. I love the use of trim – I am updating my front door this weekend with added trim and black paint for the door. All ideas from you!
Wow…..I didn’t think you could improve on the way it was….but YOU DID! BEAUTIFUL!
Mission accomplished! This looks lovely…so much more elegant!
You are so freaking smart! How did you learn to use tools so well? Did you Dad teach you or did you take a class along the way? Either way, that is totally off the wall wonderful!
Awesome! Can’t wait to see where you end up with the updates on the living room.
I love both fireplaces but I think this new design fits better in your decorating plan. I think you completed the door trim in the living room. I was wondering if you planned on changing that also with this new design. I love it but will it be too plain now that you are doing the walls with trim? Or will it be like a resting stop for the eyes? I am learning so much from you. I can begin to understand why sometimes I look at a room and something is “OFF”, LOL. Thank you again!
Sheila
That is freaking amazing. How did you learn to use power tools? Did you Dad teach you? Either way, awesome!
LOVE it! Such a clever use of trim…you never cease to amaze me!
I love the craftsman style. It’s my kind of house but it took away from your mothers painting. Your new fireplace is spectacular with your painting. So beautiful. You have a special ability to see trim and make something special. I have a son who can do that. It’s a special gift.
It went from DIY to professional amazing WOW!!! MUCH much much better:) I want to do our fireplace but it is brick(not a pretty style). Could I just screw MDF into the brick?
@Carol Young House Love has a great tutorial on how to cover a brick fireplace with wood and stone. It’s a step by step plan with pictures. Here’s the link: http://www.younghouselove.com/2013/03/fireplace-makeover-stick-a-fork-in-it/
Thank you Susan:) I remember them doing that. I miss them:(
Stunning! You are amazing! Wish I had your skills.
Oooooohhhhhh very pretty, pure awesome!
Both versions are beautiful in their own style. I’m probably a bit more of a personal fan of the style of version 1, but it’s absolutely amazing how a bit of trim changes the style so completely and this transition illustrates that wonderfully!
I love the trim additions! Both styles – Craftsman and Traditional – are great, but the Traditional style definitely fits your dressed up style better. The only other thing that I’d like to see is a piece of large quarter round all around the outside of the hearth to bring the width of the hearth at least out to the edge of the side upright piece. It would also make a rounded transition from the hearth to the wood floor. What do you think?
The quarter round all around the hearth is a good idea…or lose that whole floor section altogether (as seen in the inspiration fireplace).
I agree with Tina. Take the floor tile off. Will open the room up a bit also. Love the new look – I like both of them!
I agree with Tina and Glimmer Gal…remove the hearth to complete the look. Love it, btw.
I actually like the hearth and think Alta had a great idea! I too would love to see a piece of quarter round attached to the hearth! But WOW Kristi, what a transformation! I was impressed before but now I am in awe!
WOW ! What a difference some trim makes. It looks awesome.
Absolutely B.E.A.U.T.I.F.U.L !!!!!
Wow, so much nicer! Not that it wasn’t nice to start with but the trim really sets it off!
I love what you’ve done! Just a little thing that might look better is leave the small trim around the hearth natural or stained to go with the wood floor as wood the natural/stained
shoe molding. Just an idea…..
There are no words to express what an awesome, fabulous, wonderful, and spectacular job you did. Ditto to every comment above. You go girl!
Love it. beautiful.
Are you still planning on doing an ‘overmantel’ (or whatever the term is)?
It looks much better.
Fabulous! I love the new style. The side by side pictures struck me as “not quite done” and “Done”! I really like the additional white for the mantel and around the tile on floor. Huge & awesome difference!
So much better. LOVE!
Amazing!!! I wished you lived closer because I would totally come be your apprentice!
From ordinary to elegant–good job!
Wowzers! That trim did make a huge difference and I really like it. Love the white mantel piece also. It should look amazing with your trim work on the rest of the room.
You are truly finding YOUR style, Kristi!
I LOVE the makeover!!
I liked the first fireplace, but I really LOVE the new one. It is just what I would like to have in my own home.
Now that fireplace is so you! Love the craftsmanship too. 🙂
Fabulous job! The updated fireplace is perfect. I love how you just get things done! Very inspiring.
Looks great Kristi! I am so glad I found your website! I truly admire your patience. Love your great ideas, too! I found your website when searching for the best way to hang draperies. Now I am making my own draperies! The possibilities are endless!
Wowza! A vast improvement over the first one.
I do love the Craftsman style but I love the traditional look as well. I appreciate all the pictures with descriptions of the type of trim you used. Very helpful, thanks. I’m eager to see what you do with the windows. Very exciting.
You know, I thought I was a big fan of craftsman…but I really like that traditional fireplace so much more. So elegant!
I also like the changes to your mantle. However, I was disappointed that you have turned your attention to the living room once again. I want to see what you can do in that breakfast room. Who knows once you get started in there you may find that additional changes will be needed in the entry and living room…………
Kristi has already explained her reasons for not doing so SEVERAL times (despite her not needing to at all!!). Personally I practically never find her blog disappointing and if I did, I’d simply read elsewhere
Meow much? Jezz give her a break, maybe she didn’t read all of Kristi’s posts.
Although I like the craftsman style. I asolutely love the look of the fireplace now so much more. It looks so much better. love love love it!
I really liked your first one. but wow! The changes you made are incredible and I can now see that it does look better this way with your new living room. You are pure genius lady. I am fascinated beyond words following your process.
Your vision is coming more and more into focus with every project and re-do. ~:)
“Holy Crap” is what I said outloud! Seems crude in print….but that looks SO GOOD!! You are so impressive!!! And I wish I lived in Waco, lol.
That is beautiful, much better. Are you still planning on making a paneled faux chimney box up top?
Very nice improvement on your fireplace.
I have a small suggestion to make, as an artist myself, I find the painting of your Mother’s very well done, indeed… but, the dark painted wood trim you used as “matting” (to build up the size to fit the frame, is too stark. If you will look at all of your photos you might see what I mean … the dark “frame” jumps out and the painting is noticed afterwards. Please consider changing the dark so matches the GOLD frame so it just looks like a larger gold frame. When I have my paintings framed I make sure that they take center stage by how I utilize the framing. As I said before, since this is an unsolicited suggestion/opinion, you’re welcome to put it in the circular file! : )
Wow, that’s looks great. I love the traditional look better and now your picture frame doesn’t look too ornate to me. Can’t wait to see how things evolve.
I do like the after much better. The trim really changes things. I have a real fireplace that is painted white. My living room is pumpkin color and I think I would like to put that piece above the fireplace that you also showed. Now to convince my hubby!
You see, that’s why you amaze me so much. I didn’t even know what was missing until you added the extra trim. Then it became my very favorite style of fireplace. Traditional and elegant. Your mom’s painting was calling for it.
That was EXACTLY what it needed! It’s gorgeous!
LOVE LOVE LOVE the new look! The base cap trim is one of my favorites – I have this trim on my kitchen cabinet doors. Fabulous!!
This is amazing!!!! Gorgeous! And thanks for all the details and names of the trim. I get to that moulding aisle and just get overwhelmed every.single.time!
Kristi I loved it before but now it is so elegant Great job hunt
Kristi, again and again…..WOW!!!!! Can’t wait to see what else you have coming for the living room! You are really a bright spot in my day!!!!
Kristi, Although I thought the first mantle was beautiful, this one is truly amazing! Love, love, love it!!
Wow! I love it!!!
Beautiful! Like a lot of others have already said, I love the first version, but the new one is even more beautiful. It really clicks into a seamless look with the blinds and the painting. Love your work!
Love this! Your power to transform is exceptional. I also love the plans you have for moulding – I think it’s one of the best ways to add class (and classicism) to a room. I hadn’t realized you weren’t happy with the direction of your living room. I love the teal of the walls, but I can see from your kitchen and your plans for the breakfast room that you have a much more vibrant and dramatic sense of color than what you began with here. Have fun with this room!
You never cease to amaze me! That looks great!!
I liked the before, but i love the after. Gorgeous. Can you share a cost breakdown?
I think it’s buried in the post somewhere, but the trim came to around $80. 🙂 Trim adds up!! The rest of it — paint, primer, wood glue, nails for my nail gun, etc. — I already had on hand. So the complete update came to around $80 for me.
Beautiful. Does this mean you’re going to do the living room before moving on to the breakfast room? Just wondering where you’re going next. I know you want to replace the ceilings in both rooms which I know that’s the part you seem to be the most worried about doing.
Yes, I’m going to do the living room first. That breakfast room is just way overwhelming to me right now, especially since I just finished my long kitchen remodel. The breakfast room needs quite a bit more extensive work done to it than the living room, including still leveling the floor, adding a subfloor, and installing hardwood flooring. I just don’t have it in me to tackle those things just yet. 🙂
You listed what was staying in the living room but was wondering about the credenza that was in there before the fireplace. Are you planning on using it somewhere else and also the table you made? Do you plans on changing them to fit the new style?
The credenza will eventually be used in the seating area in our bedroom. The drawers will stay the same, but the green might need to be changed to a different color. I’ll decide once I start working on that room. The console table in the entryway is staying, but it’ll also need a makeover. Since it’ll be sitting against a white wall, I’m thinking it needs to be painted a really striking color, and then perhaps given a highly lacquered finish. That’s as far as I’ve gotten on my plans for that so far. 🙂
I absolutely love it
Hun
Looks great-high end!
When you first posted your FP makeover yesterday, I liked it but I didn’t love it. I knew there was something about the tile that I wasn’t crazy about, but couldn’t put my finger on it. Leave it to you to figure it out and take it to the next level. The finishing touch of simply muting the colors a bit is what takes it from really nice to elegant. Your creativity and energy is amazing!
Yes, I agree with Briscoe.
I mean Briscoe 🙂
Well, I keep typing the “L”, but it doesn’t show~~~
We are so on the same wave length!!! When I saw your inspiration picture yesterday, I thought yay, Kristi lightened the tile and took the wood up to the ceiling. Then I realized it wasn’t your room! Sooooo, are you going to go up like the inspiration room? It would be gorgeous, and a snap for you! You would have to change the design of the face for your mom’s painting, awesome, Blessings
Another fabulous project complete. You never cease to amaze me with your style, knowledge and energy.
Too funny! I just painted my tile backsplash last week–Travertine unsealed stone–so it took the latex paint great. Your mantel and tile turned out great!!! here’s the link of my backsplash if you want to check it out! http://www.slipcoversbyshelley.com/2014/10/painted-kitchen-cabinets-backsplash.html
Simply amazing.
My godness you must be good at fractions. And mitering! Sheesh thats fine work, you really have a great eye. How do you even know the thin paint coat and sanding will look so good on the stone of the fireplace, like, what a chance, dont you second guess yourself and think what if I wreck my beautiful fireplace? Stunning outcome.
I love the new final look! The tiles were not quite right with the new white version, but now that they’re whitened, you’ve achieved perfection. You should be proud!
I live it!
Love
Fantastic job! Just shows you what a bit of imagination and skill can do. Love the picture above the fireplace too. Rounds it all off. Well done..
Marc http://www.thediyhubby.com
WOW!! Just WOW.
I was so impressed with the initial fireplace and I’m blown away by the improved version. You amaze me. Just amazing.
Uh. Maze. ING. Really. The before was fantastic and this is just spectacular as well.
LOVE the painted stone!!!!
Great call on the tile. Painting it took this fireplace to a whole new level. So impressed!
I concur with almost everybody else. Loved the first one, absolutely adore the second. Awesome job as usual!
Fabulous! The high contrast in the tiles needed to be neutralized and you came up with a very creative way to do it!
Great job! I gotta say though, the hearth apron is bothering me. It doesn’t look like something that would have been original to the fireplace. I think it’s too wide…it should only be as wide as the tile on the fireplace. Or just loose it altogether. I think you could make it look so much better in a Kristy kinda way. Don’t know what that would be…just know you can do it better!
I LOVE your new tile treatment! It looks so much better toned down with paint. 🙂
I am shocked that you painted the tile – but it worked. And it does look great. I’ve learned from you that it’s OK to go change something even after you’ve worked so hard on doing it the first time.
Visionary! (you) 🙂
Now that is one gorgeous fireplace and will work beautifully in your new, more tradition scheme. Bravo on the tile treatment. It made a world of difference to the feel of the fireplace. The new softness is so elegant. I certainly doubt I would have thought of it.The ‘before’ and ‘after’ photos really show the difference. I wonder how many people everywhere are hating their fireplace tile. I hope they all see your post.
wow Kristi what a great job. I was so impressed with how you made this from nothing the first time around now I love it even more. Amazing trim work and the stone…just beautiful. Another great job. Cheers
I support your choice,it is brilliant! For years it’s been done,”whitewashing”like ! To tone down a painted surface. I love the fresco look now ! Classic!
Wow! Geesh, Kristie! Now I want to go and redo my fireplace mantel with more trim or something. That mantel is absolutely stunning. Love! 🙂
Hi Kristi, I came across your fireplace project through a Pinterest link. I was so impressed with your design that with your permission I’d like to share it on our website along with a link back to this page. I added it to this page of our website:
http://www.victorianfireplaceshop.citymax.com/fireplace-blog.html
If you want me to take it down then I will, I just thought you did such an outstanding job and wanted to help bring more visitors to you.
That pattern and the trims gave a new texture to your fireplace and it looks beautiful.It’s really inspiring to know that you made this fireplace from scratch. I recently remodeled my home in Toronto and I hired Stylish Fireplaces to design and install two electric fireplaces. One in my living room and a small wall mount one in dining room. I’m gonna add trims like yours in it now.Thank you for the idea.
Hey Kristi! I have a quick question for you : I’ve been wanting to tone down my kitchen backslash mosaic tile that looks pretty much identical to the tile you started with, except that it is a combo of stone and glass. Do you think that doing something similar to what you did here would hold up in a kitchen? Did you use plain white latex paint?
I did just use plain latex. If I were doing this on a kitchen backsplash, I think I would test out using oil-based paint, or possibly doing the dry brush with latex and then putting some sort of clear protective coat over it. I’m not shy about painting stuff that other people would never think to paint, but I would definitely try out some different types of finishes and products to see what might work the best.
I just remembered that there’s a Martha Stewart craft paint that is supposed to work on glass and ceramic. It takes about 30 days (I think) to cure, but after that, it’s supposed to be permanent. I’d try that!
When you said you were painting the tile, I though, “Oh we know that didn’t work because she clearly installed Carrera marble instead, just gorgeous though.” I had to pick my chin up off the floor when I realized that was paint and not a completely new marble tile. I wanted to make a suggestion; I wondered if you thought of adding a paneled “chimney” above the mantel like the one in the inspiration photo? Not all fireplaces have the chimney projecting into the room but because your fireplace has so much projection it would help complete the illusion of a real fireplace. The paneled “chimney” would make a lovely backdrop for your mother’s stunning painting.
I feel stupid because I looked ahead and you were way ahead of me on the chimney idea! It really look beautiful.