Garage Workshop Progress & Plans
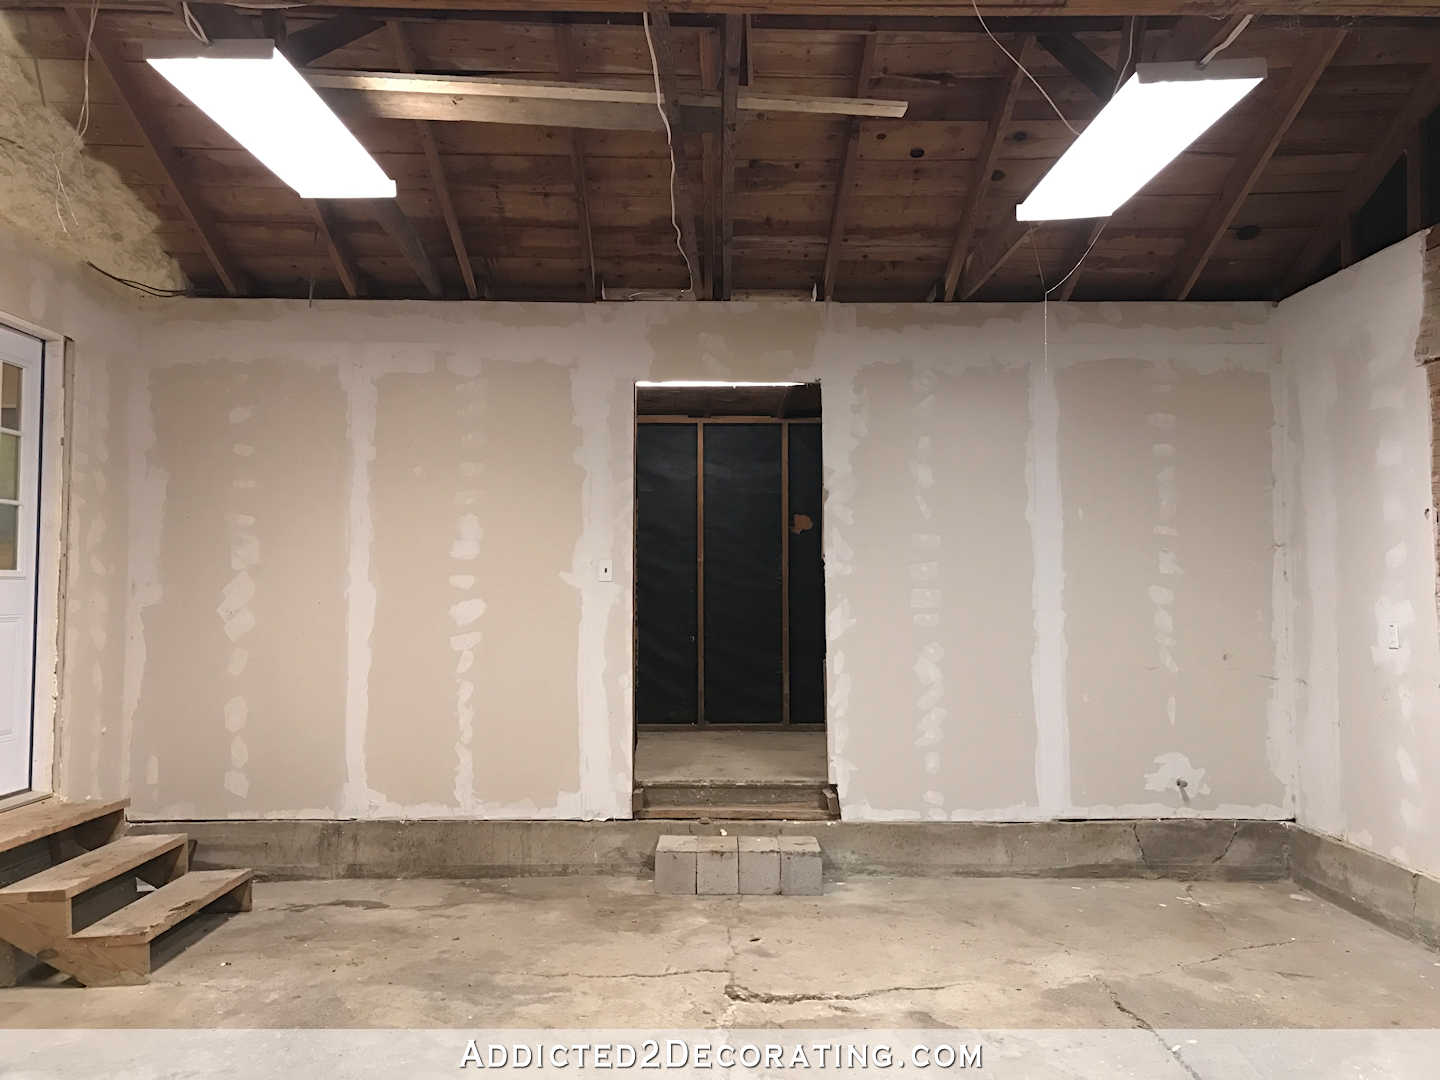
After a week-and-a-half, my garage still isn’t completely clean and organized. Those of you who said this project might take the whole three weeks of my father-in-law’s stay may have been right. 🙂 But quite a bit of progress has been made! All of that stuff that completely filled the garage before…

…has now been whittled down to a relatively small pile in the middle, and we’ve gotten the lower cabinets situated on the far wall.
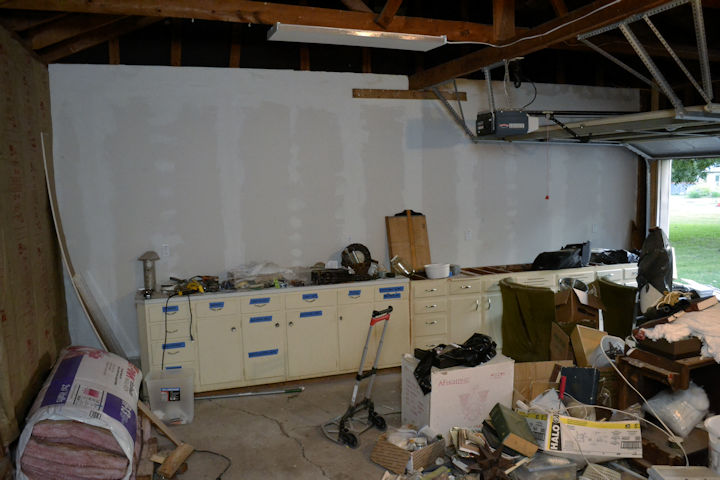
I’ve also got new insulation, new drywall, and four new outlets on that side of the garage.
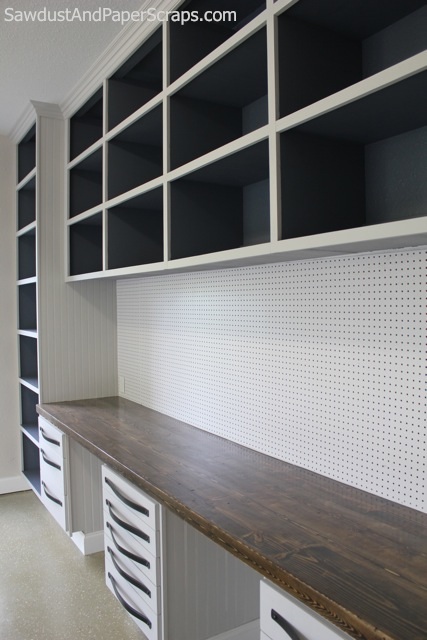
As I started organizing my tools and supplies in the cabinets (you can see my temporary blue painters tape labeling system 😀 ), I quickly realized that those cabinets that I’ve been planning on using in here (which were the original kitchen cabinets) may just have to be a temporary storage solution. I’ve had garages before, but that was before I had all kinds of tools to store, so this is really my first time to try to organize a workshop. I hadn’t realized just how much drawer storage is needed for all of those smaller tools and supplies that I’ve accumulated. In fact, I’d say that I could use almost that entire wall filled with nothing but small (shallow) drawers, and very few (if any) actual cabinets. I really like how the lower right side of this wall with the shallow drawer storage looks…
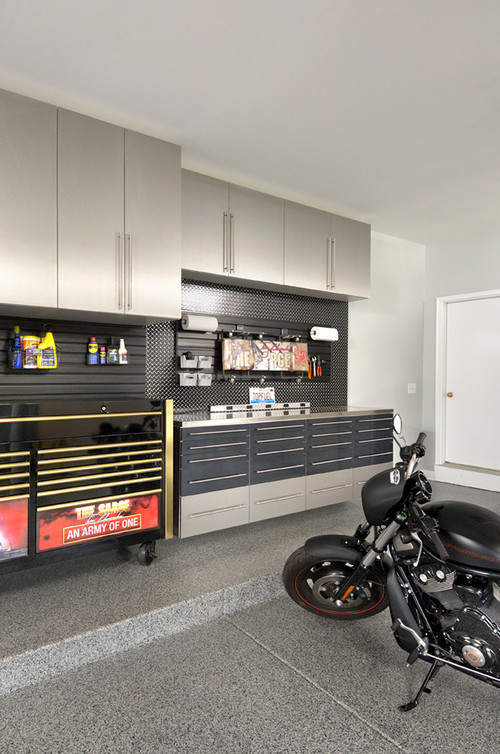 Contemporary Garage And Shed by Chicago Closet Designers and Professional Organizers Encore Garage
What I have now is way too heavy on the cabinet storage, which I really don’t need, and way too skimpy on the drawer storage. So now I’m planning on building something custom for the garage — and entire 21 feet of gloriously organized drawer storage for my tools and supplies. I think I’m more excited about this than I was about my kitchen! Is it strange that my kitchen has stock cabinets and my garage will have all custom built storage? I guess we can see where my priorities are. 😀
So with this new revelation that I’ll need all new custom-built storage, I’ve been planning. And dreaming. Like I said, this is my first time to design and organize a workshop, so I’m trying to think through and anticipate everything I’ll need in here, but I feel like a fish out of water with this. I don’t necessarily hide the fact (or apologize for the fact) that I tend to be a “form over function” kind of person. But with the garage, it has to be all about function, efficiency, and organization if the goal is to make my life easier and eliminate the chaos from inside my house.
You know how there are designers that specialize in kitchen design? I kind of wish there were designers who specialize in garage workshop design. I’d call one and schedule a consultation ASAP! But since I’ve never heard of such a person, I’m afraid I have to tackle this one on my own. Of course, I’m sure that some of you have workshops at your house, so you can let me know what has worked, what you’d change, and various things I need to think through before I start my serious planning and designing.
Here’s what I’m thinking so far:
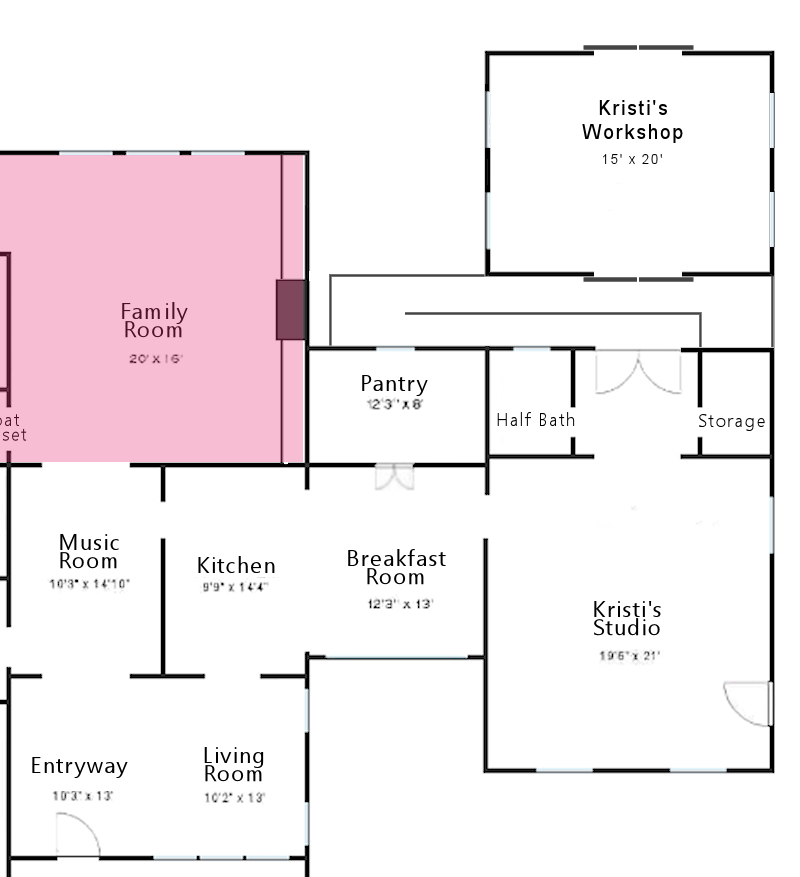
1. I really do want lower cabinets stretching along that entire far wall of the garage (about 21 feet) with mostly shallow drawer storage for things like tape measures, utility knives, wrenches, screwdrivers, drill bits, painting and dust masks, gloves, etc. I’d like a few deeper drawers for small power tools like my Dremel Multi-Max and such. And I might also add a couple of cabinets for things like my electrical tool bag.
2. On top of those lower cabinets that stretch along that entire wall, I want a solid surface worktop — an amazing 21 feet of uninterrupted countertop space. I’m actually thinking concrete again, because concrete countertops are virtually indestructible. And indestructible is certainly what I want in my workshop.
3. Above the countertop on that long wall, I’d like to install wall shelves specifically for things like paint cans, spray paint, etc. — things that I don’t use often, but that I want sitting on open shelves so that I know what I have.
4. On the wall to the left of the long wall (which would be the back wall of the garage), I want to hang a peg board. I had originally planned to put a peg board above the long cabinet, but I’m so short that reaching things on a peg board above the lower cabinets would be very inefficient. I’d have to have a ladder to reach almost everything on there except for the very lowest items. So I’ll put it to the left of the long worktop, and I’ll use that for things like extension cords, paint rollers, framing squares, hand saws, levels, etc.
5. And finally, in the middle of the garage, I’d like to build at least one (maybe two) work tables on locking casters for things like my miter saw and table saw. I think each large tool would need its own table, right? That way I’m not constantly having to move one over to use the other.
I won’t need storage for lawn and garden items in the garage. We have a shed in the back yard that’s completely empty and can be used for those things. So this will pretty much be exclusively for my house-related DIY tools and supplies.
What am I missing? What have I forgotten about? If you have a workshop, and you’ve got some tips to pass along to me as I plan the design and organization of my workshop, I’d love for you to share with me! What’s your favorite thing about your workshop? Or what do you wish you could change?

Addicted 2 Decorating is where I share my DIY and decorating journey as I remodel and decorate the 1948 fixer upper that my husband, Matt, and I bought in 2013. Matt has M.S. and is unable to do physical work, so I do the majority of the work on the house by myself. You can learn more about me here.
I don’t have a workshop, but I think a sink would be handy to wash out paint brushes, rags, and whatnot. Is that even possible?
I’m sure it’s possible, but I’m not sure if the budget will allow right now. But I’m sure that’s something I could always add in the future. I’d LOVE to have a sink specifically for washing out brushes and stuff!
I think I’ve seen people rig up one of those big plastic sinks, with a hose attached as the faucet and a drain leading outdoors.
Maybe one of those cute garden sinks that I’ve been seeing a lot of too.
I agree a sink is a must have and like Jacqueline said, one of those plastic utility sinks with hoses would work fine. Clean up during and after a project make a big difference. Also my brother recently posted on home talk about how he used a pair of tool cabinets for an island in his kitchen. He loves he shallow drawers. He has one drawer just for his knives and with the liner the knives don’t move around and dull by hitting each other.
You might consider putting a large rolling worktable in your garage. One that is a comfortable height for doing upholstery or refinishing small pieces of furniture. Also, don’t forget a shop vac to keep your beautiful garage clean.
P.S. will your car need a space? 🙂
I am hoping to keep one side clear enough so that I can park my car in there.
So glad you’re planning space for your car! I can’t tell you how many times I’ve been grateful for a garage to park in. Most of the time it’s the quickest way into the kitchen with groceries, too. Don’t give up that luxury, at all costs!
Maybe some kind of divider, so the work items (ie mess) don’t creep over to your parking spot. Nothing permanent, so you can use the spot for bigger projects. Just something to discouage the inevitable overflow.
They are garage and storage designers–check with your Home Depot to get pointed in the right direction. Various modular unit manufacturers have consultants, also.
Sounds heavenly Kristi! I was wondering about your car too!
I’ll be following this one closely. I am currently building a house and am formulating how to organize the garage. Did you see Yellow Brick Home’s post from yesterday? They just finished their garage!
Hi Kristi. Paint and such should be lower and very heavy duty, weight conscience shelving. If it fails due to weight, yuck!
Compressor/air hoses and vacuum system. Oh so very important for you! Perhaps a central vac with moving hookup.
Hope this helps.
The tool storage in my garage came from my brother. I find the drawers in his big red Craftsman chest to be just wonderful. Things on shelves tend to get messy and I am always wanting something at the back and have to unload stuff to get what I want. There are some really strong pull out shelf units you can get..I got some in chrome from Lowe’s that are really strong. I put them in my lower cabinets. They’re strong enough to Hold heavy stuff like circular saws, drills, etc. and it is much tidier to have things behind doors!
Hahahahaa! I wondered how long it would take…Garages and shops are a completely different animal than anything indoors! We actually salvaged some cabinets from a doctors office that was being renovated. There are all kinds of little drawers, file drawers (like magazine storage) that are perfect for power tools, deep drawers for sets of tools plus accessories, cabinets, etc. And the countertop was so badly damaged that we couldn’t salvage it, so, we had some old solid wood doors that had damage on one side…those became countertops! Then we have large open shelving on the opposite side of the workshop for storage of bins…my hubby keeps all of his plumbing accessories in one bin labeled PLUMBING, then keeps all of the painting brushes, rollers, trays, Floterol, in another bin labeled PAINTING, electrical stuff in a bin labeled ELECTRICAL, etc. We have our paint stored in a cabinet (a solid handmade one from an estate sale – we paid $10 for it!), chemicals are also in a closed cabinet with a lock. We have a huge old table from a school that we are putting wheels on, to make a rolling work table for the center of the workshop.
You may also want to consider having one of those hanging extension cord things. We have one and it is amazingly helpful. It will even stretch out of the shop for those projects (and days) that can be done outside.
Good luck!!!
Brilliant ideas, Skye! Cheers, Ardith
Don’t forget to have shelves for your lumber, my dad always has an area that has slots about 12 – 18″ apart up and down and the size of a sheet of plywood width and depth, he would use it to slide odd sized wood and keep things organized. It also would keep his lumber flat so it wouldn’t warp 🙂
I agree with the shelves or even pegs for the lumber. Mine is all in a big box and it get too full and hard to find things.
Maybe a rolling tool chest so you are not constantly jumping up and down for a frequently used tool. Small rolling stool-perfect for painting and sanding around objects. Fireproof locker for flammables.
Concrete counters might crack if you hammer something on them. Wood counters have a give that absorbs blows.
Pegboard everything possible.
Looking good!
We have found and swear by peg boards – hanging in site – easy to locate – paints and etc in your base cabinets
I have the peg over the counter as well as on the adjacent wall from the floor up. absolutely everything is on the pegboard. Screwdrivers, all small power tools etc. drill bits are on magnet strips. Screws are in jars attached to the underside of the upper shelf. Everything was being left out on my counter or work surfaces so putting them on the pegboard fixed that. Drawers were being left open and filling with sawdust. My next purchase is a wall hung vac system to try and cut down on the dust accumulation.
I too used old kitchen and bathroom cabinets from my parents remodel to organize my garage workshop. It is heavy on the cabinets and the has peg board above the counter, which I hate for the same reasons you already stated.
One thing I did right was remove some of the cabinet doors and make deep shelves low to the floor for large bulky tools and/or tools cases like my circular saw and my large Kreg jig case. Stuff like that you don’t want to life over your head to put away if you don’t have to. One thing I would *love* to build/add, is an extension table for table saw. Something to catch large pieces of wood or sheets of mdf as they slide through the saw. I am also on the lookout on Craigslist for an old file cabinet to organize spare/scrap wood: http://www.listotic.com/unusual-furniture-hacks/3/
That organization will make your work so much easier!
I would love to organize my garage better… That’s one of the rooms that just gets put on the back burner. It’s just so overwhelming but you’re inspiring me to take it on as my next project. Thanks! 🙂
Don’t forget about storage for your ladders and sheetrock lifter. I would think with your talent, you should be able to take the doors off the cabinets and figure out a way to make your own drawers that will fit it the space of the cabinet. Those cabinets were made of good wood, and you can use the wood from the doors and shelves to build your drawers. I would try to think about a design that uses what you have. That way, you will have fewer trips to HD. You only need the right kind of hardware for rails and rollers. I would get those metal things that you can slide labels in. I like the concrete idea, you already have the equipment to do it, so that is a cost saver. Think about what you have before you start your design. I would get the peg board up right away. I have seen garages where the owner hangs the items and then traces them with marker so that when they are removed their shape remains as a reminder as to where it goes. I think work spaces are the easiest thing to design and plan. I don’t know that I would worry too much about a place to spread out fabric. Your dining room can do double duty for that. A work table at the right height is a good idea for your upholstery projects. I would hope that while you spend time thinking and designing the garage, you still go ahead and finish what you have started in the house. Get the dining room, music room, foyer and bath finished. They start working on the garage. Blessings
I know someone who has lots of experience, and would be glad to share all that he knows with you………:^)
And yes, your saws need their own tables in the center….with a couple of roller stands to help you out!
Be sure to leave space (and electricity) for a drill press and a band saw, which you will shortly decide that you need :^)
Blessings,
J
My biggest issue in a workshop space reliant on portable tools is sawdust. It accumulates on open shelving and pegboard tools and drifts into areas where you don’t want dust (I’m in a basement). Resolving that will be an expensive proposition but is the reason my tools are stored in their own tool cases and I can drape plastic where needed. When I create sawdust I open two windows and set up a fan blowing out in one window. It helps a lot.
For a counter I would recommend wood–two 3/4 plywood. Lots of hammering and messing around with glue and stain mixing on a workshop countertop. Concrete would probably chip as wood does….but wood is easily replaced. Also consider if your portable tools are going on portable stands (mine are) and build your counter so those portable stands can slip right in and out of the way. If they aren’t being used you can drop down some plastic when you’re creating a lot of dust so they don’t get too dusty. I really like portable stands that can lock and then roll back out of the way.
I’m a pure amateur without your skills so I’m not sure what you’re finding as you get your tools organized. I found a lot of duplication and in the past few months finally carted off those duplicates to the Habitat for Humanity store that’s nearby…..they use the money they make to finance Habitat for Humanity construction in my area. It’s a donation and not a commissioned sale so make sure you pick up a donation form if you decide to go this route.
One of my successes was a roll around bin organizer with large and small bins supported by strong shelves. I organize my tape, nails, screws, drill bits (I have metal, concrete, wood, scrubbiest, etc.). I have one bin with all of the instruction manuals. This was pricey but a real success for me.
I think what you’re doing to create a dedicated workspace is great! Enjoy reading your posts!
Pretty sure one of the pages I follow listed a website that had workshop layouts. Jayscustomcreations had someone inquire about this- I think someone commented to go to garagejournal (dot) com and found a lot of diagrams from all over the world. 😀 might be worth a gander. 😀
Perhaps Santa can bring you an adjustable work table for Christmas. I don’t know the correct term but, it’s a table with a crank handle that allows you to raise or lower the table to whatever height you need. Makes it much easier to “load” your heavy object onto it at ground level, then raise it to work height.
I think it’s wonderful that you’re doing this! It will make your life so much less hectic to have the organization taken care of. There is a blog, sawdustgirl.com I believe, where Sandra has built her own workshop and works with others to design and build whatever they are working on. She is hard core with an amazing set of tools and projects, and like you, she has no problem tweaking things until they are how she really wants them. She might be able to give you some pointers or helpful info. The projects she has down and featured with others are pretty impressive!
Have you seen the beautiful, slick new paint on floor coverings for garages that they sell in the home improvement stores? They are in the paint isle, near the stains and decking improvement area.
Some beautiful finishes and colors. I was looking at them wondering if they could be used for a modern kitchen countertop application myself. Anyway, when it comes time to finish the garage floor, check them out.
We re-did our garage in 2014, it was a necessary pre-cursor to our giant kitchen renovation, actually. Our garage is smaller than yours (1.5 car, ~350 sqft), and we do actually store a car, bikes, and lawn equipment in it while it also serves as our laundry room. So maxing out space was an absolute necessity. We took out the old kitchen cabinets that were hanging (and were useless as storage), but kept our Craftsman tool chest with lots of drawers of different sizes for hand tools. Here’s what we added…
– A utility sink was an absolute necessity and not that expensive to add to the laundry/water heater plumbing.
– Hanging bike storage right near entrance makes them easy to access and use all the time.
– Low boy water heater so we could build a bar-height counter top (dedicated to a very messy espresso setup) over it. What can I say, my husband loves his espresso, but it’s VERY messy so we keep it all in the garage.
– Also added a lower (and longer ~5 or 6 feet long) wall mounted work surface (so garbage can on wheels can roll underneath it) which we mounted the vice directly on.
– Heavy duty wire shelving with clear plastic bins – lots of them – organized by topic. Gardening bin, plumbing bin, adhesives bin (why do we have so many kinds of glue!), tiling bin… I like being able to see what we have and the bins make it easy to (for example) bring all the plumbing stuff right to the project, finish the project, close the bin and put it back. With the tools in the drawers, I’m constantly running to/from what I’m working on to get yet another tool that I thought I’d need.
We debated epoxying the floor, but ended up not doing that since we spent as much as we were willing to at the time. Still may do it someday, though now my husband wants to install a car lift into the center of the garage that sits below the level of the rest of the concrete slab for working on vintage cars… oy!
I know our needs are probably different from yours, but hopefully that gives you some ideas! I don’t want to link spam, but I can send you a link to our before/after pics if you’re interested!
I’m actually in the same boat as you. I have a whole garage bay with my tools thrown into it and I haven’t made the time to set it up right yet. However, being a “function over form” guy, you know I have lots of ideas. 🙂
– First, I think they *do* have garage designers. Find one of those closet organizing companies (the ones that do the big walk-ins). They usually sell the garage cabinet systems like in the photo above and they probably have design staff that can help you piece together the right combo. In fact, I think The Container Store might sell and design those systems too.
– One thing I’ve found helpful is that instead of having a lot of shallow drawers and arranging hand tools like you would cutlery, I prefer to keep tools in bins or boxes alongside tools used for the same kind of work. For example, I have a “Wallboard/Spackle” box that contains all the tools and leftover supplies to do wallboard and another called “plumbing” and another called “tiling” and so on. When I want to work on wallboard in a room, I can take the whole wallboard bin into the house and return it when I’m done. It also provides a place to put tools when cleaning-up for the night inside the house so they don’t get scattered. Right now, I’m using cardboard banker’s boxes, but if I were going to build or buy something, I’d probably get the bins from the Ikea Trofast toybox system (which we have for my daughter) and build simple boxes with rails to hold them like the pine version they have: http://www.ikea.com/us/en/catalog/products/S89102095/ …or even put rails into your lower cabinets to hold the bins like pull-out drawers. You could also probably use sturdy Rubbermaid Bins with lids.
– I love the idea of the floating tables with locking casters and I want one too. I believe This Old House did a demo on how to build one and they probably have plans and videos on the website. I think if the sky was the limit, I’d build a small stand for each power tool (chop saw, table saw, router table, etc.) and then one big work table for the middle of the room like you might see in a sewing or craft room. It’d also be helpful if the table raised or lowered so you can work on larger pieces, but I don’t even know what kind of hardware you’d need for that without getting into hydraulics.
– Another piece I’d love to have is something to hold all the wood and wood scraps. I think TOH did a rolling thing that had a back area to hold sheet goods standing-up, slide-in slots on the end to hold long boards (like trim) and bins in the very front to hold small pieces. The whole thing was on rollers. It may have even served as the bench for the chop saw…I don’t recall exactly. I don’t have room for something like that, so I instead built a wood bin adjacent to my bench that serves a similar purpose and gets the wood off the floor, which can get damp in my garage.
– My grandfather was a finish carpenter and he always had these homemade benches (built of scrap wood) that he’d tote from job to job. They were about 2 feet high, about 3 feet long, had a handle hole cut in the top to pick it up, and a shelf underneath with 1×2 edges so you could toss a few tools in it when carrying stuff to and from a job site. They’re the perfect height to use two to hold a long board while you work on it (like painting), the perfect height for sawing boards, and the perfect height to use as a step-stool or even reach a ceiling in a house. I’ve also seen patterns for smaller ones that are more like the size of a milk crate. I think they were called crickets. A pair of sawhorses are a must, as well.
– Pull-down power – If you’re going to have a work table in the middle of the room, have some sort of retractable power source that hangs from the ceiling (they make lights designed to be used in automotive garages that have outlets on the light fixture when you pull it down). Sounds silly but it’s sometimes easier than having a cord across the floor.
– I’m not sure I’d do the concrete countertops. It’s not a kitchen and you shouldn’t have to worry about damaging your work surfaces. Most of my grandfather’s workbenches were made out of old solid oak doors. You could accidentally nail through your piece into the countertop, cut into the edge with a jigsaw, or or get paint on it or even intentionally screw a piece to the countertop to hold it still and it was okay. Clearly, solid doors are hard to find (he worked at a College), but a good solid piece of plywood or MDF should be plenty sufficient and if it gets too swiss-cheese looking, you can replace it cheaply or fill and paint it. I wouldn’t spend all the money and time on nice countertops for a workshop.
Anyway, those are my thoughts… 🙂
Love your ideas on organizing tools by job type. I did this too in my garage and it really helped organize the mess. All my paint supplies are in one bin, all my plumbing basics in another and so on…..
Kristi you may also want to look in to workstation brackets. I used some for a desk but they hold a ton of weight and then provide space below that you could store rolling tool carts. You could mount the counter at whatever height needed.
Here’s the Lumber Cart I was talking about. Maybe it wasn’t from TOH or maybe they borrowed it from Pinterest: https://s-media-cache-ak0.pinimg.com/736x/ef/be/22/efbe225d3e499981b967ba2a527c586b.jpg
There are all kinds of variations if you just google “lumber cart”.
I like this too:
https://s-media-cache-ak0.pinimg.com/236x/47/e5/59/47e5597f957d80d9790381e0a481e148.jpg
Here’s the rolling workbench/table:
http://www.thisoldhouse.com/toh/how-to/intro/0,,20390500,00.html
The stools my Grandfather had were like this:
http://media.askbuild.com/legacy/232-1.jpg
The “cricket” stools were something like this:
https://www.pinterest.com/pin/291608144597013337/
The pattern I saw was in the Reader’s Digest DIY book.
The Retractable power cords are like so:
http://www.amazon.com/Bayco-SL-800-Professional-Retractable-30-Foot/dp/B000256R9G
http://www.amazon.com/Alert-Stamping-920DT-Incandescent-Retractable/dp/B001W1RANQ/
Also, I love the suggestion someone made about a retractable air hose reel. However, I’ve seen them and they can get pricey after you’ve bought the extra hose (you’ll want to keep one portable). I’ve considered building a shelf/stool as a home for my pancake compressor (the same as yours) when it’s not in use or being used in the garage and a retractable hose reel would be awesome. Maybe even mounted from the ceiling like you see in pro shops.
So many neat ideas!
What are you planning on doing on the garage floor? What product is on the second picture you posted.
This : https://www.pinterest.com/pin/277745501995952976/
I hear ya about it being a paint to reach a peg board over a cabinet.
We did a pegboard on the side like you mentioned. Also used those hanging storage bins along one wall – http://www.homedepot.com/p/Triton-Products-LocBin-5-3-8-in-x-4-1-8-in-x-3-in-Stacking-Hanging-Interlocking-Polypropylene-Bin-in-Brown-24-Piece-3-210BR/205374738
best.things.ev.er.
Plenty of outlets!!! I would put a strip in along the back the of the work bench so you can plug in all along it. Then a pull down one in the center of the garage would be nice. A charging station for any battery packs. Also, plenty of light- and not just one fluorescent in the middle of the garage. A small wall painted as a chalkboard to do sketches and make calculations on, or write down a quick measurement or supply list (then take a pic on your way out- maybe next to the door where you can reach it easily. Cubbies- to hold paint cans, spray paint, rollers, tarps, etc (should be lower since paint fumes drop)… and a workstation for those times when you need to get on your laptop to look at plans or something online with a comfy stool. Rolling wood storage cart, rolling work tables for all of your saws, etc… Check out Ana White for ideas/plans for those. I would definitely stay away from concrete countertops if you’re going to be hammering on it. Wood is so much more forgiving. I’d go with an Ikea butcher block heavily varnished. Insulation! You’re in Texas so the garage must get pretty hot in summer and pretty chilly in winter or during your rainy season. You might need a small a/c-heater system. Maybe a screen door if you have a regular door that leads to the back yard- or even put one on going into the house so you can hear if Matt needs you (and you won’t feel so isolated). I would even get one of those screen doors for the overhead door to keep bugs out during the summer or at night when you’re working because you’re going to have awesome lighting and can work all hours. And don’t forget the good stuff- a small fridge for water or soda (or beer if you’re so inclined), nice blinds on the windows if there are any, a rubber mat for standing comfort in front of work bench. And remember, garage walls do NOT have to be painted white! Paint the floor or coat it with that two part system so it looks nice and can easily be hosed down. I also have a “to go” bag of basic tools that I use to bring my most-used tools into the house to do small things- screwdrivers, hammer, tape measure, pliers, wrenches, square, picture hanging paraphernalia, and an assortment of nails/screws/hooks. That way you’re not taking tools out and (not) putting them back every day. The key to organizing is you have to do it every.single.day. Every single time you use a tool, you have to put it back. Just like shop classes in school, where you have to return your tools to the tool cabinet when you’re finished using them or at the end of class OR your garage will look like it did last week- no matter how many cabinets or custom storage you have. 🙂
I love and agree with everything you said..!!
I think this old house magazine has good stuff on workshops. There was a special issue maybe last spring or summer (?). There are designers, I’m sure! This is big business these days. Check out woodworking and hobby mags/ sites for what you want.
You can keep all of those cabinets. Just buy those pullout accessories for kitchen cabinets from Home Depot.
Garages, even ones that are not workshops get surprisingly dirty. I would rethink the open storage in an effort to keep things cleaner. Large cabinets would still allow you to open double doors and gaze at your spray paint collection. Also, pegboard, need to consider how to keep the brushes & rollers dust/dirt free.
Retractable air hose reel would be on my list of needs. They are so handy for getting that cumbersome hose line out of the way, but still easy to use.
My husband uses his workshop for all kinds of projects. He bought a 15 ft laminated counter from HD for $10. If you’re open to something besides concrete.
The magazine “The Family Handyman” always has great ideas about garage and workshop storage, and they give directions on how to diy storage benches, etc. Check out their website and see if you find ideas. =]
Yup, my suggestion exactly! Try here: http://www.familyhandyman.com/workshop/storage
Kristi, it sounds like this project is more of a workshop than a garage. I’m going to assume that in Texas, you can leave the car in the driveway year round? I think that with the tool collection that you have, which is probably the envy of about every handyman in your town, that you have your priorities set right on how to use your garage.
I have one workspace designated for me in the garage, and the top is metal and I love it! It is attractive, as well as indestructible to chemicals, paint, etc. It seems if you could purchase thin sheets of metal to wrap on the surface tops, that would be much easier and lighter than cement. I have even seen metal counter tops in the kitchen in a very old house of a friend of mine. I always thought those were cool as well!
If it were me, I’d skip most/all of the drawers and enclosed space and use open shelving for larger tools and peg boards or similar to hang all the little things in open view. That way when you need to grab something, you don’t have to look for it first. Of course I’d want things labeled well or have another system so that things were guaranteed to be put back where they belonged so you’d have consistency. Open storage is the epitome of function over form!
Hi Kristi ; You are in luck. There is such a place that designs garages. it is called
http://www.garageliving.com They have great before and after pictures and lots of ideas.
Hope this helps. Good Luck, can’t wait to see it
Hi Kristi. Garage Living provides custom fitted garage cabinetry and other storage solutions to keep you organized and to maximize storage space. Let us know if we can help with anything!
Hi Kristi: You are in luck it is called http://www.garageliving.com
I like all your ideas. My husband uses his pegboard for his small, often used tools. He has outlined each one so everything gets put back in its place.
Also, for your garden shed have you seen the old file cabinet turned into garden tool storage?
Vintage 1970’s garage here with room for 1.5 cars, water heater, and upright freezer. Ours came with attic access, and built-on shelves. We currently have no room for me to paint anything out there from tool mess.
Dedicated power outlets and plenty of them.
Dedicated battery charging station?
Excellent lighting so you can spot the problem spots quickly.
A painting booth- temporary type?
Slop sink/shop sink for cleaning up
Lowes, Home Depot, and Container Store all offer garage organizer folks.
You’ll want to hunt the Family Handyman articles online.
Also, Adam Savage(Mythbusters)has organized his workshop and created his own solutions.
Lowes rolling cart 3-ways
Paint shelf for 117 spray cans
cordless drill holsters
Sliding wall of tools
modular pegboard system
What’s important in organizing a shop?
swinging storage
Light-duty Folding work table
I have to agree with all the people that say concrete is too brittle for tops that you are going to bash things on. We considered it too, but eventually made thick wooden tops out of scaffolding planks, which were ridiculously cheap, and pretty easy with a borrowed biscuit joiner. It would probably have been easier to stick two sheets of plywood together though, and no worries about cracking then.
We have big shelves under the workbenches where I store bulky items, and am planning storage bins to corral related items as many have suggested above.
For smaller things, like drillbits and screws we are going to use linbins (http://www.linbins.com/) I can’t seem to find a US site for them, but can’t believe that they aren’t available, perhaps they go by another name in the states? Anyway, they are great as they hang on the wall but can be easily unhooked to take to wherever you are working.
Magnetic strips like you use in the kitchen are handy to hang screwdrivers and such on. Mount them just over the lower cabinets. Tools should be easy to reach and visible. Saves drawer space for other necessities. Plenty of electrical outlets. Workspace on wheels. You’ll be reorganizing and arranging constantly as your workshop and talent grows.
Hi Kristie, my husband had a high garage with many tools, wood working, automotive, garden as he has many interests. Peg board was great for hanging small tools so you know where they are. He had a rolling bench that fit in along the work bench with his radial arm in between. He said greatest thing he owned. Used it inside & out. Repurpose your cabinets. Take off the front & build your drawers & have some open shelving. Don’t go fancy on your top as they will soon be stained with paint & stuff. 2×4 tops are sturdy. & im sure cheaper than concrete. Used them over 20 years. Get yourself a vise too. It comes in handy @ times. Hang a space for spare lumber. Build a bin for long things such as shovels, racks etc. I know you have the decorative gene to pretty it up but main thing is for it to be neat, functional & organized. You can go broke with all the storage gadgets they sell , but you’re so smart I’m sure you can figure out how to do it on the cheap side.
We purchased used pallet racks (same type of shelving that Home Depot & Lowes use- incredibly sturdy and strong!). The uprights come in various heights. For upper and lower shelves we purchase the wire rack shelves. We planned to use a shelf (about 36 inches high) as a workbench surface, so we cut 2×12’s as that work surface. One of our shelf units is 2 ft deep and the other is 3 ft deep. We have pegboard for hanging tools on the 2 ft deep shelf unit, we’re both tall, so reaching over the work surface for screwdriver is no problem. Power tools are in cases on the shelf below the work bench, direct lighting hangs above and an attached a power strip to the front of the unit is always handy. Used pallet racks were more budget friendly (and sturdy) than shelving found even at the big box stores. Lots of fun to organize, good luck!!
In my workshop, I have found open shelving to be the devil. Not to be dramatic or anything. But if I were custom-building, I would do a combination of all sorts of drawers and cabinets – fairly shallow cabinets so gallons of paint wouldn’t get lost three deep, but so basically EVERYTHING is enclosed. Now, if you’ll excuse me, I have to go clean sawdust from between my quart cans. 🙂
Wow, great progress on the garage!. I can certainly understand how you would want a garage that has a place for everything and everything in its place however with all your ideas and pending projects on the inside I’m thinking that using the cabinets you have and adding work tables, etc to make it functional for you and to actually use the space for awhile while you finish the inside would be a good idea. That way you would be able to focus on the inside while having a chance to “learn” and figure out exactly what you ultimately want in that garage. Don’t get me wrong I’m a person who adores organized spaces just looking at it from a practical standpoint. You have already made HUGE progress in the garage just getting it to the point of being an actual space to work. I vote for taking the garage project slow because it’s ultimately going to be where you create all the beautiful things you come up with. It’s an important space for you, give yourself a chance to spend some time in there creating and the perfect plan will come together.
Have you considered tall storage, for things like ladders, unless you’re planning on hanging them. I think a must is a lumber rack and storage bin, if you have the room. Somewhere for all that left over or waiting to be used timber to go. When I say storage bin I’m thinking of something similar to the raised garden bed you made, only lower to the ground and with higher sides. Great for all those smaller pieces of timber.
Check out Ron Paulk on YouTube. He has incredibly detailed videos on designing workshop setups and fitting out mobile workshops. He is an organisation guru.
Definitely visit Ron Paulk. His workbench is my winter project.
Check out “Sawdust Girl” … Her blog details the workshop she designed. Very elaborate, it even has a vacuum system for sawdust! Maybe you will find a few ideas there. Also, Sarah at “The Ugly Duckling House” organized her garage awhile back. Nothing elaborate, but again maybe she has some ideas that will make sense for you. Good luck!
If I were you I’d put up the peg board first and then give the cabinets another thought. You may need a lot less drawer space than you think after that and I second the suggestion someone made before that before you throw away all those cabinets and start making custom ones I’d see what I could do to retrofit them with pullouts and maybe even replace a few of them with drawer cabinets from your local re-store place (if you have one) you know the places that take used construction stuff and resell it.
I have lots of lots of tools and a two car garage that we both want to park in and one pegboard system a couple shelves for paint and the larger bulkier power tools and a craftsman workbench with all drawers has been all I’ve needed.
p.s. I’m short too and find that I have very limited reach on my pegboard, but can still get to it over the cabinets. Make sure your paint shelves are high enough that you don’t bang your head into them.
I keep thinking of other things. Just remember a key to good organization is to have things where you will use them so if you have to stop what you’re doing at the work bench and walk to the other side of the garage everytime you need a tool it’s going to get old really fast and things will migrate to where you use them most and not get put away so think about how you will use the space before you just put storage where it will fit best.
Have you given any thought about the storage room @ the back of the garage?
How do you keep up with so many projects going at one time ?
Woodsmithshop.com has plans and video for a great work table. Track lights a real cheap at our Habitat store. Check out the u tube channels for “woodworking”. There are LOTS of great ideas for power tool cabinets and shop organization.
In Texas you don’t have to worry about paint freezing but in Idaho its a great way to make your paint solid so you can throw gallons of it away. Lol
Just another comment about checking out Sawdust Girl. Here’s a couple of old posts from her blog including one about her own garage workshop cabinets and a guest post about garage workshop organization with some great ideas.
https://sawdustgirl.com/2012/03/28/garage-workshop-cabinets/
https://sawdustgirl.com/2013/09/25/workshop-organization-ideas/
How fun! My husband and I just built a new work shed. It took awhile to get everything set up. We really thought through what exactly we would be doing in there to come up with the layout. We made sure to keep all of our tools at arms reach while working at the work bench. One thing that popped into my head while reading about your concrete work bench… I was just working on making rivets out of nails, so I was doing a ton of bashing on our wood workbench. Do you think concrete would hold up to random acts of violence on projects here and there? I have beat the crap out of the wood counter, but a board or two can easily get swapped out if I get too crazy on it 🙂
HANG THE TOOLS on pegboards, don’t stash them into drawers! That’s my workshop dream, to have rows of screwdrivers, rows of hammers etc, and just look at them and pick the right one! But that’s subjective I guess.
The objective advice is that if you live with your garaga workspace for a while you’ll be able to figure out what works and what doesn’t. So you can compare how easy it is to get the right screwdriver from a drawer and compere it to getting the right hammer from the wall.
As for height issues, nobody says you have to make a pegboard behind your bench the same dimensions other people do – you might as well make a short one that gets what – one line of tools? so be it – and fill the space over the bences with shelves, hanging lower than most people’s since they don’t bother you. Since you are the builder you can do whatever you want!
Oh, Kristie. You are in for some fun. We built a garage specifically as a workshop with no prior workshop experience. My husband is a home improvement contractor, so most of his work is on site. When we started our furniture business we worked outside so the idea of a dedicated space was VERY appealing. I can tell you that you do need a permanent work table and a permanent spot for your mitre saw and table saw( those suckers are HEAVY). You will find that it will take some time( maybe months) before you come to satisfactory tool arrangement. Don’t be afraid to over build on shelves, drawers and hanging space. You will fill it up!! I look forward to seeing what you come up with in the coming months,Jeri
We have an old set of kitchen cabinets in the garage. They were free.
If I was building from scratch or replacing those cabinets I would do this –
http://jayscustomcreations.com/category/woodworking-2/my-shop/
The built in miter station with full support and the stop blocks and integrated measuring would be fantastic.
Have fun!
Oops. This is the direct link – http://jayscustomcreations.com/2015/03/miter-saw-station-storage-boxes-and-drawer-fronts/
Ok, the amount of items stored there is a joke, BUT THE LOOKS!!! (Plus, it could fit any other amount of items). http://www.abeautifulmess.com/2014/06/workshop-space-organization.html
I really like the idea of a garage not looking like one!
In my workshop I like open pegboard behind my workbench and a moveable workbench is a must. Then I can work from either side of it plus I built it 1″ lower than the table saw/miter saw so it can double as an out feed table if I’m working with long material. I have drawers and I’m not a fan I find myself using open shelves and the pegboard most of all.