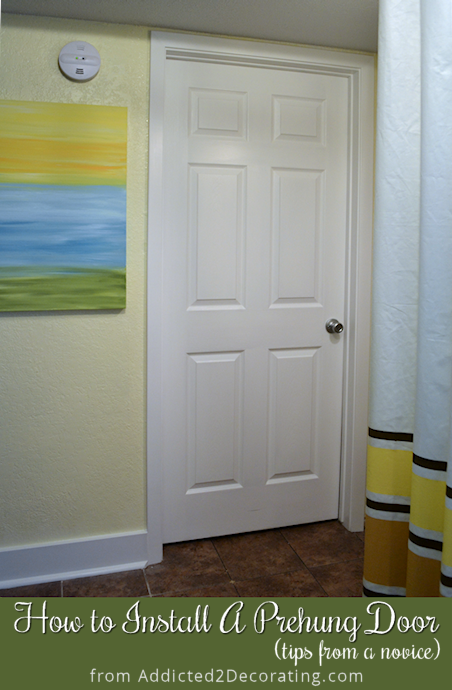
How To Install A Prehung Door — Tips From A Novice
Yep, that’s right…I’ve installed my very first door, so now I think I’m a pro and have decided to teach y’all how to install a prehung door. 😀 Well, okay…not quite. But I did just install my very first prehung door all by myself, and I learned some tips along the way that I want to pass on to you.
Before I installed my door, I went to YouTube and watched several “how to” videos on the topic. Then when I went to Home Depot, I asked the man there what tips he would give this first-timer. All of them had pretty much the same things to say.
I ended up doing the opposite.
So, here are my tips-from-a-novice on how to install a prehung door. I’m sure if a contractor read this info, he’d be rolling his eyes at me, but as a determined DIYer who does all of my projects alone, these are the things that I found worked best for me.
1. Keep the door in the frame when installing the door.
This is absolutely the biggest point on which I disagree with the pros. Every single one of them said to remove the door before installing the frame. Okay, I tried that. With the door removed, the frame becomes the flippity floppity thing that I couldn’t keep upright by myself, so I certainly couldn’t keep it plumb, or level, or square, or any of those other important things. It was a mess.
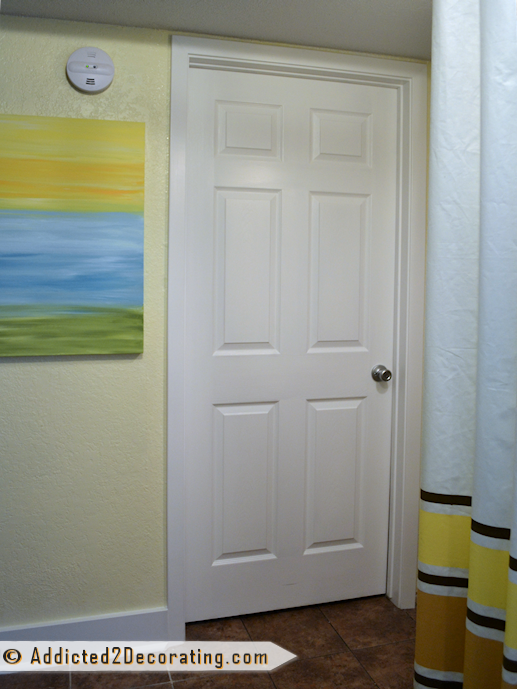
As soon as I put the door back in, the frame remained rigid and perfectly square. And best of all, I KNEW that the door would fit after it was installed, because it was never removed during installation!
2. Shove the frame all the way against one side of the opening.
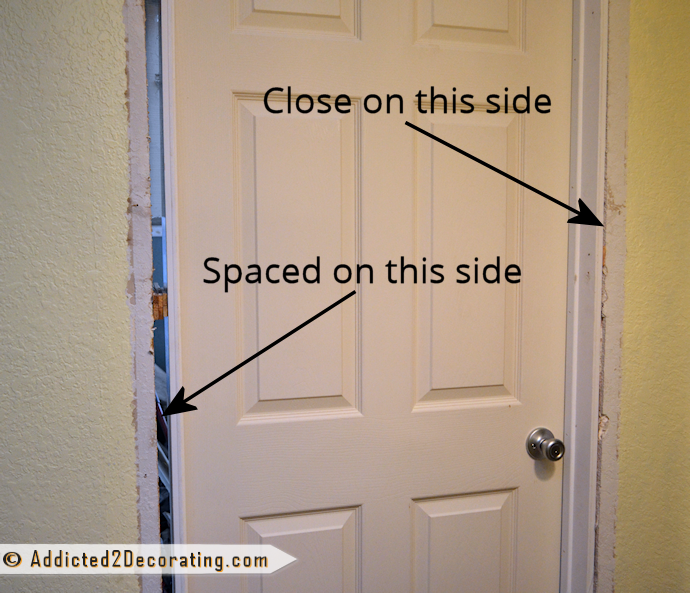
This is something else that the “pros” didn’t do. They all got the door nice and centered in the opening, using shims on each side to center the door.
Well, I found that nearly impossible to do by myself. So I ended up shoving the door frame all the way to the right and nailing that side first. I did have to use one shim at the bottom just to get it perfectly level, but that was so much easier than using shims all up and down that side to try to center the frame in the opening. That left me with a very wide space on the other side, but I just used shims in about four different places to fill it in and nail it into the 2″ x 4″.
And that leads me to tip #3…
3. Don’t freak out about big gaps.
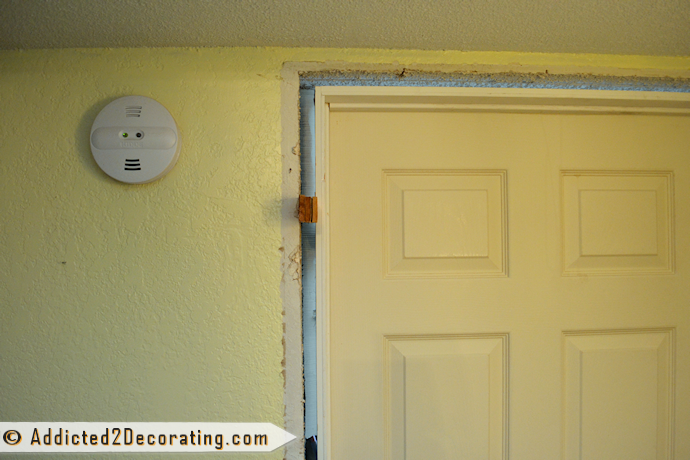
I’ll admit, when I was left with this big, massive space on the left side of the door frame (which was bigger than it looks in this picture), I initially had my doubts that this door would end up looking decent. But there was nothing to worry about! The trim covered it all up, and made the finished product look great! And if your gap is even bigger, then just buy wider trim!
Seriously, it’s no big deal at all. I had to stack six shims to get enough thickness to fill this space, and I did that in about four different places on this side of the door. That’s a lot of shims! But it all worked out, and with the trim on, nobody would be able to tell.
So have you ever installed a prehung door? What tips would you give? And did you do it the “pro” way, by removing the door first? Or did you do it my way by keeping the door in the frame?
Share your door installation secrets!

Addicted 2 Decorating is where I share my DIY and decorating journey as I remodel and decorate the 1948 fixer upper that my husband, Matt, and I bought in 2013. Matt has M.S. and is unable to do physical work, so I do the majority of the work on the house by myself. You can learn more about me here.


Great job! So glad you left the door in place, I am still trying to figure out why in the world someone would take the door out. I have helped hang doors before and never once did we remove the door from the frame. …
Oh good, so it’s not just me! I don’t know why they would do it that way either. I certainly couldn’t manage that frame without the door holding it all together and square.
I’ve always wanted to tackle this and you just gave me the confidence to do it. Thanks for the great tutorial. Loved it!
Makes perfect sense! Door looks great..Men at Home Depot kill me with the bull they give out…most of the time, I wind up having ot take a different path to make something work correctly…occasionally, they can be helpful..but usually not..
Wow! You did a great job!
I’ve only installed one pre-hung door, and used this kit:
http://www.thequickdoorhanger.com/
and my husband and I worked on it together. I thought it was fairly easy, but have never installed one the traditional way, so I don’t have anything to compare it to.
You installed the door alone- you rock!
We used the quick hang door tool listed above and absolutely loved it. Would not consider hanging another door without it!
Looks great! But I’m wondering how five-foot Kristi got that door inside and in place all by herself to begin with. I am amazed at some of the things you accomplish with no help.
I’m wondering this too!!! You’ll have to share how you got it home and wrestled it in place. Maybe we need Matt to take a photo or two of you “on the job.”
I have a lot of determination and a very strong will. 🙂 Oh, and those doors really aren’t heavy at all. They’re hollow. 😀
Great job. My only comment would be that I would have shoved it up against the wall on the hinge side and shimmed the heck out of the doorknob side. I worry a bit about it going wonky later with the shims on the hinge side. In any case, you won’t be around for that, so no worries!
Very good point, David! I remember wondering which side should be flush against the opening, and for some reason, I decided upon the door handle side. Now I can’t remember my reasoning, but your reasoning most certainly makes more sense!! I’ll keep that in mind for the next one. I have two more to install. 🙂
Yay!! Great job! I wish my husband had taken your advice. Haha! Or had thought about that when he installed a couple of doors in my ‘office’ in our first home.
Wow! You go girl! It looks great and thinks for the tips! Have a great weekend.
Leslie
Ha ha, my hubby is a “pro” and would have a fit if I tried to leave the door in (yep, I can hang a door, I come from a long line of tradesmen!) but I say go with what works because at the end of the day, your door looks GREAT and ‘guidelines’ are really only suggestions 🙂 But then I feel that way about almost any project I take on, lol…
Please don’t show your hubby my post. 🙂 Or maybe you SHOULD show him just so he can have a good laugh. 😀
I say whatever works, and whatever works the easiest is the way to go! I have to do some projects when hubby isn’t home to avoid those differences of opinion. I’ll trace something to cut out a piece of wood- he wants to measure and measure and then measure again. I already have it painted and installed while he’s putting the tape measure away! 😉
Ha! I hear you on the “differences of opinion.” Matt and I simply CANNOT work on projects together. It’s the only time we ever fight. 🙂
Wow lady, your really are a helpful blogger. I will be installing some sort of pre-hung door in my kitchen pantry and i will definitely refer to your tips. Keep up the good work.
Just out of curiousity… was this a door as in your front door to your home? Or was this like an indoor (bathroom, bedroom) door?
This is an interior door…our bedroom door. I’d never trust myself to install an exterior door. Some things are best left to the pros. 🙂
Hahah okay I’m glad I asked!! We need a new front door BAD and I was thinking, “that’s a really big gap for an extrerior door! Even if you cover it, what about the draft?!” Good to know. Thanks!
I think for exterior doors, you have to fill in the gaps with that spray foam stuff first. Not sure though. 🙂 I’m sure there are plenty of YouTube videos about it. Although, I watched YouTube videos on how to install interior doors, and then did just the opposite! 😀 Sometimes I think these projects are all about doing what feels right and what works for your home…as long as building codes are being observed.
That’s marvelous. I love it when women develop their own systems for what works well. You absolutely did all the right things. One concern: I notice you have what looks like continuous flooring, but if someone has a threshold, it would be centered in the opening, and a door shimmed to one side might not look centered over the threshold. No one wants to move a threshold!
Along these lines, I blogged about the girls’ way to paint a front door.
http://diyhomestagingtips.blogspot.com/2010/11/girls-guide-to-painting-your-front-door.html
Aahhh, a very good point, indeed! I’m sure there are a few other circumstances where a person would definitely want to center the door. One other I though about was if a door was located on a very narrow wall, like a pantry door in a kitchen. A door like that being off center by a couple of inches might be noticeable.
There is an even easier way to install a prehung door. If you can get split jamb doors with preinstalled casing trim (jamb comes apart at the stop), Lowes sells them in certain parts of the country, that has the casing (trim) already installed, all you have to do is remove the split jamb up to the stop and hang the door by only nailing through the casing. No shimming required!- It makes the whole process go about 3 times faster. Let alone you don’t have to cut any trim at 45 degrees etc. Here is a link to how to do it and what they look like:
http://www.finehomebuilding.com/how-to/departments/building-skills/hang-a-split-jamb-door.aspx
I laughed out loud at the part “if the gap is bigger use bigger trim” that is my kind of DIY 🙂
Haha! Yep, my kind too, along with “make it up as you go along.” 😀
Hello,
Ladies, there is a very easy way to hang an interior door that I found after doing some research of my own when redecorating my condo. You should be able to pick these up from any Home Depot, which is where I got mine. They are called E-Z-Hang and they can be found in the door section of Home Depot. This is the link that will show a video tutorial of how to use them to install the door. They are about $4.99 per set and you need one set for each door.
http://www.ezhangdoor.com/home
Great article, some great information and advice.
I’m hanging my first interior door in probably 2 decades so I figured to bone up on the technique. Found lots of helpful info. First key: do the hinge side first. The reason the pros remove the door and you did not find that necessary is that solid wood doors are HEAVY! If you thought the jamb without the door being flippity floppity was a problem, imagine what fun it would be to try and hold the jamb in place with a heavy door swinging back and forth pulling at it … while you are making adjustments to the shims from both sides at once, while holding the level and holding the nail in one hand and the hammer in the other.
You do want the hinge side as solid as possible, it is doing ALL the work supporting the door. I don’t think I’d want to trust long screws through a wide gap of shims on a solid door. Not likely a big problem with a hollow core door though.
For installing any kind of Pre-hung door, Interior or Exterior just use the brackets they sell at home depot in the interior door aisle. No shimming needed and is the same cost as a pack of shims. There site has the instructional video for using them, its http://thequickdoorhanger.com/installinginteriordoor there worth every penny!
Thanks for the great tips. Appreciate the practicality and simpleness of your method. I’ve been watching lots of howto’s already on YouTube as I’m finishing up my basement alone with my wife and none gave any tips for novices on how to start on, as if they are just making these videos just to get advertisements and making money with no regard of sharing knowledge and experiences to others and doesn’t care what the novice carpenter will get into and what to expect, thinking the ones watching their videos are already pros.
Again thanks for the tips as I might try your method first when I get to the part of hanging my prehung doors.
Harold
Good job by the way. Like I always said, there is always a way and you found one. Next time you install a pre-hung interior door, have one side cased while still framed and square. This will also help you balance the gap and be able to nail it in place by tacking the casing to the wall. Then reinforce the jambs using screws to the 2 x 4 liners. Trim the other side and your done. That’s how I do it.
I purchased a door hing kit called EZHANG from Lowes that came with 7 brackets. I really thought it was the easiest door I ever installed. Here is their video http://www.ezhangdoor.com
@Kristi Linauer
I have purchased a prehung door last week , but I did not understand how to install a prehung door i read your post and may it will help me to install.
Nice job. The only problem I see on the door is the fit to the stop towards the bottom of the door. It seems to gap a bit. This is because you fastenened directly to the king stud, which is never perfectly level up or sideways. Also if the king stud warps even more as the years go by you can get more problems with the fit of the door on the stop and your reveals.
The reason the pros tell you to remove the door is so that you can get the hinge side shimmed and level without the door in the way. If you hang the hinge side slightly higher than the lock side, you have play to adjust for a perfect reveal both on top and lock side. Basically this is the same way as the EZ hanger work you float the door in a level state. While I like the EZ hangers I would still shim the lock side above and below the lock, and at each hinge for long term stability. Especially with kids around running and slamming doors at play.
Hi Ladies,
I think it’s awesome that so many women are becoming interested in doing work like this on their own. I do have to say that I think pro carpenters are just like pro athletes in a way; they are highly skilled individuals who we can learn from. If you want to be a better athlete, play with someone better than you; listen to pro carpenters, there are reasons why they do things in certain ways. There’s something to be said for taking pride in a job we do right.
I really like the fact that the author is helping women to know there’s no need to feel intimidated by “men’s work.” In fact women are so detail oriented for one thing, we’re prized in areas like finish carpentry.
Great job coincidentally. Like I generally said, there is dependably a way and you discovered one. Next time you introduce a pre-hung inside entryway, have one side cased while still surrounded and square. This will likewise offer you some assistance with balancing the crevice and have the capacity to nail it set up by attaching the packaging to the divider. At that point strengthen the supports utilizing screws to the 2 x 4 liners. Trim the other side and your done. That is the means by which I do it.
Leave the door in, take it out — two disparate schools of thought. But every craftsman I’ve ever talked with leaves it in place whilst fitting the jambs. And the reason to shim both sides of the jamb (hinge and latch) is because not everyone is as lucky as you were to have a door opening that was close-to-size; sometimes the trim will NOT cover the gap (ask me how I know this…) if you hang the jamb flush to one side with no shims!
And yes, you’re correct: next time fasten down the hinge jamb first (whether or not you have to shim it).
Oh, one additional trick, something you can still do after the fact: replace the middle screw on the top hinge with a longer screw (you’ll likely need about a 3″ one) that will go through the shims into the trimmer stud — that will go a long ways toward preventing the door from sagging over time.