Diamond-Tufted Upholstered Headboard
I love…LOVE…a diamond-tufted upholstered headboard. I like them in just about any shape and size. I’m just a sucker for diamond tufting.
 via The Paris Apartment, queen size $2200
But that deep tufting can be quite intimidating for some DIYers. But it shouldn’t be! Once you learn the process, you’ll wonder who in their right mind would ever pay such an extravagant price for a headboard. So let me show you how to save a small fortune.
First of all, you’ll need to determine the size of your headboard. The one I made for Gwen was a king size, so I made it 80″ wide x 34″ high. This allowed for a couple of inches to tuck behind the mattress at the bottom.
Once you’ve determined the finished size you want, go to Home Depot or Lowe’s and purchase a piece of 1/2″ MDF, and have them cut it to size for you.
You’ll also need:
- a bowl or small plate (optional);
- a Sharpie marker;
- a jigsaw (optional);
- an electric meat carving knife;
- a tape measure;
- a yard stick or other long straight edge for marking lines;
- staple gun and staples;
- your choice of fabric, large enough to cover the headboard size, plus about 18 inches on each side;
- 2″ foam, large enough to cover the MDF (this can be pieced together, if necessary);
- hi-loft polyester batting, enough for at least two layers to cover the MDF;
- adhesive for the foam (I prefer spray adhesive, although the fumes are quite noxious, so it has to be used outside, or you need to wear a protective mask);
- buttons…lots and lots of buttons (Gwen’s king size headboard required 57 buttons, and I used half ball cover buttons and covered them in the same fabric as the headboard. It’s a pain, but just go ahead and prepare these in advance, according to the instructions on the package.)
- one package of thin nylon or polyester upholstery/roman shade cord (can be found in the upholstery section at JoAnn Fabrics or other fabric stores);
- a large-eye upholstery or embroidery needle; and
- an electric drill with 3/8″ drill bit.
Don’t be frightened by the list! I promise…you can do this!!
To start, you will need to place your MDF on some support where both the top and the bottom can be accessed. Workhorses would be preferable. I used two chairs.

This step is optional: On the two top corners of the headboard, use a small bowl or plate as a template to round the corners.

Use a jigsaw to trim along the pencil mark to create rounded corners. Remove rough edges with sandpaper.

Now adhere the 2″ foam to the MDF using your choice of adhesive. I prefer spray adhesive, but if you use it indoors, be sure that you use a protective mask, and that all furry and feathered creatures are in another room protected from the fumes.

You may need to piece the foam to cover the entire piece of MDF. That’s not a problem at all. Just be sure to get the pieces butted against each other as smoothly and evenly as possible. Trim any excess foam with your electric meat carving knife.

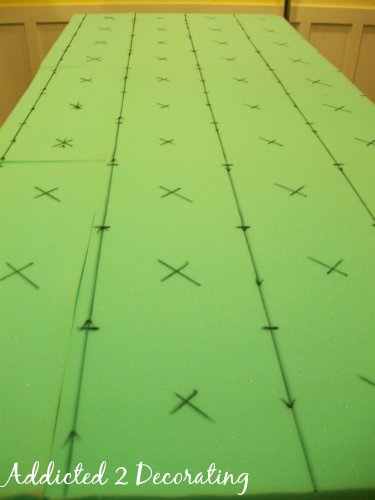
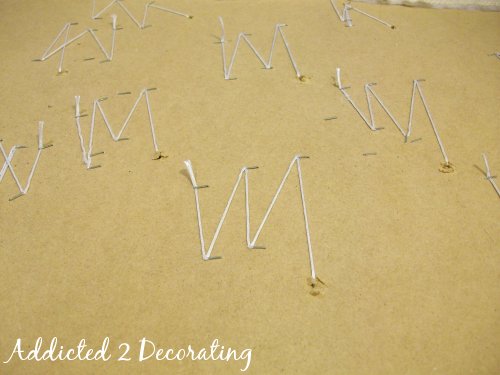
Now we need to mark where our buttons will go:
Starting from the top of the headboard, place a mark at 8″, 16″, and 24″. Do this in several places so that you can use those marks as guides to draw horizontal lines. Then use your yardstick or straight edge to create horizontal straight lines all the way across the width of the headboard.

Find the center of the headboard, and place a mark at the center of each horizontal line. Use your tape measure, and beginning from the center marks, place a mark every 8 inches.

Now use your straight edge, and place diagonally between the marks you just made at 8″ intervals. This will show you where the buttons need to be placed on the diagonal.

Once you’ve got the whole headboard marked, it should look something like this. The top of the headboard is the long edge on the right side of the picture.
Next, use your drill to drill a hole through the foam and the MDF. Warning!! DO NOT go slowly on this. If you begin to drill slowly, the drill bit will grab the foam and rip it to shreds. You want to place the drill bit on the button mark, press down all the way so that you can feel the MDF, and then at FULL SPEED, drill very quickly through the foam and the MDF.

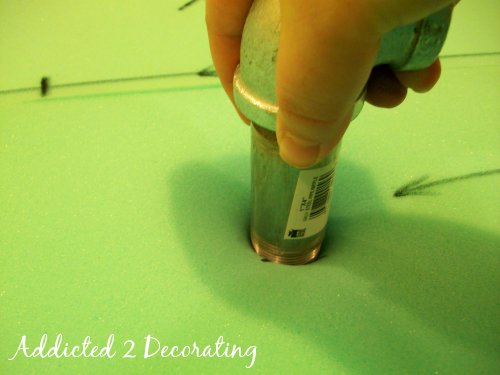
This next step is the one I dread the most, but it’s necessary. Professionals have a nifty little tool they use for this, but since I’m not a professional upholsterer, I have to make do with substitutes.
The goal here is to make holes in the foam for every single button that’s large enough for the button to rest at the bottom of the hole. Make sense? In order to do this, I use a combo of this little “tool” and my fingers to pinch out the extra foam. This tool is nothing more than two different pieces I found in the plumbing section at Home Depot. I place the pipe onto the button hole area, and begin twisting.
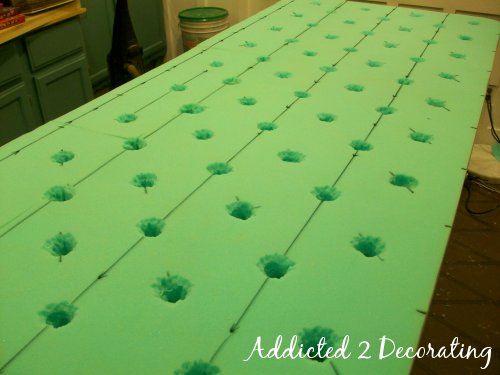
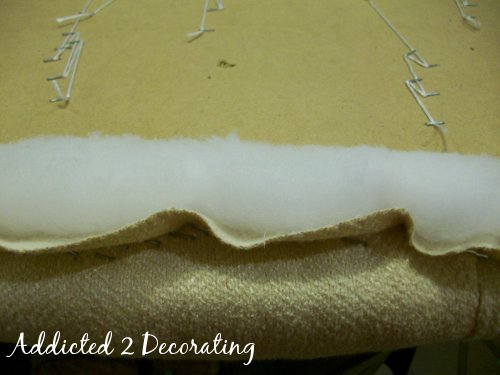
This is the least fun, the messiest, and potentially the most frustrating part of the whole process, but when it’s finished and the mess is cleaned up, it should look like this…
Now you’re ready for batting. I always use two layers of hi-loft batting (it’ll say hi-loft on the package). The more layers you use, the deeper the tufting will appear…but of course, the more you use, the more your project will cost, and this stuff ain’t cheap!!

Then spread out your fabric on top of the batting. Be sure that the fabric is centered, and there’s plenty of extra on all four sides.
To begin the tufting, you’ll start in the center of the headboard, working your way down on the main lines you drew at 8″, 16″, and 24″. As you work from one button to the next, be sure that the fabric is not pulled too tight. If you pull it too tight, you’ll lose the look of the deep tufting.
If you need guidance on how to string the buttons, and how to secure them on the back with your staple gun, you can refer to step #23 through step #25 of this upholstered headboard DIY for details.

Continue working across the horizontal lines with the buttons. It should look something like this…

After you finish all of the buttons on the horizontal lines, you’ll start on the diagonals. This is where the magic happens! When you press down on the diagonal, the tufts and folds should pretty much form by themselves. You may want to work with them a bit to create neater and cleaner folds, but you shouldn’t have to do too much.

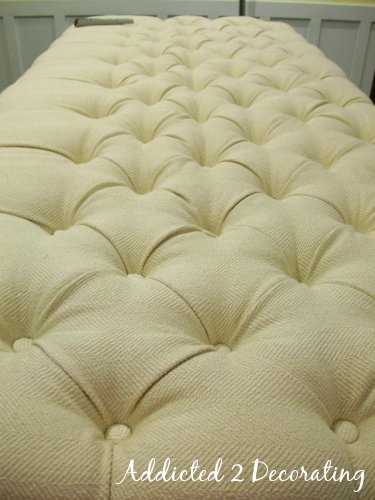
Once you’ve finished all of the diagonals, your headboard really begins to look like something quite special!!

The only thing left to do to finish the front is to secure the edges of the fabric and batting. Begin at one of the buttons, and create a nice, neat fold. Wrap around to the back and secure with your staple gun. You will do this around the entire headboard, creating a fold from each button to take up the slack in the fabric.

Once you’ve made it all the way around, the front of your headboard is finished!!
The back of your headboard will look like this. Pretty, huh?
The last thing left to do is to clean up the edges on the back. You’ll have extra batting and fabric, so add a few more staples all the way around, and trim off the extra fabric and batting.
It doesn’t have to look perfect, or even pretty, but you do want it to be flat so that your headboard can rest flat against the wall. Also, give all of your staples one last inspection, and hammer in any that aren’t all the way in.

And you’re done! Now step back and admire your handiwork.

Now don’t forget…if you try this project, I’d love to see your results!!! Also, once you understand the process, you can easily modify the plans the create any shape you want. If you want a curvy headboard, like the one in the first picture, then start by drawing your shape, cut it out with your jigsaw, glue the foam and trim to the shape using an electric meat knife, and then start at the center line to mark your buttons. The process is the same.
Have fun!! Get creative!!
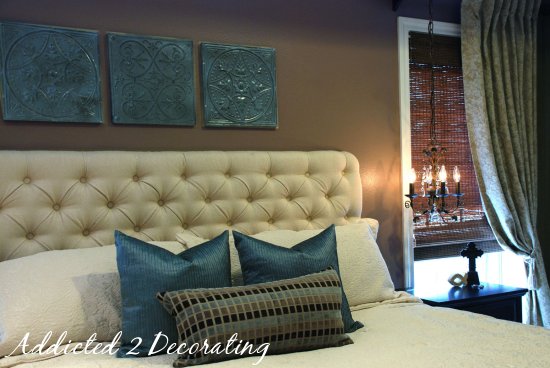
Edit: Here is a photo of this headboard in the room for which it was created…
Want to see the whole “before and after” of this bedroom?Click here!

Addicted 2 Decorating is where I share my DIY and decorating journey as I remodel and decorate the 1948 fixer upper that my husband, Matt, and I bought in 2013. Matt has M.S. and is unable to do physical work, so I do the majority of the work on the house by myself. You can learn more about me here.
This is quit the DIY project. I love the fact that it can be done using any type of fabric that you want. I might have to start with something a little more simple like your beautiful pillows before I take on a project like this. Thanks for the post!
Tracy, this probably isn't a project that a newbie DIYer should try right out of the starting gate.
But once you've got a few DIY project finished, and feel comfortable using some power tools, then you'll be ready for this. 🙂
The process is really not a difficult one, but it's definitely time-consuming, and parts of the process (like attaching the buttons) are much easier if you have a helper.
Hi Kristi,
LOVE your stuff! Can you tell me what size buttons you used for the tufted headboard?
Thanks!
Thanks, Karen! I think I used 5/8″ buttons.
I always wanted a tuft bed like this but they were too expensive. I am moving to a new state and starting over again so it is perfect time for a new bed frame. I’m wondering though, how much fabric would I need for a queen sized headboard? How did you calculate the amount needed? Thanks for your reply. Cheers!
Kristi:
WOW! I did it with your wonderful instructions. (…and I’m a first timer at tufting). Your instructions state, ‘slight indention’ in the fabric when pulling the buttons through. So, guesstimating about an inch depression?
Correct? My hubby suggested pulling the cord to the desired depression of the button, and where the cord goes through the hole and meets the wood, mark the cord with a sharpie. Then I removed the button & cord, and marked all of the remaining cords with buttons attached,(measuring from the base of the button toward the cord end) What a time saver, and no second guessing with “Is this one as tight or tighter than the last one?”.
My tufted bench is at the foot of our bed. My formula: 4 ‘found’ Queen Ann chair legs $4, attached to an old door $0 (sawed lengthwise) + 4″ foam $21, 2 layers of batting (thrift store find) $5, buttons, etc. Less than $75 finished for materials, and looks like a million thanks to your direction.
Sandy
Granted, this project may not be for the first timer…but your tutorial sure made it seem like one could do it. Good job on explaining the process.
It is lovely.
That may be a little more work that I am up for, but thanks for the great step by step…..
I saw a similar headboard while shopping with a friend and she just had to have one but didn't want to spend the money. Maybe now she can have her wish, although I will probably get rooked in the project too. Thanks for the great step by step.
Interior decorating is so much fun and opens up a whole new world with a chance to chose your own personal style and flair. You have some great tips and ideas here and I will take some to try. We would also like to offer some ideas for home decorating from our extensive range of Antiques, Collectables, Reproduction Antique furniture, Marble Busts, Fountains and Sculpture plus much more.
Thanks very much for all the good info and best wishes to you all!
Great job and love how you showed each step in the process, I think I might be able to do something like this now. 🙂 Bren
http://chefbrenscupcakesandcatering.blogspot.com/
This is amazing!!!!!!! I love this!
hey! i love the headboard, I recently made one, and I had such trouble with the buttons. no matter what I did, the top would pop off, or the metal hook on the inside would break and when I would pull to tuft it…my button became a projectile weapon. so I wasn't able to get a nice deep tuft. any advice?
did you try cutting the hole into the foam . i just made one foloowing the above directions and the hole cutting was the trick
http://www.amazon.com/s/ref=sr_gnr_aps?rh=i%3Aaps%2Ck%3AButton+Tufting+Foam+Cutter&keywords=Button+Tufting+Foam+Cutter&ie=UTF8&qid=1387728989
Kristin, did you make holes in the foam first, so that the buttons could rest easily on the bottom? That step is key. If you have to pull with much pressure at all on the button, then you will certainly run the risk of the button coming apart, or the metal hook popping out. You want to be really certain that you create the holes in the foam first, and make sure they're big enough for the button to rest at the bottom without you having to push it down with any pressure at all.
Hope that makes sense!!
Hello,
I just subscribed to your blog and was thrilled to find this DIY. I've been wanting a headboard like this forever and was trying to figure how to make one and you have it all here. Thanks so much for sharing and great blog.
Nice job with the instructions..but I'll leave this to someone more constructive than I.
http://www.decorating-country-home.com/index.html
Your step-by-step actually makes me feel like I can do this project. Me and the hubby are going to work on it together! One question though, once you have your headboard, how should you attach it to your bed?
Mary-Margaret, I always hang the headboard directly on the wall using something called Hangman that I find at Lowe's.
http://www.hangmanproducts.com/hangman-system.html
My Lowe's store carries two sizes, and for headboards, I always use the larger size.
Great post Kristi. I never thought it was so easy to make a tufted upholstered headboard. The one you made looks even better that the ones they sell in furniture stores. Thanks for sharing.
This one looks great and not too hard! Now I can get rid of the old ugly stand-alone headboard we keep in my husband's hobby room to convert to a bedroom when company arrives. This would look like a nice accent piece even when the room isn't being used for company and the bed itself is removed. I was wondering if the large hole drill bit would work to make holes in the foam–we have a couple of bits that look large enough. It seems it would be less difficult than a piece of metal piping, but maybe the teeth wouldn't be right for that.
My husband used a hole cutter with a drill bit in the middle in reverse. It worked like a charm. It didnt grab on to the foam in reverse and cut nice and clean.
Rhoda, I haven't had any success with any kind of drill attachment. I tried a hole saw, and just chewed up the foam.
However, what I did have TREMENDOUS success with on another headboard I made was using a pair of really sharp, pointy scissors. I opened the scissors so the points were about 1" apart, shoved them into the foam down to the MDF, and then squeezed. They cut right through the foam. Each button hole took four cuts, and I ended up with a 1" square hole (approximately). It was super easy and went very fast.
Thanks, Kristi–I was referring to my bits that were actually hole saws, so that answers my question. I guess I'll go find that pointy scissors! Did you still tear out small tufts around the edges (like in the photo above)?
No, Rhoda, I actually skipped that step, and it actually worked out fine.
You just want to be sure that you're cutting out a big enough hole. If you buttons are 3/4", I would cut out a 1" hole, at least. You have to allow room for the batting. If your buttons are 1", I would suggest at least a 1 1/4" hole.
Hi Kristi,
I finally made a diamond tufted headboard using your instructions this past weekend. How do I send you a picture of the finished product?
You can send it to [email protected]
Can't wait to see it!!!
I love your site! I have been researching this project for a while and I love the step by step you offer. I am using a 3" memory foam topper to pad mine with. I was thinking about putting another 1" pad on top of that. Would that be too thick?
Meghan, I don't think it'll be too thick at all! In fact, Pottery Barn's tufted headboard is 5.5 inches thick.
Thanks Kristi, I will definately go with the 4" foam idea then!
I managed to get the board cut, foam trimmed and my grid laid out last night. Today I am working on trimming away the foam where the buttons go and covering all the buttons. I am using a mohair upholstery fabric that I found at an estate sale for an amazing $6 / yard. I'll send you pictures when I get it finished.
When I made my headboard, I had a lot of luck using my kitchen apple corer… I have perfect little foam holes just the right size. That saved me HOURS of work. And I used pegboard for the back of the headboard so I didn't have to fuss with drilling through.
hi kristi_do you know what the tool is called that cuts the foam holes out for the buttons? i'd like to buy one if it's affordable! THANK YOU for taking you valuable time to have your super informative website for people like me to enjoy and learn!
I made a tufted headboard (this shape and picture contributed to the vision: http://elizamagazine.com/blog/wp-content/uploads/2009/03/princess-tufted-headboard_queen_king.jpg) and your directions were leaps and bounds above the rest of similar, less-thorough, practical, systematic and picture-filled step-oriented process! I had also read tufting instructions before but no description gave me a better understanding than the blog you linked to. Because I did a scalloped-shape and foolishly chose a pattern (I got excited to find an apple green & beige geometric pattern at the fabric store for $2.99/yd and impulsively strayed from my original plan of one-color distressed silk to save $$ and go trendier). It was an amateur attempt and came out pretty well with the exception of the diamond tufting, which was difficult given the shape and rigidity of my fabric. I will probably use for a year or so and then make a second attempt with new fabric! I will send pictures along:)
Elisa, what width fabric did you use for that red headboard? My problem is, I drew out a design very similar to yours, projected it onto my plywood, traced and was about to cut my board when I discovered there was no way I could use the 58″ fabric that I had to cover a scalloped headboard. Did you combine two widths of fabric to get a wide enough piece to cover and tuft your tall headboard? Help!
I finished mine this afternoon. I made it indent in the bottom so the mattress will fit under it and I can bolt it to the bed frame. I think it turned out great! Thanks for the info! Oh…for those out there trying this…have a lot of extra fabric on top and bottom BEFORE tufting. The fabric gets pulled back more and more while you tuft..making it hard at the end if you haven't planned for extra hangover. Happy Headboarding…here's mine!!
http://www.facebook.com/photo.php?pid=31829653&l=e75826b2b3&id=1405029390
Hi! I was wondering if you remembered how much extra fabric was on the top and bottom before you started the tufting? I was only able to find fabric that was 56″ wide and my mdf board is 37.5″.
A few questions before I attempt this project! 1. What size buttons did you use? 2. Did you use one continuous piece of fabric or have to sew 2 pieces together to come up with the right size? I want to do a tall headboard, im just nervous a seam will be an eye sore. Thanks for any imput!
How do you cover all the buttons? Thanks
I purchase the half-ball cover buttons, available at JoAnn Fabrics. They are metal buttons that come in two pieces. You cover the top piece with whatever fabric you choose. The instructions are on the back of the package.
Wonderful tutorial. Thank you so much. I have a tool that you might love. It will cut right through the foam and make your circles. Best of all it's cheap. It's a automotive gasket punch. It comes with a whole set of different size circles that you can do. I got mine on ebay for $18. It comes in it's own little carrying case. I have cut circles out of felt and made flowers, cut paper etc. It has paid for itself over and over again. Now I have another use for it! :}
Have a wonderful New Year.
Shelley
Here's a question: wouldn't it be easier to use the pipe tool to cut the nesting holes before you drill? I think you'd have less drag on the foam, and possibly less mess.
Just thinking out loud here 😀
Great tutorial, I may actually make this one day 😀
Great tutorial – I linked it to my "headboards – upholstered" project post too!
Krisit- I may be just over-thinking…but I did not understand the step where you start on the diagonal lines. there is not string between the diagonals-correct? Is that just a matter of pressing down with your hands…ughhhh maybe I just need more coffee and to read it again. Beautiful job, thanks so much for the information!
Oh dear…you don't understand my directions, and I don't understand your question. Perhaps we both need coffee! 🙂
Kristi-
Thanks for attempting. What I mean is: You say to start stringing the tufts at the middle (each string is done individually) and work across. Then; once that is completely done; and you begin to set the diagonals… do you just use your hand to get the line of fabric correct?? Or do you string diagonally as well? I guess I am not understanding the step of getting the diagonal of the fabric to look finished. Sorry— I seem to be that one in a million who is missing the obvious. Thanks again of you can help me. Jennifer
I think she means do one row of buttons then skip one row, repeat until you get to the end then go back and do the skipped rows.
GREAT tutorial! Can't wait to try on an ottoman coffee table my hubby and I are making this week. I love tufting but hate to pay $500+ for one! 🙂
Amazing tutorial!!! I am a 1950's pinup photographer and have used this tutorial to create a hanging panel that will be used for a set I am designing for a Burlesque shoot. I am making it out of red crushed velvet!!!! I will post pics when it is complete!! Please enter me in this contest! Thanks again for the tutorial.
Juli
Kristi- I loved your tutorial but just have a couple questions! Number 1, do you need to frame out the back of the MDF with 1 or 2 by 4. All of the previous headboards I have made and have seen other tutorials make show framing out the outside of the MDF with such material.. is this not necessary or is there a reason this should not be done for this type of headboard? Next, could you explain or show an example of the fold you are talking about to secure the fabric at the end? When you fold from button to button are you folding the fabric in on its self or outward?
Thank you!!
Nope, I don't frame it out with 2 x 4's. I'm actually not even sure what purpose that would serve. I think that would be necessary if you were using something really thin for the front, like peg board. But because I use at least 1/2" MDF, it's sturdy enough on its own.
Now regarding the fold…if you look at the 7th photo from the end of the post, look at the button, and you'll see a line in the fabric from the button to my hand. That line is a fold. I simply folded the fabric over onto itself, from right to left, to take up some of the slack in the fabric that happens when you tuft the fabric.
Hope that makes sense!!! 🙂
Agh, I wish I would have seen your blog before I made my two ottomans…they are tufted but I didn't accomplish the deep diamond tuft that I wanted…I still like them, but seriously…this is amazing! Hmmm, which room in my house needs a bench? I have a feeling my scrap piece of MDF isn't safe…
Hi there! LOVE your detailed tutorial and plan to do our own. Could you please help by answering a few more questions? What size buttons did you use? Approximately how much fabric is needed for covering the buttons? Does the above yardage account for that? Thank you so much! Kristin
Hapigrl, I'm pretty sure I used 7/8" buttons. And I'm not sure how much fabric I needed specifically for the buttons, but I had plenty of fabric from the yardage specified in the instructions. It seems like each buttons required about a 3" circle of fabric.
Hi there! LOVE your detailed tutorial and plan to do our own. Could you please help by answering a few more questions? What size buttons did you use? Approximately how much fabric is needed for covering the buttons? Does the above yardage account for that? Thank you so much! Kristin
GREAT tutorial! Can't wait to try on an ottoman coffee table my hubby and I are making this week. I love tufting but hate to pay $500+ for one! 🙂
I think she means do one row of buttons then skip one row, repeat until you get to the end then go back and do the skipped rows.
Wonderful tutorial. Thank you so much. I have a tool that you might love. It will cut right through the foam and make your circles. Best of all it's cheap. It's a automotive gasket punch. It comes with a whole set of different size circles that you can do. I got mine on ebay for $18. It comes in it's own little carrying case. I have cut circles out of felt and made flowers, cut paper etc. It has paid for itself over and over again. Now I have another use for it! :}
Have a wonderful New Year.
Shelley
I finished mine this afternoon. I made it indent in the bottom so the mattress will fit under it and I can bolt it to the bed frame. I think it turned out great! Thanks for the info! Oh…for those out there trying this…have a lot of extra fabric on top and bottom BEFORE tufting. The fabric gets pulled back more and more while you tuft..making it hard at the end if you haven't planned for extra hangover. Happy Headboarding…here's mine!!
http://www.facebook.com/photo.php?pid=31829653&l=e75826b2b3&id=1405029390
Thanks, Kristi–I was referring to my bits that were actually hole saws, so that answers my question. I guess I'll go find that pointy scissors! Did you still tear out small tufts around the edges (like in the photo above)?
Great post Kristi. I never thought it was so easy to make a tufted upholstered headboard. The one you made looks even better that the ones they sell in furniture stores. Thanks for sharing.
Where did you get your fabric from? Is there some where online that you buy from? I'm having trouble finding fabric in the size i would need for this project. i want to make a queen size headboard and figured I need about a 70" x 100" piece of fabric, but I cant find any wider than 54". Please help!
rachel, that is the problem that I was having. I had to scrap my original design of using a scalloped, tall centered design and am going to use a rectangle instead. I could not find any fabric wider than 58″ wide.
For wider fabric I used a queen or king size flat sheet
Rachelle, I just used 60" upholstery weight fabric from a local store. I think the finished height of my headboard (which is a king size) is something like 34", and the fabric worked, plus I had a few inches to spare to cover the buttons. If you're needing fabric wider than 60", I honestly don't know where to get that.
@b98c4e0d737e3654c6e53e3d41a43b38 I just found a 70X102 linen table cloth on sale for $34 dollars. Try that maybe.
I just finished my headboard that came out really good. It cost me only $100, when I went to the fabric store (Jo'Aan) & looked at the prices of foam that was killing ($29.99 for a yard, you need atleast 2 yards), I started to reconsider this project but then I went to Walmart & found a mattress foam for $11.99 that was only an inch thick so I bought 2 (queen size) & doubled them over, so I ended up paying only $24 something for the foam (which takes a big chunk of your money in this project), also buttons are so expensive & you need lots of them, I went online & found the whole sale supply website (start to end supplies) & bought 100 pieces only for $22.
I wanna say Thanks to Kristi for her time help. God bless you!!!
Here it is
Wow, that looks fantastic!! You did a great job on it.
Thanks! I could not have done it without you.
is it the same process for leather too
Kristi,
When I tried to follow this link, I found that the page no longer exists. Could you post these directions for me? I'm starting to gather supplies to make this headboard this weekend. Thanks! If you need guidance on how to string the buttons, and how to secure them on the back with your staple gun, you can refer to step #23 through step #25 of THIS UPHOLSTERED HEADBOARD DIY for details.
Julie
Hi Julie~
Thanks for letting me know about the broken link! I've fixed it now, so it should work. Let me know if there are any other problems.
I agree!
Thanks so much! I've got almost all of my buttons done and my husband and I are working on the rest of the headboard this weekend. I found some very nice outdoor fabric in black–it's got a small diamond pattern, and I think it'll look great.
Julie- I was wondering how your headboard turned out using the outdoor fabric. I found a beautiful print I’d like to use as a headboard however it is only available in outdoor weight. I’m not sure if it’s suitable for a headboard. Thanks!
I want to do the same thing and make a very tall headboard. What did you eventually do? I don't know how skilled I will be at this, but my only thought was to have two vertical seams symmetrically placed down button lines such that, for example:
Going horizontally from left to right across a king size headboard, measure 1/4 of the headboard and place the vertical seam at that mark. Do the same coming from the right hand side. This would have a large piece, 50% as one solid piece running down the middle.
I think to get this right it would take a lot of very precise measurement and patience.
I think you have just saved my design, actually. I assume that you want to measure so that these seams are definitely hidden in the tufts. I am going to consider trying this.
my daughter came in last night and gave me a ‘duh’ moment. She suggested that I take my 58″ fabric and double it and make the seam along the area which will be covered by my pillows. That way, I can basically make my headboard as tall as I’d like, using standard sized fabric.
Kristi. I have loved your website and your projects. My computer crashed last weekend with ALL my saved stuff gone!! omg! I finally found you again. Now I will backup with disks and paper notebook! Thank you. And when I get my project done I will send you the photos! Barbara.
Run the fabric lengthwise! Just find a print or design that will work in that direction. Wa La! solved!
Kristi, I was wondering if size 45 buttons (1 1/8 inch) is to large for this project? I found a place that will cover the buttons for .40 per button and they are out of the 7/8 inch. should i spread them out furter? I am so excited to start this project, Thank you for the great instructions!!
they do have 3/4" buttons, would that work better than the 1 1/8"? Im worried I wont get as deep of a tufted look with the larger ones. I would love you opinion Thank you!!
I would suggest going smaller instead of larger. How fortunate to find someone to do them for you!! That's my absolute least favorite part of this project.
Thank you so much for the great instructions and pictures! Best I found on the net! I just completed a very ambitious headboard – turned out pretty good for it being my first time.
Elisa, that looks amazing!!! This does not look amateur at all! I just completed my headboard, but it is quite a bit more amateur than yours! I will also be doing a second attempt at some point in the future.
btw, how did you attach your file?
My 1st headboard. I learned a lot thru this process. This headboard is 48" tall, so I had to sew 2 pieces of fabric together. The fabric store covered my buttons for 55c a piece. The outside shape of this headboard was pretty challenging for a 1st timer, so I would recommend to others to not cut in quite as deep on the sides. I used a hole saw bit to make the holes in the foam, which worked out wonderful.
Thanks again for sharing your instructions!!!
Nicely done! I love the shape. I've tried using a hole saw, and it ripped my foam! Hmmm…wonder what I did wrong.
Just use the hole saw bit with out the drill similar to how you used the pipe. Turn it with your hand and the tube of foam comes right out.
Oh! That's brilliant! I didn't even think of that. Thank you. 🙂
I sewed it down the middle and it looks good.
I just finished my first headboard – thank you foe such great instructions. I found this project time consuming, but fairly easy, what with your great instructions and all! I just spent time covering my buttons during a movie, attaching all the buttons in advance to the cording while visiting with friends, etc. so I never felt like I was spending hours on this project. I am so happy with the results, but I would like to share some of my reflections for those that were first timers like me:
Make sure that your batting is the same size as your fabric. Seems like a no brainer now – but I actually cut the batting to the shape of the headboard before realizing that that was not going to work!
Make sure that you have PLENTY of fabric/batting hanging over the edge. I had a good 6 inches and it was not enough! For a beginner, I would recommend a foot (on each side).
I was so worried that I would pull the fabric too tight so ended up leaving it a little loose in the middle, where I started (which is probably why I used up so much of the overhang). I found that if I pulled the fabric until it was smooth, with no stretching, I had the best results. When I tried to leave just a little give, I ended up with wrinkling.
For cutting the foam holes out, I simply used a glass to draw a hole (on the foam) around every drilled hole and used a super sharp nonserrated knife to cut out the foam…worked like a charm – the whole procedure took about 15 minutes, tops! Tried using the hand applied hole saw bit, but it wouldn't cut through my foam! One word of caution – you might want to make those holes a little larger than you would think…I used a glass 2'' across to mark the holes and I used buttons that were 3/4" diameter, with 2" medium density foam covered with one layer of batting. The tufting looked really deep and the buttons looked perfectly in proportion to the depth of the tufting.
And finally – I absolutely needed help when actually applying the buttons to the headboard. I don't see how anyone could do that job alone – I had to keep flipping the headboard to thread the cording through the headboard – not to mention then standing the headboard on edge to staple (and hammer the staples) to keep the cording (and thus the button) in place. However, quite a manageable job with 2.
I LOVE YOU! LOL Thanks for FINALLY explaining this tufting process in a way that makes me believe that I can accomplish this look on my own! Fantastic site!
This is ridiculously awesome!
I am in love with this headboard!!! i was just at a PB outlet and saw one for 400$ so i am glad i found this! I have a question though… how much MDF do i need for a King Size headboard if i want to make the headboard in the first picture?? 🙂
Jenna, you'll need one full sheet of MDF. It comes in 4 feet X 8 feet pieces, and should cost around $24. Places like Home Depot and Lowe's will cut it for you. The width of your MDF for a king size bed should be around 80 inches (give or take a couple of inches, based on your preference and your bed's actual measurements). The height is completely dependent upon your own personal taste. Since the MDF is 48 inches, you can make it anywhere up to 48 inches. Of course, if you want to purchase more MDF and combine pieces by securing them with slats of wood on the back, you can make it as tall as you'd like. Just remember that fabric generally comes in widths of 60 inches, so if you go much over 35 inches high with your headboard, you'll need to be willing to sew pieces of fabric together to cover the headboard.
SO. ABSOLUTELY. FABULOUS. !!!! Thank you for the wonderful step by step. I feel the need to try this soon 🙂
you did a great job and the links for additional instructions were very helpful!
Kristi you are such an inspiration. I'm not that crafty but with the help of my main squeeze we just made our first headboard. It's brown damask fabric (see photos). I think he's addicted too now. He wants to make the next one cushier and more ornate. Thank you for giving me the courage to try!
You did a fantastic job! Congratulations!
This looks incredible!! As soon as I saw this I went out shopping for fabric! The sales woman said I would probably need to sew a couple pieces of fabric together for it to cover the entire board, did you have to do that?
I didn't have to sew any pieces together. I made the headboard just about the maximum height that I could make it without having to sew pieces together (about 34" high), and then I railroaded the fabric (used it horizontally). I used 60"-wide fabric, so that gave me about 13 extra inches on the top and the bottom. If I had made the headboard any taller, I would have had to sew pieces together, and would have used the fabric vertically.
My daughter and I just finished a tufted headboard for her bed at her apartment. Following "most" of your instructions, here's what we did:
1. We made the headboard 64" w x 48" to fit a queen bed. Claire wanted her headboard to be big!
2. We reduced the number of tufts & buttons to 23. That meant redrawing the diamonds and determining new placement of buttons.
3. We used roll foam because it was less expensive and I got two lengths cut to fit.
4. MDF is cheaper, but, heavier than plywood. Since Claire lives in an apartment we used 1/2" plywood.
5. I bought an inexpensive "hole" drill bit (1 1/4") to use with my drill to cut the foam.
6. I missed the part about using thin drapery cord and bought upholstery button twine. That was a mistake. The button twin is too flat for the staples to hold.
7. I also didn't have a 3/8" drill bit and used one about half that size. That was also a mistake I won't make on the next headboard 🙂
The biggest time hog was getting all the supplies together. This is approximately what we spent:
Plywood – $30
Fabric – 2.5 yd – $12 (it was on sale)
Foam – 2 lengths of 2" (24" w x 64" length) $66 (24.99/yd original – 30% off)
Hi loft batting – 2 twin sized packages – $26
Buttons – $30
Supplies – $15
All total about $175 – $185.
Hope you enjoy!
Jackie & Claire Kapaun
Hi Jackie,
I am looking to do the exact same thing for my apartment/college house. Could you send me a picture of what hers looked like using only 23 buttons? Thanks!
do you know what size buttons these are?
My dad and I just made my headboard this weekend and I'm so happy with the results. Thank you so much for the wonderful step by step instructions and pictures as this was my first DIY project and it was very helpful.
Thank you so much for your wonderful tutorial. I cannot wait to try it out.
Two questions:
1) Is it possible to do all this using an existing headboard that came with the bed frame? Instead of buying a whole new sheet of MDF? Will the staple gun be able to penetrate the wood?
2) Is there any way to add the thin ribbon that seems to run around the perimeter of the headboard as shown in the photos of the professionally done headboards?
(1) If you have a headboard that is a solid piece of wood, then yes, you can use that instead of purchasing MDF. How your staple gun will work depends largely on what kind of staple gun you have. If you're using an electric staple gun, chances are that most of the staples will not go in all the way, and you'll have to hammer them in separately. If you're using a pneumatic staple gun (the kind with an air compressor), you shouldn't have any problem.
(2) I don't know what ribbon you're referring to. However, if you're talking about some type of ribbon used as an embellishment, I would use a fabric glue or even hot glue. Just be sure that if you're using hot glue, you use a thin bead of glue so that it doesn't bleed through the ribbon or squeeze out from either side of the ribbon.
I want to find a shortcut for attaching the buttons. Do you think it will work if I use two staples in the front where each button goes? Then use a hot glue gun to attach flat rhinestones over the staples?
Love this tutorial by the way! I am gonna attempt this project this weekend!
Not only do I NOT think it will work, but I KNOW it won't work. 🙂 Yes, I speak from experience. I've tried several shortcuts, and the only one I found that works is using screws and washers through the front of the headboard into the wood to hold the tufts, then gluing buttons or rhinestones over the screw/washer. Just know that you're taking a risk in the screws snagging the fabric. This method is best done with thicker fabric. Don't try it with thin polyesters, silks, etc.
Bummer! I like the screws idea thought; very clever 😀 I am going to use Pho-leather upholstery fabric that has cotton backing. Do you think that would tear? Do you cut holes in the fabric for the screws?
Also, In an effort to use less of the pricey batting. Can you staple the batting down then cut x's where the buttons go. Leaving the cover fabric loose and continue as normal. I think I saw that on a youtube video… That way you won't need as much extra batting overall.
Thanks again 😀
I can't believe I found your blog. You're my new hero. I've wanted a properly tufted headboard forever, but could never spend the bucks. I'll be trying this next week. I'll spend this afternoon checking out your other projects. Your tutorial is excellent. Both photos and instructions make it very clear to follow. Thanks for sharing your knowledge.
Hi there Fantastic information, Love, Love, Love diamond tufted headboards! I was wondering if anyone has any idea what the cost of supplies cost (excluding the electric tools and the fabric) for the queen size approximately? Thanks for the post Andrea( Decorator at heart)
Hi Kristi!
I wanted to thank you so much for you DIY. I used this DIY to make my headboard and had a great outcome. I did my headboard in March but completely forgot to add pics. Here it goes! Thank you again!!
Just to add on for those who have never done a project or DIY.. this was my first ever and although challenging, it was very rewarding.
This is lovely… I am working on a simple headboard with foam and batting and my problem is the corners. Can you tell me how to do a square corner so that it looks neat… how do you manage to get the fabric around the corner so that its square and neat?
Thanks for the photos and tips! Loved your blog the best. I would like to do several walls in my media room in tufting so I am going to be a professional by the time I finish!
Kristi, I have been searching for the longest time for good instructions on how to do this. You did an AMAZING job of explaining and showing. I'm hoping to get an ottoman done by Thanksgiving. I'll try to get pictures to you as soon as I have it done. Thank you so so much!!!
I have made a padded headboard twice–this time I am trying the diamond tufts. What size buttons did you use? I am using a microsuede and not sure what size I should use. Also how is the above headboard attached? I agree with everyone, your instructions are great. Thank you!
Kristi, I am just about set to start this project, but recently had a professional upholsterer tell me that it was 'impossible' to achieve the curvy shape of the backboard without making a complete mess of the edges. When I look at your picture, it appears that you have done something (ie; a finishing treatment) to the edges/back. What does need to be done to cover pulled fabric? I am determined to prove this guy wrong!
I can assure you that the upholsterer was wrong. I've done curvy shaped tufted headboards, and the edges turned out beautifully. Now the top headboard in this post isn't mine. It's one that I found online. But all they did was add covered cord to the edge all the way around. On mine, I just pulled the fabric around to the back and stapled. I have no idea why he would tell you it's impossible. (Except that he's a man. I don't mean that in a mean way, but I'm often told by men that things I want to do are "impossible" and then I turn around and do them. I think it's just a difference between men and women. We tend to be a bit more determined.)
Love, love, love this but don't think I could do it and have it turn out the right way. I will need much help.
I used these awesome DIY plans for my own tufted headboard! I did a bunch of internet searching and these were the most detailed. I tweaked a few things, like how far apart the buttons are. Also, I used four layers of 1/2" carpet underlay instead of 2" fabric store foam because I got it for free! The carpet store gave me some large scraps they had. Overall, I spent between $150 and $175 on this project, and I get TONS of compliments on how awesome and professional it looks. Thanks for the wonderful DIY plans! (Colour is more accurate in the first photo – natural daylight!)
Would cotton duck be a good fabric to use for this project?
I think cotton duck would be a great fabric to use! I would suggest pre-washing the fabric and then ironing it before using it. I used cotton duck to reupholster these chairs with tufted backs, and it worked beautifully.
I am so excited that I stumbled across your blog! I absolutely love it and I cannot wait to make my own headboard! Your instuctions are great and have really inspired me! Thank you!!!
Hi Kristi,
I too am glad I found your detailed explanations! I have been wanting to do one for our master bedroom for a long time. Can I use 51% polyster and 49% nylon? Its burgundy crushed, and I thought I will make curtain from it. But after seeing some other pictures in your blog, I want to use this fabric for a luxurious look :).
Leena, the blend of fabric doesn't really matter. It's the weight of the fabric that matters. Really, you can use any type of fabric you want. I've used everything from thin polyester and duppioni silk, to heavy vinyl. You just need to keep in mind that anything at one extreme or the other (either really thin or really thick) is going to present a challenge if you've never made a tufted headboard before. The challenge of figuring out how to make this headboard is enough for most people, without adding the extra challenge of dealing with shifty, thin material that snags easily, or super thick material that won't tuft and fold easily. Whether or not you're up to the additional challenge, only you will know. For most, I recommend eliminating the challenge of dealing with difficult fabric on the first headboard, using a medium weight fabric (like a decorator cotton fabric or an upholstery fabric that's on the thinner side), and just get used to the process of tufting. Make a headboard for someone else, or for a guest bedroom. Then once you've got some practice, you can add the additional challenge of a difficult fabric.
Finished after two intense days… My fingers still hurt from the button making but after trashing those went to craft shop and did new ones that worked much better. I ended up screwing the fabric to the board then tying on the new buttons. Not as much pressure on the button itself. I am not too happy with the color of the buttons so I may change them out later. Overall very happy with the results.
Hi Kristi,
In your tutorial, you state “If you need guidance on how to string the buttons, and how to secure them on the back with your staple gun, you can refer to step #23 through step #25 of this upholstered headboard DIY for details.”
The link in that sentence did not take me to where the instructions are for the upholstered headboard.
Can you repost the link to the instructions?
Thanks a bunch!
BTW, I really enjoy your site. 😉
I found the instructions here: (by searching the a2d site)
http://addicted2decorating.com/diy-project-accent-furniture-upholstered-headboard-with-wood-frame
Hope that helps!
Hi Kristi,
I was wondering if you have any videos for this project? I follow you all the way until the buttons and then I got lost a little bit when it comes up to putting the diagnonal buttons. I haven’t started or bought any of the supplies I was just researching doing a little research before I begin.
Thanks!
Wendy, unfortunately I don’t have any videos of this project.
Here’s a video from Brick City Love
Thanks so much for your tutorial. I used yours and a few others to make my diamond tufted headboard with nailhead trim.
http://orange-sugar.blogspot.com/2012/01/diy-diamond-tufted-headboard-with.html
Also made a matching bed frame
http://orange-sugar.blogspot.com/2011/12/diy-nailhead-chunky-leg-bed-frame.html
Hi my next project. I am so excited!!! Your tutorial has been the best to understand, thank you! I will send a picture once I am done.
very very nice! just what i was looking for. ima try it!
I always wonder how the headboard is attached to the bed frame. Thanks much!
So excited! I am currently in the middle of this project! When I got to the step where you have to make your drilled holes bigger in the foam so the buttons can settle in I found the BEST TOOL! Instead of fussing with it by using a pipe or rod and picking the foam out I used a 1.5″ hole saw! 10min and 85 holes later wha-la! =) done! Just thought I would share this with you DIY’ers =) oh and I will try to post picks as this headboard is 82.5″x82.5″!! Talk about taking too much on =p
Hi,
I really want to attempt this project, but I don’t see how many inches from the top do I start my first row fo buttons?
Thank you so much for the wonderful tutorial! I shared a link to it on my blog 🙂
http://kirstenerickson.blogspot.com/2012/01/diy-headboards.html
Hi:
I have a fabric headboard with legs already to attach to a metal frame. I want to re-cover it in a microsuede and tuft it. Do I have to remove the old fabric or can I go right over it? It’s a square headboard. This will be my first attempt and I really want it tufted. What do you think?
If you want deep tufts, you need to remove the fabric that’s on there already, and be sure that you cut button holes in the foam, as the instructions show.
Hi – You inspired me to take on this project! I ordered a tufted headboard that wasn’t quite what I wanted and then I saw this and returned it! Started mine last weekend and I’m at the button stage. This is my first major project and I love how it’s coming together! I don’t think my buttons are as deep as yours but they still are deep and I’m fine with it. I also made mine taller at 42″. I probably would be finished if I didn’t have a 9 month old but I aim for the weekend. So excited to see it completed. For me the measuring was the hardest part, just trying to make sure everything was even, but after that it was smooth sailing. this is probably because I don’t have all the right tools but I’ve made it work. Thanks for the post!
Hi Kristi! Thanks so much for this amazing tutorial. I have everything ready to go to tackle this DIY, with one exception… The foam. I talked to an upholsterer, and he warned that the medium density foam I had already purchased would be too dense. What type of foam did you use/recommend?
Im trying to figure out how much fabric I need. You say enough to cover headboard and 18 inches extra on each side. But what about covering the buttons, how much did you use with those?
Im trying to figure out how much fabric I need. You say enough to cover headboard and 18 inches extra on each side. But what about covering the buttons, how much did you use with those? And what kind of fabric did you us?
I had over 90 buttons on my headboard and I only used about 1/4 yard of fabric to cover the buttons. My buttons were 7/8″ and I ordered them online for cheap at http://coverbuttons.com/.
I could only find fabric that was 54″ wide so I had to sew two pieces together. I originally wanted to use upholstery fabric but I could never find any that I really was in love with so I just used some linen fabric and it worked beautifuly.
I made a headboard using these directions. I wish I had used smaller buttons but am pleased with how it turned out.
I made myself a headboard this weekend and it turned out so good! I made my headboard 4′ x 6′ so it was large. I did it all myself except for the button part. I did a few by myself but it was too hard and I got a friend over to help. I laid my headboard on 2 saw horses and one was above thredding the buttons and I was below w/the staple gun. I used an air gun to do the trick so I didn’t have to hammer any staples in. That seemed to work much better. Just need a gun which runs $70-80 and a compressor. It makes the project go much quicker. I can’t wait to work on another project! Love your website.
I LOVE this, I’m plainning on making this next weekend.
Just a few questions though.
What would be the best type of fabric for this?
How did you attach it to the wall?
And how did you attach the buttons on?
Thanks! 🙂
I love this headboard and plan to make one myself. Most fabrics I am finding are 54” wide. With your guidance of having 18” on either side, this clearly is not enough fabric for a 34” wide headboard. I really don’t want to have to sew 2 pieces together and have a seam. Can you make a recommendation where to find wider fabrics? I truly have no idea about fabrics. Someone suggested to me that I try muslin, but someone else said that might not tuft well and that it is too thin. What do you think? Thank you!
Thanks so much for the comprehensive tutorial! I just made my own headboard and would love your opinion on it! You’ve been such an inspiration. Here is the tutorial that I wrote:
http://rachellynnk.blogspot.ca/2012/05/diy-tufted-headboard.html
Thanks again!
I LOVE this ! Can anyone give me an idea how to attach to bed? Do you attach to wall?
The problem I have is I have an adjustable bed.
Rebecca
Rebecca, this headboard hangs on the wall using a French cleat type of hanging hardware that you can find at Lowe’s or Home Depot.
You are GREAT ! Thank you so much. I will attach pictures as soon as I complete ! Am very excited to have found you and your great projects !
Rebecca
If you are using a solid color fabric you can just railroad the fabric so as not to have to seam the fabric. This way your length will be the 54 inches and you buy as many yards of continuous fabric to equal your width of the bed.
oops I didn’t mean to reply to melinda!
I’m going to give this a go …
Just created an amazing tufted headboard in dark grey chenille with glass buttons – looks AMAZING!! Thanks for your brilliant tutorial!
Thank you so much for your fantastic instructions. I made what I think is a wonderful bedhead. I have come into a little drama attacthing it to the bed. One of the buttons in the middle of the bedhead (which is now backed by a piece of wood) popped of during assembly. Please tell me that you have a solution other than pulling everything apart. Thanks again for your great blog. Emily
I have made a tufted headboard before where I used a short screw and a washer to secure the fabric to the wood from the front to create the tufts, and then I covered the screw and the washer with a button that I just glued on. That’s really the only solution I know of.
Hi,
Went to get the MDF and it only comes in sheets of 1″ at my local Lowes. It is very very heavy and costs 38.00 a sheet. Is there anything else I could use.?
Thanks so much for any advise
You can use plywood. Very strange that your Lowe’s only carries one-inch MDF. Home Depot carries three different thicknesses.
Thanks Kristi very much. Our local Lowes has nothing and Home Depot is about 45 minutes away. I will just get plywood, thanks again
Rebecca
I’m super stoked about this project. Will get my supplies this morning and start this afternoon hopefully. I do have a question though. Does the headboard go all the way to the ground, or does it look like your headboard is kind of floating in the middle of the wall behind your mattress since it extends a couple inches out past the edges of the bed? Every picture i see of these types of headboards don’t really show me that which i’m looking for. If i didn’t explain my question clearly, please let me know.
Thanks for any info!
The headboard is hung on the wall using a Hangman French Cleat from Lowe’s.
Hi again Kristie,
Dying to start my project, ordered foam online and it is not here yet.
I can’t get out to go to Joann fabrics had surgery on my foot, and tried to google ■one package of thin nylon or polyester upholstery/roman shade cord and it comes up with all kinds of things all sizes, not what I think I need. What diameter and do you know online where I can order?
Hi Kristi,
I am so excited to make all sorts of tufted furniture pieces using your tutorial! It is my passion to create a frugal yet elegant home. I bought a new house and moving in soon – planning to leave all of that outdated bulky stuff behind. Tufted furniture will give my new home such an elegant, exquisite look!
Thanks again for all the time you took to create your website – It’s great!
How much overhang would you recommend for the foam? Do you use the exact same measurements as the MDF or account for a little extra to cover the edges?
I don’t allow for any overhang on the foam. I cut it to the precise size of the MDF, and then wrap it in batting to cover the edges.
Do you think doubling up 90″ wide Muslin fabric would work for a 48″ tall headboard? It’s impossible to find fabric wide enough for this oversize King Headboard that I’m attempting. Thanks!
Sure! I think that would work just fine.
Omg! This is brilliant ! I litterally couldn’t belive my eyes when i saw how doable this is! But i would like my headboard to have leather material.. Do you think that’ll work?
I would NOT suggest that you use leather (or vinyl) if you’ve never done diamond-tufting before. It is incredibly difficult to work with, and if you’re just learning how to do diamond-tufting PLUS have the added frustration of working with a material that is uncooperative and very difficult to work with, I don’t think it would go well. At least make something with a workable fabric first, just so you can learn the tufting process.
instead of buttons, is it possible to use rhinestones? if so is there a different procedure to doing it? thank you so much for posting this. i really wanted to do this except with rhinestones instead of buttons. Please let me know. 🙂
I think rhinestones would be SOOO CUTE!! Very modern looking especially if you used a sleek black material!
All i can say is amazing tutorial. I feel like a pro and I’ve almost completed my dream headboard. I am adding wings and nail head trim down the wings. Thank you for the easy to follow directions.
All i cn say is amazing tutorial. I feel like a pro and I’ve almost completed my dream headboard. I am adding wings and nail head trim down the wings. Thank you for the easy to follow directions.
Thanks for this great tutorial! I have almost everything ready to start my project! I am totally excited!!
I noticed on the foam it looks like you cut out more than 57 button holes. Actually it looks like a 7th row was cut out but in the end you used only 6 rows. I love the look and really all the pillows will cover the lower untufted part. I am totally going to try this I just have to gather all my supplies. I am really in the planning stages and just wanted to see if I missed some thing.
Amazing!!! I am now inspired! You Rock!
I have a new temperpedic mattress and foundation on a frame
which is very high. It leaves only 24 inches between the top of the mattress and a window above.
What spacing would be appropriate. In the sample it was 8″ horizontal lines. or is a tufted headboard not practical for this size i.e. 24″H by 62″W?
Thank you.
Hi Kristi,
Love your tufted headboard… So pretty!! I would like to make a tufted bed bench to match my DIY headboard… I fell in love with this one.
http://www.restorationhardware.com/catalog/product/product.jsp?productId=prod1700020&categoryId=cat1580034
… Just wondering if you’ve ever tufted all the way down the sides of a bench or ottoman? Would love your advice on the corners. 1) Do you think sewing will be involved or should the tufts take care of the extra fabric? 2) how much foam/batting do you suggest for a bench? And 3) where would you start tufting… Top middle then work your way out and down? Or maybe a corner?
Thanks so much! Your post was SO helpful!!
Hello! I have a quick question, I’m a little lost about the 8″ 16″ and 24″ markings. What exactly does that mean? Help! I can’t wait to make this!
From the top edge of the headboard measure down 8″ place a mark, measure another 8″ from there (the 16″ line placement) and place a mark and another 8″ place a mark (the 24″ line placement) . Do this all the way across the board to get your horizontal lines.
OMG!! You’re a lifesaver! I used this site to make our headboard. For a first timer, the headboard turned out great. I made the mistake of purchasing too thick of a foam, my needles was too short to get through. Lol…so my husband had a great idea and we ended up using a crochet needle to thread out the buttons. Either way, It came out beautifully. I will now be making diamond tufted storage ottoman for our living room and since this is second time around, it should be much simpler and easier to put together. Thanks again! You are a great inspiration.
I have been looking for months on how to make a diamond tufted headboard. I added this to my favorites immediately. I had given up on finding instructions which were understandable and that would make the project seem doable. I had an idea in my head how to accomplish the tufting, but I just wasn’t sure. Now I know I was on the right track. I will be making this headboard in a few weeks once I am able to purchase all my stuff. I purchased the fabric and it is dupioni silk curtain panels I found on sale. I will have to sew them together to get the size I need and I now think I will have to try to find another panel to be sure to have enough for the buttons. Or just be very careful and try not to waste any fabric. I will be making a frame for my headboard because it will be at least 6 feet tall. I am doing the frame because I may use the headboard as a room divider and want the back side upholstered (not tufted). (Office area behind the bed) Thanks for the information, and once I am finished I will try to upload photos.
Muito perfeito,parabéns pelo trabalho,vou fazer para minha cama!!
Hey, regarding the drill bit size, 3/8″ is a fairly large diameter bit, is this correct? The pictures show a bit that looks a lot smaller, closer to 3/16″ diameter. I drilled the first hole for my wife with the 3/8″ bit and is a really big hole for just a pieces of thread to go through.
Thanks,
EH&K
WOW!!! AWESOME INSTRUCTIONS CAN”T WAIT TO TRY THIS!!! I am going to make one for our room which is also a King size bed. Can you tell me an estimate on how much the materials all cost you??
I think I am going to give this a shot. I would like to maybe use a thick pattern fabric, do you think that would work with this project?
Hi Kristi,
Thank you for these GREAT instructions. I had pinned this a couple years and finally made a tufted headboard using your tutorial. I really like how it turned out. You can see it here: http://www.lilikoijoy.com/2013/04/diy-tufted-headboard.html
I really appreciate you sharing your creativity with us. Thanks again. Sharon
My daughter is renovating her room. We saw this DIY tufted headboard and had to try it out! My daughter had this great idea which was to use drawer pulls instead of buttons. I drilled holes in the bottom of the board where we wanted the pulls to go and then we put the screws in those holes. We pushed the screws all the way through all of the material and them screwed on the top part of the hole. We went with crystals pulls and I’ve got to admit it looks great! This may seem tougher than using buttons, but I think that it will be more secure in the long run. I hope this helped!
can you post a pic of this…. I haven’t started yet because the buttons seem to be the most challenging part!
It is one thing to do a project and quite another to document everything to teach. Excellent job.
Kristi~
I tried the head board and it was great. However, I would like to make a few suggestions: the foam “piecing” should be done at the bottom of the headboard instead of the top. I made the
Oops! This is what happens when you try to post too late at night!! LOL!
Kristi,
I am making headboard for my stepdaughter and wanted to let you know about my experience so far. Your instructions have been great but I am finding that a few things can be done a little differently to make it easier and wanted to share with you. Most people will figure these things out after doing one but knowing in the beginning is helpful.
First I would get the center measurement before attaching the foam especially when dealing with a shaped board. I would also use the pieced foam at the bottom of the board and not the top; I noticed in your picture that you did this but didn’t realize it until after the fact. Ultimately it shouldn’t matter but if there are any noticeable flaws it wouldn’t show.
When I started the hole drilling I took your advice about going fast and had no issues at first but then ripped the foam a couple times. I repaired it but then decided to use a punch and hammer through the foam to mark my holes on the board and use my pipe tool to cut the foam first and then drill the holes out! Worked great and eliminated the risk of tearing the foam.
I’m taking step pics of my project and will send to you when I’m done so you can see how it all came out. Thanks again for the inspiration and encouragement to take on this project. I’m so excited about how it’s going to look!!
Janis Floyd
Arlington, TN
Kristi
THE BEST TUTORIAL I HAVE EVER SEEN on Diamond Tufted Upholster ! Thank you very much for sharing 🙂
All the best!
Ana
I just did this to make a diamond tufted ottoman. Worked great, but the best way to do it is to cut the holes in the foam first, then drill your holes. Eliminates all the issues with taring, which you almost certainly will have otherwise.
Agreed!!! Highly recommend cutting foam first—SO much easier!
I finished my stepdaughters headboard and she loves it!! Turned out great!! I wish I could send pics to you–you’d be proud!! Thanks again for the great tutorial!!
Hi, can I use 3″ foam
Yes, you can use any thickness of foam that you want.
I love these instructions! Can’t wait to start!
http://www.amazon.com/s/ref=sr_gnr_aps?rh=i%3Aaps%2Ck%3AButton+Tufting+Foam+Cutter&keywords=Button+Tufting+Foam+Cutter&ie=UTF8&qid=1387728989
Hi Kristi,
I followed your tutorial to make my own tufted headboard and I am so happy with the results.
Thanks so much for sharing!
Check out the final product on my blog: http://www.bbanman.com/diy-summer-tufting/
I also included a link back to your tutorial!
What size buttons did you use? Or does it matter?
Thanks.
Beautiful job and very informative tutorial. Hope you do not mind me adding; for those who are questioning amount of yardage you may have to ‘railroad’ your fabric …. if other words ‘seam two pieces together’ and ‘match’ up the fabric if it has a pattern.
Note: a) Fabric comes in standard sizes so often for larger projects it requires to be seamed. Drapery panels are a good example.
b) Ensure you purchase extra yardage if your fabric needs to be railroaded/matched. A similar rule is used, when purchasing/hanging wallpaper.
In event that you are using a plain fabric that may have ‘a nap’ (texture/sheen) — ensure that the two pieces run in the same direction when seaming.
Note: Some examples of fabric that have a nap are — velvets, corduroys, satins, faux/real fur, etc.
With all said above; if the fabric has been seamed and pressed properly, the piecing process will hardly be visible particularly when it is used in a ‘deep tufted’ project like Kristi’s beautiful headboard. -Brenda-
Hello! How many yards of fabric did you use to make this king size headboard? Thank you for sharing this very good headboard tutorial!
Your method of telling everything in this piece of writing is in fact
pleasant, every one be capable of effortlessly be aware
of it, Thanks a lot.
My spouse and I stumbled over here coming from a different page and thought I might check things
out. I like what I see so now i’m following you.
Look forward to looking into your web page repeatedly.
Love your instructions and am gathering info, etc. to do my own. What I was wondering was how much fabric I would need. I don’t want to buy way more than I need. I am planning on doing a king size headboard with a 3″ padding. I know the number of tufts definitely play a part in the formula. Is there some type of rule of thumb for figuring out the yardage?
I’d love to know you mounted this on the wall. I’ve gathered almost all my materials for an excellent Father’s Day gift for this weekend, but I’m stuck on this last step!
Wow! Beautiful job, I have to try this! Was wondering if I can use vinyl rather than fabric (for practicality and cleaning). Obviously vinyl would be thicker.. Would the process be more difficult and would I get the same effect? P.s. Sorry if someone asked you this before, there are just SO many comments to read through lol 🙂
Found this tutorial. I am so excited because we purchased our new home and waiting for our closing date. So many projects and how fun its all going to be, especially upholstering my very own headboard. So thank you for this simple and inspirational tutorial. A definite money save.
Hi Kristi,
First off, amazing tutorial and thank you for posting this for us all! I had a unique question that it seems no one has asked so far (yes, I went through all comments and they were so helpful!). I am actually creating a tufted WALL for my nursery. It will be 3 panels with each panel having a height of about 90 inches and the width will be about 47 inches. I purchased a 200 pack of buttons to cover fabric on them (60 buttons on each panel based on 8in diagonals) and wanted to ask you a few things based on your instructions.
1) How much extra fabric do you recommend if I used 1/2in plywood, 2in foam, and 1/2 batting PLUS taking into account the tufting that will take up fabric too for each button. I plan to make holes down to the plywood as you suggested
2) I purchased 1.5in buttons and mold kit. What size do you recommend I make the holes in the panel itself before tufting? I will likely use sharp scissors or go get a saw hole that a few people mentioned.
3) What type of cord do you recommend exactly? I see some mentioned drapery cord and others mentioned upholstery cord. Which one and why?
4) I would like to ‘pre-make’ all the buttons with their cords before starting the tuft process. With taking into consideration the thickness of the entire setup (plywood, batting, foam, fabric will be medium weight linen or polyester) and stapling behind the plywood a few times in the ‘z’ shape shown in your image, how long of cord do you recommend I cut for each button?
5) Is there a certain way or method we can use to assure ‘uniform tufting or tightness’ of each button?
I know this will be a very lengthy project because I’m essentially making there headboards but I’m really excited and will have friends and family help. Thank you for your input in advance!
I read this post when it came out, but am just now getting into headboards. I have a simple question. Is this one mounted to the wall or did you put some kind of “legs” on it? I would like to have some kind of legs for support, but not sure how to go about that.
I am looking to create my own headboard and have fallen in love with your fabric choice. What kind of fabric is this?
Hi, Kristi. Thanks to your exceptional instruction, I completed an upholstered headboard of my own. It was my first time, I’m very proud of the results and I could not have done it without your step-by-step. I’d be happy to share photos with you if you like. Many thanks for your mentoring.
-Bjorn
I’d love to see it! You can email me at [email protected]