John & Alice’s Master Bathroom:: The Reveal!
Oh my goodness…this was one of those projects that I thought may never end. There were several really time-consuming projects involved–painting the cabinets, making the framed mirrors, adding accent tiles, and painting the faucets and shower frame.
But there were also lots of trial and error projects that ended up being…well…errors. Like the torn paper wall treatment that was scrapped, and then the glazed wall treatment that turned out to be too busy. Then there was the wrestling back and forth with ideas of how to cover the brass shower frame. And let’s not forget the two days spent cutting little tiny wood pieces that I thought would end up as frames for the mirrors.
I’m sure there were more scrapped projects that I’m just not remembering right now. But at least it’s finished…FINALLY. Here’s a quick before and after view before we get to the details…

Now let’s start at the beginning, shall we? Here’s how the room started out. The cabinets were in good shape, but they were just so plain. And that sea of mirrors above the vanity was more than a little overpowering for the room….
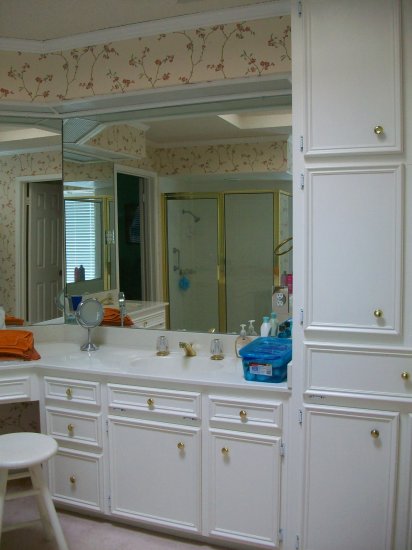
The flowery wallpaper just added to the busy look, and then there’s the pinkish carpet…yikes!!

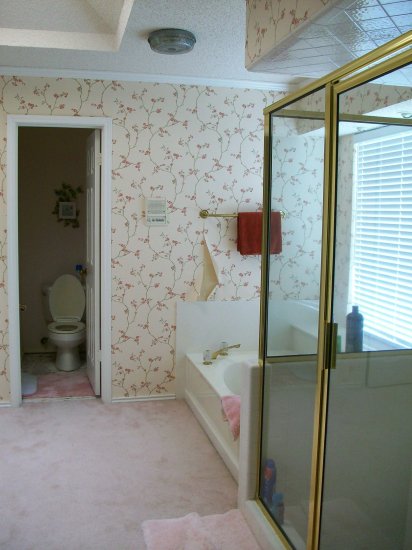
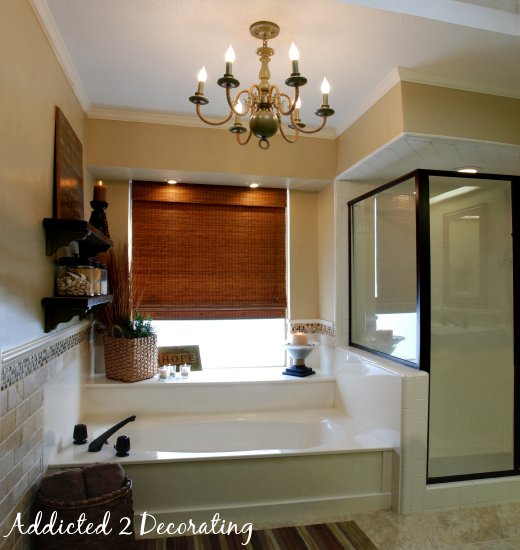
The bathtub area definitely had potential. I just hated that you had to look past a really bright brass-framed shower to see the tub and the window!
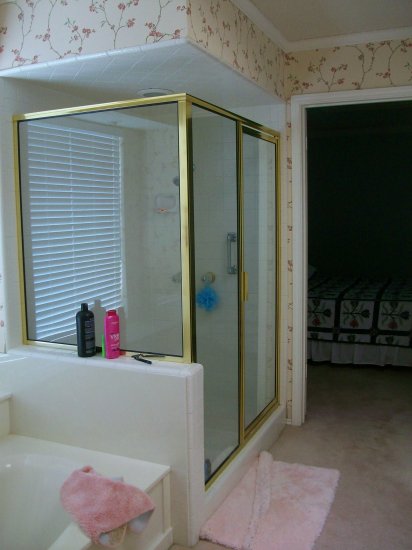
And there’s the brass-framed shower, in all its glory. It was the first thing you see when entering the bathroom, which means it was visible from the bedroom. Not good. Not good at all.

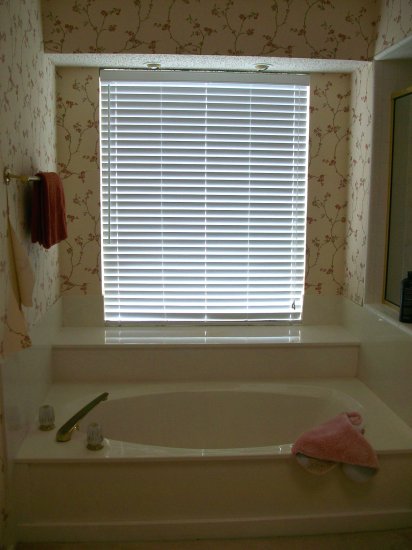
And a closer look of the tub area. I could see that it had potential.
So are you ready to jump from this 1980s flashback into the present? Here’s what this room looks like now..
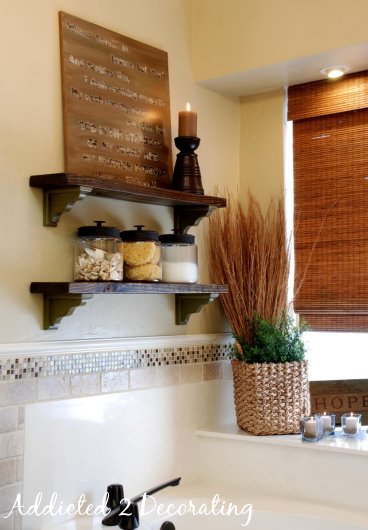
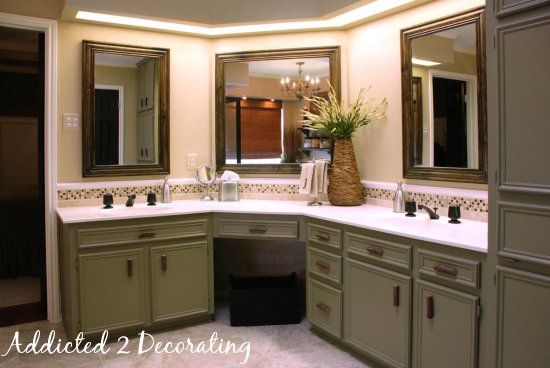
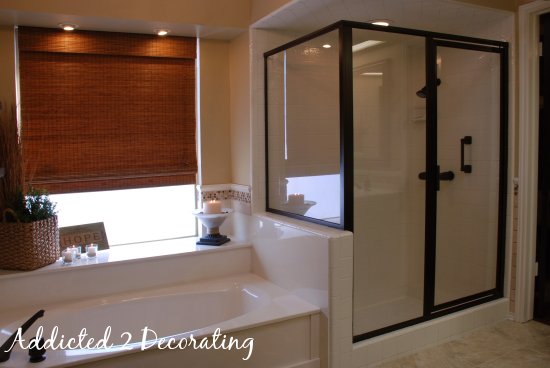
I added tumbled marble tile all the way around the room, accented by glass mosaic tile. And of course, all of the brass fixtures were painted oil-rubbed bronze. I added natural elements all throughout–wood, rattan, dried grasses, jute..

The shelves are very simple–stained 2″ x 6″ lumber, cut to 36″ long and stained, and then glued to ready-made wood brackets (from Home Depot) which were painted green and then stained/glazed for an antiqued look.
The tile continued around the vanity area and created a decorative backsplash. The cabinets were painted an earthy green, and the handles on the cabinets were made from real branches.

The shade on the window is from Home Depot. They didn’t carry them in the right size, so this one is actually about nine inches too short (sshhhhh…don’t tell!!). So in order to block the rest of the window, I added frosted window film. This was still much more cost-effective than purchasing a custom-size shade.
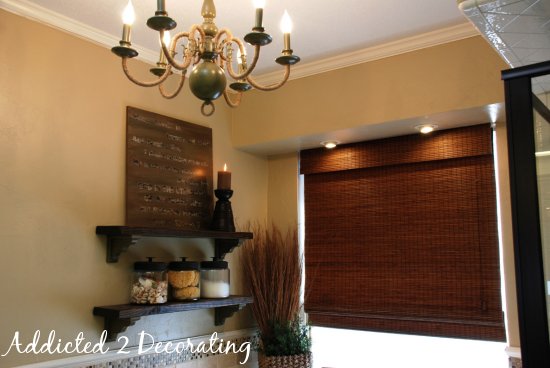
A close up of the $25 ReStore chandelier. It was originally shiny brass. I spray painted it with Rustoleum paint in Oregano, and then wrapped the arms and the little ring on the bottom with jute to add a natural texture.

I added the tall arrangement to camouflage the difference in the distance between the three mirrors.

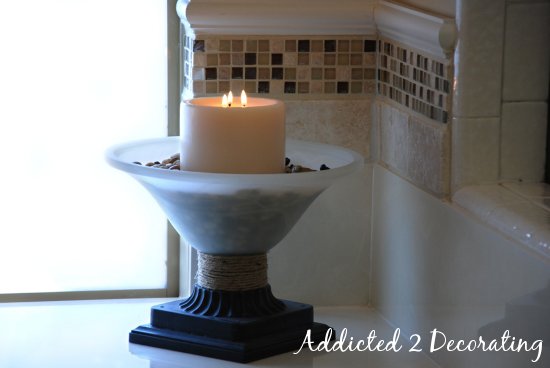
Close up of the footed bowl made from lighting parts found at ReStore and a piece of wood found at JoAnn Fabrics. A little glue, a little spray paint, and a bit of jute, and voila! A footed bowl perfect for holding a large candle.
And the new oil-rubbed bronze shower frame. This single project had the most impact towards updating this room than any other project, in my opinion.


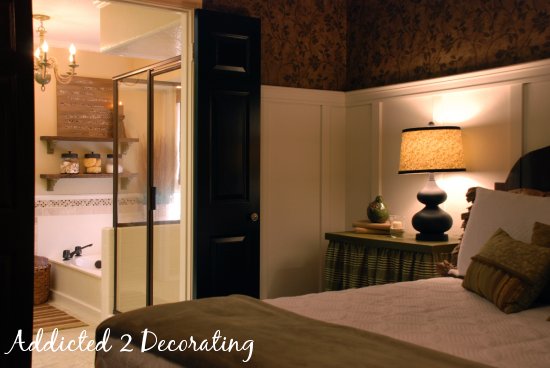
I absolutely love how the bathroom and bedroom flow together–the colors, the style, etc. It’s definitely a master suite now.

Now from the bedroom, instead of seeing shiny bright brass, you see oil-rubbed bronze. Much better!!!

Well, I think all of the time and effort was well worth it. I’m just thrilled with how this room turned out!!

Looking for specifics regarding this makeover? Here they are…
Sources
- Wall Color: Gobi Desert 710C-3, Behr Paint from Home Depot
- Cabinet Color: Dill, Martha Stewart from Home Depot (I had this color-matched in interior oil-based paint from Kelly Moore in a satin finish)
- Paint for faucets: Rustoleum, from Home Depot
- Chandelier: ReStore
- Rug: Home Depot
- Decorative Accessories: Marshall’s, Hobby Lobby, Pier 1, Michael’s, Bed Bath & Beyond, and Home Depot
- Woven Window Shade: DesignView Bamboo Providence Maple Roman Shade from Home Depot
DIY Projects For This Room
[categorythumbnaillist 491]
Posts About This Project:
[catlist id=308]

Addicted 2 Decorating is where I share my DIY and decorating journey as I remodel and decorate the 1948 fixer upper that my husband, Matt, and I bought in 2013. Matt has M.S. and is unable to do physical work, so I do the majority of the work on the house by myself. You can learn more about me here.


Amazing! Awesome job!!!!
Do you mind if I ask what product you used to do make the 80’s brass into dark bronze? I assume it was not spray paint…
Spray paint. You can find the link to that project under the section labeled “DIY Projects For This Room” at the end of the post (the second picture) as well as the next section “Post About This Project” – the third link down.
I am in the process of painting my shower door and yes the mist from the spray paint does travel everywhere.With that being said cover up everything in your bathroom prior to painting your door!🤣
I love the final bathroom reveal and I am now working on painting my shower door. 😍
It's beautiful, I'm so impressed!
Yes,yes, yes!… I have been watching your progress on this room from time to time. Although it took awhile, MOST DEFINITELY GORGEOUS! Really love what you did to the bathroom–looks so beautiful and up to date.
What originally caught my eye was the upper wall paper treat in the bedroom with the board and batten. The bathroom is just a lovely transition. Thanks so much for sharing your obvious talented project!
That is gorgeous!! I love the black shelves over the tub. I have a tub similar to that, and we have the builder-grade silver towel bar (as if it's in a useable place). I LOVE those shelves. 🙂 You did a remarkable job! Love it!
Amazing! Love everything about it! What color are the cabinets? LOVE THEM!
OMG! I love it! I can't wait to redo the brass in my mom's house. The final product is great! Congrats, you deserve a glass of wine and a soak in your new bathroom.
Kristi, I need to say you did another remarkable job again. I just love how this bathroom turned out. Like you said, it just flows together with the bedroom. The proper use of some decorative accents really adds the final touch to it.
Thumb Up!
Paula Jo
Class is what comes to mind when I see that room. It is elegant without being fussy. Beautiful.
Very well done… This bathroom is hot.
this post is very interesting. no wonder so many people who comment on this post including me. there is indeed a smart person. thanks for the info
I am very pleased to read your post. I found your site in google / reader. Your site is very good that this post is recommended by google to me to read it
Holy crap, that is amazing! You did such a great job, that should be in a magazine! Can you come do my bathroom??
I love the black doors! Beautiful!
It is beautiful. Yes, well worth the effort and the all the hard work….
Great job! I also have the "lovely" gold shower doors and always thought about spraypainting them. Can you share the steps to doing this project? I would appreciate it. Thanks!
Rebecca
Hi Rebecca~
I wrote all about the process here:
http://blog.addicted2decorating.com/2011/01/diy-project-how-to-paint-bathroom.html
Go for it!!! And when you're finished, send me pictures!!! 🙂
Always love seeing these amazing bathroom redesigns. Appreciate you linking to the process!
Hi, I am just wondering how the painted faucets are holding up? I thought about painting my shower door as well, but was afraid it would look awful after a few washings. I love this bathroom, you did a wonderful job.
Melody, this isn’t my house, so I have no idea. I haven’t seen them since about six month after they were painted, and they looked just fine then.
WOW! This is amazing…Your time spent definitely paid off!!!!
oh my lordy, oh my lordy!!!! it looks GREAT!! i love it!!!
Beautiful transformation! I love all of it, the colors, textures everything!
I'm just amazed. I could tell in the before pics what great bones your room had–but that after. WOW! And huge kudos to you for making it so budget friendly, too. The tile is amazing, the love the color of the cabinets, but I also love how you built that simple candle holder. I'm so impressed. Gorgeous!
Your bathroom looks amazing! You did a great job!
Kristi, I was left speechless……had to go get some more coffee. This is an amazing transofrmation looks like a design show photo shoot and I agree the flow to the master bedroom is seemless, very very beautiful! so nice to happen by your blog from between naps on the porch
It turned out wonderful. I love the colors you chose ! Kammy
Kristi, this is just an amazing transformation! I just don't even know what to say except this is just beautiful and all the work you did was so worth it, it looks like a brand new bathroom!
I went into your tutorial on how to paint the faucets and handles because this is exactly what I want to do to our powder room faucets and have wondered how F-O-R-E-V-E-R!
I'd say you have done an outstanding job on this and deserve a huge pat on the back girl!
Thank you for sharing in another MM, this was the best I've seen!
Terry
Such a huge change! I love the cabinet color!
Kristi,
Fabulous job!!! Loved your chandelier. I bought a similar one and painted it silver. I loved how you tied in so many different elements. It's a beautiful make-over.
This room IS.ABSOLUTELY.GORGEOUS! Can you come and do my master bathroom? I love how you incorporated all of the natural elements into the room and the tile that ties everything together so well. I also agree that the shower made a huge difference in updating the bathroom. All of your hard work really paid off! Love the chandelier too…I would never have thought of that beautiful oregano color.
WOWSA you turned and outdated (but huge) bathroom into a spa retreat. Fabulous!
May I ask, did you paint the brass shower enclosure or replace it? We have some (ok a lot) of "80s" brass that I would really like to
salvage and repaint.
Really impressive transformation! I'm pretty sure I used that exact same tile (travertine plus mosaic accent) in my kitchen!! LOVE IT!
I love that before and after. I would love top paint the fixtures and brass on my shower stall but am afraid. How is the paint holding up on the shower, faucets etc??
This is one of the best bathroom makeovers I think I've seen. I love how you didn't just strip it but used what was already there.
Great job!!
This is one of those rooms where you would walk in and just go "Aaaaahhh". Love it! This is truly an amazing makeover, one of the best I've seen. 🙂
I LOVE LOVE LOVE this bathroom!
May I ask what color of paint did you use on the walls? It is the perfect shade of tan!
Brenda
Hi Brenda~~The wall color is from Behr (Home Depot) and it's called Gobi Desert.
All of the sources for the bathroom are on this page…
https://www.addicted2decorating.com/john-and-alices-master-bathroom-makeover.html
Just scroll down to the "Sources" section.
How Luxurious! I L.O.V.E. the shower surround! best part! Great Job!
Wow! It looks great! Thank you for all of the detailed information!
-Diana
Awesome job! What kind of tiles did you use on the floor?
Hi Alaroway~
The homeowners replaced the flooring in the entire house before I started working on the room. It's all Mannington vinyl. Vinyl tile in the bathrooms, and vinyl "wood plank" in the rest of the house.
Love that you upcycled that Re-Store chandelier. And the bathroom looks fabulous. Where have you been all my blog-life? Following you now.
Brittany
http://www.prettyhandygirl.com
What a great way to save money and landfill! We will do the same and we can't wait to see what ours will look like.
THANKS so much for your tips!
This bathroom is so similarly laid out to ours, and this post has given oodles of inspiration!! Thank you soooo much!
what a great redo it turned out stunning!
Love the look…not really into the chandelier..think it looks to "made over"
I too have polished brass in my home,,,and it's a new home! I am pleasantly surpised to see that brass and gold finishes are making a huge comeback for 2011!! I will now be in line with the current trends…everyone will soon be wanting it back!
juliesfreshperspectives.blogspot.com
Gorgeous bathroom! What a simplified, tranquil space you created! Thanks for all the great ideas for updating.
Are you serious?? GORGEOUS!! Wow! That is such an amazing transformation! I'm so impressed!
unfortunately that paint job will not adhere over time… ive been producing faux oil rubbed bronze for years… results are great for items that aren't handled much… but a faucet is a handle. Then add a wet environment… hmm
best to give it a top coat and add a bit of time before it finally wears…
Gorgeous bathroom! What a simplified, tranquil space you created! Thanks for all the great ideas for updating.
Awesome job! What kind of tiles did you use on the floor?
How Luxurious! I L.O.V.E. the shower surround! best part! Great Job!
This is one of those rooms where you would walk in and just go "Aaaaahhh". Love it! This is truly an amazing makeover, one of the best I've seen. 🙂
Kristi, I was left speechless……had to go get some more coffee. This is an amazing transofrmation looks like a design show photo shoot and I agree the flow to the master bedroom is seemless, very very beautiful! so nice to happen by your blog from between naps on the porch
Beautiful transformation! I love all of it, the colors, textures everything!
I am very pleased to read your post. I found your site in google / reader. Your site is very good that this post is recommended by google to me to read it
this post is very interesting. no wonder so many people who comment on this post including me. there is indeed a smart person. thanks for the info
Another fabulous design. Your talents are endless! Love to know how the painted faucets hold up. . . have a brass/chrome combo in my bath that I would love to paint over the brass part. Love the tutorials!
I am BEYOND impressed!!! You are ABSOLUTELY AMAZING!!!! I just found your site and I know I will be back many, many times for ideas if we ever buy our own house. Thanks!!!
Kristi 🙂
Thanks so much for such great inspiration.
I almost didn't comment, til I went back to your front page and it said, "….. and leave a comment, I *love* comments"….. so here it is. 🙂 I'm ecstatic that I found your site last week. I've been poring over it ever since, and came across this post earlier this evening.
Kristi, you just saved my bathroom. LOL!!! I *swear*, your culmination of posts for this project could have been written by me. I've been "re-doing" my extremely tiny bathroom for 3 weeks now…. and the worse part is, it's only a temp re-do til we tear the whole thing out and start from scratch! But I couldn't wait coz it's so horrificly ugly (is that even a word??) Blue cultured fake marble laminate spanning 3 feet, but only consists of one sink on the far left. A HUGE builder's mirror across the wall above the entire thing. Vanity that is so old, it has "decorative"
diamond-shaped pieces of wood glued to the front of all the doors in the center, and the handles are centered in *those*. The molded shower is that old yellow/gold, and the sink is white. Floor is linoleum.
To make a long story short, the walls have been painted 3 times so far (I'm currently back to primer right now) the vanity is espresso (but I'm not happy with it; the poly is too shiny, I hate the diamonds, & spray-painting the handles didn't help), and the laminate is also on it's 3rd coat of primer…. meaning 3 attempts have been made on the walls and the counter, and I wasn't happy with any of them. The only thing acceptable so far is the cheap peel-and-stick fake travertine tiles, which only cost 25 cents each on sale and look pretty good for cheapo. LOL We did remove the huge mirror, but I still wanted a mirror….. just not a 3 foot mirror. 🙂
Anyway, I saw this bathroom you did……. can you say LLUUUURRRVVVEEEE ????? I immediately knew this was what i've been looking for!!! LOVE the colors; already have 90% of the accessories; matches the floor I have down; all projects are do-able by me, AND it's gorgeous! THANK YOU!!! for taking the time to post all those tutorials!!!! <3 I just started reading DIY blogs a few weeks ago, and yours is the BOMB!!! Thank you so much, again… 🙂
Amazing! Did you paint the shower frame too or is that a new shower?
OMG this looks amazing!! Now I have proof that our ugly shower frame can be spray painted bronze-hooray 🙂
What a transformation!! Thanks for sharing and the inspiration for tackling such a project.
Ameturish at best. You can't get those window blinds right can you?
How has the paint held up on the faucets and the shower? I am thinking about doing this to my bathroom. And did you end up using a top coat or not? You mentioned you might not because it was glossy. Great job!
beautiful I love it thanks for the great ideas!!
OMG! You transformed that bathroom so much it makes me what to remodel mine too! I love your choice of colors and the earthy designs are just perfect. The minimalism of your new bathroom just makes it so elegant. Although your framed door looks really nice on your bathroom, I would prefer a frameless glass door instead. Talking about cleaning, I heard frameless glass doors are much better to maintain. But anyway, overall, it was pretty impressing. Good job! 🙂
Another AMAZING job!!! Very interested in the painting of the brass….wondering how that al hold up….
Looks great, LOVE the new tub vignette!!!
Where exactly is the source section??? I have been scrolling up and down and cannot seem to find it and I am dying to know where those jars are with the brass lids. I have been searching for jars just like those for my bath salts. I also am going to use a couple of your ideas for my bathroom reno. I love your work!
Very nice work! What a difference! You’re quite talented! Thanks for sharing!
It looks fantastic! Now that you’ve had this done for over a year, how are the painted faucets and drains holding up?
Honestly, it’s been about six months since I saw them myself, but they were holding up great!
I seriously think I was meant to find this post! Not only do I suffer from the awful gold fixtures EVERYWHERE!!! but our names are Alice + John too! So crazy!
How long has it been since you painted the brass shower frame and faucets. What are you cleaning them with? How have they held up?
My husband clean our bathrooms and uses vinegar and water in a spray bottle to kill any bacteria hanging around.
Do you think that this RustOlean Spray Paint would hold up to weekly cleaning with vinegar?
I came across your blog on pinterest when I was looking for a remedy to my ugly gold shower. I think I might have goosebumps after reading this post because this is EXACTLY the idea I have for our bathroom!!! I mean down to the shade on the window and EVERYTHING! I’m SO happy to know there is a remedy OTHER than ripping it out 🙂
I am thinking about painting my brass shower. How long has it been since you painted it? Is it holding up? Did you ever put a final clear automobile finish on it? It looks great.
I have the exact questions! I’m thinking about painting my shower as well – but worry about how long it help up and if the finish went on after all.
Wow! Dramatic change, it’s Stunning, so, so Beautiful!
This is beautiful, thanks for all the wonderful diy projects!
Great design. It’s amazing. Did you paint the shower frame too or is that a new shower?
all your designs are so amazing. i want you to decorate my entire home. lol
Hello again! Rustoleum has a universal paint and primer in one. Could this product be used and eliminate the primer step? Thank you!
Just because this is a bathroom, and the faucets get loads of wear and water, I personally would not skip a step. I think it’s important to use some sort of etching primer or automobile primer before you paint.
This blog was a lifesaver… I just purchased a home and the house it beautiful except all the BRASS fixtures! My bathroom is almost identical to yours…THANK YOU SO MUCH on how to save my 80’s shower!!!! I hated looking at it and did not have the money to redo the bathroom.
Hello Kristi! So you’ll be happy to know that I have successfully painted all our faucets in our bathroom from silver/brass to oil rubbed bronze. I saved the shower enclosure because that was a piece that would take a lot of prep and time. So now the shower enclosure and the light fixture are the last two things to do. My question is for the shower enclosure. It has caulking around some of it but then some really thick plastic piping between the frosted glass and brass frame. Did you take that off did you tape around it? Thank you, Amanda
Did you spray paint? The fixtures. ..mine are gold and dislike them. How exactly did you do them
Hi Stacey~
You can see the details on painting the faucet and shower enclosure here: https://www.addicted2decorating.com/d-i-y-project-how-to-paint-a-bathroom-faucet-shower-enclosure.html
I’m also changing some of my bathroom – 1993 style, as we prepare the house to sell. I’m trying painting my shiny brass to make it chrome, and so far, so good. I’m quite impressed with how clean your glass shower enclosure is. I’ve tried just about everything I’ve found on the net, except a mild muriatic acid mixture because the instructions suggest taking a part the shower enclosure first and doing the work outside. I might have to resort to that. How did you clean the glass, or are you just lucky and don’t have any buildup on it?
Thanks.
Hi Kristi!
I LOVE your site and I have to say that I LOVE this redo! It’s amazing. Since its been a couple of yrs now I was wondering if you had a recent update on how everything was holding up. I am considering painting my faucets and enclosure as well. Thanks so much for the inspiration 🙂
Hi Angela~
Unfortunately, I haven’t seen this bathroom in at least a year-and-a-half, so I have no idea how it’s holding up. Sorry!
You are amazing! Your work is amazing! I love looking and envy your talent. You are so inspiring for those who don’t have large wallets for improvements. Thank you.
I love this bathroom! It is a lot like mine in the house I just bought. So looking forward to changing it. I love the oil rubbed bronze frame instead of the nasty brass. You have great ideas. I wish you lived closer to Dallas, I would hire you!
Hi, in just wondering how the painted faucets are holding up? I thought about painting my shower door as well, but was afraid it would look awful after a few washings. I love this bathroom, you did a wonderful job.
Hi, I am just wondering how the painted faucets are holding up? I thought about painting my shower door as well, but was afraid it would look awful after a few washings. I love this bathroom, you did a wonderful job.
I just need to paint the brass on the shower enclosure – If you did this again and only had to do the shower – would you remove the hardware and prep and paint and reinstall?
I am so impressed with the shower surround update. I can see that the time and labor involved will pay off. Did you use the automobile primer on the shower frame too? I saw the video on Youtube video and it looked like you just painted the ORB on the brass.
Thanks!
There’s no denying this is a winning update to the master bathroom! Terrific job on selecting the color scheme and details – looks great!
How did you do the brass shower stall. You mention it often, but how and what did you do. We have the exact problem with a shower! And we don’t see it in the sources.
The details are here: https://www.addicted2decorating.com/d-i-y-project-how-to-paint-a-bathroom-faucet-shower-enclosure.html
Beautifully decorated bath. I’m ready for you to give me advice on my bath redo.
Please email to me some information on arranging a meeting at my place. You do
Wonderful work, are you doing new jobs?
I know this is an old post, but I’ve been stalking your blog the last 2 days, as I just discovered it! In the before pictures, I noticed that there was a towel bar above the tub, but you removed it in the afters. Where did you put the towel bar, or is there one at all? I only ask because this is very similar to the layout of my bath, but I would much rather use that space above the tub for decorative shelving with accent pieces like you have here. I’ve seen some people put their towel bars in the toilet room, but to me this just seems unsanitary (I don’t want to dry my freshly cleaned self with a towel that has potentially been subjected to toilet spray all day!).
Thanks!
Hi Jess~
It’s been so long that I honestly can’t remember where I put it. But I generally opt for robe hangers instead of towel bars for towels because they take up far less space.
so beautiful…. I would really like to see pics of your bedroom if that doesn’t sound creepy. :-). I like dark walls in my bedroom and would love some ideas from yours, I need to update.
This room is the inspiration for my master bath makeover. I love all the details and information you provided! I’m wondering about the sign/wall art that is on the top shelf. Is this something that you made and can you give details about what it is? I would like to mimic the design in some way. Thanks!
I realize this post is years old, but on the off-chance that you might still reply, I have to ask:
Do you happen to remember the specifics on those accent tiles? That is, the combination of the tumbled marble and the glass mosaic tiles? My husband and I can’t agree on anything when it comes to design, but when we came across your page we both said, “WE WANT THAT!” So, if you happen to remember anything about where you got them, what brand, etc., it would be SO wonderful.
THANK YOU! 🙂
I don’t remember the specifics, but I do remember that I bought everything at Home Depot.
This is exactly what I am wanting to do with my 80’s Bathrooms!! I am curious how the faucets and shower trim have held up. Did you do anything to the metal before painting and did you use a clear coat? It looks really great, you did a fantastic job!!
Thank you!
How well has the painting held up now that it has been several years – especially in the shower?
Hiya from Austin Texas! This turned out so great and gave me the confidence to try these techniques myself. Yes, I too, have the gold monster. My previous owner highlighted the gold framing with a full line of faucets, handles, mirror and door handles. I want to take that new fancy Rustoleum all-in-one spray paint to everything!
I am also curious about the cultured marble back splash… I cannot tell from the pic if it’s integrated/one-piece/sloped or if it was a rectangular, individual cut, which you could remove and then apply the tile to the wall board. Did you tile on top of the cultured marble, if so, how did you get it so flush?
I removed the cultured marble backsplash and replaced it with tile.
Kristi- long time follower here (I remember when you were working on this!)
I want to paint the shower frame in my son’s bathroom, but I’m wondering about longevity and durability. Any idea on how their shower is holding up after 9 years?
how did the painted faucets stand up to daily wear and tear ? thanks Tempted to do this as well
I don’t know. It wasn’t my house, and the homeowners sold the house about six months later.