A Seven-Foot-Tall Queen Size Headboard (For $25)
It’s not finished yet (it still needs lots and lots of sanding, and then stain and polyurethane), but I started on the headboard for the white room yesterday. I wanted a big, dramatic statement on that long, white wall, and I think this seven-foot-tall headboard will do the trick. 🙂

I made a similar headboard three years ago for John & Alice’s master bedroom, and while I try my best not to repeat projects, the fact is that I needed a really inexpensive headboard for this room, and this seemed like the best way to achieve that.
For this headboard, I purchased eleven cedar fence pickets which were $2.25 each. And that’s it. Everything else I needed (screws, construction adhesive, extra wood), I already had on hand. So this really did cost me about $25 out of pocket. Not too bad for a seven-foot-tall headboard!!

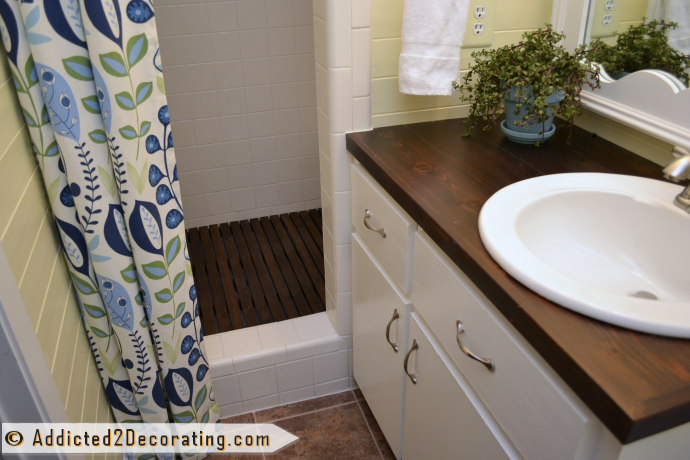
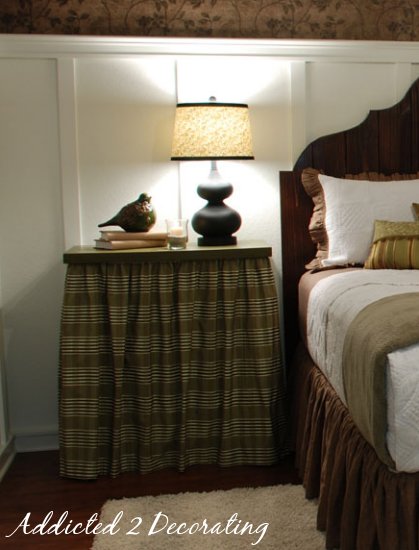
I hope to stain it kind of a medium brown, somewhere between the shade on the window (which you can see in the pic above) and the countertop and shower mat in the adjoining bathroom.
So we’ll see how it turns out tomorrow Thursday. Cedar can be kind of unpredictable when it comes to stain, so fingers crossed that it doesn’t turn orange! 🙂
This headboard was incredibly simple to make. Here’s how I did it…
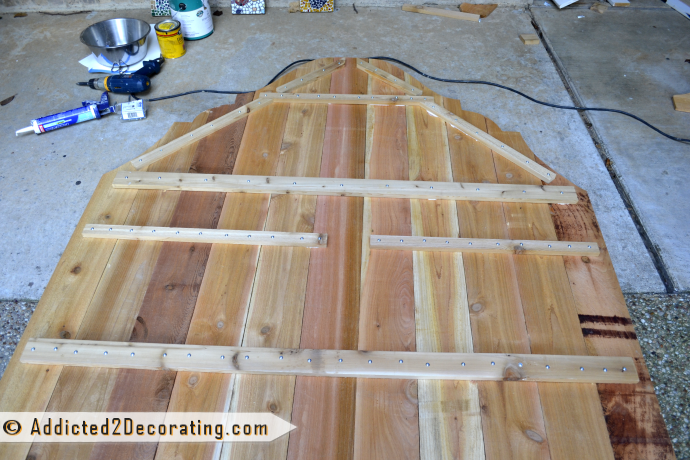
First, I lined up my cedar fence boards side-by-side on the ground, with the good sides facing down. A queen size requires eleven fence boards. When I got them all arranged so that they fit together tightly, I dropped the two outer boards down 14 inches to create the legs. Then I used some scrap pieces of 1 x 2 and 1 x 3 cedar, along with LocTite construction adhesive and 1.25-inch screws to secure the boards together.
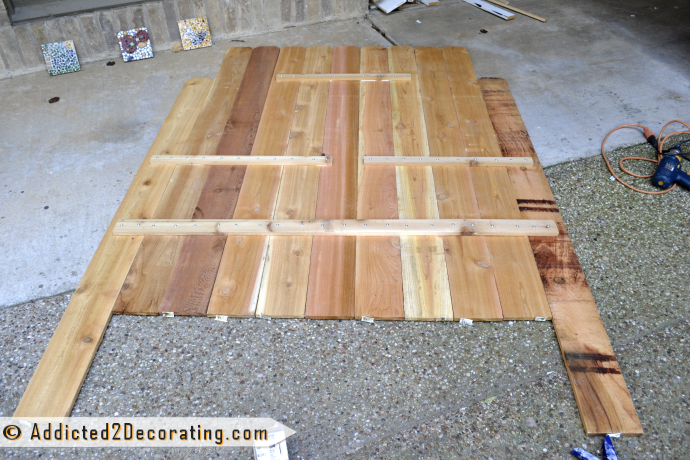
I tried to kind of plan ahead so that the boards on back wouldn’t interfere with the shape that I wanted to cut out.
At this point, I carefully turned the headboard over. It was still very flimsy at this point since it had so little bracing on the back, but I wanted to get the shape cut out before adding more bracing.
Just like on the other headboard, and on the mirror I made for the bathroom, I used heavy paper (I used watercolor paper since it’s what I had, but you can also use cardstock paper, newspaper, cardboard, etc.) to draw half of my design for the top of the headboard.
After cutting out the design, I traced the design onto half of the headboard.
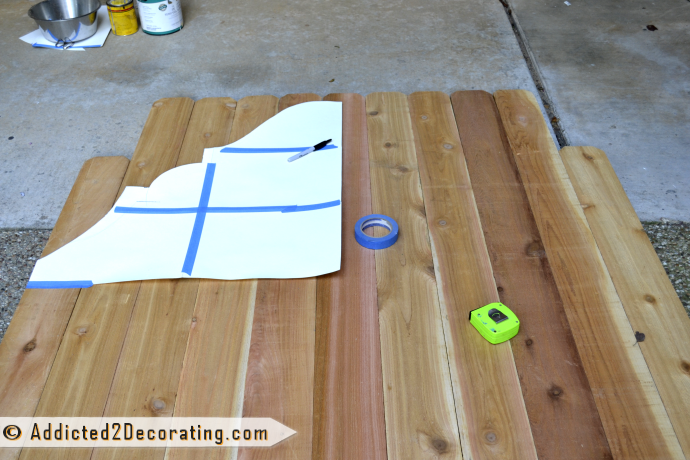
Then I flipped the pattern over and traced the design on the other side for a perfectly symmetrical shape.

This headboard was so huge that in order to cut out the shape, I had to stand it upright, and use a ladder to reach the top. (I am, after all, only five feet tall!) 😀 I used my jigsaw with the same blade made for cutting curves that I used on the scalloped frame for the bathroom mirror. But I’ll admit, I didn’t take near the time or care in cutting out this headboard that I did with the frame since imperfections on projects like this aren’t nearly as obvious as they are on things like a mirror frame.
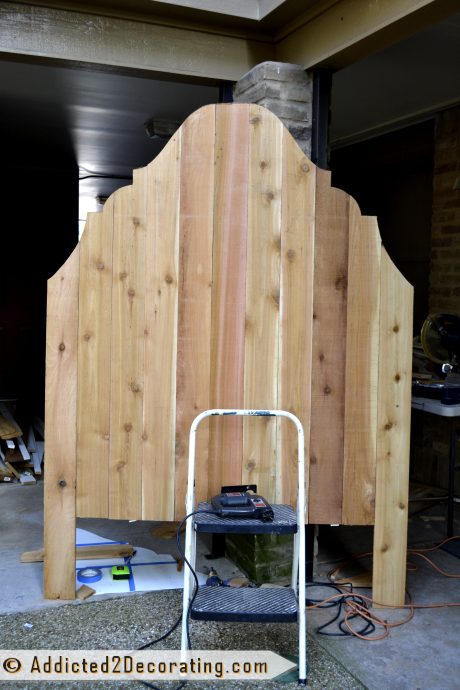
After the shape was cut out, I placed the headboard face down again, and added more bracing to the back. Once these strips of wood were in place, the headboard was very sturdy.
So today, I’ve got a ton of sanding to do. These fence boards are so incredibly rough, but I know that they can be sanded (almost) perfectly smoothly because these fence pickets are what I used to make the wood countertop in the teal and yellow bathroom.
I’ll show you the finished headboard tomorrow Thursday!

Addicted 2 Decorating is where I share my DIY and decorating journey as I remodel and decorate the 1948 fixer upper that my husband, Matt, and I bought in 2013. Matt has M.S. and is unable to do physical work, so I do the majority of the work on the house by myself. You can learn more about me here.
Such an impressive headboard, Kristi! I’m loving all the choices you’re making for this room. Can’t wait to see it finished!
It will definately make a statement in this room! I love the size and hope your staining comes out the color you wish it to be. Can’t wait to see this room completed – sooooo exciting!
I am so inspired by your ambition and I can’t wait to see the finished product! Love the shape, too, by the way.
The Energizer Bunny strikes again!!!!! Seriously, your energy level leaves me in awe. Not to mention your off the charts talent. 😉
Loving this headboard! You are so creative! I am looking forward to seeing the outcome!
Amazing! You are truly a skilled wood-woman!
I love it and will keep it in mind when I’m ready to do something for my headboard.
AMAZing!!! WOW!
Way cool! Can’t wait to see it when it’s done!! 🙂
Loving your ingenuity once again! Can’t wait to see the bedding you choose to coordinate with the green and white chevron stripe drapes. Whatever it is, I know it will be lovely!
I love this idea. I bet it took a lot of sanding to get those cedar planks smooth. I hate sanding, but it’s definitely a way to keep your costs down. Can’t wait to see it painted.
This is amazing! I need to build this for my photobooth backdrop for my upcoming wedding!
I guess your going to have to start selling these headboards on Etsy eh?, good job!.
Love it!
You are one ambitious girl but that’s evident by all the projects you’ve taken on in renovating your condo. So glad I found your blog.
Hey Kristi, thanks for the tutorial! My sister had shown me a pic from Pinterest of a similar headboard, but wanted a few tips on how to do it. The next day…guess what showed up on my newsfeed in facebook? YOUR TUTORIAL!!! She was so excited and had my dad help her….click link to see final project. http://customslipcoversbyshelley.blogspot.com/2013/09/niks-bedding.html
Love what you’ve done here, what brand and shade of stain did you choose?
I think I used Rust-Oleum in Dark Walnut.