Painting Success (Kind Of ) And Sconces Installed
Well, y’all, I finally had some level of painting success. I sprayed the cabinets, and the finish came out much better. It’s still not perfect, but better.
And once again, it’s that long flat piece at the top that’s giving me trouble. No matter what method of painting I use (roller, brush, sprayer), I can still only paint 1/3 of it at a time before I have to get off the ladder, move the ladder, get back up there, and continue painting. And those stop/start areas always show up. They show up less with the sprayer, but they still show up.

But at this point, I think I just need to be satisfied. This kitchen just may be the very thing that breaks me of my perfectionism. And at this point, I think the only people who would be bothered by these areas are my perfectionist brother and me. (Yes, he’s afflicted as well.) 😀
The bottom line is that I need to move on. I could spend another week trying to get this perfect, but I’ll never get this kitchen finished at this rate. It’s time to leave well enough alone. Plus, at this point, these cabinets have so much paint on them it’ll probably take a year for them to fully cure. Ha!
I can’t continue adding paint. It’s enough, already. I keep having images of Hal’s painting from Malcolm In The Middle. Did you ever watch that show? It’s so stinkin’ funny! But there’s one episode where Hal, the father, takes “kidney failure” leave from work to focus on something he’s always wanted to do — create a painting that he’s envisioned in his mind for years. He spends an entire week in his garage working on this painting, and just can’t get it right. Finally in the end, he gets the painting just like he wants it — absolute perfection and just as he envisioned it in his head — and then the whole family stands there watching as the 2-inch thick layer of paint starts to peel away from the canvas just from the sheer weight of the paint that he piled onto that canvas. (I tried to find a video of it. It’s Season 2 Episode 14. Seriously one of the funniest shows!)
So yeah…I’m done. And good enough is good enough.
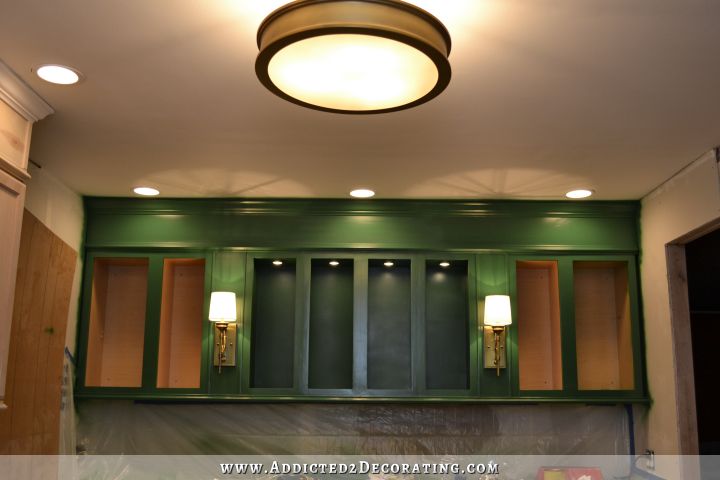
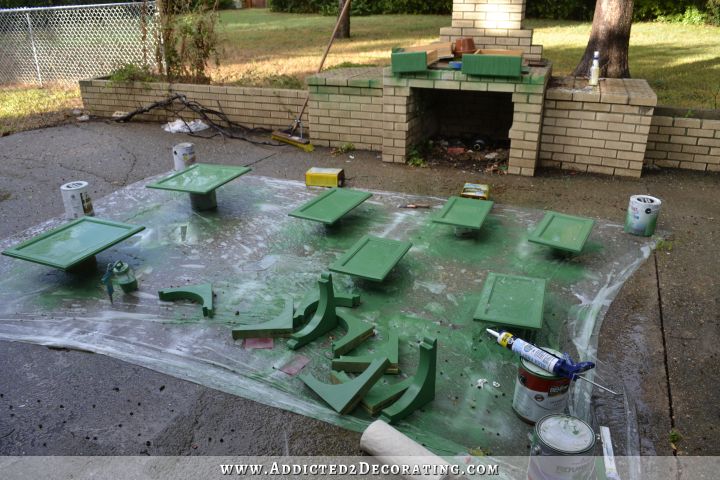
Now let me just say that I love my spray gun. Its the Critter spray gun that I bought on Amazon. It sprays a very fine mist of paint, so the finish is very smooth. And it also sprays very accurately. I didn’t tape off the ceiling, and you can see here that the overspray is pretty minimal. In fact, most of that paint was already on the ceiling from when I brushed the paint on.

I’m also really starting to appreciate these cheap stock cabinets from Home Depot. Before I sprayed, I spent probably two hours trying to tape/paper the insides of the four cabinets that I didn’t want painted. It was a big frustrating task because I couldn’t get any tape to stick to the inside of the cabinets. I finally did get three of the cabinets papered and taped, but on the last one, I gave up. I’d tape up a piece of paper, and it would fall right down. So I decided to just take my chances without the paper.
Turns out that the slick melamine coated interiors of these cabinets are completely unaffected by latex paint. See the over spray in the picture below? And see the three areas where I swiped my finger through it?
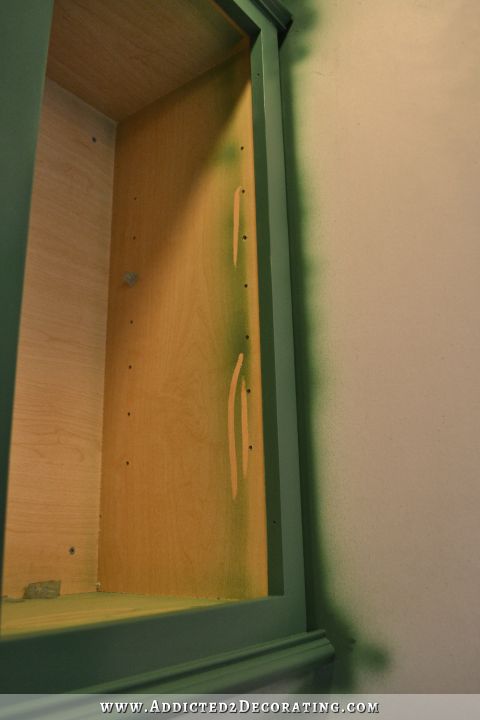
I did that after it was completely dry, and it came off really easily like dry powder. So no more taping/papering the interiors of the cabinets for me. As long as I don’t accidentally sand the insides, and then accidentally prime them with oil-based primer, I’ll be fine. I’ll just spray the cabinets, and then go back with a paper towel and wipe off all of that paint dust.
And now, can we just take a minute and look at these scones?
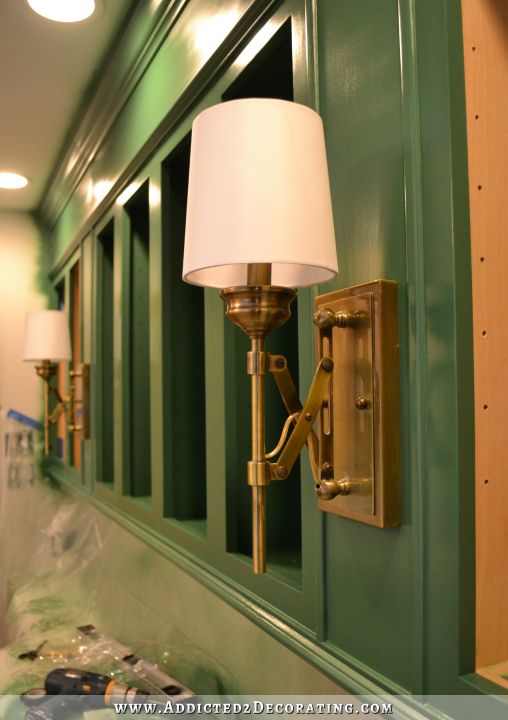
I love them. I purchased them from Shades Of Light, and originally planned to use them above my fireplace in the living room, flanking a piece of art. But when the artwork I used turned out to be bigger than planned, I came up with another place for these sconces. I’m actually really glad it turned out that way! I think these are the perfect addition to this wall of cabinets.
I don’t think Shades Of Light carries this sconce anymore. I haven’t been able to find it on their website ever since I purchased mine. If I find it somewhere else, I’ll add that info to this post.
Update: It looks like Ballard Designs carries this sconce. Unfortunately, they sell it for more than what I paid. 🙁
So now I just need to finish up the gold leaf on the remaining five doors, and I’ll actually, finally have one bank of cabinets finished.

Well, kind of. I’ll still need to get the glass for the four middle doors, but I’m not in a hurry for that. I’m focused on painting for now.

Addicted 2 Decorating is where I share my DIY and decorating journey as I remodel and decorate the 1948 fixer upper that my husband, Matt, and I bought in 2013. Matt has M.S. and is unable to do physical work, so I do the majority of the work on the house by myself. You can learn more about me here.

I get so excited to see your progress. Everything is coming along so beautifully. Love those sconces
They look marvelous! I would never notice the fine details in the paint, and I bet nobody else will unless they read about it first. I was wondering if you were still trying the mesh cabinet fronts with the leafing. It sounds like you’re going with glass again, is that right?
So excited for you!!!! They look great and the sconce is very pretty. Your vision and focus is pretty amazing. I’m sure no one is going to notice those stop/start areas but you and I’m sure we wouldn’t see it either if you hadn’t pointed it out. Great job!!!
Hi Kristi:
I just want you to know that I think you are amazing. I’ve been following you on facebook for about 6 months now and want you to know how much I admire you! Keep up the good work and DON’T BE SO HARD ON YOURSELF 🙂
Wow – Absolutely Gorgeous!
Love it!! The sconces look great too.
If ever in the future you have to stand high and spray something and want to avoid moving the ladder, you could create a scaffolding thing by using 2 ladders, 2x2x8’s and 4 screw clamps. Still need to be careful, but it works in a pinch as long as the ladders have their steps at the same height. Just rest the 2bys on the steps at correct height and then use the clamps to attach them to the steps
Oh forgot to mention the 2bys need to be much longer than the span and stick out as far as possible on both sides and put some weight on them to counter balance. Or you could use a table you don’t mind walking on if you have the space.
Ditto, Lena! We haven’t used your ladder method yet but had loaner scaffolding from a nice contractor and it was great for washing and painting a 2 story foyer and hanging a new light fixture!
I was going to say the same thing. You could even build 2 tall sawhorses and get a heavy duty board to put on top of it. I have done this before. If it is a short span it works really well. It is a pain when you have 10 ft ceilings and you have to keep moving the ladder.
Could you use two ladders with a board between them? You would not have to get off the ladder so your painting would not start and stop. Painting a stairway wall gave me the idea.
Good luck no matter what it will look fab.
J
The cabinets look fabulous! Once the rest of them are painted, I wouldn’t be surprised if those spots don’t just fade into the background. Now that you have the method worked out, it shouldn’t take as long to finish the rest. I’m looking forward to seeing the gilded doors in place; I think they’re really going to look great with the sconces and your overhead light.
Once you reach that stage, you’ll have a fully functional and mostly completed kitchen. Have you considered just putting a coat of paint on the kitchen walls for now and then backtracking to finish up the small jobs in the living room, dining room, and hallway, such as finishing the trim on the wall behind the fireplace, the front door, and the hallway? I know you said you’ll never again finish a sheetrock ceiling, but the hallway ceiling isn’t that much to do. It might feel a lot better to you to have those small things out of the way before tackling the tile in the kitchen. I know you have your own way of doing things, letting your muse guide you as it were, so if this is not your way, then do what you feel like doing at your own pace of course. But since it was those little things that were discouraging you a few days ago, maybe it would help to get them out of the way.
This looks amazing! I think you might be pleasantly surprised to find those start and stop points disappear as the paint fully cures over the next few weeks.
The sconces look fantastic against that green! Glad it’s starting to come together for you!
One of my favorite episodes of Malcolm. I can literally recite almost every line from every episode of that show, thanks to netflix (and before that, TiVo). I’ve been through all seven seasons at least 50 times! I’ll admit that sounds psychotic, but it’s more that it’s always playing in the background when I’m home. Anyway, glad to know there are still fans of such a well written and funny show out there!
Never watched it. My kids did so I just associated it with ICarly and Drake and Josh. I will seriously check it out, missing Bryan Cranston since Breaking Bad ended!
Being a bit of a color-phobe in the beginning stages of breaking free, I have to say these cabinets are stunning!!! Absolutely love them! The gilding really ups the wow factor, too!
ABSOLUTELY striking! It’ s going to be gorgeous!!!
People entering your kitchen will be drawn to color and your beautiful light fixtures, and anyone who notices your “imperfect” ceiling level board is entirely too tall. It looks gorgeous. Brava.
Kristi…have I missed it in the past? Maybe you use a really fine grain black sandpaper between coats of paint? I think that helps with marks….well except whatever is on the final finish. I wish BM still sold their original alkyd satin impervo. Someone actually asked me if my windows were plastic coated because their finish was so perfect. Not that that made any sense since I had a 1620’s style saltbox house. 😉 The part about that…I never painted much in my life before embarking on painting an entire new home. I’m so glad I went to a great paint store and they taught me how to paint.
I have to tell you….I wasn’t sure about the green…but with the sconces…it now looks amazing!! You’re a DIY rock star!
Probably too late, but the solution is to rent scaffolding and set it up so you can simply walk along the bank of cabinets continuously spraying. I discovered the joy of scaffolding when I painted my dining room with vaulted ceilings.
Looking fabulous, in an event! Love the sconces!
Another solution is to set up 2 ladders and put a wide plank of lumber between the two to form a scaffold.
Good morning! Glad to see you are still with us, LOL! I was worried that this paint would have caused you to pull a Thelma and Louise just to avoid it! I think it looks great, and scones are beautiful. Glad to see you are considering parting ways with your perfectionism, believe me, it is highly overrate. There is probably a perfectly good reason for you not to do what I am about to suggest, but here goes anyway. Why not just stand on the countertops to paint up high? That way there is no up and down and ladder moving. I stand on mine all the time to clean on top of my cabinet (I have 9′ ceilings so going all the way up would look very disproportionate). I am sure you must have a reason for not doing it that way. it will be exciting when you get the lower cabinets done on that wall, and get the doors on. Then you will have a real focal point. It’s been a long road, but you are making headway. I just bought two critter sprayers. One for oil and one for latex. Talk about anal!!! Have a great day and as always….Blessings.
IT’S BEAUTIFUL!!!! nuff said.
Kristi! Way to go girl!!!! Looks awesome!
Good Morning!
I must say that I am relieved that you are letting the imperfections fade to the past. I think you will find with time that they are unnoticeable.
The green color of the cabinets is so rich. I think it is the most fabulous color I’ve ever seen and I love your confidence to use it in your kitchen! And the sconces! Oh my, what perfection!
I can’t wait to see what’s next!
Everything about that first photo is gorgeous. The color, the ceiling fixture, the sconces, the light reflected from them on the ceiling. Looking forward to the gold-leafed doors being installed to see all the parts coming together.
I think they look fabulous! Could you stand on your counter to spray the top that way you wont have to move the ladder?
Wow, Kristi! Your vision and creativity is AWESOME! I love that you always seem to come up with something beautiful and yet unique. Sconces on that wall of cabinets is something I don’t think I’ve ever seen before and yet it looks so COOL! I can’t wait to see this kitchen when you finish. Can’t WAIT!!!
It is looking fabulous!!! Can’t wait to see the gilded doors up.
yeeeehaaawww!!! It is looking like a Kristy room! The sconces and light fixture are AMAZING together! Cannot wait to see it all come together!
Fantastico!!!
😀
Kristie, they look beautiful and probably the only people who would notice the imperfections you’ve mentioned are you and your brother! We are our worst critics! You are such a resourceful, smart woman and so talented in figuring out how to do things. Especially having the courage to try to do them yourself!
I am LOVING the green! Just a suggestion for the next bank of cabinets.. when you go to spray it, make yourself a short scaffold using the 5 gallon buckets from home depot with long wood planks on top.. you’ll be able to move along without having to move a ladder. Just a thought, it works great for me!
Kristi– It looks stunning! No one except you will see the lap marks. The nearby bright lights are spotlighting it I think. If you do decide to try another pass at fixing, couldn’t you stand on the base cabinets, making sure you are supported by uprights in the cabinets? Would a small roller that you use horizontally in one pass from side to side make sense? Be sure to get a video of that for us!
That green paint is absolutely gorgeous on it’s own but with those sconces added to it is so rich and luxurious feeling! This kitchen is going to be a knock out in the end. Beautiful work, Kristi!!!
I think it looks wonderful! I MUST get a spray gun. I’ve always just rolled or brushed my paint but I can see now I’m missing out on the best way to do it.
Side note that I’ve been actually been thinking of for DAYS now: No idea if you’ll even see this comment, but I thought I’d mention it just in case. A couple of posts ago (I think) you mentioned that sometimes Matt’s wheelchair footrests scrape against things. Do you know about Sugru? If you haven’t used it or heard of it, it’s kind of like play-dough for fixing things. I think it’s a silicone product. You could make tiny, thin, unobtrusive, custom bumpers for the footrests and it might save you on some touch-up work. I’ve used it on all kinds of things because I break stuff. all. the. time.
Have you ever thought about rigging up some sort of scaffolding so that you can paint the high, long areas without getting up and down the ladder?
Ask a carpenter friend or someone who paints for a living to borrow their scaffold. It is the safest way to paint up things out of reach. 🙂 I think the paint job looks great!
Forgot to say that your kitchen and all of your other projects look great! You are awesome!
It looks beautiful! You do awesome work and are very talented.
WOW! There’s not one thing I don’t love about this. Now, when your finished, can I get ya down to Georgia to do both my kitchens please???
Pretty pretty please??
Have a blessed day, Hope
Beautiful! Absolutely love those green cabinets. The white with that green will be stunning. Have you come to a final decision for the big wall? Painting? Tiling?
A W E S O M E !!!!!
The sconces go so well with the fixture Matt gave you. How did he do that? My husband wouldn’t know brass from brushed nickel! LOL
I’m totally in love with the paint colors you are using and the sconces are so great! Keep up the good work, you are my inspiration!
With the shadows the sconces throw I really couldn’t see any “bad” areas in the first pic. And if you hadn’t put an arrow to them, I wouldn’t have seen them in the second either. You’re right in that only you and your brother will ever notice. They look so good! I especially like the trim pieces on either side of the sconces…I never noticed them before and they look REALLY good. Really elevates stock to custom.
I remember that episode – Ba ha ha ha haha! Funny stuff!
Those cabinets look beautiful!
Everything looks beautiful! I admire your patience and vision for what you want.
(don’t call me names, but I was wondering if you could have stood on the countertops instead of using a ladder?)
Have a great day 🙂
This project is coming along swimmingly (when’s the last time you heard that word?). I love this kitchen. I know you have a tough time with your persistent perfection, but it’s working. Awesome!
Great job! I’m sure no one else will notice your paint seams.
The combination of the green cabinets, the sconces, the gilding, and the glass fronts will be amazing! They are all nice on their own, but the combination is what sets your kitchen apart! I think you will be very happy with this room.
those sconces are perfect for that! Absolutely lovely with the green paint 🙂
I love your blog. You are just amazing and have such an abundance of energy and enthusiasm in all you do. Someone may have offered this input already, on your cabinet looking more shiny than you want. Have you experimented with different types of light bulbs? Each type and brand even gives a variety of hues and intensity. With the recessed ones so close to the cabinet, the light properties could be intensifying the shine. Just something else to experiment with that doesn’t require a lot of effort 😉
As Lawrence Welk would say, “Wunnerful, Wunnerful!”
I do believe you are getting a more glossy effect on your cabinets due to the heat from the can lighting. Did you spray with those lights on? I get a similar effect if I paint outside when it’s too hot
Love, love, love your blog. This project has been a complete monster. I really think the shine is from the lighting….it’s very intense. I think it looks so lovely. I could not picture the green, but now you have opened my eyes and the sconces….gorgeous!
Amazing..just amazing
They look amazing. Can’t wait to see it all complete.
Perhaps, in years to come, if they need repainting, you may find it easier to use painter (decorators) ladders and planks. Here in Australia, they’re not cheap to buy, but you can hire them at a fairly reasonable price.
Like these
http://www.ullrich.com.au/ladders/tplanks.php
Kristi, the cabinets looks beautiful so far, and those sconces add such a rich touch! It is going to be gorgeous when you get that bank of cabinets completed – that gilding is such a nice element and is really going to bring the cabinets up another design notch. You have such a terrific vision!
This kitchen is going to be a master piece. I just love it, it’s beautiful. The green, the gold oh my. Congrats and hang in there you are in the home stretch. Cheers
Beautiful work, Kristi; I like how you think, how you work, and how you explain.
Next time you are painting a high header, try making yourself a scaffold with a stepladder at each end and one or more sturdy boards (for width, say two 1″ x 12″s) the full length you are painting. With a handheld container with enough paint and possibly a third stepladder for getting up there (once), you could work all the way across without the partially dry stop/start lines.
What an Exquisite Kitchen. I just love it, it’s beautiful. You have such a terrific vision! Everything looks beautiful! I admire your patience and vision for what you want. I love your blog. You are just amazing and have such an abundance of energy and enthusiasm in all you do. Have a great day.
Kristi would you mind telling me the PSI setting you use on your compressor when using the Critter? Tonite was the first time using mine. First time using a sprayer and It’s not going so smoothly.