Pony Walls With Columns – FINISHED!!
Well, everything else looks like a complete mess — the torn up ceilings, unfinished walls, unframed opening to the hallway, filthy floors that I didn’t have time to mop, the dining table that’s still sitting in the music room — but at least my pony walls and columns are finished! You’ll just have to use your imagination for everything around it. 🙂
If you missed the previous posts on this project, you can find them here:
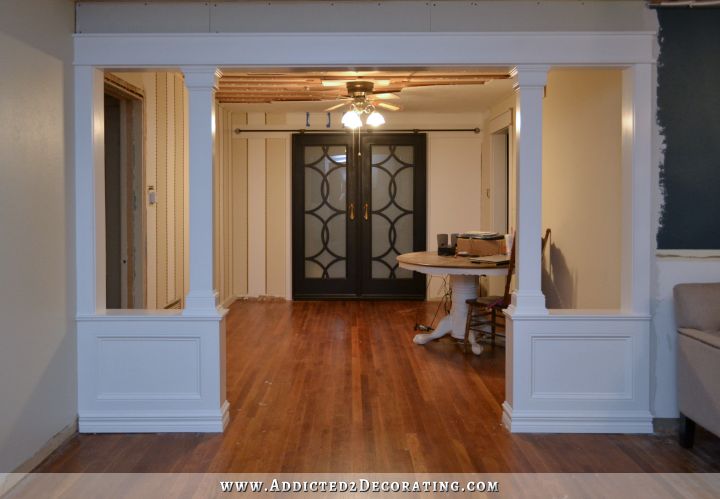
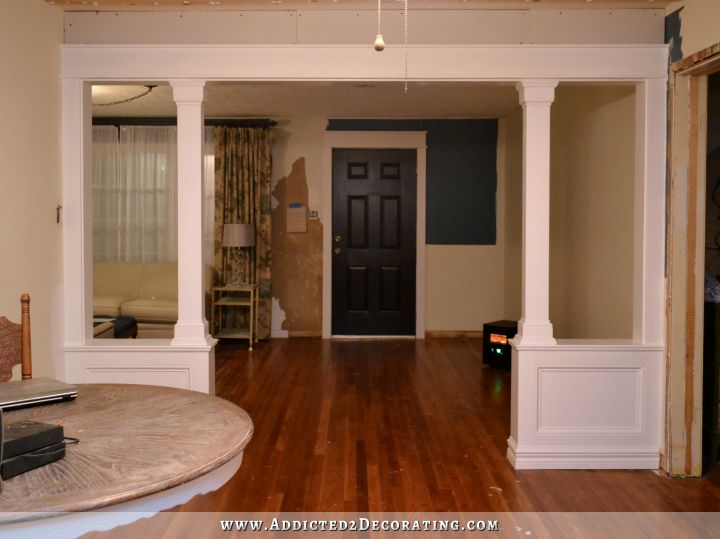
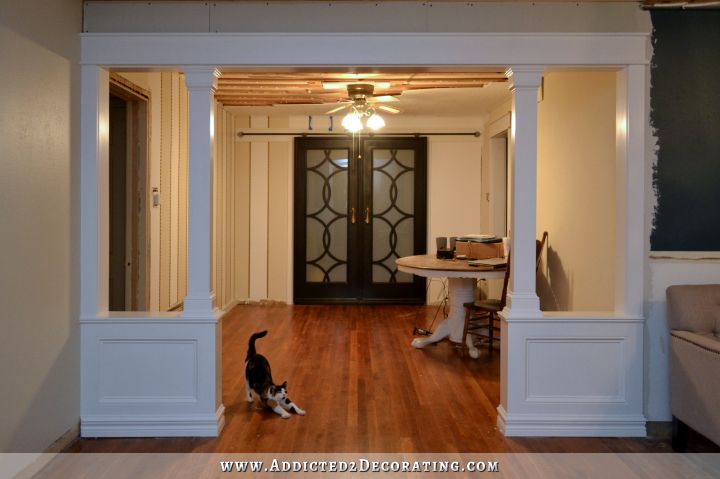
So here’s the new view from my front door!
This was the view from the front door when we bought the house.

It came out exactly as I had envisioned in my mind. That’s always exciting when that happens! The new pony walls and columns “frame” my rolling doors just as I had imagined. I think those doors look more special standing alone as one pair than they would have if I had made a second pair.
But most importantly, I love that they give separation and definition between the rooms without the music room feeling too closed off and isolated.
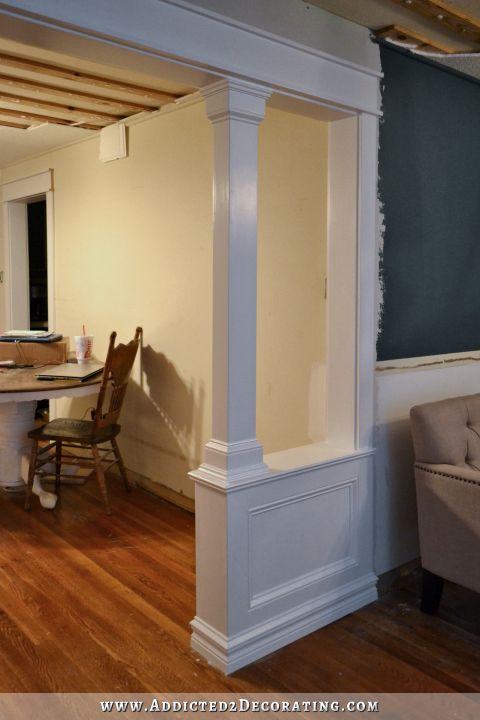
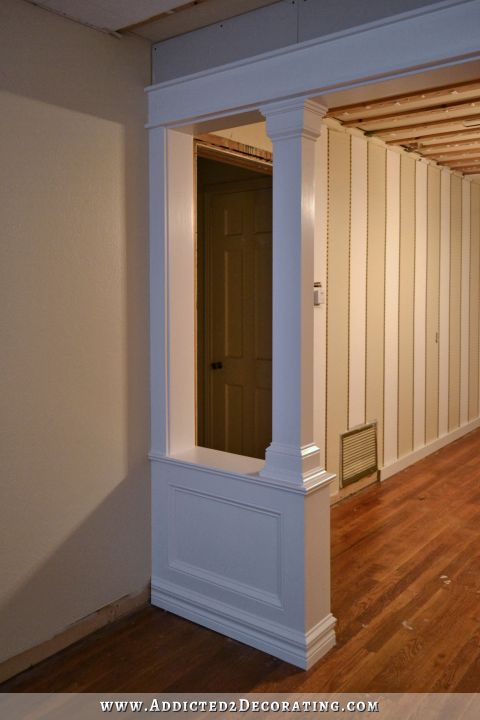
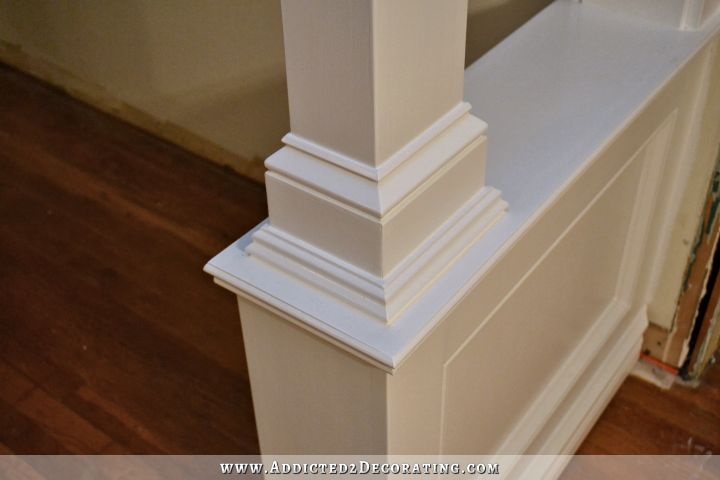
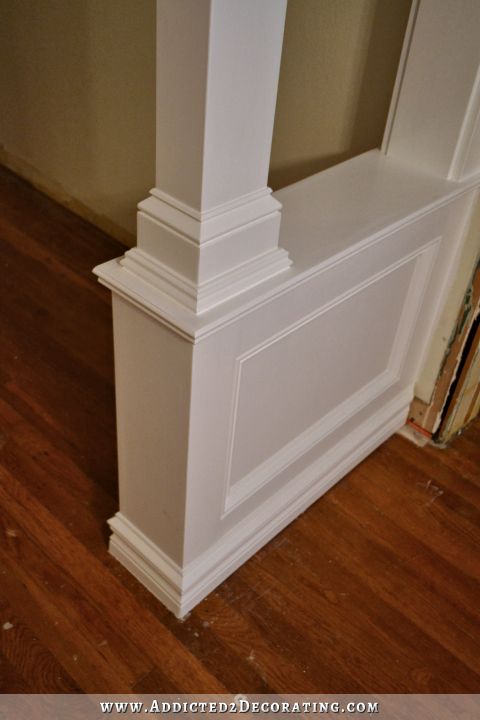
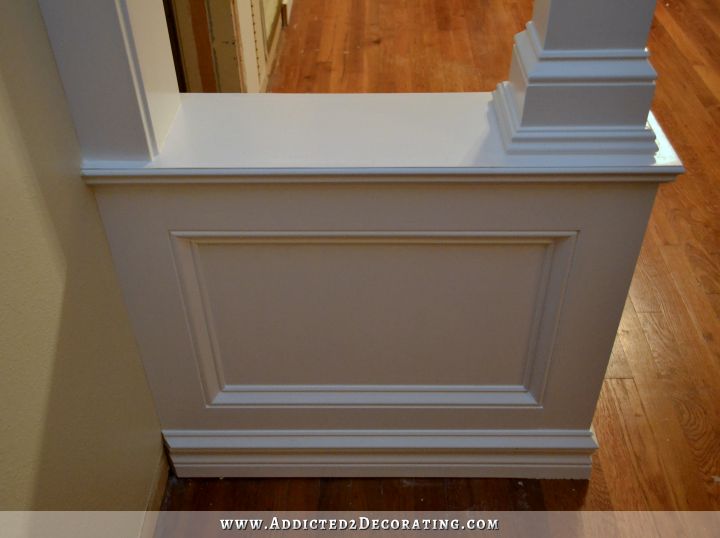
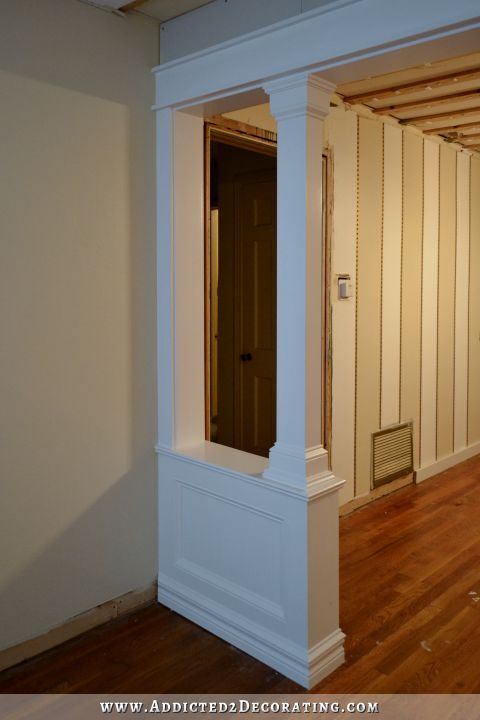
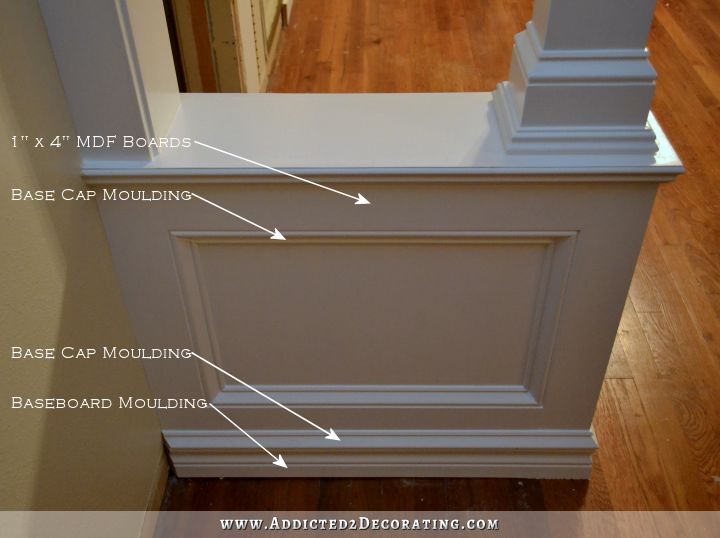
The trim on the columns made all the difference in the world. And again, I just used 1 x 4 MDF boards as the base trim. On top I added base cap moulding, and around the base on the pony wall I used something called panel moulding.
I used the same panel moulding around the top of the pony wall, but I turned it the other way (upside down, I guess you’d say).

And then to trim out the front and back of the pony walls, I used 1 x 4 MDF boards to form a frame, and then used base cap moulding around the inside of that frame. The only new thing I added since my last post was the baseboards. I just used a standard baseboard from Home Depot, and added a base cap moulding to the top to make it taller.
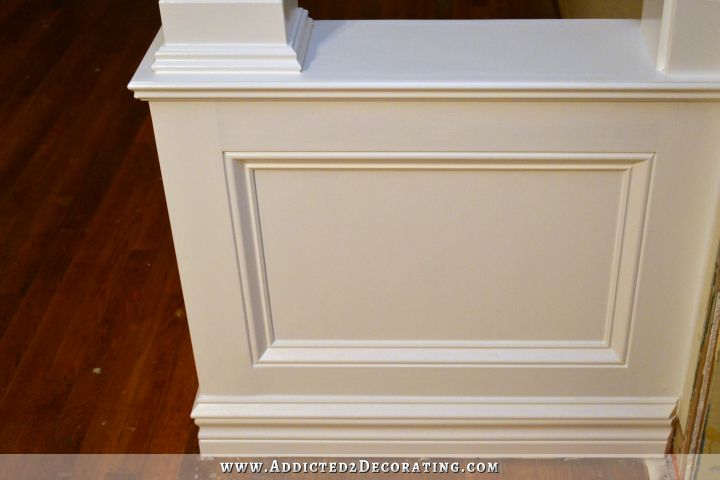
All of that trim makes such a huge difference in the finished project. It’s what makes the project.
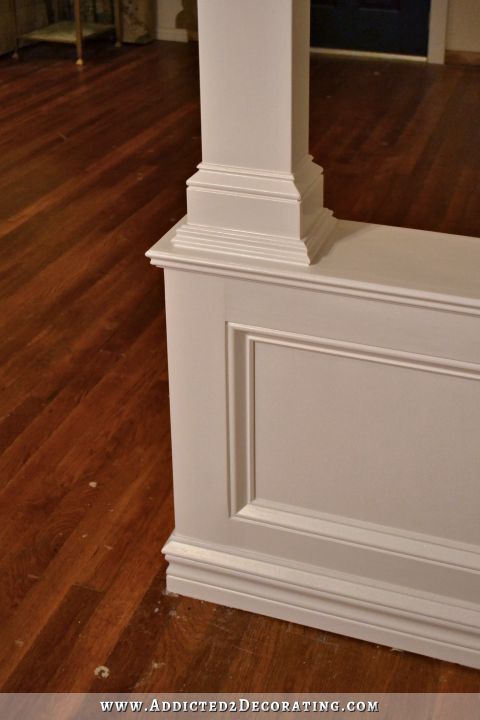
I added the same trim along the tops of the columns as well. And the top trim around the cased opening is made of 1 x 6 MDF boards and 1 x 2 MDF boards.

With the trim that I used on the ends of the pony walls and on the jambs of the cased openings (1 x 6 MDF boards), this wall/opening ended up being the exact same thickness as the other cased openings that I’ve done in the house, which is exactly what I wanted for consistency.
Here’s the view looking the other direction. The front door isn’t centered like the rolling doors are, but that’s okay. I can live with it since this isn’t the initial view when someone walks into the house. And please ignore the wall. Don’t ask. Long story.
And of course, I had to add this picture. 🙂
This project ended up taking me two days longer than I had anticipated. I always tend to forget just how long all of that trimming out, wood filling, sanding, caulking and painting take. The basic build didn’t take that long comparatively, but the trimming and finishing always take way longer than I think it will. But again, that’s the most important part! 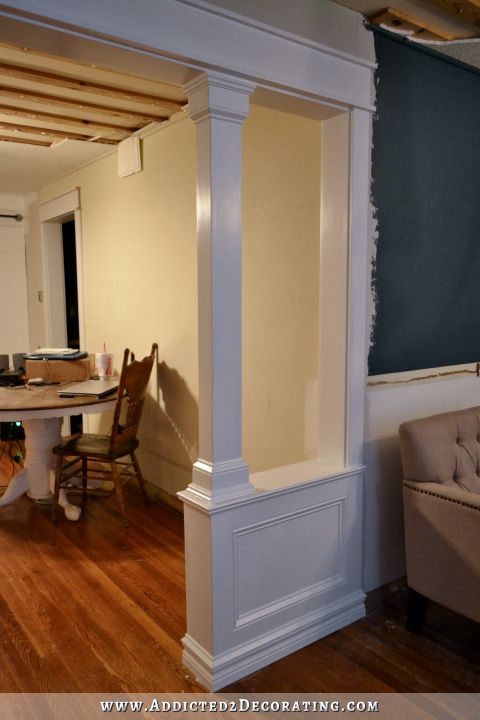
After everything was sanded, I primed with Zinsser oil-based Cover Stain. It’s my absolute favorite primer because it hides everything, and once it’s thoroughly dry, it sands beautifully.
And then I painted the whole thing with a brush in the same trim color I’m using throughout the house — Behr’s Polar Bear, which is a slightly warm white. It took one coat of primer and two coats of paint to finish. I did add paint conditioner (Floetrol) to the paint to minimize brush strokes.
And that’s it! I’m so excited that I can cross this project off of the list. And this was one of the big ones for this year, so it feels so good to have it done already.
Now I just need to get all of the mess around it taken care of. 🙂
Here’s a quick update on the drywall. I’ve decided to do it myself, and my brother and sister have volunteered to help me. We would have gotten started this week except that we have squirrels living in our attic. *Sigh*
We had already scheduled the animal trapper person to come out and do his inspection and set out cameras at the end of last week, and then come back this week to set out traps to catch the little critters. He’s scheduled to come set the traps today. So if we start pulling drywall off of the ceiling right now, we’ll totally interfere with the animal trapper’s process, as the squirrels will just go away during all of the commotion, and come right back when things quiet down. I need for them to be trapped and taken far away so that can’t find my house again. Then I need for the holes and entries repaired and patched so no new squirrels can enter. And then we can take care of the ceiling.
So right now, I’m just waiting, trying to be patient, and living with a terribly ugly ceiling. This too shall pass. 🙂
UPDATE:
I’ve had a couple of requests for some labeled pictures to help people understand the different types of moulding I used in this project. Hopefully this will help!
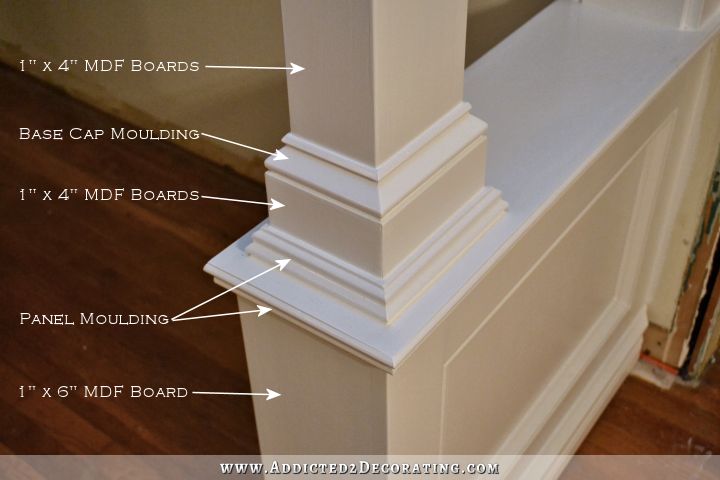
The MDF boards come in 8- and 10-foot lengths, and are generally located with the lumber. Just look for the white boards, as they’re pre-primed. They won’t actually say 1″ x 4″ or 1″ x 6″ on the label, because even though the sizes are comparable to real lumber, for some reason they’re labeled according to their actual sizes. So it might real 11/16″ x 5.5″ instead of 1″ x 6″.
The base cap moulding will be found with all of the other moulding and trim, and it is sold by the linear foot. You can click here to see the exact one I used.
The panel moulding is also found with the moulding and trim, and is also sold by the linear foot. This is the one I used. Some panel moulding has a rabbet on the back. Please note that this one is flat on the back.
I can’t find the baseboard that I used on the Home Depot website, but it’s just standard baseboard moulding, sold by the linear foot, and found in the moulding and trim section of the store.
Hope that helps to clarify things!! 🙂

Addicted 2 Decorating is where I share my DIY and decorating journey as I remodel and decorate the 1948 fixer upper that my husband, Matt, and I bought in 2013. Matt has M.S. and is unable to do physical work, so I do the majority of the work on the house by myself. You can learn more about me here.

Looks great! This gives me confidence to try something similar at my house.
Can you tell me what brand of wood filler you use? I’ve been using some DAP stuff but it’s hard to get it to go on smoothly without voids, and sanding it takes forever.
I always use Elmer’s from Home Depot. It works really well, and sands so smoothly. I’ve found that if you’re staining over it, Rust-Oleum wood stain works the best. Minwax will turn it a different color than the wood, from my experience.
Thanks, I’ll be sure to pick some up. Don’t get me started on Minwax, it turns everything yellow.
high i love this im building this for my stairwall can you tell me i see he placed the bottom board up from the wall alittle to accomidate the base molding i dont quite see how he did this can you tell me what size base molding was used
I think the baseboards are about 3.5 inches high.
Absolutely beautiful Krisit !!!!
Wow, Kristi, this is absolutely stunning! I love the combination of the rolling doors and the pony walls – it’s just perfect!
Am I the only one who counted your project entries yesterday and came up with 110? That’s a little more than 2 a week, but some of the projects seem like something you would do before breakfast (even though it would take me a week of holidays to get them done :)), so I guess with this being one of the bigger projects you can give yourself a little break now! In order to get the squirrels to a safe place… I’m just kidding, I do not imagine that you’d be sitting in your living room waiting for the critters to be taken elsewhere to go on working. It’s just what I would do after accomplishing something as big and beautiful as your pony wall/column construction!
Yikes! I didn’t count them. Once that list out of my head and in written form, and I saw how long it was, I was a bit afraid to count them. 😀 I wouldn’t be placing any bets that I’ll finish by the end of the year. But I’ll give it my best shot, that’s for sure!
OMG! It looks so good! I am totally jealous of your talent!
Good luck with those critters! I could send my dog to hunt them for you! He would be going nuts hearing them. All of the squirrels steer clear of us because of him.
Absolutely stunning! You’re going to have to find a show-stopping light fixture for that room once the rest is finished!
Wow, they look gorgeous Kristi. You must be so proud of your achievement. Well done!!
Great job! The year is starting out with amazing results. Look forward to what’s to come.
WOW! YOU ARE AMAZING.LOVE IT.
It looks great!
Fantastic job as usual. You inspire me every single day to buy tools and get to work. I’m a little slow on all of the trim lingo. Maybe next time draw some arrows and wording on the pictures for us non-builders.
I added a couple of pictures with labels and arrows, and I also put links to the specific products I used. Hope that helps to clear things up! 🙂
I knew from following your endeavors that the pony walls would look great, what I did not expect is the absolute elegance even unfinished as the surrounding area is. This is absolutely stunning Kristi you are pure genius at this reconstruction/construction/decor stuff and I am so freakin jealous ! LOL 🙂 🙂
Absolutely stunning!
I read your to do list also, I am ready for a nap that just wore me out reading it.LOL Looking forward to 2015 with you.
Wow….another home run!!!
Kristi, I love it! The view is so grand! Question, the Behr trim paint, is it oil-based or water based? I’ve started repainting my trim with an oil based primer (white) but I already am seeing some yellowing.
It’s latex (water-based). I absolutely love oil-based paint. It’s my favorite. But when I paint with white, I use latex, because the yellowing of oil-based paint is more noticeable with white than most other colors.
Congratulations Kristi!! This is one of your best short projects ever. I am so impressed. It really makes a statement for your entry and we all know the importance of first impressions…. I bet you can hardly wait to get the next room done, right? Keep up the great work. You are superwoman for sure.
I am so proud! Indescribable improvement! And, with those doors, O. M. G. Great work!
This is GORGEOUS…love the look!! Would like to do this in my home! it is such an elegant look with the columns!!
Looks stunning! Glad you decided to deal with the ceiling. You will be ALOT happier!
LOVE IT! I don’t comment often but I read every post. I’m blown away by the look and your ability to do it! I’m always anxious to see “what’s next”. Thanks for your blog.
Oh, I’m so sorry you have squirrels in the attic! I had that problem one time and it almost drove me nuts. I completely lost my mind one day and tried everything I could think of to drive them out … including getting in the attic with a broom and putting a boom box playing Led Zepplin in the attic!!!!!!!!!! I ended up finding success using powdered fox urine from the feed store. I made little balls of it out of old panty hose and throwing them in all the corners of the attic. Squirrels hate that smell and leave. Then I was able to find the hold they were coming in and put a piece of wire screen over it. Finally, success! And I got my sanity back! The life of a single mom ….. figure out a way without spending any money!
THANK YOU for that suggestion!!! I searched online for ways to drive them out, and I did see suggestions to use fox urine, but in my mind urine = liquid. I just thought how disgusting that would be, and discarded the idea immediately. I had NO IDEA it came in powdered form! I can handle that! 😀 I’m going to start calling around to feed stores and see if I can find some.
It looks stunning! I would be tempted to center the dining table under the ceiling fixture and put a couple chairs around it. Just so I would be able to eat dinner and enjoy the doors, pony walls and striped wall that are done so far. Well done Kristi!
Unfortunately, Matt can’t maneuver through that room if the table is centered. 🙁 It’s driving me crazy having it off to the side like it is. But that’s the main reason we can’t use this as the dining room. That’s was the original purpose of that room, but it just doesn’t work for us that way.
Wow! You did an amazing job, and I love how the walls frame those gorgeous doors! Can’t wait to see the finished walls.
For dry walling the ceiling I know they have those lifts that are really helpful. I don’t have any personal experience with them but I would think they might be an answer to prayer for you. I think you can rent them.
I actually have one! Yep, bought it on Amazon about two months ago. And it’s still in the box, and still sitting on my front porch, exactly where the UPS man left it, while I’ve been inside avoiding it and pouting about having to drywall my ceilings. 😀
I am in awe of your talent and vision.
Absolutely beautiful! I also would like to know what brand of wood filler you use. Thanks for your blog!
I use Elmer’s brand from Home Depot. Great stuff! And it sands very easily once it’s completely dry.
Great job Kristi! Super-amazing job!
What a brilliant idea and wonderfully executed! I love the depth and finish it provides to the space. I really admire your work and how solid it looks when you’re finished. Thanks for sharing and for the inspiration!
Kristi, this is truly your best WOW! The view of the rolling door now is spectacular! Awesome, just awesome!
I love this. How do you manage to cut such great miter cuts? My husband and I put trim around the perimeter of a coffee table top and struggled and it STILL DIDN’T COME CLOSE! I had to putty like crazy to make it look like a solid piece. He has a chop saw with guide but we are doing something WRONG. Any tutorials on how to cut miter cuts????
My cuts really aren’t that perfect. I just use a ton of wood filler, followed by lots of sanding, and the follow up with caulk. I’m tellin’ ya, wood filler and caulk are my best friends when I’m working on a project like this with all of that trim.
Very elegant. If you do wainscoting in the living room, it should be just this high and identical to the boxes on the pony walls. I know it’s not the standard height, but I have seen wainscoting that low and it was wonderful. Anyway, onward and upward. I’m surprised your construction noise doesn’t drive the squirrels away.
I think that’s a great idea – to make the wainscoting in the living room the same height as that on the pony wall! I believe it would make the walls seem taller since there would be more space above it than below. Good thinking!
I’m really surprised also that the noise doesn’t drive them away! I even yell at them and beat on the ceilings, and they don’t even care. They’re not phased in the least bit.
Absolutely beautiful! I love the final outcome and such great craftsmanship. You really have a talent for this. I’m even more impressed that YOU do it and don’t rely on a man to get it done. 🙂
Kristi, you absolutely, totally ROCK!!!!!! Give yourself a hug. You earned one. That is lovely, and you have every reason to be proud of your creativity and accomplishments. You have a true gift, and you use it well. Let those creative juices flow!
Another A2D masterpiece! Some people would put a little quarter round at the base of the columns, but you once again went over and beyond. Really stunning!
I have to say, this is absolutely my favorite thing you have done. I love the kitchen, but this is my look. I have walked around my house looking for a place to do this and the only place I have is between my living room and dining room. I don’t think my husband will let me do it, since we will be selling the house, but it would look gorgeous. The fact that you can do just about anything is truly amazing, however I think your real talent lies in the trim work you do. I don’t know how builders work in TX, but up here if you hired out you would be in such demand. Good carpenters are hard to find. When we built our home the custom builder had to bring in an old timer to trim out our front door and windows and also to do the crown molding since it is about seven pieces. You make it look so easy. You have the ability to take nondescript pieces of molding and by adding more to them you create masterpieces. The sanding, filling and caulking are talents that not everyone possess. When your house is done, you should find local custom builders and show them your work. Tell them what it cost you for the materials and then give them a huge hourly rate. You could pick and choose your jobs. I envy your talent. I would love to be tuned into details as you are when you are doing a project, however, I don’t think I could jump from project to project unless they were complete. Please, please please get that ceiling done, finish the base board and crown molding and then move on to the front hallway. The living room is fine until you start in there, but you could have a beautiful entrance, nice living room and until the “breakfast room, dining room” is done, I would use the music room for a dining space. Your table would look great in there and if I recall there were some wooden chairs that went with the table that you could use. You would then have all the esentials. Beautiful entrance, living room, dining area and kitchen. Perfect spaces for keeping nice and entertaining. You could have a life outside of DIY!! You could even use the dining table for a game table when you have company. The pony walls(I have never heard that expression before you) are just beautiful. I want them desperately. Blessings
I agree. Really, just mop that floor, center the table, add some chairs and touch up the living room paint and that space would look even better from the front door. Once you have that ceiling done, you can finish the walls and trim out the door to the hallway and the you can bring in your piano and decorate that space!
Unfortunately, a table centered in that room won’t work for Matt. 🙁 That’s one of the main reasons we really do need a dining room off in a side room somewhere, rather than in the main traffic flow area of the house.
ThEy look amazing. My husband does stuff like this and yours are excellent
Much to be admired! It looks fantastic!
Wow, wow, and WOW. I LOVE how the pony walls frame your one-of-a-kind rolling doors. This really adds so much elegance and definition to the music room/living room/entryway. It was a perfect solution to giving definition without blocking light to that area. I also noticed you’ve moved the sofa in front of the window – love that furniture arrangement!
Don’t let those squirrels get you down. I hope you can get rid of them soon so you can finish the rest of these rooms so they will be ‘presentable’ for company. I’m sure it will be a real jolt of pleasure for you to have that done.
Once again, you are a-maz-ing. I voted for you yesterday. How’s that contest coming?
I actually don’t know how the contest is going. I’ll just have to wait and see. I sure could use those gift cards, though!! 😀
Soooooo, Soooooo PERFECT !!
Also, I want to comment on your Living Room to do list: I vote NO to putting wainscoting and grass cloth in the living room.. Use that in your den. It’s just to casual for the gorgeous living room transformation you are planning to equal your goegeous kitche!!
I’m actually leaning that direction. Which is strange because I’ve been planning and dreaming about wainscoting and grasscloth for over a year now. But now that I have my pony walls finished, I just think it might be too much. I’m thinking I just need to find one solid color to put on the walls, and be done with it.
I agree that wainscoting and grasscloth would be too much, and would distract from the beautiful pony walls.
LOVE IT!!!
Wow so beautiful!
Wow! The columns and pony walls are amazing. They look fantastic with the doors in the music room.
Just beautiful and so fast… do you ever take a rest day? Love all your projects!
I actually do rest! I promise! 🙂 I try to take one day a week where I relax and don’t work on projects, unless it’s some little crafty thing…but no heavy lifting, no power tools, no building or constructing. It hard for me to take more than one day off because I get SO bored and antsy, and my mind won’t stop with ideas that I want to try. 🙂
Looks beautiful!
I am giggling at your cat — doing the “down dog” yoga position. : )
I love these. I have a half wall between my breakfast nook and my dining room that has to be there (it insulates the hose bib outside) but I hate the way it looks. I think I’d like it much better if I trimmed it out a little and gave it some character. Should be pretty easy since it’s already built and I’d just be prettying it up right? I’d also love to do the pony walls between my living and dining rooms. I love that it distinguishes the two spaces without actually separating them.
I think you should go for it! And send me pictures when you’re done! 🙂
Wow. Stunning! I would be hard pressed to place any piece of furniture in front of those doors. The look you just created is based on the beautiful doors being a focal point. It would be difficult for me but I’m sure you got it covered! 🙂
Oh, I don’t plan on putting anything in front of the doors. 🙂 My piano is a little spinet, so it’ll go up against the wall. I could only dream of having a grand or baby grand!
Once again just shaking my head….you have crazy talent girl! If you ever want to come to sunny southern Arizona and bask in our beautiful weather and float in my gorgeous pool and eat my delicious food and maybe work on a project or two while you are at, let me know! I’ll spruce up the guest room and spoil you rotten!
You have no idea how tempting that offer sounds right now! 😀
Just let me know when you’re coming! For reals!!!
Knocked it out of the park!
Looks fantastic!
Bummer on the drywall – about the squirrels AND that you’ve come to the conclusion that you have to do it yourself, but at least you can take breaks and look at those gorgeous doors and pony walls with beautiful columns!
I never cease to be amazed by you and your projects.
You are crazy, woman! (and I mean that in a good way) And it took you 2 days longer than you had planned? Oh, puh-leeeease! The speed at which you get your projects done is just mind blowing. Again, good job!
Love the look! You do amazing work.
Question on the paint conditioner. How much do you add to the paint. Is there a ratio you use? Thanks!!
I think each brand might be different, but I use Floetrol, and it says you can use up to eight ounces per gallon of paint. I’ve learned that if you use more, it actually has the opposite effect and the paint dries too quickly. It’s strange, but that’s been my experience. So I try to use only what the instructions say to use.
Once again you’ve nailed it! I love how they turned out!
Perfection!
Classic elegance!
OMG, that came out fantastic! Bravo! About the squirrels, is that a big problem in Texas? My daughter moved there in July (to a rental – military move) and have them in their attic too. While visiting them, I woke up to what sounded like they were right behind the headboard, having a race! Drove me mentally crazy! My husband and son in law patched the screening back up where they came & went, but the next day it was opened again.They are still trying to get rid of them, have called in pros, but I think they still have them. I will mention another poster’s Fox urine to her!
Yes, it’s definitely a big problem in this area. Squirrels are everywhere, and they’ll make themselves at home in your attic, or walls, or anywhere else they can get in. I’ll be looking for some of that fox urine as well! 😀
Really outstanding work, Kristi. It looks absolutely stunning!
WOW…!
Ok I just learned what a pony wall is- but it is beautiful! Great job!!!!!
I don’t really know why I am surprised any more by the beauty of your projects, but I am! You have knocked it out of the park on this one again!! 🙂
I hope the previous owners of your house follow this blog. You would knock their socks off!
They actually came to visit last year during my kitchen remodel. They liked it!
Ha Ha! I’ll BET they liked (and would have to LOVE it now!) You have definitely turned a sow’s ear into a silk purse!
On a side note, I’m looking for the site where you were one of the top 10 projects nominated for a $500 award, and can’t find it. I know initially I found it via someone’s comment, but you ALSO had a blurb at the start of one of your posts asking for votes. I can’t seem to find it. I’m assuming you removed that part of the post?
Oh, and not to worry, I already voted for you!!!
I just wanted to check out a few of the other entries.
Stunning. Love how the wall looks with your fantastic rolling doors. Just wow.
WOW! Looks amazing! You are a rock star, girl! 🙂
That room is absolutely beautiful. When do you sleep? Find those furry little animals and make them pay rent.
I actually do find time every single night to sleep. 🙂 AND, I’m sleeping longer now that I used to, so I’m getting more rest! A whole six hours each night, which is amazing for me.
Absolutely beautiful….You are a very talented person…..love, love your blog!!!
another fantastic project, it gives the illusion that the music room is bigger!
Kristi, you are an AMAZING woman! That’s all I have to say!
Beautiful. You are a decorating visionary.
Do you put latex paint over the oil based primer?
Love the cat.
Yes, I use latex over oil-based primer. You can’t put latex paint over oil-based paint, but primer is a different story. At least Zinsser primer is a different story. You might want to check the label if you’re using a different brand. It’ll tell you what you can coat it with, but I do think most oil-based primers can be coated with both latex and oil-based paint.
Did you use gloss , simi-gloss or satin paint? It’s beautiful. Sure ups the look. I agree with good paint color for the living room . Let your accessories speak.
Looks really good just not sure if the barn door style matches…barn doors and even the new strip treatment you are tackling in the music room have a very contemporay feel and this seems so much more traditional, it’s all clashing for me even though I love it all, just not together.
I have always loved pony walls and these look great thanks to all the trim you did!
Absolutely Beautiful! What a transformation! I am wondering what kind of paint finish that you use for the trim. Thanks!
High gloss or Semi-Gloss?
I used semi-gloss. I never use gloss for anything. It’s way too shiny for my taste.
ETA: I should clarify…I don’t like high gloss on walls, trim, doors…basically any of the structure of a house. Now a beautifully lacquered piece of furniture with a super high gloss finish…that’s a different story. 🙂
Beautifully done. These frame your hanging doors, echo the stripes on the next room’s wall and let in so much light. I think the trim work is brilliant. Brava!
Kristi: I love, love love what you did! Good Job! Carry On!!!!!
Wow! What an impression these make. I can’t wait to see more of your ideas take shape!
Thanks so much for adding the arrows and trim descriptions! Hopefully soon I’ll be able to put this knowledge to use. I won’t be doing anything as detailed and labor-intensive as pony walls, but this will help with whatever I plan. This project is my favorite, well, this and the kitchen. Be well.
Looks beautiful! Your blog has become a great inspiration for me. We don’t have cable or internet, except on our phones, and it’s so fun to watch you try new techniques, alter designs, and create a one of a kind home. I’m still waiting for our huge renovation to get underway again. The arctic blast has really messed up our plans. I can’t wait to see your craft room plans since I will finally have a place to do my sewing and store my yarn stash 🙂
Wonderful! Beautiful! You are so fast it makes my head spin. I’m still measuring, making lists and trying to be sure my plan is right and there you are ….Done! You go girl!!
Beautiful. Those walls looks as good as the ones in my house made 100 years ago. Actually, they look better. Mine need painting.
It looks wonderful! I’ve long wanted to do this in my foyer-to-dining room doorway. Now I know how! (or at least, my handy husband will know how!) 😉
PHENOMENAL! You are a trimming wizard. The pony walls turned out beautifully. So inspiring!
Kristi, I join your many fans & faithful blog followers by congratulating you on another bee-yew-tee-full job well done!! You never fail to astound with your mad skills & inspirational vision. You simply see things in your mind’s eye that normal mortals do not. Is it just me, or do the pony walls & columns actually make your music room look TWICE the size?! Quick question: is this one of the rooms that still has to be leveled? If so, how will that affect your beautiful pony walls & wall treatment? And how on earth are you going to rip lumber off your ceiling without damaging those stunning columns & striped walls? Bigger question: how am I going to sleep until you get it all done???! What a transformation! These last few months, you have done your best work ever…& it just keeps getting better. As always, thanks for being YOU.
This area has already been leveled. It’s still not perfect, but I don’t think a house this old, in this area, can ever be perfect once it’s unlevel.
I think if I start removing the 1 x 4’s from the ceiling starting on the wall that hasn’t been painted yet, I can get them down without hurting the stripes. Hopefully. 🙂
And you’re right. I do think the pony walls make the room look bigger! Kind of like when I added the wall of built-ins to my tiny condo living room, and it made the room look sooo much bigger! It doesn’t make sense, but that always seems to be the case.
Best decision you could have made, especially in regard to your living room. I’m so hoping your piano is an ebony baby grand. The room will be beautiful & is well on it’s way!
Unfortunately it’s not. 🙁 It’s a mahogany spinet, so it’ll go up against the wall on the left side of the room (looking from the front door to the sliding doors). I could only dream about a baby grand! 🙂
My favorite thing so far! Absolutely stunning and you are so savvy – they showcase the sliding doors beautifully! Bravo Kristi! My only wish is that these were in MY house!
hi Kirsti, wow that look is so classical and soooooo elegant. Certainly frames your barn doors. Love the look. I would now carry on with wainscotting the sitting room walls trim and paint and bingo another project would be completed. Feel for you with tenants in the attic, I have unpleasant possums in my roof and drive me insane. But once you are sealed up then you will complete yet another of your many tasks. But well done with you workmanship on this project simply beautiful work. Love watching your work and the details that you kindly share are fantastic. Thank you and take a cup of tea and simply admire you work. Look forward to your next project!
Love the pony wall, not diggin’ the stripes, sorry.
Wow Kristi, that looks so good! Well done. Thanks also for the labelling photos – very clear now. Interesting that Americans call it a ‘rabbet’. Australians call it a rebate!
Congratulations! Can’t wait for the next thing!
Liz in Australia. 🙂
Beautiful! I am glad you are back at it, you have been an inspiration to me.
I keep having this thought but have never had the courage to suggest it since you currently have over a hundred projects on your list!
How would you feel about a tiny pony wall & pillar to the right of the front door when you come in.it would do the same job of separating the living room from the entry without feeling closed off. And would give continuity to the rooms.
All I can say is WOW ! The pony walls frame the sliding doors beautifully !!!!
Wow! I don’t usually comment, but this transformation is unbelievable! Amazing! It’s hard to believe you did it all on your own in just a few days!! It adds SO much to the house and really transforms the whole space. Can’t wait too see what else you have planned 🙂
*** Angels Singing ***
Love the pony walls and columns!
Super cheap and easy solution to the squirrels in the attic problem – and I know you’ll be skeptical because I was, but now I have zero squirrels in my attic. Buy several spray bottles of Renuzit Renew Pure Breeze Super Odor Neutralizer Fine Mist Air Freshener (99 cents a bottle at WalMart) and spray and/or pour heavily in attic. Allow a few days for squirrels to vacate then seal the holes they entered through. They hate the smell, drives them out! Plus your attic smells nice.
This was the perfect way to showcase the doors! Absolutely stunning! I am so impressed and amazed by your endless talent!!
You clever thing you! So much better than it was before. I would be very chuffed with myself if I had done this. What light fitting will you be replacing the current fitting with?
Perfect! Can’t wait for your next project!
As always you continue to amaze me! I have the worst time putting together molding layers, it’s like I just can’t see it! Good luck with the squirrels, we had a bird and her babies last spring in our attic!
Bravo!! I love how the pony walls give a hint of elegance and beyond that, the barn doors are almost a surprise. It is like opening a gift and finding another gift box inside! I love how your house is unfolding.
Well, once again, a big homerun on this one Kristi. I love how you centered those doors in the the view part the pony walls. I totally agree the pony walls look much better than a second set of doors would have.
What I wouldn’t do for your knowledge, decorator tastes and can do attitude. I’m surprised you didn’t capture that squirrel bugger yourself and find a way to relocate him into a little dream home you designed for him because I can only think that he saw all your great improvements and being a creature with extraordinary taste he wanted to live there! Who wouldn’t want some cute pony walls, rolling doors and ohhhh that awesome kitchen!
Anyway thanks for the inspiration, I’m about to start pin my own bathroom remodel and I’m doing it myself (except the new toilet install). Hopefully, I won’t flood the house….
How about if we no longer call the beautiful doors “barn doors” and instead refer to them as rolling doors? It’s most appropriate in this case.
Gorgeous! I can just see a beautiful statement light on that ceiling. Props to the stretching kitty for making that photo so special. 🙂
What a striking Entry and Music Room you have now. I really love the expanded feel and it is so open and airy yet perfectly showcases your rolling door. Also, it allows the music room’s decor (when you finish it) to be a highlight, too. Great work. Can’t wait to see what you decide to do to the music room now that it can really be seen.
Absolutely perfect and classy! You’re right…they frame the sliding doors beautifully.
This looks amazing. You’re amazing!
I just saw an architect refer to these types of columns in a home as a colonnade \ˌkä-lə-ˈnād\ . I may be misunderstanding, but “Pony walls” just don’t accurately describe their loveliness. Your colonnade is beautiful, my dear 🙂
What an amazing change! Love it.
Looks great!
And thank GOD that you found the squirrels while they’re still alive. We had a bad experience with a squirrel that somehow got into our attic and perished. Ugh…it was terrible. We didn’t know what happened at first, and thought that perhaps an animal had died near or around the foundation. Every time it rained, the smell was indescribable…
My wonderful husband finally ventured up in the attic on one of his days off and found it. It was a mess. He had to remove the damaged insulation, bag the carcass and bleach the remaining area to kill the smell, but it worked. I will never forget that experience–so thank God you have the opportunity to remove them alive. It will make a big difference!
Kristi….I love your pony walls and columns! They are fantastic! Thank you sooooo much for the labeled trims. Whenever I look in the moulding section I am absolutely lost! Thanks again and keep on DIY-ing. Have a Blessed Day.
Margo.
Thanks so much for sharing this. I’ve been wanting to do this between my dining room and living room but wasn’t so sure I wanted to tackle it. You’ve inspired me. It looks fantastic!!!! What a transformation! 🙂
One word to describe your creation…. DAMN
Hi, you did a gorgeous job. What is the finished height of the pony wall, then the columns? I am trying to do the same thing in my living area. What is the length of the left and right pony wall (width)
thanks
Absolutely stunning!
How tall are the ceilings and then the height of both the columns and the pony wall? Thank you. Looks incredible
The ceiling is 8 feet tall. I think the columns started at about 24 inches from the floor.
It completely changes the room. This makes it bigger and brighter. It opens up the hallway and gives a natural light which is a great idea. I might try this at home too. Do you think adding a niche or some storages would weaker the foundation?
hi, so exited to find you and your pony walls and columns. I want them and will build them … thank you sharing your ideas and inspiration with us.
I am so inspired to do just this. I currently have a raw opening that this would be perfect for. I cannot wait to get started on it. Ordering tools today!
This is exactly what I’m dreaming of doing in our craftsman style house that is sadly lacking in detail and vintage charm. You are amazing! I love the way it turned out and I’m sending this to my contractor as a guide. Thank you!
Wow! All I can say is Wow!!! That is the most beautiful thing I have ever seen. I have a love affair with Pony Walls, and you did an incredible job! I’m always looking at old homes in search of pony walls! If I can figure out a place to add a pony wall in my home, I will! What in inspiration, thank you!! I also adore the color you used – Polar Bear!