Rolling French Door Progress (Almost Finished!)
My rolling French door project is almost finished! I spent many hours this weekend working on the doors, as well as reframing the doorway to fit the doors, in hopes that I might be able to finish by last night, but I just couldn’t do it. I’m almost sure I’ll be able to finish everything today, though.
The last time I showed you the doors closed in front of the doorway, they looked like this…
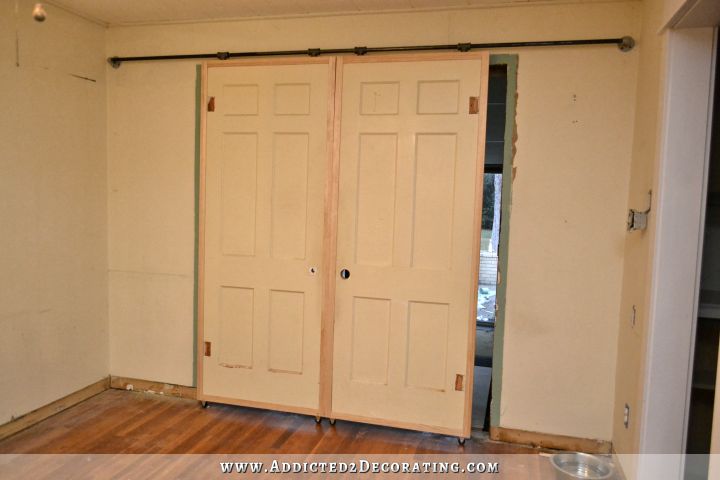
Clearly the doors weren’t quite fitting. So the first thing I worked on this weekend was getting the doorway reframed so that it’s a bit smaller, it’s perfectly centered on the wall, and the doors fit the opening.
You can see that I used the same trim design that I’m using on all of my other doorways in the house, but it’s configured just a bit differently. Instead of the trim extending only above the doorway, it extends the full length of the wall.
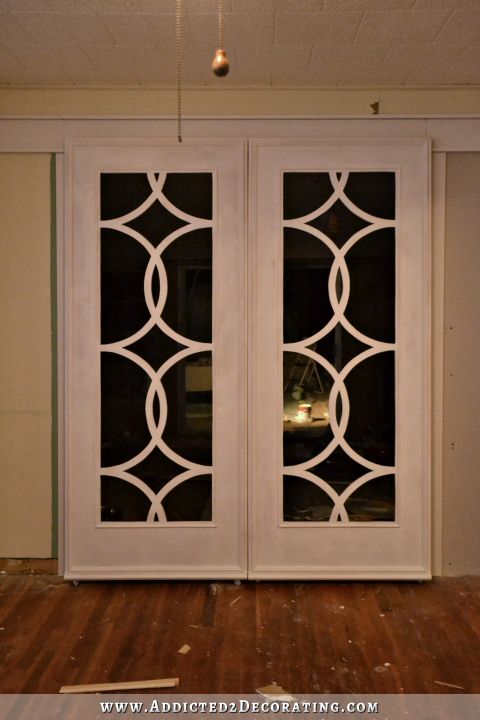
When I posted these mock ups a few days back, showing the trim only extending the width of the doorway opening…
…I had a few people leave comments telling me that’s not quite how it’s done with rolling/barn door style doors. 🙂
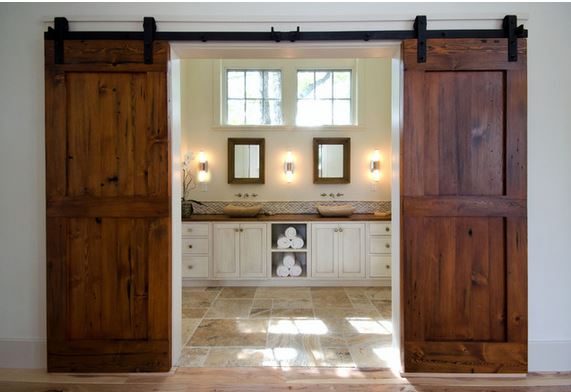
I’m so thankful that it was brought to my attention, because I honestly had never paid attention! But sure enough, I went to Houzz and looked up sliding barn doors, and on the ones that have trim around the doorway, the trim almost always extends the width of the barn door hardware and covers the top of the area where the door sits in when it’s open. Here’s one with trim that’s similar to mine…
That definitely looks so much better than what I had in those mock ups, so that’s what I did on my doors.
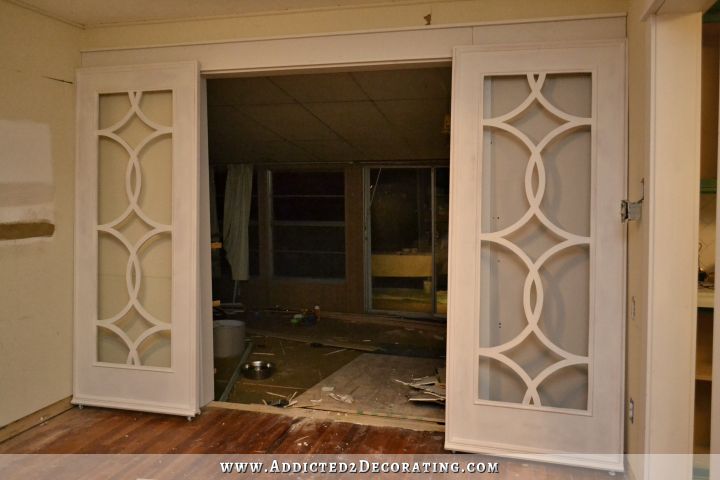
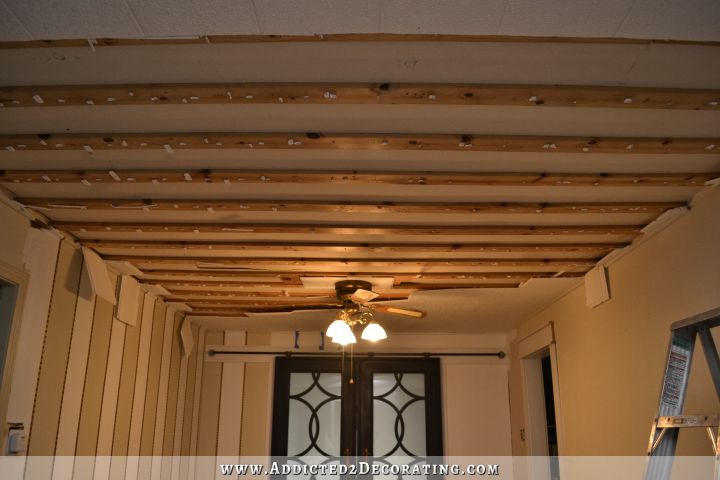
Of course, I don’t have the rolling door hardware back up yet, and I think it’ll make much more sense when it’s installed. I think it looks fantastic having the trim extend the full width of the wall when the doors are open. I’ll admit, I still think it looks a bit funny when the doors are closed, but the doors will probably never be closed during the day or when someone visits. I’ll mainly just be closing the doors at night when I’m closing everything up and heading to bed.
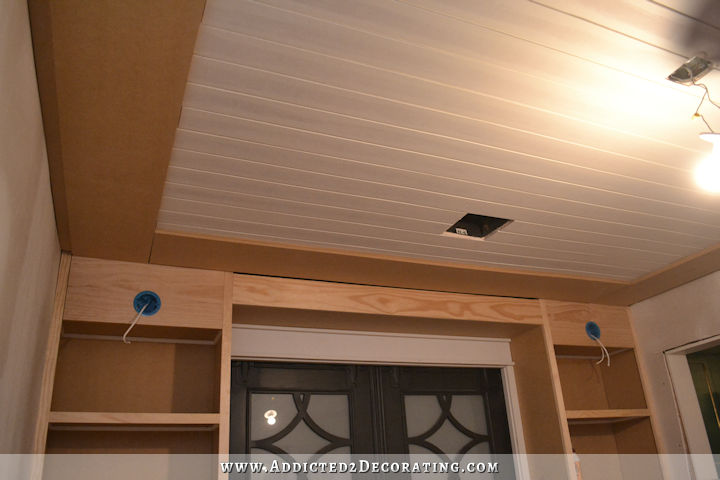
Reframing the doorway was kind of a pain. Since I narrowed the doorway, the new trim wasn’t wide enough to cover the space between the new door jamb and the edge of the old drywall, so I ended up having to remove some of the old drywall.
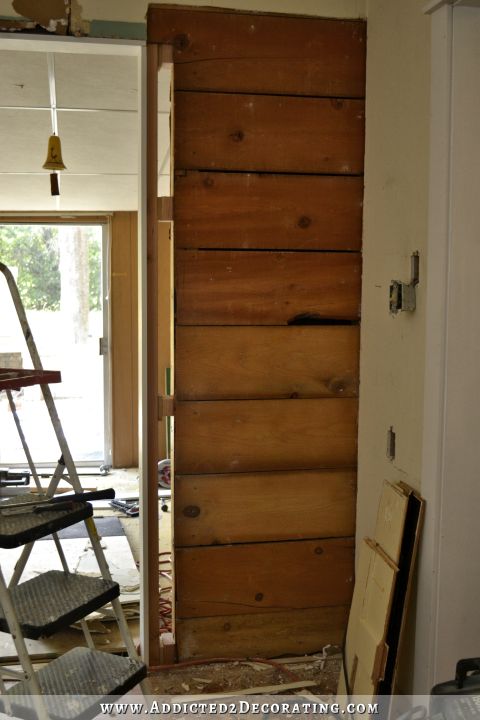
And then I added a new piece of drywall that extended all the way to the new door jamb.
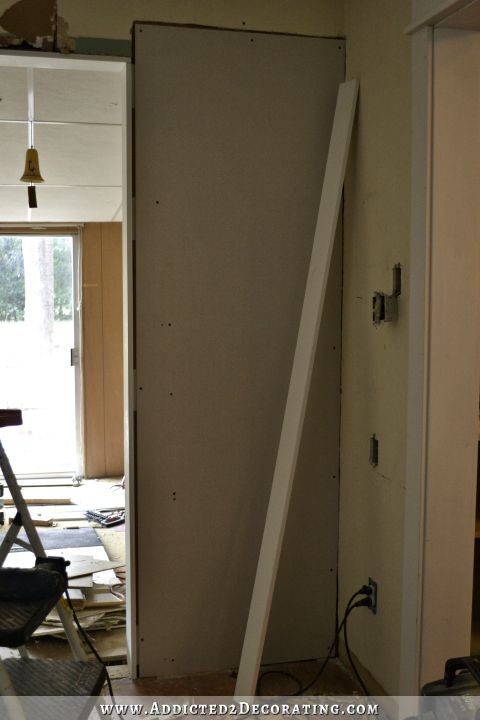
Then I could add the new door facings. And I’ll be honest with you. I didn’t bother taping and mudding the seam where the new drywall meets the old drywall at the top. I placed that seam strategically so that it would be under the top moulding, and since I’m going to to be caulking all of the edges of that top moulding, I figured that would be sufficient. Or maybe I was just feeling lazy. (Have I mentioned how much I hate dealing with drywall?) 🙂
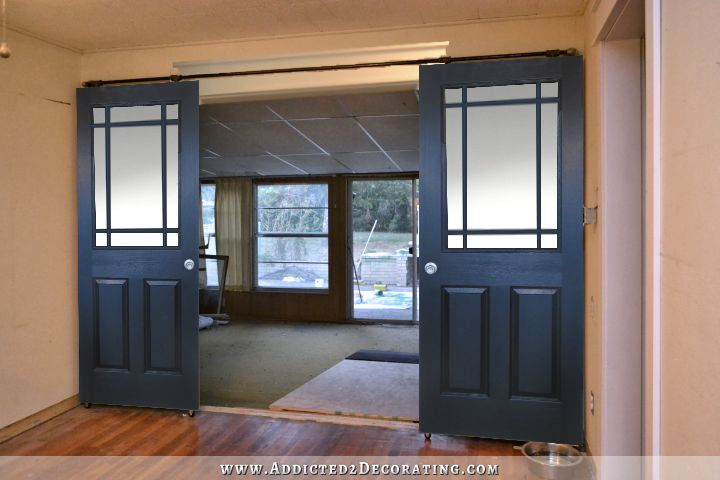
Anyway, it’s almost finished! The doors are primed and sanded, so they’re ready for paint today. Once they’re dry, I can add the glass and the trim on back and be finished with the doors. Then I need to do some wood filling, caulking, and priming on the doorway trim, and get that trim and wall all painted. And finally, I need to finish stripping the ugly black paint off of the black steel bar that I’m using for the rolling door hardware, and get those end pieces painted, and get everything reinstalled.
I’m so excited about how these doors are turning out! They’re completely different from my original idea for these doors, but I think this style is much more suited to my house.
And on a final note, I had a few people ask about how I filled the door knob holes that were in these doors. The door on the right had a big hole in it from a modern door knob. The door on the left had a much smaller hole in it from a vintage door knob.
For the large hole, I used a hole saw attachment on my drill, and cut out a circle of wood from one of the sections that I cut out of the middle of the door that matched in the thickness that I needed. Then I glued that circle of wood into the hole with wood glue. When the glue was dry, I filled in around the edges with a generous amount of wood filler on both sides of the door, let it dry thoroughly, and then used my electric sander to sand it smooth.
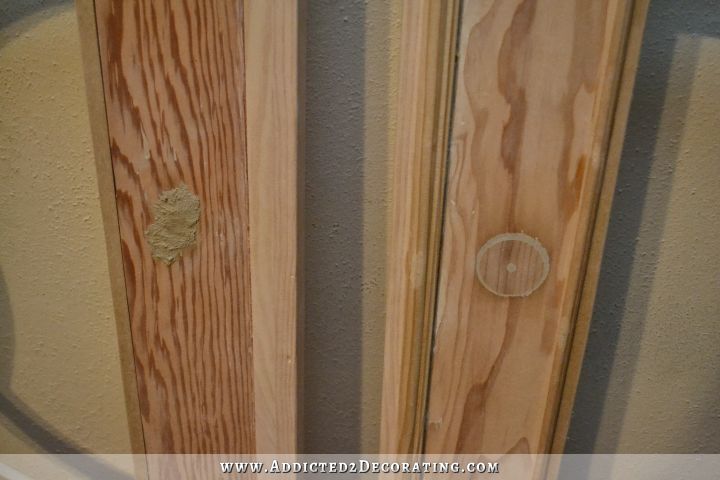
For the door on the left with the much smaller hole, I actually wadded up paper and stuffed it in the hole. Then I filled in with wood filler on top of that on both sides of the door. Once it was completely dry (which took about 24 hours) I used my electric sander to sand it perfectly smooth. I forgot to get a picture of that one after I sanded it and before I primed it.
Anyway, I’m hoping that these doors will actually be usable before I go to bed tonight!
And in other news, my replacement cabinet doors and drawer fronts were delivered on Saturday! I’m determined to get these rolling doors finished (since I don’t want to leave yet another unfinished project), and then I’ll turn my attention back to my kitchen. My goal is to get my kitchen finished by Sunday evening, and then spend next week at the condo getting it ready to sell. That’s the plan, at least. We’ll see how it goes.
Update:
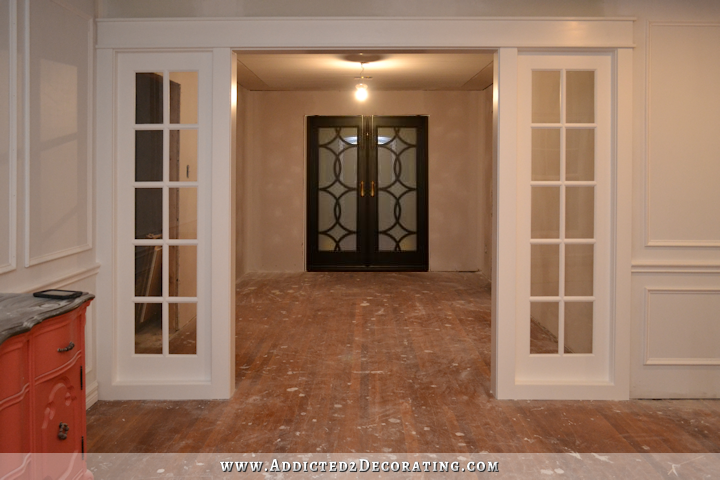
My barn door-style French doors are finished! Here’s a peek at how they turned out…
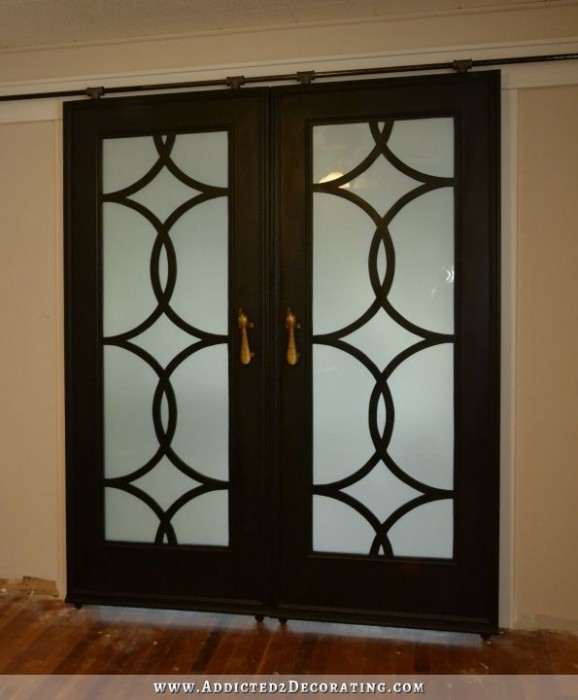
You can see more pictures of the finished doors here…

Addicted 2 Decorating is where I share my DIY and decorating journey as I remodel and decorate the 1948 fixer upper that my husband, Matt, and I bought in 2013. Matt has M.S. and is unable to do physical work, so I do the majority of the work on the house by myself. You can learn more about me here.

Amazing. I love how this project is turning out. We just did a similar look for our bedroom door where we repurposed an old screen door. We love it. I can’t wait to see your doors finished! Keep up the inspiring work.
looking good
Looks great! You just took the ball and ran on that project. 🙂
Kristi, I absolutely LOVE, LOVE, LOVE your doors!! They are simple but pretty, and they really go with your house. (And the peacock handles are really cute too!) Not quite sure… but I think I love them almost more than your kitchen! Hard choice, lol. Luckily I can admire them both on your blog. 😉 Keep up the amazing work!
Absolutely in love with the design of the doors! I was not a fan of your original concept. they reminded me too much of a dutch door. I can hardly wait to see them all painted out.
Kristi,
Your doors look awesome, can’t wait until they get the glass in. They are beautiful now, but once the
glass is in it will add so much Suffication to them. I love that you are all about detail with each of your
projects. I am new to the site, and you have been enspireing me from day one. Although it is the end
of summer, my projects are still outside (we painted the outside of our home) and now I am adding the
fine detail to the home to give a much needed make over. I even made a new sofa couch for the deck.
I wanted to Thank You, because you have ignited the flame within that I can do these things and be con-
fident. I am on your site every day for ideas and encouragement. May God Bless You and Your Husband
for I know that you touch many lives everyday with your postings.
Vicki in Vancouver Wa.
Be sure to note just where your filled door handle repair is so you don’t install the peacock handles in the exact same place on each door. You will want a more secure (solid) place for the new ones. Project is looking great!
That same thought had occurred to me.
I was thinking she could/should reverse the doors so that where the holes were filled would be on the outside. At least, that seems like the best option in my mind.
Your doors are absolutely gorgeous!
Those doors ar so stunning! It may be a bit over the top but what if you used that fretwork design as nailhead trim on slab doors for the rest of the house? Or gold leaf on that design?
Kristi, they are amazing and I am looking forward to seeing them painted!
They are looking so beautiful. I am excited for you!
Loving the doors and can’t wait to see the kitchen get back underway! LOL I’m sure you’re more eager than any of us to see the kitchen done.
On the wall by the barn doors, since the trim above extends the whole wall width and you mentioned some concern about what it looks like when closed, have you considered a special wall treatment of some sort for just those little wings behind the door? Unfortunately I know your planks of wood behind the drywall didn’t extend to the new jamb but the first thought I had when I saw that is how cool that could have looked as the actual walls behind your barn door. Maybe horizontal planks or just a special paint finish? Wallpaper? A trim pattern like you showed in your recent post?
Just bouncing ideas off here, but it might be nice to have a little surprise on those little strips of walls when the doors are closed. 🙂
I think if you take a moment to picture your suggestions in your mind, you’ll see how “busy” that would look and how such a treatment would detract from the graphic impact of the design on the doors, especially when they’re open.
And I disagree.
I would *not* have taken the time to even suggest it if I didn’t think it would look better, personally.
Nowhere in my suggestion did I say it needed to be tartan plaid or something over the top that would compete with the doors. I think a simple pattern like some of the trim patterns Kristi shared the other day would go a long way towards making those little strips of wall look like something more than an afterthought when the doors are closed. A few small strips of trim on either side of the box alone would make it look more complete to me. For that matter, even a slightly different hue of paint would make a difference.
The other examples of barn doors pictured above were on walls that were wider than the doors. In this example with the top trim going from wall to wall, it feels off to me, personally.
But to each their own. Most of us have different opinions on what “detracts” from a design. And I’m glad we don’t all think the same. It would be a very bland world if we all followed the same rules.
In case I haven’t already chimed in, I have to tell you that I LOVE, LOVE these doors. They’re so perfect!
This is by far my favorite of all the projects you’ve done! They will be stunning!
I don’t know if I have ever told you this…… Yeah every freaking time I comment, I think, how FREAKING AWESOME you are…. I love those doors…. WONDERFUL job… !!!
Fantastic! I’ve been away for awhile,and love the progress!
I can’t tell you enough, how much I ;love how the doors turned out!!!!!….You did a amazing job Kristi!….WOW<WOW<WOW!!! Is all I can say!…LOL!!!…Can't wait to see kitchen and doors finshed! No rush now. Haha!!
Those doors are looking really great! I can’t wait to see the finished project from both sides!
Can I just say you’re FREAKIN AWESOME!?
These doors are beautiful. Your attention to detail gets me every time.
Wow the doors look lovely, even better than I expected they would look –
P.S. Would it be too much to take the trim above the door right around the room?
AWESOME!!! is the word of the day.
I think you are going to love these doors!
Kristi, may I compliment you on your designs of having the house speak to you and you paying attention! I’m 63 years old and I’ve always been a fan of colors! Your house is amazing! I live vicariously through you! Keep up the great work!!!!
Beautiful!
Sweet!
Your doors are absolutely gorgeous! I am so envious of your talent. Your home is going to look like a million bucks!
What a fit! Like a glove! Stellar trim and finishing work. Beautiful.
You continue to amaze and inspire!
I would be so proud of myself if I was you. A truly inspiring piece of work.
Those are gorgeous! I am amazed by your ability to bring your vision to life. Even more, I’m impressed by your can-do attitude. Inspiring!
Love them!
And your blog!
I really think if you put something fabulous, granted it has to not stick out from the wall much,
On each side , that they’ll look good closed too!
Like I’m some expert! Hahaha
I’m loving every step of these sliding doors. You’re so great. Keep it up.
Okay, so I know this might be a silly question because maybe you’ve mentioned it but I’ve read all the French Door posts you’ve made and I just can’t see it…
How/where did you get the glass in it?
I’d love to use your idea but I can’t figure out that part. Could you help me? My email is listed above if it helps. 🙂
I love the doors, but would also like to know how the glass was installed.
Thanks!