Seven Of My Past Furniture Makeovers And The Lessons I Learned From Them
I’ve spent the past couple of days working on my piano. There are probably a thousand other projects I should be working on right now (taping and mudding my entryway and dining room ceiling, for example), but I just didn’t have it in me this week to start on something like that. I went straight from working on the condo, to finishing up my bathroom remodel, to spending a week-and-a-half doing one of the biggest building projects I’ve ever tackled in my niece’s bedroom. So I just needed (and wanted) to spend a couple of weeks taking things a bit easy and working on nothing but fun-to-me projects — first my buffet, and now my piano. I’ll get back to the serious stuff, focused on my dining room and entryway, as soon as I feel up to it again. (I’ve got an entire house to remodel practically by myself, so this is a marathon, not a sprint). 🙂
I love a good furniture makeover (specifically casegoods…not so much upholstered chairs and such). Unfortunately, I don’t really get the opportunity to do many of them. But each time I do one, I learn a little bit more about furniture, about DIY, about products I prefer, and so much more. Each one is a learning opportunity. And learning opportunities are my favorite part of DIYing.
So let me show you some of my past furniture makeovers and tell you about the lessons I’ve learned from each one.
1. Pet Station From A Vintage Secretary Desk
This pet station is still one of my favorite makeovers. When we lived at the condo, a neighbor was getting rid of this old vintage secretary desk.

I didn’t really have any need for a secretary desk, but I did have a need for a place to keep a water bowl, dog food bowl, and cat food bowl, and I needed them arranged in such a way that the dog couldn’t eat all of the cat food. So I turned that secretary desk into this pet station, with a dog food bowl and shared water bowl on bottom, and a cat food bowl on top (out of the dog’s reach). I turned the actual desk area into a bed for the cats, and used the drawer to store leashes, dog brush, flea comb, and other pet paraphernalia.
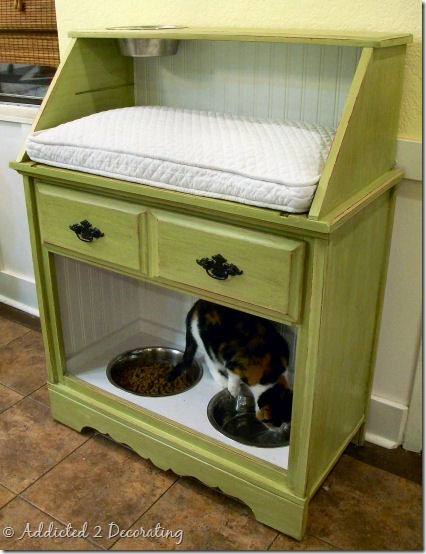
Lesson learned: Think outside of the box! This wasn’t just a makeover. It was an upcycle. I took a piece intended for one purpose, and gave it a completely different purpose. You can find furniture upcycles all over Pinterest to inspire you — coffee tables turned into dog beds, coffee tables turned into ottomans, wood drawers turned into wall shelves, dressers turned into benches, and on and on.
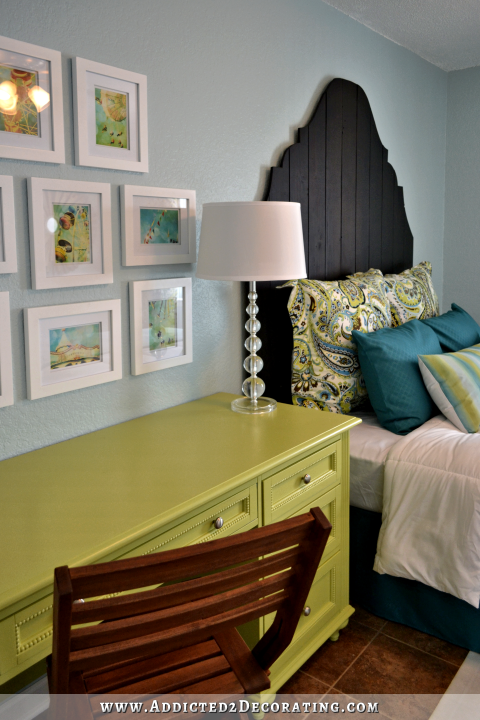
2. Painted Desk
This is a desk makeover that I did for the condo bedroom. It started out just a simple white desk, and I originally intended to paint it with orange Chalk Paint.
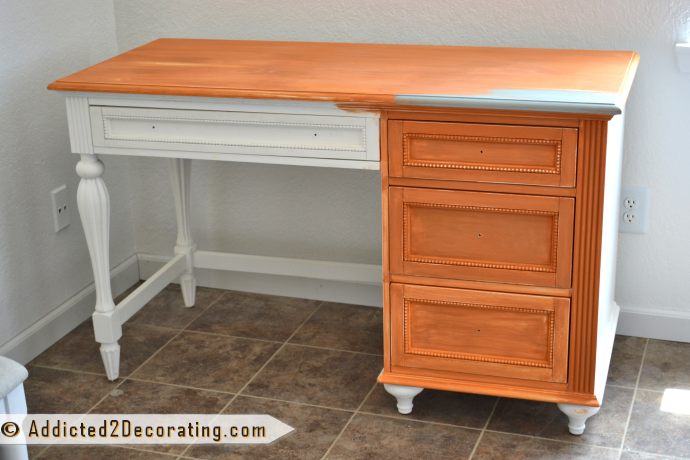
When it still looked streaky and awful after three coats of Chalk Paint, I gave up and went back to my tried and true method of painting furniture and cabinets using regular latex paint.
Lesson learned: I do not like Chalk Paint. I know it’s all the rage, but it’s not for me. After three coats, it still looked streaky and awful. Not only that, but the finish is so flat and porous that you absolutely must seal it with something (wax or water-based poly). If you don’t, anything wet will soak into and stain the finish. So it’s not so quick and easy as the hype would lead you to believe.
3. Dresser Turned Into Media Console
I did this dresser makeover years ago for some of my last decorating clients. They didn’t really need a dresser, but they did need a media console for their living room. So I took this old Craigslist dresser…
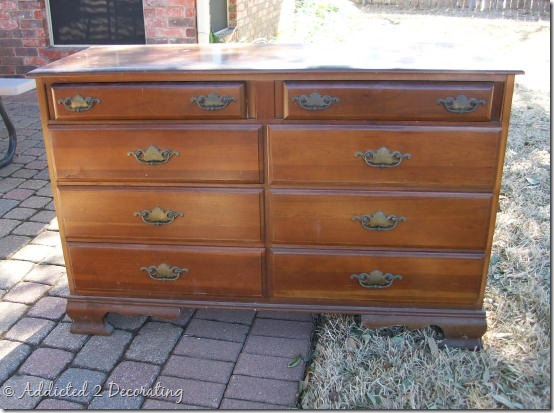
And turned it into this media console that could hold their flat screen t.v. on top, and their dvd player and whatever else in the upper compartments.
![]()
You’ll notice that the original dresser had four rows of drawers, and the media console has three rows. Once I removed the drawers, I realized that if I just turned the existing rows into compartments, those top two would be too small to hold anything. So I removed all of the insides from the dresser shell (except for the bottom row of drawers), and remade them so that they had fewer rows with more space on each row. It wasn’t incredibly easy, but it wasn’t all that difficult either.
Lesson learned: It’s not that difficult to reconfigure old furniture to fit your needs. Don’t feel like you’re stuck with the original configuration if it doesn’t suit your needs.
4. Small Cabinet Makeover
This is a cabinet makeover that I did for my grandmother. She needed a place to put her microwave, and this little cabinet was the perfect size. The problem is that it wasn’t very pretty, and the top was a thick plastic laminate.
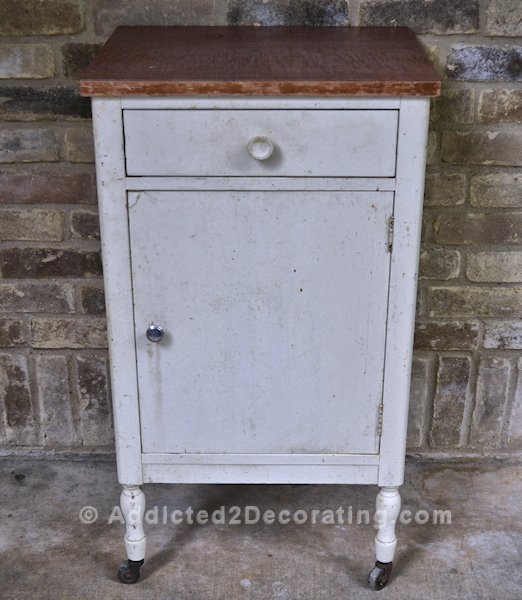
Rather than replacing the top (which was my original plan, but I couldn’t get it off), I covered the laminate with new wood veneer and edged it with wood moulding. Once it was wood filled, sanded, and stained, it looked like a solid wood top.
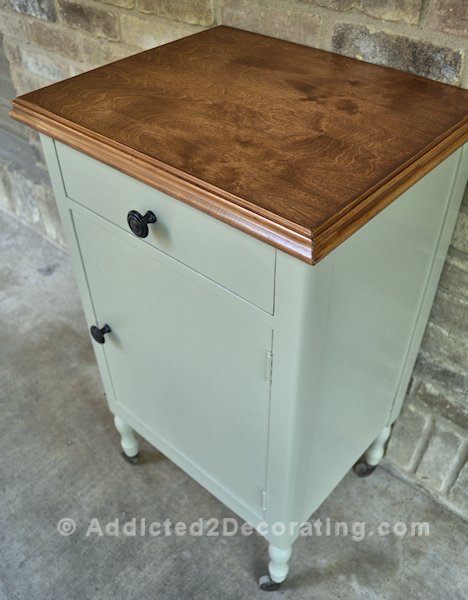
Lesson learned: Wood veneer is actually quite easy to work with. I used the kind that comes in large rolls, and has the adhesive backing already on it (you can find it on Amazon). You simply peel, stick, and trim to the right size. Very simple stuff. After doing this project, I’m not nearly so intimidated by old furniture that has peeling, chipped, cracked veneer since I know how simple it is to replace.
5. Credenza Makeover
This old credenza was another Craigslist find. I had originally intended to restore it (since I learned that replacing old wood veneer isn’t so difficult 🙂 ), but first I had to get that old chipped and bubbling veneer off of there.

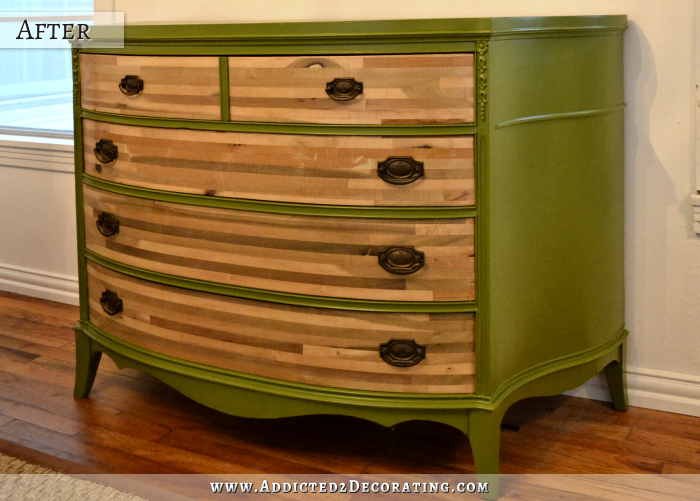
When I finally did get the old veneer off, I discovered these amazing pieced-wood drawer fronts underneath.
Lesson learned: I learned how to strip old veneer off of wood furniture. It’s not easy, and I don’t think any method would be easy with veneer this old and stubborn, but this method did work really well.
Another lesson learned: Sometimes what’s under the old veneer is more interesting and shouldn’t be covered up. Now of course, this is a matter of opinion, and beauty is in the eye of the beholder. But I found the pieced-wood drawers to be way more interesting than the mahogany veneer. And these pieced-wood drawers are most often hidden underneath veneer on curved-front drawers. You probably won’t ever find them underneath flat-front drawers.
6. Buffet Makeover for my mom
This was another piece of furniture that ended up being used as a media console, and this one was for my mom’s living room. The original buffet had some water damage and other scratches on the top.

So I sanded down the top and stained it, then painted the rest of the buffet.

Lesson learned: Be careful with veneer!!! Do you notice how the wood grain on the original buffet is going side to side, while on the refinished top, the grain is going front to back? Yeah…that’s because I got a little too aggressive with the sander and sanded right through the wood veneer on the top. Sometimes that wood veneer on old furniture is really thin. SUPER thin. And you have to be extremely careful when you take a sander to it. Start on the lowest speed, and use a fine-grit sandpaper (nothing rougher than 150-grit) until you can get a feel for how thick the finish is, how thick the veneer is, and how aggressive you can be with it without damaging it. I ended up having to sand off ever last bit of veneer from the top because I damaged it so badly. Thankfully the wood underneath was very pretty, even if the grain was going in the wrong direction.
7. Dining Table Makeover
This was a fun makeover of an old Craigslist dining table. I generally don’t like oak at all, but this table had some of the most beautiful wood grain on the top. So in my makeover, I highlighted the wood grain with a process known as cerusing.
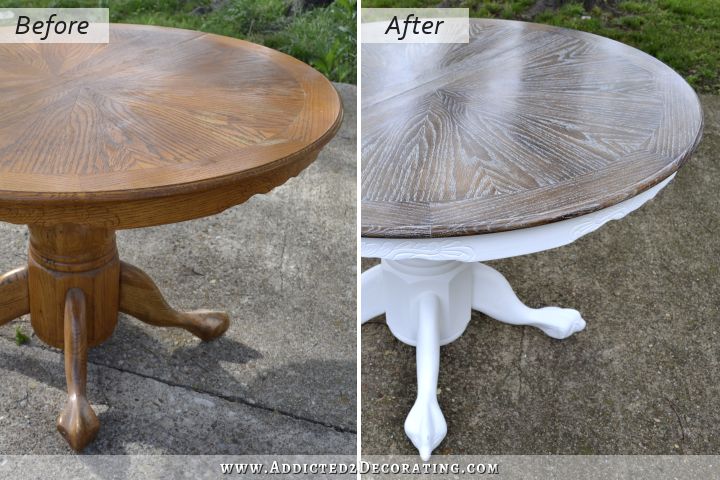
Lesson learned: I learned how to ceruse oak! If I were to do it all over again, I would use really dark ebony stain with the white cerusing. I think that would be more striking, and would also give the table a more updated look.
Another lesson learned: This project really sealed my love for oil-based Zinsser Cover Stain primer. When I was working on this table, I had run out of oil-based Zinsser, but I had some water-based Zinsser on hand (which I generally only ever use to prime drywall before painting). So I used the water-based stuff. That was a big mistake. I had three or four areas (knots in the wood, I think) on the base that kept bleeding through the primer and paint. No matter how many times I re-primed and re-painted over those spots, they would eventually bleed through again. I finally gave up and got more oil-based Zinsser. One coat of oil-based Zinsser put a stop to the bleed-through completely. Now it’s all I’ll ever use on furniture and cabinets. I only use the water-based primer on new drywall before painting.
Each project is a learning experience. 🙂 I love doing furniture makeovers, though. They’re some of my favorite projects. I only wish I had more opportunities to do them!

Addicted 2 Decorating is where I share my DIY and decorating journey as I remodel and decorate the 1948 fixer upper that my husband, Matt, and I bought in 2013. Matt has M.S. and is unable to do physical work, so I do the majority of the work on the house by myself. You can learn more about me here.
Kristi,
Where can you purchase oil-based primer? Our home stores such as Lowe’s and Home Depot no longer carry anything oil-based. I wonder if it is a Michigan thing?
Linda
I buy mine at Home Depot. They don’t carry oil-based paint (actually, they do have a tiny amount), but they carry several kinds of oil-based primer, as well as paint conditioner for oil-based paints. You might check on the primer aisle just to make sure. Even if they don’t carry oil-based paint, they might carry oil-based primer.
I love them all.
I noticed you use a lot of green paint in your pieces. not to critique, I do love that green!
That upcycle pet station is fabulous. You did a great job on that one!
#4 small cabinet I laughed so hard at this… “Rather than replacing the top (which was my original plan, but I couldn’t get it off) “couldn’t get it off” yeah, that’s happened to me a few times, couldn’t get something off so had to work with it LOL
The pet station – how come the pinterest images are in red but this one in green? Did you find more than one?
I originally painted it red. Then I went another direction with my color palette at the condo and later painted it green.
I love the pet station. Wish I could find a secretary to do this too. I like all your make overs but could really use that one!
This is a wonderful post. My sweet cat recently died, but I fed her on the kitchen counter because my dog loved and would scarf down her food. My kitchen is too small for something like this but just realized I can put one in the corner of the very large dining room, which will take care of the problem of constantly kicking the water bowl in front of the dishwasher! I’ll be looking for one in the thrift stores so that when my heart heals and I rescue another cat . . . I’ll have my wonderful Pet Food Station. Thank you!
Also, I have projects planned that match a number of the ones you show. My brother recently pointed out what I hadn’t noticed about a thrift-store dresser I bought. It has a veneer and he thinks it will take a lot of work to fix it, so it’s just been sitting there. Now, using your post and directions, I can fix and paint it!
Again, thanks for all of the wonderful posts. My friend didn’t believe me at first when I told her that your mother painted the flowers on the wall in your niece’s bedroom. She was astonished . . . and excited.
I
I really enjoyed this post, too. It was neat looking at your furniture makeover projects. You are so creative and you think outside the box!
So are you now using the pet food station in your house? I have never seen it in any of your house pics.
It was actually at the condo all this time, and we only moved it to the house about a month or so ago. I’m undecided on whether I’ll keep it or not.
Hi Kristi, great post as all of us have become used to!
When you say oil base Zinzer, are you referring to the BIN Primer Ultimate?
Funny story! I purchased a can. Was stirring and stirring. Not blending at all. So I stirred harder and BAM!! Stick broke, hand plunged in can and primer went everywhere, on everything and can I tell you what a mess!
Called the company to find out why this would not mix properly. Was told great info.
1. Not really oil base, it’s actually ethanol, (alcohol) base. Which means it can be shaken! YAY!!!!
2. It can be ordered off amazon and shipped as well. YAY!!!
3. This product is absolutely AMAZING!
4. Oh My Word- this stuff dries beyond QUICK!
5. Worth every penny!
Thank you for all you give to us!
I’ve heard great things about that one, but the one I use is called Zinsser Cover Stain oil-based interior & exterior primer.
http://www.homedepot.com/p/Zinsser-1-gal-White-Cover-Stain-Interior-Exterior-Primer-and-Sealer-3501/100398377
I’m glad you are doing something finals familiar this week. I live in Texas too, and I’ve finally learned that at this time of the year when it’s so stinking hit, my energy, creativity, and drive dwindle to a minimum. All return with the first cold front through. 🙂 Take care of yourself!! Excited to see what your piano decision was.
*that feels familiar. Sheesh.
Oh my gosh, the heat!!! I was outside working IN THE SUN yesterday stripping part of the piano, and it was 107 with a heat index of 109. I finally had to come in and wait until the sun went down a bit before continuing.
How do you get such a professional looking paint job on all your projects? I started using Floetrol (?) but seem to need more than that. Help!!
This was one of the most informative blogs I’ve seen in a long time and I subscribe to several. I like your finished projects and the info! Keep em coming!
I’m one of those chalk paint people. I generally don’t have a problem with streaking and the time savings is in the lack of primer.( and primer can give me a headache). I always use Annie Sloan. What I like about it is the glow and the versatility that does not look ‘plastic’. And yes, you must wax it for almost every use.
My first renew of an old piece taught me the most important lesson… always number the drawers that you remove to repaint. I ombre painted a waterfall chest of drawers and when I finished the drawers did not fit the way that I painted them. Thank goodness, I only had to repaint two of the four drawers. Now with every job, I make sure to mark the drawers and doors when I remove them. I also place all of the hardware in zipper plastic bags and mark them for the project. This saves on time and frustration later. Time is money in our furniture business.
All great projects upcyling old pieces of furniture. My favorite is the dresser you took the veneer off and found that beautiful wood. Loved it!!
Wow!!! Really amazing, your furniture makeovers are very creative and is given a brand new look to it. Your posted images really made me think that we can also do some creative experiments with our interior furnitures. Good one
Like everyone else, I’ve got to make that secretary turned pet station and I love the bow front dresser with the veneer removed. I like to both paint and refinish case goods depending on the quality and where it’s going. A tip for refinishing veneer, start by stripping the old finish with Dad’s Easy Spray (use a brush not the spray bottle), a plastic putty knife with the corners rounded, and some 0 steel wool. Clean up with mineral spirits and some 00 steel wool and then use progressively finer steel wool to sand. It’s pretty fast and the veneer stays intact. Caveat: for oak use only stainless steel or bronze steel wool because the iron in regular steel wool can react with oak.
Hey, Great work dear. Very very informative and expressive writing. All the mentioned key points show your research and study behind this writing.