Sliding French Doors – The Missing DIY Details
Evidently I didn’t to such a swift job at including all of the DIY details on this project, because y’all had lots of questions! And it was mostly the same few questions over and over, so I clearly left out a few steps. Let’s see if I can clarify some things. 🙂
(If you missed the big before and after of this French door project, you can see it here.)
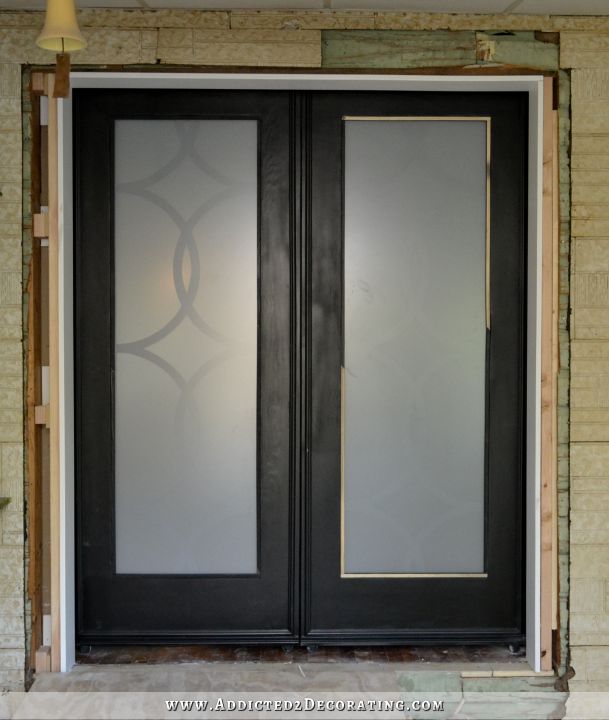
First up, attaching the fretwork panel to the door.
I started out with a six panel door that I had cut the entire center portion out of. So the inside edges were just flat, or as flat as they could be after I cut the panels out. They were actually pretty rough, but there wasn’t any kind of rabbet or anything like that.
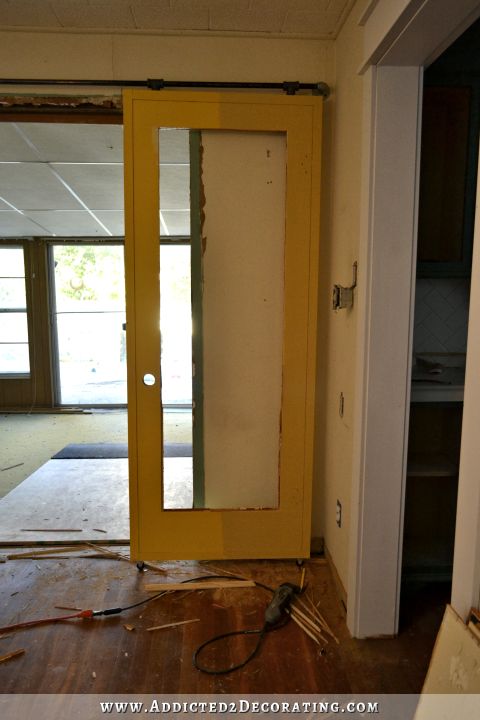
So to attach the fretwork panels, I simply placed a bead of wood glue around the outside edge of the fretwork panel, and then placed the panel inside the cut out on the door. I made sure that the front of the fretwork panel was flush with the front of the door, and then I used 1 1/5-inch 18 gauge finishing nails to nail the panel to the door. The arrows in the picture below show the direction I nailed the panel to the door.
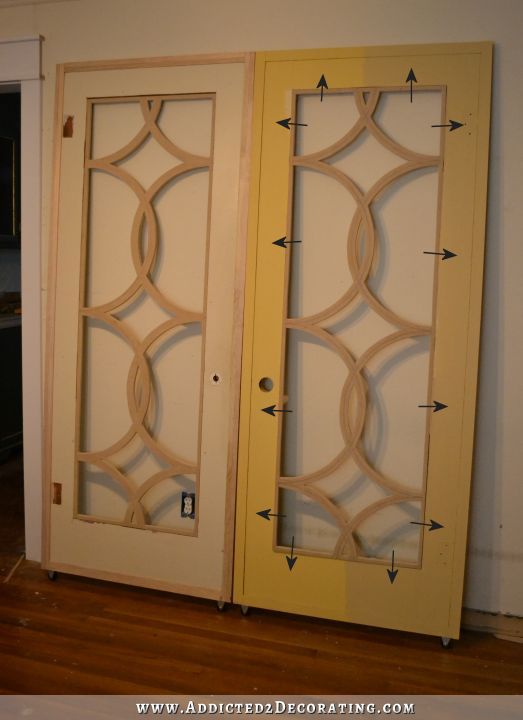
Obviously that took care of the panel being attached to the door, but it didn’t leave a very pretty finished look since there were slight gaps in some areas between the panel and the door. So in order to cover those up, I used some small 1/2-inch-wide trim. I found this at Home Depot in the area where the trim is sold in whole 8-foot lengths. I attached this trim so that it barely covered the small gaps between the panel and the door, and I attached it using wood glue and 1/2-inch finishing nails, making sure that I shot the nails through the trim and into the door, and not into the fretwork panel.

Then you can see that I added some larger trim around the outer area of the door. Once all of that was attached, I wood filled all of the nail holes, sanded, caulked any areas where trim meets door/fretwork panel, primed, sanded, and painted.
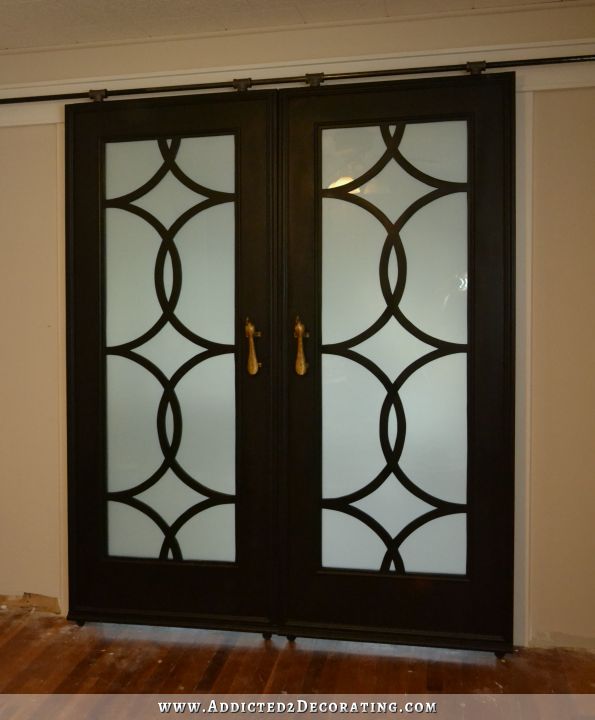
Once the door was painted, I was ready to insert the glass. But first, I frosted my glass with Gila frosted window film. You can get this at Home Depot, Walmart, and probably Lowe’s. It’s a very simple process. Clean the glass, spray it thoroughly with Gila window solution, remove the plastic protective sheet from the film and place it on the glass, squeegee out the window solution. You can watch the Gila video here for more details. This is my third time to use this window film, and I just love it. It provides complete privacy, even at night with the light on in the room. I used it on our bedroom window at the condo, which faced a busy parking lot on the first floor, and I never bothered to close my window shades after that. Seriously.
And now, inserting the glass…
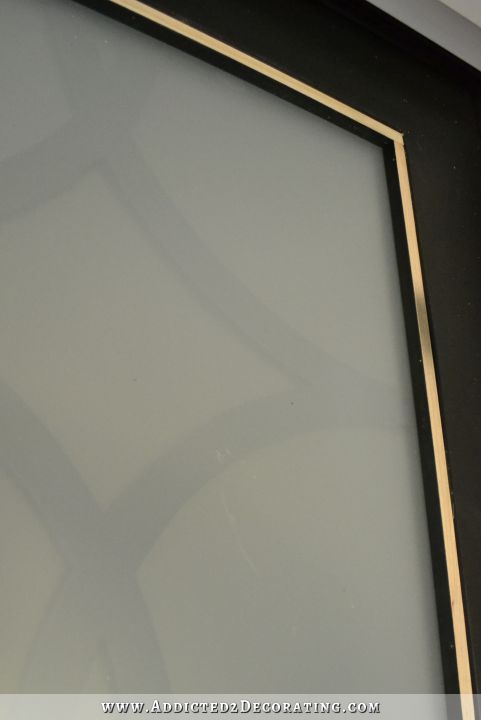
I spread out a canvas drop cloth on the floor and placed the door on the floor with the front facing down and the back of the door facing up. I carefully placed the piece of glass into the opening so that it was lying flat against the fretwork panel.
Next I applied a thick bead of clear silicone sealant around the edge of the glass, right in the corner where the glass meets the door. And then I cut pieces of 1/2-inch square dowel rods and placed them right on top of the glass and right next to the door. I then used 1 1/2-inch finishing nails to secure the dowel rods to the door. I actually realized this morning when I took these pictures that I forgot to finish painting the dowel rods on one of the doors, but it actually helps you to see what I’m talking about a bit better.
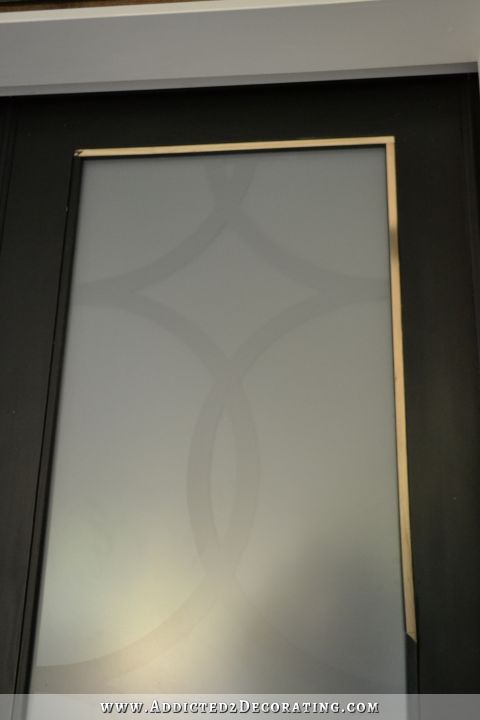
So you can see how those dowel rods are placed on top of the glass, and then they’re secured with nails driven through the dowels and into the door, much in the same way that the fretwork panel was attached.
Square dowel rods come in 36-inch lengths, so I used six dowels for each door — one for the top, one for the bottom, and two for each side — cut to size with my miter saw.
And now, here’s a view of the doors from the back side. Pay no attention to this ugly wall. All of this siding will be torn down and the room will be rebuilt eventually. But you can see that the fretwork panel is visible, but it’s very subtle. And it only really shows up if there’s a light on in the room, or if the sun is shining brightly through the front living room window. The sun through the living room window is why the fretwork panel on the door on the left is more visible in this picture.
But as far as privacy goes, again the window film offers complete privacy. In that picture above, I had my dog sit about 10 inches just on the other side of the door on the left, and you can’t see him at all in the picture. In fact, I thought that he had gotten impatient with me and had walked away, but when I opened the door he was still sitting there. He’s such an obedient boy. 🙂
And finally, the cost…
- Doors: free!
- MDF panel: $29
- 3/16″ tempered glass: $170 ($85 each)
- Window film: $21
- Trim: $145
- Caulk, wood filler, paint, primer: on hand
- Door pulls: $40
- TOTAL: $405 ($202.50 per door)
That’s not too bad for completely custom French doors, right?
That makes me wonder how much something like this would have cost if I had them commissioned by someone who does custom doors. Hmmmm. Anyone have a guess?

Addicted 2 Decorating is where I share my DIY and decorating journey as I remodel and decorate the 1948 fixer upper that my husband, Matt, and I bought in 2013. Matt has M.S. and is unable to do physical work, so I do the majority of the work on the house by myself. You can learn more about me here.

Whoooohooo… Gorgeous!!! Yeah I don’t even wanna know what that would have cost as custom. I looked into glass film when we moved. I could not decide on a brand. I have a large window on my landing as well as above my tub in my master.
Beautiful ! What are you doing about handles in the backside ?
Very beautiful doors! Because of clearance issues I would think that she would have to use a sliding closet door pull or finger pull (in bronze or gold would be pretty and match the peacocks)!
Thank you for the additional details. Looks so pretty! I love that you got your dog to assist you, as well! Keeping it i the family, ha!
I thought you had doors that you cut the middle out of?
I did. That first picture is what they looked like after I cut the middle out.
$202.50 per door for the custom gorgeous doors you made is a real value. Ordinary 6-panel doors would have cost nearly that, and with added hardware, would probably have been at least that. When you do the next pair, if you can re-use the glass from your old sliding doors, you may be able to get the cost down even more!
Great job, Kristi. They look very high end.
I love this project! As far as having then custom made my guess would be at lest $1200 each but I might be a bit high. Just a guess…
It would be nice to see your design on both sides. I know that would mean clear glass, but can you add your wood design to both sides?
Nope, I’m just going to keep it on the front. That’s the only side that shows when the doors are open, and they’ll almost always be open during the day. Also, the chances of me being able to cut out two completely identical pieces of fretwork that fit perfectly and precisely together front to back is exactly 0%. 🙂 In order to do that, I’d need to use one of those big laser cutters, and I don’t have access to one of those.
What about painting the backside of the fretwork black so that you could see it a little more? I absolutely love the doors…you truly are talented and so creative!
It is painted black. I painted every bit of the door, front and back, before adding the glass.
I tried looking for a cost on the internet for a custom job similar to yours and could find nothing. The closest I found was $716 with straight interior wood pieces. The fretwork you added is absolutely unique and incredibly gorgeous!
They would have cost thousands, and now that I know you only paid $40 for the pulls, I love them too! I was afraid that they broke the bank and cost a couple hundred! Look like they are India Brass. Love all of it! So many blessings
And the hardware needs to get added to the cost, too, right?
I gave the cost of the hardware on the hardware post. Since most people don’t install their French doors on sliding hardware, I didn’t include it. I just wanted people to have the info on the cost of the French doors for those who wanted to transform their panel doors into French doors. I also didn’t include the cost of framing out the doorway, because that’s completely separate.
Your doors are absolutely amazing!!
I would really, really like to see a tutorial on the hanging hardware. Pretty please…..The store bought stuff is just too expensive for me, but I need to regain the space of the door swing so I can convert an incredibly tiny bedroom into a much-needed walk-in closet. Thank you.
Or even just a written shopping list and written directions would be wonderful! If no one else needs them, can you please send them to my e-mail address?
Are you going to add the fretwork to the other side as well? For a second when you were showing the unpainted trim, I thought it was gold leafing. I know you said you were going to cut back a bit so its not everywhere, but it does look beautiful if you did want to add it to the kitchen side 😉
No, the fretwork is just going to be on the front sides of the doors. The backs of the doors will only be showing at night when I close the doors, so it doesn’t matter to me if it has fretwork on the back or not.
I may still add some gold to the doors, but I’ll probably wait until I finish the kitchen and decorate the music room.
How is it even possible to be Surprised!!! each and every single time I visit your website?!?!? You simple A.M.A.Z.E me, Kristi!!
Your talent, your skills, your creativity! Wow. I am in awe. Just my rotten luck I don’t live next door. I would offer my help just to see what you are up to next!!
An inspiration, truly! Thank you for being you. 🙂
Thank you for the details. You’re such a inspiration to me. I learn so much on your blog. If only I could learn the patience, cleverness and determination that you have. In time,…
The doors are gorgeous. Thanks for the explanation of how everything was attached. I prefer this look where you can see the design from the other side, but only if there’s a light on. No need to even consider fretwork on both sides. This ranks up with the upholstered coffee table– both very pretty and looks like you spent a fortune!
Great detailed post. I’ll be saving this for sure. What type of pulls will you be putting on the back side? More peacocks or something simple? As for the price of custom solid doors I can’t imagine them being any less than a thousand each. Cheers
You mean to tell me that those beautiful peacock handles were only $20 each. I’m flabergasted, they look like they cost waaaaaaaaay more than that. Are you sure that’s not a typo? Great job, love everything about this project.
You mean to tell me those beautiful peacock handles were only $20 each? I’m flabbergasted! Are you sure that’s not a typo? They look waaaaay more expensive than that. Great job, I love everything about this project.
I am in awe. Not only at the finished product, but at your process – never would I have imagined from your start (the country-style rustic doors you were considering) what your finish would be. And so quickly did you turn!
I enjoy living vicariously through your process. I live in a rent-stabilized flat in New York City (no renovating for me) and have a fear of power tools, but you inspire me still. There’s a whole lot I can do if only I could summon up your gumption. 🙂
They look beautiful! Thanks for sharing all the details about the trim. If I make one I’ll send you a picture.
Kristi, I have been so busy the last 2 weeks with work. But I have been able to peek in occasionally. I just wanted to say the doors turned out beautifully. You continue to astound me with your vision and capability. I am excited to see how the kitchen turns out now that you have your drawer fronts. And I missed being able to take time to peruse your blog. I am glad to be back. LOL
Absolutely stunning!!!!!
Wow! I just went back and read all of the posts…what an INCREDIBLE project. I’m making notes about that Gila window solution! I have windows in my new master bath that “borrow light” from the hall. I was worried about people seeing in from outdoors but it looks like you may have just found my solution for me! Thanks….and WELL DONE! xo
Can you share where you purchased the glass and what thickness you used and was it tempered? I have to replace a piece of glass in my front door and HD/Lowes only carries 3/32″ and I’m not sure if that is thick enough. It is also not tempered.
Mine is 3/16″ thick, tempered, and cost about $85 per door. I purchased it from a local glass shop.
Did you order your glass online or get it locally? I just need a small piece about 26×14 and I’m getting quotes for $50. Also curious did you use tempered glass in your kitchen cabinet doors?
A local glass shop. I don’t now if the cabinet door glass is tempered, but I paid around $80 for all four pieces.
Wow! nice customization