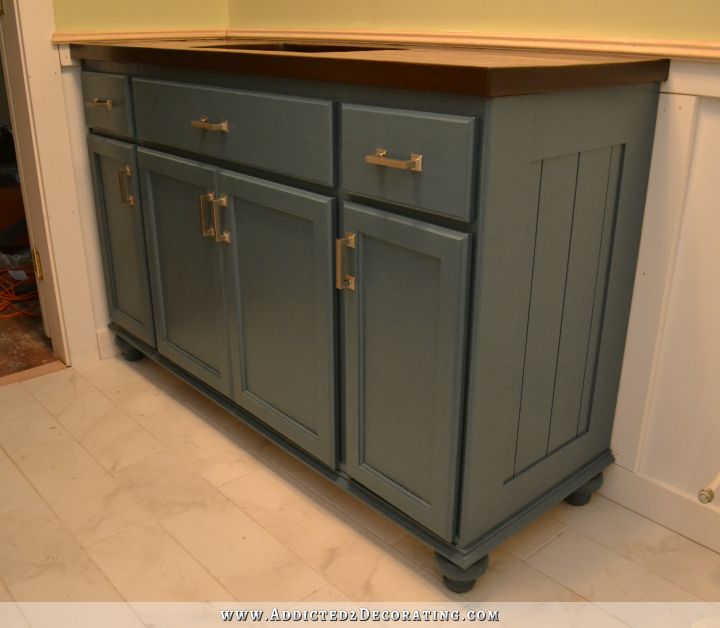
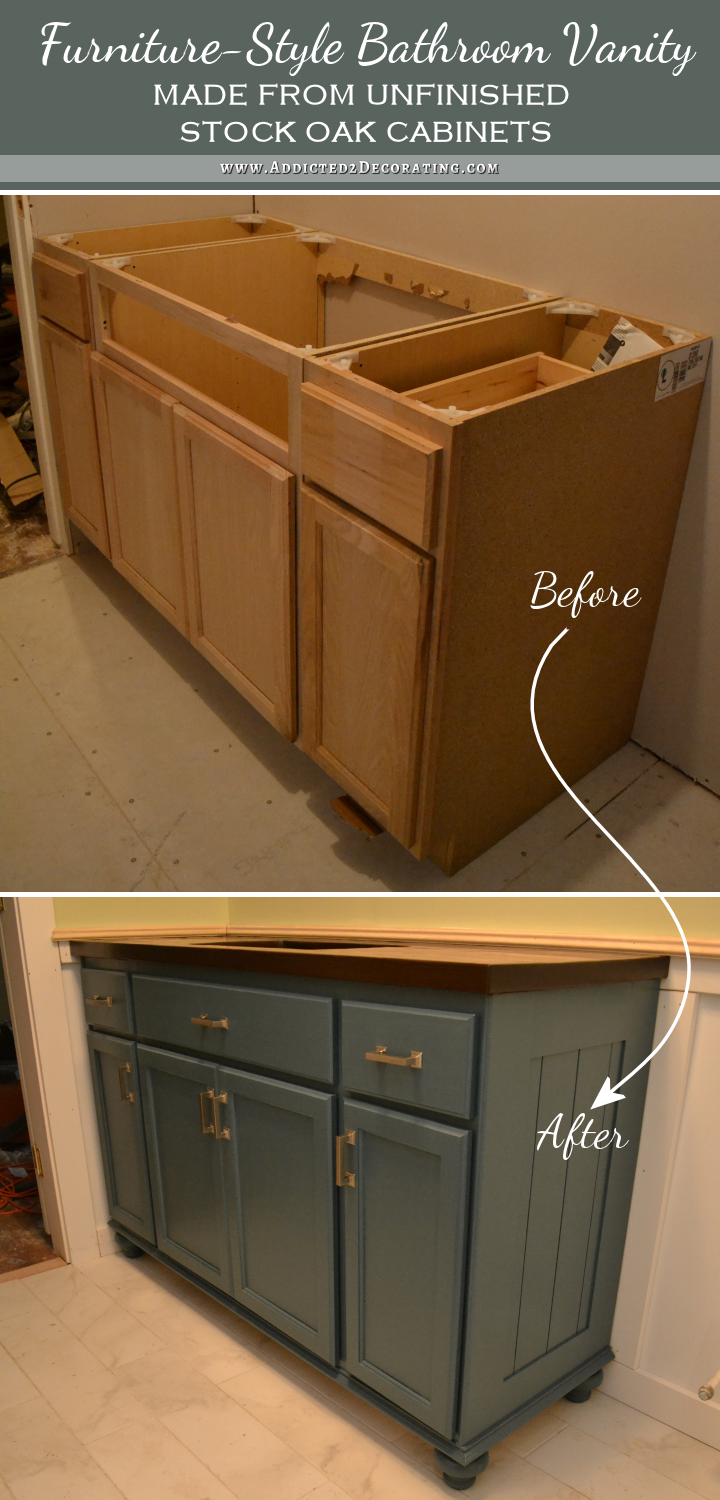
Teal Furniture-Style Vanity Made From Stock Cabinets – Finished!
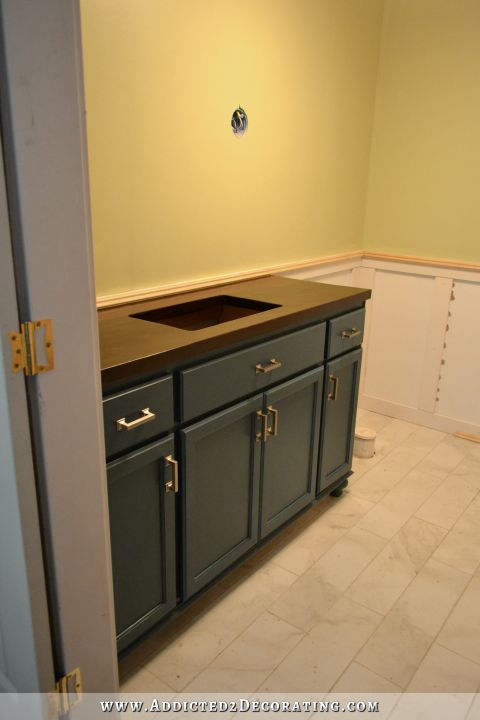
I finally finished my vanity, and I love it! It’s tall (36 inches, which is taller than the standard bathroom vanity, but evidently that height is becoming the new norm), dark (a beautiful deep teal, Behr’s Mythical Forest), and oh so handsome!
I apologize for the blurry pictures. For some reason, all of my pictures from this weekend have been blurry, no matter what I do. Perhaps I’ve finally gotten too much caulk, wood filler, and paint on my camera for it to work properly. 🙂 I think it’s time to buy a new one. Ugh…that’s a major expense I certainly wasn’t expecting.
Anyway, I used stock cabinets for this vanity — one 30-inch cabinet and two 12-inch cabinets.
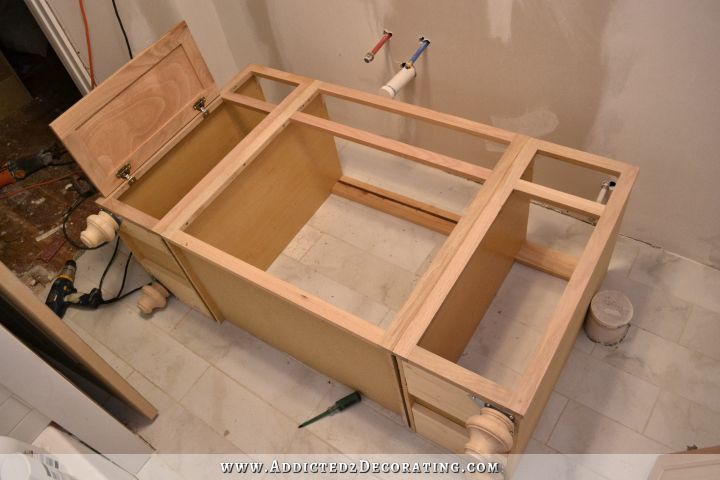
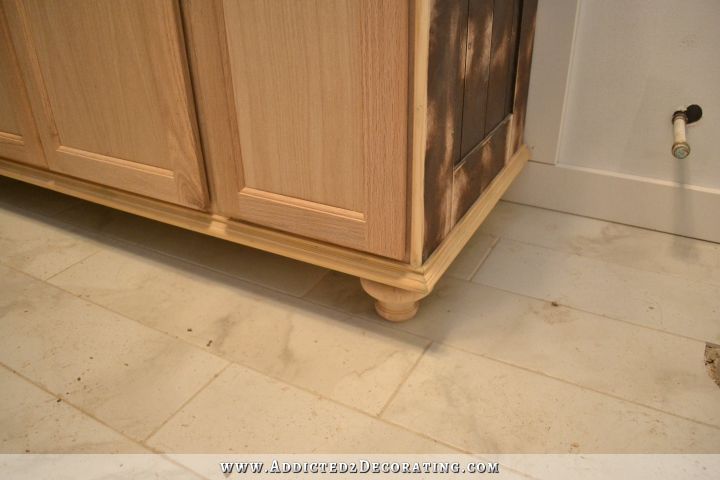
And then I added some finishing details like trim and an end panel design.
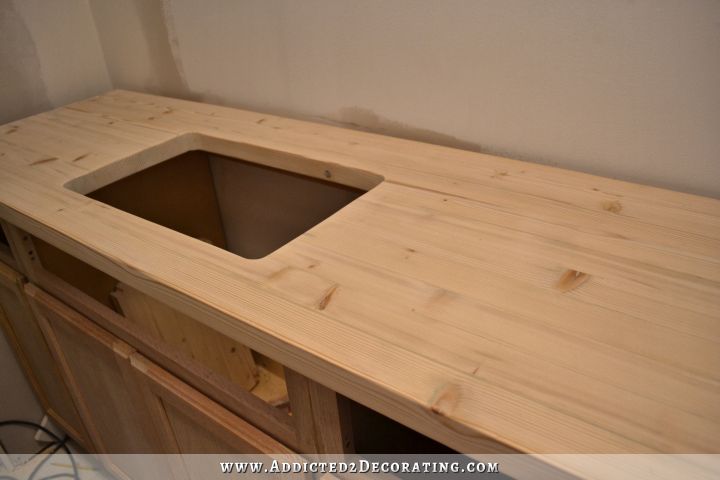
I made the countertop out of $22 worth of rough pine 2 x 3 studs.
And now she’s all primed and painted! I really like the teal paired with the green walls, and I think once I get the shower curtain made and hung, it’ll tie everything together.
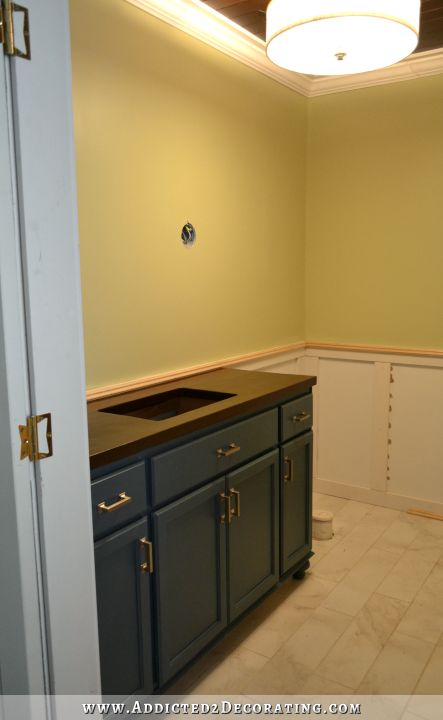
I’m always so disappointed with how the countertop looks in pictures. In person, it’s dark, but you can definitely tell that it’s wood, and you can see the wood grain in it. Also, the light spots are very obviously knots in the wood, and they actually look really pretty. In pictures, it just looks like a solid dark countertop with light splotches. 🙁

I’ll have to work on getting a better detail picture of the countertop.
Ugh…those blurry pictures. 🙁 So sorry.
So how much did my vanity cost? Here’s how it breaks down:
1 3o-inch Stock Cabinet: $100.80 (purchased during a 20% off sale)
2 12-inch Stock Cabinets: $118.40 (purchased during a 20% off sale)
Wood Filler: $8
Furniture Feet: $40
Wood Trim: $19.43
Primer: $8.88
1 Quart Paint: $13.47
Wood for countertop: $22
Screws: $7
Stain: $8.46
Polyurethane: $10.77
Finishing nails, wood glue, paint brushes, etc: On hand
TOTAL: $357.21
Not too bad for a furniture-style vanity with a countertop, right? All of the ones I’ve seen online that are a comparable size to mine run anywhere from $1000 to $1700, and I’ve even seen a couple that are more than that! Even the cheapest furniture-style vanity with a countertop that Home Depot carries is $979. So I’d say that making my own from stock cabinets really paid off!

Addicted 2 Decorating is where I share my DIY and decorating journey as I remodel and decorate the 1948 fixer upper that my husband, Matt, and I bought in 2013. Matt has M.S. and is unable to do physical work, so I do the majority of the work on the house by myself. You can learn more about me here.
Gorgeous!
Love it!!!! Great job as always. You are an inspiration to me.
Beautiful. You do such amazing work.
Love it! This is just the right combination of light and dark in the room. I love how the vanity pulls from the ceiling. And the tile and walls…..Perfection! !!!
Sheila F.
Amazing! I love the combo of colors. The wood on ceiling and wood
vanity top is spot on. Looking forward to see complete room.
Always a great job.
The vanity is gorgeous and the handles set it off beautifully! Question: Did you spray the paint finish on?
I actually brushed the paint on. The weather hasn’t been cooperative lately, so I wasn’t able to spray.
Do you have a post somewhere where you show how you paint your cabinets? What kind of primer, paint, any finishing varnishes, number of coats? If not, can I formally request one? =)
I actually do! I wrote this post a while back:
https://www.addicted2decorating.com/how-to-paint-cabinets-with-a-paint-brush-and-get-a-near-perfect-finish.html
Thank you!
Incredible! It’s a gorgeous vanity.
I agree. It is gorgeous!
You know I LOVE EVERYTHING YOU DO!!! EVERYTHING! THIS PHONES MUST BE MESSED UP BE CAUSE THE PIC LOOKS GREEN…LIKE OLIVE GREEN. BUT IT’S PRETTY ANY COLOR.
Beautiful! You do wonderful work. The pictures are very clear on my iPad!
I love it!
But for some reason, I thought the feet would match the countertop…but I do like the teal.
And I’m not a color on the furniture kind of girl but this has me wanting to do it in my horrible master bath…maaaaaybe just a little! I think it would brighten it up a lot!
Love your vanity! Well done! The shower curtain will definitely tie the colors of the walls and cabinet together!
Looks really good Kristi! I really like the hardware you picked. Now tell me, the wood trim around the top edge…..what will happen there? I thought you had said earlier that you were going to use a trim tile across the wainscoting and also as a backsplash for the vanity. Has that changed or was this trim in the plan? Floor looks great, now that it is clean of dust etc and we can really see it. Such pretty tile, you make really good choices. I think I would be overwhelmed with that. Can’t wait to see it with the scones and mirror etc. A real show stopper, and you are so right about the cost….I see them on sites like Wayfair and they aren’t anywhere near that nice and cost way more. Blessings
The trim that you see there was part of the plan. I’ll add more on top to make a backsplash.
Congratulations! Put a big ‘ol check mark next to that on your list.
Love the cabinet color but I LOVE the hardware…I am a gold person and those are amazing…Can you share…As always…GOOD JOB!!!!! You inspire…
Kristi, you truly are an amazingly talented lady. Can’t wait to see it all finished.
It looks stunning! I love the hardware, too! Can’t wait to see the finished bathroom!
I like the hardware. Pulls for everything looks nice, rather than knobs mixed with pulls.
Absolutely beautiful! Pictures look great on my monitor.
I notice you didn’t drill the faucet holes prior to installing the counter top. What kind of faucet are you going to use?
I’ll be using the magical kind that doesn’t require plumbing. 😀 Okay, maybe not. 🙂 That was a big oversight on my part. I should have drilled those holes before staining and polyurethaning the countertop. Now I just hope I can do it without making a big mess of things. But the countertop really isn’t ‘installed” at this point. I’ll need to finish the wainscoting before I can actually install the vanity and countertop.
Your vanity is fantastic, I love it. Inspiring as always.
Don’t buy a new camera just yet! You can have it professionally cleaned or send it off to the manufacturer. 🙂
You never cease to amaze me…Can’t wait to see the finished bathroom..
Love everything! Where did you find the drawer handles? They’re brass yes?
They’re actually stainless steel from Build.com. I’ll share details in a future post, hopefully this week.
The vanity is very beautiful and I simply love your hardware choice. Did you have that on hand as it doesn’t appear in your cost list? If not, can you please share where you bought it?? Many thanks – as always 🙂 The room is coming together so beautifully!
It was actually provided to me free of charge. I’ll share details in a post later this week.
Very pretty! Maybe I’m missing it,but I don’t see the cost of the pulls in your breakdown.
LOVE it – I must remember when we redo our bathrooms to use that 36″ height,,,it seems so much more user friendly!
The colors are outstanding!
Oh and did anyone else notice that Kristi’s logo has the same color combo as the bathroom? 🙂 Addicted in the wall green and Decorating in teal. Love it!
I noticed that, too! 🙂 Does that mean we are detail people? 😉
Kristi, it’s beautiful! And, the pics are not blurry on my computer at all. I can’t wait to see what kind of mirror you pick to go with your vanity! This bathroom is going to be a show stopper!!! Wow!
Oh girl! You are so going to have another beautiful home!!
It is so beautiful, Kristi! Great job.
It’s lovely Kristi!!
The two colors together are beautiful….I can’t wait to see it with the fabric in the room as well!
Blessings,
J
You. Are. Incredible. Your work is simply beautiful and I am in awe!
Beautiful!
Love what u do. Still waiting to see how you shortened the drawers. We are planning to do that on a project we are working on. Thanks
It turned out beautiful! And i love the hand pulls…Bravo a job well done Kristi!!!
Wow. You are the diva for taking inexpensive materials and making them look like a million bucks. This bathroom will be another room worthy of a high-class magazine spread! Another great job, Kristi.
I don’t think the pictures look blurry. I think the hardware you chose looks really good and the whole item came together to look great.
I want a vanity just like yours! Gorgeous!
I love what you do! Love this blog.
Looks great! As usual! I love the handles….where did you get those? (I don’t see them included in your breakdown) Have a Blessed Day and keep on DIY-ing!
They look like brushed nickel on my monitor, but I went back and read the comments and some are saying they are gold. What finish are they?
They’re from Build.com. They provided several things for my bathroom, so I’ll be sharing details later this week. They’re actually stainless steel.
Beautiful work. What an elegant bathroom this is becoming. When you were doing all the hard, physical work that never seemed to end, you wanted to get to the pretty stuff. You’re there!
Kirsti. WOW WOW,!! The room is looking great and the vanity is excellent. The bathroom is coming together beautifully. What a SUPER WOMANxxx
Oh, I LOVE the vanity! So rich and classy looking!!!
The pictures are clear!! Wow!! Love the way your bathroom is coming!!!!!Great Job!!!!!
You know I was really against the darker teal colour when you showed us the samples but now that it’s done I think it looks smashing. Mind you, I love everything you do. I can’t wait to see what comes next.
That is just beautiful! You are such an inspiration! I look forward to your posts and using some of your tips for my home. Great job!
Okay….so I am THRILLED to see this finished!!!,(as I am sure we all are)
This is FABULOUS!!!!!
I am ready to tackle the ones I need because of YOU!!!!!
So congrats dear one on getting it done….can not wait to see the shower curtain!
Hang in there you are nearly “fin-ee-to’d”
Oh my gosh I love your bathroom! The vanity color makes want to jump up and paint something!
Curious about one thing…why attach hardware on a non-operational drawer? Judging by the photo, the undermount-sink will prevent the use of a traditional pull out drawer in the center section. Unless you have opted to convert the drawer front into a hinged-tilt-out storage compartment, such as the Rev-a-Shelf product. I know this post is older, but I would be interested in knowing your thoughts on the use of hardware with non-operational panels. And, all-in-all, well done!
I always put hardware on non-operational drawer fronts because I hate for fake drawers to look fake. I guess it’s a matter of personal taste, but I hate seeing fake drawer fronts that are obviously fake. In my mind, it’s kind of like seeing drapery panels that are hung on either side of a window from those short little rods on each end, rather than having one drapery rod that covers the entire width of the window. It’s true that most people don’t actually use their draperies, and most are purely decorative, but those tiny little rods just scream “I’m fake and cheap!” I like for draperies, whether they’re actually used or stationery, to look like they could be functional, and I like all drawer fronts, whether attached to a drawer or a false front, to look like it could be functional. I just basically don’t like anything that screams, “I’m fake!”
Humor me for a moment…I don’t want to abuse your time. However, while I’m never one snoop and rummage through others drawers, I would be exceedingly curious if I happened to see a vanity with a non-operational drawer and a handle attached. One glance, and I’d know that the placement of the sink makes the drawer front non-operational. To me, adding hardware is the faker-y part. It’s akin to the French ‘Aha’ — a garden design where the lawn ends with a sunken (hidden) wall to separate it from the sloping meadow. It derives the name by the sudden surprise of the garden visitor who discovers the visual-trickery with the exclamation, “Aha!” The key difference in this analogy, is that the Aha in the garden design is useful, whereas the handle is not. In reading your post these several days, I know your patent response is, “it’s up to personal taste.” Agreed. However, I would suggest that some of your readers might like to consider another option…one I’ve used before…of monogramming (or setting a small plaque on) the non-operational drawer front. I’ve had the drawer front carved in some instances for as little as $12. I’ve applied brass or ceramic “tags” for as little as $18. Granted, this only works if the non-operational drawer is CENTERED. Asymmetry will not work in this design scenario. But the effect is beautiful, simple, and on-the-cheap. Cheers!
The teal trend is very popular in interior design and for good reason. It is a beautiful color that brightens up a room and makes you feel good. The good thing about teal is it looks good with light or dark counter-tops as well as different variations of metals. The vanity looks great!
Did you post how to cut the drawers down? I would guess that you would also have to shorten the drawer slides?
Because my older home has a hole for the vanity that is 47 inches wide and the standard now is 48 I could use this process to make my own vanity. Thanks!.
I didn’t do a post on it (that I can remember). But I took the drawers apart, cut the sides and bottom shorter, and reassembled. I had to purchase shorter drawer glides to use.
Very beautiful! I am about to do something very similar to my own bathroom. What color did you use for the vanity?
It’s called Mythic Forest by Behr.
Wow! This is one of the best before / afters I’ve seen! Great work and I love the colors!! We have this style of cabinets in our kitchen, and are going to paint them. I was looking for a good idea on how to trim out the sides, which are plain particle board. And I love the feet!! Might be a lot of work replacing the slat front bottoms with feet for entire kitchen, not sure if I can get my boyfriend on board with that but it really makes a huge impact. It looks so much more high end.
Washroom is beautiful. Can I ask where you purchased the feet for the vanity. We are redoing our cabinets and would like feet.
I got the feet at Home Depot.
http://www.homedepot.com/p/Waddell-WAD-2781-4-in-x-4-in-x-4-in-Basswood-Turned-Bun-Moulding-10001514/205977510
How did you do the side panel? Love the look
You can find the details here: https://www.addicted2decorating.com/bathroom-vanity-trim-wainscoting-progress-and-painted-walls.html