Upper Cabinets Finished (And I Finally Achieved The Perfect Sheen!!)
Show of hands…who among you actually thought that I was going to be satisfied with the finish I showed you yesterday on the cabinets? And who among you actually thought that I was going to leave it alone? And who among you actually believed that I really and truly thought that “good enough is good enough”?
*Raising hand.*
I honest to goodness believed that I was done with those cabinets. I really did believe that I was satisfied with the finish. So yesterday morning, I wrote my post sharing with all of you that it was finished, and I was satisfied, and I was giving up my pursuit of the perfect (for me) finish.
Then after I wrote that post, Matt and I sat down for breakfast. And as I was sitting at the dining table (in the music room, as I showed you on Friday), I kept staring at those cabinets and seeing all of the shine with the sunlight bouncing off of them. The lights in the kitchen were off, so it wasn’t the bright recessed lights above causing all of that shine.
I became so frustrated all over again. I hated it. I’m not going to all of this trouble, spending all of this time, and spending all of this money, to end up with a kitchen with awful shiny cabinets that I hate. Knowing that’s what I would end up with destroyed every ounce of motivation I had to work on my kitchen yesterday.
So once again, I knew I had to come up with a solution. And I did!!! And it turned out just like I wanted. Just like I had envisioned. And now my kitchen cabinets have the most gorgeous velvety satin finish I’ve ever seen. I mean seriously, I love the finish. I couldn’t want or ask for anything more.
The key was topcoating everything with Rust-Oleum Ultimate Polyurethane in a matte finish. I sprayed it on, and oh my gosh, it’s gorgeous. I wish I could invite every single one of you over to my house so that you could stand in my kitchen and see it in person for yourself. It’s absolutely, 100%, exactly what I wanted.
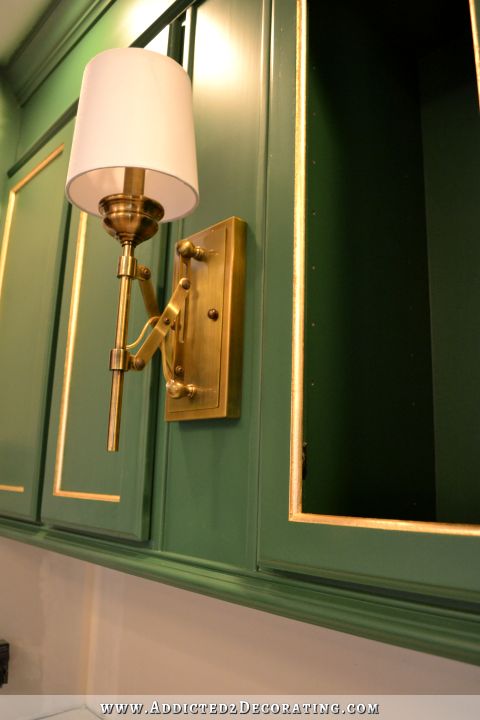
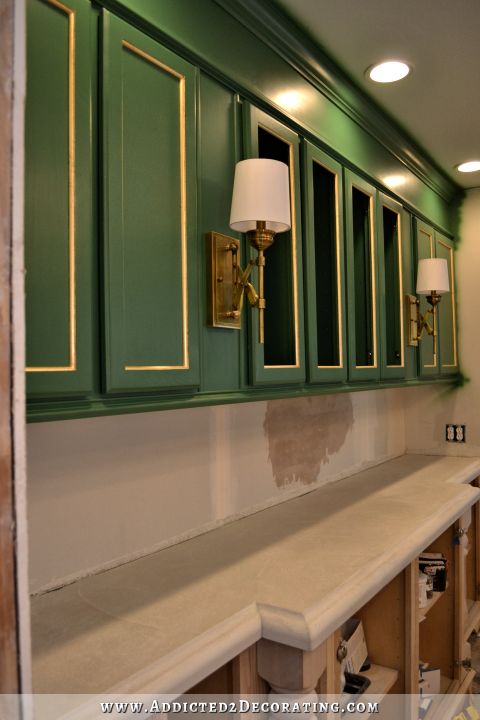
Just to compare, here’s a close up picture that I showed you yesterday of the sconce.
See the shine on that cabinet? Everything is shiny, from the top crown moulding to the trim on the bottom and everything in between. Just…no.
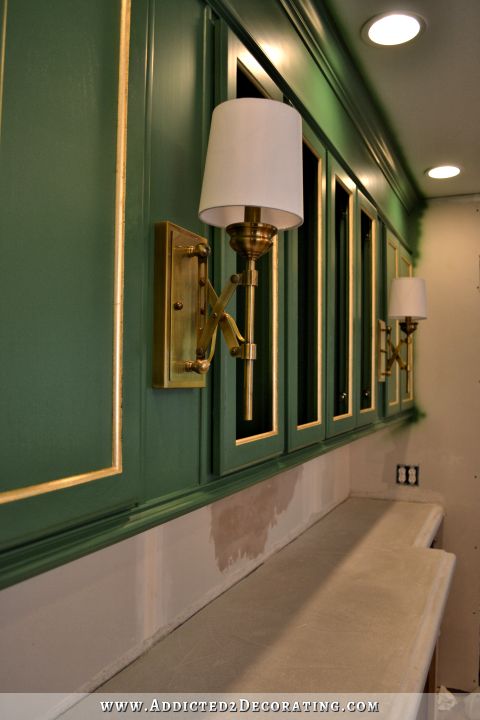
And now? Gorgeous, velvety satin finish.

And now I’m excited again about my kitchen. I was getting so discouraged, and so frustrated, that I really just wanted to throw in the towel. I thought if I can’t have the finish I want, then I’d rather just live with bare wood in my kitchen and the dream of what it could be in my mind. But I did not want to live with those shiny cabinets in my kitchen. But now, finally, after a week-and-a-half, I’m not only satisfied, but I’m thrilled with the outcome and excited to do the rest of my cabinets now.
So having to respray everything really put me behind schedule yesterday. When I got up yesterday morning, the only thing I had planned for that day was to get the other five cabinets doors gold leafed. But after deciding that I still wasn’t satisfied with the finish, the new plan was to devise a new plan, redo everything, and then finish the gold leafing.
I didn’t even start the gold leafing until 7:15 last night, and I redid two of the doors that had already been gold leafed. So I didn’t finish the gold leafing until 1:20am. Totally worth it, though.
And then I got up early this morning to install the doors and take pictures. So needless to say, the doors might not be installed perfectly right now. They’ll probably need some adjustments so that they’re all hanging evenly with each other.
Anyway, it’s done. Finally. And I’m satisfied. Finally.
The good thing is that now that I’ve finally found the magical combination (Benjamin Moore Advance paint topcoated with Rust-Oleum Ultimate Polyurethane in a matte finish), the rest of the cabinets should go so much faster.
And now, one more thing…
I had someone ask me to take different pictures with the different lighting that I have in my kitchen just so that y’all can see the options and how everything works together. More than likely I’ll never have a need to turn on all of the lights at once. That gets very bright when I do that, and I still don’t even have my undercabinet lighting installed! 🙂
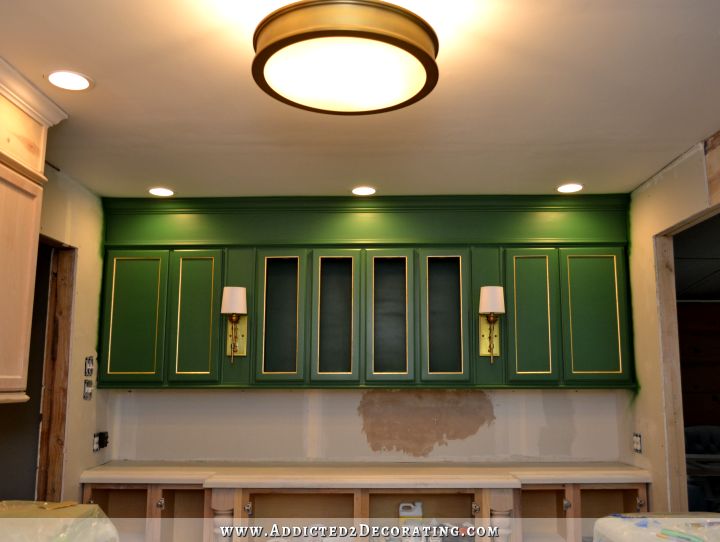
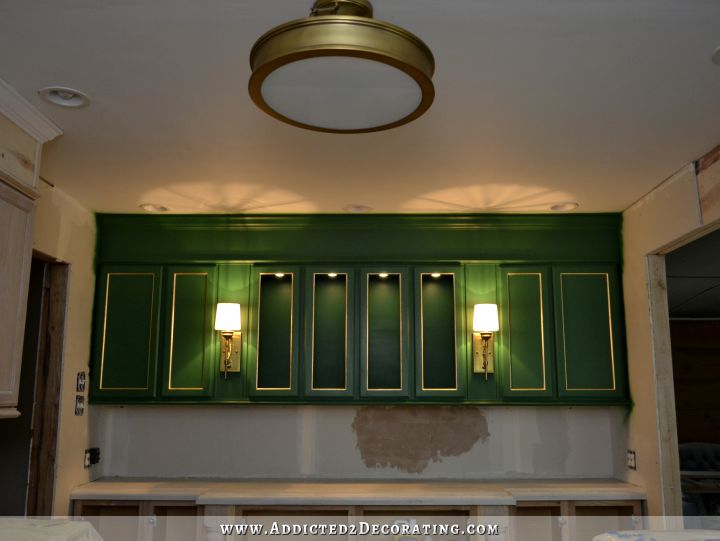
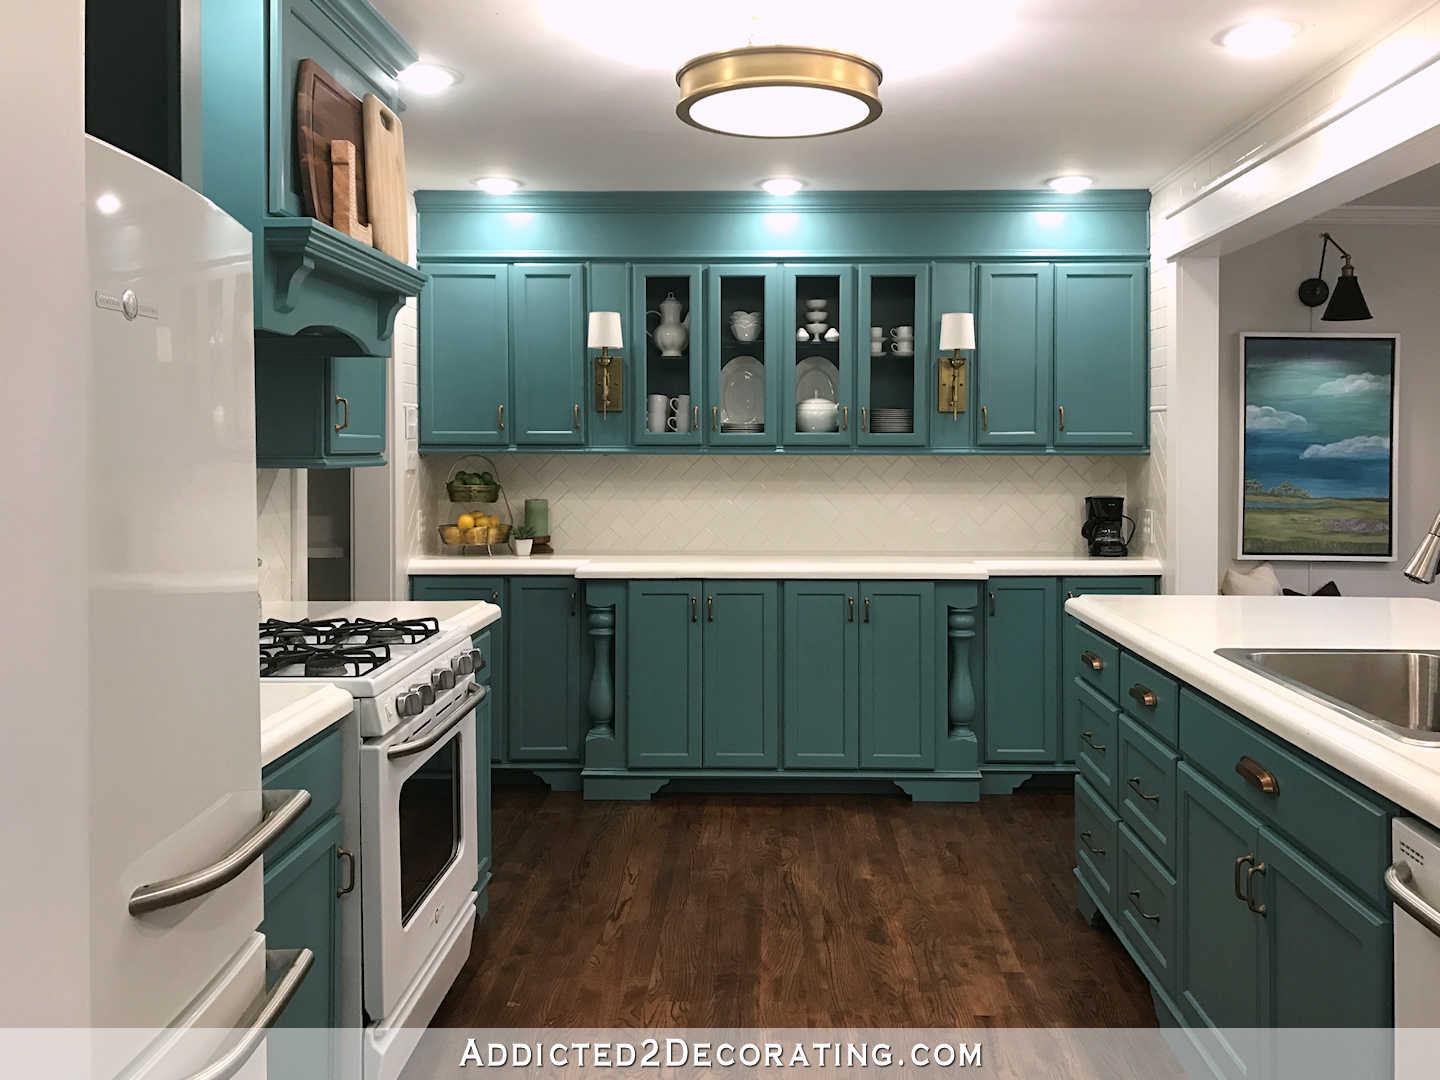
Anyway, here are the different lighting options that I have. This is with the recessed lights on, plus the center main light. (All of my recessed lights are in dimmer switches.)
And next, center main light, plus the sconces and inside cabinet lights. (The inside cabinet lights were an afterthought, and they’re on the same plug as the sconces. Both are controlled with a switch on the left wall.)

And here’s my favorite, especially at night when I’m not really needing task lighting, but just needing a little light — sconces and inside cabinet lights only.
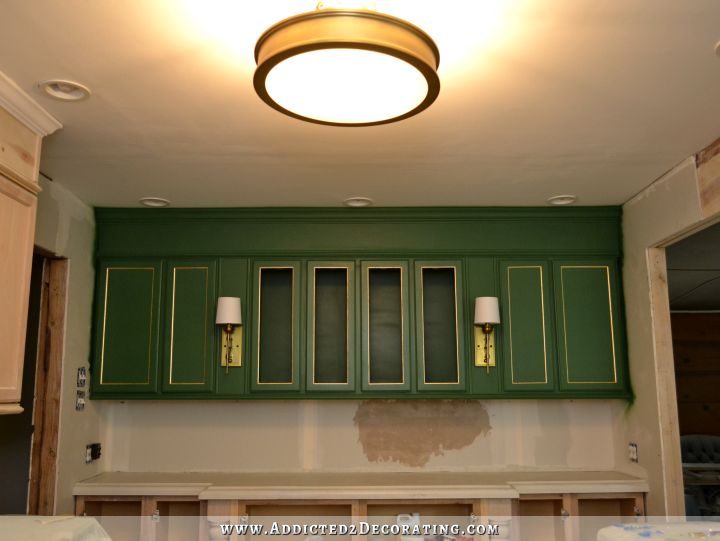
And finally, this is just with the center main light on…
I can’t even tell you how much I love having these different options, especially since this room started out with one single light bulb lighting the entire room. What a difference!
Today I’m starting on those lower cabinets. And who know…now that I know what the heck I’m doing, I just might be able to finish those in about two days rather than ten! 😀
Oh, and I still have to find cabinet hardware. Unfortunately, I know pretty much exactly what I want, even though I’ve never seen it before. That’s always a challenge because who knows if it even exists, or if I’ll be able to find it, or if I’ll be able to afford it if I do ever find it. It’s always so much easier when you start a search with an open mind and not really a clear idea of what you want, right?

Addicted 2 Decorating is where I share my DIY and decorating journey as I remodel and decorate the 1948 fixer upper that my husband, Matt, and I bought in 2013. Matt has M.S. and is unable to do physical work, so I do the majority of the work on the house by myself. You can learn more about me here.
Yay Kristi! So happy for you that you have exactly what you want now! And I’m taking notes for when I paint my kitchen cabinets… I was uncertain of the sheen to choose. Do you expect the matte sealer to clean up nicely and often? Thanks for sharing the perfect combination.
It’s a very cleanable finish. I just sprayed the doors with the final coat of poly last night, and just this morning before I took pictures, I had to wipe one of the doors down with a wet rag because it somehow got covered with dust. It cleaned up beautifully. I didn’t scrub it, of course. I’ll let it cure a bit more before I do that.
Thanks for finally figuring it out before I start painting my kitchen cabinets!
Yahoo, now I don’t have to go through what you did. I would have pulled my hair out!
Good to know, thanks 🙂
Oooh. I know what you mean about the hardware. I have a vision in my mind of what I want. I’ve been looking for three years, and I’ve seen ‘close’ to what I want, but non The Very Thing. And I don’t want to settle. :/
Good hunting.
I can totally relate. I get it in my head and I have to look and search to find what I want. It’s so much fun when you find what you have envisioned.
Your cabinets look awesome. Can’t wait to see the finished product!
Thanks for inspiring me to get my house projects started and finished.
I knew you weren’t going to leave it alone! I am the same way, if I’m not happy with it it just keeps creeping into my mind and drives me batty! Absolutely love this finish, love your resolve, and sending lots of encouragement your way to finish the rest of it, babeh! 🙂
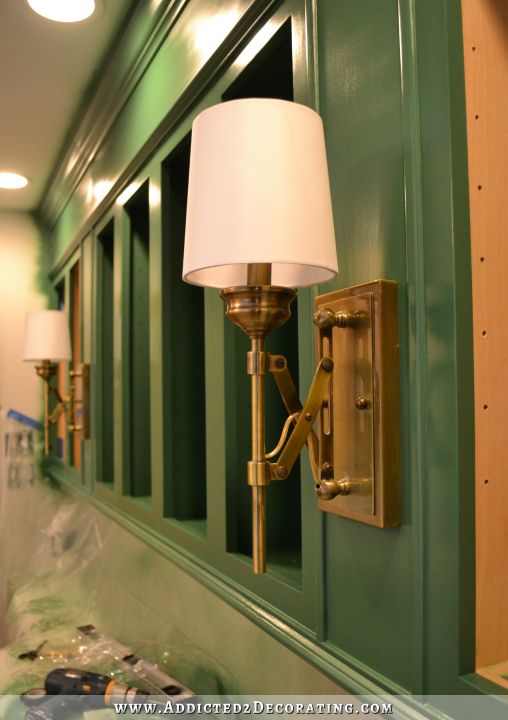
So, so lovely. Love the color with the gold leaf, and LOVE the sconces and the pattern they throw on the ceiling. I’m sure you’ll sail right through the rest of it now that you have the combo figured out. Well done, Kristi, well done!
I absolutely love your cabinets!! And I have so enjoyed watching their evolution. I want to add under cabinet lighting in my kitchen too.
My cabinets have been refaced and have flats bottoms underneath them. It seems my only choice is LED strip lighting on the underneath side. What do you think? Has anyone tried using this type of lighting? You will see the underneath base of my cabinets from my den. That worries me. Can you think of other choices I might have?
I think the strip lights are perfect. I’m considering those myself.
Kristi,
Thank you so much for your positive comment. Validation always helps me with my decision making! I’ll be interested to see how your under cabinet lighting is done.
I have had the LED strip lights under my kitchen cabinets for almost two years and I Love, Love, Love them. I have not had any trouble with them at all and they are great for task lighting when used with the recessed lights or for a night light when the recessed lights are off. I would definitely recommend them.
Once again I am in awe of your determination and persistence. You are an inspiration to me.
Okay, you got me. I did believe you would leave them alone, though I did notice in the sconces photo that they were really shiny. But I am sooooo happy for you that you finally got the exact finish you wanted! There is nothing like having to live with something that is not the way you wanted it to be. Sometimes, with time, we realize that it’s not as bad as we thought, but other times, arrrggghhhh! it’s a constant fingernails on chalkboard irritation. The cabinets look really upscale in the matte finish, especially with the contrast of the gold leaf and the burnished finish of the sconces.
Now that your enthusiasm has been renewed, I expect you’ll knock out the rest of them in no time, and I’m looking forward to seeing them completed. One question: will you be putting the gold leaf on the drawer fronts too, and if so, since they don’t have molding, how will you do that?
I will be adding it to the drawers also. I bought some very small cabinet trim that I’m going to add to the drawers, and then I’ll add gold leaf to that trim.
ooooooo, that’s going to look sooooo good!
Will the trim on the drawer fronts be the same width as that on the doors, or will it be a different width? I saw how you did the bathroom vanity in the condo, and that really looks as if it was always there!
P.S. Will you be putting glass shelves into the glass-front cabinets? What sort of glass did you decide on? Clear, frosted, bubble? I can just see the sparkle it will add!
Yes, I’ll have glass shelves cut when I have them do the doors. I’m thinking I’ll just do clear glass. I love seeded glass, but I don’t want to get too many textures/finishes on that wall.
I think you should use the seeded glass or old glass in the cabinet doors. as they are, they look a little too new. You have done a wonderful job!!
Hi, Mary, while I agree with you that seeded glass would be perfectly appropriate on the doors, I also can see that plain glass would give an ‘updated vintage’ look, which I think is what Kristi is going for. Also, since this is a lighted cabinet for display, having the clear glass will work better for that purpose, I think. Capice? 😉
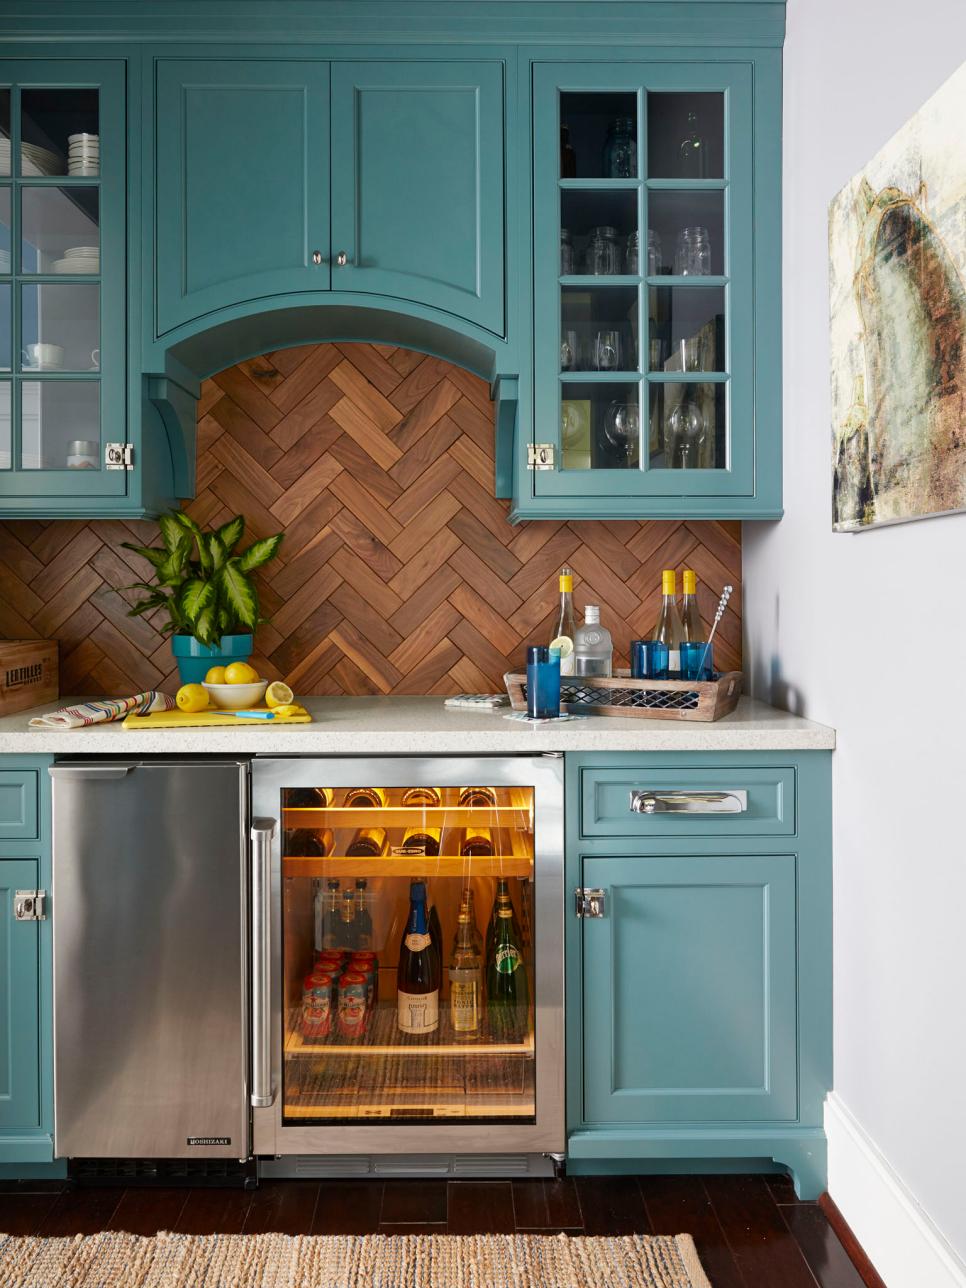
Herringbone subway tile on walls, glass front cabinets, corbels, and added feet.
Traditional Kitchen by Piedmont Architects & Building Designers robert kelly
Sorry, guys, I’m trying to post a photo I found on Houzz.com and I can’t get it to work right. My bad! Please excuse!
Absolutety love your cabinets!
WOW… spectacular!!
So did you poly the doors as well? Those with the paint only were the satin finish you were looking for… did you do the matt finish over the gold leaf?
I did poly the doors also. And they’re gorgeous. 🙂
I should have added the info about the gold leaf! But yes, I did use the matte poly over that, too. And interestingly, it’s still shiny. It might not be quite as shiny as it was originally, but the poly really didn’t affect the shine much at all.
The reason I had to redo two of the doors that I had already gold leafed is because I was sure that I couldn’t spray the matte poly over the gold leaf. So in my mind, the doors that I had already gold leafed would need to be redone after I sprayed the poly. Soooo…I sanded off the gold leaf off of two of the doors before spraying the poly on the doors. 🙁 Finally, on the third door, I decided to try the poly over the gold leaf, and it worked! It came out just beautiful! So I went ahead and put one coat of poly on all of the doors, the did the gold leaf, and then added one more coat of poly on the door, including on the gold leaf. They turned out just gorgeous, and the gold leaf is still shiny.
I’m glad you’re picky (I am too) and I know that would have bugged you every time you looked at your cabinets. Thank you for all your knowledge… I’ll be painting my cabinets soon and now I’m feeling better about it… if you can take it on so can I. You are empowering!!!
Thanks!!
Yay! So glad you got the finished you wanted. I can relate! Looks fabulous and love all of the lighting options. So pretty Kristi, you are doing an awesome job. It’s going to be a show stopper when you are done. True story.
Wow. Just, wow. Yesterday, you posted the photos and I was thinking, “Gosh, it’s really not that bad. The shiny isn’t horrible.” And, it wasn’t. It was fine, really. At least, in my mind. And then…this photo….today…Holy Crow!!! As usual you were right and I was wrong. This is amazing. I can’t believe the difference. Isn’t it amazing when it finally happens??? When the stars align and you get. it. right. When you thought you were going to have to settle but you didn’t?!! It’s like God finally turning His face towards you and saying, “Ok, I will relieve you of this frustration now.” I hope you did a happy dance in that kitchen yesterday. Lights on. Lights off. Naked. Clothed. Whatever! Just dance, woman!!!!
My thoughts exactly!
Absolutely beautiful, what a fabulous high end look. You are a CHAMP!!
For hardware, try this site: http://www.nest-studio-home.com/
Their options make me think of your kitchen.
Kristy, this room is turning out to be the jewelry box of your home! How beautiful! I’m so excited to see more green!! and backsplash!
To quote my mama, “You beat all I’ve ever seen!” and “You’re like a dog on a bone.” Both good things. 😉 I am in awe of your perseverance. I would have thrown my hands up a long time ago. Kudos to you!
Breathtaking! Stunning! I love the simple formula too. Love that BM Advance – and thanks for the hint on the poly. Truly gorgeous.
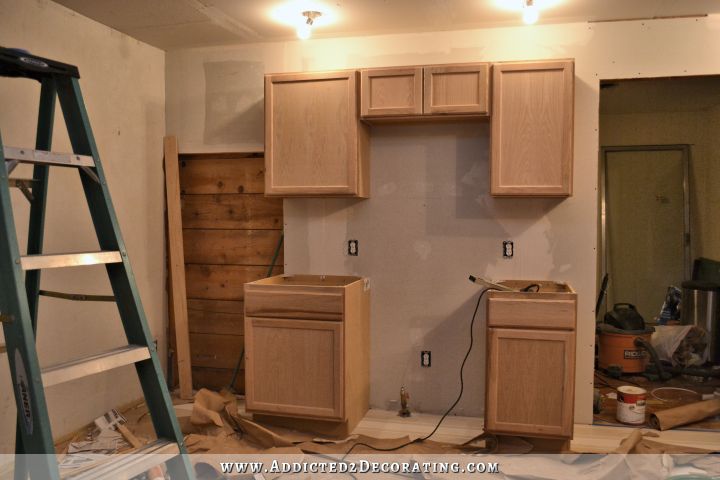
Kristi, I have to tell you when I first saw that picture of the raw stock cabinets with weird spaces in between…I thought you were crazy..then you showed the vision…but the outcome is crazy impressive!! Great job, girl you have skillz and vision!! But I have to tell you I have been showing your site to my husband..(hinting if this blogger can do this certainly we can…) but it back fired! He said if she can do it…I think I shouldn’t help you…you can do it by yourself…:( LOL Your blog really inspires me! And the fact that you share your failures so honestly keeps it real! I love how you made those cabinets look so custom. BEAUTIFUL!
loving that finish… so excited to see what the next few days brings you!!
Your cabinets are breathtaking! You know how some rooms just make you feel good when you look at them? Well, that’s the feeling I get when I look at your kitchen – I would totally trust you to design anything in my house, and that’s saying a lot, since I think we have the same personality about getting things just right:) And, although I don’t know you personally, I was a bit surprised to read that you were ok with the “not quite perfect” results. I was so happy to read this post and know that you are now totally satisfied with your work – you’ve not only put a lot of physical labor into your kitchen, but a lot of emotional labor as well, so you deserve perfection. Now, don’t forget to take a few moments to wallow in your success:)
When I saw the satin finish and your displeasure and struggles with it, I thought “what’s the matter with the satin finish?”. It was pretty. HOWEVER, when I saw the matte finish, my jaw dropped down in amazement! Such a difference! Satin finish will NEVER appear in my kitchen cabinets, either! Thank you for your perseverance.
Wow, wow, wow…..the cabinets and sconces look absolutely stunning Kristi. I am also totally in awe of your determination and you are such an inspiration.
We remodeled our kitchen and breakfast room last year. We put our recessed lights on a dimmer switch. LOVE, LOVE, LOVE it. When you need a little extra, but don’t want them too bright.
Those are so gorgeous, Kristi!! I love how you’re fearless when it comes to color, but I’m even more in awe that you are my opposite in that you GET THINGS DONE!! I have so many halfway finished projects around here. You’re my hero 🙂
I knew you would NEVER settle. You are truly an inspiration.
Absolutely. Stunning.
Absolutely gorgeous, Kristi. I’m glad you stuck with it until you got exactly what you want. That queasy feeling in the stomach every time you look at something not quite right is very familiar to me. Glad you found the fix. 🙂
Oh, and can’t remember if I suggested this before, but on the matter of gold leafing- how about if you tape off the area, apply the adhesive, then remove the tape before applying the gold leaf. Would that prevent the ragged edges, and be easier than the alternative of trying to be so precise with the glue when not taping?
I don’t think that would work simply because no matter how hard I burnish the tape onto the door, the adhesive is so watery that some of it always seeps through in places. So if I were to remove the tape and then do the gold leafing, it would stick to those places. The tape keeps those places hidden until I can remove it and wash those areas off with a wet paper towel.
Gosh Almighty Kristi! This a marvelous transformation…love it love it love it and i could say it again love it!
Way to go….
G.
Kristie, these are, without a doubt, some of the most beautiful cabinets I have ever seen! You deserve an award for initiative, creativeness and courage to keep trying, even when you are frustrated! It seems silly to keep telling you how much I am impressed with you and what you design, each time I post but that is just how I feel. Your kitchen will be beautiful and needs to be displaced someday in a design magazine!
Who would believe that stock Home Depot cabinets could look so upscale and rich? They certainly looked great yesterday, but I do like them so much better now that they are softly glowing. Great job, Kristi.
One word…..AMAZEBALLS!!!!
(Hope I didn’t offend anyone, but that was the first thought that came to my mind!)
I love it. I cannot wait to see it finished. I know it’s going to be beautiful.
Hooray Kristi! I knew you would find a solution.
Kristi…I really wondered if you could live with “good enough.” 😉
So glad you found a solution. I’m pinning this to remember.
Congrats on a gorgeous outcome!! The sconces and the gold leaf are amazing.
I’m wondering…now that the cabinets are looking so classy and upscale….might you be rethinking the white subway tile?
No, I’m sticking with the subway tiles simply because I don’t want this kitchen to spin out of control and end up so fancy that it doesn’t seem to go with the rest of the house (or doesn’t seem to match my personality — I like some shimmer and shine, but I’m not fancy). 😀 Know what I mean? I’m counting on the concrete countertops, painted wood floor, and subway tiles to inject some humble materials and a bit of casual into a kitchen that could otherwise end up a little too over the top and fancy. But a little bit of fancy and shine mixed with the more casual materials like painted wood floors and subway tiles seem like a happy medium to me.
That is exactly what I think makes your kitchen prettier and more welcoming than the inspiration photo.
I agree, Kristi. The contrast of the ‘humble’ finishes with the ‘fancy’ finishes is what makes a room – or an outfit – sing. It’s like wearing nice blue jeans and a great tee shirt with gold earrings!
Your kitchen is going to be stunning when it’s all done. I get inspired everytime I visit your site.
I recently purchased some drawer pulls from a local shop. The brand name is Hickory Hardware and I saw on their website that if you’re an avid blogger you can contact them. I’m thinking maybe they might offer a great discount or even freebies to you if you found something you like.
Just wanted to pass on that information to you in case you weren’t aware.
Have a great day!
Could you tell us how you did the gold leaf so perfectly and quickly? It looks beautiful!
Sure! I wrote a post about that the other day. You can see it here: https://www.addicted2decorating.com/adding-shimmer-shine-to-my-cabinet-doors-with-gold-leaf.html
Could you share how you did the gold leaf so perfectly and quickly? It is gorgeous!
WOW!!! Your cabinets are so beautiful. I love them. Everything about them.I just sat here and stared at the picture for at least 5 minutes. Pat yourself on the back girl. I have just started my fireplace and so hope mine looks was good as yours. I’m so excited for you getting the finish you wanted. I really didn’t think you would quit until you did get it right. That’s just not how you do things.Good luck on your hardware hunt. I hope it will be a short hunt. I also bought the Critter sprayer, I thought if you thought it was a winner than my hunt was over. I LOVE< LOVE< LOVE it. It's not heavy and very easy to use. Thanks for telling us about it. Looking forward to tomorrows post.
Wow!
Finally a blog where your not just putting lipstick on a pig! You do your projects right. I am a perfectionist at heart so, I get it. Thank God I am not the only one. I have been known to throw a fit over paint sheen. I have finished my house a -1930’s bungalow and I have found that I am the happiest when I’m covered in saw dust, sweaty and exhausted. So, for know I live vicariously through you. You are so inspiring and I enjoy getting your blog posts in my inbox.
Beautiful! Well done!!! Personally, my response to your assurance that you were “done” was “uhh huhh…we’ll see.” 🙂
Whew I’m so happy thst you found the solution! I was suffering for you!
I can’t wait for it to be finished! Godspeed!
One idea on the hardware … could you find the style in whatever finish and then custom spray paint it to your desired color?
I’m not opposed to doing that if I don’t have any other options. But I’d rather get something with a factory finish on it in the right color. Those are just so much longer lasting than spray paint. But, if all else fails, I’ll be spray painting some hardware. 🙂
Oh, I hear ya! I am in the same boat – I will NOT be able to decide on my new kitchen cabinet hardware because I am soooooooo picky. On any aspect – shape, type, finish! Argh!
I was thinking that with your mad spray painting skills and determination that you’d somehow accidentally or on purpose derive the formula for the factory finish! Haha!
Kristi,
I saw these pulls on Overstock.com (Amerock Essential’z line) – they look similar to the ones Alta posted on your Facebook page. Amazon carries these too but Overstock had a better price.
http://www.overstock.com/Home-Garden/Amerock-Essentialz-Brushed-Bronze-Cabinet-Pull-Pack-of-5/9105788/product.html
🙂
You know what you want even if you’ve never seen it before… ROFL!! I LOVE that!!! lol I’m so happy that you found a way to achieve the finish you had in mind.
Great job!
I am completely, totally in love with your wall sconces and the lovely light pattern on the ceiling. I’d be tempted to keep them on all evening, just so that I could enjoy walking into the kitchen and seeing them. If it’s possible for a kitchen to look sensual, yours does. Brava! Brava! Brava!
I do love this finish! I really love those sconces! Thanks for showing all your lighting variety – I’m so envious!
Its GORGEOUS! All of it. The color, the finish (perfect), the lighting…very elegant. I didn’t understand what all the fuss was about with regard to the finish. Now that I see it with the new “velvety satin” finish -I get it. Huge difference. And I’m so glad you are finally satisfied. And those sconces…I die!
What a difference between the two finishes! So glad you came up with the solution and looking forward to seeing you finish the lowers … and the rest of the kitchen! Really inspiring job, Kristi!
Hi Kristi, So glad you are over the moon again! Happy that you found a fix for what ailed you and your cabinets! I can’t wait to see the bottom tier. They are going to be over the top with the feet and posts. I really think these cabinets could win awards. They really are lovely. Now let me know where I can send my Barney’s find…by the time I get it mailed off your kitchen will be just about finished. Excited to see tomorrows post, please Lord, no more glitches for Kristi this week! Blessings.
All this painting cabinets info couldn’t have come at a better time for me! Thanks so much for sharing everything in detail and sharing your honest opinions!! And thanks for answering peoples questions, so many bloggers don’t do that anymore. I feel so much better about painting my cabinets now :-))
I really liked the original sheen. But then I saw the matte and WOW! I appreciate your attention to detail and your determination to get the look you want. KUDOS to you Kristi. I do have a question about the gold leaf. Did the matte finish dull it? It looks beautiful in the pictures and I appreciate the dull look of it. It looks appropriate and for such a small detail it really brings the stock cabinets to a custom look. (which I suppose it is LOL). Just wondered about that. Again you amaze. Just beautiful. I truly would love to see you on network tv. You would rock the DIY world.
I had expected the matte finish to completely ruin the effect of the gold leaf, but surprisingly, it didn’t at all. It may have toned it down just a tiny bit, but it’s still very shiny and very metallic.
I’ll put it simple; STUNNING!
I love the final product and I absolutely knew when I read yesterday’s post that there was no way you were going to leave those cabinets alone. I knew you would continue working until you got them exactly as you wanted. Congrats on a job well done!
Congratulations, they are stunning!
When you first said you were going Green – I thought ” yuck ” – but OMG Kristi these turned out magnificent – so sophisticated – just LOVE them!
Happy for your Happy! 🙂
Gorgeous cabinets! Awesome lighting!
Way to go!!! We are considering painting our cabinets, but I did not want a shiny finish so I have been dragging my feet. Now, I have inspiration!!! I am a hands on girl too so it is always a good time reading your blog and see what does and doesn’t work. Now, you can smile each time you walk by your cabinets.
THOSE CABINETS ARE EXACTLY IT!!!!! I’m chuckling because I read your post yesterday and actually thought, she is not going to leave those alone and after reading your blog for several years now, I knew you’d get back to them and find a way to make them the way you want. And you did and they look rich and luxurious and gorgeous. I am so happy you gave it one more shot. What a fantastic solution. SO happy for you!
While I was okey with the shine, my heart was heavy because you were not. And when I saw the matte finish today I was amazed at what a difference it made. The shine WAS NOT okey, when you can get this gorgeous matte finish. I love everything you have done in your kitchen, except for possibly the puck lights in the open cabinets showing so much. If you had put them at the very front edge of the top, the trim on the door would have hidden them and only the lighted area would show, not the light itself. So remember that when you install under cabinet lighting. Put it at the very front edge of the cabinet right behind that beautiful trim you added on the bottom.
As you can see, I’m another perfectionist. It’s a disease and very hard to live with.
I am squealing as I do a happy dance! So beautiful! I’m sure you are aware that all your fans feel good when you do, and 🙁 when you have your problems. Sort of like a sister.
That’s so exciting when something like that happens, and things finally just ~come together~. This looks excellent. It’s a little bit glam and a little bit masculine simultaneously and looks really classic, like something you’d pull out of Elle Decor. It definitely looks like custom professional work! Hope things are more smooth-sailing from here on out 🙂
FANTASTIC …… !!!!!!
Did I think you were done and going to leave well enough alone? No, not in a million years. When you’ve been following a blog for awhile, you just know what things will just have to get changed. And I knew the shine would have to get changed (even if I don’t mind shine at all). I think the gold leaf is what really sets these cabinets apart- it is absolutely stunning.
Saw your comment about the hardware on Facebook so I thought I’d share this link: http://www.kitchen-cabinet-hardware.com/antique-brass.php
Just amazing! I am completely hooked on reading about your kitchen remodel. You are doing amazing things and I love everything you are sharing each step of the way. Can’t wait to see what you still have in store. Did you decide between the glass or wire screen for the doors yet? I would love to see it with the wire screen, guess I’ll have to stay tuned…
I’m leaning towards glass. I really love the brass mesh idea, and I actually found a place online that has it for a very reasonable price. But I’m just afraid I’ll end up with too much brass/gold. I want it to be a detail, but not to take over.
So happy you found a way to fix your finish problem. But now you have made me aware of the finish of my recently painted cabinets. And I didn’t realize painted cabinets needs a coat of poly to be durable.
You stated you sprayed your poly. Does that mean you bought your poly in spray cans or you used a paint sprayer that is hooked up to an air compressor?
I’ve never used a sprayer. They scare me. And I wonder if they really would save me any time. Once I’ve hung plastic everywhere & then add in the time involved with cleaning the sprayer, is it still worth it? I’ve gotten pretty good with painting with a brush & using self-leveling paint
If you used a good quality paint on your cabinets, they shouldn’t need polyurethane on top. Mine wasn’t a durability issue. It was a sheen issue. The paint was just too shiny for my taste, and the only solution I could think of was to topcoat with matte poly.
To spray the polyurethane, I used my Critter sprayer that I purchased on Amazon, and it hooks up to my air compressor. It’s very easy to use.
I never believed for a moment you’d leave those cabinets alone, hahaha! I have to say I am glad you didn’t. They are absolutely gorgeous now. I can’t get over the difference the matte finish has made. Now the gold leaf shines instead of the green which is just the way it should be. They shouldn’t be competing. They are total perfection!! Congratulations for having the sticktoitiveness they needed. I’m happy that you are happy!
Love them, Kristi. Such a bold, classy statement they make!
So happy for you that everything is coming together! This may sound bad, but I was having a hard time imagining how everything was going to look when the wood was unpainted. Now it’s all coming together so lovely and it’s going to look fantastic! I love that green- it makes me laugh every time I think about the name as I live not far from the actual Derbyshire.
Wow! Stunning…you are so determined! Love what you do.
Not for one single nano second did I think you were satisfied/finished with those cabinets…. A Perfectionist will never be able to comfortably “Change Her Spots” Hooray for you…. Horray for us Perfectionist….. Horray for Matt and his most amazing wife…. <3 Pat
Love the matte finish. One question….when do you sleep?
I’ve actually been trying to do more of that lately so I don’t get burned out. 😉
I have been secretly following along and most definitely cheering for you. I really love what you are doing and the cabinets are looking oh, so sophisticated, classy, and gosh darn fabulous! 😉 LOVE those sconces!
I know you will find those handles that you see in your mind. lol Seriously, we all have visions of what we like / want, it is just a matter of finding it in the ‘real’ world. I only say this because I have dreams of certain items / ideas and then I wake up and start searching all over the internet. The weird part is I usually find what I dreamed about. – Those handles are waiting for you. 😉
You are an inspiration! Amazing job :-). I cannot wait to see the kitchen come together.
WOW!! I knew you wouldn’t leave it till it was the way you wanted it, I saw your post yesterday and said not happening she will do something to fix it. I cant wait to read about your progress every day, I love your ideas and cant wait to see the finished kitchen.
Your kitchen cabinets look gorgeous! Thank you for sharing all the REAL life drama that goes along with doing it all on your own. There is NO doubt that you are the Queen of DIY and we should all bow down…. no other blogger can claim the same level of design, execution or even commitment that you do. Well done, Kristi!
Absolutely stunning! I thought you were being a little OCD about the thing but I just couldn’t believe the difference now. How elegant it is!
Stupendous! I was a bit worried about ‘green’ cabinets, but they are truly beautiful. Excited for you to finish the rest and reveal what the cabinets and flooring look like together. I would say you nearly have a one of a kind beautiful kitchen. Oh..BTW..I will be over as soon as you are completed to soak it all in in person. Lol. You said you wished you could have is all over. I wish you would hire out for a week or two. Until tomorrow or the next day when you have all the cabinets painted and gold leafed.
silly question but what sheen is the BM paint?
I got the paint in a satin finish.
Stunning! That’s all I’ve got to say about that. (Quoting a little Forest Gump this AM) So glad you found the right combo. Can’t wait to see the finished product. Carry on!
Fantastic!!!
Congratulations on getting what you wanted! How refreshing to read the ‘real-life’ saga of the kitchen cabinets instead of a shiny, glossy blog post. HGTV has us spoiled into thinking that you can do a major project without any problems at all. You are the real thing! Thank you for being so open and candid about the DIY process.
Yeah! They look fabulous!!!
Love the finish!
Do you plan on having crown molding around the entire room? And if so, will it also be green? Or is it okay to leave the rest of the crown molding white? I love the idea of the cabinets being a color but am wondering about the molding around the rest of the room. We have low ceilings as well so the crown is continuous.
Love what you’re doing so far!
I decided to do the crown moulding just above the cabinets, and not on the walls. But I have done kitchens where the crown moulding continues around the room. In those cases, if the cabinets are a different color than the trim color, I always do the crown above the cabinets the same as the cabinet color, and then switch to the trim color (always white) on the walls. It looks fine. It looks really awkward to have white crown on top of cabinets that aren’t white.
Kristi, congratulations on finding a solution to the finish problem. I, too, love a softer, satin finish. The cabinets have a very stylish and sophisticated look with the softer finish. (Of course, that’s just my simple opinion.
One question: Did you use the same polyurethane on the gold leaf?
Yes, I used the same Rust-Oleum matte poly over the gold leaf. I thought it would dull the gold leaf, but it’s actually still very shiny and metallic.
Absolutely startling. Your kitchen cabinets look gorgeous! How elegant it is! You are so determined! Love what you do. You are doing amazing things and I love everything you are sharing each step of the way. What a fantastic solution. Great job!
I am in love with the green cabinets. I am in the process of redoing my kitchen and deck and now thinking of the green cabinets!!! Are you going to tile the walls like you once said? If so, will they also be in the herringboine pattern witht the subway tiles?
Yes, I’m going to tile all of the walls. I think I’ll only do herringbone on the walls up to about 55 inches, and then above that up to the ceiling I’ll do a running bond pattern. That’s the plan, at least.
Hey
Did you sand all the shiny off? Or just cover it up with the matte? I wish I had asked thisan hour ago because I just sanded off my shiny (why is satin poly SO shiny????) and also some paint so I had to re touch. Sigh…four hours until I can try the matte poly…
I used the matte poly over the satin finish BM Advance paint, which was actually more semi-gloss than satin.
I wonder if it’s the colorants that made the sheen seem glossier. I used Advance satin (in white) on my cabinets, and I found the sheen to be on the flatter side – which is fine. I loved it.
But now I worry what the charcoal gray (that I plan for interior doors) will looks like, if the darker color will make satin seems semi.
(sorry for the necro lol)
They make Matte & Flat matte … which did you use?
I don’t remember, but I wouldn’t recommend using this product anyway. Since I did this project, I’ve repainted my kitchen (I just wanted a different color — my cabinets are now teal), and I discovered a far superior clear coat product. I’d highly recommend General Finishes High Performance Topcoat. I purchase mine on Amazon, and I use the flat finish, which actually has just a slight sheen to it. It’s amazing stuff, and I’ll never go back to another brand.