Watercolor Tile Herringbone Table Lamp Base – Part 1
After spending about three hours searching online for lamps to go on my new scalloped console table, I finally decided that I just needed to make my own. Since the table is soooooo curvy, I wanted the lamps to be very linear with nothing curved or round on the entire lamp.
I found a couple of lamps that interested me as far as the style, but the colors, and of course the prices, were all wrong for my room and my budget considering that I really want two lamps for my table.
The main lamp that caught my eye was this Chevron Column Table Lamp from Shades of Light.
![]()
That lamp retails for $345.00. There’s no way I could fit two lamps into my budget, not to mention that the color is all wrong. And I’m not crazy about the chevron pattern either. But the overall style is just what I wanted.
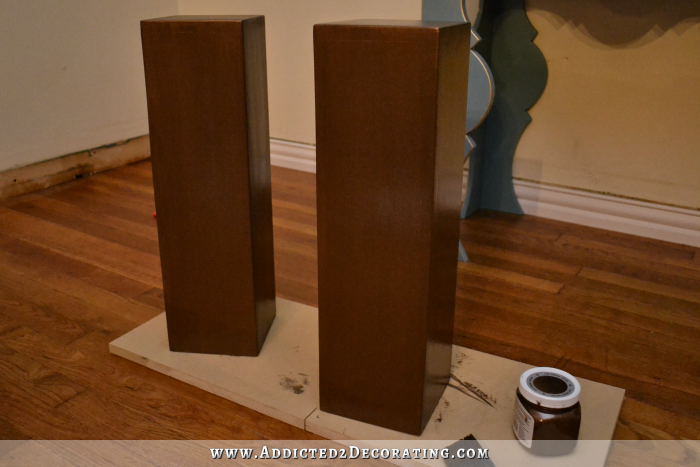
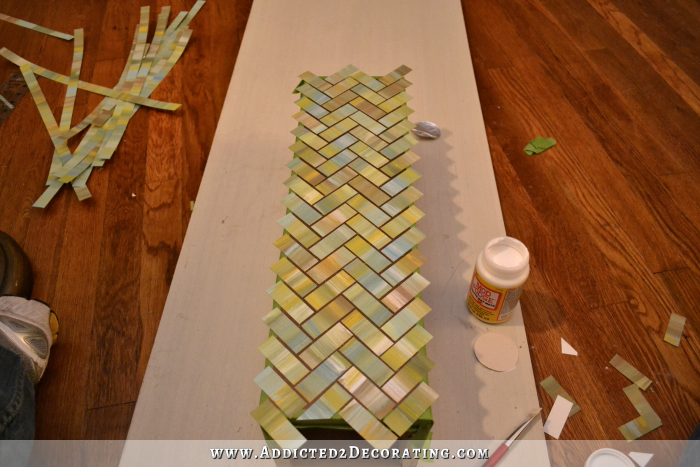
So I set off to make my own, using that style as my inspiration, but putting my own twist on things. Instead of a chevron pattern, I opted for a herringbone pattern. And of course, I used colors that actually go in my living room/entryway. So far, I’m about 75% finished with one lamp base, which looks like this at this point…
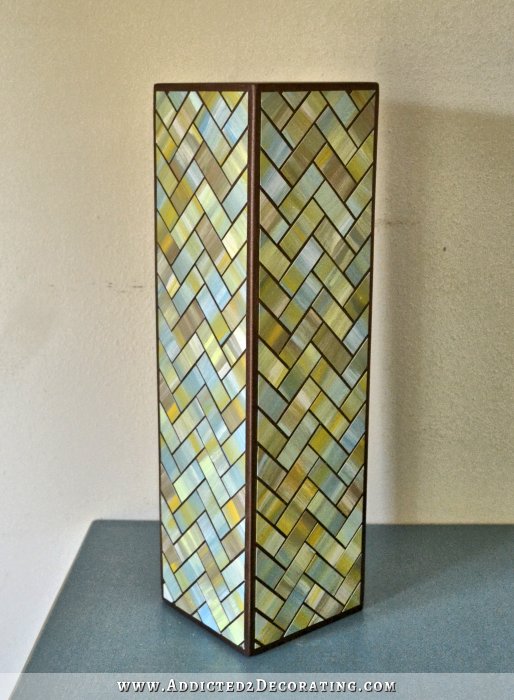
I’ve only done two sides with the herringbone pattern, so I have two more sides to go on this one, and then all four sides on the other lamp base. It’s a very time-consuming project, but it’s not difficult at all, and I personally think the results will be spectacular when they’re finished!
So let me back up and show you how I got to this point.
I started by cutting four pieces out of scrap MDF (left over from my scalloped console table) to 19.5 inches by 5 inches using my circular saw.
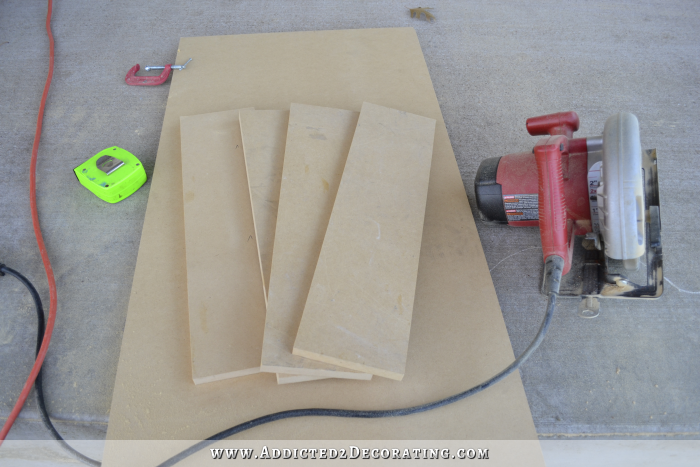
I made a mistake in cutting these, because I actually wanted my lamp bases to be 5 inches square. That means that I should have cut these to 4 3/8 inches wide. But sometimes my mind has a hard time with numbers. 😀 So I ended up with lamp bases that are a bit thicker than I had wanted.
Using wood glue and a nail gun, I attached all of the pieces together to form a square. Just remember that when you’re using four pieces of equal width, and you want to form a square, you have to offset them like this.
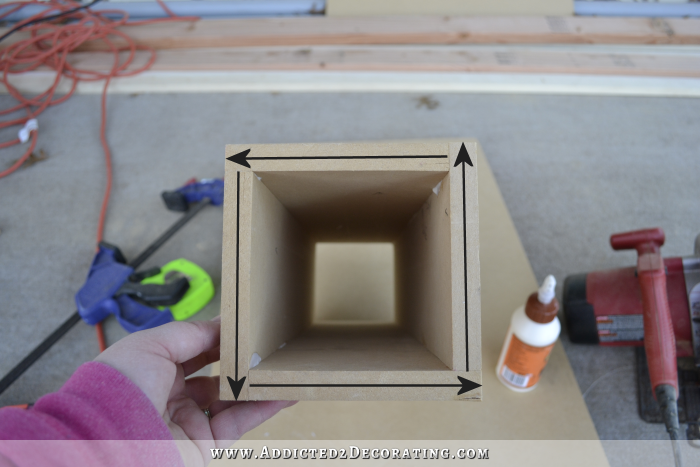
With the four pieces attached, the lamp base looked like this.

Then I used my circular saw to cut a piece of MDF to cover the top, and attached it with wood glue and a nail gun.
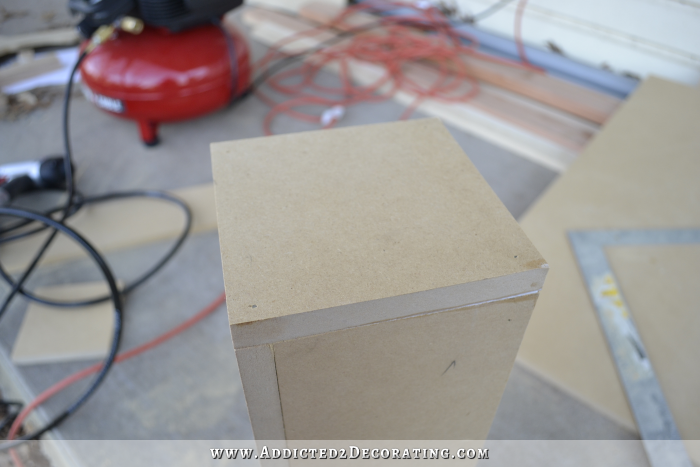
Then I filled all of the cracks and nail holes with wood filler, let it dry completely, and sanded the whole thing down so that the sides and top were perfectly smooth. And just like I do on all of my wood/MDF projects, I used sandpaper to round all of the edges very slightly for a bit of a softer look.

Next I gave the lamp bases two coats of paint. I didn’t even bother to prime them first. The paint I used was a metallic paint from Home Depot called Cast Bronze.
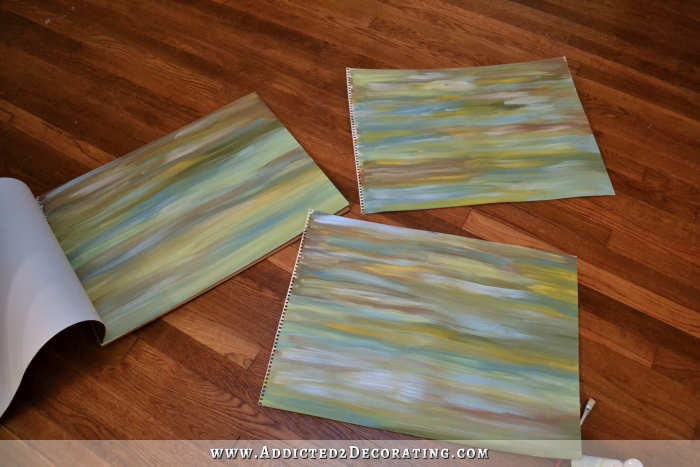
While that paint was drying, I got out my watercolor paper, seven colors of acrylic paints that I chose based on my drapery fabric, a cup of water, and a small craft brush, and got busy making the “watercolor” paper that would eventually become the tiles.
There’s no real art to this at all. I just randomly squirted colors onto the paper, and dragged my slightly wet (not sopping wet!) brush through it. I tried not to brush over it too much, or the colors would blend together and become muddy. If that happened, I just squirted a bit more paint, and brushed over it again. I tried to make the colors as random as possible.

I did three sheets of 18″ x 24″ watercolor paper.
Those took several hours to dry (I left mine overnight to dry), and then I used a razor blade and a straight edge to cut them into 3/4-inch strips.
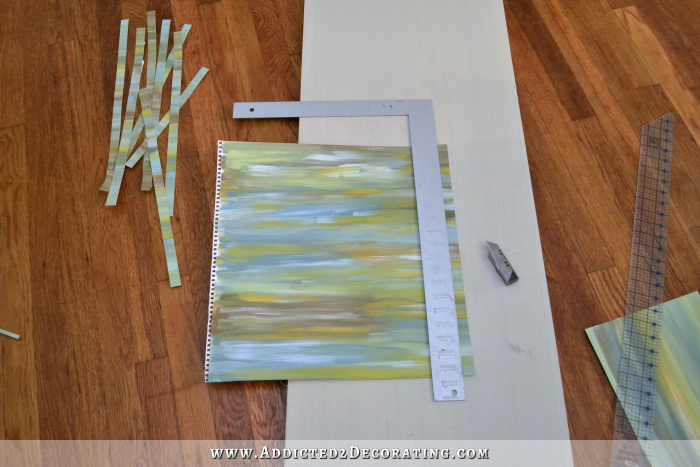
Of course, if you use watercolor paper that’s small enough to fit into a paper cutter, that would be easier. But my paper cutter is only 12 inches, so this paper wouldn’t fit. I used a transparent ruler (actually my bias tape ruler) to measure from the edge 3/4 inch, and then put the metal framing square right up against it. Then removed the transparent ruler to cut the paper with a razor blade. It went pretty fast, but it would have been much faster with a paper cutter.
Then I cut the strips into 2-inch pieces.
With all of the paper pieces cut, I prepared the lamp base by marking off 1/4-inch on the edge with painters tape. I did this because I wanted a thin solid brown border on each side that wasn’t covered with “tiles.”
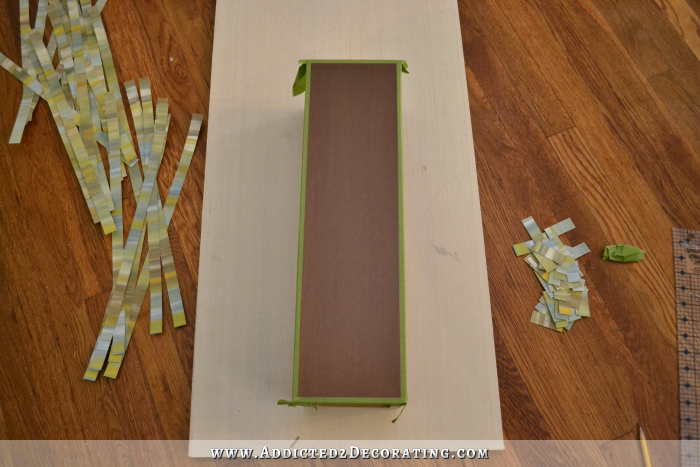
And then I used Mod Podge to adhere the pieces in a herringbone pattern.

With one side completely covered in the tiles, it looked like this…
So then I used a straight edge and a razor blade to trim off the paper right at the inside edge of the painters tape, and then removed the painters tape to reveal the thin brown border all the way around.
Cutting all of the “tiles” is definitely the most time-consuming part of this whole project, and if I had to do it again, I’d definitely make a point of using smaller paper that would fit into my paper cutter. But instead, I used what I had on hand. So far, the only cost for these lamp bases is the amount I spent on the paint, which is about $10. Not too bad! There will be other costs involved before they’re finished, like the actual electric lamp parts, lamp shades, etc. But so far, these have been quite inexpensive, especially when compared to the inspiration lamp!
Hopefully I can get these finished today and show you the finished lamps tomorrow, but something tells me that I might need an extra day of cutting and gluing paper. 🙂
EDIT: The lamps are finished! Click here to see Part 2 of this project, as well as the finished lamps.

Addicted 2 Decorating is where I share my DIY and decorating journey as I remodel and decorate the 1948 fixer upper that my husband, Matt, and I bought in 2013. Matt has M.S. and is unable to do physical work, so I do the majority of the work on the house by myself. You can learn more about me here.


Holy crap!! You are amazing woman! I literally thought those were real tiles.. can you just keep posting your daily creativeness everyday because you inspire me! xx Liz Marie
The lamp is terrific. Your talent continues to impress.
*secretly I imagine you in your work clothes all day and paint on your laptop 😉 It keeps me from idolizing too much…
Are you KIDDING me?! I thought those were REAL iridescent tiles! Your creativity know no bounds. Magnificent!
That was exactly my thought as well
Same here!
Wow! I thought I was going to read a tutorial on cutting glass when I first saw this on FB. These lamps are going to be stunning! This is the first time I’ve seen something on a blog that I might actually try to make myself. Can’t wait to see the finished product.
Totally agree – these are amazing!!! Thought they were glass – was certain I wouldn’t want to go to all the work of cutting tiles. Now I want to try my own lamps. You are so creative.
You are SO creative! I LOVE what you’re doing with the lamp bases! A quilter’s rotary cutter and a quilter’s transparent 24×6 ruler would make fast and easy work of cutting those “tiles.” They’re somewhat expensive tools but I use them all the time.
Amazing!! I thought you had tiled the base with some type of mother of pearl tiles. Awesome job, can not wait to see the results. I may have to include this in my things to do.
I wonder if you’re planning to do a top coat of some sort to finish…. Something to protect that beautiful paper. I can’t wait to see the finished lamps!
I’m guessing that she will top coat it with Modge Podge. My one experience was using MP with 5th graders to create a personalized Monopoly board. When you brush it on it is opaque white and you think you have ruined your project! (At least I did.) But it dries transparent and smooth. If I am right about Kristi’s plans, I wonder if she will have to MP just one surface of each lamp base at a time to get it to dry smoothly? Do you need your wet surface to lay flat (versus standing vertically) to get a good result from MP? Many assumptions on my part, I know . . .
I think dimensional magic MP would be beautiful, but I also think it would be a bunch of work to do each paper tile individually to bring it the glass tile look. Also not sure if the 3D MP might be too glassy??? I will wait and see what happens because I know Kristi will make it awesome somehow!
Totally thought these were made of actual tile! Great job Kristi, I love the herringbone pattern.
Before you do the sides (and make the next lamp,) you could trim your watercolor paper down to fit in your paper cutter. Then just use your ruler method for the excess 🙂 That should make it go a little faster!
I love your brilliant mind. The lamps look very nice, from the pictures you can’t even tell it’s watercolor paper, it looks like some fancy exotic shell or something.
Any plans on how you are going to protect the paper from environmental issues (humidity), pets, or just general handling?
Those are awesome!
Kristi, you never cease to amaze and inspire me. When I first saw the picture, I wondered where you found the tile, cause I never see anything like that at my local big box fixit stores.
Now see this is the perfect example of something I learned from you!! I’ve been scouring to find a lamp that will work for our kids room but never found one. Now I can make one!! And I don’t even need any fancy tools-you are a gem! Happy MLK day and thanks for the inspiration!
A.MA.ZING! Not to mention gorgeous. I don’t know if I have the patience, but I sure want to try.
Genius Kristi, pure genius!
Wow! I thought that was stained glass when I first saw it. Very nice.
Why don’t you measure half way down your painted watercolor paper – cut the paper in half and use your 12″ paper cutter to cut the stripes? I would make that paper fit in my paper cutter!
Absolutely remarkable. You are amazingly clever!
A+ for me!! I knew I recognized your technique. I admired the fish scale art and really wanted to try it. On the lamps it looks kinda like mother of pearl. Now I really, really want to try!! You are my idol!! 😀
Yep! I remember and love that fish scale art piece! The lamps will be absolutely magnificent!
Wow that is amazing. When I saw it on Facebook I thought they were real glass tiles. Fantastic work.
That’s amazing!
I love this!!! Are you going to do any kind of polyurethane over the top? I just found your blog last week and I am so inspired! Now to manage my time so I actually can try some of your ideas!
Oh my goodness! I seriously thought those were pieces if stained glass! Absolutely beautiful! These lamps will be more beautiful than your inspiration!
Wow! I was wondering where you got the beautiful paper to do those…that is a genius idea. May have to try my hand at these. I am a self-proclaimed lamp whore! lol
I am sooooo doing this! How very cool!
They look exactly like iridescent tiles!
Well done!
😉
WOW…That’s all l can say…you are incredible!
LOL — Just when I think that I am the “Queen of Hacks” you come along, and put me to SHAME! I started to get a hint the other day when I saw tiny scraps of paper on your post – but I was like,,,how did she get those colors???
AMAZING!!! Just AMAZING!
I would love to know how you find the time to think,,,much less than create so many stunning items! I for one never brag that I have a budget to spend (and waste) on items that can go into my home for full price items. I get no satisfaction in knowing that an items was full price — my thing is, finding the item for a LOWER cost! I like having the ability to inject more pride, for a bargain decor choice, for sure! ANYBODY can, ‘throw money’, at a decorating project, (if anything just to “get it done”), but, It takes a LOT of patience and perseverance, to be able to create and see out a project like you do! Congrats on yet another fantastic project! I cannot wait to see them when they are a finished working lamp!
LOVE LOVE LOVE it
you are inspiring with the amazing ideas you come up with!!
why do you waste your time with the nay-sayers?! you are awesome
Everyone has said what I think already but you have confirmed that ALL MY creativity was given to you!! I am in awe of your creative mind 🙂
That looks amazing. Will you be coating the herringbone with any lacquer or mod podge to keep it from curling? Keep it up! I look forward to the seeing how you do the wiring..
You are just……AMAZING! I LOVE IT! Now, lets add some money to your budget when you have time…make to more and sale them.. oh yeah! ;-).
Very cool! I have been wanting some square lamps too but with a mother of pearl mosaic design. I never thought of trying to make my own. Yours are terrific. I can’t wait to see the finished product.
You are truly AMAZING … the ideas you come up with are beyond my ability to imagine. Keep it up PLEASE! I can’t wait to see your projects!
Could NOT believe that this was paper and water colours! I, too, thought it was some sort of glass tile. You are definitely amazing! Will you be able to coat this with some sort of sealer? If this were my house, I would worry about humidity, but also water/juice/coffee spills. Can’t wait to see the finished project to see if you use a round, square, or rectangular lamp shade.
This is genius! I was positive you had found a deal on some small little tiles. Your creativity never ceases to amaze me. Nice job!
WOW, I will definitely be trying this…quite the idea, would never have thought !!!!
This is a truly magnificent DIY project! You DO inspire so much confidence that these creative projects can be done by anyone with the proper tools and the motivation and time. Thank you for being you!
If there’s a 2014 contest for the most creative, artistic DIY, this one has won already. Well, unless YOU top it with something else.
When I first saw this lamp base, I thought for sure it was stained glass!!! What a great illusion. You are so creative and smart, and I love that you share that with us. Thank you. How’s Matt doing now with the move to the new house and all the changes?
I covet your lamps. I may have to try this idea, because they are beautiful and different.
Love this! Looks like stained glass! And hey..KEEP on BLOGGING !
I thought it was glass too. Wow, spectacular!
Fantastic job. I thought that you’d used ceramic tile (I have several sheets left over from my bathroom remodel. You obviously have the patience of a saint because that is entirely too much work for this kid. 🙂
Brilliant! What a great idea!
this is absolutely a genius idea!thank you sooo much for your pics and your ideas….your transformations are amazing….and the price is right!love the details!thank you for inspiring me over and over again!you are a real blessing!
Beautiful! Unique and beautiful!
Amazing! Cannot wait to see both lamps on your table! 🙂
When you wrote that this was easy, I thought to myself, “Tile cutting, no way.” The paper tile work is ingenious and looks fantastic. Your creativity makes this blog a necessary stop. I never thought I’d say it, but you make me want a nail gun of my own. Keep it coming!!!
Wow! I love it! I never guessed till I got to the part in the instructions that the tiles were painted paper! Talk about ingenuity… Can’t wait to see them finished.
So amazing!! I was shocked to find out your tiles were paper not glass. It looks so beautiful. I can’t wait to see them done. Congratulations on an outstanding, clever idea/job.
Easier than all those little wood pieces you cut out to make the mirror in the condo!!! Love this.
Unbelievably awesome… they look gorgeous!! i AM SO JEALOUS OF YOUR CREATIVITY!
Fabulous! I’d love to see them sealed with resin for a nice thick, glossy coat. 🙂
So Cool! I’m not surprised you “made” your tiles but only because I was fascinated by you “tiled” mirror frame.
You’re A.MA.ZING!!
I”M curious as to where you’re going to find just the right shade, and for a decent price. Knowing you, you already have a source up your sleeve.
You continue to amaze me!
Holy Crap! I thought those were real mosaic glass tiles or something. I love it. Amazingly creative! I can’t wait to see the finished duo.
Christine
This is WAY cool. I do have a couple of suggestions. If you cut the paper in half manually, then turn it sideways, it will now fit in a paper cutter. Also, could you have predrilled holes in the top that are necessary for adding the lighting parts?
You are so creative…..I thought for sure you had tiled it…..thanks for sharing
These are going to be awesome! I can’t believe it’s paper!
Debbie
Well, I ditto everyone else. I always thought I was creative, but seriously, next to you, I’m lacking. I think this extremely boring desk job is rotting my brain. I should just shut down my blog now!!! I do stained glass work and I can’t believe how beautiful your paper tiles turned out. You are amazing for sure.
You are just so amazing and creative. I just can’t get over the ideas you come up with. They are gorgeous!
Thats great. I found a lamp at a yard sale one time that was made from a old thick Christmas wrapping paper tube with Christmas paper still on it. It was not very pretty. I bought it for about 25 cents and re-painted it with a textured paint. I have enjoyed it for years.
Unbelievably creative! You are a serious inspiration, Kristi! Nice!
Like all your other followers, I’m amazed at your creativity. When I saw the lamp in the first photo I thought it was glass tiles. As I kept reading I was shocked that it was water-color paper and you used Modge Podge (one of my favorite things!) to adhere it. Wowzers! I am assuming that you will Modge Podge the whole thing when you get them all glued on. So beautiful!
totally thought it was glass. Never would have come up with this idea. You are consistently inspiring to me. Thanks for being so generous with your ideas. It’s beautiful.
YOU are awesome and so creative….love to see your projects…
Wow! Just WOW! I, like most everyone else, thought these were glass or ceramic tiles. So creative! Can’t wait to see the finished product.
What a beautiful idea, I thought for sure you were cutting ceramic pieces, and I love the price of these. You are one amazing woman!!!!
Fantastic… Do you ever give your brain a rest?? Does Matt give you ideas or suggestions. Or has he ever talked you out of an idea? Wonderful job as always.
Cheers from a scorching Brissie.
Wow!! Gorgeous! Day after day your creativity and patience for detailed projects amazes me – but clearly it is worth it because they turn out so spectacularly. I need to take a page out of your book I think! Love it Kristi:)
I would never have guessed the tiles were paper at first glance. They really look like tiles made out of shell or glass. Looks awesome!
Can’t wait to see the rest and hope you’re going to do the step by step on the lamp parts. I’ve got a lamp at home that needs rewiring. I’ve been sitting on it a few years now. Can’t bare to get it rid of it. To learn sooner, I could watch Youtube, but I love your tutorials, so I may just wait! Thanks again, Kristi.
Holy molly lady, I would never have the patients to do that.. I too thought that they were tile… Great job…once again..!!!
Amazing. This is absolutely beautiful. How do you get all these creative idea? I am not creative at all, but I certainly like following your tutorials to re-create your ideas. Please post a tutorial on how to insert the light and the electrical parts. Thank you so much for sharing your creativity!
Love, love love. Kristi, I love how your mind works. Positively beautiful….
Amazing job and so creative! You did it again, Kristi!
OH MY STINKING HECK!!! You are a genius….a creative genius!!! I hope you are strutting your feathers girl! Cause all those naysayers who had you so down a few days ago are eating crow right now! I know we are only in January but I would bet those lamps will be one of the top DIY projects of the year. They are beyond awesome. So now you need never again worry about what some jealous, habitually negative, gloom caster says or writes…you rocked it!!!
You are freaking brilliant. My goodness those bases are amazing!
You are so talented! Amazing.
This post is why I continue to read here. You are so incredible talented and original! I never see projects this original on other dig/decorating blogs!
Your creativity is amazing and you are such an inspiration to those of us who love beautiful homes on a budget. You help make it possible. Thanks.
You don’t really need another admiring comment, but… I’ll add mine anyway: Simply a remarkable, first-rate, faux stained glass lamp. Congratulations on a job well done.
Looks just like real glass tiles. How did you cut the tiles once they were attached to the base? I would think a razor blade would ripple or tear the tiles or a line would be cut into the mod podge or base and be noticeable. I don’t see anything like that on yours.
Wow!!!!
That is amazing, of course!! Do you ever think to yourself that I just cannot work on this project or any other project today or for a while, because I’m tired of all the work? I can see myself doing some of the easy projects that you do, but I start getting a little tired and impatient when I think about the more time-consuming projects. You obviously have a lot of patience, Kristi. I admire you greatly.
Gorgeous, gorgeous, gorgeouos! Cannot wait to see the finished lamps! Amazing job, as usual!!!
Crazy detail ! Fabulous creation. To finish it off perhaps before you cut the paper you might try light coats ( letting each coat dry before repeating) of an acrylic spray finish in either matte or semi gloss. This will protect the watercolor from being smudged if you were to finish it with a protective coating by brush. Once it is mounted on the base then you could repeat with two more coats of spray finish. the finish then would be quite durable and water resistant.
Clearly I’m too used to FB, because I wanted to like about a million of these comments. Everyone else already said it better, so I’ll just say wow! Love it!
That is gorgeous! I was so surprised when I got to the end of your post and saw that your tiles were actually paper! Wonderful job!
It looks great, I love the design and colors.
DITTO! Your very clever, it’s amazing what ingenuity and perseverance can accomplish, I too can’t wait to see the finished product and what you do with the shades.
You knocked it out of the park, Girl! Can’t wait to see the end result.
Wow! totally thought they were glass tiles! Beautiful & so creative!
Kristi, do you have a workbench? It looks like you do most of your work on the floor- you must have back muscles of steel!! =]
I’m so impressed!!
And to think I spent all that money on tiny glass tiles that were on a mesh backing to cover the fireplace surround on my led electric fireplace. You could never have found anything to match your room so perfectly. When I said you needed art lamps, I didn’t actually mean you had to make them, but I’m so glad you put the rest of us to shame. Can’t wait to see the finished project.
Kristi, You totally amaze me. The lamps are going to be beautiful! Thanks for more inspiring work.
Awesome! A rotary cutter might speed up the process on the larger paper. I’m new to your site and love your ideas.
One awesome lamp – at first look I thought it was tile! This is fab!
You are a genius!!! What an absolutely BEAUTIFUL idea!! I can’t wait to see the finished project. My son has been looking for lamps for his space. He does electrical…so..if I would get moving and build the lamp and he could electrify it…..WOW! Thank you so much for your inspiration!
I am really impressed by this lamp base. It looks like stained glass to me. I can’t wait to see it finished.
Traci
I am stunned! I am absolutely in awe of your creativity and talent right now! I thought that you had used some pretty opalescent tiles and when I read and saw that it was paper, my mouth literally dropped open! I really have so much respect for you and the way you do things! These are going to be gorgeous and I can’t wait to see the finished project! Hugs, Leena
That. Is. Amazing.
They look like real tiles! These will look so nice on your new table. Looking forward to seeing them finished.
I love this! I thought they were real tiles too. I saw similar back splash before so I figured maybe that’s what you used…until I read the post. The result is amazing.
I am usually a crappy decorator and stick to the very basics and still things look like crap, but you and a couple of other decor bloggers have inspired me to crawl out of my box. I have been rethinking my house and painting accessories (something I’ve never done before) and getting ideas (finally) that I know will look good. 🙂 Thanks.
Absolutely incredible! I was so in love with the gorgeous glass tiles you were so painstakingly putting on our wood lamps and was wondering if you used a router to inset them so perfectly…and was blown away that they’re paper. Fan-freakin’-tastic!
Really…I can’t even find a word good enough to let you know how much I love these. And I’m a picky hag when it comes to lamps.
Damn fine work, girl!
This is stunning!…just beautiful.
You are sooo clever.. I thought you used tiles! I guess you will varnish to harden and protect later.. WOW!
You may have outdone yourself on this one. I’m pretty picky – this is not only really inexpensive, but classy – I really like it. And it’s do-able. Time consuming? Gah. Put in BBC’s new keepsake version of “Pride and Prejudice” miniseries and let the work commence…Mr. Darcy makes everything dreamy – even tedious cutting of paper 😉 Fantastic project – definitely in my list of things I plan to do – only I’m thinking to do it in pale shades of pink, for my bedroom. Think it’ll work in those colours? I just love the watercolour blend..it’s really beautiful.
You are the GODDESS of DYI – your creativity and determination are so inspiring. I always look forward to reading your blog first, and I’m never disappointed. You go girl!
Oh my God! You are really very talented! This table lamp looks amazing, I couldn’t even think that with paper pieces cut someone can make such a beautiful thing like that! Great work! I also thought I was going to read a tutorial on cutting glass when I first saw this on FB. But it’s rather simply and so creative! There are so many things we can make with our own hands! For example, I like to make colorful pillows that decorate our sofas.
That is amazing! I love that lamp, at first I thought it was stained glass. Can you come to my house and make some things for me?
I love it! Wow, wish I was so creative….
Wow! This is so beautiful. You’re an inspiration!
Another one out of the ball park! I really, really like how these lamps are taking shape. Curious to see what you do as far as the shades. Where’s my “thumbs up” icon??
I am going to repeat the first comment HOLY CRAP! Those lamps are absolutely beautiful and you could sell them for big bucks. I have no patience and would not even attempt trying it. You really amaze me.
SO AWESOME!!!!! I seriously thought those were tiles and was hoping you were going to tell us where you got them so I could literally steal this idea! You are so creative!!!!!
I can’t wait to see what you do next!!!!!
That is awesome! I made my own lamps out of liquor & wine bottles & added Xmas lights inside, I went to the flea market & hit garage sales for the lamp parts & shades I was able to buy lamps for as little as $1.50… I covered the shades with different fabrics, & gave them as Xmas gifts, i made them to suit everyone such as football teams & UT & UH! I am going ur idea however I am going to do it for a baby’s room so I will use a traced picture from a color book to make the art!!! Thanks for the awesome idea!!!
Holy Crap you are talented. You should go on the design star you would win for sure. Can’t wait to see the finished product.
Kristi, this is amazingly beautiful. I can’t wait to see the finished lamps. I’m curious…I understand that you mod podged all the paper to the MDF to adhere it, but did you or will you mod podge over the entire outside (top) of the paper so that its smooth?
Wow…great idea! This could be done with scrapbook paper as well if there was a pattern/color you liked! Thanks for the great post!
Whaaaa??? Mind. Blown. Seriously amazing!! You completely fooled me. I totally thought they were real!
xo, amy
WoW !! I thought this was stained glass reflecting in natural light. This is nothing short of genius !!!
How in the world do you have so much patience?? Love the lamps, I would never have the patience to cut those tiles. And this isn’t the first time you’ve done a project that just blows me away by your patience.
WOW! Can I have just a small % of your brain and creativity!?! I would NEVER have thought of this!! AMAZING!
There are no words to truthfully let you know how hard my chin just hit the floor……
……in a good way!!! Amazing! Simply Amazing!
no words…
amazing, no that does not cover it. awesome, nope must be bigger better. hmmmm.
no words to describe your talent!
Hello! I am wondering if using bronze, copper, gold colors with a pearl white border would work to make these lamps? Or do you think those colors would blend too much and end up with a brown lamp?
Thanks and I really look forward to making this lamp! Stunning
Renee
As long as you don’t blend the colors too much with the brush, it would work.
Hi Kristi, I can’t believe I found this project and you! I’ve been trying to figure out how to do this very look to mimic inlaid bone “tiles” for a tray, AND mirror AND table top;) And here you are and here it is!
It’s gorgeous, and you have so inspired me to tackle my idea now. One question, if you won’t mind answering. how well do you think the Modge Podge would hold up with a tray or table top? Would you recommend something else for those?
Thank you for all the great inspo,
Kim
You are nothing less than BRILLIANT! I vote you get your own HGTV show. I thought the lamp was covered in glass tiles and looked back at your site to see how you cut them. Then I see it was WATERCOLOR paper. Yes, I can do this! Thank you!
Love the lamps so much! I bought a wooden one at a thrift store similar to yours and have painted the watercolor paper. Read some reviews on the Rust-oleum Triple Thick Glaze and someone said stuff stuck to it after it was dry. Did you notice any tackiness?