Wood Shim Sunburst Mirror
The wood shim sunburst mirror is finished!! And I’m so excited about how it turned out!
When I left off yesterday, it looked something like this…
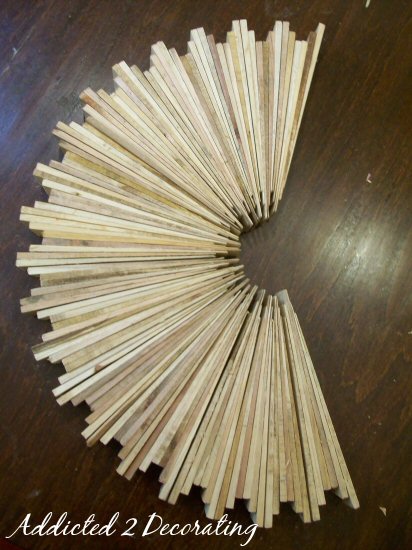
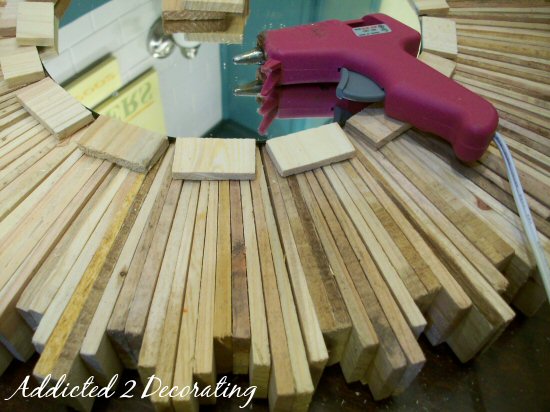
Because I changed the design, I didn’t have nearly enough shims to make the complete circle. So, I made another trip to Home Depot to pick up more packages of shims so that I could complete the circle. In all, I used 17 packages of shims, and the complete circle required 33 sections of 6 shims each.
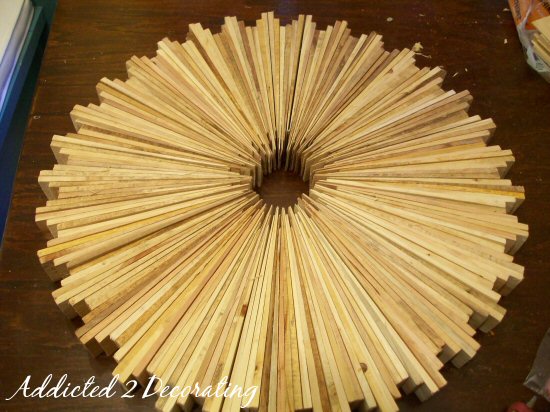
Next, I used a wood wreath form that I found at Michael’s, and used wood glue (NOT hot glue) to adhere it to the back of the sunburst. I placed heavy objects on it and left it to dry for about four hours. (Nevermind the stained part. That was from the previous design that I didn’t like.)
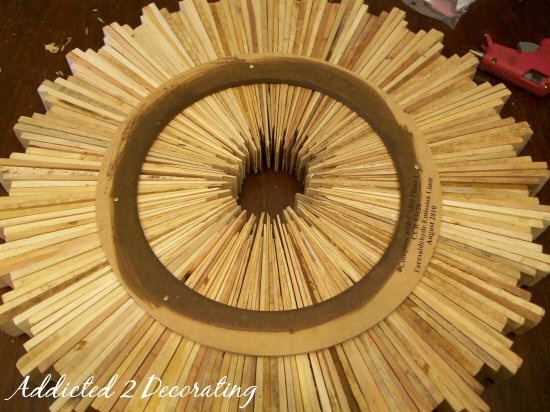
When the wood glue was fully dry, I turned the sunburst over, and adhered a round mirror in the middle, and then used my glue gun to attach 1″ pieces of shim (that I cut with my miter saw) around the edge of the mirror.
And then I added a second row of 1″ pieces to cover the edge of the mirror.
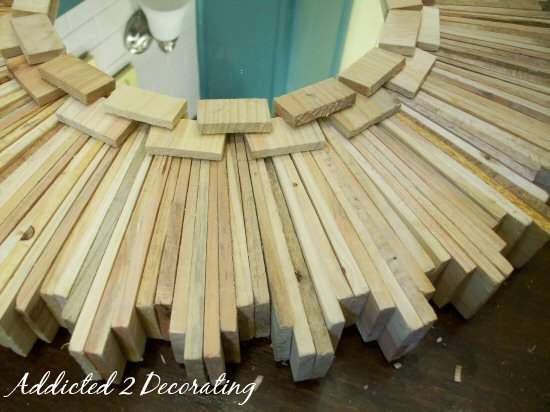
And with that, the construction was finished!
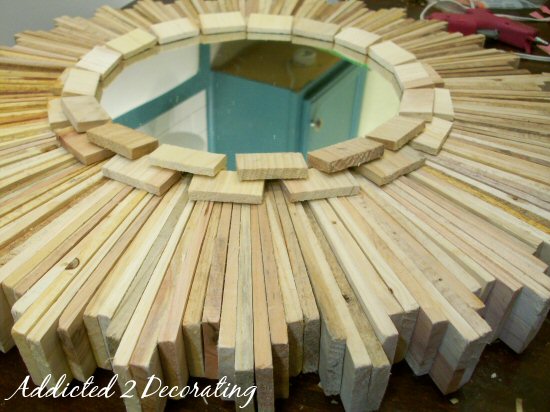
I didn’t want to stain the wood, but I did want to seal it. I only had non-yellowing polyurethane, but I actually did want the finish to add a warmth to the wood, so I opted to use Waterlox that I had left over from my kitchen butcherblock countertops. You can see how the portion on the left has a warm look to it.

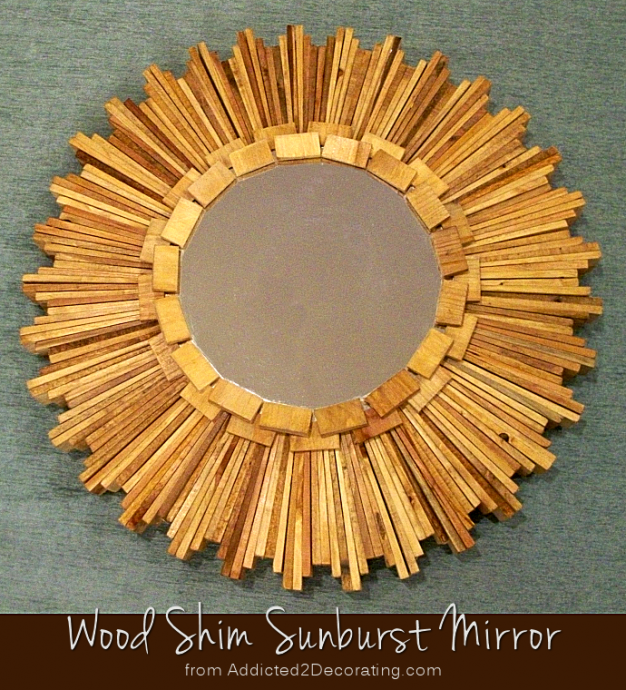
And after two coats of Waterlox, it was finished! Here’s the final result.

Now really…doesn’t that look like something you’d see in a designer catalog?! I don’t think anyone would ever assume that it’s cheap wood shims!!

If you decide to try this project, here’s my advice: Don’t weed through the shims and pick out the “ugly” ones. Use all of them!! I had some that were VERY rough looking, but it’s all of the variation that gives this piece such a unique look. I even had a couple of pieces that still had bark on them! I used ’em all.
Edit: I’ve had several people ask how heavy this mirror is. I don’t have a way to weigh it, but it feels very comparable to my eight pound weight. I should also mention that the finished diameter is about 22 inches.
Pssstt…Did you miss Part 1 of this DIY? If so, click here!

Addicted 2 Decorating is where I share my DIY and decorating journey as I remodel and decorate the 1948 fixer upper that my husband, Matt, and I bought in 2013. Matt has M.S. and is unable to do physical work, so I do the majority of the work on the house by myself. You can learn more about me here.


You are a GENIUS!! This looks so awesome!
very earthy in a modern way. I'd love to do one with drift wood 🙂
That is really cool! Do you think painting it would be good too? I am thinking about trying this out as a statement pc of a sad wall that needs something, but I would want it painted to pop off the wall.
Liz, you could certainly paint it! I'd do that before adding the mirror, and then paint the 1" trim pieces separately before attaching them.
Be sure that you paint BOTH sides of the 1" trim pieces that will go on top of the mirror, because you will be able to see some of the reflection in the mirror.
I'm in awe of your busy-bee ways! I get tired just reading your fabulous blog… This looks great. Well done!
Beautiful! I think it would look pretty white too…it looks very heavy..
I love this. My question is how heavy it ended up being?
Stephanie @ [email protected]
Hi Stephanie,
If I had to guess, I'd say it's between two and three pounds.
Okay, I was a little off in my guess. I think it weighs more like eight pounds. I don't have a way to weigh it, but I picked up a five pound weight to compare, and it's definitely heavier than five pounds, but it feels pretty comparable to my eight pound weight.
Two to three pounds…lol. I'm sooo not good at estimating weight!!
Very pretty! But…how heavy is it?
I love this! I would love to try one painted. I would never have thought to use wood shims!
What a great statement piece, I don't think I would have ever thought of something this creative! I am inspired.
I absolutely love it!! I soooo want to make one for myself! About how much did all the materials cost?
Tiffany, all of the materials totaled about $30.
That turned out great! I especially love the detailing around the mirror and the variation in color of wood.
wow, that is the best DIY startburst mirror I have seen! I am very impressed!
I love love love love it! It looks like something that would cost hundreds of dollars! I can't wait to make one! Thanks for giving away your idea! 🙂
LLinKS
Wow that looks awesome!
I LOVE IT!!! I might even have to copy it… :O) I have been gathering things to make one for myself but never even thought of using wood shims… Great idea.. :O)
This looks great…you would never know you used shims to make it. Very creative!
Just one word. A MA ZING
This is so unique! I love it! Where do you get your inspiration…and your talent? I love looking at all your projects! Do you ever rest?
This came out amazing!! I really want to try this. 😀
This is fantastic!! You continuously blow me away with your ideas!!
oh my goodness…..I might seriously have to try this this weekend!!
I LOVE this! I have been looking for a round mirror to go in my bedroom over our dresser. Your pictures make this project seem very simple but I wopuld need to stain mine to a darker color…closer to cherrywood. I am going to have to consider this carefully before jumping out there.
Thanks for sharing!
oh my god, that is freaking amazing! i LOVE it!
Wow! How creative! I love this idea! Thanks for sharing.
Wow, that is totally cool!
This is impressive. How much hands on time did it require?
Aaron, I think the whole process took a total of an hour or so. Of course, I'm not counting the time I spent on the original design, then taking apart the original design. 😀
NO…WAY!!! what a great idea! bookmarking in my head on this!!
WOW..that is a super fabulous idea and it came out awesome!! This is def going into the "to make" file. Great Job!!!!! I love it!
That looks AWESOME POSSUM! So cool — so cool that I am going to profile it on my blog this weekend I think!!
What a wonderful project! well done..
ok now THAT is cool!!
Wow!
Tana
I am so impressed with this mirror! I would never have guessed it was shims. Just came across your blog and I'm a new follower.
I am not joking when I say this could be in my top 10 favorite projects of all time. This is absolutely brilliant. Genius! I hope you don't mind that I link it on my FB page. Love it and will definitely be "borrowing" the idea!
Amazing! Came over from Just a Girl…I am so impressed with this project. It's the best sunburst mirror DIY I have seen online!!!!!
That is so cool! Very clever!
The mirror is beautiful!! I love it!
This is AMAZING!!! I'm in love!
I can not believe you made that. It looks incredible to say the least.
Brand new follower here!
This is genius! I love it, and after seeing so many pretty starburst mirrors in Ballard's catalog, I'm ready to do a knock-off. I already have a couple packages of shims (cannot remember for the life of me WHY I bought them!), so I'm ahead of the game already. I'd love to add a convex mirror to the center (like what I saw in Ballard's).
Love the warmth of this piece you did. Perfection!
Best,
Kimberly
How creative! This looks like it cost much more than $30!! I am going to save this and try to make it too. Thanks for the idea
This is FANTASTIC!!!
Wow! This is the coolest sunburst mirror I have seen yet! Great job!
wow, that is very creative. So pretty, might have to try and make that one hehe
Wow! That is impressive…I love it 🙂
Unbelievable. I am so going to try this. I'm going to follow you so I don't forget to try this. Great job!!!
I'm obsessed with sunburst mirrors and have been hunting a DIY for ages. THIS is the one I'll try! By far the most elegant one I've seen. Oh happy day! (what's that? oh nothing…just hubby grumbling in the background that I'll be MIA for a few days 😉 )
This is beautiful! Sunburst mirrors are always sooo expensive! I think I'm sending the husband to Home Depot today! :o)
This is fabulous! A nice, sturdier take on the sunburst mirrors made with the sticks or coffee stirrers. This would be great on a deck or patio too!
That is just gorgeous!
If you wanted it to be less heavy, you could cut out the interior ends of the shims. Cut a circle with a diameter 1/2" – 1" smaller than the mirror, before you glue it on. And maybe you could do something with what is left over?
LOVE THIS!!! Will you share it at my linky party this weekend?!
This is definitely the sunburst mirror I'll be making. Love it!!!!
Would you mind updating your blog with a picture of it up on the wall when you find the perfect place?
I'll definitely do that, Michelle!! This is going in my bedroom over my DIY headboard, which sits between my DIY closets, and sits on my DIY storage bed base. 😀
Still quite a bit to finish, but there's a glimpse of it in the last picture on this post…
http://blog.addicted2decorating.com/2010/10/my-bright-idea-bedside-lighting-for-my.html
HI Kristi-
This is truly a work of art you have created. It is perfect. I always see these mirrors in catalogs and was thinking of a way to create them…you did, and quite impressively!!!! I have a feeling Home Despot's all over the country are going to sell out of shims.
My best- Diane
It's the best looking sunburst mirror that I've seen. Looks so expensive! I want one!!
This is definitely the BEST DIY sunburst mirror I've seen! Great job!
girl I love this mirror!!!What a clever idea and perfect execution!
Nice work
Christine
greatoakcircle.com
I love it! I am so excited too because I just got like 6 packages of shims and the D.I. for $1!! How sweet is that? I will be starting this today!!
Thanks for sharing!
Tasha!
I love it and shamelessly may be copying it
One word: stunning!
What a great idea. It looks amazing. I'm your newest follower. I'm having a party over at http://diyhshp.blogspot.com/ I would love if you stopped by and linked up your project.
Love this idea!! My favorite sunburst DIY that I have seen. Love your blog!
shannon berrey designs
http://www.shannonberrey.com
Awesome, that loos amazing!
Love this idea.
I did a little sunburst mirror too, but yours s way better;)
You can see em here..
http://pudel-design.blogspot.com/2010/05/diy-venezianischer-sonnenspiegel.html
Lovely greetings…
I love it!!! I just saw a sunburst mirror similar to that in a traditional home mag and put it on my DIY list, and have been pondering how to make it work myself.. It is the first sunburst mirror that I have really liked. Thanks for sharing.
Jessica
One Word: Ingenious! Watch out West Elm, you have a competitor!
I featured you as one of my favorite's from TT&J's Linky Party.
I would love for you to check it out!
Amanda
frillsandfrolic.blogspot.com
Love this!! I'm going to give this a try, it would look great in my breezeway!
I started working on mine today. What are you going to use to hang it?
jandj, I actually hadn't thought that far ahead!! I don't know how I'll hang it, but it's going above my bed, so it needs to be VERY secure. I'd hate to be awakened during the night with that crashing on my head!!
I love this project and I really think I will try this in my own home too. I linked to your project on my blog today! http://lifeasanoakes.blogspot.com/2011/03/favorite-diy-finds-of-week.html
Beautiful work 🙂
I made it! I did your original idea. Here's my post. http://jandjhome.blogspot.com/2011/03/diy-sunburst-mirror.html
Thank you so much for the inspiration!
Wow, amazing!!! LOVE IT!
I just found your blog on jandjhome. Your sunburst turned out incredible. Thanks for the great tutorial.
Funny! My husband and I were just talking about copy catting Ballard Design's mirror and then I saw your tutorial!! I love it. One question…how heavy does it end up being. Just wondering : ) Thanks for the wonderful idea!
http://www.twosidesoftherainbow.blogspot.com
Wow! This is incredible! Thanks for sharing!
did you glue the shims together with wood glue? what size of shims did you use. are they the 6 inch or the 16 inch. want to make one badly thanks. im a fan
Alicia, I glued the shims together with hot glue, but glued the wood wreath form to the back with a good amount of wood glue. I guess I used the 6-inch shims, because they certainly aren't 16-inch.
I just made mine and LOVE it! Can I ask how you're hanging it? Mine is quite heavy and I'm worried it will fall LOL. It's going over the guest bed.
another question. how big around is the glass mirror itself. just want to buy all the right supplies. we live in a small town so when i make a trip to the craft store which is 2+ hours away i stock up on exactly what i am going to need for several projects at once cause i never know when i will be able to make another trip. thanks for your help
Very creative. Nicely done.
$30! Wow such a great idea. I wonder if it will get too heavy if I tried to make it larger.. Has anyone tried?
Yahoo!!! I LOVE blog-land…what did I ever do before I could learn from others people's experiences who have "crazy" notions like myself. The plus side for me is bloggers are much more creative and actually make some of my ideas possible. I've been lusting after the Ballard Design 48in sunburst mirror and now can DIY for 1/10th of the cost, which means I can actually afford it thanks to you!!! I'm giddy can you tell?
Just saw this and now I know exactly what I am going to do for my starburst mirror!! I had bought shims and started staining them already because I wanted to create a starburst mirror with them, but I wanted the mirror to have some depth and personality to it, so I was going to do what you where going to do at first and layer the shims. But not now! Now I am going to recreate your second look. It's amazing. Thanks so much for sharing it.
Jennifer
http://alwaysinwonder.com
Very creative. Nicely done.
did you glue the shims together with wood glue? what size of shims did you use. are they the 6 inch or the 16 inch. want to make one badly thanks. im a fan
HI Kristi-
This is truly a work of art you have created. It is perfect. I always see these mirrors in catalogs and was thinking of a way to create them…you did, and quite impressively!!!! I have a feeling Home Despot's all over the country are going to sell out of shims.
My best- Diane
I am not joking when I say this could be in my top 10 favorite projects of all time. This is absolutely brilliant. Genius! I hope you don't mind that I link it on my FB page. Love it and will definitely be "borrowing" the idea!
ok now THAT is cool!!
Wow!
Tana
WOW..that is a super fabulous idea and it came out awesome!! This is def going into the "to make" file. Great Job!!!!! I love it!
Wow, that is totally cool!
What a great statement piece, I don't think I would have ever thought of something this creative! I am inspired.
Can you buy the shims already cut to the sizes you need or do you have to have woodworking equipment? I would love to try and make one of these. They are beautiful and much more affordable than buying one already made.
WOW! I have the urge to stay up late and try this tonight!
I love this mirror. I definitely want to make one myself – such an inspiring idea! Love your blog!
Have you hung this yet, though? I am interested in how it should be hung and whether or not it stays together well with hot glue after it is hung and gravity takes hold.
I haven't hung it yet, but I can assure you that if you follow the instructions, it's incredibly sturdy. I wouldn't trust the hot glue alone, but the floral ring glued to the back with wood glue makes it super strong and sturdy.
Great! Thank you!!
WOW looks great! I Want to do this.
Love it! It looks fantastic.
Love this project so much I made one of my own! Now, I am just trying to figure out the safest way to hang it. I want to hang it over my bed but I am too scared! Did you hang yours yet? If so, please share how you did it.
I still haven't hung mine, but I think I would use one of the really small Hangman hangers that they have at Lowe's. There's no way it would fall off of the wall with one of those.
Just came across this project idea & LOVE it! I've been looking for the perfect "something" to finish our dining room update, and this mirror is it. I saw that you used about 17 packs of shims…were they 8" or 12"? Contractor pack (42 ct) or regular homeowner packs? So excited to make this….and I don't need my husband AT ALL, LOL!
I used the shorter ones, and I think there were 12 shims per package. Have fun! 🙂
Hello! You did a fantastic job on the sunburst! How long were the shims that you used?
You are an inspiration! I have to watch my budget now and you are providing some wonderful ideas that can be used for re-decorating and updating my home. I look forward to seeing all of your projects… Also, great "how-to" instructions!
I love this. Way more complex than I'm willing to sit through. I recently featured in a post http://decoratingcents.blogspot.com/2011/11/trends-sunburst-mirrors.html. Would love for you to stop by and grab a button.
When I first saw the mirror I fell in love with it and expected to be intimidated by the diy process. But, you’ve inspired me to want to try it. It looks great and I can’t believe it only cost you $30 to create. You could probably sell it for A LOT more!.
Amazing work, Kristi! My fiancee and I are about to close on our first house and i think you are about to be my new best friend! Thank you so much for the inspiration 🙂
i am in the process of making this mirror and it’s coming out REALLY nice!!! (will post pics when i’m done) i would have been done if i hadn’t kept running out of glue or shims….lol. i have a couple of questions. Did you use wood glue to adhere the mirror? What size was the wreath form you glued to the back? and, what did you use to actually hang the mirror?
Thanks for all the inspiration!!! I absolutely LOVE your website!!!
This is so awesome!! From reading comments I see that you attached pieces witha glue gun. Just curious if it has held up. What is diameter of mirror and how did you end up hanging it? Thanks so much!!.
Yep, it’s held up perfectly. The diameter is about 18 inches, and I hung it with a small French cleat hanger from Home Depot.