Devising An Electrical Plan – My Step-By-Step Process
Well, good news, folks! For the first time in two weeks, I woke up this morning actually feeling like I could tackle a DIY project today. And not a moment too soon. If I spend another day sitting still and binge watching Netflix, my mind just might turn to mush.
But I did take a break from Netflix for a few hours while I finalized my electrical plan for the studio, half bathroom, and mudroom. I plan to do the electrical work myself, and believe it or not, the actual wiring is the easy part. Coming up with the plan is the hard part, because there are so many things to think through.
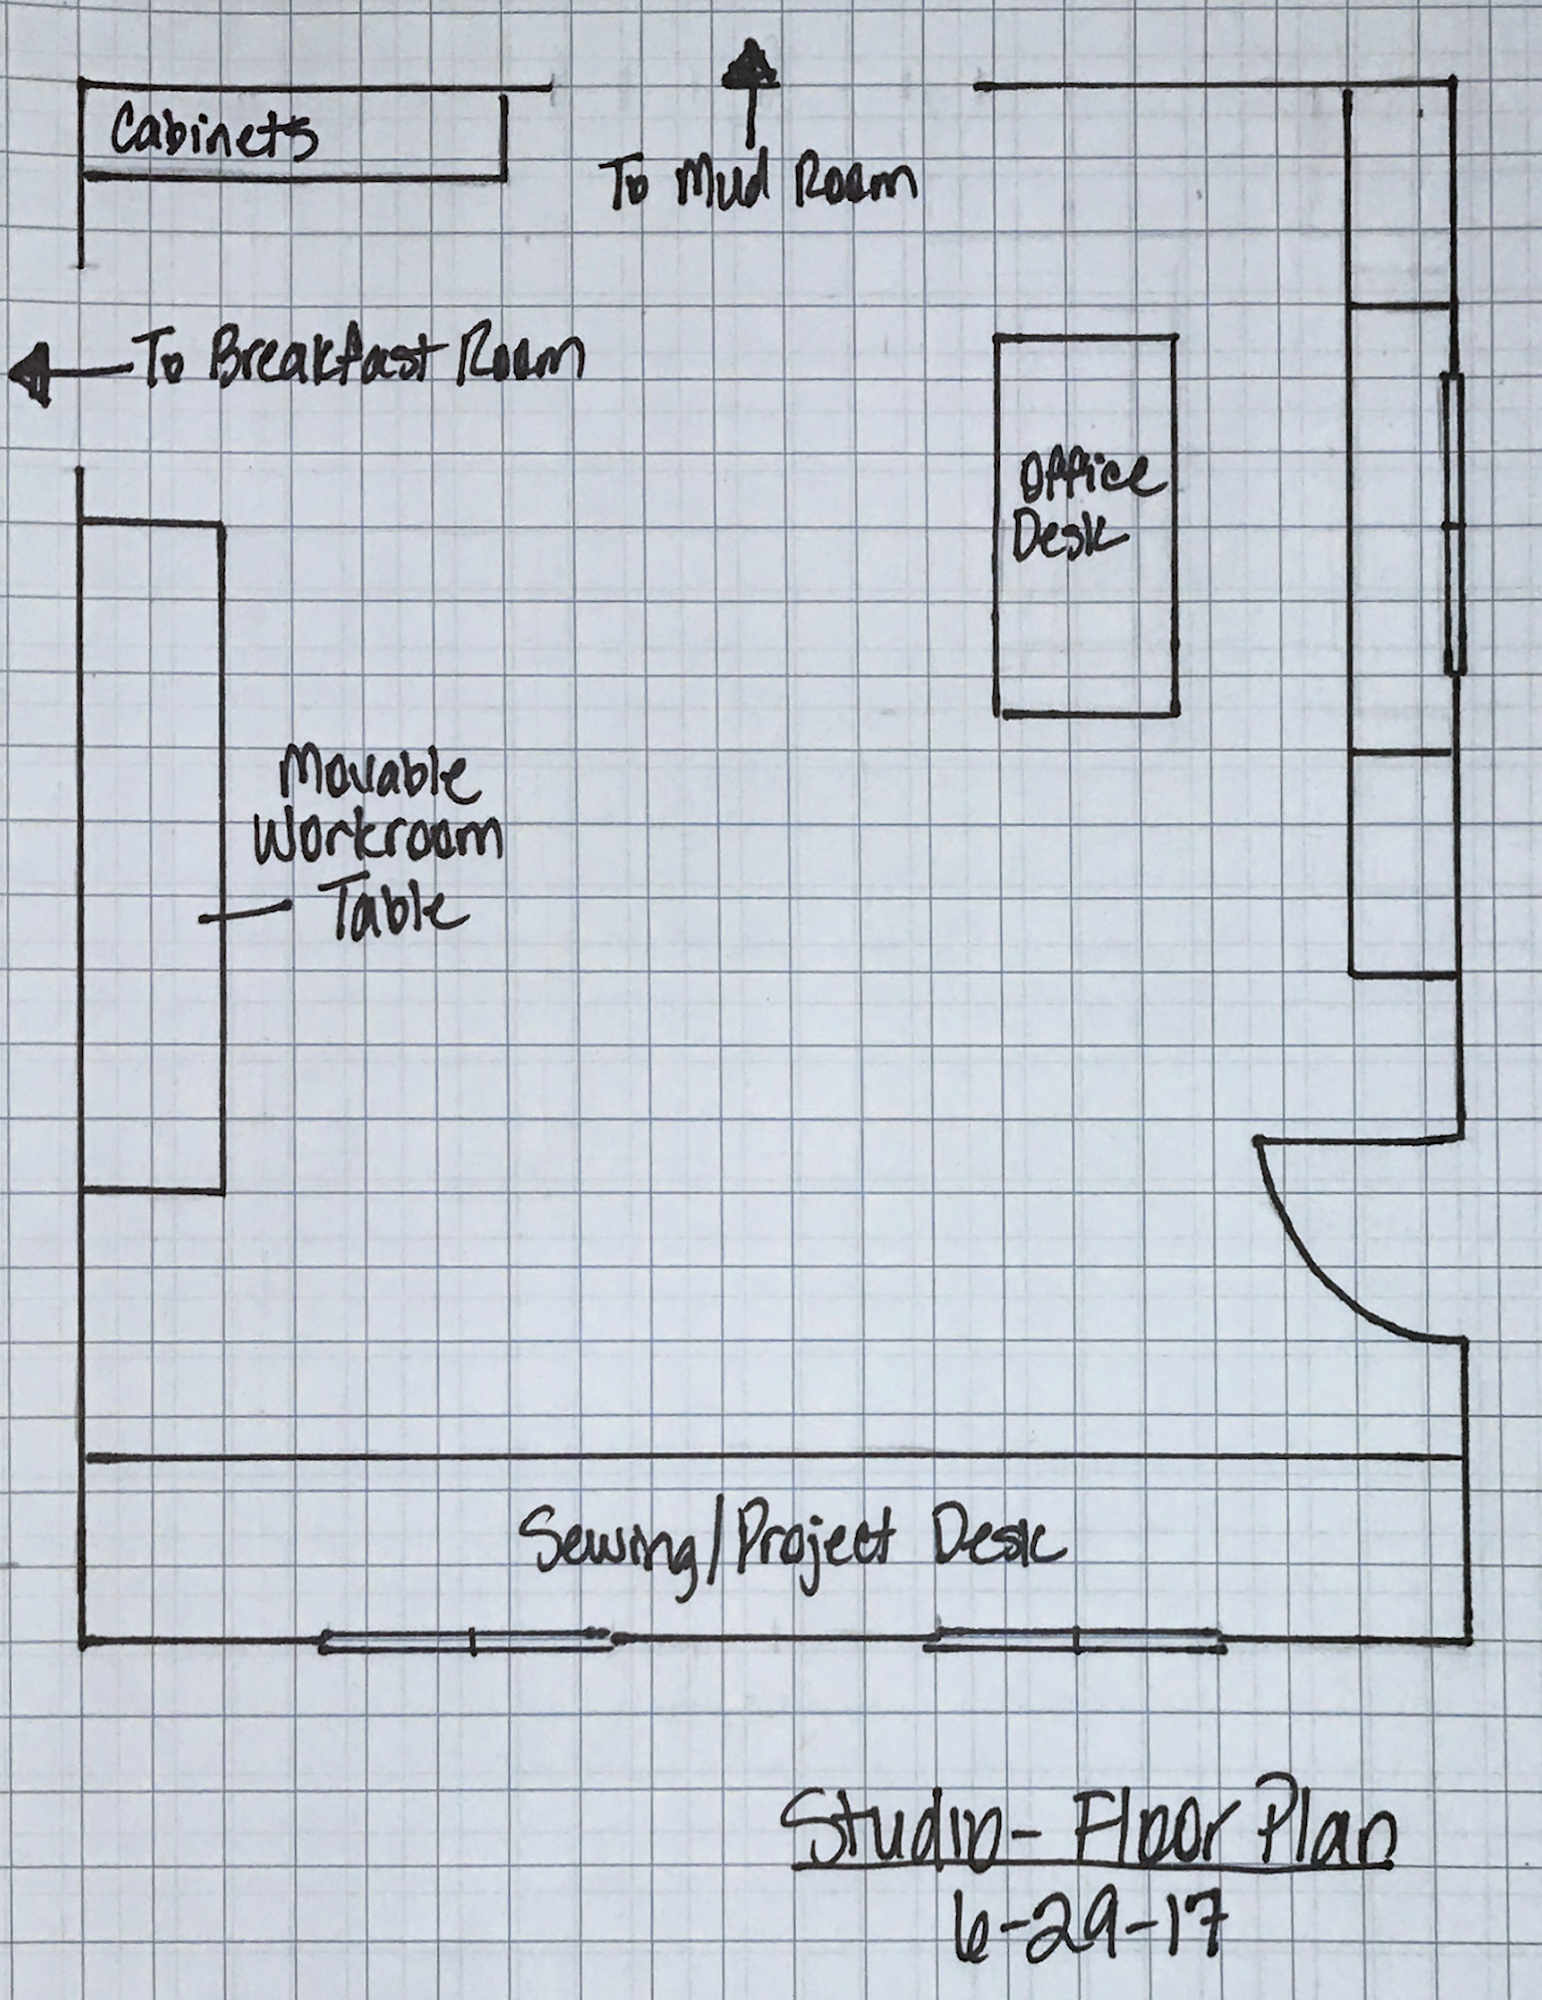
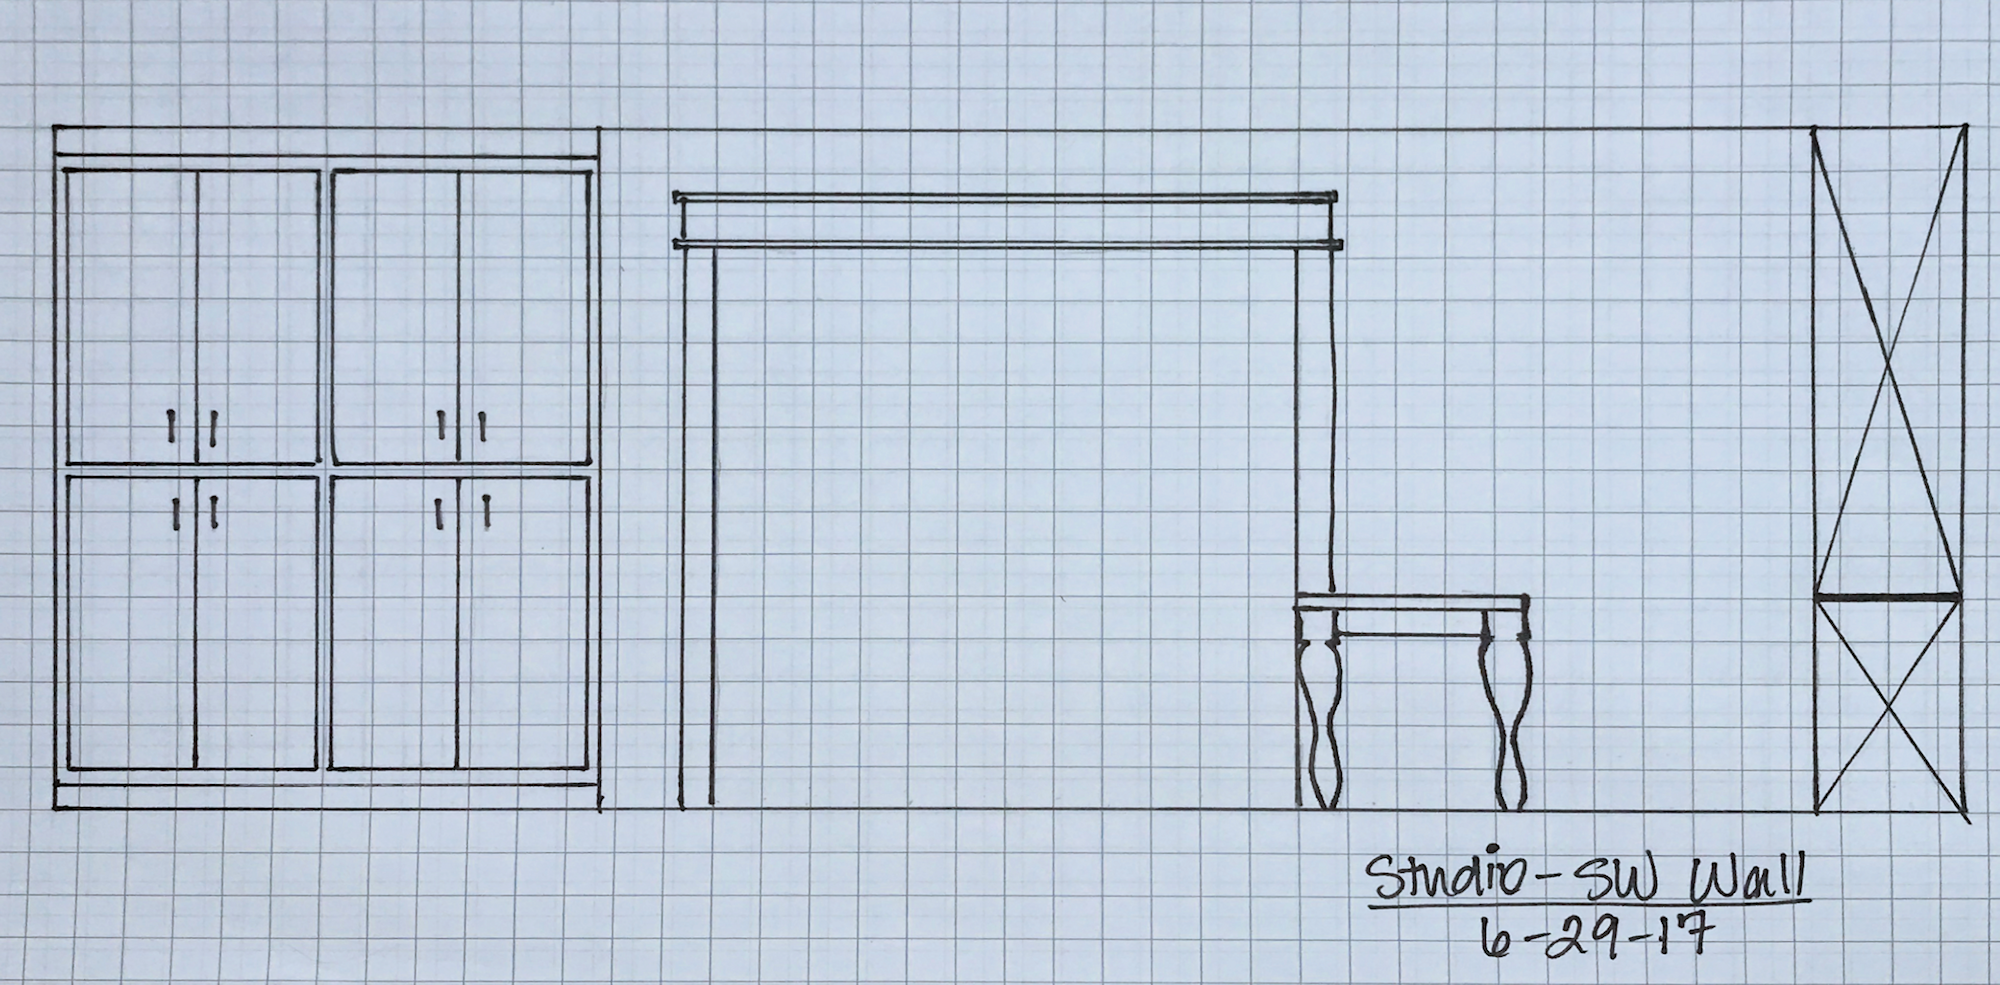
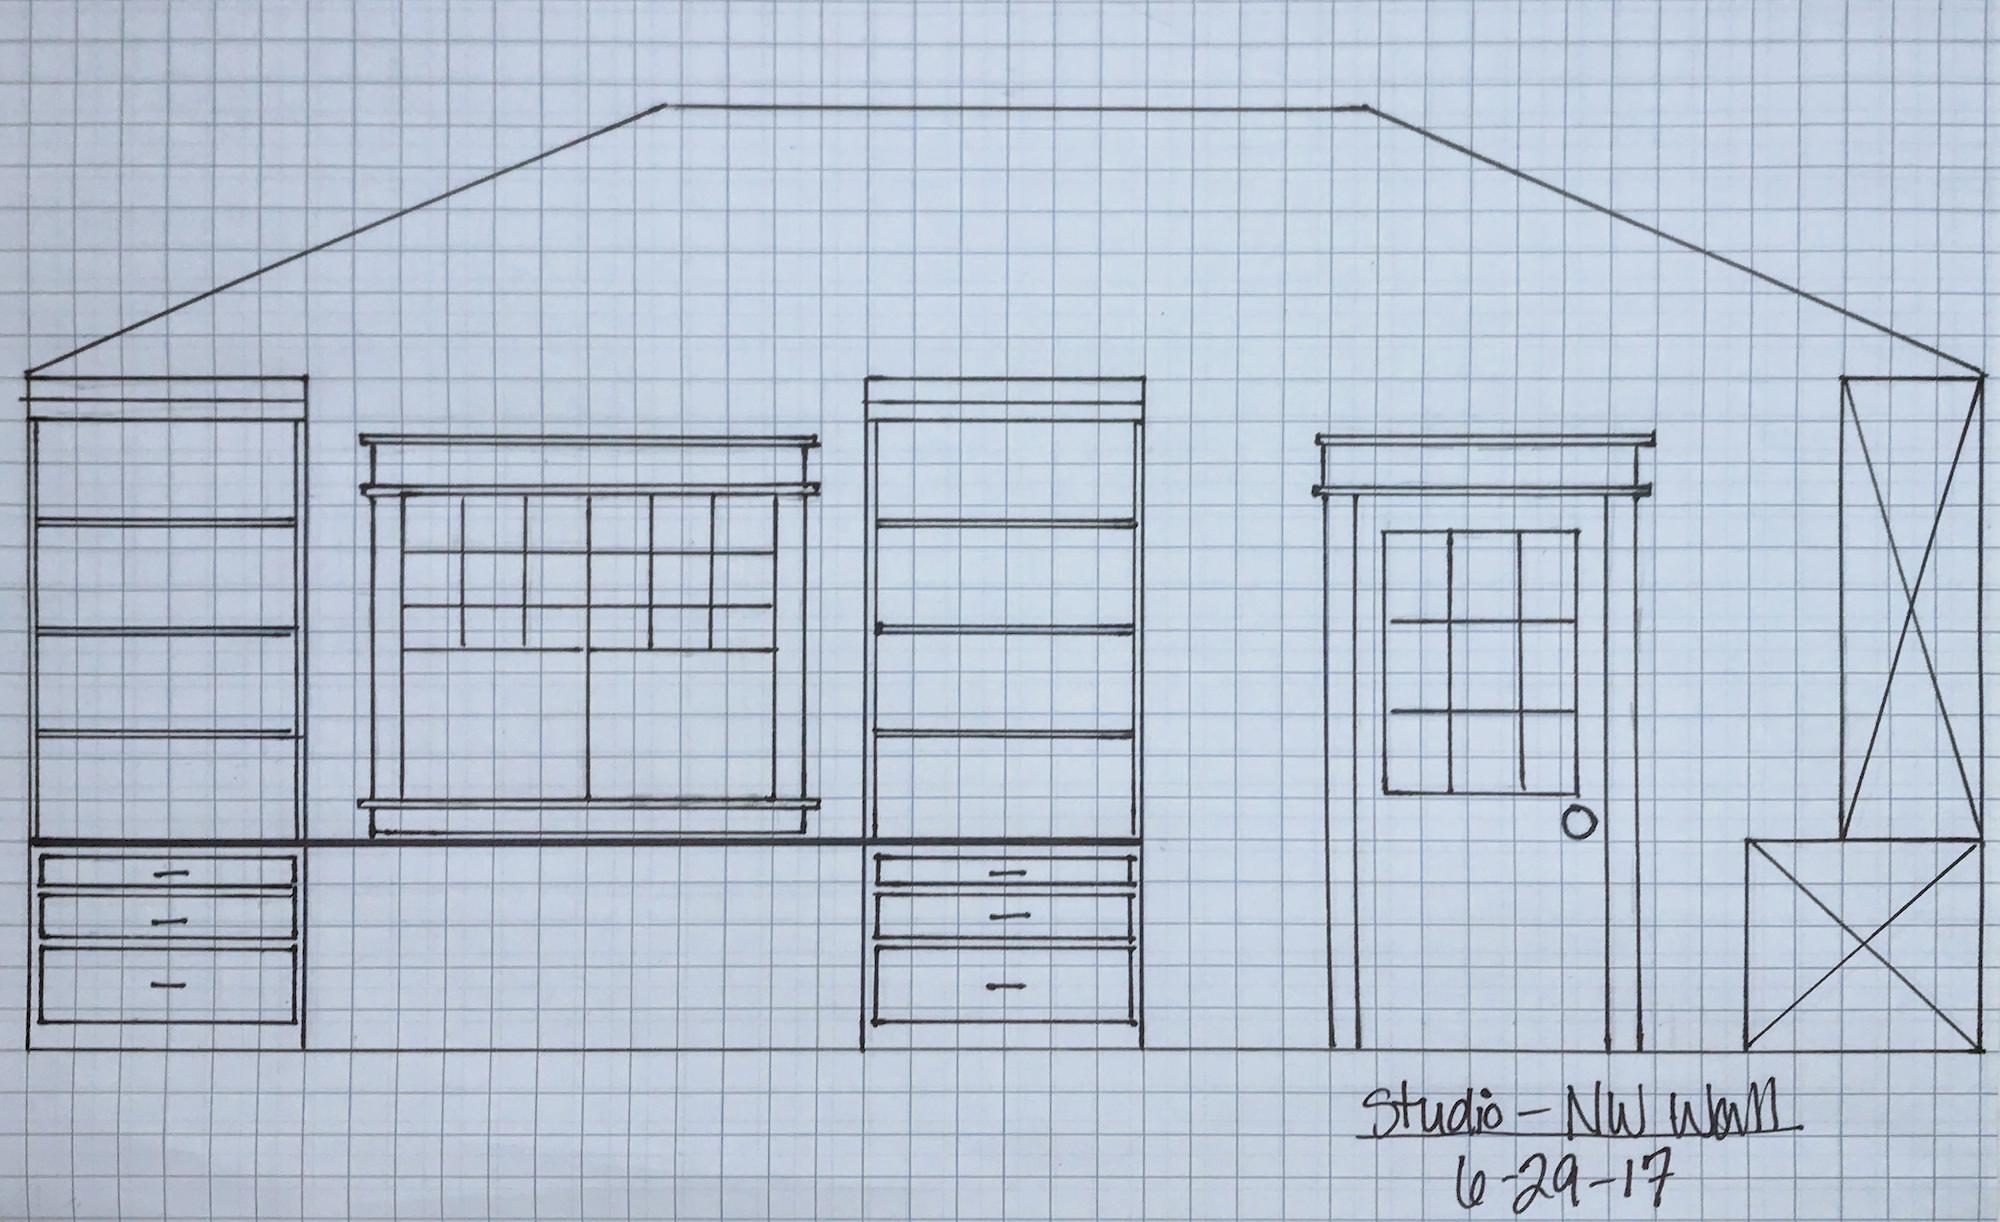
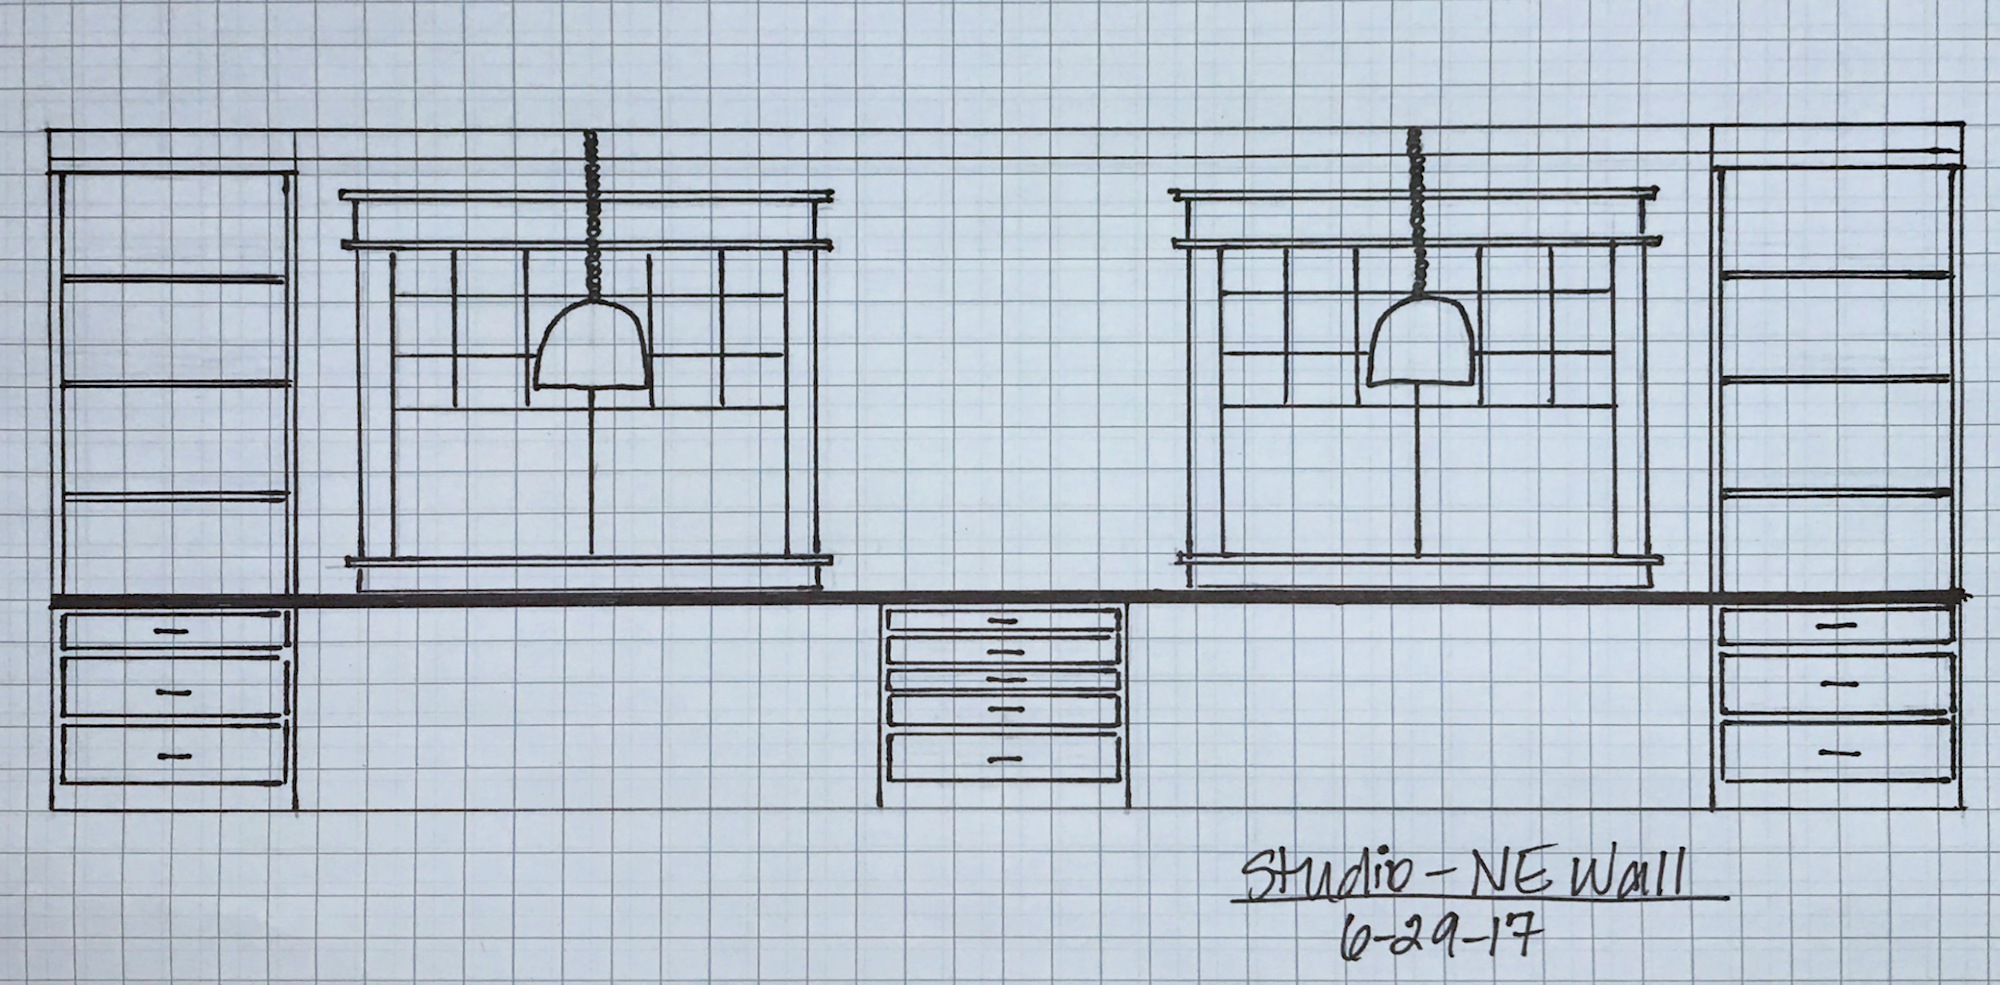
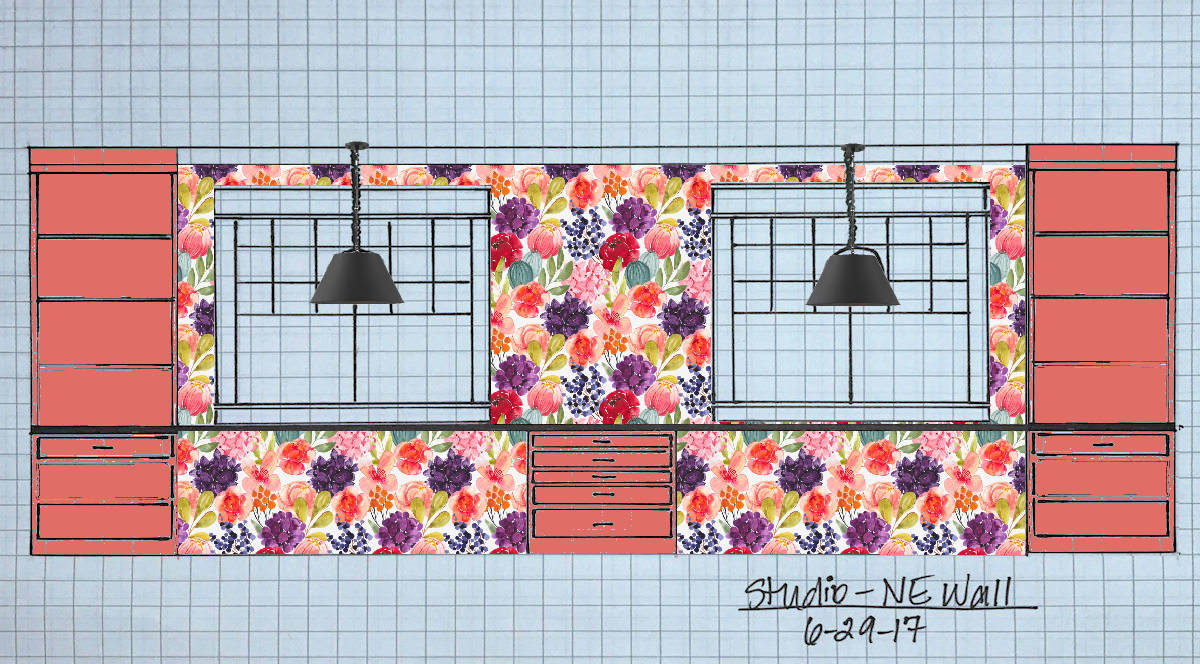
Before I can come up with a lighting and electrical plan, I personally think it’s very important to already know how the room is going to be used and arranged. If it’s a living room, I want to know where the chairs and sofa will go. If it’s an office, I need to know exactly where the desk will go. I like to already have the plans drawn up and have them on hand when working out the electrical and lighting plan. These are the drawings I did back in June that show how I plan to arrange my studio.
For areas with lots of storage or cabinets, it’s also important to know how that storage will be used. Is an outlet needed inside the cabinet for a station for rechargeable batteries? Will there be a printer hidden in a cabinet that needs an outlet?
When I do an electrical plan, especially for a room so large that will be used for actual work and not just for plugging in table lamps and a vacuum cleaner once a week, I start out by making a list of the general lighting and electrical needs for the space(s). I like to think of lighting in layers or categories, and then work from there. The categories I think through are:
Decorative central lighting – I always like to put one decorative light in the center of the room. If at all possible, I like for this central light to be a beautiful chandelier or pendant light, and it serves more as a decorative element than anything else. But because I live in Texas, there are some instances in which I need the thing in the center of the ceiling to be a ceiling fan with a light. I try to avoid ceiling fans in areas like dining rooms, formal living rooms, etc. But there are some instances where exchanging a ceiling fan for a gorgeous chandelier just isn’t an option, like bedrooms. I can’t handle Texas summer nights without a ceiling fan in my bedroom. And since I foresee spending a great deal of time in my studio, I’ll also be sacrificing a gorgeous chandelier for a ceiling fan in there.
Ambient lighting – This is the general lighting in a room. Sometimes the decorative central lighting can also act as the ambient lighting. In fact, in most of the rooms in the house, the decorative chandelier or pendant light serves as the ambient light. But in some rooms, I also like to supplement the chandelier/pendant light with additional ambient light in the form of recessed lights. I don’t have room in the rafters of my studio for actual recessed lights, but I’ll find something similar that takes up less space to add more ambient light in the room.
Task lighting – This is lighting required in specific parts of the room for specific purposes. In my studio, this would include specific lighting over desks and work tables.
Decorative accent lighting – This would include little pendant lights (just because they’re pretty), wall sconces, and even floor and table lamps that will require electrical outlets.
Electrical outlets – Determining outlet placement is a bit easier than lighting. In most rooms, you just want to be sure you have electrical outlets spread throughout the room, with at least one outlet on each wall. But in a room like a studio and/or office, placement for specialized use requires a bit more thought. Also check local codes for placement requirements around windows, doors, sinks, as well as GFCI requirements.
Once I’ve made my list of all of the lighting I need and want that fits into each of those categories, I start marking up the floor plan. I suggest making several copies of your floor plan before marking it up, because it’ll probably take several tries to get it right. And even when I think I’m finished, I always seem to want to go back and make changes.
After I mark the placement of all of the lighting, I then decide where I want the switches for those lights to be. And do they need one switch? Or do I need to be able to switch the light off and on from both sides of the room?
Here’s how my floor plan looked after I got everything marked — lighting placement, switches for lights, and electrical outlets.

I know. It looks like a mess. 🙂
The floor plan markup is more just to get a visual to see how everything will look together and make sure the whole room has adequate lighting and electrical outlets spread around the room. But when doing the wiring, I don’t actually work from the floor plan. Instead, I work from a thorough list that I make as I mark up the floor plan.
Here’s what my list for the studio area looks like…
Lighting (Switch Location):
- Studio ceiling fan with lights (breakfast room door/studio side door)
- General recessed style lights (breakfast room door/French doors)
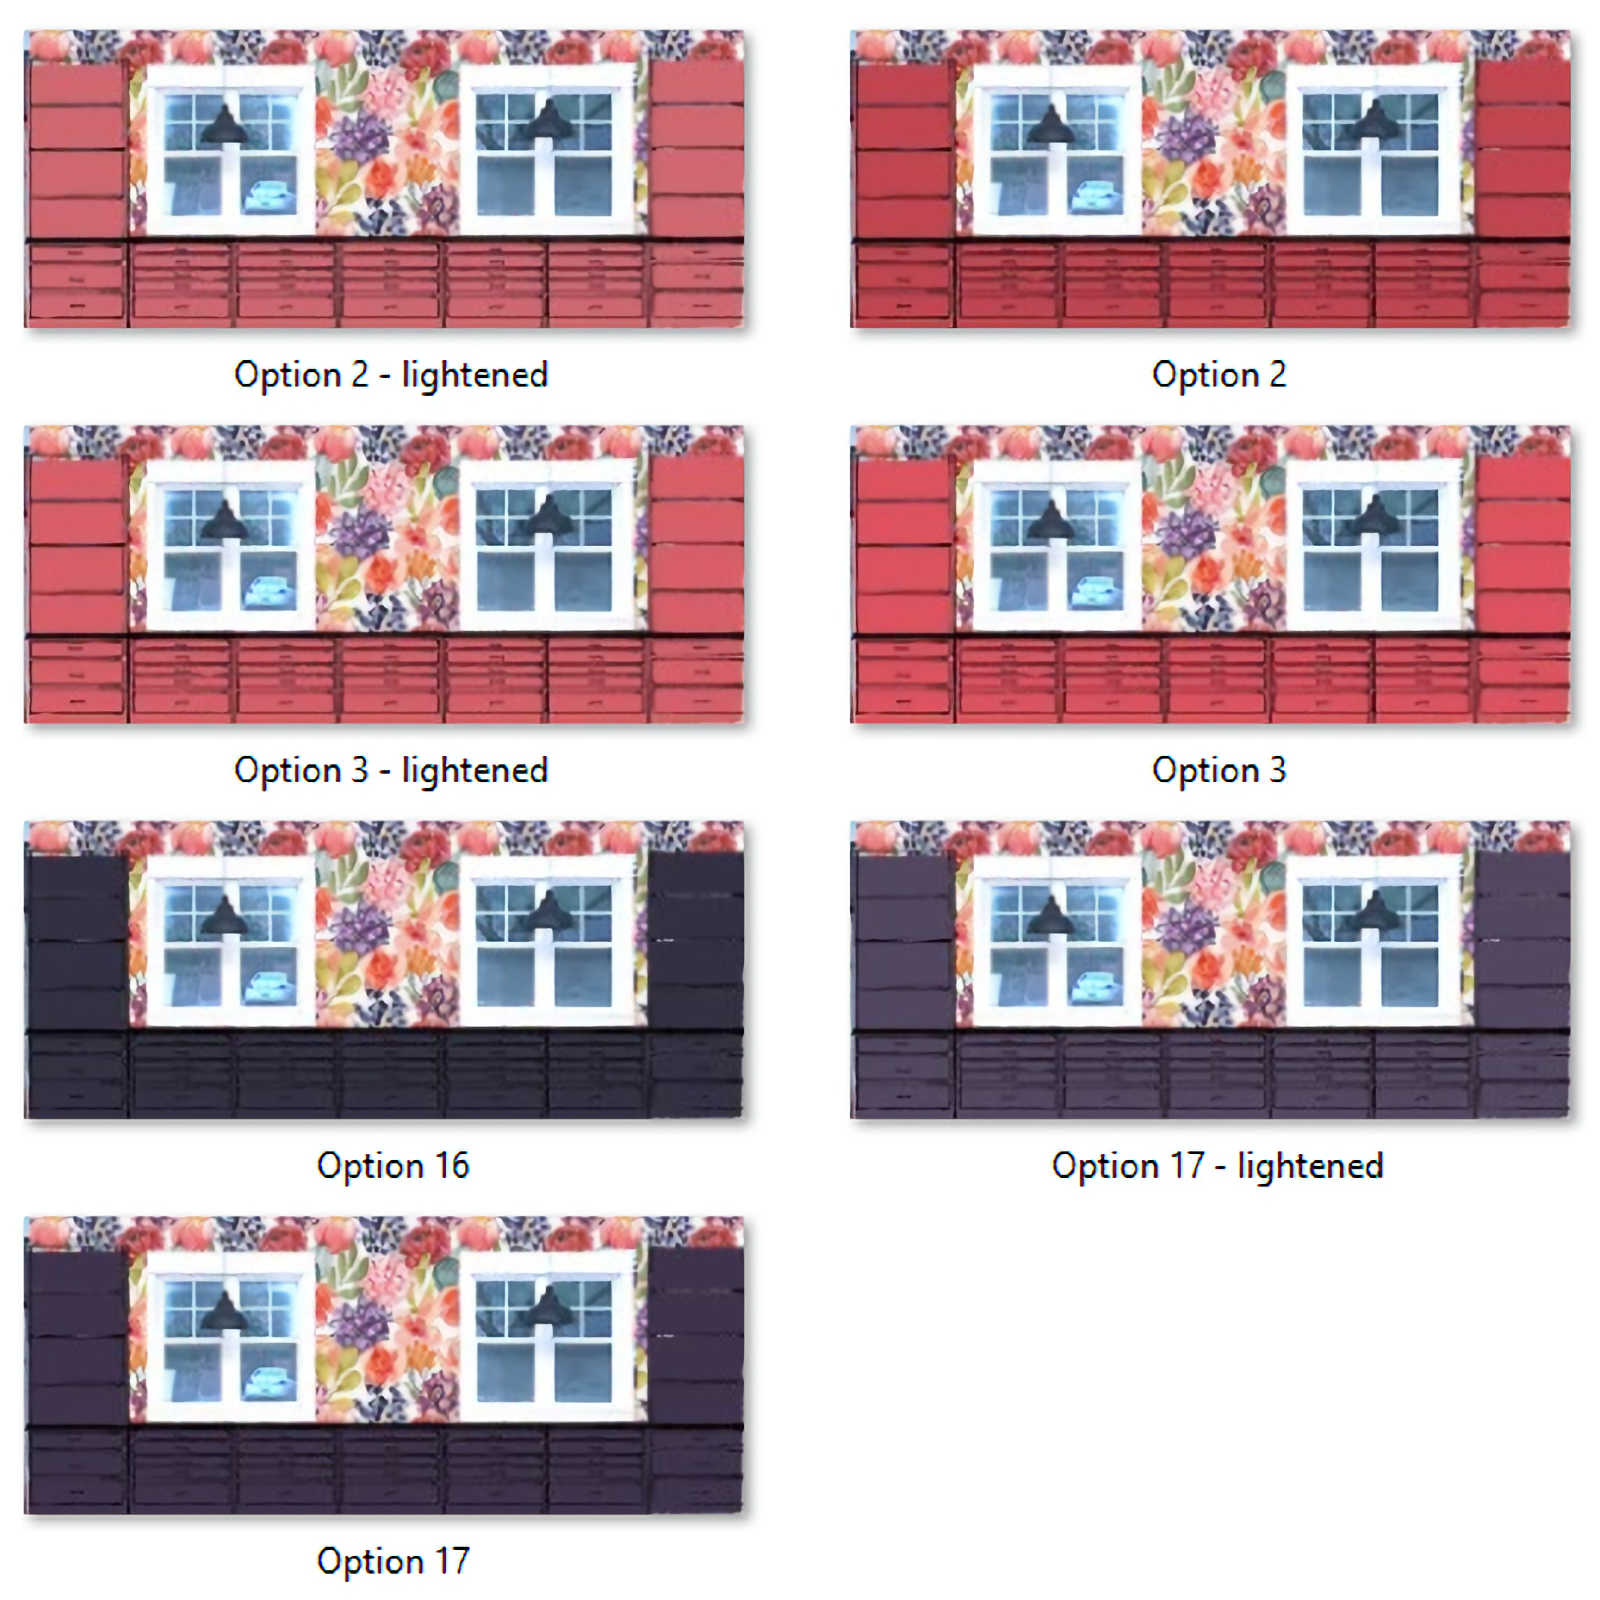
- Pendant lights over worktop (wall between windows)
- Pendant light over office desk (wall to right of cased opening)
- Sconces on office bookcases (wall to right of cased opening)
- Portico light (wall to right of side studio door)
- Outdoor lights flanking French doors (mudroom wall to right of cased opening)
- Main mudroom light centered on French doors (mudroom wall to right of cased opening)
- Bathroom vanity light (inside left of bathroom door)
- Mudroom closet (just outside closet door)
Electrical Outlet Locations:
- 3 outlets low on workroom table wall
- 3 outlets on wall between windows on worktop wall
- 2 outlets inside top cabinets on worktop wall
- 2 outlets centered under windows on worktop wall
- 1 outlet to left of studio side door
- 1 outlet outside of studio side door
- 2 outlets inside lower cabinets in office area
- 2 outlets on side wall by office desk
- 1 outlet on wall inside left of breakfast room door
- 1 outlet beside vanity in bathroom
- 1 outlet above table height on workroom table wall
Those are the lists that I actually work from when running the electrical wiring, but I do keep the floor plan around for reference. I also like to give it a few days, or even a couple of weeks, after then plan is in place before I start the work. That way, it’ll give me time to really think through the list and be sure I’m not missing something.
So I think I have this room pretty well covered with different types of lighting and plenty of electrical outlets to cover just about any and everything I could possibly use this room for. I’ll give it a week or so, mull it over a bit more, and be sure that I have it just right before I climb up into the attic and get started.

Addicted 2 Decorating is where I share my DIY and decorating journey as I remodel and decorate the 1948 fixer upper that my husband, Matt, and I bought in 2013. Matt has M.S. and is unable to do physical work, so I do the majority of the work on the house by myself. You can learn more about me here.


I used the oulets that have 2 outlets plus 2 usbs together when I did my kitchen remodel. I used them on every outlet except the plugmold that I ran at a 45 angle at the back of the upper cabinets. Can’t tell you have much we’ve used them. One of our best decisions.
Great idea Trina, this is also probably the time to do something about it if she gets a weak wireless signal in this new room. She may have some “smart” equipment in the future (don’t ask me what) or may want to blog/surf/upload from her desk here.
This is an awesome list! The only thing that I would add is that I think there are outlet spacing requirements in certain states. Like for some reason I think that in NC you have to have an outlet ever 6′-10′ on a wall. I guess so maybe cords aren’t strewn about all over the place? Not sure, but, anyway, I seem to remember that. Also, how does the permitting process work? On all the home improvement shows they make it seem like electrical has to be signed off on before “they can close up the walls”. The shows always act like there’s some big delay associated with this process. Is that really the case? Does the city/county have to come check on your electrical? Maybe it’s a state-by-state thing.
I wondered about that too. In WA state the spacing requirements are similar, and smoke and CO2 detectors have to be hardwired in (which seems wise since there’s a furnace in the space). Definitely need permits (in WA) for this much new wiring, but codes vary a lot state to state.
Hi. Just wondering if an outlet embedded in the floor would a) be of use, b) be feasible should you ever have to move your movable workroom table to the center of the room? (P.S. Glad you’re feeling more like your ol’ self.)
I’m actually going to do a ceiling mounted retractable cord for use above the workroom table so that when working on large projects, like draperies, I don’t have to deal with cords strewn across the table.
Did you include a ceiling outlet for this retractable cord? I was going to suggest at least one.
Great plan! Do you have enough service on your electrical panel for the necessary breakers?
I upgraded to 200 amp service (which is standard for new build homes) when we got our main HVAC system, and I have plenty of empty circuits. I only need four (maybe five) circuits for these rooms. Two circuits were already in use for the garage, so I’ll just reuse those, and then require two or three additional. I think I have ten unused circuits right now, so when we do our big addition, I may need to add an additional service panel. But I have plenty for now.
What about a recessed outlet (or two) in the middle of the floor, so that when you pull out the moveable work table, you don’t have cords reaching all the way to the walls? Wiring would need to be done from the crawl space (or remove piece of subfloor and replace).
Great post!
I think I may have mentioned this before, but I wonder if maybe you shouldn’t consider a couple of floor plugs in this room since you’re planning to have a couple of floating work surfaces. Specifically, I thinking under your desk (so you can plug-in your laptop, a lamp, or a phone charger). And I’m thinking you might want one in the middle so that when you roll the big work table out into the center to do a sewing or craft project, you can plug-in appliances (glue gun, sewing machine, your electric foam knife, etc.) without having to run extension cords to the walls. In fact, I think I’d even build a 2-gang outlet right into the side of the table (like you might on a kitchen island) and attach it to a heavy-duty extension cable coming out of the bottom of the table so you can plug the “table” into the floor outlet and then have the appliances plug into the outlet on the table. You could do the same for your desk by velcro-mounting a power strip underneath the desk.
I was thinking about that for the middle of the room too, although I was thinking more of the ones that hang down from the ceiling. Outlets in the floor would look much better!
I originally thought of the pull-down ones but since she raised the ceiling so high and doesn’t have exposed beams, it probably wouldn’t work very well. I think the floor might be a better option.
I agree. A couple floor outlets somewhere in the center core of the room may come in handy. We have two in our living room, since we have open floor plan. There are two outlets each, and they have a flip up/down brass cover that fits flush on top of the outlet plate when not in use, and lay flat when they are being used. Nice that the covers stay there with the outlets! At our other house, they put in single outlets that had a screw-in cover. I hated those, because when in use, i had to store the covers in a drawer, then try to remember where I put them. And I had expected double outlets, so I didn’t have enough for how I intended them to be used.
The hubby was a lineman for years but also knows inside electrical. We contracted out our kitchen remodel last yr but he did the electrical. I was ignorant to the fact and amazed how much planning there is to electrical.
In terms of a ceiling fan vs. chandelier: what if you did a big chandelier in the middle, and then two ceiling fans evenly spaced on either side (one more towards the front, and one back more towards your desk)? In such a large space that might help with airflow, and you would still get your beautiful chandelier! Alternatively, you could stick with a ceiling fan in the center, and then two smaller chandeliers or pendants evenly spaced on either side.
I was thinking this too…
Wow, that’s a lot of light fixtures! Electrical work is so confusing. It must be very taxing to be an electrician, I have great respect for anyone who can do this stuff. Not to knock plumbing, but why do plumbers have an iron clad strong union and very few electricians are unionized? Not that I want to pay more for my electrical work to be done, it costs enough as it is but that’s another subject altogether.
My husband was trying to explain the wiring plan for our basement we are finishing. After about ten minutes, my brain went to mush! So complicated! Props to you for understanding all of that! You are a female that makes the rest of us proud!
I second that! I really really respect another woman who can do “man’s work” like this.
Glad you are on the mend, Kristi!
Having been involved in two recent remodels, these are my tips: 1. DIMMERS – Without dimmers, I think you can now see my beach house from outer space when lights are on. 2. Programmable settings- my son’s house has controls that are managed through his phone. For example, he can program lights to be on for the task such as watching a movie. When he leaves his house, the sensor knows his phone has gone and shuts off the lights. When he returns, the sensor knows the phone is home and turns on the lights.This is way too complicated for me, but he loves it and it was not that costly – under $200.
Kristi, can you tell us how you learned your electrical skills? Actually, all of your skills fascinate me and I wonder if you grew up in a DIY household, studied the trades or just picked things up intuitively?
I, for one, am fascinated by how you got this capable.
I learned electrical from my brother-in-law Bill, as well as by doing lots of reading and watching YouTube videos by electricians. (I’m convinced you can learn anything on YouTube.) Basic electrical work, i.e., running new circuits from the circuit breaker, wiring outlets, and wiring lighting, is shockingly easy, especially if your walls and ceiling are open (i.e., pre-drywall) like mine are. I’m convinced that electricians make the big bucks not because electrical itself is complicated, but because they often have to climb into hot, dirty attics, squish themselves into tight spaces, and fish wires through walls that already have been drywalled. The actual electrical work itself is fairly easy.
As far as DIY in general, I’m mostly self-taught, but I did grow up in a household with parents who valued DIY, used power tools regularly, and were comfortable with me using power tools when I was young.
This post might give you some insight: https://www.addicted2decorating.com/the-bravest-craziest-diyer-ive-ever-known.html
What a wonderful post, you seem so much like your Dad. The word “fearless” comes to mind,
Have you planned where your ironing station is going to be and provided for the electrical needed for it? Along those lines what type of iron are you going to have a gravity fed one, etc.?
My workroom table will also serve as an ironing station. I doubt I’ll buy a gravity fed iron anytime soon. When my house is finished, and if I decide to start a side business making draperies for people, I might consider investing in a gravity fed iron then.
Having lived in Texas for 28 years and now living in Florida, I would put TWO ceiling fans in a room that big. I don’t think one will be enough.
Like many other people already mentioned the state requirements including permits are important to consider. In some “cities” there are permitting requirements in addition to the state requirements. I like how you included decorative lighting in your electrical plan. Most electrical plans I have seen forget about this and end up having to re-do electrical later or they end of having extension cords. Thanks for the step by step approach, it will help me be a little better organized on my next job.
Wow that’s a lot of electrical stuff. You may want to talk with a electrician to see if your service can handle it. You may need to upgrade keeping in mind your future additions. When we did our detached garage my husband put a sub-panel in there and ran all the electrical to that. I think the ceiling fan is great for this space but you might want to think about 2. Glad you’re feeling better.
I have 200 amp service, which is standard for new homes today, and 10 empty circuits available for use. No need for an electrician to tell me that. 🙂
Kristy I thought I would share my solution to not having a center ceiling mounted fan.
I found an oscillating ceiling fan that mounts in the corner of a room so you can still have
a center light. I like the air movement they provide and they look really cool.
Hope this is helpful,June
Hi-We just completed a remodel and I installed Lotus LED flushmounts for my ceilings. They install with clips into a hole cut into the Sheetrock, they have their own junction box/transformer, and they are only 1/2″ thick so they can be installed over joists/rafters–and actually centered or spaced evenly! There are several YouTube videos about installation, and I love how they sit flush with no bulb to change. Ever. They are a little more than standard led cans, but don’t have that ridiculous housing. Hope this helps!
Someone above mentioned smoke alarms – it would make sense to add one in there since it’s separate from the main living space and has that high ceiling.
Have you seen the ceiling fans that look like chandeliers? I wonder how they actually work and they might be a nice compromise. This one is pricey but gives the idea: https://www.wayfair.com/Willa-Arlo-Interiors-Borja-6-Light-Air-Ionizing-dLier-Ceiling-Fan-WRLO7182.html