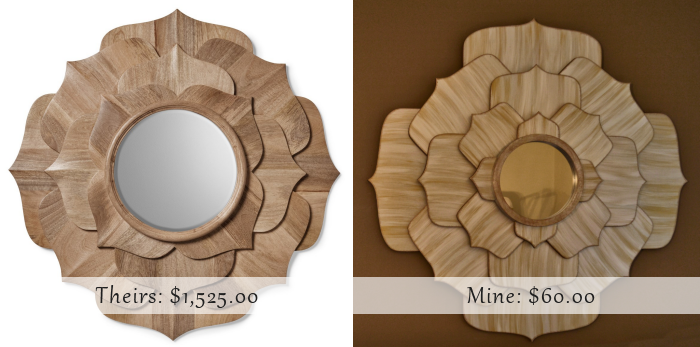
DIY 40-Inch Metallic Lotus Flower Mirror
On the wall between my two smaller living room windows, I had originally planned on using the painting that I showed you yesterday. But as many of you pointed out, anything square or rectangular on that wall would just add another box to the room. I already have so many boxy items (windows, chairs, ottoman, end tables) that I needed to add something that wasn’t square to that wall to soften all of the angles.
So I made a 40-inch lotus flower mirror.

I was inspired by this lotus flower mirror from Layla Grayce. There are many things that I like so much better about that mirror, but I didn’t happen to have $1,525.00 lying around to purchase a mirror for my living room. And I’m pretty pleased with my $60 version.
Here’s how I made it. (Warning: awful pictures ahead. I made this on my front porch well after dark, working by the light of one light bulb.)
I used 1/2-inch MDF, and since I knew I wanted the mirror to be 40 inches wide, I started by cutting a 40-inch square.
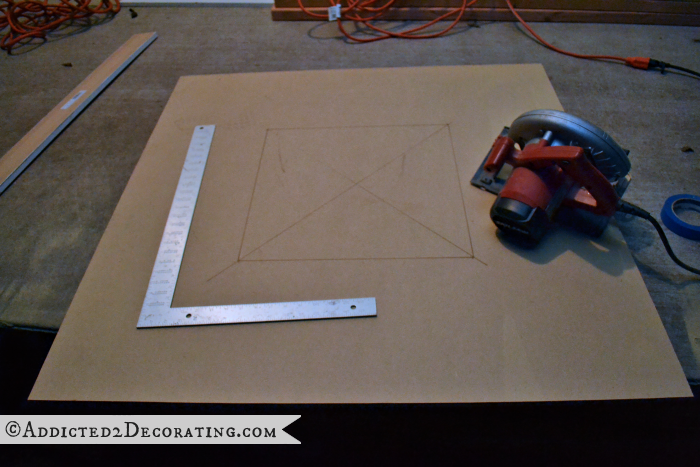
Then I found the center, measured out 12 inches, and drew a square. Why 12 inches? I have no idea. 🙂 It just seemed like a good number to me.

Next I taped four sheets of paper together and cut them to the size that would fit perfectly between the edge of the middle square and the edge of the MDF.

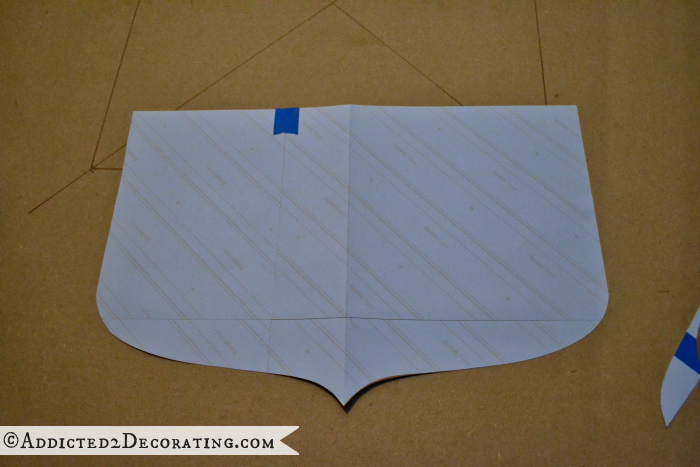
Then I folded the paper in half and drew and cut a perfectly symmetrical flower petal.

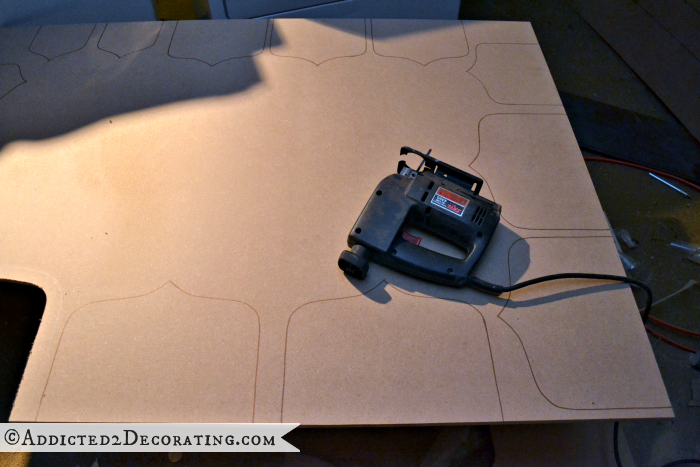
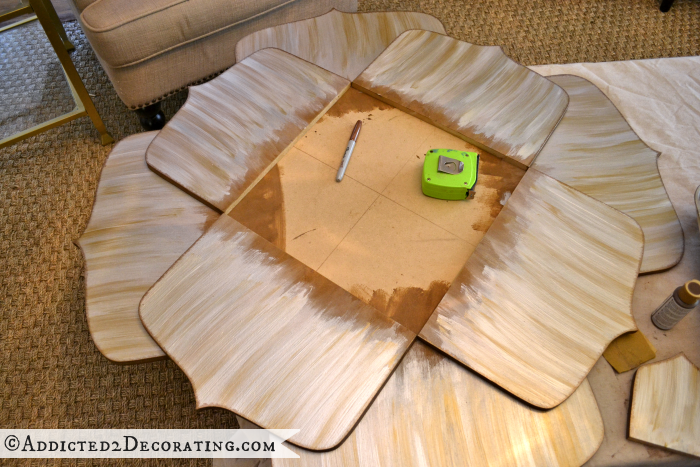
I used the template to trace four flower petals on the 40-inch square of MDF, lining the straight edge of the pattern up with the lines of the inside square that I drew.
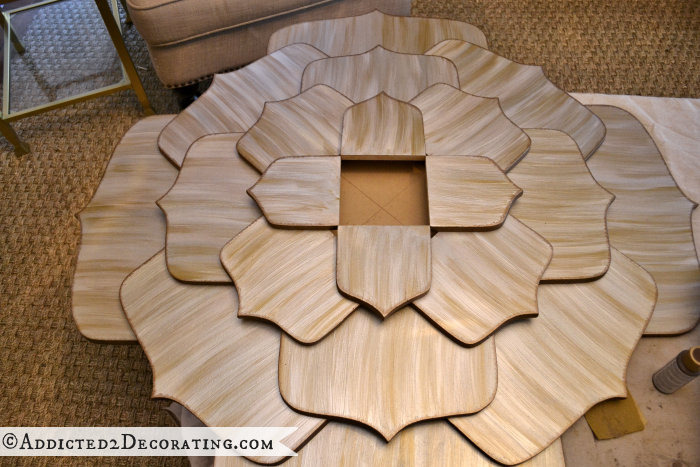
With all of them traced, it looked like this. And I kept the back petals all connected to the center square to serve as a solid base for the entire mirror.

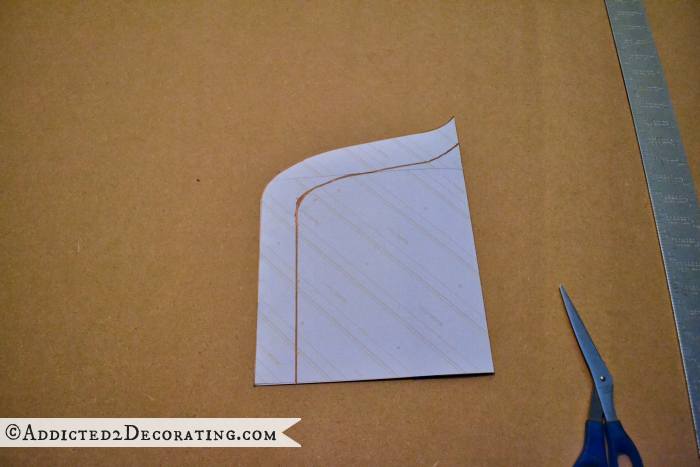
Then I refolded my pattern, measured 1.5 inches from the edge, and trimmed the pattern. This would be the second row of petals, so I traced four of these onto MDF. I repeated that three more times — measure 1.5 inches, trim, trace four petals, repeat. I ended up with five sizes of petals, including the main base petals.
Then I used my jigsaw to cut out all of the petals. (This would have been SOOOO much easier had I been working during the day in actual sunlight!!)
After all the petals were cut and the edges were sanded, I decided for some reason that I needed a dark base. Since I didn’t have any dark paint on hand, I used stain on all of the petals. This ended up being a huge waste of time, a waste of stain, and completely unnecessary. It would have been better had I just painted directly onto the plain MDF.
So in the following pictures, you’ll see that the petals are all dark. Just ignore that. 🙂
I used five different metallic craft paints — bright gold, soft gold, champagne, sterling, and white pearl. (Various brands, all from Michael’s.)

And using a craft brush, I brushed on the various metallic paints in a random manner. At first, I tried to be very careful and blend the colors to make the variations subtle. After doing several petals like that, I realized that I actually preferred this messy, streaky look, so I went back and started piling on the paint onto each petal to achieve this look.
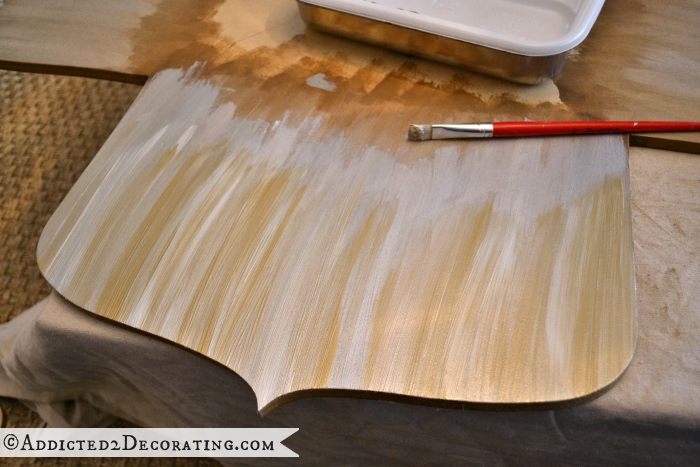
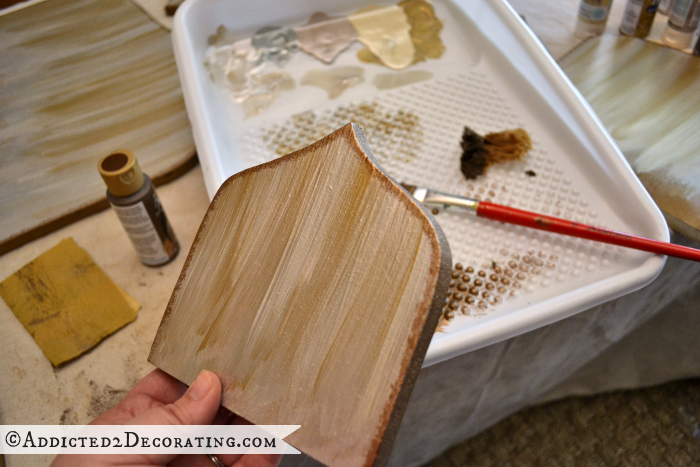
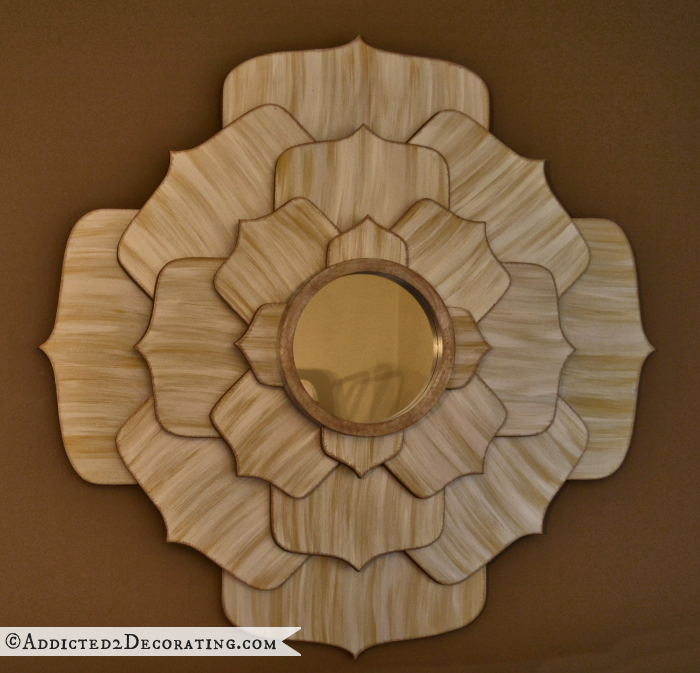
When the front was dry, I went back and painted the edge of each petal using Rich Espresso metallic paint (DecoArt), and I also used a sea sponge to dab the color onto the very edge of the front of each petal just to give them some definition.
When everything was dry, it was time to assemble. The center lines that I drew on the base, along with a tape measure, really came in handy in getting all of the petals lined up. I assembled everything using wood glue. So I got the second row all lined up and glued on…
Then the third row…

The fourth row..
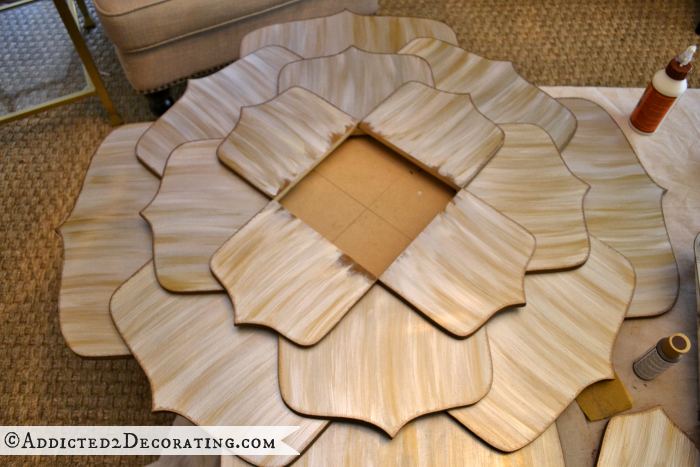
The fifth and final row..
And topped it off with a mirror…
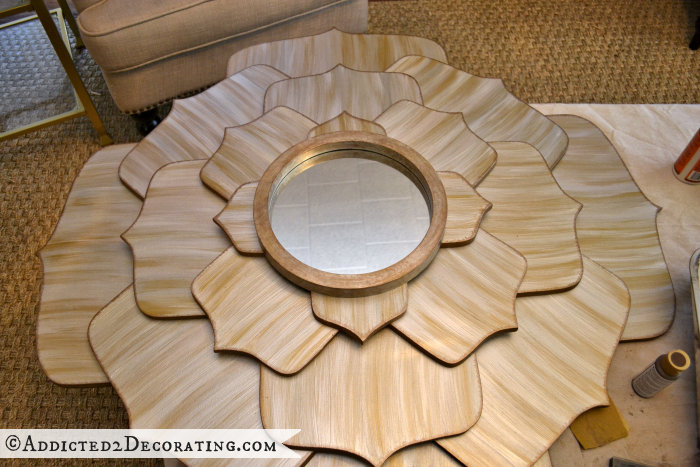
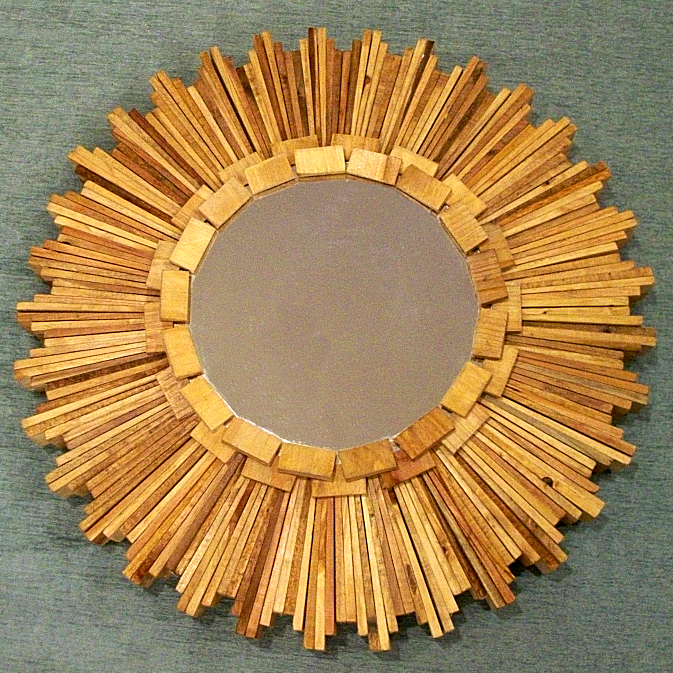
The mirror was one of a set that I bought from Home Depot. The set came with five round mirrors for $15. I used one of the round mirrors on this sunburst mirror that I used at the condo, and this is the second one I’ve used. I still have three left that I can use on future projects. I don’t think you can beat that price for five round mirrors!!
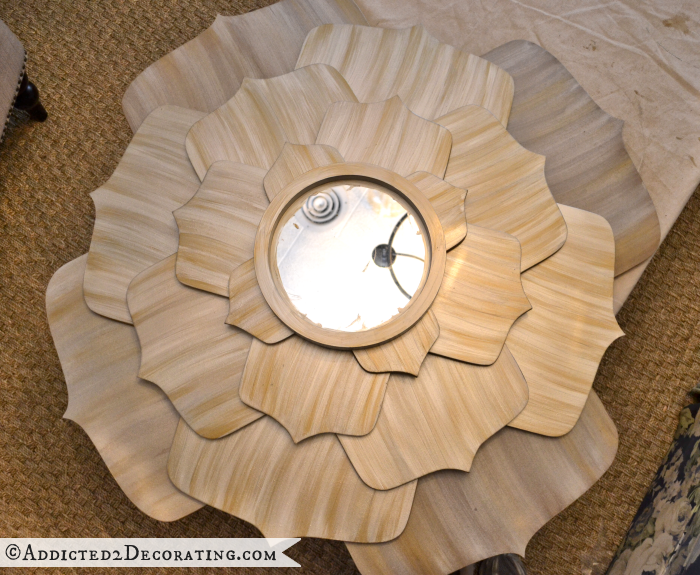
And I also wanted to show you the huge difference that the Rich Espresso metallic paint made on the front edges of the petals. Here’s how the finished product looked with those edges defined.

But earlier in the day before I painted those edges, I was piecing the mirror together just to get an idea of what it would look like finished, and you can see how washed out the petals look. There’s no definition at all between the petals, and they look kind of blah.
So that’s a very subtle detail that makes a huge difference.
Here’s a look at my mirror along with the inspiration mirror.
EDIT: I should have known that the most common questions would be, “How did you hang it?” and, “Is it heavy?” 😉
Yes, it’s a heavy mirror, as you could imagine, since it’s made of layers of MDF. If I had to guess, I’d say that it’s somewhere in the 15 to 20 pound range. So really, it’s no heavier than a large framed mirror.
But any time I want to hang something heavy on the wall, whether it’s a king-sized upholstered headboard, a lotus flower mirror made of heavy MDF, or anything in between, I always use an Ook Hangman metal French cleat. You can find them at Lowe’s and Home Depot with the picture hanging hardware. They are the easiest things in the world to use (and even come with their own level!), and I swear by them. Seriously.
They come in different sizes, and the one that I used on this mirror is five inches long and will hold up to 60 pounds. The big ones, which I think are 12 inches long, will hold up to 200 pounds. They are the best things ever! (And they’re not even paying me to say that. 🙂 )
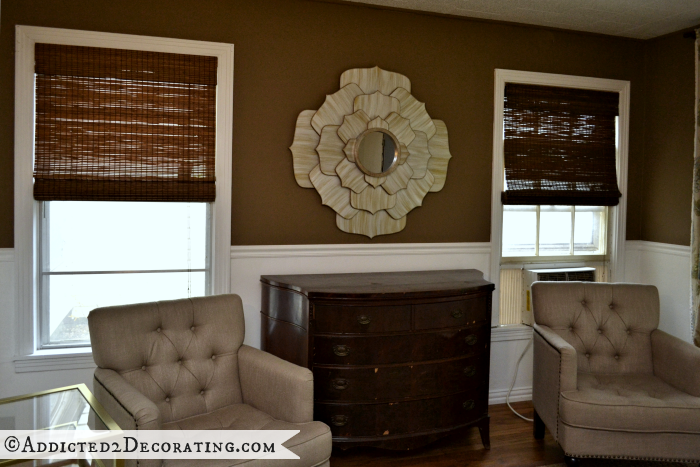
And as requested, here is the mirror hanging on my wall. I still have quite a lot of projects in this room (window treatments, accessories for the credenza, plus a thousand other things), so it’s looking a bit sparse, but at least you can see the scale of the mirror on the wall.

Addicted 2 Decorating is where I share my DIY and decorating journey as I remodel and decorate the 1948 fixer upper that my husband, Matt, and I bought in 2013. Matt has M.S. and is unable to do physical work, so I do the majority of the work on the house by myself. You can learn more about me here.


Amazing! I love it! – but MDF can be so heavy – what did you use to hang it??
Wondering the same thing here! I am in love with this!
I added that info to the post. I should have known that people would wonder how I hung it! 😀
I used an Ook Hangman metal French cleat from Home Depot. I used the 5-inch size on this mirror, and it’ll hold up to 60 pounds.
thanks for sharing how you hung it – and it looks amazing on your wall!!
thanks you for putting the flower mirror my wife see it and i made one for her everything is happy happy happy
That is absolutely gorgeous! Is it heavy? what did you use to hang it on the wall.
It probably weights between 15 and 20 pounds. Any time I hang something heavy like this, I always use an Ook Hangman metal French cleat. You can get them at Home Depot or Lowe’s in the section with the picture hanging hardware. The specific one I used on this mirror is five inches long and will hold up to 60 pounds, but they have them up to 12 inches long that will hold up to 200 pounds. I use them for so many things, including hanging king-size upholstered headboards!! 🙂
Great job! Lets sees picture of it hanging in your room!
As per your request, I added a picture to the post of it hanging in the room. 🙂
So beautiful Kristi, I’m impressed with your skills, the design is gorgeous!
Kate
I think you could make something similar to this with recycled ceiling fan blades. Love yours!
You definitely could. It would be difficult to get the variation in size with ceiling fan blades (the widest petals on mine are 17.5 inches wide), but it could be very similar. And since ceiling fan blades are narrower than my wide petals, and it would require more “petals”, they would actually create a very beautiful flower shape. Now I want to try it! 😀
U.N.B.E.L.I.E.V.A.B.L.E.!!!!!! Wow! Outstanding job…..you are amazing!
wow….You nailed it! Looks identical, to me….Good job!
Would love to see it hanging. So it isn’t hand carved. I think spending $1500 on a mirror is almost sinful. How big is the mirror portion only Kristi?
I added a picture of it in my room. 🙂 The mirror on it is 11 inches in diameter. The set of five mirrors that I bought comes with three different sizes (I think), and this is the biggest one in the set.
Beautiful job, Kristi! (I think it also looks wonderful without the mirror.)
You did it again! How beautiful! Such a wonderful piece of artwork, and when someone asks where you got it, pat yourself on the back! Are you going to hang it temporarily while waiting to level the foundation? By the time you get these smaller things done, you will have a very clear view of what you want your window coverings to be, but I’m favoring the softer shades on the two small windows and your original idea on the large one. You’re going to have a living room that every one of your followers will drool over.
I actually went ahead and hung the mirror (and added a pic to the post).
I think I’m favoring the Roman shades as well. At least I am today. 🙂
I love the metallic paint on the petals and think it will go well with the wall color in the living room. This is an amazing mirror and can’t wait to see it on the wall. And that price for 5 mirrors? Endless possibilities for other rooms, for very inexpensive price. Well done.
I added a picture of it on the wall since several people requested it. 🙂
It looks just right! Love it!
It looks like it’s made of ‘shells’ or something like that. I love it!
AMAZING!!! Seriously, I love this. What a fantastic job.
That is gorgeous!!!
Love it!!!
Do you have templates for the petals?
No, I don’t. 🙁 Bummer. I just use a pencil (or in this case, a metallic Sharpie marker), and kind of freehand it until I get a shape I like, and then cut it out.
AMAZING!!! You are a true designer because I know that pointy leaf tip mimics the flowers edges in all that fabric. So it’s not matchy matchy, it GOES! Which in my book is true design. I am in awe of that mirror!
WOW..I want to see it on your wall!! It is gorgeous!
I added a pic of the mirror in the room since a few of you mentioned it. 🙂
This is so beautiful, you are great when it comes making you own version!!!
I like it better than the original. Way to go!!
I agree! Kristi, I just stumbled across your site and I have to say, you have great ideas! I will be visiting your site more often for inspiration. Your lotus flower mirror is better looking than the more expensive one! Keep up the great work girl!
Very pretty. It turned out great! I need practice with the jig saw….my cuts don’t come out as smooth and uniform as yours did. Your new mirror looks great and now I can’t wait to see the rest of the house!
When you use the jigsaw for projects like this, are you sure to use a blade that’s labeled for “curves”? The blades made for cutting curves are thinner and narrower than regular blades, and allow for finer, smoother cuts. They make all the difference in the world!
Wow! You should have your own DYI T.V. show!
Oops! DIY!
You have mad skills Kristi. Beautifully executed as always!
The mirror is beautiful! Great job! Its looks perfect on that wall. Your blog is so inspiring! and real!! Love all of your ideas. I always look forward to reading your blog!
Proportions are perfect.
Wow – so beautiful. I suspect we will start seeing more of these in the coming year based on your gorgeous inspiration! Love, love!
Very nice.
Okay, now I know you work miracles. Not only is this a beautiful creation but you created it in the “almost dark”.
Seriously, I only wish metallic paint would show better in photos because this is a great idea. Finding a big mirror item is usually so expensive, at least in my world. Even if I had it, I don’t think I could bring myself to pay thousands for a mirror (unless it is a true French or Italian antique). This goes into my Ideas folder for certain.
I wish the metallic paint showed up better, too!! In person, it has a very pretty (but soft) metallic glow to it that I simply cannot capture on camera. Not sure if it’s just not possible, or if it’s because of my inferior photography skills. But I wish y’all could see it in person! 🙂
Kristi, I like yours better than the one for $1,500. It looks great on the wall. How did it feel to do a project like this after all the other projects you’ve been doing? Bet you had fun with this one!
It felt great! Sometimes it’s just necessary to step back from big projects (or tearing stuff apart), and just make something that’s pretty and fairly easy. And best of all…FINISHED! 🙂
Looks fantastic!
Love this!!!!!!!!!
Looks great!! Now, why are those windows still naked? 😉
Because you haven’t sewn my window treatments for me yet! What’s taking so long? 😀
Stunning!
Love, love, love it! I have a huge space on each side of my fireplace above built-ins and have been looking for matching mirrors for each side to reflect natural light ( I’m a mirror collector/freak). These are perfect and even have a bit of art-nouveau/ deco period look to them which is what I want for my home!!! Outstanding! Thank you for the post!
Coolest mirror ever! I absolutely love it, pinned it, AND sent a link to my husband 🙂 We have no wall big enough for it right now in our tiny casita, but you better believe I’ll be pulling up that pin when we get our house built! Thank you, thank you, thank you for sharing how to do it!
BAM! You did it again. 🙂 Love your version of that $1500 mirror. (say WHAT?!?!) Looks great on the wall!
I am always amazed at the decor items you make/recreate from inspiration. Never in a million years would I have thought to try and make that on my own. It looks beautiful!
Kristi, that is beautiful!
I am blown away! I think this is my most favorite project you’ve done yet! I’m constantly amazed at your talent and creativity, that looks absolutely gorgeous in that room!
Just gorgeous. Very inspiring!
Breathtaking! I am in awe of your many talent, you are an inspiration.
I am in awe!! I know you don’t decorate and DIY to amaze any of us, but amaze us, you do!!! Your creativity and imagination makes me think outside the box. Also, makes me wish I had you as my neighbor. 🙂
I love it, especially with the metallic edges!
When I first started reading this I didn’t think I’d care for the finished project, but I have to admit it looks fabulous on that wall …. just the touch it needed ! And you’re so right about the darker edges. I am impressed !
OMG..that is freaking beautiful! thanks for showing it on your wall…oooo la laaa!
The paint on the edges really did the trick. It looks so great on that wall. A really beautiful piece for your focal wall. Wow, that room is really coming together.
I gotta check out that mirror pack from HD! Thanks for the tip!
I bet this looks waaay prettier in person. Painted in brighter colors, this would be so cute in a little girl’s room too.
Wow that’s great Kristi, talented, when are you making one for a giving away for those of us who cant do that. 😉
How do get such creative inspiration?? 🙂
I search pinterest and nothing comes back half as pretty. And…your piece looks just like the original.
I have so many blank walls…..
Bonnie, truly one of my favorite things to do is to look at items on online retail stores and ask myself, “How would I make that?” That’s where I get most of my inspiration. But I don’t always try to make my items look like the inspiration, but sometimes it’ll just be a shape that inspires me, or a color (or the way that the color is used) that inspires me.
But I could honestly spend hours and hours — and entire day possibly — looking at everything that popular online retailers offer and asking myself, “How would I make that?” 🙂
You seem so brave to me. I would be hesitant to make something so large but it looks absolutely beautiful. I love your taste and am excited to go through this home make-over journey with you. Thanks for posting.
OOOHH! I LOVE it! You were so right to break up the ‘boxes’ in the room, and this is so much better than just popping a round mirror up there. Great job!
I am also thankful you mentioned the hanger, as I have something I am about to start working on and was concerned about how to hang it (revamping an old antler set for my oldest sons Christmas present;) I was afraid the antlers would fall and impale someone, which would dampen the holiday spirit, lol…:) Great job as always, you should write a book!
Sally, your comment made me literally laugh out loud — that someone being impaled would “dampen the holiday spirit.” 😀 Ummm…yes, I suppose it would. 😀 Oh my, I laughed so hard at that.
I didn’t look at the $1525 inspiration mirror until after I read the article. I may be a bit prejudiced (since I always like the projects you do), but that expensive mirror doesn’t hold a candle to yours!
OMG! I love it! It’s gorgeous and quite frankly, I like it better than the $1500 one! (Who really pays that for a mirror???) And so did my hubby when I drug him over to look at your pics. And it looks great on your wall. The rooms coming along!
I gotta ask Kristi, are ya planning to do a faux fireplace or mantle under it?
I think I’ve abandoned the idea of a faux fireplace because I really want a real one. I mean, a gas one. I figure since we already have the gas lines under the house, and I’ve found a plumber who whose prices are unbelievably low, I may as well go for the gas fireplace option. So I’m going to start saving up for that. It’s just one more thing that’ll have to wait until after we’ve leveled our foundation, though. 🙁 But hopefully by next winter, we’ll have a working fireplace in there. I want one in our bedroom, too. 🙂
I absolutely love this.
That is gorgeous! And it looks perfect in that space! It looks like you paid hundreds of dollars for it! I am always amazed by your talent! Can I have some of it?
You may already have it, and you just don’t know it yet! 🙂 Have you tried? 😉
No, I have never tried using power tools. But I would really like to. It is intimidating though. I did pull up a sub floor in my downstairs all by myself though. I was very proud!
Tanks Kristi for the info about he jig saw blades. I am just now starting to use power tools and knowing that will come in handy! Your room looks great!
Very nice. I love your handy work! Any plans to change the wall color?
Actually, yes. The wall color was always meant to be temporary. I’ll eventually be covering the top part of the walls in grasscloth (probably a light to medium brown), and the bottom part in white wainscoting. But those are more things on the “can’t be done until we level the foundation” list. 🙂 So until then, I thought I’d just play around with paint and try something different. I don’t really love the brown that I chose (it’s a bit to green for my taste), but I also don’t want to spend time and money to change it since it’s just temporary anyway. 🙂
The mirror came out awesome and it fits the space perfectly. I admire your talent❤️
Un-freakin’-believable! Where’s the ‘dropped-jaw’ emoticon when I need it? Is there nothing you can’t do? You are so amazingly talented, and that mirror is incredibly gorgeous. I like it better than the one from Layla Grace. Your paint technique gives so much dimension to the leaves, they actually appear to curve upward. Wow!
Best,
Kimberly
Oh, believe me…there’s plenty I can’t do. Cook and bake, for example. Keep plants alive for any reasonable amount of time. I could go on. But I just don’t publicize those things. 😉
This turned out so beautiful! I had thought of making it a while back, but it never would have turned out this good if I tackled it. Amazing job, Kristi!
Kristi, your lotus flower mirror is just gorgeous! Really! How talented you are to design that! I would love to do one, but on a much smaller scale. I’ve just about used up all my big walls!
Great job! Your living room is going to look so beautiful!
Great job Kristi!
I love how you mad your own version of something really expensive that you loved
Yours is much prettier with variations in texture and color than the $1500 mirror. Looks great on the wall. And thanks for the tip on what to use to hang heavy objects. I have several mirrors at home that are frameless, but they are bigger (one is a big round, another is rectangle), and I have wondered about making pretty frames for them. I thought your spoon frame was verrrrry interesting (and probably very light!), but more blogs on unique DIY frames would be great. Again, you hit a home run!
Specfreakintacular! Will pin to make for my foyer. When I have a foyer.
That is beautiful. I made a starburst mirror, but I love this new design. Good job.
Simply beautiful. Thank you for sharing your creativity. It would be so easy for you to just design these beautiful rooms and homemade decor and not share. I love reading your blog.
All I have to say is if I took on something like this, it would take me 40 hours to complete and would be one hot mess! I bow to your creativity and skills with power tools!
Wow, that is a beautiful mirror! At first I thought you had made it from ceiling fan blades, which is something I’ve been pondering, but could never figure out how to put them together. I like your idea much better, and the graduated scale of the petals is much prettier. Make me one? 😉
Now I KNOW that you’re creative enough to make one of these yourself, Sheila. 🙂
“ABSOLUTELY LOVELY”…… NO MORE NEED BE SAID!
Fabulous! It looks stunning on the wall. I want one now. I think I can do it!
HOLY COW!!! (Texas Speak) your creation is beautiful and looks so good on the wall. Can’t wait until your next post.
Fantastic piece as usual – really like the colors/patterns of the petals! Beautiful project!
I love it and think you did a fantastic job. When I first looked at it hanging my immediate thought was, ‘but it is still square, just artistically square’. I wonder how it would look, though it might be too late?, to rotate it so it desn’t create a square footprint? Either way, it is creative and lovely and awesome!
Better looking than the $1,525.00 version, much!
Amazing!
Absolutely gorgeous, Kristi! You are so amazing. Your talent knows no bounds!!!! So proud of you and all you’ve accomplished in your new home.
I absolutely LOVE the mirror……and what a difference it made to that wall! Gorgeous!!
It is so STUNNING!!!! You are so amazing! Quick question… how long are each of your leaves? If the biggest one is 17.5 inches wide, what’s the lenghth? You have inspired me to dive in and try making it! So excited!!!
The biggest one is about 11.5 inches long. But keep in mind that the four back petals are all attached to the middle square. In other words, they’re all one piece that serve as the backing for the whole mirror.
Thanks Kristi for being an inspiration! I finished my mirror! Time for a happy dance! Just have to hang it. So glad to be done. Your tutorial was awesome! Every woman needs to pick up a power tool and create something that makes them smile. Thanks again!
Awesome, Carleen! I’d love to see it!! 🙂 If you want to send me a pic, here’s my email: [email protected]
Very impressive! Love this!
My hands are killing me trying to cut the leaves with the jig saw. Lol! Oh what we do for diy! Gotta love it!
WOW, it looks amazing and IDENTICAL to the high end one!! That is a ridiculous price for a mirror ha…I’m so impressed with your design skills! love your blog!
Happy Holidays!
Joey
It is gorgeous and I love it; however, I’m not sure I could ever do it. My carpentry skills are extremely limited. I just discovered your site and I am so glad I did. You are incredibly talented. Thanks, also, about the hangers that you recommend and I have never heard of – gosh, there are so many products out there that can may our lives so much easier.
I’m wondering if you could achieve a similar effect by using old fan blades? The cut on the MDF reminds me of those!
Great tutorial, I would definitely try this one day! 🙂
The room is beautiful! ?? Why do people have curtains falling or dragging on the floor?? Just wondering. Seems like dust catchers.
I don’t know why people have those. I would imagine it’s just a style they like. I personally don’t like it at all.
This is a fantastic mirror!!! And yours looks much, much better than theirs!! 😉
Absolutely LOVE this! Great job, it is stunning…and yours is much better than theirs.
Every piece amazes me, but this one…….oh my word! I want one! You should sell the pattern!!
Brilliant! !
You are awesome!!!!!!
Great site, nice design posting keep it up! 🙂
Wow – This mirror is beautiful! Thank you so much for making a tutorial and sharing it with us!
lovely lengthy tutorial, thanks for explaining
Again, totally inspired. But I rent my place and can’t use anything heavy duty for hanging pieces on my walls. Is there a lighter material I could try to decrease the finished weight for a first draft? I want to do this in a silvery tone to set off my color scheme
The only think you need to hang this is a French cleat, which requires two screws into the wall. You can easily patch that with spackle.
I love it! If I had the option, I would choose yours over the inspiration piece. You should have your own show on HGTV.
Cheryl
Thank you for the breakdown explanation, would definitely look great in a home
I like the idea of the mirror and it inspires so much kind of similar mirrors , but adding colors, changing the shapes from lotus to other flowers. Though, if you compare both of the mirrors, there is a difference of sophistication, as the former gives a very natural wooden look which is why it is pricy. Neverthless, yours is fantabulous and complementing the dark color and adds vibrancy to the wall. Keep up good work.
Cheers !!
Manila
You’ve inspired me with this very stylish project. But I wondered if ceiling fan blades could be reused to create something similar instead of cutting mdf?
WOW! I just saw this mirror for the first time AND THOUGHT YOUR MIRROR WAS THE HIGH-END ONE! It is gorgeous! So inspired to make my own. You could totally sell that beauty for big bucks. Well done!
Wow! This is awesome Well, it looks like I have another project to add to my list! LOL You are truly amazing! Thanks again for the inspiration!! Love it!