Sewing Basics: How To Make Continuous Bias For Welt / Piping

Today I want to show you a very simple way to cut 280 inches of continuous bias for welt cord (also called piping cord) from 1/2 yard of fabric. If you have no idea what I’m talking about, don’t panic. Let me back up just a little bit.
Do you know what welt cord is? Perhaps you’ve heard it called piping? Even if you’ve never heard the term, you’ve surely seen welt cord.
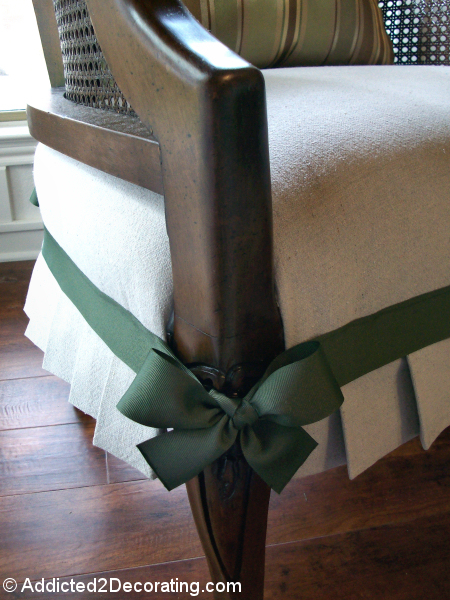
Welt cord is that fabric-covered cord that is used on upholstery, slipcovers, and other projects like some duvet covers, pillows, headboards, etc. My favorite projects with welt cord tend to be upholstery and slipcovers that use a contrasting color on the welt cord, like this dark gray slipcovered chair with contrasting white welt cord from Custom Slipcovers By Shelley.

Welt cord can often take a project from looking like a DIY project done by a novice, to looking like an upscale professional-quality project.
Very often I see DIYers finding thrift store furniture that came with welt cord, and reupholstering it without the welt cord. I understand why they do that, especially if they haven’t been sewing for very long. Cutting all of those bias* strips for welt cord and sewing all of those strips of fabric together can seem overwhelming, tedious, and time-consuming. But I’m telling you, it’s not as bad as you think.
*Bias is fabric that is cut on the diagonal. You may have heard of, and even used, bias tape. These are strips of fabric that were cut on the diagonal and then folded and pressed. Cutting fabric on the diagonal allows the fabric strips to be a little stretchy, making it easier to use around curves and corners without bunching, gathering, and wrinkling.

The conventional way of making bias is to cut lots of diagonal strips from your fabric, and then sit at the sewing machine tediously sewing all of the individual strips together one by one to form one long single strip of fabric.
I hate using that method, and I will admit to leaving welt cord off of more than one project because I didn’t want to take the time to do all of that tedious work. But I have since learned a much easier way to make one long continuous bias strip that requires sewing only one single seam.
Here’s how it’s done…
Start with 1/2 yard of fabric. I used 55-inch-wide fabric. Open the fabric up so that it’s just a single layer with the selvages on the sides, and the cut edges on top and bottom.

Next I used a bias ruler, which is a ruler that is cut at a 45-degree angle on one end. Obviously, you don’t have to actually purchase a bias ruler. You could easily make something similar out of heavy cardboard, or even a piece of wood that is cut at a 45-degree angle on one end. Whatever you use needs to be about 2.5 inches wide.
Starting with the ruler lined up with the bottom left corner of the fabric, use a pen or pencil to mark off the strips. (I used chalk so that you could easily see my marks on the dark fabric. I wouldn’t recommend that you use chalk.)

Continue marking the strips until you reach the top right corner on the other end of the fabric. Then on the last marked line only, cut off the excess fabric.

Now you’re going to fold and pin the top and bottom cut edges together. This is where the magic happens! Take the bottom right corner, and fold it to meet the first line on the top edge. The join the first line on the bottom edge with the second line on the top edge. And so on. Second line on bottom to third line on top. Third line on bottom to fourth line on top.

This is very important! When you’re pinning the edges together, you want the two lines to meet along the area where your seam will be rather than meeting on the edge of the fabric.
For example, I was going to use a standard 5/8-inch seam to sew the fabric, so I made sure that the lines were touching 5/8-inch from the edges of the fabric.

With the two edges pinned together, the fabric will naturally want to twist.

Now you’ll sew the two edges together. Like I mentioned above, I used a 5/8-inch seam. (The zipper foot isn’t necessary at this point. That’s just what was on my machine at the time.)

With the seam sewn, the fabric will look all twisted and unruly.

So reach your hand through the middle and turn the fabric right side out, like this. See the seam on the diagonal? Perfect! See the continuous chalk line that goes around the entire length of the tube of fabric? Find the beginning of the continuous strip (which will be the first corner that you pinned before sewing the seam), and start cutting along the line.

And cut, and cut, and cut some more.

Until you reach the other end of the tube of fabric. What you’re left with is the long, continuous piece of bias that has already been pieced together. No more sitting at the sewing machine while tediously piecing together strip after strip after strip of fabric.
You’re welcome. 😀

And now, of course, you’re ready to use your bias strip however you wish! I admit that I have never even once in my life made bias tape. On the rare occasions that I use bias tape, I purchase the pre-made stuff. I’ve only ever cut bias for welt cord.
And speaking of welt cord, there are different kinds available. Below you’ll see the two different ones that are available at my local fabric store. The one on the left has a twisted look to it, and it costs about three times more than the one on the right. The one on the right looks more like tubes of cotton held together with a mesh of threads wrapped around the outside to create the cord.

If you know me at all, you’d probably expect me to use the cheap one, right? Not so. I much prefer the one on the left, even though it’s quite a bit more expensive. I prefer it because it has a consistent size (the one on the right has thicker spots and thinner spots), and the one on the left feels heavier, more substantial, and more durable. Overall, I find that it’s easier to work with and the finished cord has a much nicer, smoother look.
To make the welt cord, find the end of the bias strip, and sandwich the cord into the strip.

Now using the zipper foot on your machine, sew the fabric together as close to the cord as possible without actually sewing on the cord.

Be sure that you’ve sandwiched the cord into the fabric so that the seams are facing the inside.

And when you get to a seam, simply open up the two sides (this reduces bulkiness), place the cord over the seam, and fold the fabric over the cord.

And when you’ve sewn the length of the cord, you’re left with this beautiful covered welt cord, ready and waiting to be used on your project!

Now when I’m using the welt cord on a part of the upholstery where it will be attached by stapling, I use the welt cord as is. However, if I’m going to be sewing the welt cord, I do this one extra step to ensure that the lip on the cord is the right size for my seam.
I take a piece of cardstock (or a piece of junk mail) and cut a short strip that is the width of the seam I will be using on my project (in this case, 5/8-inch wide), and use it as a guide to trim any excess fabric. Again, this extra step is something I do only if I’ll be sewing with the cord.

And that’s it! Now you’re ready to add welt cord to your project!

I used this particular welt cord on my dining chair makeover. Tomorrow I’ll show you the step-by-step process for upholstering dining chairs using welt cord.

Addicted 2 Decorating is where I share my DIY and decorating journey as I remodel and decorate the 1948 fixer upper that my husband, Matt, and I bought in 2013. Matt has M.S. and is unable to do physical work, so I do the majority of the work on the house by myself. You can learn more about me here.


Omg. It seems so hard ….
Alex, it’s really not difficult at all. I think if you were to take it step by step and do it once, it would all “click” and become very clear, and from then on it would be very simple for you.
Okay, I’ve been sewing for a zillion years and that is the most brilliant explanation and technique I have ever seen! BRILLIANT, I tell you!!
Thanks for the tutorial! Can’t wait to give it a shot on an ottoman I’ve been trying to sell because reupholstering it properly was not an appealing option. I can’t wait to try it now!
Diane, I’ve sewn since I was in high school, and I only recently learned this technique. If only I had learned about it 20 years ago!!! Better late than never, I suppose. 🙂 Have fun working on your ottoman!
Christi- This is a great, very clear tutorial! I’ve sewn all my life but had not made piping for quite some time. I searched the web a few months ago for instructions to jog my memory and found nothing so straight forward. I have no idea how tags or what ever works, but if you can make your post come up for those searching not only welting…but piping (the term that must have been used in my sewing classes many decades ago! Maybe that’s regional?)
It really isn’t that hard – and so worth taking the time to do. Thank you so much!!!!
Thanks for the tip, Heather! I’ll definitely add “piping” to my key words. I’ve heard it called that as well. In fact, that’s what I’ve called it most of my life. It was only in the last few years that I realized most pros call it “welt”. I tend to use the terms interchangeably now.
Heather, Christi is in my state and I’ve also only ever heard piping! I think welt might be the technical term, since I’m pretty sure it’s a play on “warp and weft”, because you need both to get welt.
no. obviously it is because it is like a pipe no duh
delete my comment above. thought they were wondering where word piping came from. and thats cool to learn where welt probably came from and i agree.
oh but i already analayzed this long ago, i believe welt comes from, like if you get whipped you get welts…a long thin object
Erin,
Even if you did think that they were talking about the word piping and where it came from, it doesn’t warrant such a rude comment. In the future you should probably think before speaking or typing, that way it will save you from looking like a jerk.
That.is.GENIUS! After a grueling experience, I have been foregoing the welting because of all the work, but this is such a great tutorial, it makes me want to try another project with it!! Thanks for such a wonderful explanation and step by step pictures. Love all the pictures you include in your posts! Sharon
Thank you so much for the straight forward photos and explanation. I have two chairs sitting in my basement waiting for me to figure out how to make piping. Which is the term I learned many many years ago from my grandmother who was a seamstress.
I read somewhere about using cotton clothesline for the piping. Was thinking about checking Walmart today to see if it’ll work…thought it would be a lot less expensive. I’ll let you know if I think it’ll work!
Oh my gosh…absolutely brilliant!
Your explanation is so clear and I can’t wait to do this!!
Amazing!!! Wish I had known that many years ago. And your instructions are so clear. Thanks.!
Thank you!!! I’m going to stash this post away for when I get brave enough to try it! I think it’s gonna be soon! 🙂
I could have used this on saturday! I did an ottoman with the same kind of piping. I totally agree with you that piping can make the world of difference and that after re upholstering quite a bit of things with welt, it’s much better to get the more expensive welt! great tutorial, I’ll be trying it soon, thanks!
OH MY MUFFINS! Thank you SO MUCH! Yep, I’m one of those who just skipped the welt cord — but no more! I almost can’t wait to make some!
This gives me hope and inspiration, Thank you, thank you!
Wow! Thanks for this post! I am a beginner sewer and was curious about a few things and all of a sudden all the posts I read have something new about sewing that I didn’t know. Very helpful!! Thank you so much!!!
Thank you so much!! I watched a friend do this once but she wasn’t able to explain to me how. She had a name for this method, but I can’t remember exactly what it was, something like fascia?? I too have searched for this simple way to do this, but came of lacking, so thank you for posting this!!
This is a great tutorial. It’s quite definitive and I liked that you explained it step by step. I understand what you mean about the job looking unprofessional without welt cords. I did some cushions recently and added some welt cord around the edges. They were the best cushions I’ve made. They look store bought.
Thanks for the tutorial!! I am okay at basic sewing but never really understood how to cord something. I’m totally gonna try it now.
Thanks!
Thank you so very much for sharing this! I tried this technique for the first time and it worked like a charm. It was much easier than the traditional way and saved me so much time. Thanks again Kristi 🙂
This is the coolest sewing tip I think I have ever seen! I HATE making welting, and I have been doing it the traditional way. If I am going to go to the trouble of making a slipcover, I always make welting too, it really sets the piece off, but I dread it. I am going to be making some soon, as one of my slipcover projects has now jumped up in line! I love that you use an old cardboard tube to wrap it around too, I always wad mine up and throw it in a drawer, only to be frustrated with how it looks when I take it out. (I often work harder, not smarter!). I am pinning this so I can refer back to this awesome tutorial. Thank you! Once again, you have made something in my life so much easier!
Great tip. Thanks. I will definately use this to make bias and welt strips.
Kristi, Wow! This looks really neat! Will the technique work with a larger piece of fabric — say 45″ or 54″? Or, do I need to use multiple 1/2-yd. sections?
Hi Cynthia~
I’m sure you could use larger fabric. Just depends on how much weld cord you need. 🙂
I need to use this technique to make piping/cording for a doctoral graduation robe. Thank you for posting this tutorial. I have one question: You stated
“This is very important! When you’re pinning the edges together, you want the two lines to meet along the area where your seam will be rather than meeting on the edge of the fabric. For example, I was going to use a standard 5/8-inch seam to sew the fabric, so I made sure that the lines were touching 5/8-inch from the edges of the fabric.”
But the pictures look like the fabric is meeting on the cut edges. What did I miss?
I was just analyzing this myself. I’m sure she’ll reply, but what I think she means is your “chalk” lines have to be touching where your thread will sew through, not necessarily on the ends of the fabric edge. That way when you are cutting on the chalk line, you line will continue straight at the seam, and all will be straight. I hope this helps! I haven’t made it this way yet, but plan on practicing on some muslin to get the technique before using an important piece of fabric.
And to someone who commented about cotton roping from Walmart for welting, I must say that has been what I’ve been using for a years now. It’s pretty consistent in width, and is very economical. Happy sewing to all!
Laura,
Thanks for clarifying for us. I used this method many years ago and thought it was fabulous, but when I tried to find the method in all my books, I could not find it. So glad it was what popped up when I googled it. I too needed a bit more explanation to avoid some second guessing. Question to you all-how wide do I need to draw my strips if I am covering a 3/8″ cord and sewing it in pillows with a 1/2″ seam allowance? Thanks again, Jeanne
Wow, sending huge pats on your back thru the internet! This is the most incredible tutorial! I make a ton of welting, traditional, frustrating method way. No more! Can’t wait to get home and try it! Thanks is not sufficient, but thank you!!!!!!
You’re right … I’ve been intimidated by furniture upholstery projects that have welting. There’s a chair waiting in my basement right now. It has a box cushion and welt cording, and I have been simply scared of it. You’ve given me a bit of confidence that I can tackle it. And, hey, the chair only cost me $4, so if it’s a disaster, I’m just out $4 and a few supplies!
Great tutorial ! Very well explained ! I think that the term PIPING is used on clothing while WELTING is used on furniture and draperies . . . in any event, it IS the same thing and is made the same way. I have never seen the idea to sew the material together BEFORE cutting ! LOVE that ! I can’t tell you HOW many times I have sat at my sewing machine trying to piece the strips together in the right way ! hahaha ! Brilliant !
I DO have to add that the width of the strips will be determined by the size of the cording material to be inserted inside . . . for example, I recently made two large 26″ square pillows and I used 1 inch diameter cord material (in order to be balanced, the large size of the pillows dictated that I use a MUCH larger welting than what Kristi has shown). To determine the width of the strips you will need, use a cloth measuring tape and measure the circumference (around the outside) of the cord and add 1.25 inches (for the seam allowance of 5/8 inch). For instance, a 1 inch diameter cord will measure about 3 1/8 inches AROUND . . . then add 1.25 inches for the seam (5/8 x 2) . . . for a total of 4 3/8 inches wide strips.
I hope this helps and has not muddied the great tutorial ! Thanks !
I have made yards and yards of bias strips this way; it’s great. However, when I was using it for welting, I glued it with fabric glue rather than sewing. It just made it easier and quicker.
You are my idol! I can’t believe this works…. and I was able to pull it off!!! Thank you!
THANKS for POSTING THIS! I’ve used this method for nearly 30 years, but lost my directions and couldn’t remember how. I cannot get over the number of tutorials on the net that show the old, tedious method! (Ludites!) Yes – this can be confusing, but it is SO WORTH forging on and figuring it out. Great photos.
Kristi,
This is a wonderful tutorial, and a magic trick indeed. The only question I have is how much welt cord you got from 1/2 yard of fabric – i’m just trying to figure out how much fabric I’ll need to make, say, 20 yards of welting. Thanks!
Kristi, thanks so much for this tutorial. I’m assuming that if 1/2 yd makes 280 inches, one yd of fabric makes double that? This is truly GENIUS, I can’t tell you how tedious (and at time confusing) it is sewing strips together. I just subscribed to your blog and can’t wait for more tips. Thanks!
I had directions for using this method of making cording but lost them 30 years ago . I am in the middle of a large project ( redecorating my granddaughters den) and am covering an ottoman and making throw pillows. I need to make about 30 yards of cording. I thought I was going to have to cut bias strips and sew them together. Finding your website was a blessing.
What a brilliant technique! I’m a textiles teacher and will be sharing this with my colleagues as well as utilising it on the sofa I am in the middle of making! Such a time saver!
I did an online search for this topic and was pleasantly surprised to find that your tutorial was one of the first results. From now on I’ll start by searching your blog posts first!
I was wondering if it is possible to use this method for stripes or velvets? I usually make the welting the very tiring and old fashioned way, but after seeing this want to try it! But I have 2 striped outdoor lounge cushions to do..does anyone know?
thanks
Thank you so much! This was my first search as I am contemplating re-uphostering my living room furniture! Didn’t expect to find such helpful advice with my first click! Ready to get started!
I am planning to recover a dozen dining room chairs and reupholster an old rocker. Haven’t done this in decades and was dreading making the piping. This looks so much easier. thanks.
Stanley
Thank you so much for this! I am making throw pillows with stencil designs on them. On the cording, I couldn’t find any in my super store and am not near a real sewing store so I purchased clothesline cord. It’s a nice uniform shape as well and no one will ever know. It comes in cotton and other materials. Brenda
I’ve been dying to try this! I love anything with piping/welting! I am trying this technique with 1 yard of fabric that is only 42.5 inches wide. I am having trouble getting the pinning right. When I try to pin so that the lines match up at 5/8 inch, the edges are no where near to being even and it is therefore impossible to sew a seam. Any suggestions?
Yes, in my experience, oil self-levels much better than latex, especially if you use a paint additive like Penetrol.
Ummm….I think you may have replied to the wrong person. I didn’t ask about paint. 🙂 I was inquiring about continuous bias with 1 yard instead of a 1/2 yard and that I’m having difficulty with it. Any thoughts on that? By the way, how many yards of bias do you get from a 1/2 yard of fabric? Thanks! Kelli
Oh my goodness. This is going to be such a timesaver. I wish I had known this on my last two slipcover adventures! I have more to come, and I will definitely give this a try…right after I buy that awesome ruler! Thank you for all the tips and projects.
Thanks so much! I tried your method and it worked like a charm. This is the first time that I have attempted making welting and your step by step instructions with pictures walked me right through it. It came out beautifully.
Thank you! I used to do this long ago, but couldn’t remember how to do it. Your directions were so straight forward and easy to follow. Hopefully I won’t forget again, but if I do, I know where to look!
I’ve measured, pinned and cut and I have 8 yards of continuous fabric, YAY! Now to add the cording. Thanks so much for your clear directions and photos, Kristi.
I have used this method before and it is wonderful. I need to make 60 yards of piping – do you know if you can do this method with more yardage than just 1/2 yard of fabric?? Such as 4.5 yards? Would it work the same?? Thank you for your help!!
This is fantastic. I made welting/cording using this technique yesterday for some pillow covers I am making for my daughter. I ran into a hiccup when I lined up the chalk marks, because I didn’t take into account the 5/8″ seam allowance. It was an easy fix and after I lined it up correctly, it turned out beautiful.
This is great!!! Thanks a million! Need to bookmark/pin for the next time I need it. I made a little mistake by not looking at how the arrows pointed to the NEXT line….but it was easily fixed and now I have six yards of courduroy welting that, even if I’d wanted to buy, I would have never found in the right color/size. I had read about this before but your pictures and explanation made it very easy to grassp. Really appreciate it!
Amazing! I totally just made a mile of welting! I will be using it to redo my dining chair covers. So easy. I didn’t think it would work or that I would mess it up but it worked. Awesome tutorial. Thank you.
I need at least twice this much piping, so do you recommend using one yard at a time or still use a half yard? Thanks
You can use as much fabric as you need to make as much welt as you need.
This is great! Can you please verify that when you are marking your strips, you mark them on the RIGHT side of the fabric?
Yes, it’s on the right side of the fabric.
Thank you for the quick reply! I need about twice as much piping so will try it with a yard of fabric. I am so excited to try this! Thanks again!
it doesnt matter which side you draw the lines
I’ve been sewing since I was about 10 years old….. 40 plus years. This is the coolest trick in the history of sewing! I made 30 yards of piping in no time at all. Thank you!!!
Thank you so much for the terrific instructions and photos – THE BEST! I so appreciate people who provide things like this on the internet. I am making a duvet cover and want to pipe it with a great bias contrast fabric and I’m now ready to go forward with my project.
Great tip!! I have a question – is it true that piping cords need to be Washed BEFORE you make the slipcovers, so to prevent it from “buckling”?? I heard this on DIY’s John French.
A millions thanks for this excellent tutorial! A great idea well explained.
I haven’t done any real sewing in a while, but it seems that using chalk to mark your fabric is common, so not to be advised against. After all, your marking what will be “the wrong side” of the fabric. And don’t tailors use chalk all the time?
Oops.A million thanks that is. Or millions of thanks–even better!
Thanks I recently made some strips for edging on pillows and had trouble with having a wavy or rippled bias when I sewed it closely over cording. What am I doing wrong. Don’t know how to correct this. I pinned closely along seam line
i tried this once and immediately saw that it is not faster and is more tedious as you cant cut the bias as fast as when the fabric lies flat on table.
sewing individual bias ends together is easy when you sew them in a chain, without stopping to cut thread and snip the thread after. (hard to explain without a picture).
This is a GREAT hack. I’ve done welting the old-fashioned way, and this is a giant improvement. THANK YOU!
Oh. My. God. You have just saved me a HUGE amount of time, and eliminated the panic I was going through when I thought I hadn’t bought enough fabric to make all my piping. Bless you!!!
Genius! Can’t wait to try this method.
I know it is an old post but thank you! I have been stalling making two long cushions for some window seats in my house because I just couldn’t face making that much piping. Your technique actually looks fun. I hope that I will have them made by the end of this weekend. Best. Cathy
I noticed in the comments that you say you can use more fabric if you need more welting. I’ve got a piece that is 45″ wide by about a yard and a quarter long. I cannot for the life of me figure out how to make this work with a longer length of fabric! Please help me! I need to get this done by tomorrow and would really rather not have to do it the old way. Thanks!
Thank you so much! We just built a house with a lovely window seat. I had to cover 4 22×29 cushions and make pillows. I’ve done a lot of sewing in my life and I was really dreading all the work that goes into making a bias piping.
Your method is brilliant!!! I had a little difficulty working my mind around HOW this method would really wor, but once I was able to visualize it, I was fine. This is the handiest tip I’ve found in many years.
Thank you so very much!
Hi! We are trying to make my sons crib bedding! The bumper we found was 165.00 and way above our budget for the entire crib set! Now, we have the fabric but are struggling with the piping aspect! Is there cord that is 1/4 inch? Is there pre-made piping that is 1/4 inch? Help! New momma is so so confused!!
Who knew that was possible. Absolute genius. Thanks so much!
Just now reading this in 2017 and I must say “thank you!” This is a very smart and easy way to do this and I thank you for sharing it. Now, I just have to get up the courage to make that chair cover 😉
I just wanted to let you know that I love your tutorial. I’ve done several upholstery projects in the last couple of years that I’ve blogged about ( http://tilemosaics.blogspot.com/2017/02/seat-cushions.html ) and I always link back to your tutorial when I make my bias tape and piping. Your tutorial is the easiest with the clearest descriptions that I have found. Thanks for taking the time to make it.
Is there a good online calculator for figuring out how much yardage you need and how wide you need to cut it to cover the circumference of the cording rope?
Does this method work with fabric that has a nap?
I am using a meter of fabric that is 54” wide. When I start making the 45 degree markings at the bottom left corner and finish at the top right, I only end up with 3 strips (I’m making them 3” wide for double piping) Do you then draw lines to the left of the corner?
I must be doing something wrong because there are many more strips in the diagram and when I try to pin them as described it’s not working properly.
Does anyone have any idea on what I’m doing wrong?
This is an excellent tutorial on making welt cord (or piping!). I, like you suggest others have done, considered making a new bench seat cushion without the welt due to the tedious nature of sewing the strips together. YUK. But, this works like a charm. So very easy – just follow your wonderfully detailed instructions. One thing I would mention for duddle heads like myself – maybe indicate that the lines need to be drawn on the RIGHT side of the fabric. I wasn’t really thinking it through so first time I did on the wrong side since it was easier to see and that was WRONG – when reviewed before sewing I realized that I would have the seam allowance on the wrong side so I had to redraw the lines on the right side. Not a big deal but just thought I would mention. Thanks so much for this.
hello
Im making a duvet cover. I need 17 yards of welting. I really didn’t want to make my own for the reasons you mentioned your idea looks great. i have one question. I have no idea how much welting one yard of fabric makes. 45 or 60 inch. can you help me this that.
Thanks
Lori
If I need more than 280 inches of piping (more than twice as much) can I use 1 yard of fabric instead of half a yard? will this method still work?
Yes, that will work.
Kristi, I ultimately decided to forego the piping – but I had to comment because this was one of the best, most clearly written and photographed tutorials I’ve ever seen. You should give lessons to everyone else on the web. Whenever I had a question as I was reading through your process, you answered it in the next paragraph or picture with complete clarity. Kudos on your communication skills!
I was going to forgo the piping on a DYI project until I came across this. (I REALLY did not want to have to piece together a bunch of strips!) This made is so quick and sooo easy. Thank you!
Awesome tutorial! Your photos and explanation made it so clear. I have tried this, thanks to your tutorial, and came out with a length of bias tape that goes on for days! I made a bench cushion cover with contrast piping and the piping was the easiest part.
This is awesome, and I’m going to use it. I actually need about 280″ of welt cording for my fabric covered cornice. Now I can make it much more easily and with less little fabric.
I am interested whether you’ve ever tried this with a 30 degree bias, and whether this would help with less frequent seams, or a substantially better yield?
Thanks!
I haven’t tried it, but if you do, please let us now how it works!
Okay, I did make strips on a 30 degree bias, but I realized that the angles at the ends would not be 45 degrees, so I made the strips the old-fashioned way. But, it is better for using less fabric, as well as getting longer strips. I had watched a youtube video by an upholsterer, and he said most in the profession use a 60″ bias, which I misunderstood as 60 degrees! What they do is take a 60″ ruler and place it on the fabric at the angle for which it will be the full 60 inches, so it’s at a narrow angle bias, but it’s enough for the fabric to give a little. That way you get strips all the same length, and waste less fabric. You then just place pairs at 90 degrees with overlap, and sew your seams across at 45 degrees.
Kristi – could you make a video of this? I think it would be much easier to understand watching you doing it. Thanks.
This worked perfectly with a canvas fabric for a slipcover….my first one, and this made the whole process so easy. I made a “cardboard” ruler which worked great. Many many thanks! It gave me so much confidence to tackle the whole project before I got started with pin fitting (which was easier than it looks). The key to slipcovers is patience and plenty of time to get details and measurements right.
This has saved a project wih expensive and dwindling yardage, thank you so much!
I’ll only repeat what so many people say in here, it is GENIUS and I have too been sewing for ever too!!! Thanks to you, the dreaded tedious assembling of the strips task is resolved.
To save time:
on the part before last of your tutorial, “I take a piece of cardstock (or a piece of junk mail) and cut a short strip that is the width of the seam I will be using on my project (in this case, 5/8-inch wide), and use it as a guide to trim any excess fabric. ”
I just SAW along the edge of the whole length of the finished strip to my allowance as a guide, and then trim.
Thank you! I sure thought this sounds next to impossible but with your instructions I DID IT! WOW, I feel like I’m on top of the world. Old dogs can learn new tricks!
Hi Kristi! Do you prewash your fabric? I am using duck canvas and will be making piping (this tutorial is great). Would like your thoughts on pre-washing.
If I’m making something that will be washed regularly (e.g., a pillow cover), then I’ll prewash. If I’m making welt cord for upholstery or anything else that will never be washed, then I don’t prewash.
OH MY GOD YOU JUST BLEW MY MIND KRISTI!!! I can’t tell you how many times I’ve looked for tricks to make cutting bias cord cover easier & less time consuming… only thing I ever seem to find is people who choose NOT to cut on the bias.
This is SO EXCITING, thank you so much for sharing! I’m off to make myself some bias cord cover I’ve been putting off 🙂
I’m going to give this a try. I do wish there were printable instructions so that I won’t have to refer back to this tutorial though.
Absolutely fantastic. Thank you so much for saving time and energy on this tedious task.
I realize this post was made quite a few years ago, but that doesn’t take away from the fact that this is a brilliant idea and a big time-saver! I’ve been sewing for over sixty years and have made welting many times; always doing the the laborious task of stitching many pieces together. I batch sew it but it still takes longer than this technique. So thanks for the tip!!
p.s. Another good way to store your finished welting is to wrap it around a pool noodle. With their length, they’ll hold A LOT of welting! They’re also good for holding your ready-to-sew cut pieces (of slip covers or fashion fabric) to keep them neat and tidy until you’re ready for them. Roll them on in order of use – last piece wrapped on first, etc. – and you’ll thank yourself as you begin assembling your project. And if your project is going to stay wrapped for a while, use some brown wrapping paper (I’m always getting lots of it in packages) around it and tape in place. It will protect you fabric from light and dust, plus keep it tidy until you’re ready for it.
This is an excellent tutorial! Thanks for writing it up. Very impressive! I am
Planning on buying it premade but I wanted to see what went into it. This was so clear!