House Tour
After living in a condo for seven years, Matt and I purchased our 1948 fixer upper in August 2013. After we purchased the house, I spent some time removing all of the old carpet, removing a built-in closet that wasn’t original to the house, and refinishing all of the original hardwood floors before we actually moved into the house in October 2013.


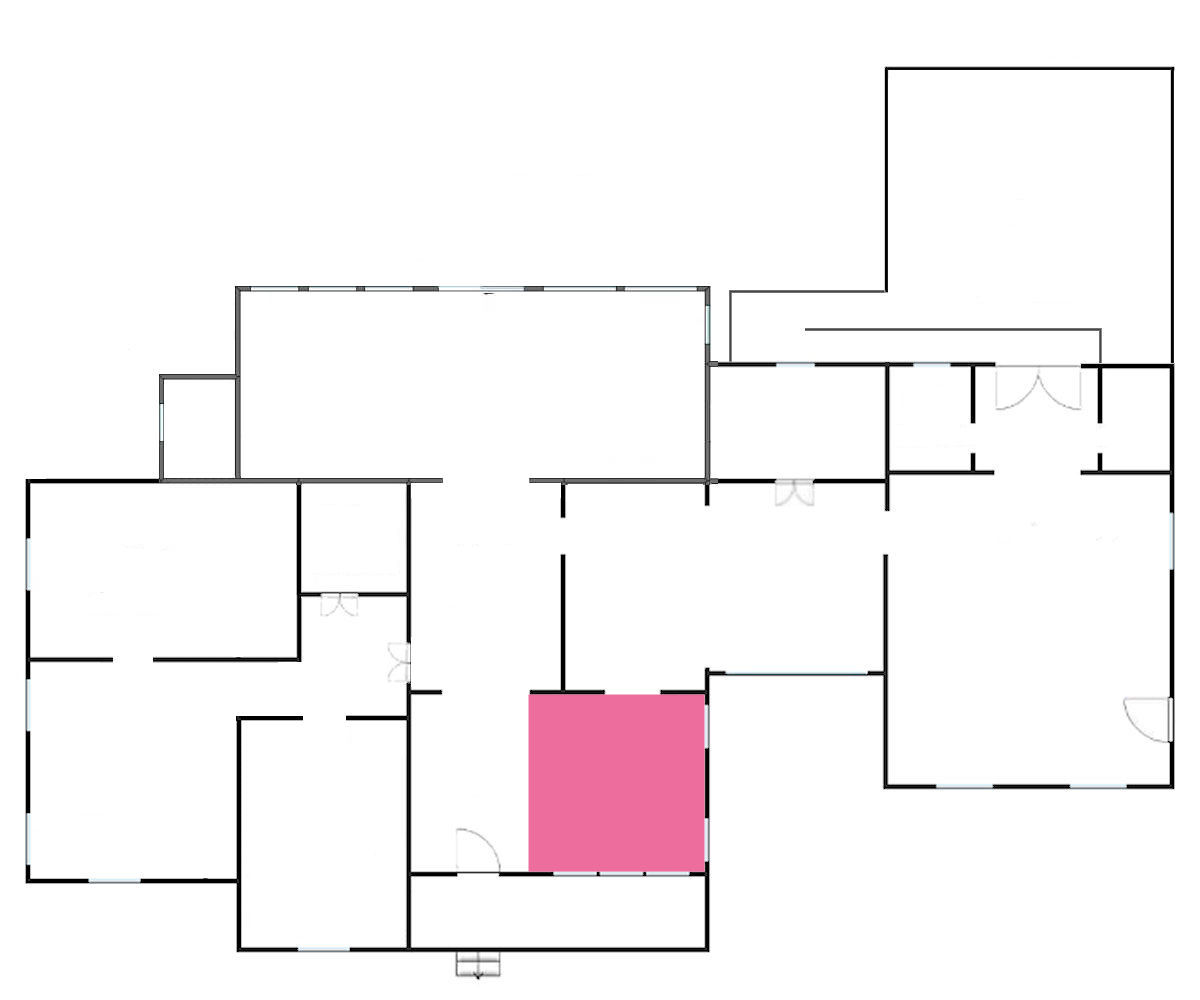
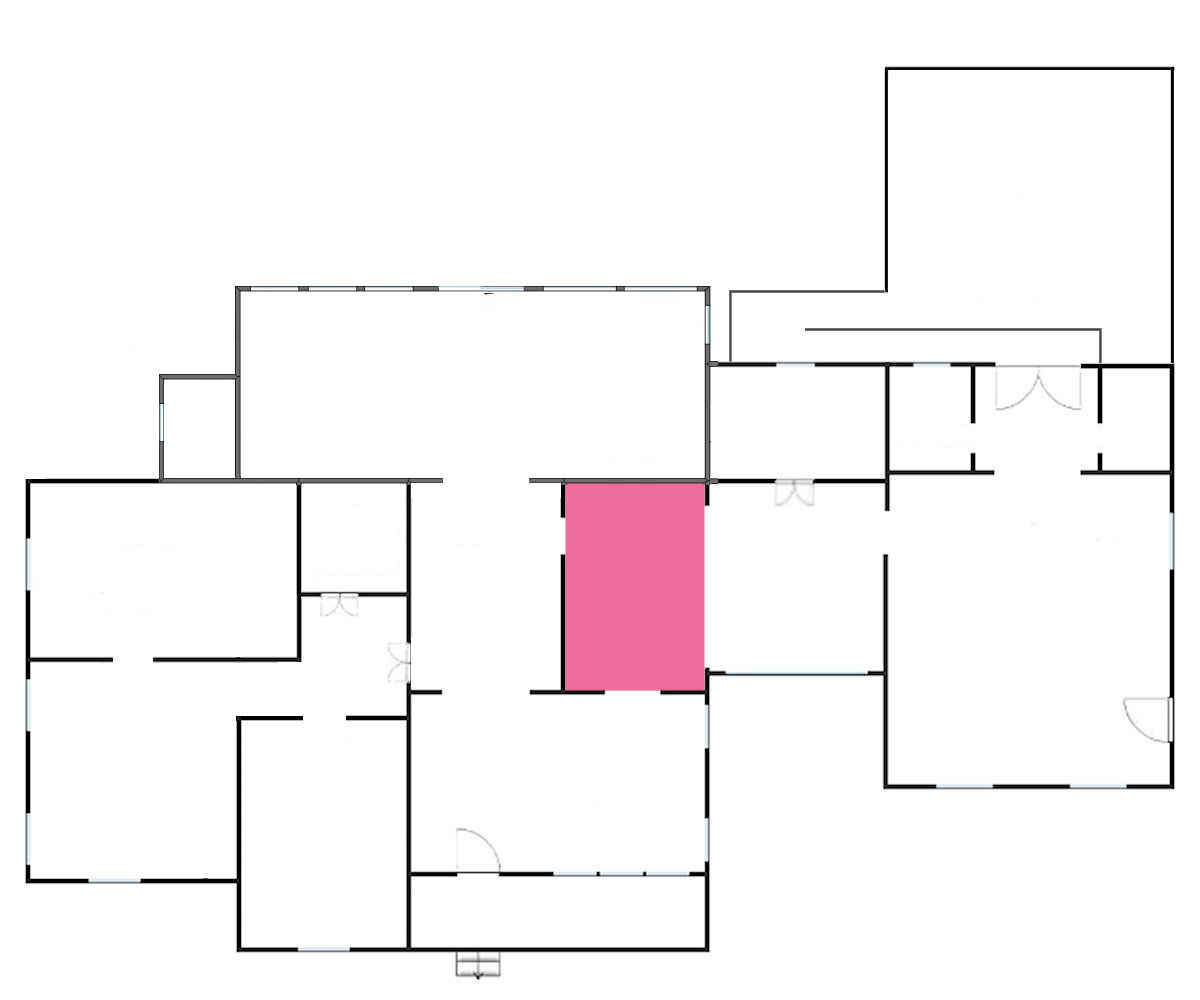
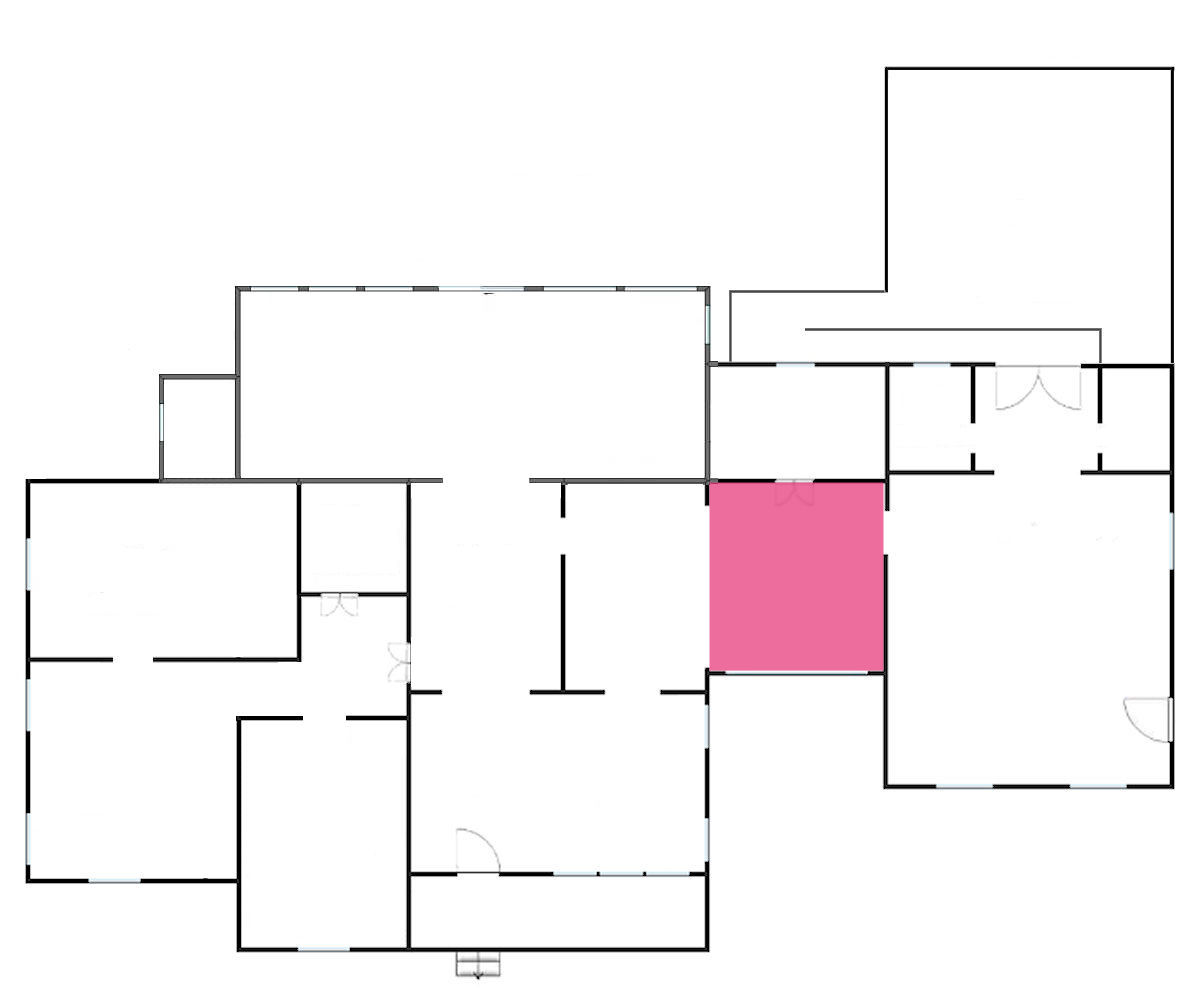
Floor Plan
ORIGINAL FLOOR PLAN:
This is what the house floor plan looked like when we bought the house in 2013.
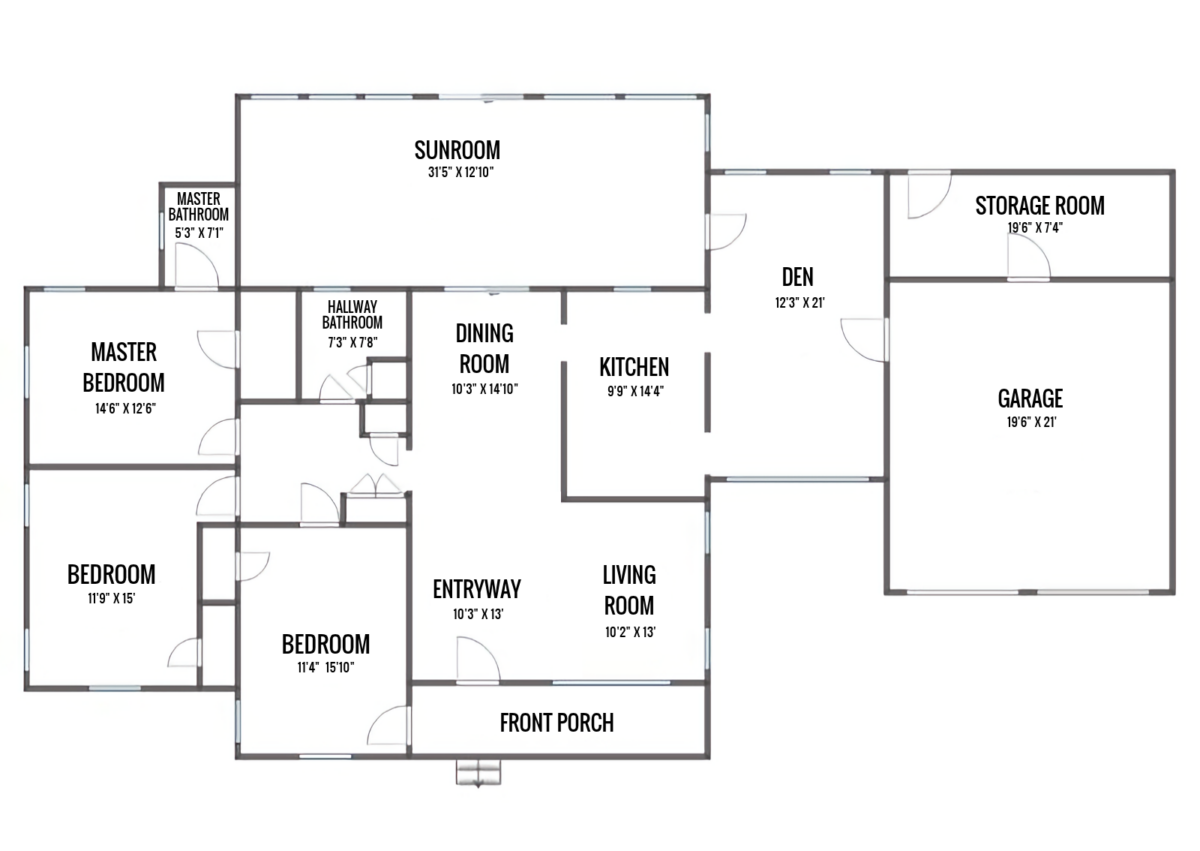
When we bought the house, the floor plan was what I would call “a good start,” but I thought it could be improved upon.
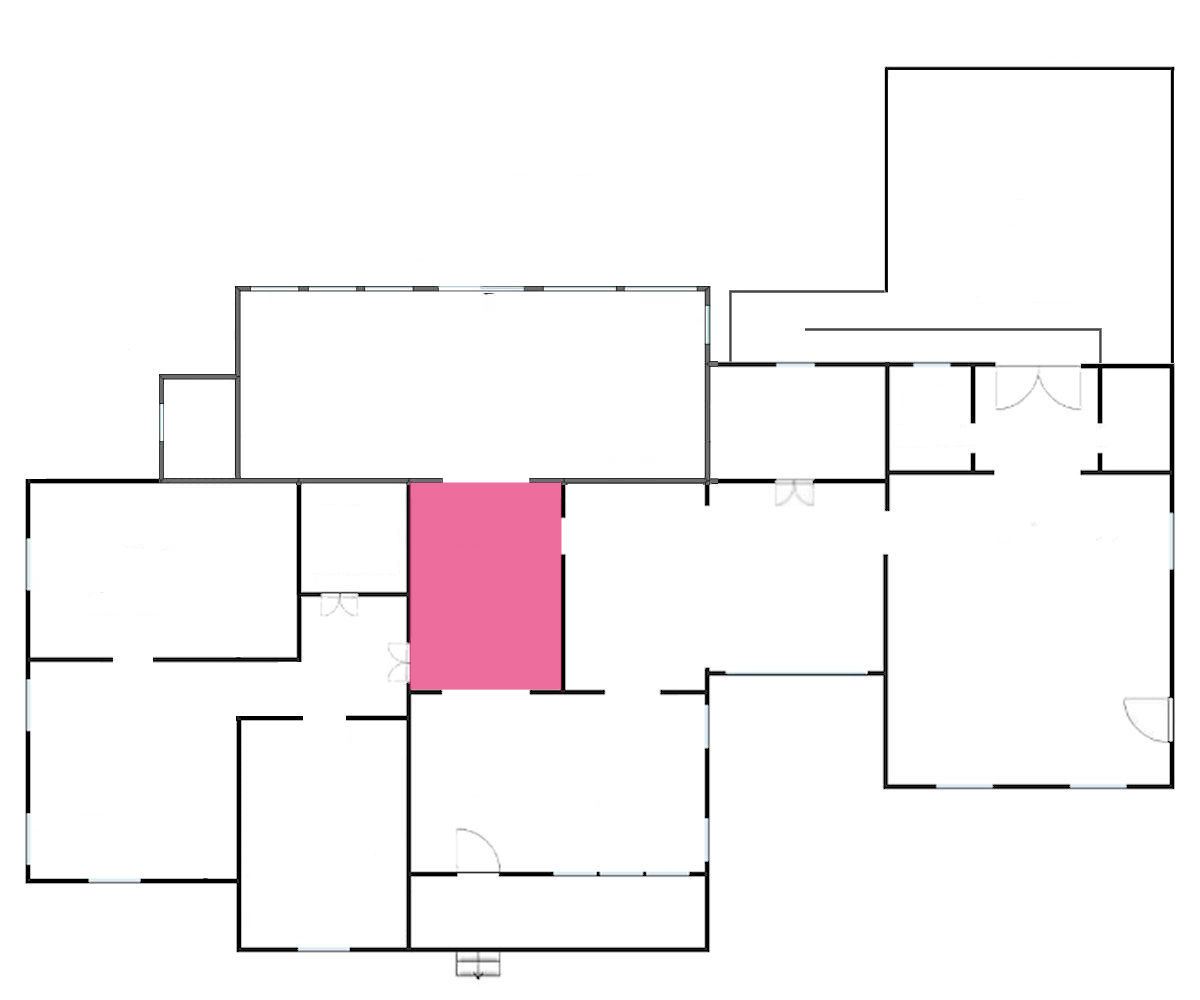
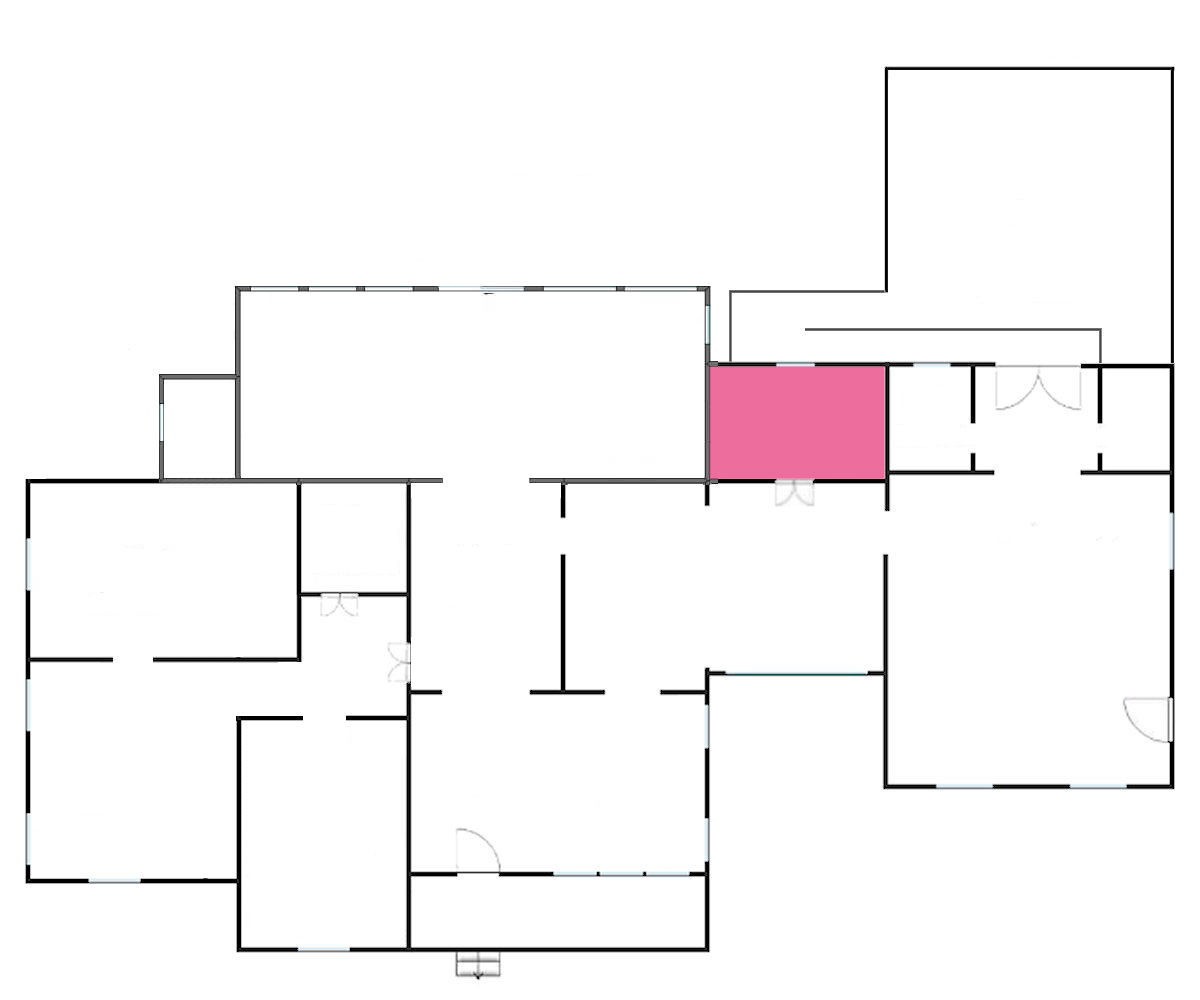
CURRENT FLOOR PLAN (SPRING 2025):
Our house has undergone significant changes, with more to come. As of right now, this is what our floor plan looks like.

I’ve turned a three-bedroom house into a one-bedroom house, which I know sounds crazy, but it works for us! The original master bedroom has been turned into a large, wheelchair-accessible master bathroom. The second bedroom (which served as our home gym for a while) will now be our master bedroom. And the third bedroom (which served as our main bedroom for a while, even though I called it the guest bedroom) is now a walk-in closet and laundry room combination. For now, the hallway bathroom (guest bathroom) still sits inside the master bedroom suite, which is strange (I know!), but scroll down to see where we’re headed. Once we have the new addition built, the current hallway bathroom will be turned into a storage closet for the master bedroom suite, and we’ll have a new guest bathroom in another location.
THE LONG-TERM GOAL:
This is the long-term goal for our house.

The current kitchen will become the dining room. The current sitting room (former breakfast room) and walk-in pantry will become our new kitchen. We’ll add on a living room, guest bedroom (which we’ll probably use as a home gym), and guest bathroom. The current studio bathroom will become a walk-through pantry for easy access from the carport to the kitchen.
In order to build our planned addition, we will have to tear down the existing sunroom and the existing original (and very tiny) master bathroom. We don’t have an official start date for that addition. I want to get the new dining room, kitchen, and walk-through pantry done first, and I have no idea how long it will take me to do those areas first. When those are finished, we’ll start on the addition.
House Exterior & Yard
THE ORIGINAL HOUSE:
This is what our house looked like the day we bought it.
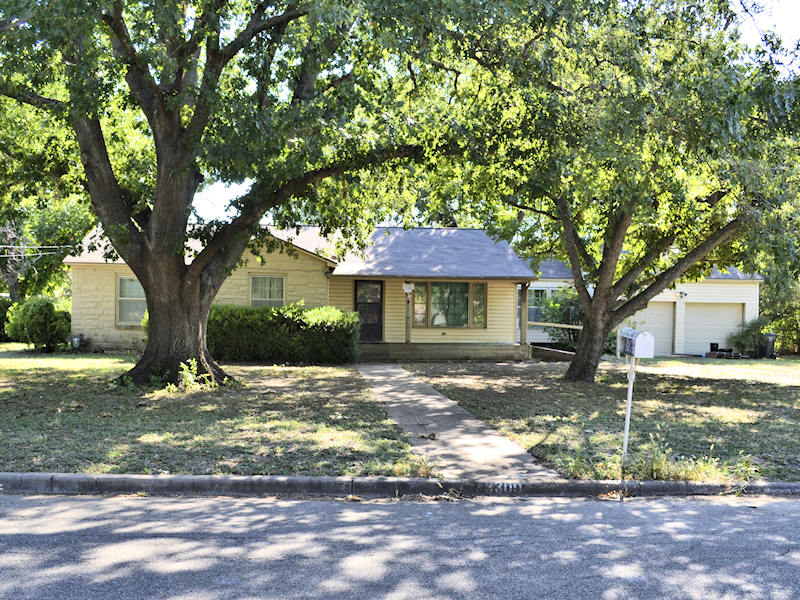
When we bought the house, the exterior looked tired and outdated, and the house had no curb appeal at all.
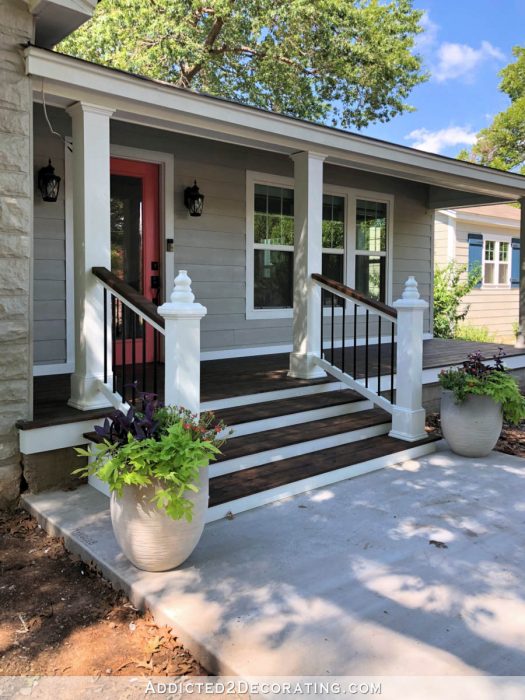
CURRENT:
I still have a long way to go (including lots of landscaping), but here’s what the front porch area of the house looks like now…
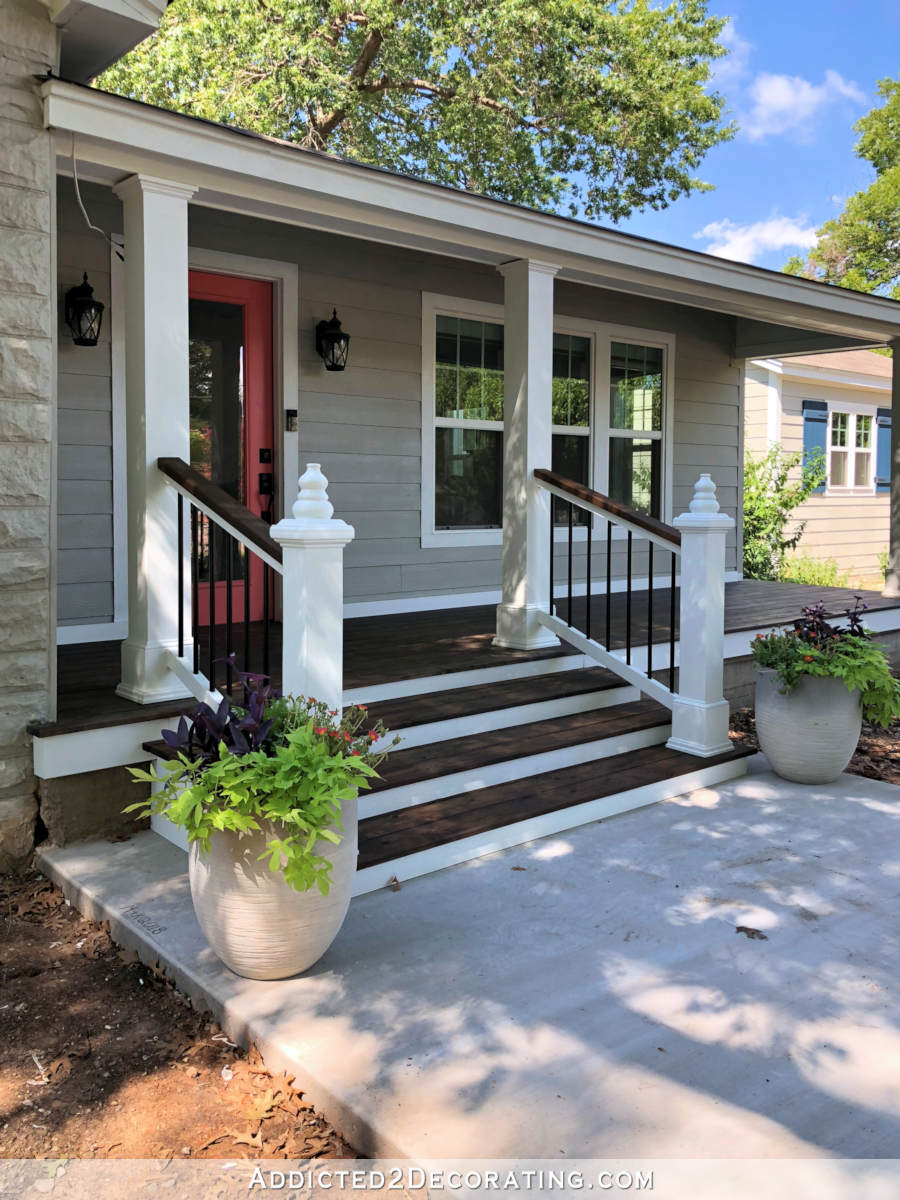
I don’t have a current photo showing the entire front of the house with all of the changes that have been made, but so far, we’ve converted the garage into my studio (so the garage doors have been removed and replaced with windows), the old vinyl siding has been replaced with HardiPlank siding, the front door and windows have been replaced, the house has been painted, new shutters have been installed, the front porch and steps have been completely redone, the old sidewalk has been replaced with a new wider sidewalk, and we had a new driveway poured that curves around the side of the house and to the carport (which we had built) at the back of my studio.
Our future plans include lots of landscaping, hardscaping, and landscape lighting. In fact, for my birthday in 2022, Matt paid for a local landscape designer to create an entire landscaping plan for our one-acre lot. Here’s a peek at what that looks like…
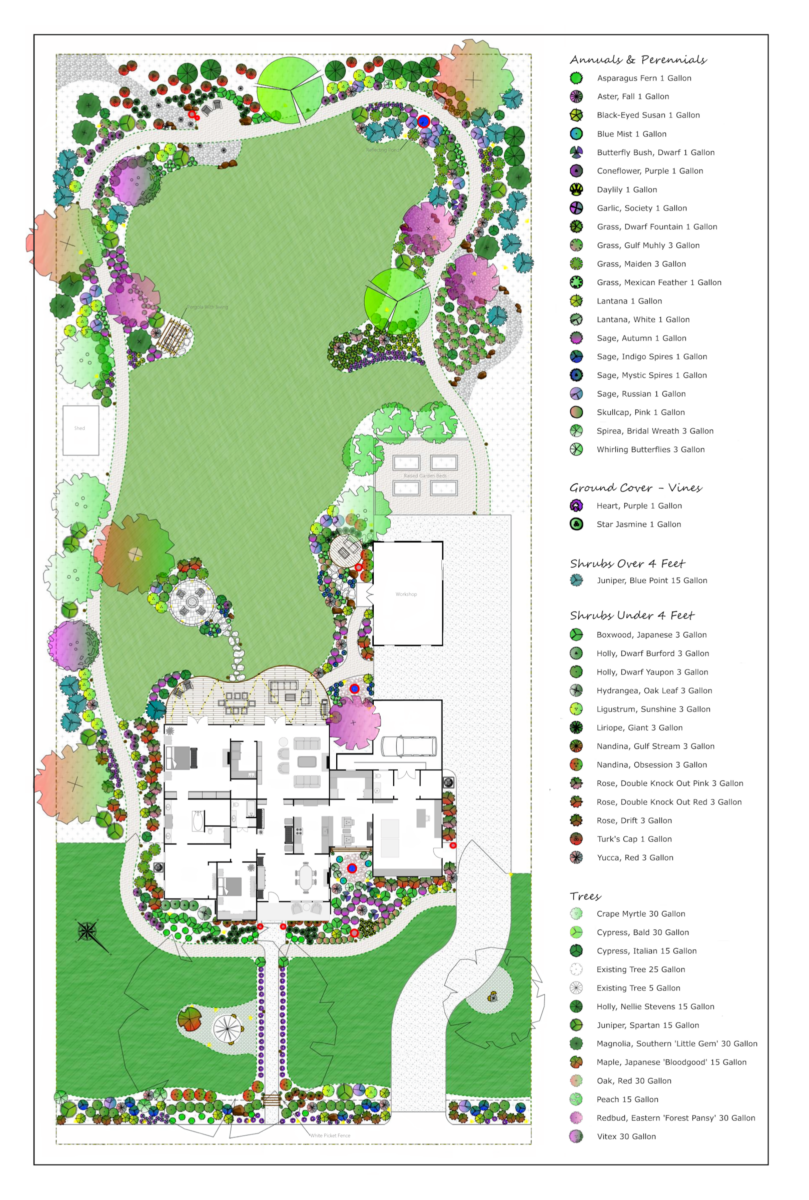
Obviously, that will be a very extensive and lengthy project that will take years and years to accomplish, but it’s fun to have a vision and a goal in mind.
Paint colors:
- Siding: Sherwin Williams Mindful Gray
- Trim: Sherwin Williams Extra White
- Front door: Benjamin Moore, Bird of Paradise
- Shutters: Benjamin Moore Gentleman’s Gray
- Front Porch & Carport Ceilings: Behr Air Blue
More About Our House Exterior & Yard

see all exterior &
yard diy projects

read all exterior &
yard blog posts
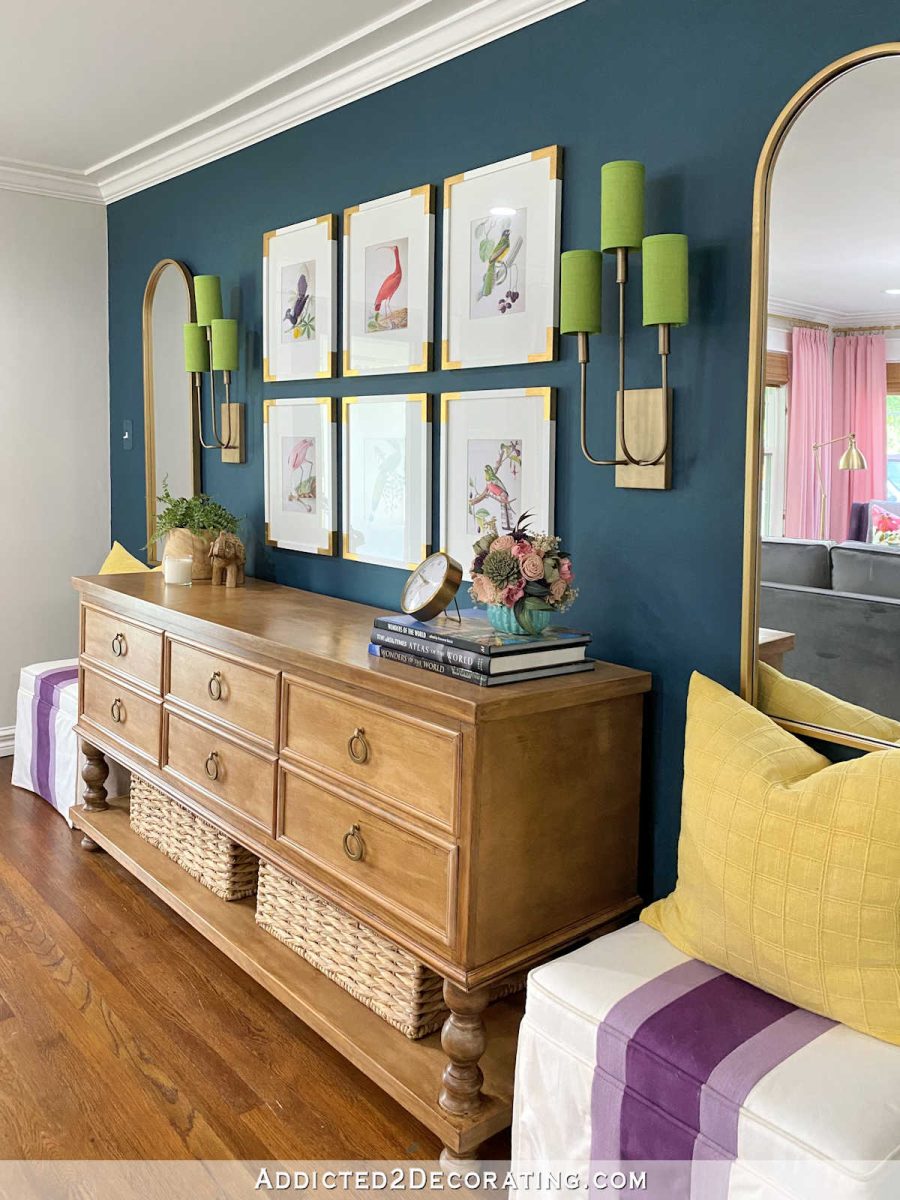
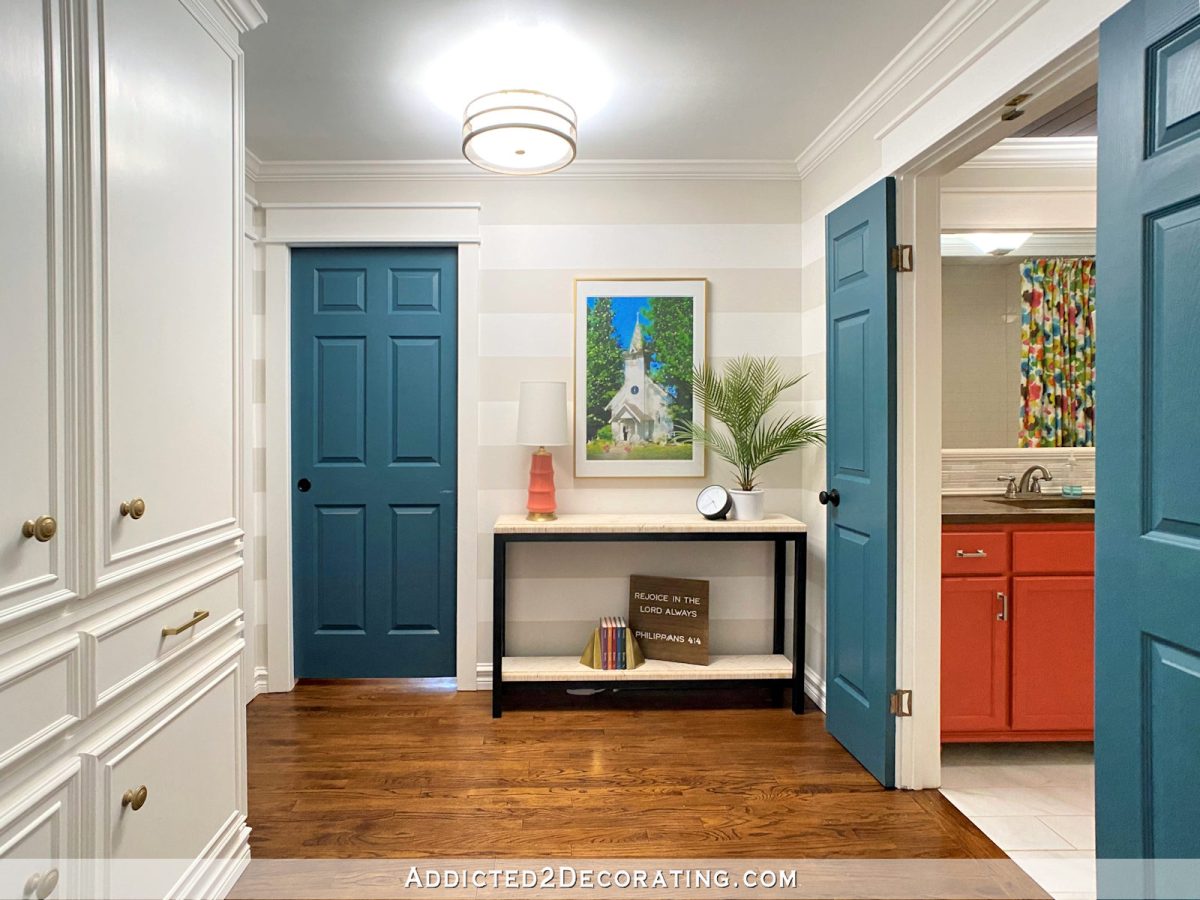
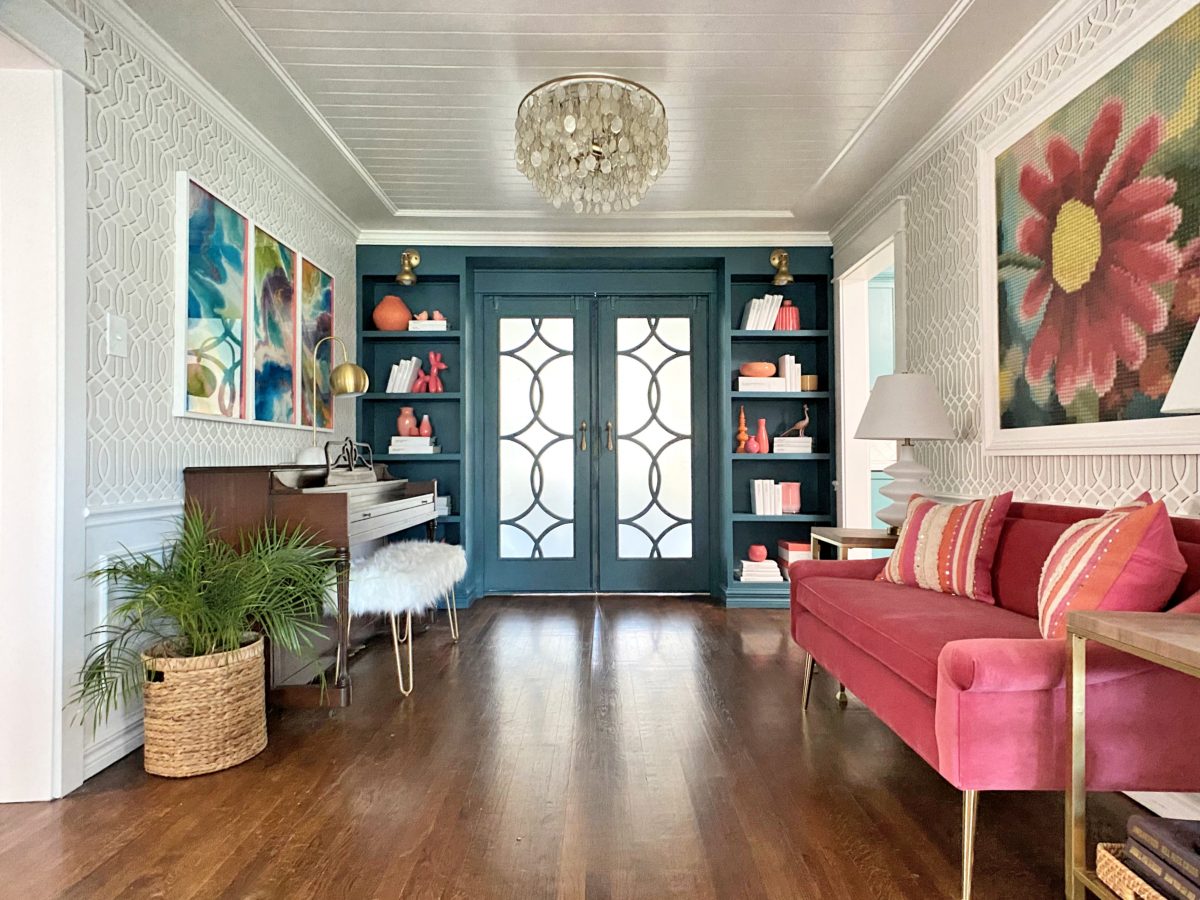
Entryway
Our house doesn’t actually have a separate entryway. The front door opens directly into a large living room. I’ve tried my best to separate that large room into an entryway and living room with furniture placement and an accent color on the wall to the left of the front door.
ORIGINAL:
This is what our entrway looked like when we bought the house.
The entryway originally had green carpet, antique white walls, and polystyrene tiles on the ceiling.
CURRENT:
Here’s what the entryway looks like now.
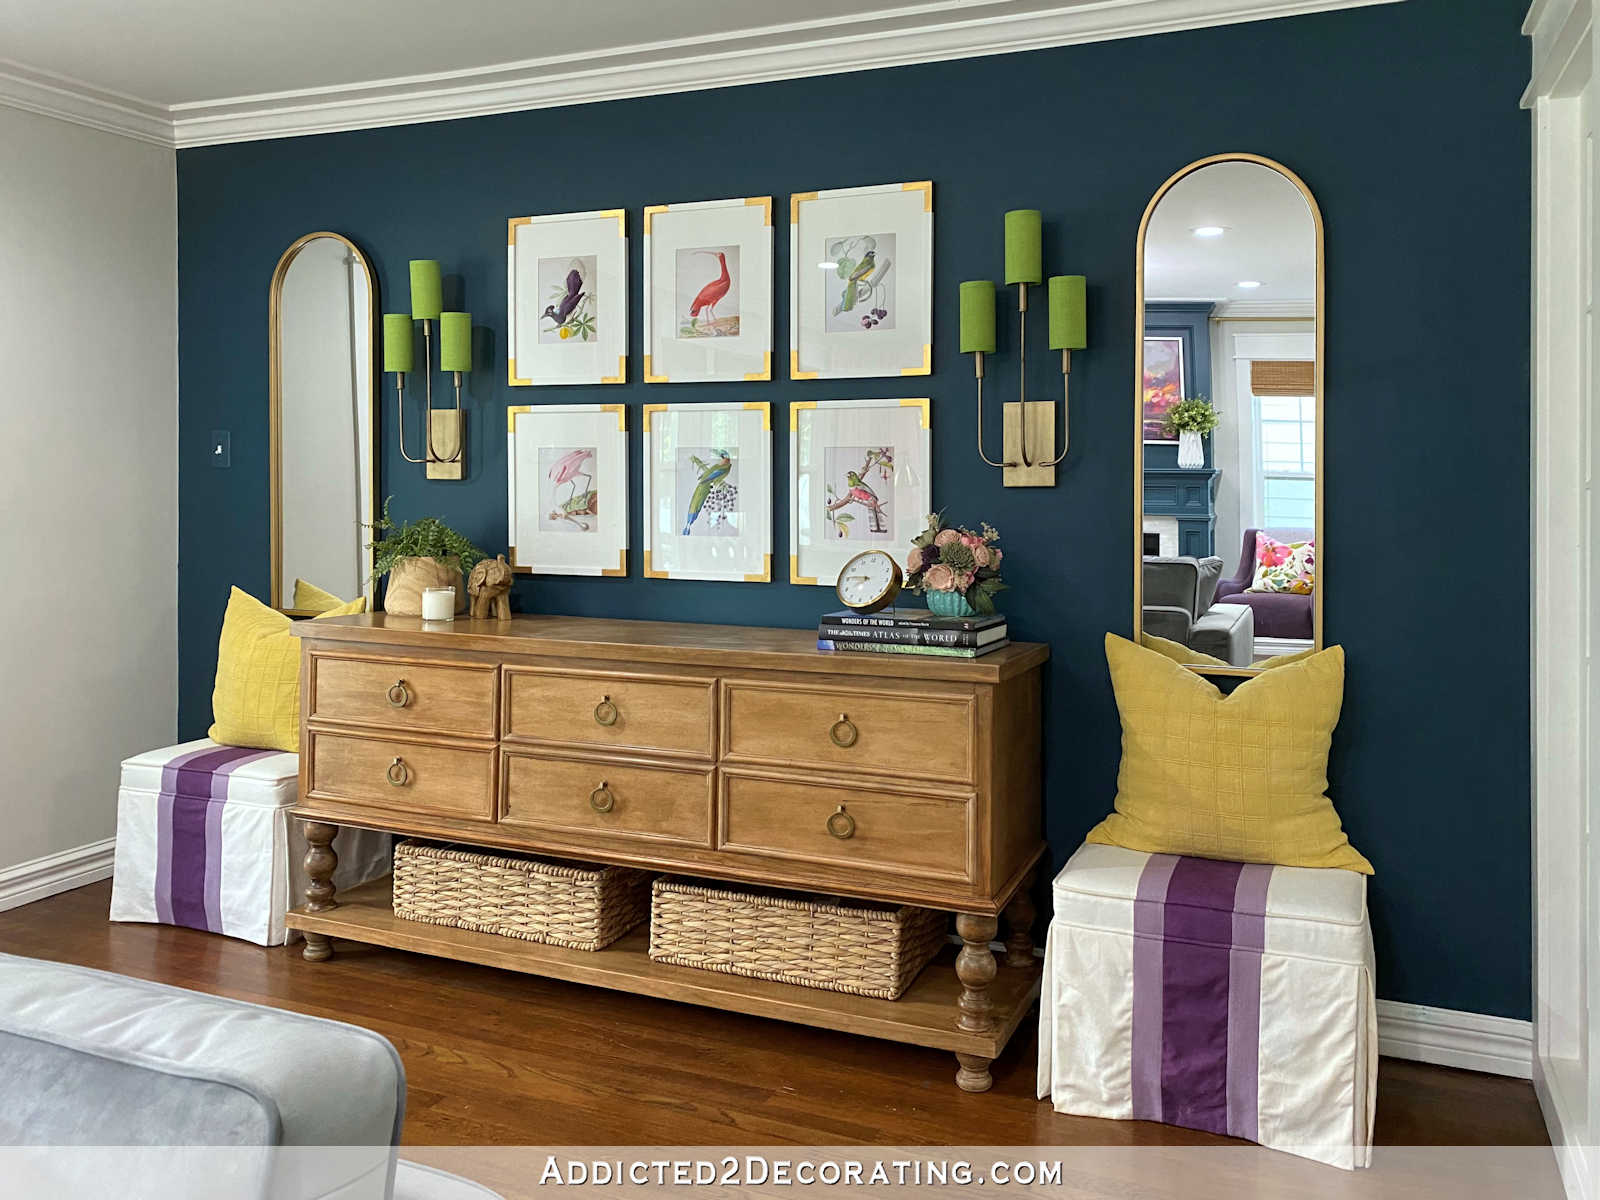
It took me four tries, but I finally got the entryway just like I wanted it. The finished area includes some of my favorite things — dark teal (my favorite color), birds, stripes, and a gallery wall. The ottomans and credenza are DIY projects that I built from scratch.
Paint Colors:
- Main wall: Benjamin Moore Custom Mixed Teal Color (click here for formula)
- Side walls: Benjamin Moore Classic Gray
- Trim: Behr Polar Bear
- Ceiling: Behr Ultra Pure White
More About Our Entryway

see all entryway
diy projects
read all entrwyay
blog posts
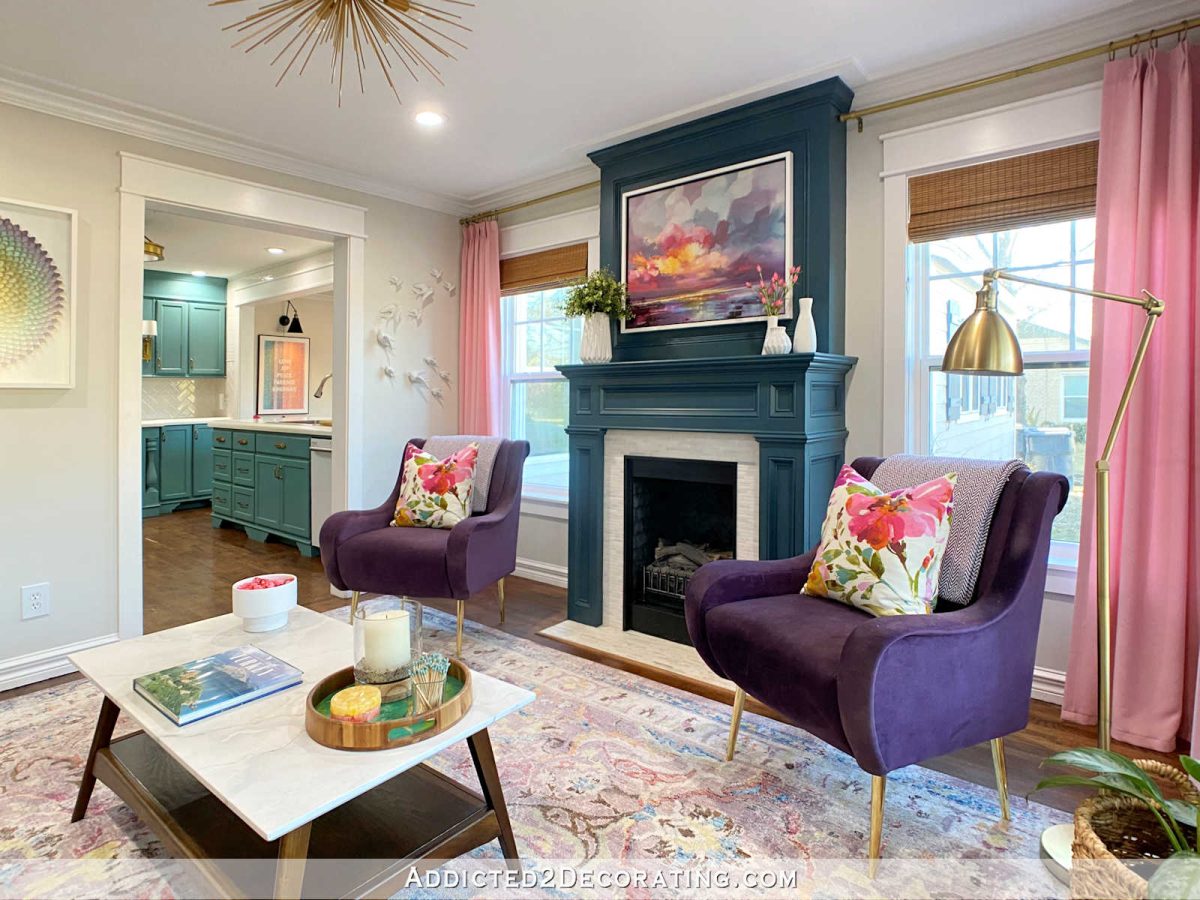
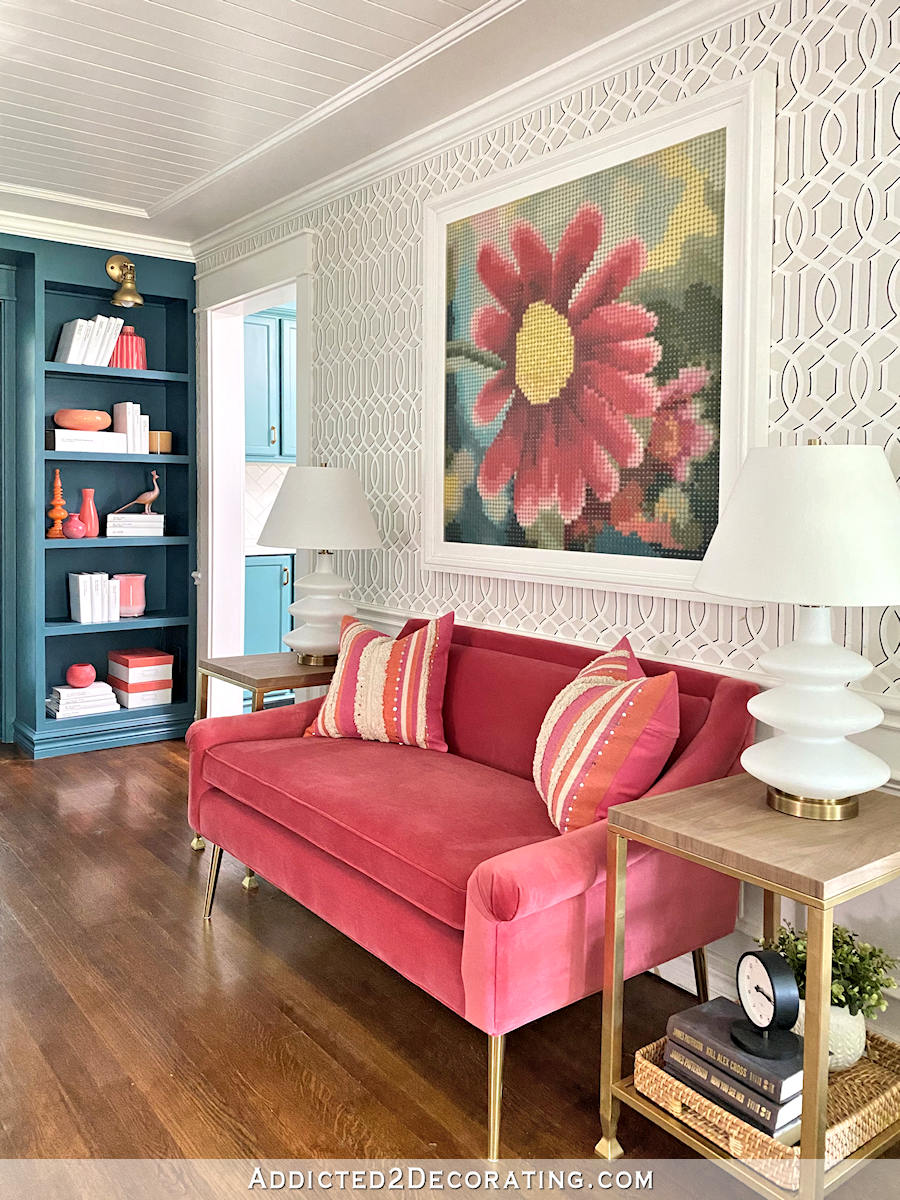
Living Room
Our living room is part of the same room as the entryway. The original completely lacked anything to make it unique, and it was completely walled off from the kitchen. I added a fireplace between the side windows and added a cased opening between the living room and kitchen, among a long list of other improvements.
ORIGINAL:
This is what our front living room looked like when we bought the house.
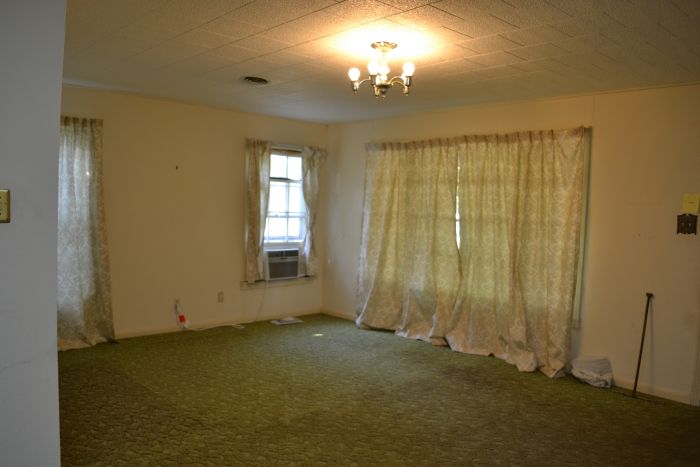
The original living room felt very small and dark, with green carpet, antique white walls, and polystyrene tiles covering the ceiling. It also felt very closed off to the rest of the house.
CURRENT:
This is what our living room looks like now. The teal fireplace is directly opposite the teal wall in the entryway pictured in the previous section.
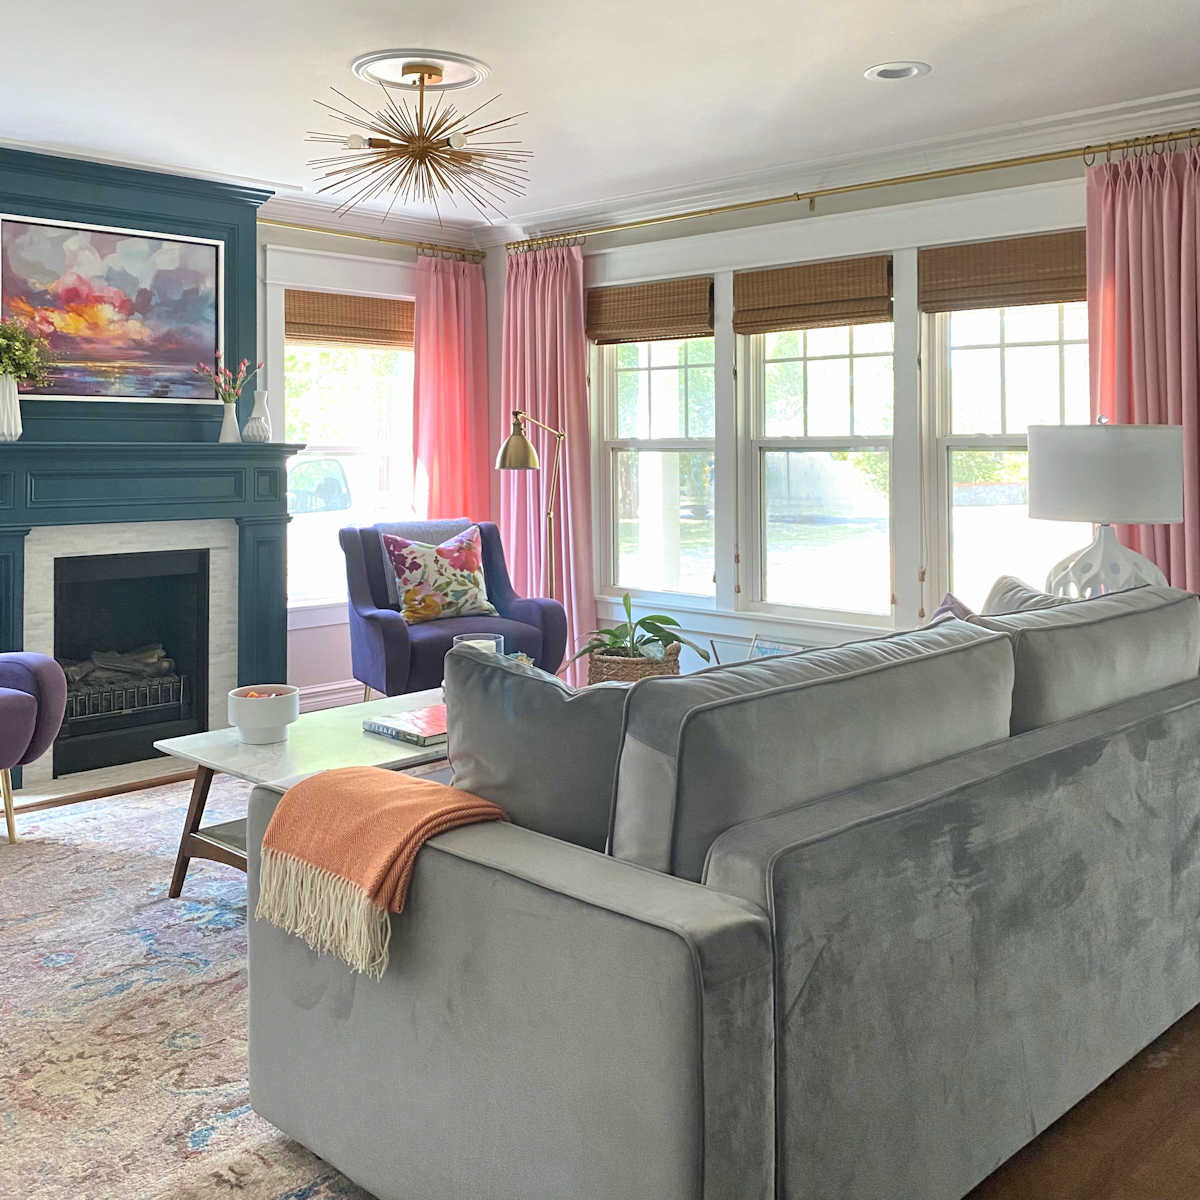
Never in my life have I had such a hard time decorating a room as I did this one. After trying many ideas that didn’t pan out (including trying to turn the room into a dining room), I finally came across the rug that served as a jumping off point for this final (and finally finished) living room. The entire room was torn down to the studs and ceiling joists and redone, including all new windows. I built the fireplace myself as a focal point. It’s not a real fireplace. It just as an electric fireplace insert in it (aka, a glorified heater), but I wanted the fireplace for its architectural interest in the room.
Paint Colors:
- Walls: Benjamin Moore Classic Gray
- Trim: Behr Polar Bear
- Fireplace: Benjamin Moore Custom Mixed Teal Color (click here for formula)
More About Our Living Room
see all living
room diy projects
read all living
room blog posts
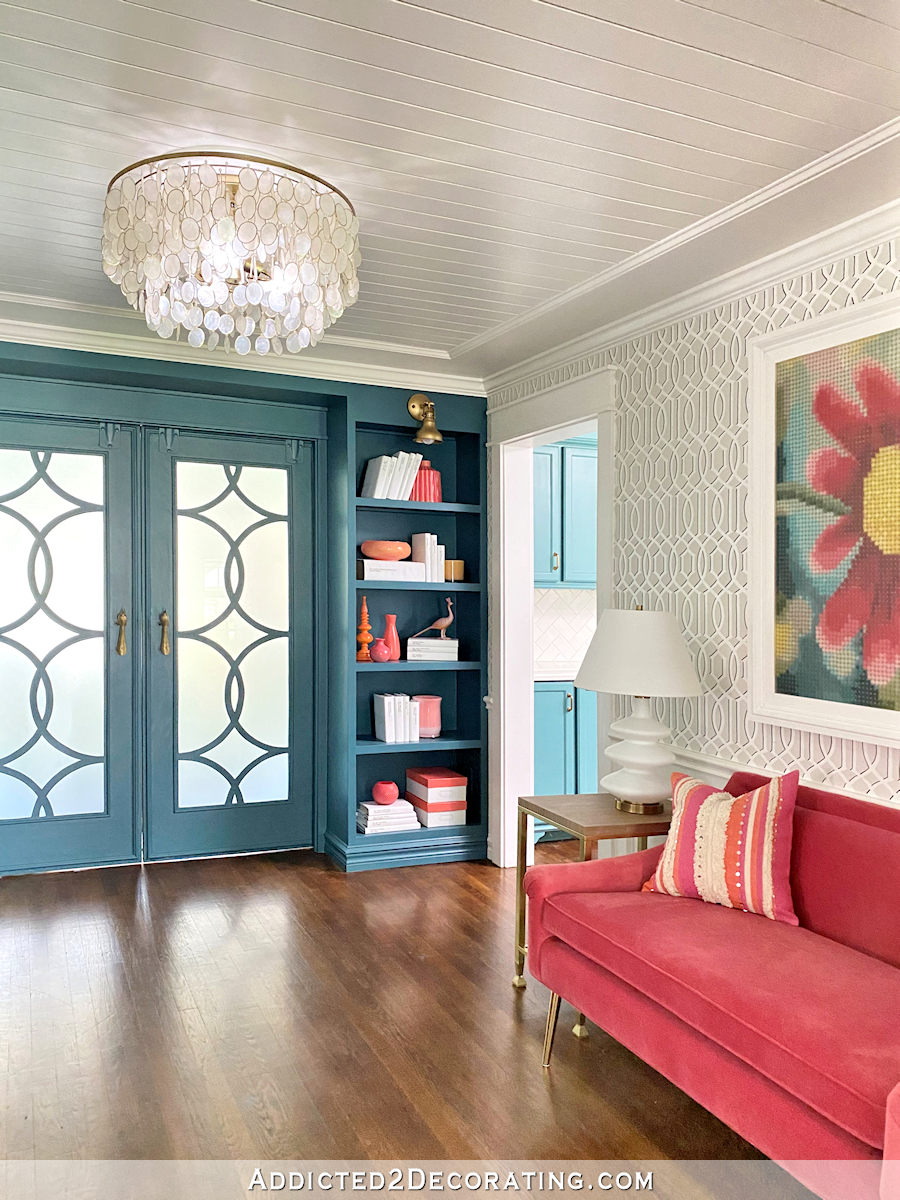
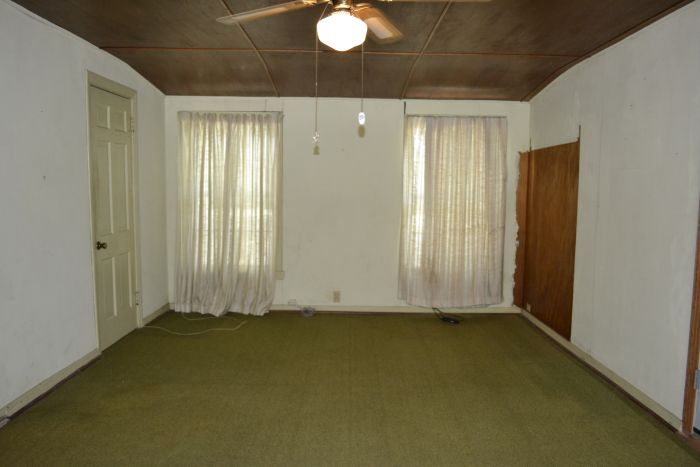
Music Room
Our music room was obviously intended to be a dining room by the builder, but with a husband who relies on a wheelchair for mobility, this room that is used as the main passthrough from the bedroom to the kitchen would have been an impractical spot for a dining table and chairs. So I turned it into a music room, keeping the middle of the room open for easy traffic flow.
ORIGINAL:
This is what the music room looked like when we bought the house.
The back wall of this room (where the sliding doors are) was the original back wall of the house, but previous owners added on a very large room (that they called the “sunroom”) back there.
CURRENT:
This is what our music room looks like now.

The music room is probably my favorite room in the house. It’s a small room, but there were so many DIY projects that went into it. I removed the original sliding glass door and replaced it with decorative doors that I made myself. And then I built bookcases around the door so that they would open like pocket doors. The walls have a hand-stenciled design and wainscoting, and I refinished my childhood piano (which was also my mom’s childhood piano), which now has a prominent place in the room. I made the artwork on both walls and filled the bookshelves with colorful items. The icing on the cake is the raspberry velvet settee.
Paint Colors:
- Wainscoting, Trim & Ceiling: Behr Polar Bear
- Wall Stencil: Behr Polar Bear and Benjamin Moore Classic Gray
- Bookcases & Doors: Behr Mythic Forest
More About Our Music Room:
see all Music Room
diy projects
read all music room
blog posts
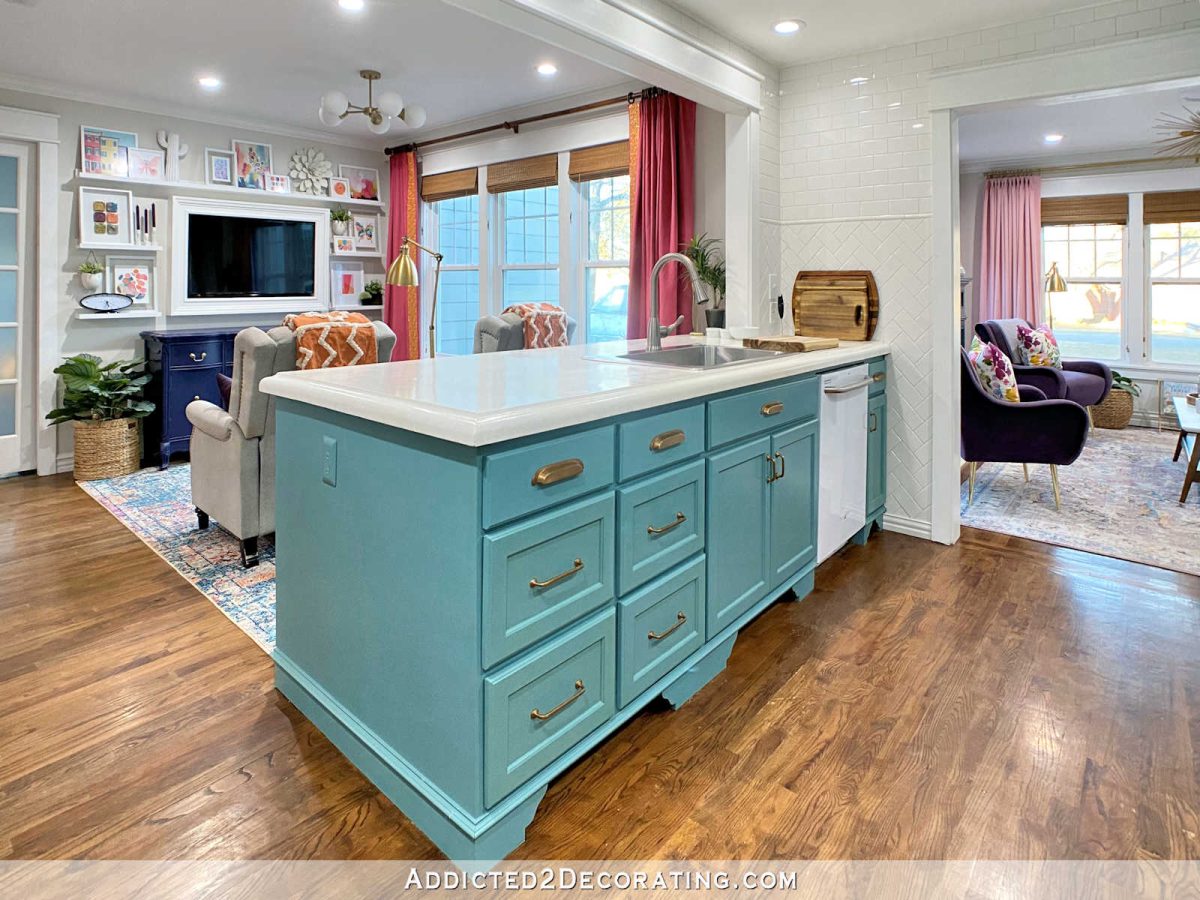
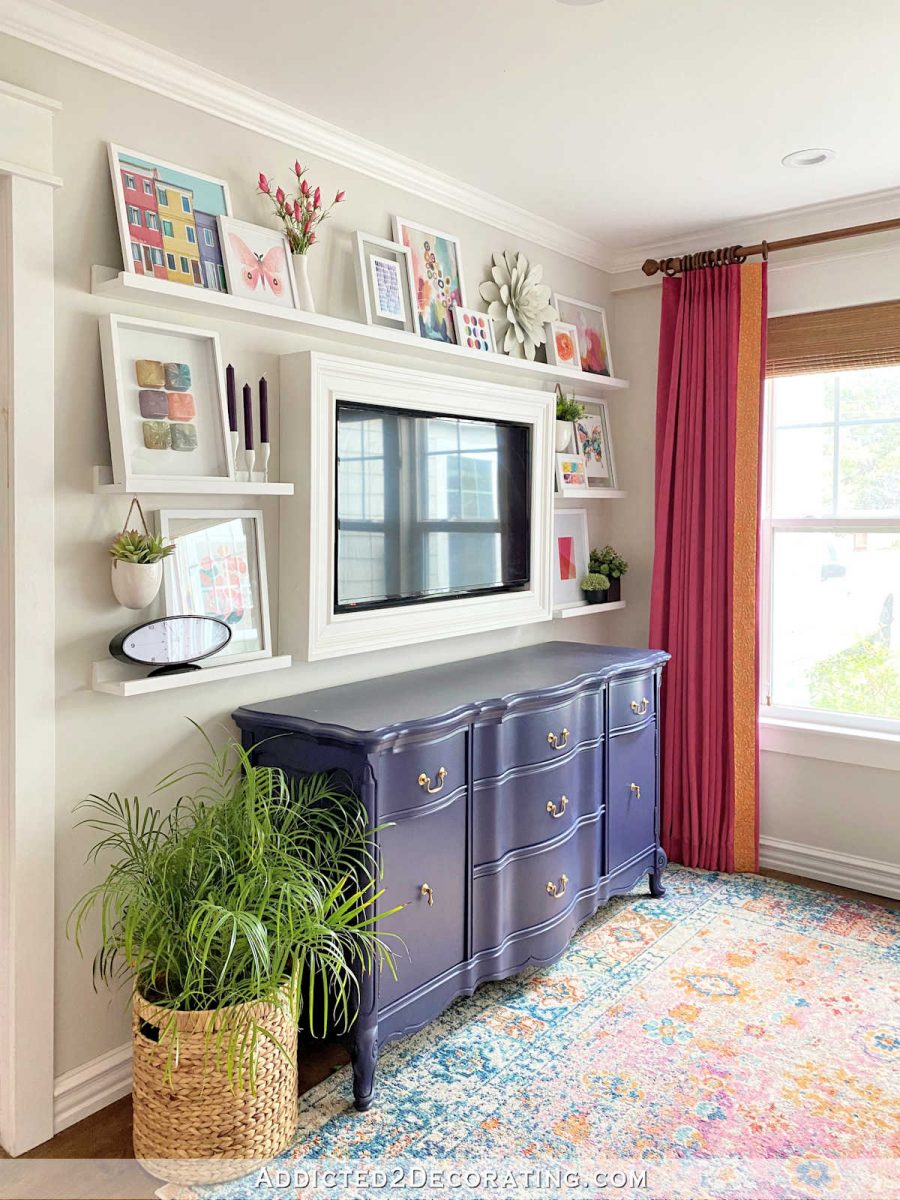
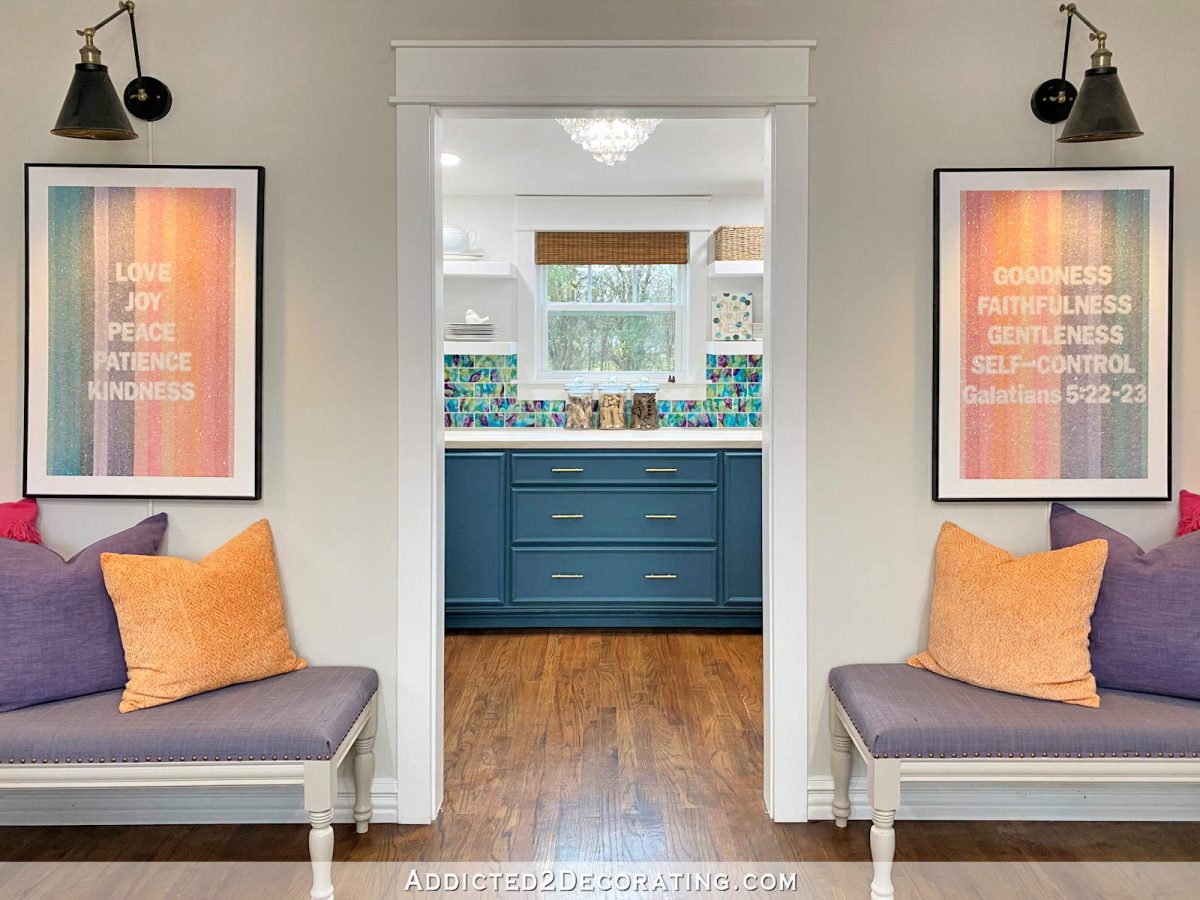
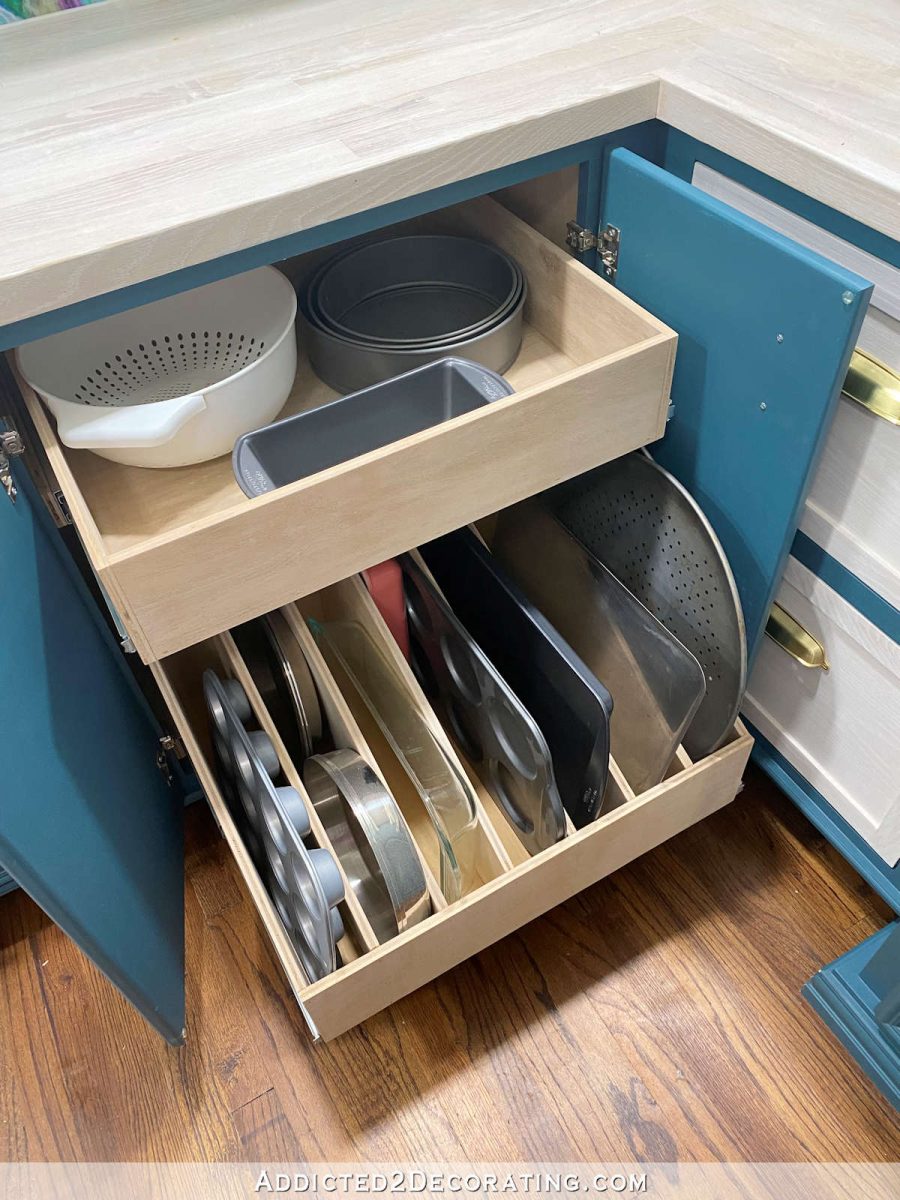
Kitchen
The original kitchen was very inefficiently arranged, plus it was walled off from the rooms around it, making it feel very small and dark. There was one window, which was originally an exterior window, but the previous owners had added the sunroom behind it, so the window was a bit awkward and provided no natural light into the room.
ORIGINAL:
This is what the kitchen looked like when we bought the house.
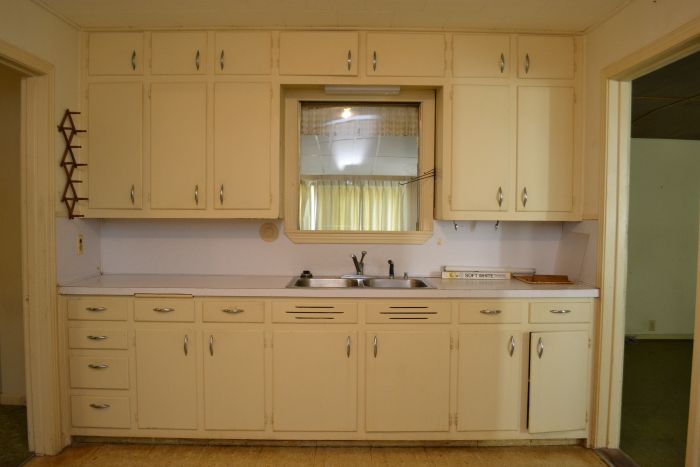
The original placement of the sink made sense when the window was an exterior window. But with the previous owners adding the sunroom behind the kitchen, this arrangement (and especially the window) no longer made sense.
THE ORIGINAL REMODEL:
This was the first room I remodeled after we bought the house, and I painted the cabinets green and added gold accents.
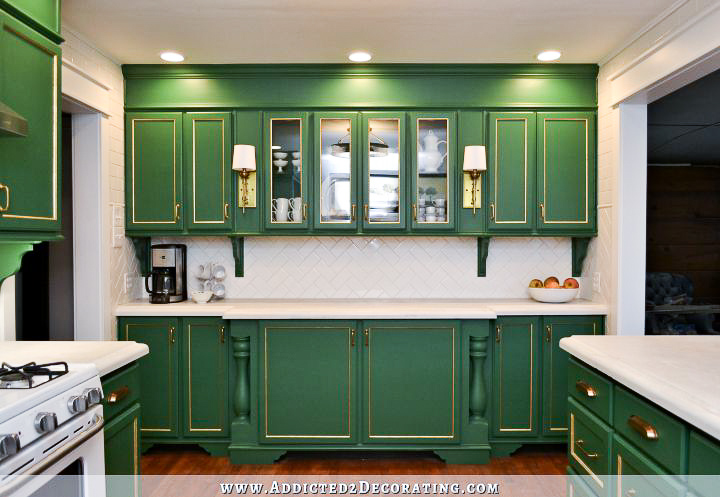
This was the first full room remodel I ever did myself. I jumped in with both feet, tearing everything down to the studs and ceiling joists, and rebuilt the kitchen with a different and more efficient configuration. I used stock oak cabinets from Home Depot, and customized them with trim and furniture-style feet.
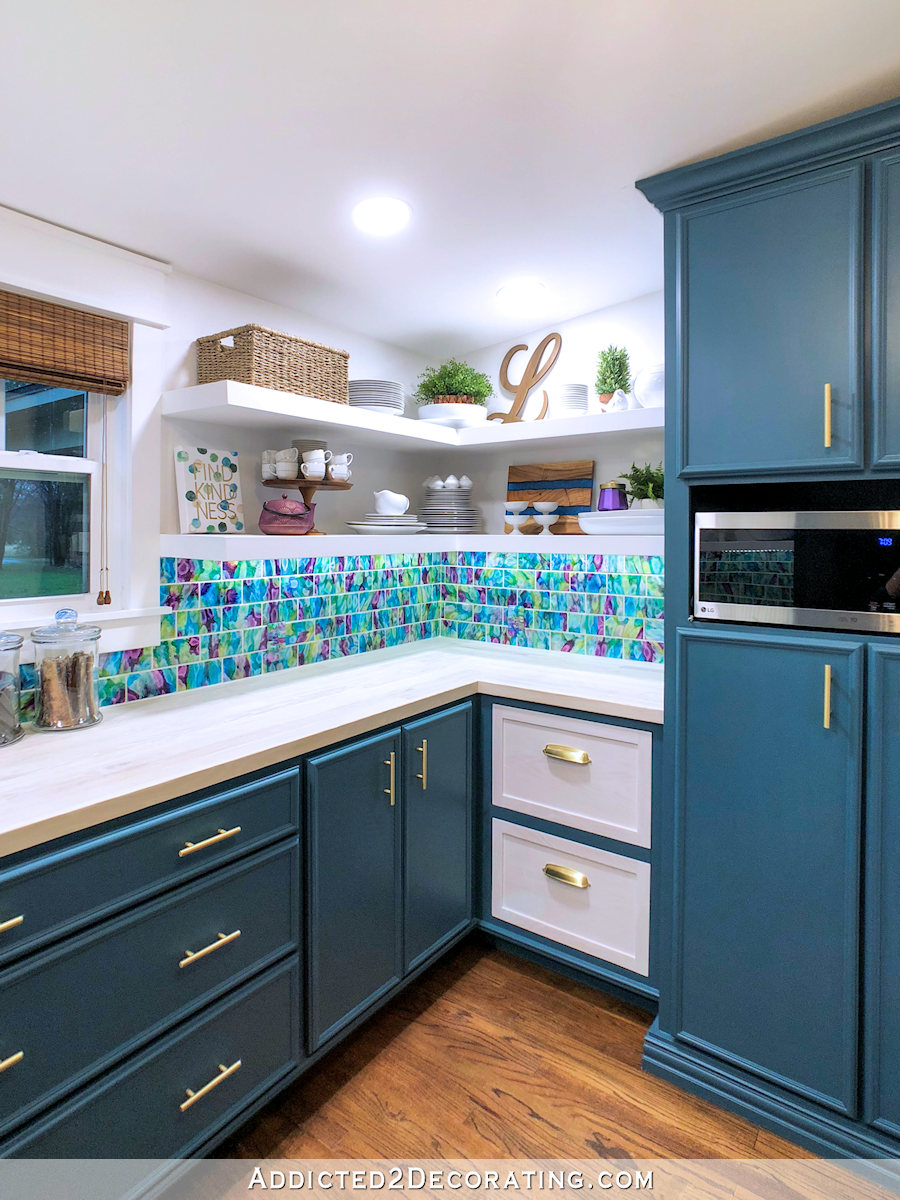
CURRENT:
This is what our kitchen looks like now.
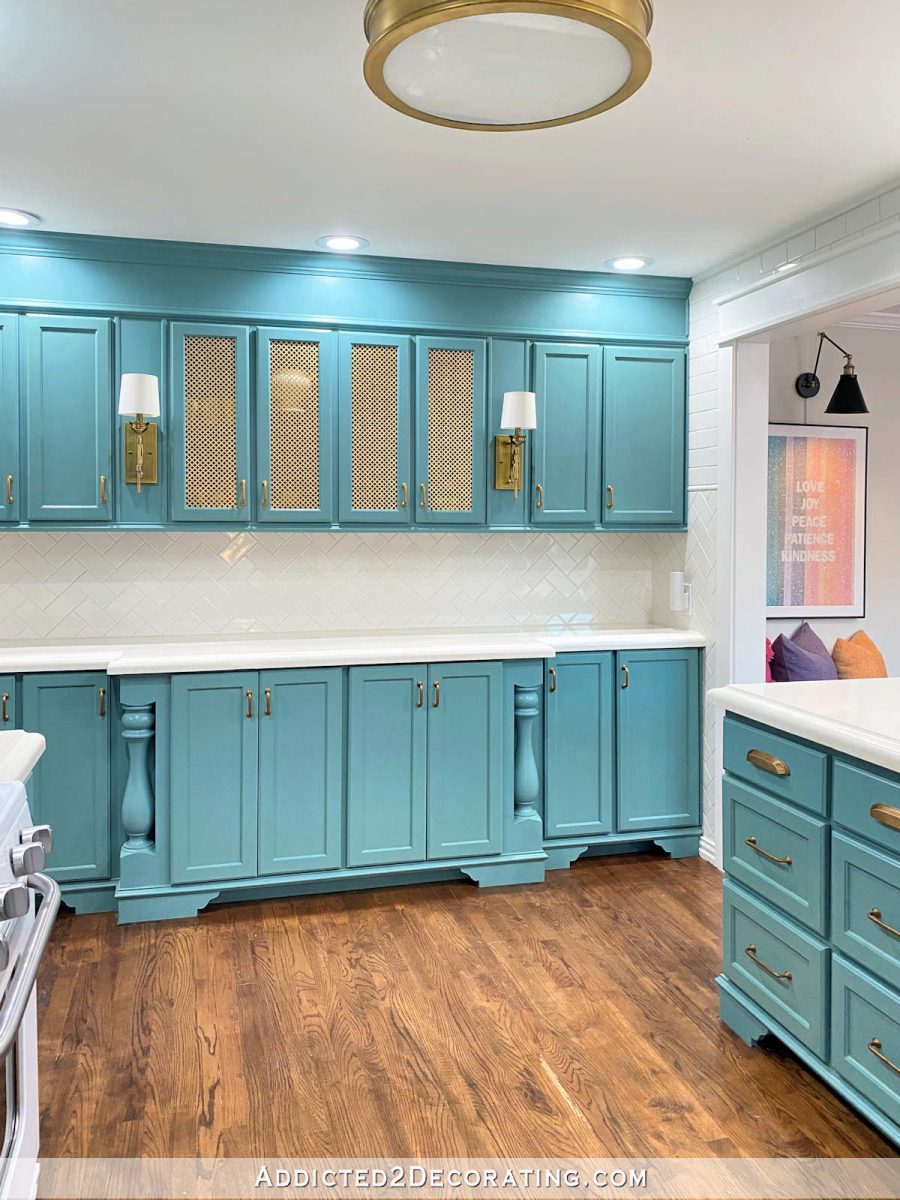
While I loved the green kitchen, I just found that green very hard to decorate around, especially considering that my favorite color is teal. So I ended up repainting my kitchen a couple of years later. The color? A lighter teal, of course!
Paint Colors:
- Original cabinet color: Sherwin Williams Derbyshire
- Current cabinet color: Behr Hallowed Hush
- Ceiling: Behr Ultra Pure White
More About Our Kitchen

see all kitchen
diy projects
read all kitchen
blog posts
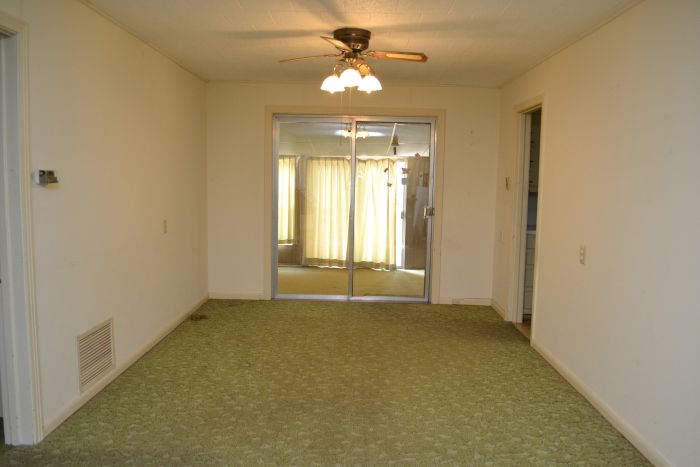
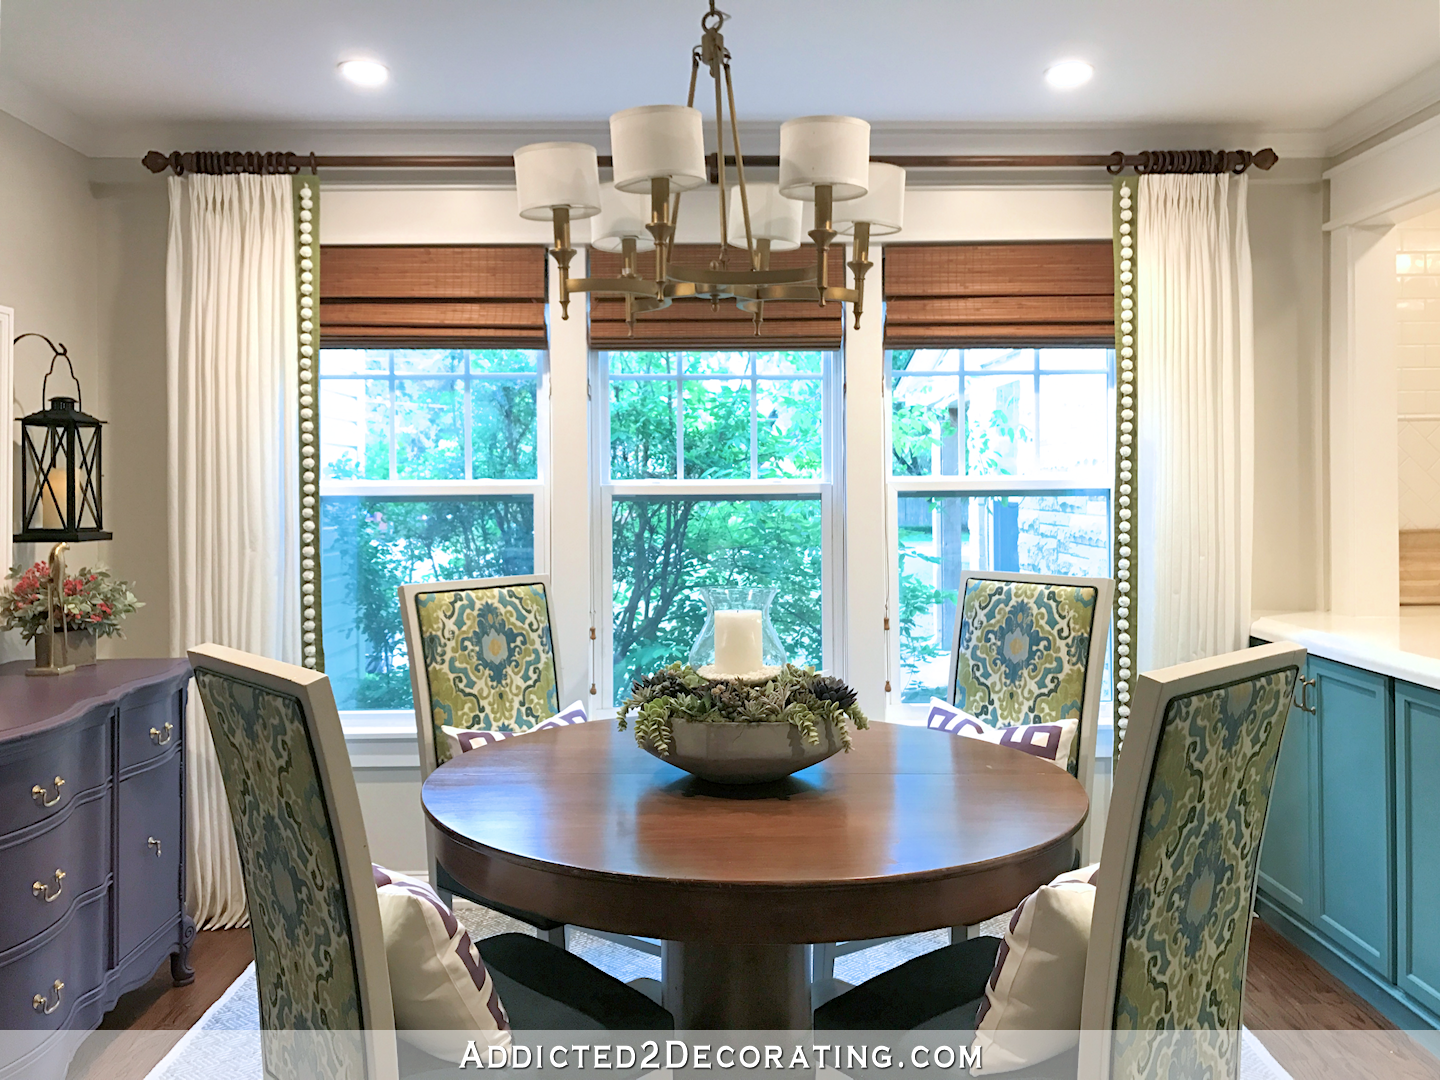
Breakfast Room/Sitting Room
When we bought the house, this room and the pantry behind it were actually one big, open room. This room wasn’t originally an interior room in the house, but was an open breezeway with a roof that served to connect the main house (i.e, the kitchen exterior door) to the garage. At some point, by previous owners, the room was closed in. And then I separated it into two separate areas.
BEFORE:
This is what the breakfast room (sitting room) looked like when we bought the house.
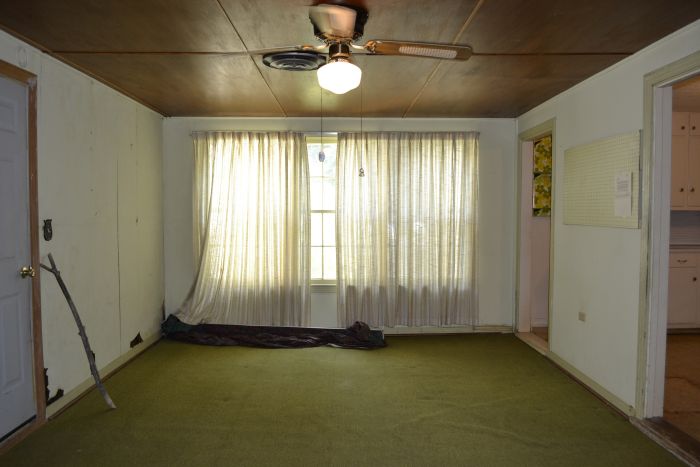
The original room was very dark and cave-like, with a stained plywood drop ceiling and dark green carpet. You can see where there was one an exterior door on the kitchen wall on the right, and the door on the left leads to the garage. This room, which was once an open breezeway with a roof long before we bought the house, didn’t originally have a front wall or back wall. The original concrete steps to the front yard are still outside under those front windows.
THE ORIGINAL REMODEL:
During the original remodel of this room, I turned the front part of the room it into a breakfast room, and it looked like this.
I knocked out the wall between the original den and the kitchen in order to make the breakfast room open to the kitchen and also installed all new windows. It made these rooms feel so much bigger.
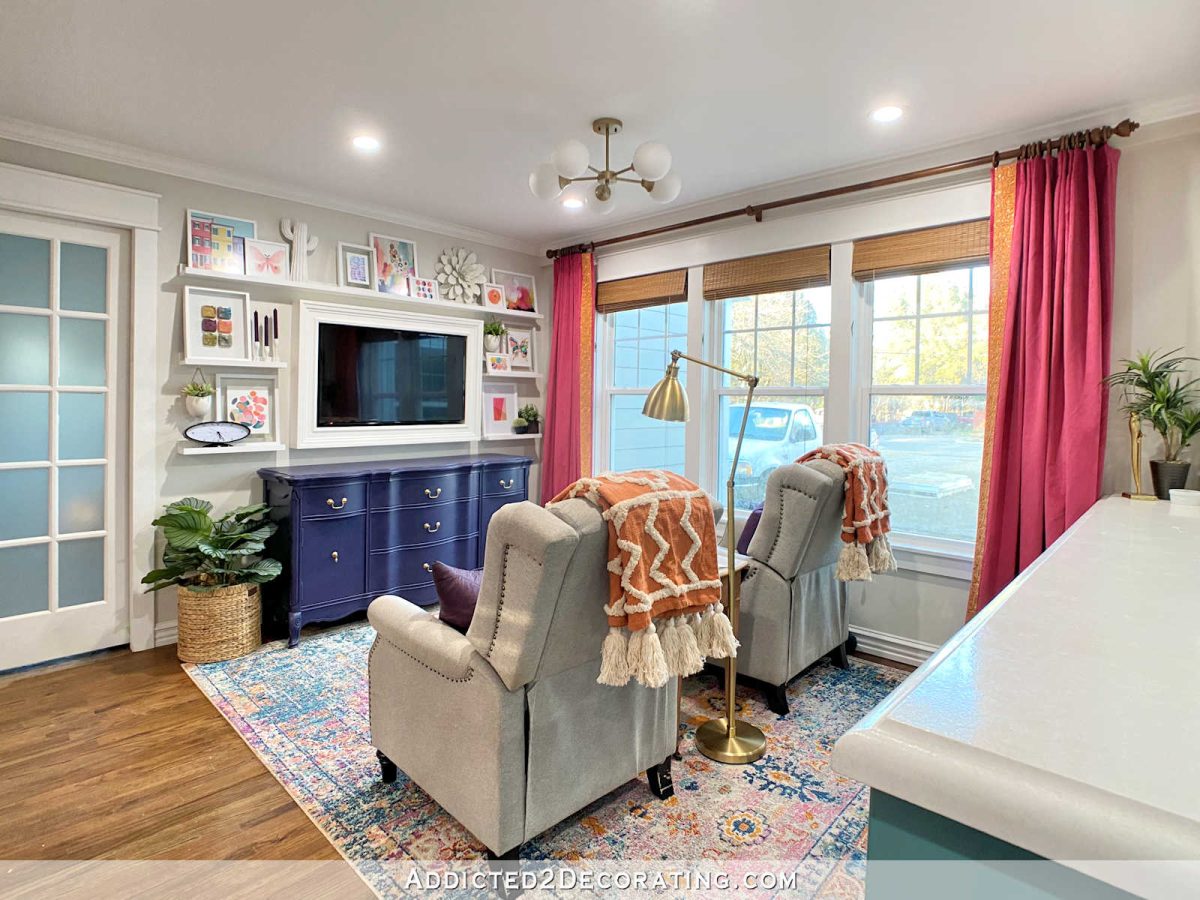
CURRENT:
This room is no longer a breakfast room. Now it’s a sitting room, and it looks like this.
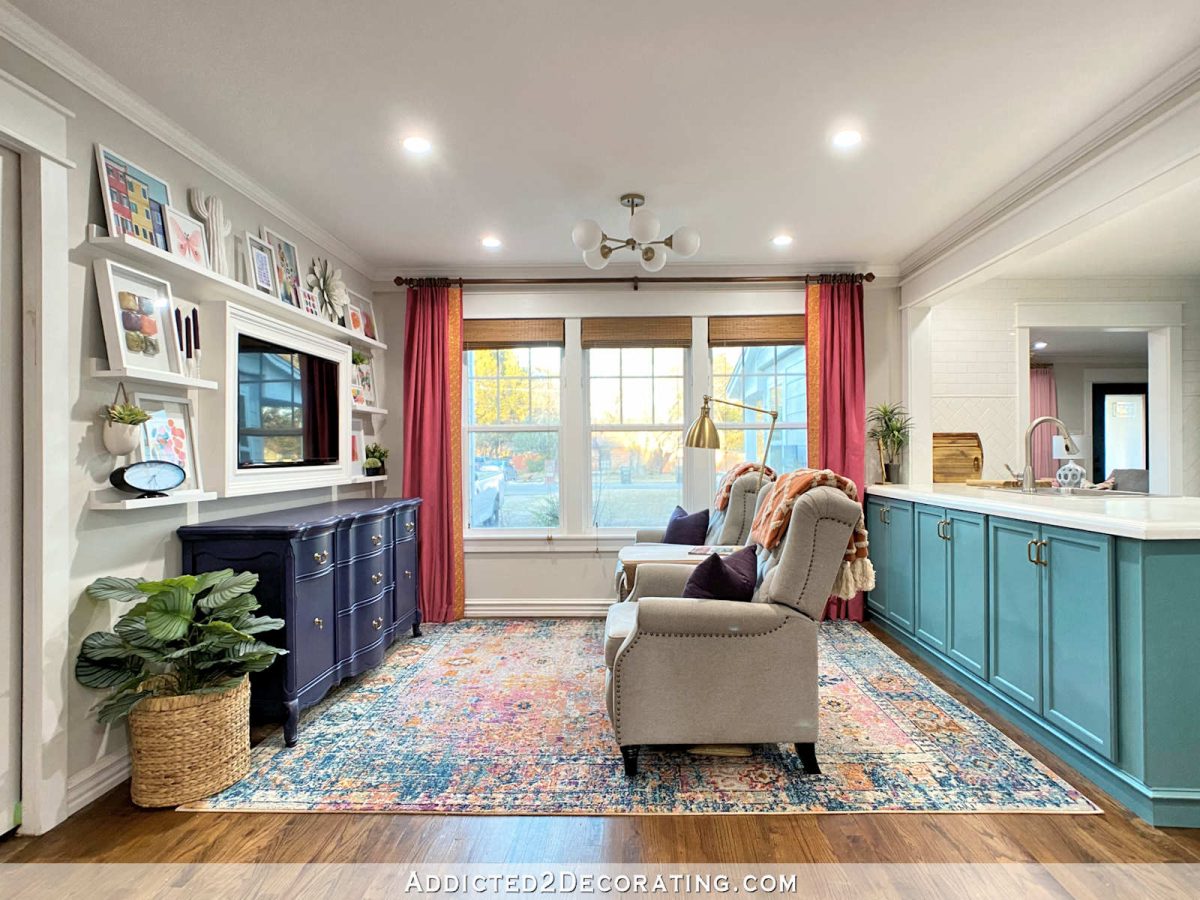
In 2021, I gave the room a little makeover, not only injecting a little more color than before, but also turning the room into a sitting room. I made this change at Matt’s request. He has M.S. and on the suggestion of his occupational therapist, he requested a comfy place outside of the bedroom where he could sit and relax during the day. Since this is the only non-bedroom room with a television, we decided this bright, sunshine-filled room was the perfect spot to put a recliner for him. So I swapped the table and chairs for two recliners to create a sitting room. When we build our addition on the back of the house, it will include a large family/media room with comfy seating and a TV. This room will actually be turned into our new, much larger kitchen (which will take up this room as well as the pantry area).
Paint Colors:
- Walls: Benjamin Moore Classic Gray
- Trim: Behr Polar Bear
- Ceiling: Behr Ultra Pure White
- Buffet: Behr Black Sapphire
- Cabinets: Behr Hallowed Hush
More About Our Breakfast Room
see all breakfast
room diy projects
read all breakfast
room blog posts
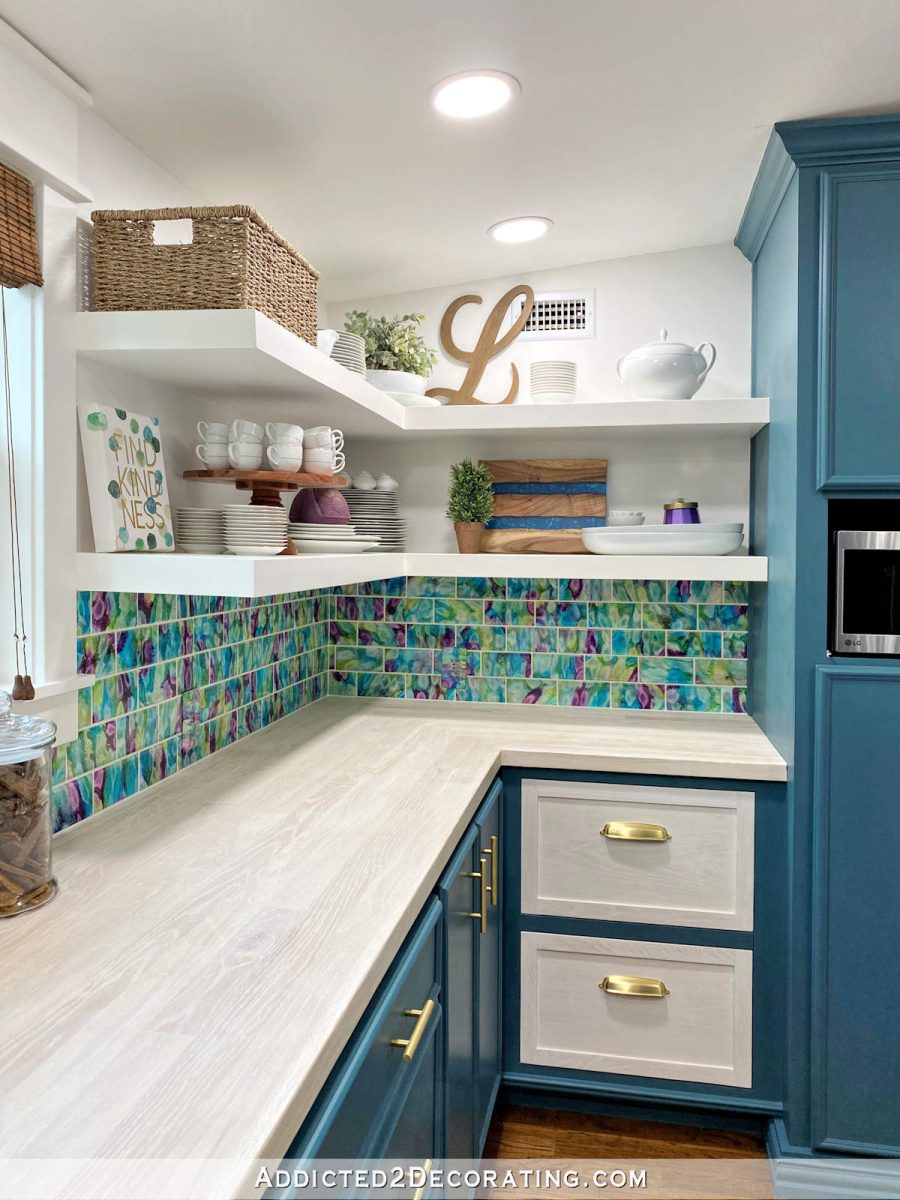
Walk-In Pantry
Again, this room and the breakfast room were one big, open room when we bought the house. I added a wall to create the walk-in pantry in this section of the room.
ORIGINAL:
This is how the back of the den looked when we bought the house. The door on the left led to the sunroom.
I took this room down to the studs and redid everything, including building a wall to separate the pantry from the breakfast room, remove the original windows, and install a new, smaller window in the middle.
CURRENT:
This is what that same view looks like today with the wall added.
And just inside that doorway is the pantry, which is 7′ x 12′.

I built the entire pantry from scratch, including the cabinets, the wood countertop made from hardwood red oak flooring, and the floating shelves. I even hand-tinted over 200 white subway tiles with clear resin and alcohol inks for the backsplash and painted my white utilitarian upright freezer teal to match the cabinets.
Paint Colors:
- Walls & Shelves: Behr Polar Bear
- Ceiling: Behr Ultra Pure White
- Cabinets: Behr Mythic Forest
More About Our Walk-In Pantry
see all pantry
diy projects
read all pantry
blog posts
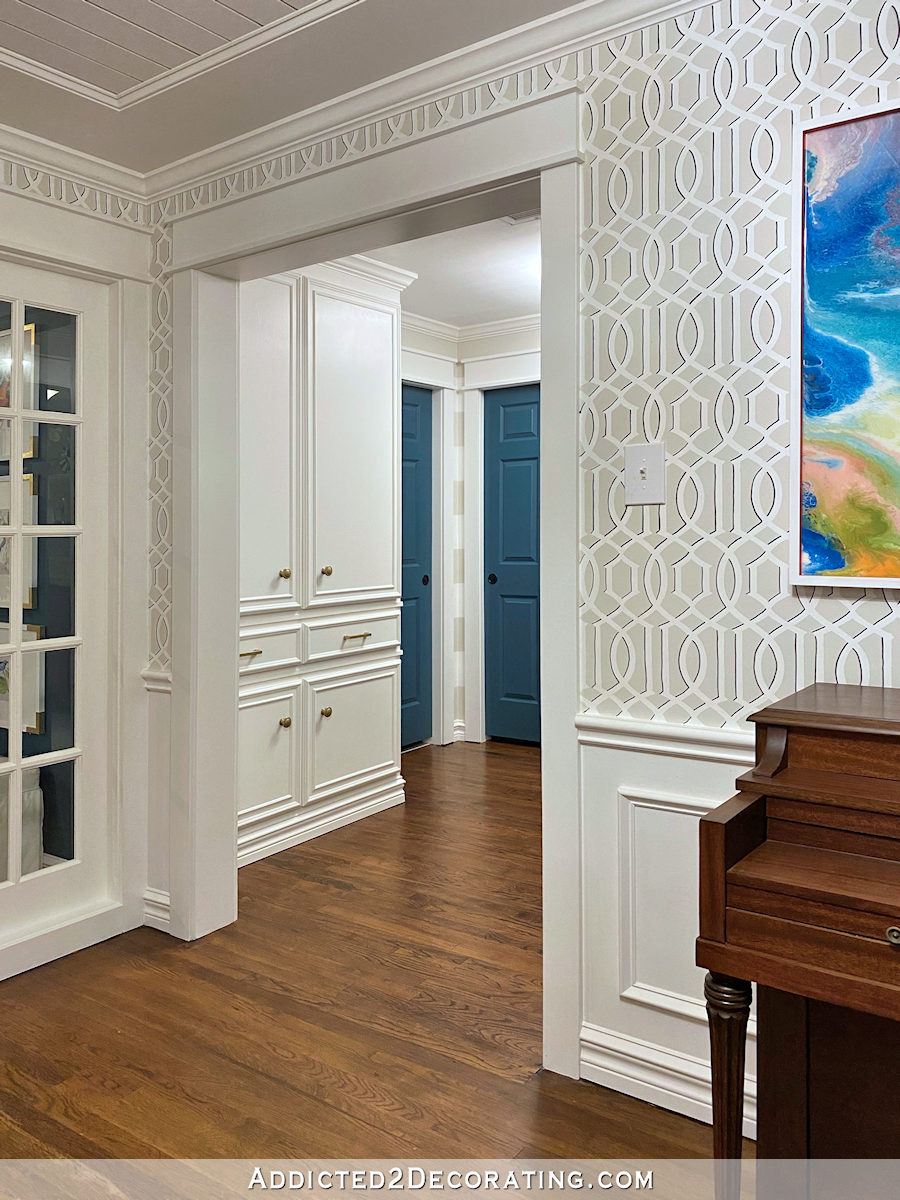
Hallway
ORIGINAL:
This is what the hallway looked like when we bought the house.
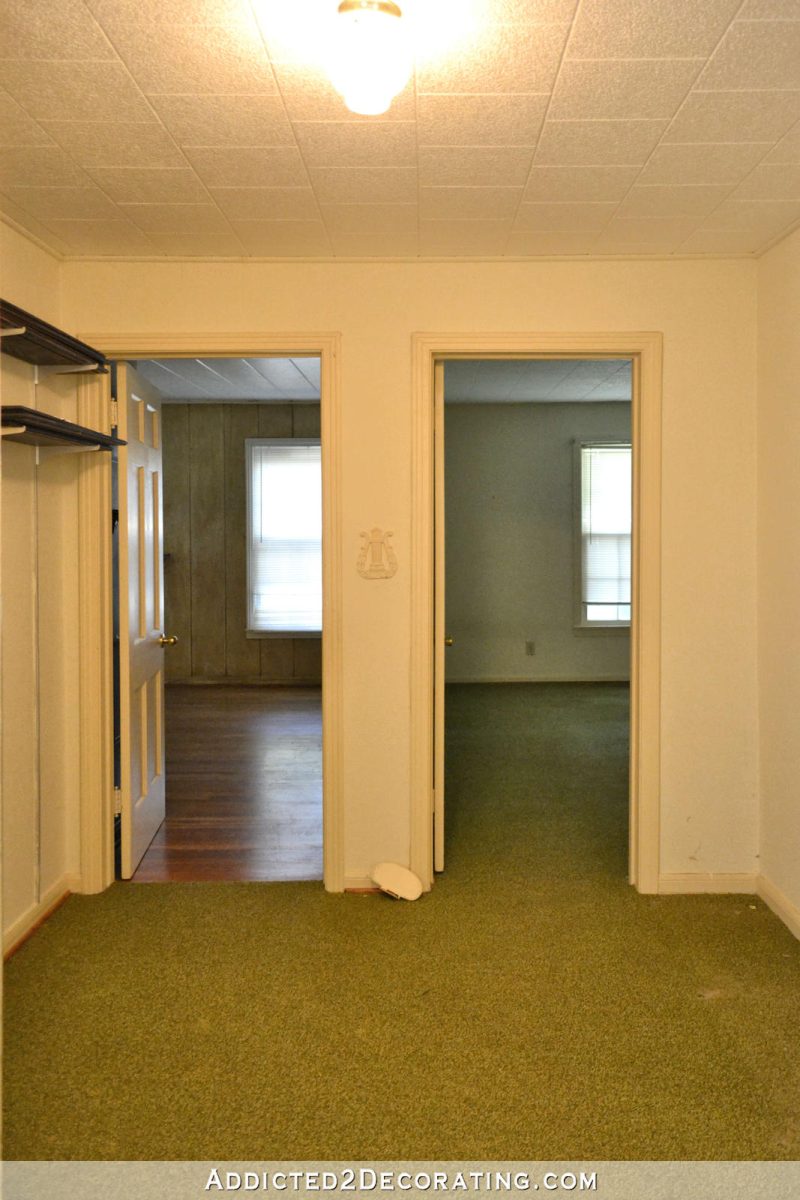
The original hallway was very dark, and at some point, a previous owner had built a DIY closet that seemed to crowd the hallway. Opposite that DIY closet was the original coat closet that had been retrofit to house a huge duct for the furnace. The doorway from the music room into the hallway was very narrow. And just like the rest of the house, the hallways had green carpet and polystyrene tiles on the ceiling.
THE ORIGINAL REMODEL:
This is what the hallway looked like after the original remodel.
I widened the doorway from the music room and cased in that opening. I removed the two original closets (the furnace duct was no longer needed once we had a new HVAC installed) and built in some cabinets on the left. From this viewpoint, the guest bathroom is on the right wall, two bedrooms are straight ahead (the original master bedroom is the door on the right), and a third bedroom is through a door on the left wall, which is hidden from view because of the cabinet.
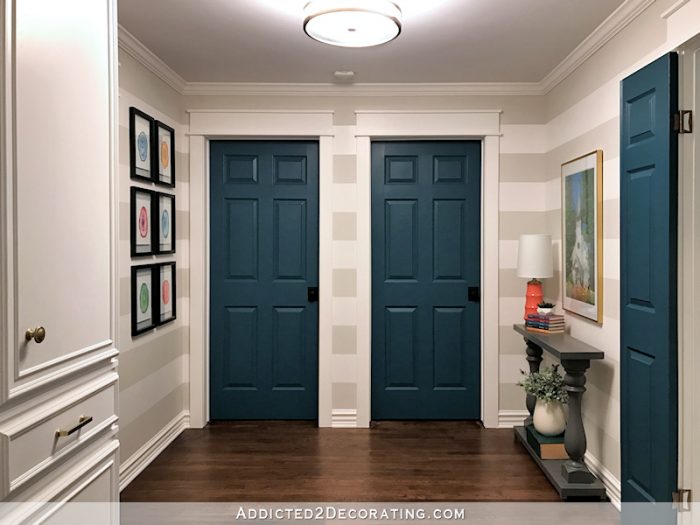
THE SECOND REMODEL:
In 2019, the hallway underwent a second remodel. After that, it looked like this.
In 2019, we decided to turn the original master bedroom into a large, wheelchair-accessible master bathroom. That meant that it no longer needed to have a doorway into the hallway, and we also needed to move a wall to square up that room. That resulted in the back wall of the hallway (where the two original bedroom doors were) being moved into the hallway about four additional feet. That left us with a smaller hallway, which was perfectly fine because the original hallway was so large that it felt like a waste of space.
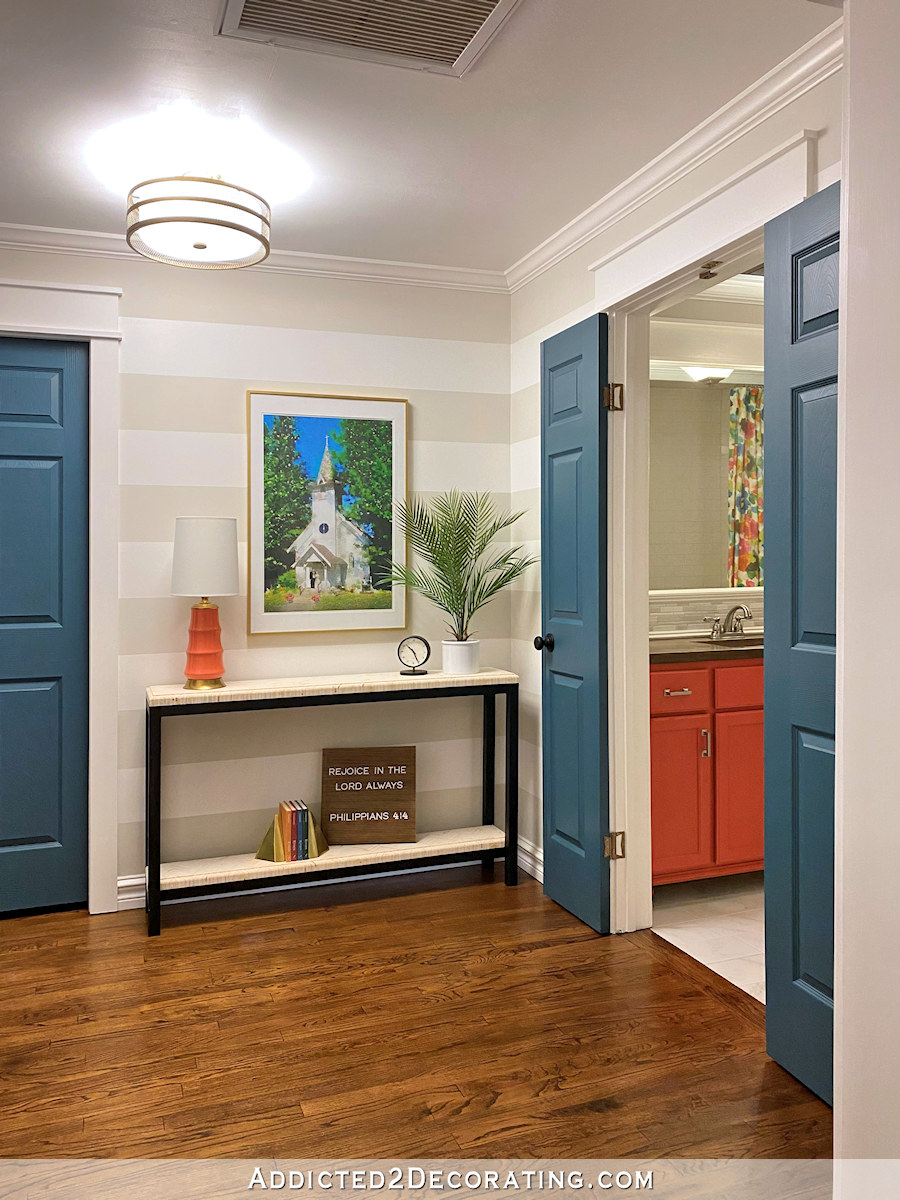
CURRENT:
This area is now undergoing yet another remodel. It’s not finished yet, so right now, it looks like this.
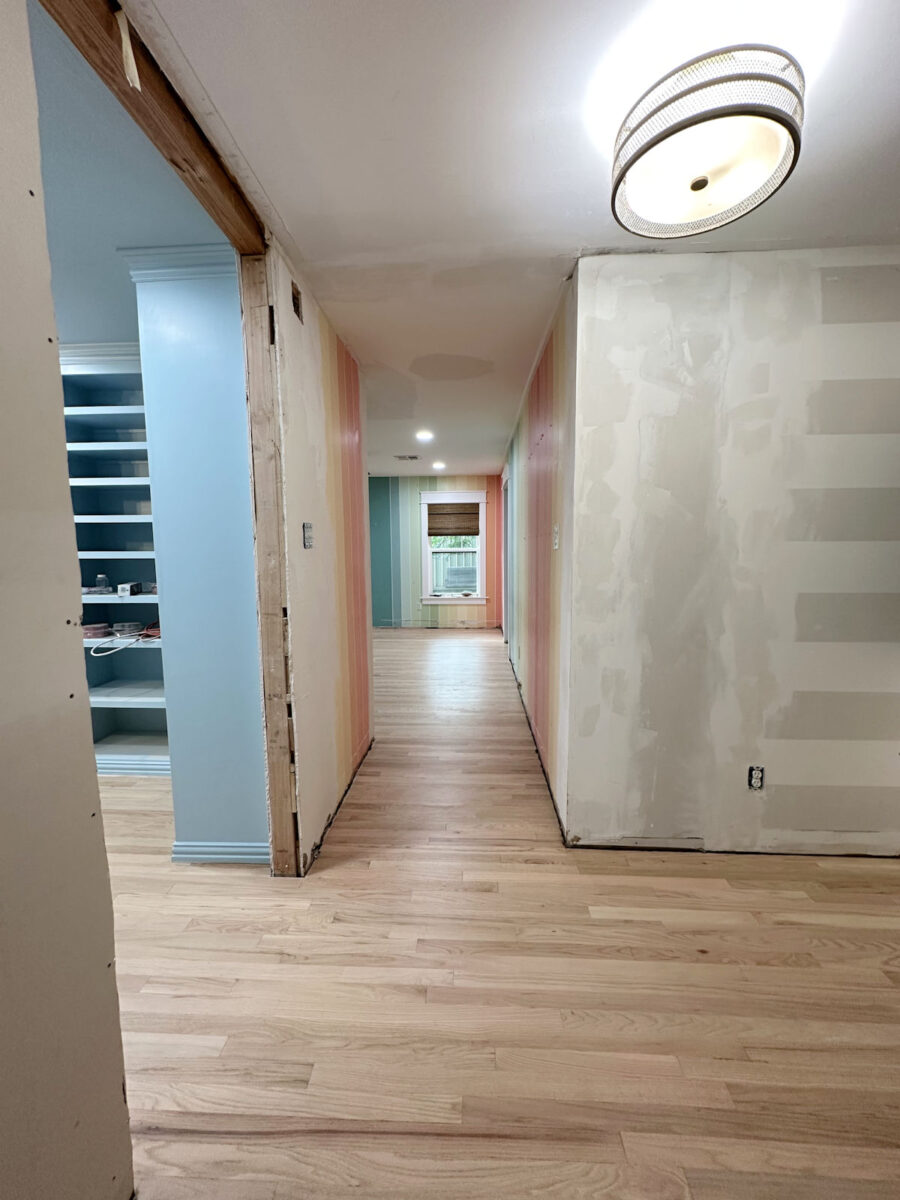
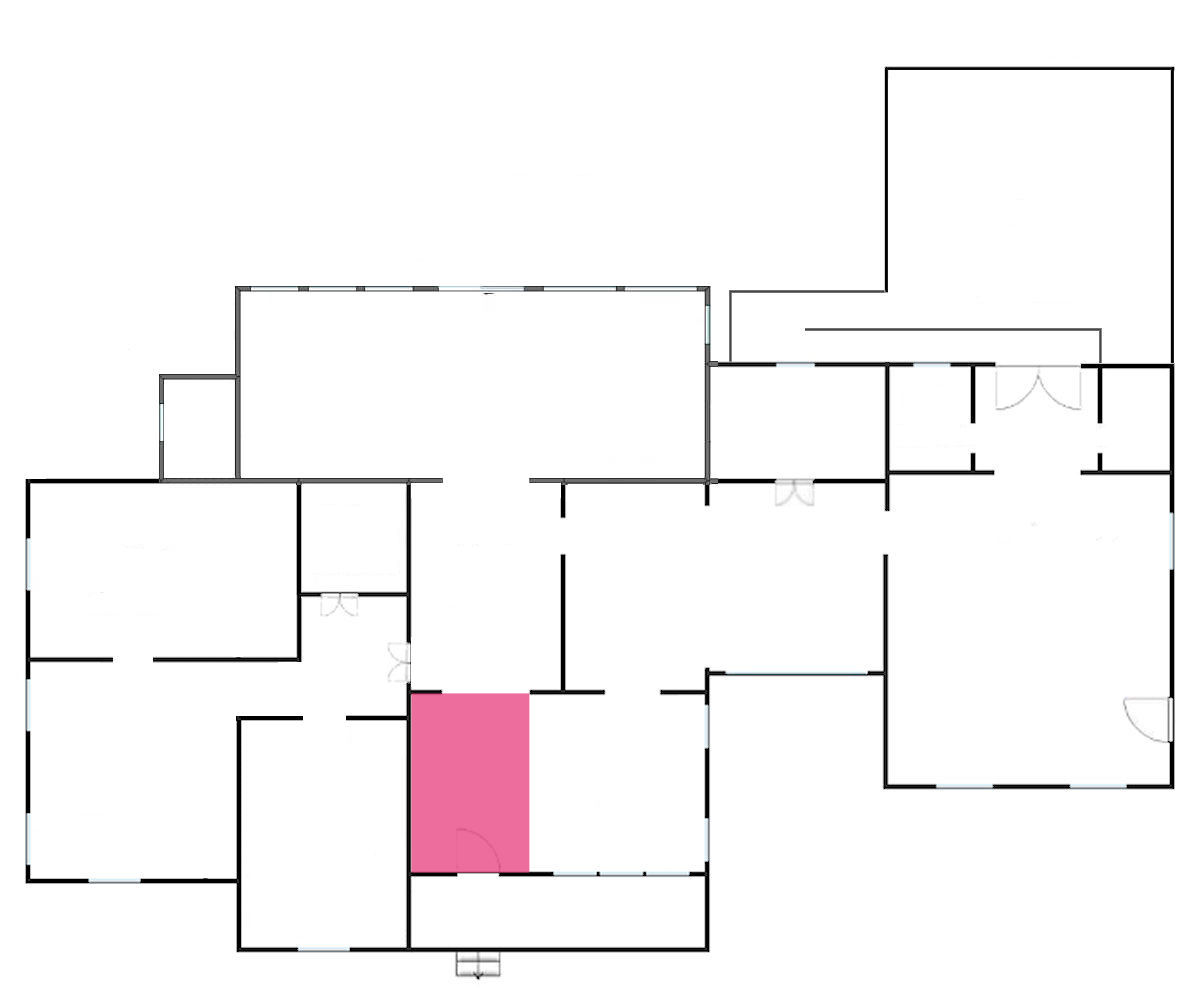
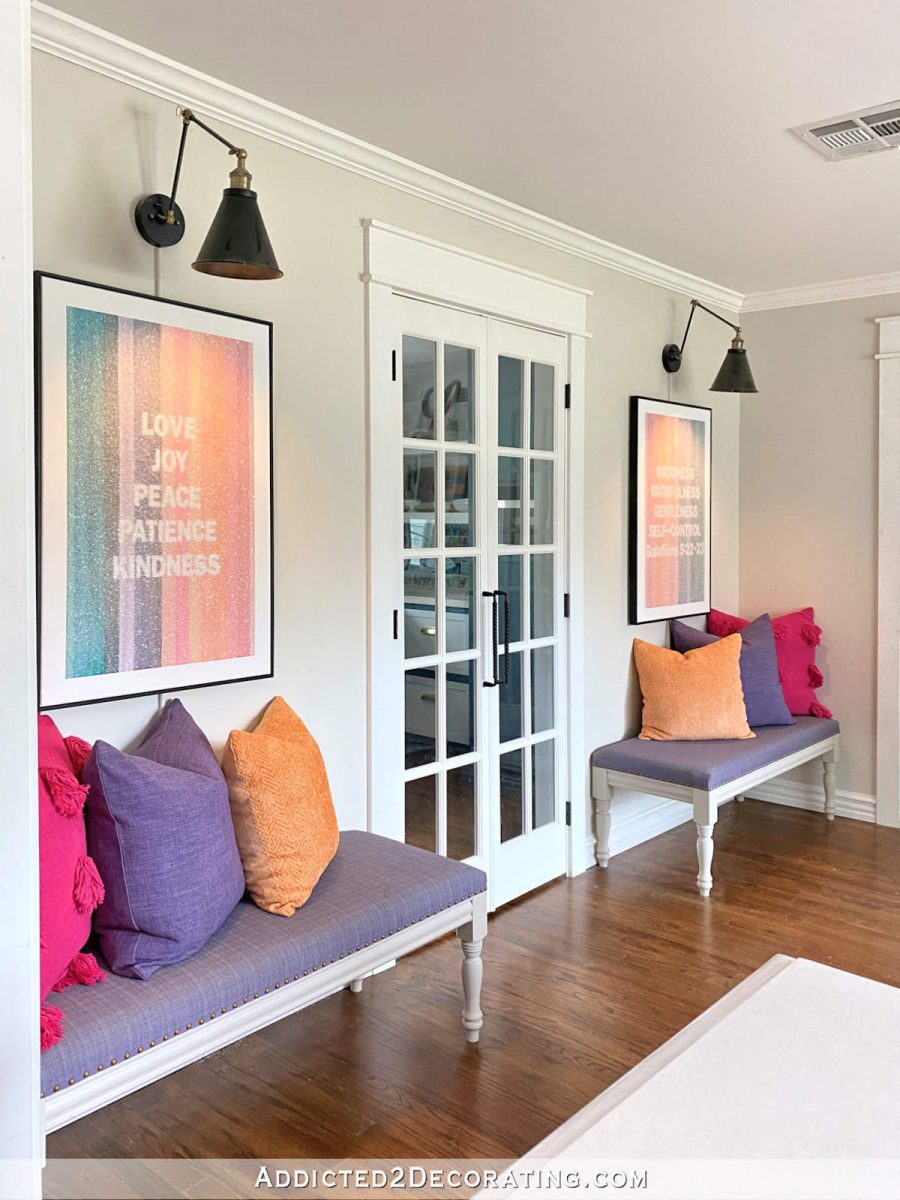
In 2024, we decided to turn this whole area, from the music room cased opening on, into one big master bedroom suite. That means that the former hallway is now the master suite foyer. I removed the doorway into the bedroom on the left completely (all the way to the side walls and the ceiling) so that the bedroom is no longer hidden behind a door, and it will be our new master bedroom when it’s finished. The original third bedroom (i.e., the former guest bedroom), which you can see on the left, is being turned into a walk-in closet and laundry room combination.
Paint Colors:
- Wall Stripes: Behr Polar Bear and Benjamin Moore Classic Gray
- Trim: Behr Polar Bear
- Ceiling: Behr Ultra Pure White
- Doors: Behr Mythic Forest
More About Our Hallway
see all hallway
diy projects

read all halway
blog posts
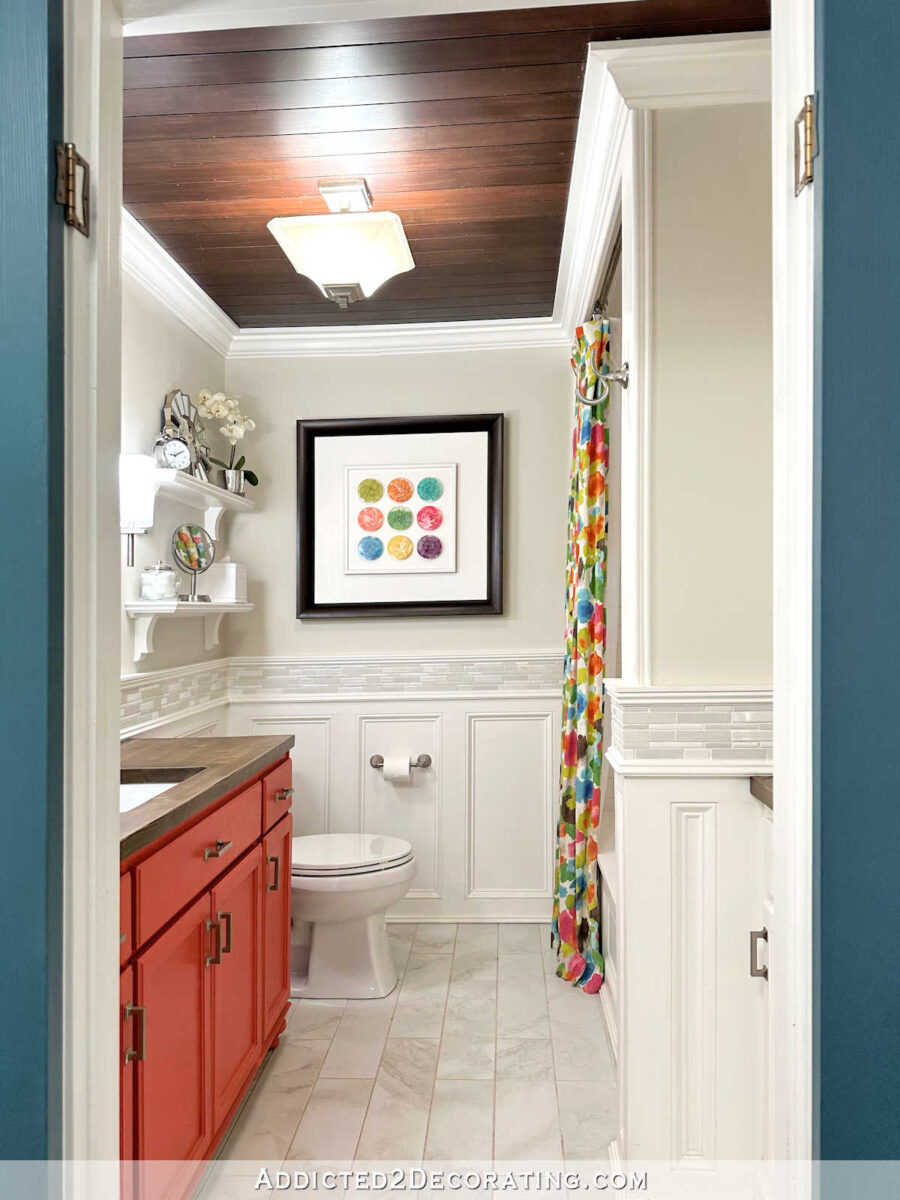
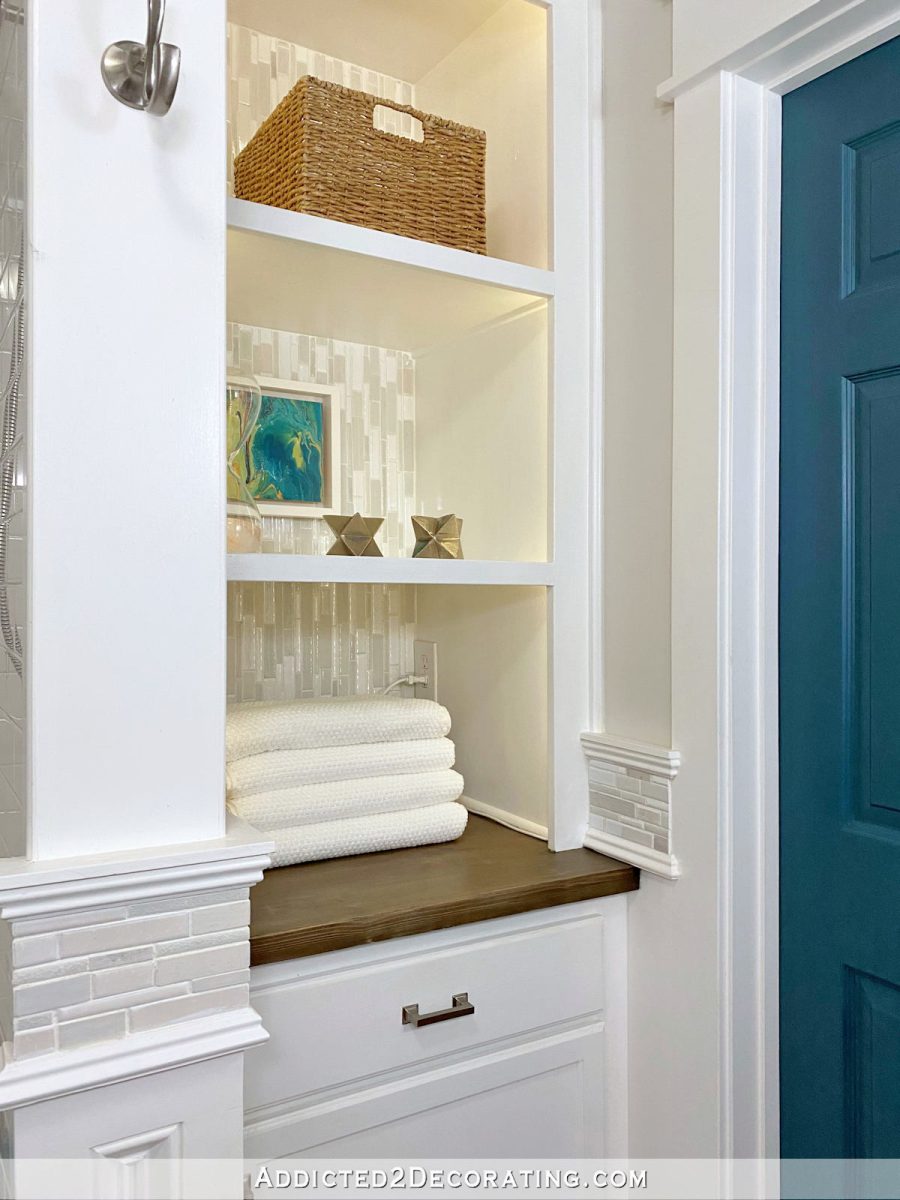
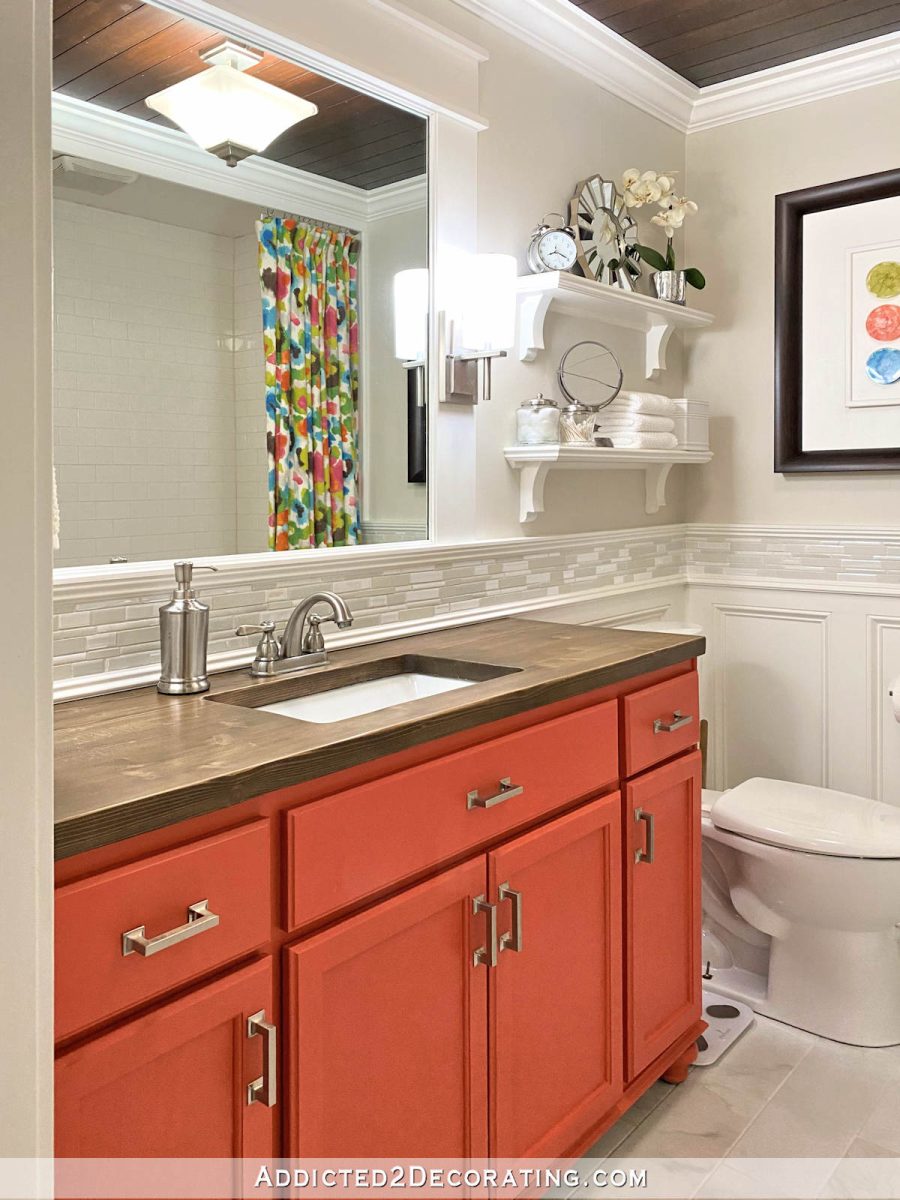
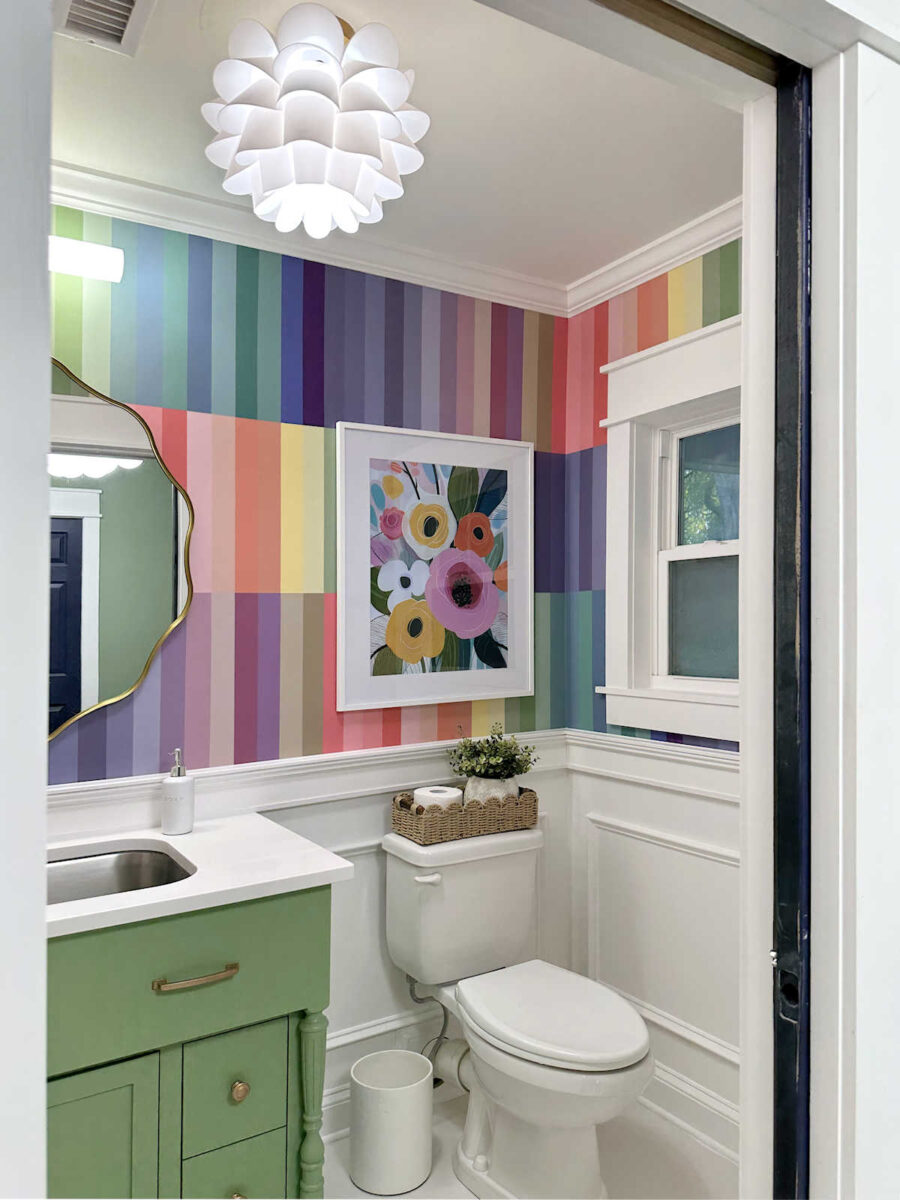
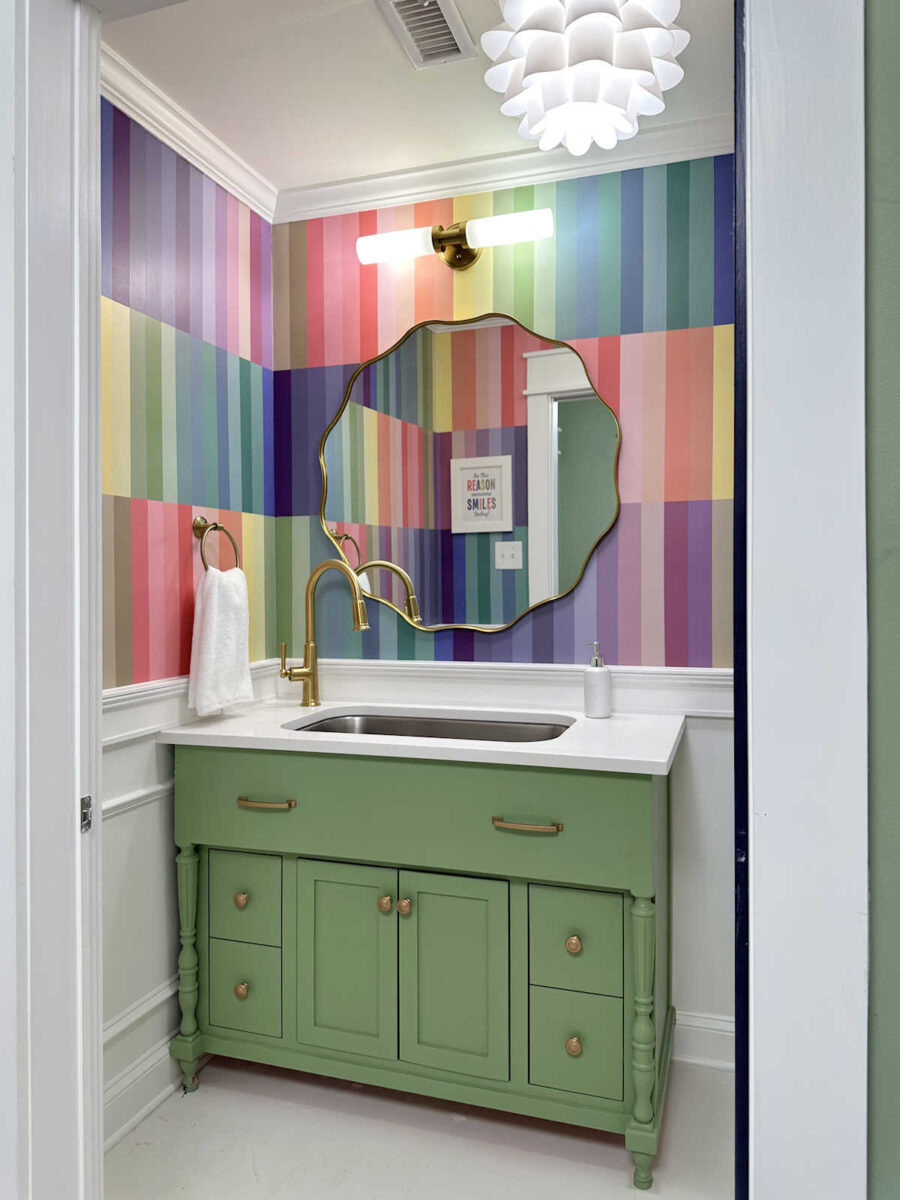
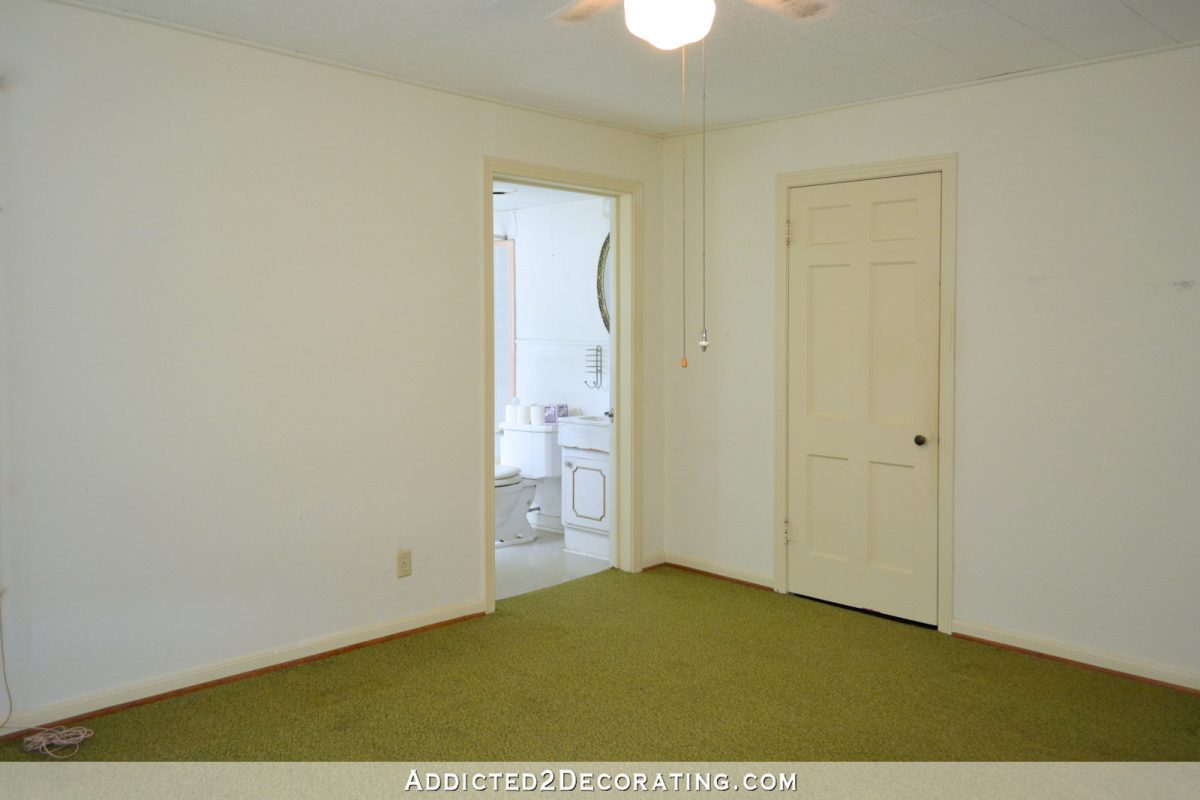
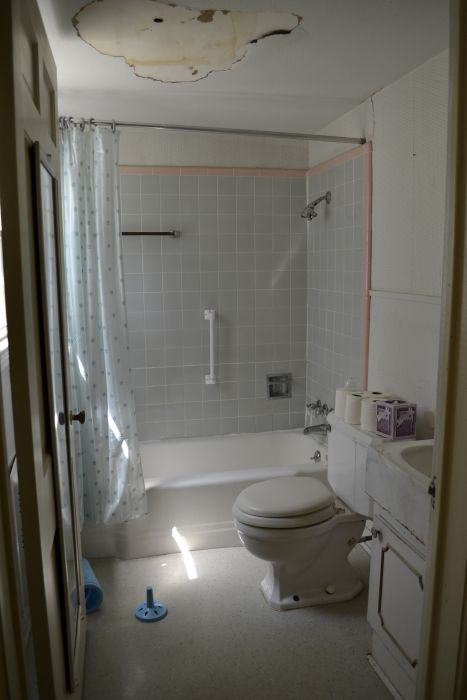
Hallway Bathroom
ORIGINAL:
This is what the hallway bathroom looked like when we bought the house.
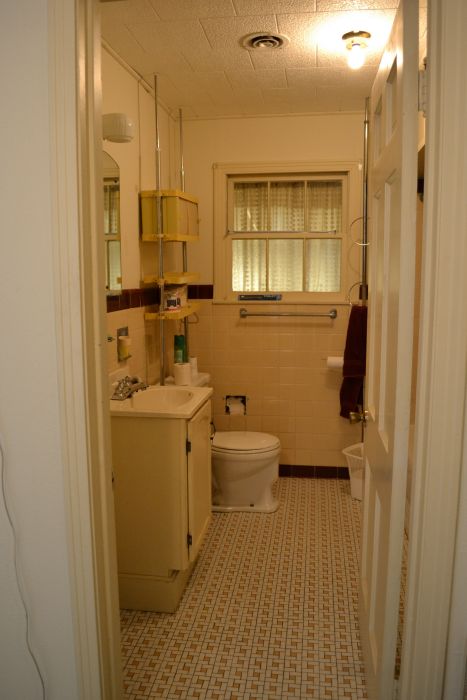
The original bathroom felt even smaller than it actually was because of a narrow door, a door configuration that covered the linen closet, and a huge storage cabinet that had been built right over the tub, making the tub feel very cave-like. The original bathroom had a window that at one time was an exterior window, but when we bought the house, it just looked into the enclosed sunroom, which was awkward.
THE ORIGINAL REMODEL:
This room was the second room I remodeled after we bought the house. This is what it looked like after that original remodel.
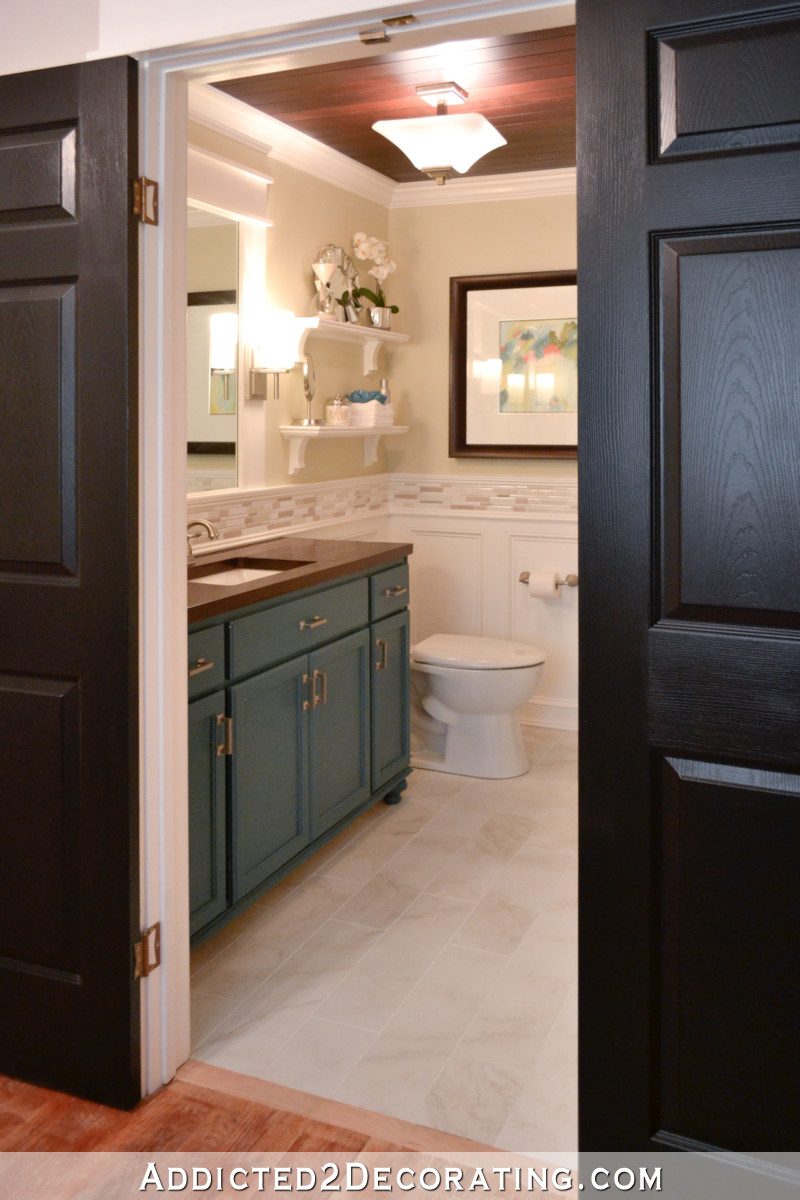
I tore this room down to the studs, floor joists and ceiling joists, and completely rebuilt it. It’s the same size and footprint, but the new wider door and double door configuration make it feel more open. The original linen closet was replaced with a lower cabinet with open shelves above, and I built a much larger vanity to replace the original tiny vanity.
Current:
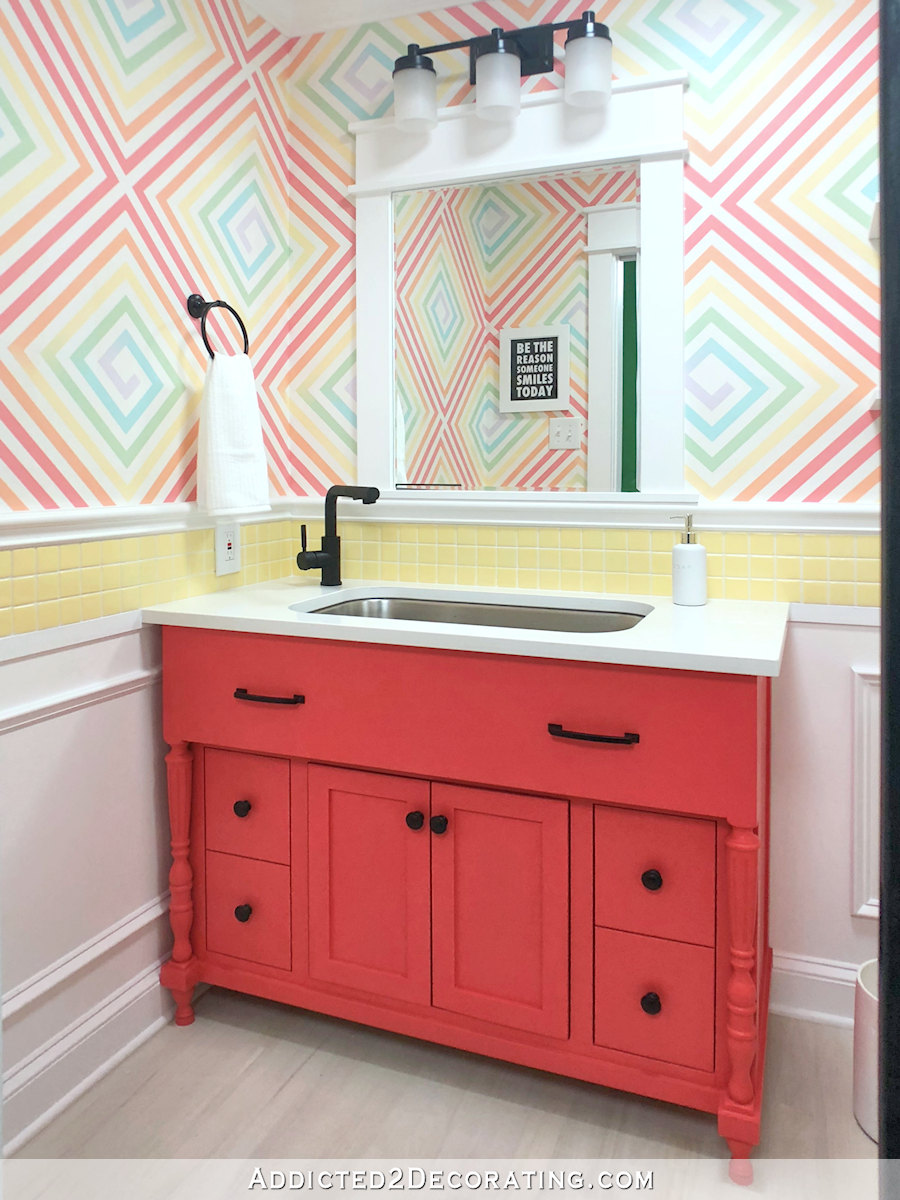
This is what the bathroom looks like now.
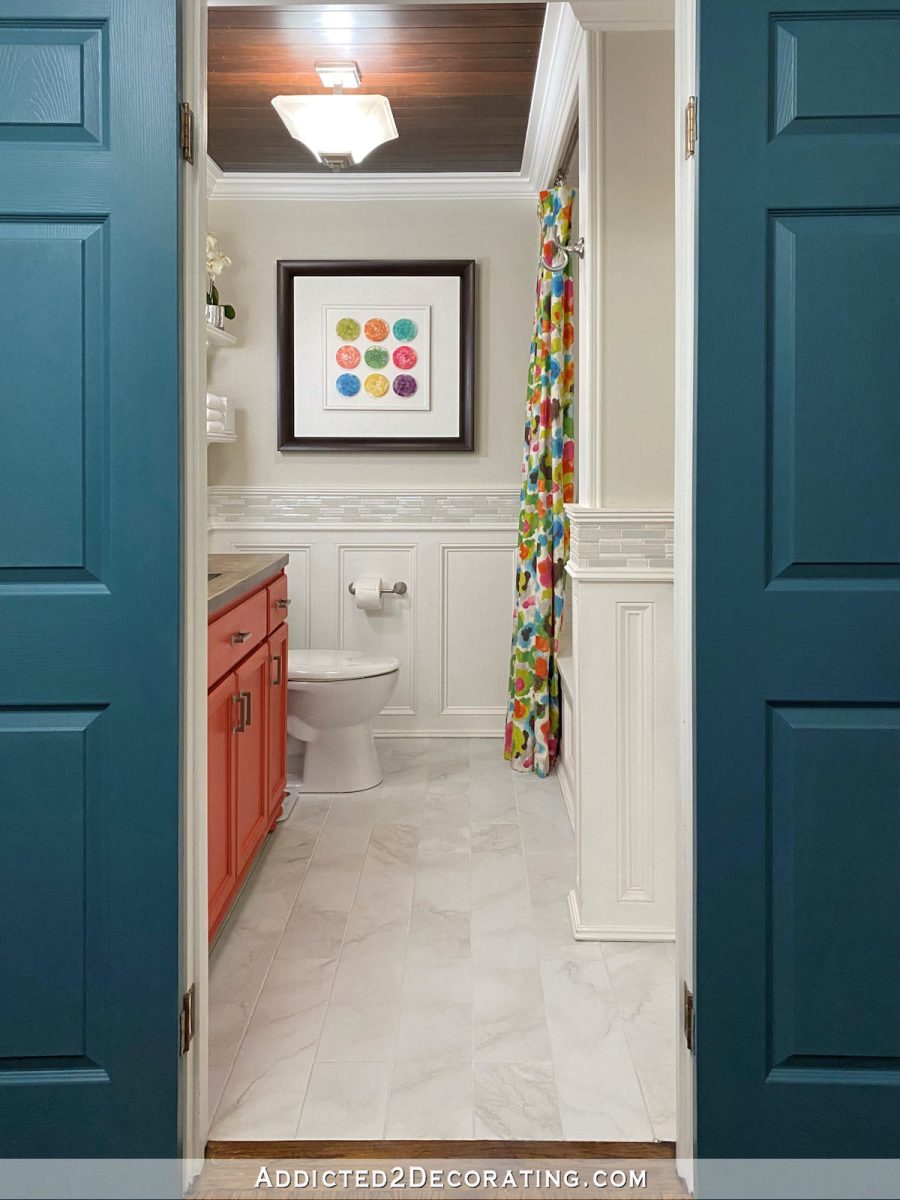
The original bathroom remodel was done before the original hallway remodel. During the hallway remodel, I decided that I wanted the hallway doors (on both bedrooms and the bathroom) to be teal instead of black, so I painted the teal vanity gray. It stayed that way for a year, and then I decided that I couldn’t live with dull gray anymore. I needed color!
So I gave the bathroom a small makeover with a new vanity color, refinished wood (pine) countertops, a new colorful shower curtain, a brighter wall color, and some new art. I also painted some of the mosaic tiles to tone them down a bit.
For now, this hallway bathroom (the only guest bathroom) will be located off of the master suite foyer. I know, it’s a very awkward arrangement. But it will only be temporary! As soon as we can built the addition on the back of our house, that will include the new location of the guest bathroom. Once that’s done, this bathroom will be converted into a second closet for the master bedroom suite, and then the floor plan will finally make sense. But until then, we have to live with the awkward floor plan. But that’s just part of DIYing a remodel of an old house! Sometimes you have to live with an awkward “in between” stage before all is said and done.
Paint Colors:
- Walls (original remodel): Behr Pale Ivy
- Walls (current): Benjamin Moore Classic Gray
- Wainscoting & Trim: Behr Polar Bear
- Vanity (original makeover): Behr Mythic Forest
- Vanity (current): Behr Tandoori
More About Our Hallway Bathroom
see all hallway
bathroom diy projects
read all hallway
bathroom blog posts
Kristi’s Studio (Garage Conversion)
ORIGINAL:
What is now my studio was originally the garage.
While there were two garage doors, presumably making it a two-car garage, the doors were so narrow that it was a very tight squeeze just to get a small Honda Civic through the door. My truck that I had at the time (and was a small one) wouldn’t fit at all. Also, the floor of the garage was about 16 inches below the floor of the breakfast room, accessible via a set of steps at the door. That made accessibility impossible for Matt. So we decided that this area would be better used as a studio/office space for me.
CURRENT:
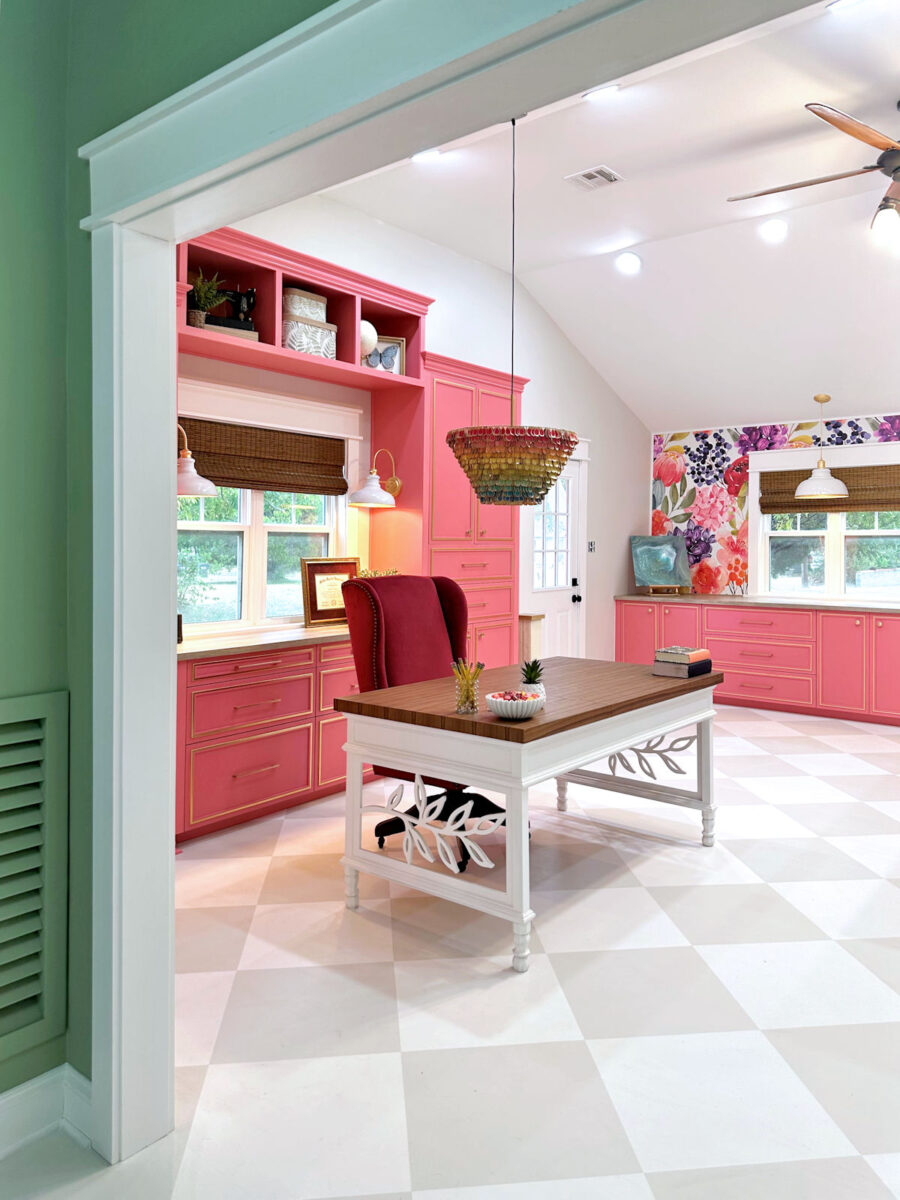
This is what my studio looks like now.

A new pier and beam foundation with plywood subfloor was added to this room so that the studio floor would be level with the rest of the house. There were also some significant structural changes made so that the room could have a vaulted ceiling free from all of the visible (and very low) framing that was in the original garage. And since this is my studio, I loaded this room with lots of color, including a wallpaper that I designed myself and IKEA cabinets that I customized and painted pink.
Paint Colors:
- Walls: Benjamin Moore Classic Gray
- Trim: Behr Polar Bear
- Ceiling: Behr Ultra Pure White
- Cabinets: Sherwin Williams Tuberose
- Floor: Benjamin Moore Classic Gray and Behr Polar Bear
- Work Tables: Behr Black Sapphire
- Bathroom & Closet Doors: Behr Black Sapphire
- Back Entry Walls: Custom mixed green (no formula available)
More About My Studio

see all studio
diy projects
read all studio
blog posts
Studio Half Bathroom
ORIGINAL:
What is now my studio half bathroom was originally a storage room at the back of the garage.
This area originally housed the huge furnace for the house, but when we had the new HVAC installed, we also had the original furnace removed. (The photo above was taken after the furnace was removed.)
CURRENT:
This is how this area looks now. It’s crazy, I know. But it’s my studio bathroom, so I decided to have some fun with it.
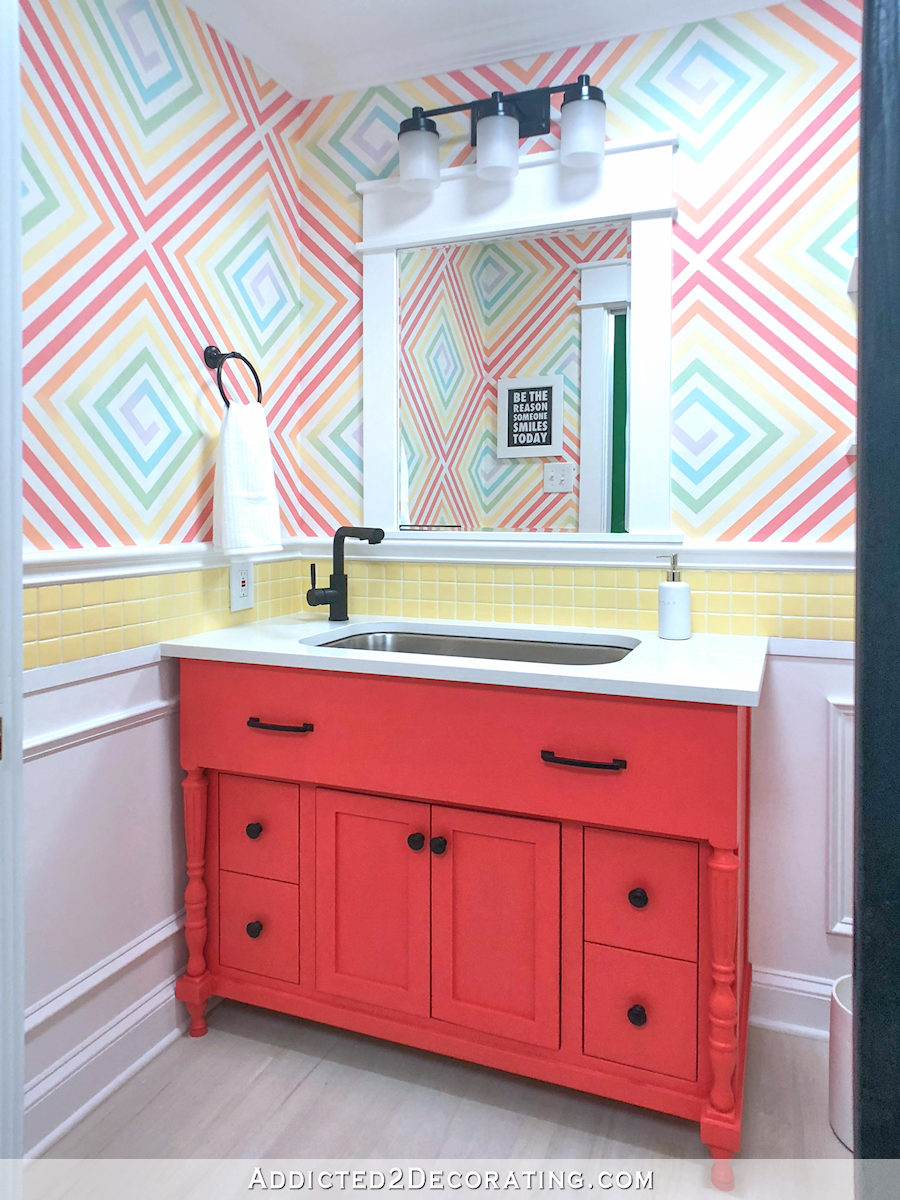
Unfortunately, this bathroom is not sticking around. When all is said and done, this area will be turned into a walk-through pantry that connects our new kitchen (which I hope to start in 2026) to the back doors of my studio that lead out to the carport.
Paint Colors:
- Wainscoting & Trim: Behr Polar Behr
- Ceiling: Behr Ultra Pure White
- Vanity: Behr Roulette
More About My Studio Bathroom
see all studio
bathroom diy projects
read all studio
bathroom blog posts
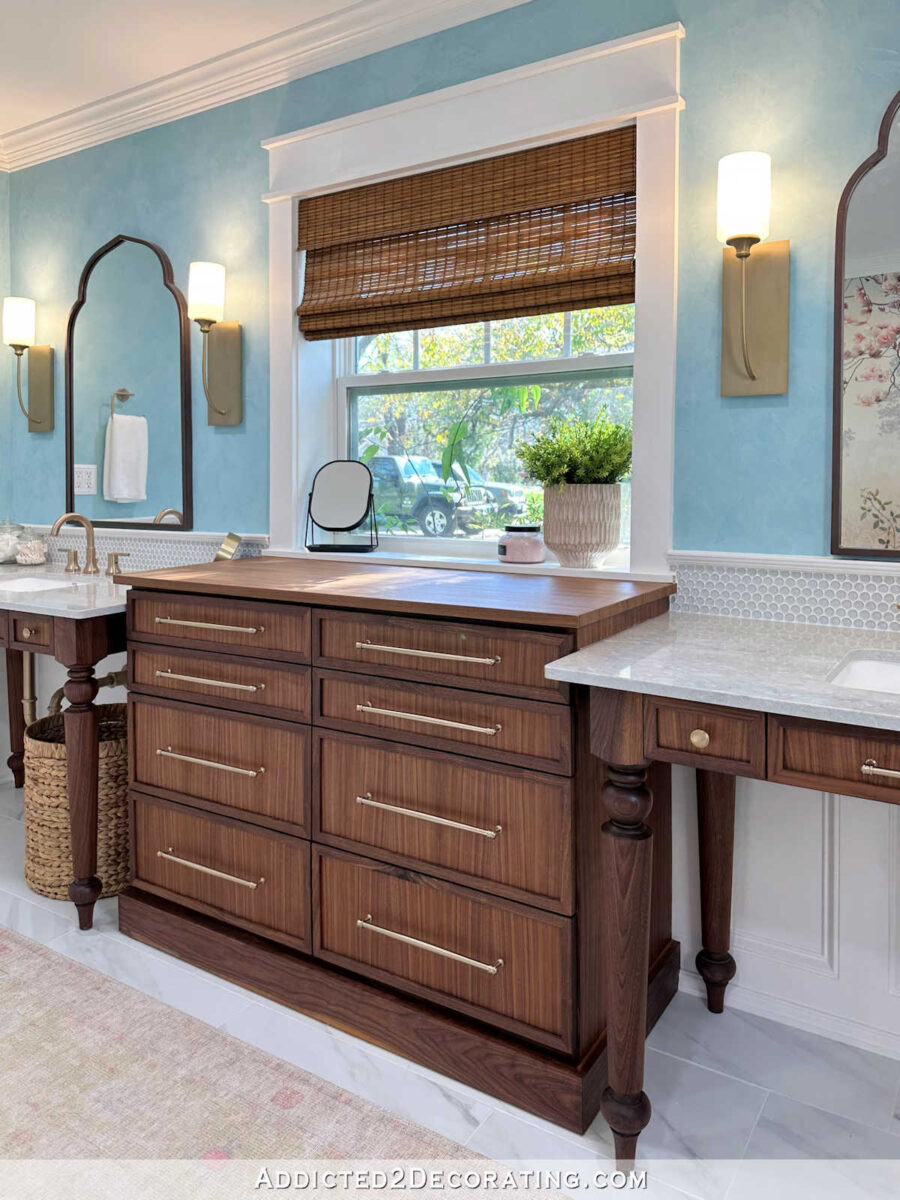
Master Bathroom
ORIGINAL:
This room was the original master bedroom of the house, and it had a tiny, postage stamp-sized bathroom that a previous owner had added.
When we bought the house, the master bedroom matched the rest of the house, with antique white walls, polystyrene tiles covering the ceiling, and green carpet. The room was a nice size, but there’s no way we could have lived with that tiny little bathroom.
CURRENT:
This is what that room looks like now.

We decided to turn the room into a large wheelchair-accessible master bathroom with a big curbless shower and wheelchair-accessible vanities that look like furniture. So many DIY projects went into this bathroom, including all of the tile, trim, and wainscoting, the glass-front storage cabinets in the water closet, a bubble light above the bathtub, two walnut vanities, a walnut storage cabinet, and a Venetian plaster wall finish in a custom color that I mixed myself.
Paint Colors:
- Wainscoting & Trim: Behr Polar Bear
- Walls: (not paint) Custom mixed Modern Masters Venetian plaster
- Ceiling: Behr Ultra Pure White
More About Our Master Bathroom
see all master
bath diy projects

read all master
bath blog posts
Original Master Bathroom
ORIGINAL:
This is what the original “master bathroom” looked like, and I use that term very loosely to describe this room.
I’m including this just so that you can see the “master bathroom” that we started off with. This room is still attached to the house (right behind the current master bathroom), and can be seen from the back yard, but it is no longer accessible at all from any part of the house. The doorway to this room has been covered up with concrete board and tile to create a wall in our current master bathroom shower. When we build our addition, this bathroom will be torn down completely.
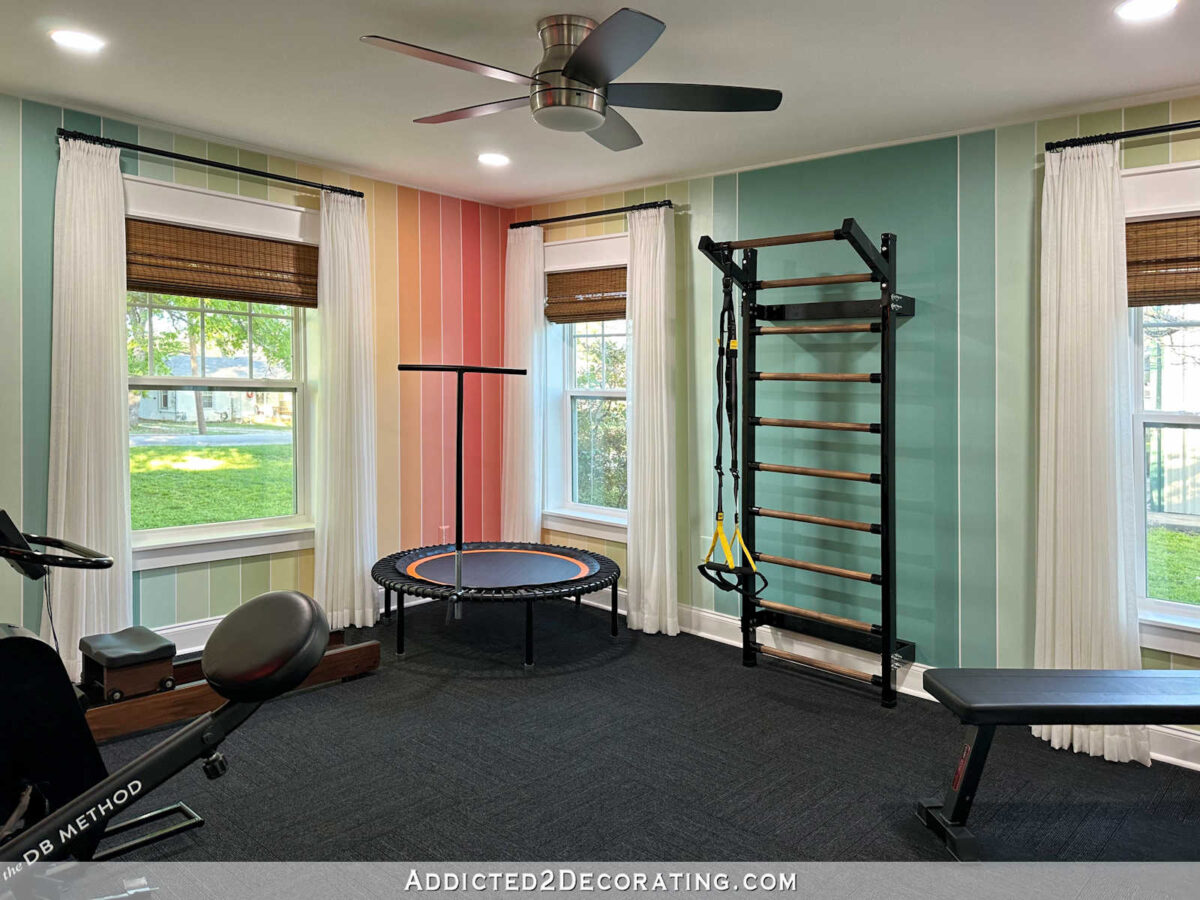
Home Gym
ORIGINAL:
This was the second bedroom in the house, and this is what it looked like when we bought the house.
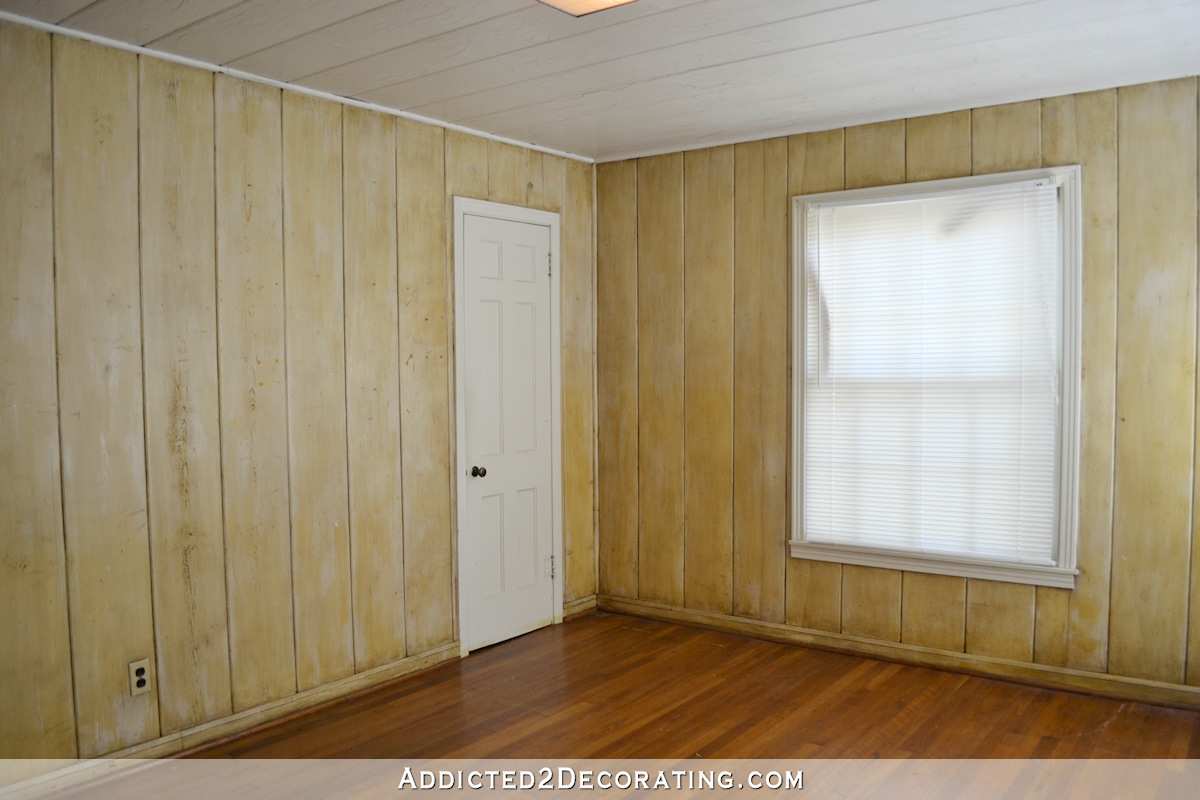
This bedroom was the only room in the house where the hardwood floors were actually exposed and not covered with green carpet. It also had tongue-and-groove wood walls and ceiling.
AFTER:
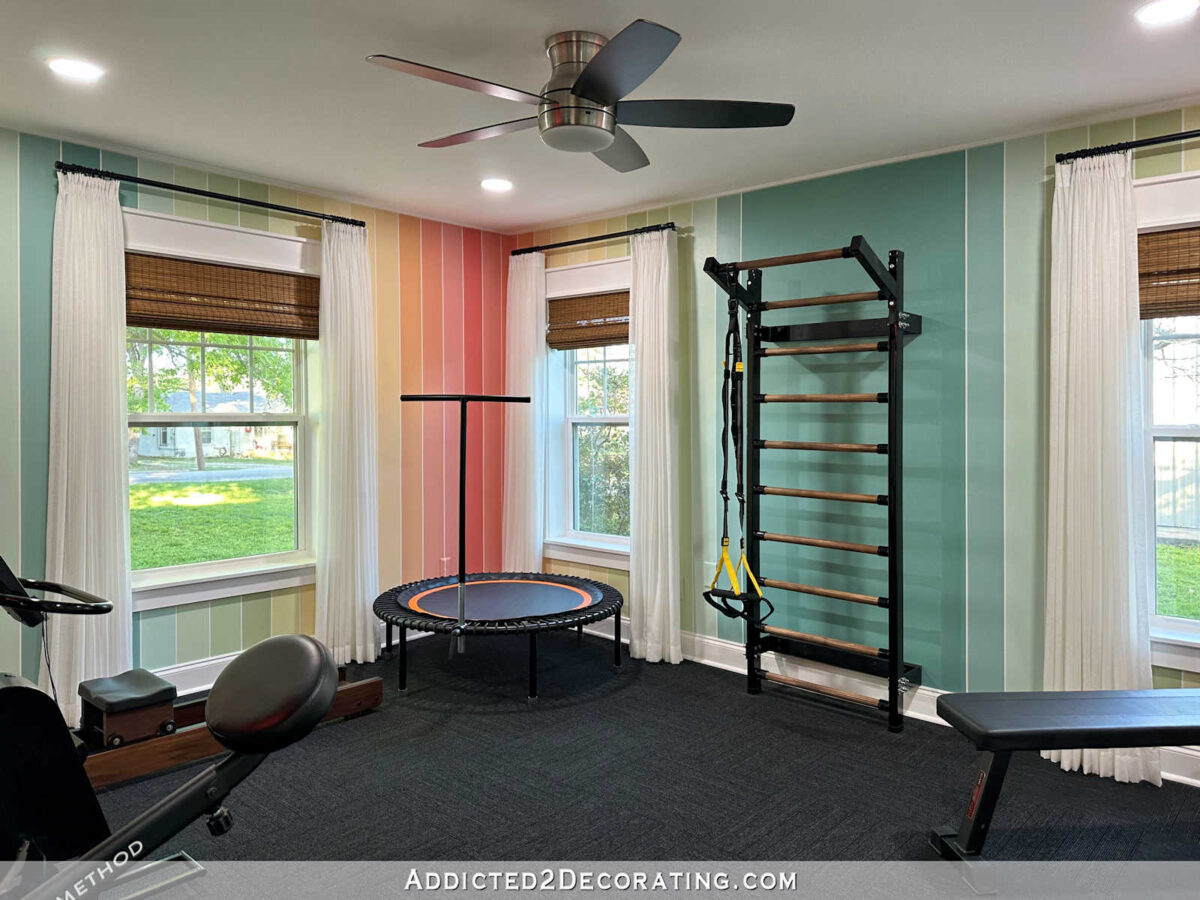
I originally turned this room into our home gym, which looked like this.
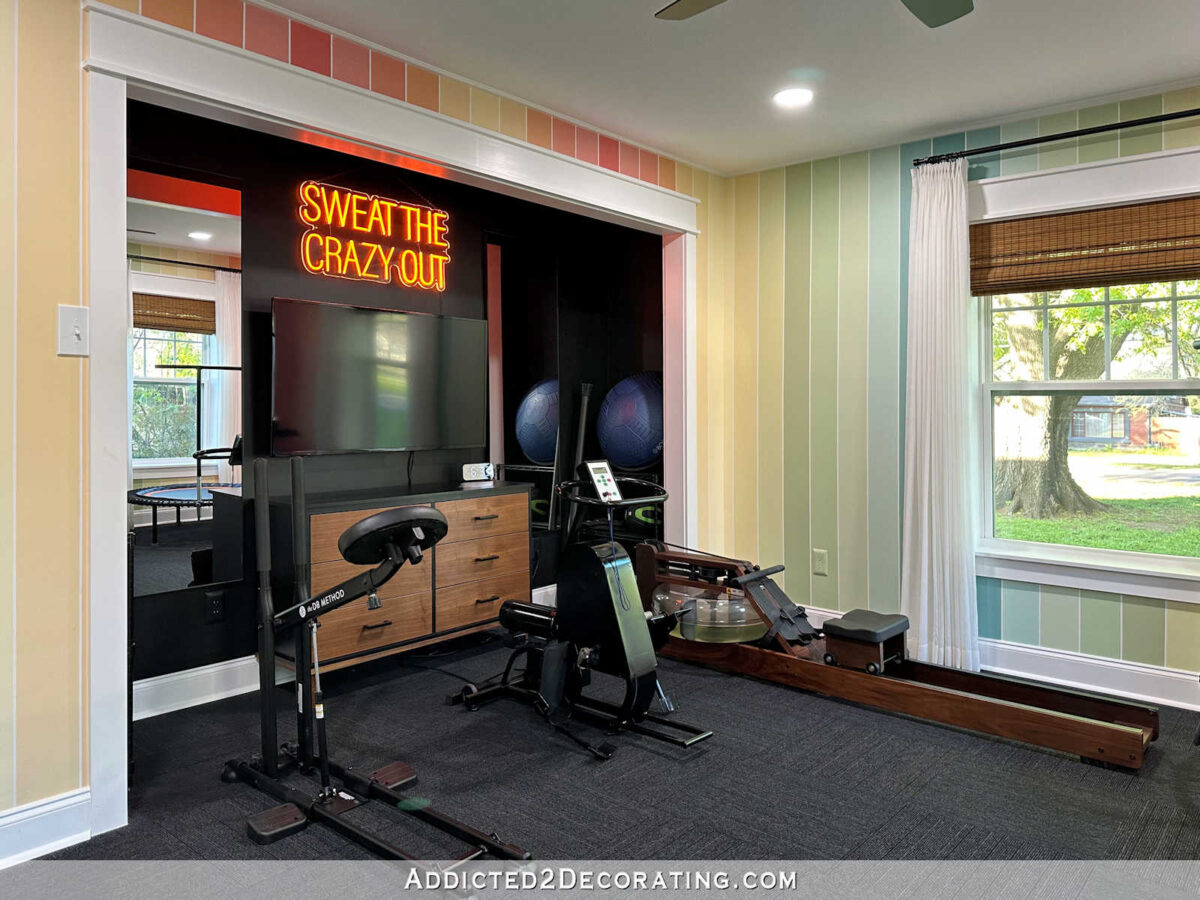
All of the wood on the walls and ceiling was removed, and new drywall and lighting installed. I had the closet in the other bedroom (the guest bedroom) opened up to this room so that the closet in this room could be doubled in size.
I finished the home gym at the end of March 2023, and we got a lot of use out of it until I noticed a huge problem with the floor in the fall of 2024. Water damage had ruined the floor, causing it to buckle really badly, and that required all new subfloor and hardwood flooring. Since the room needed pretty extensive work, we decided to go ahead and turn this room into our master bedroom. Our previous plan, up until that point, had been to include a new master bedroom in the addition at the back of the house. But this was a wrench thrown into our plans, so we changed our plans completely at that point.
So we no longer have a home gym for now, and this room will soon be our master bedroom. It’s currently under construction (spring 2025), and you can see the progress under the Master Bedroom section on this page.
Paint Colors:
- Trim: Behr Polar Bear
- Ceiling: Behr Ultra Pure White
- Wall Stripes (from darkest pink to darkest teal — all Behr colors):
- Watermelon Punch
- Priceless Coral
- Trick or Treat
- Ice Cream Parlor
- Time Out
- Hummus
- Frittata
- Calia
- Modern Zen
- Sap Green
- Avocado Whip
- Airy Green
- Wishful Green
- Spring Stream
- Summer Dragonfly
More About Our Home Gym

see all home gym
diy projects
read all home gym
blog posts
Master Bedroom (In Progress)
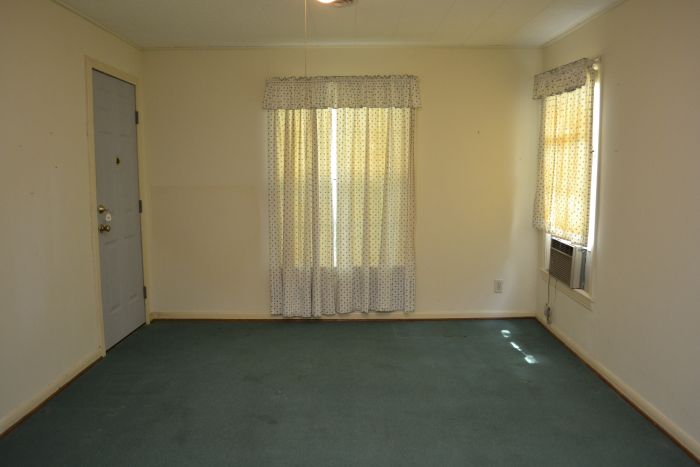
ORIGINAL:
The original of this room is the same original as the home gym. So here’s another view of the “before” of this room.

As I mentioned in the “home gym” section of this page, this room was our home gym for a little over a year before some pretty major water damage on the floor threw a wrench in our plans, and we decided that rather than redoing this room as a home gym, we would turn it into our new master bedroom.
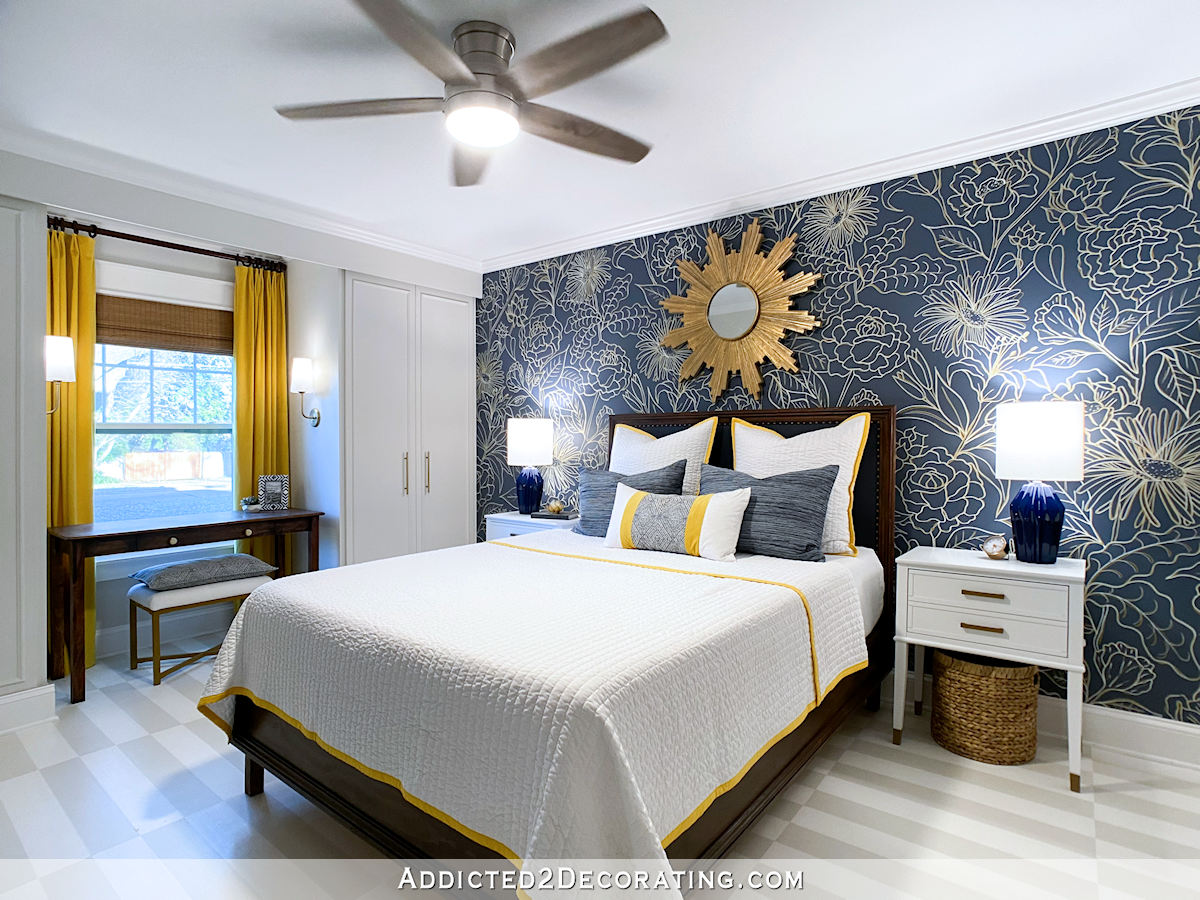
CURRENT:
This is what the room looks like today (spring 2025)
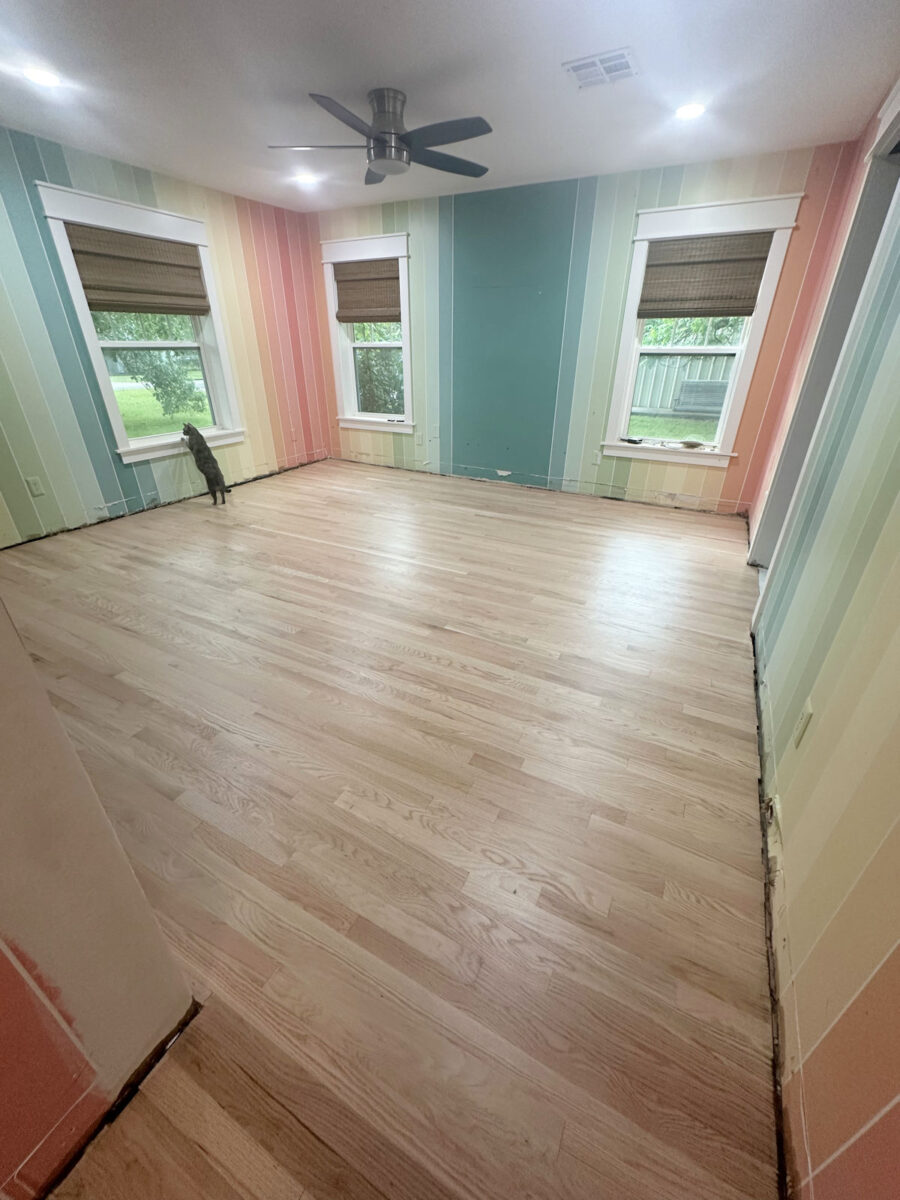
The striped walls aren’t staying. Those were great for a home gym, but I don’t want them in a bedroom. I have lots of changes planned for this room, and I’m hoping to have it finished by the end of summer or early fall 2025.
Paint Colors:
- Coming soon!
More About Our Master Bedroom
see all master
bedroom diy projects

read all master
bedroom blog posts
Guest Bedroom
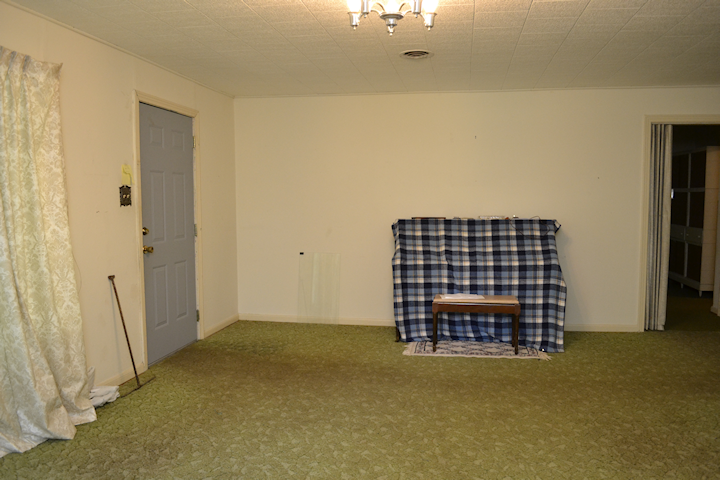
ORIGINAL:
This is what this room looked like when we bought the house.
This was yet another room with green carpet (actually this was more like teal carpet) and polystyrene ceiling tiles. In other words, this room looked like all the rest when we bought the house. This room also had a door that led out to the front porch.
THE ORIGINAL REMODEL:
This is what the room looked like after I turned it into a bedroom.
This room was completely transformed with a hand-drawn wall design and a painted floor. I had the door to the front porch removed when we had our new house siding installed, and I also had the window on the other wall (the window that had the air conditioner unit in it) removed and drywalled over so that I could build new closets flanking the one centered window. This room actually served as our main bedroom for a few years as we planned the big addition on the back of our house, which we thought would include our new master bedroom. But since our plans changed, this room has now been turned into a walk-in closet and laundry room combination. You can see that progress under the Walk-In Closet/Laundry Room section on this page.
Paint Colors:
- Closets & Walls (not the feature wall): Benjamin Moore Classic Gray
- Trim: Behr Polar Bear
- Ceiling: Behr Ultra Pure White
- Floor: Behr Polar Bear and Benjamin Moore Classic Gray
More About Our Guest Bedroom

see all guest
bedroom diy projects

read all guest
bedroom blog posts
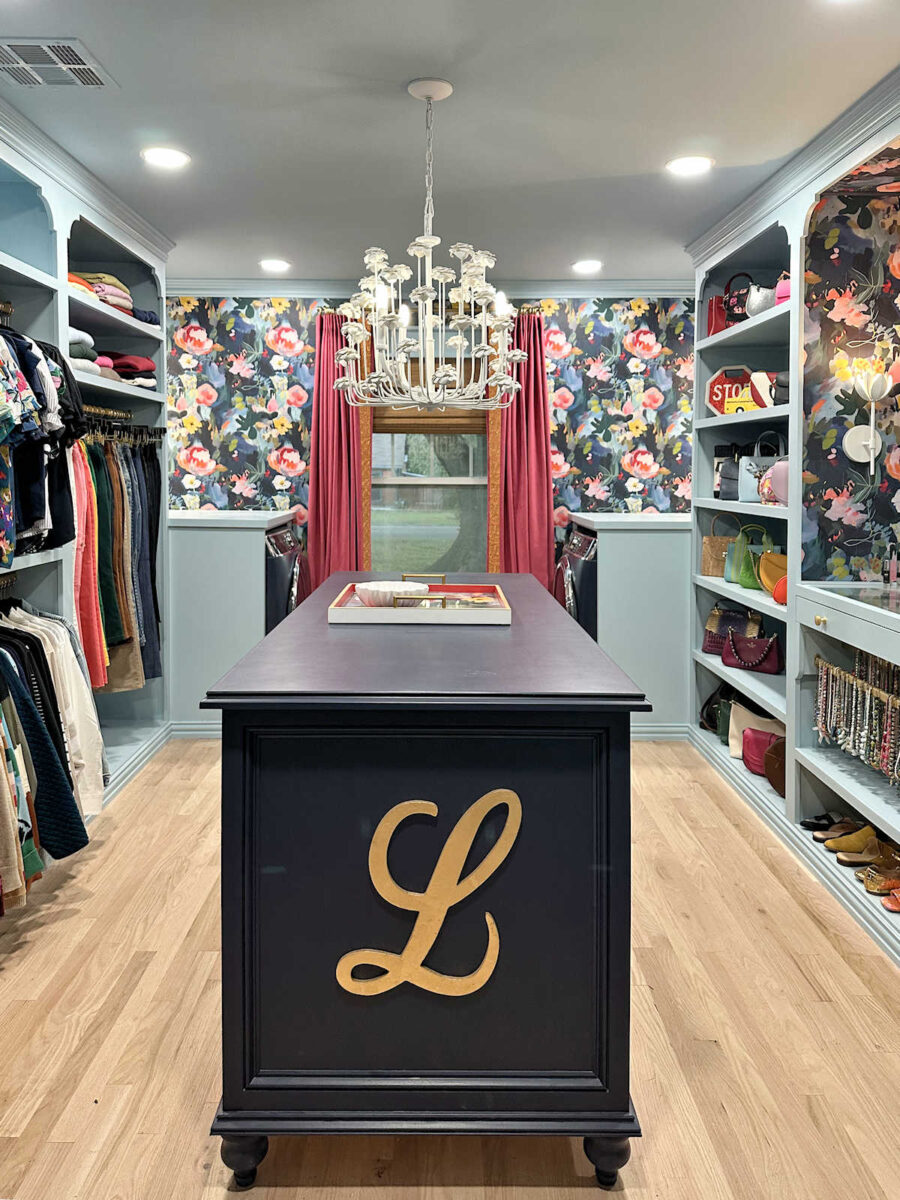
Walk-In Closet/Laundry Room (In Progress)
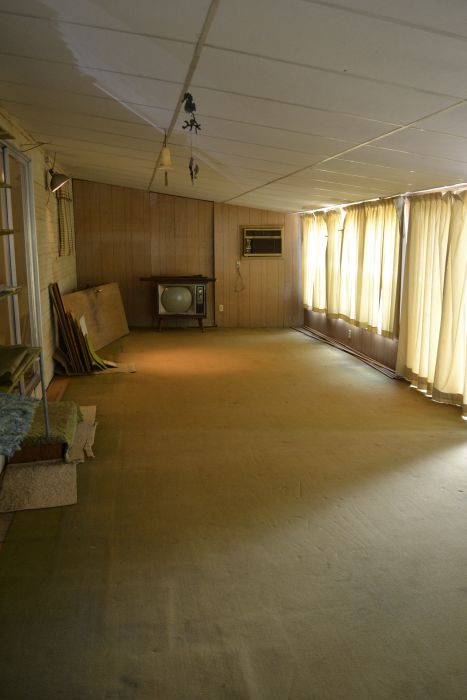
ORIGINAL:
As I mentioned in the “guest bedroom” section above, the original of the walk-in closet/laundry room is the same original as the guest bedroom since this room spent several years serving as our temporary bedroom. It originally looked like this when we bought the house.

CURRENT:
After serving as our temporary bedroom for several years, this room is now being turned into a walk-in closet/laundry room combination, as part of our master bedroom suite. It’s not finished yet, but this is what it looks like now. Please excuse the mess. 🙂
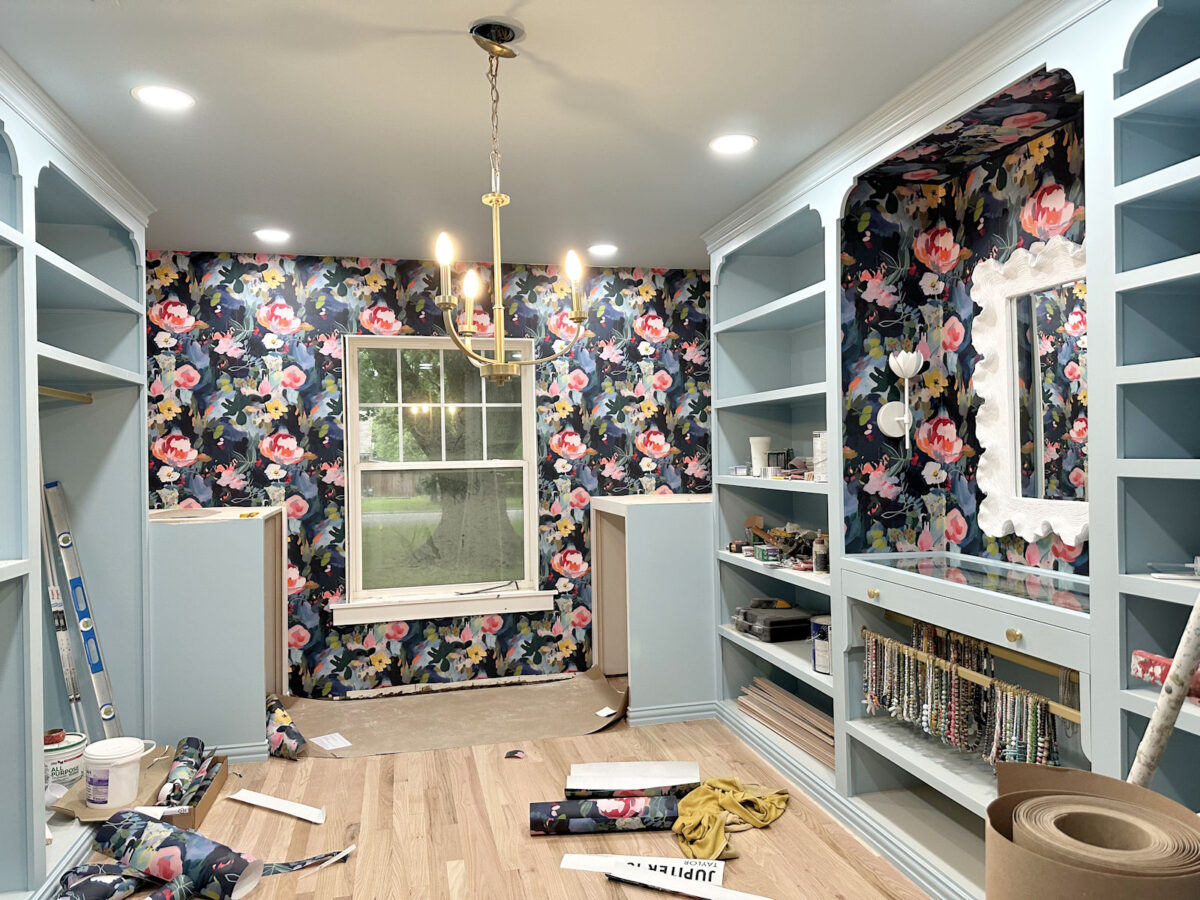
I still have quite a few projects to do in this closet, including building an island for the center of the room, but my goal is to have it finished by the end of May 2025.
Paint Colors:
- Cabinets, Ceiling & Trim: Sherwin Williams Billowy Breeze
More About My Walk-In Closet/Laundry Room

see all walk-in closet/laundry
room diy projects
read all walk-in closet/laundry
room blog posts
Sunroom
ORIGINAL (and CURRENT)
This is what the sunroom looked like when we bought the house.
And it pretty much looks like that today, except that it’s full of tools, paint cans, and other things I want to store. We have no plans to remodel this room. This room was added by a previous owner, and it wasn’t done very well. There’s a big step down from the music room into the sunroom, which makes accessibility impossible for Matt without a very long ramp. The sloped ceiling isn’t even seven feet tall on the back wall. And the “subfloor” below the green carpet is particle board. I’m pretty sure it’s not even attached to anything.
This room isn’t salvageable. It will eventually be torn down completely, and this is the area in which our new family/media room and guest bathroom will be built.
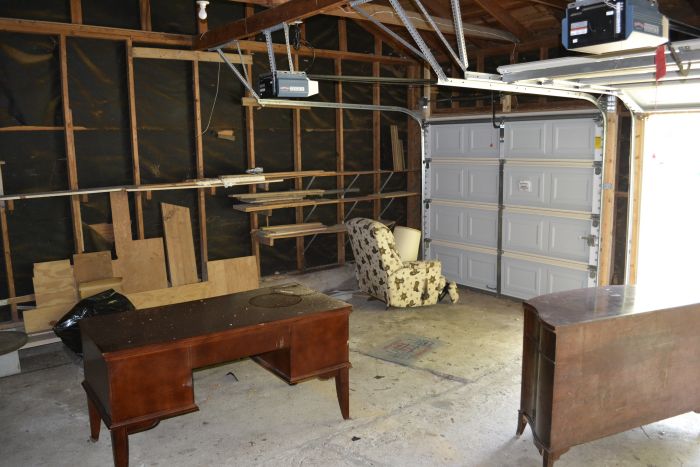
Kristi’s Workshop
ORIGINAL:
This workshop wasn’t here when we bought the house. We had the workshop built in the fall of 2024. We hired out the build to a local shed company, and this is what it looked like when they were finished.
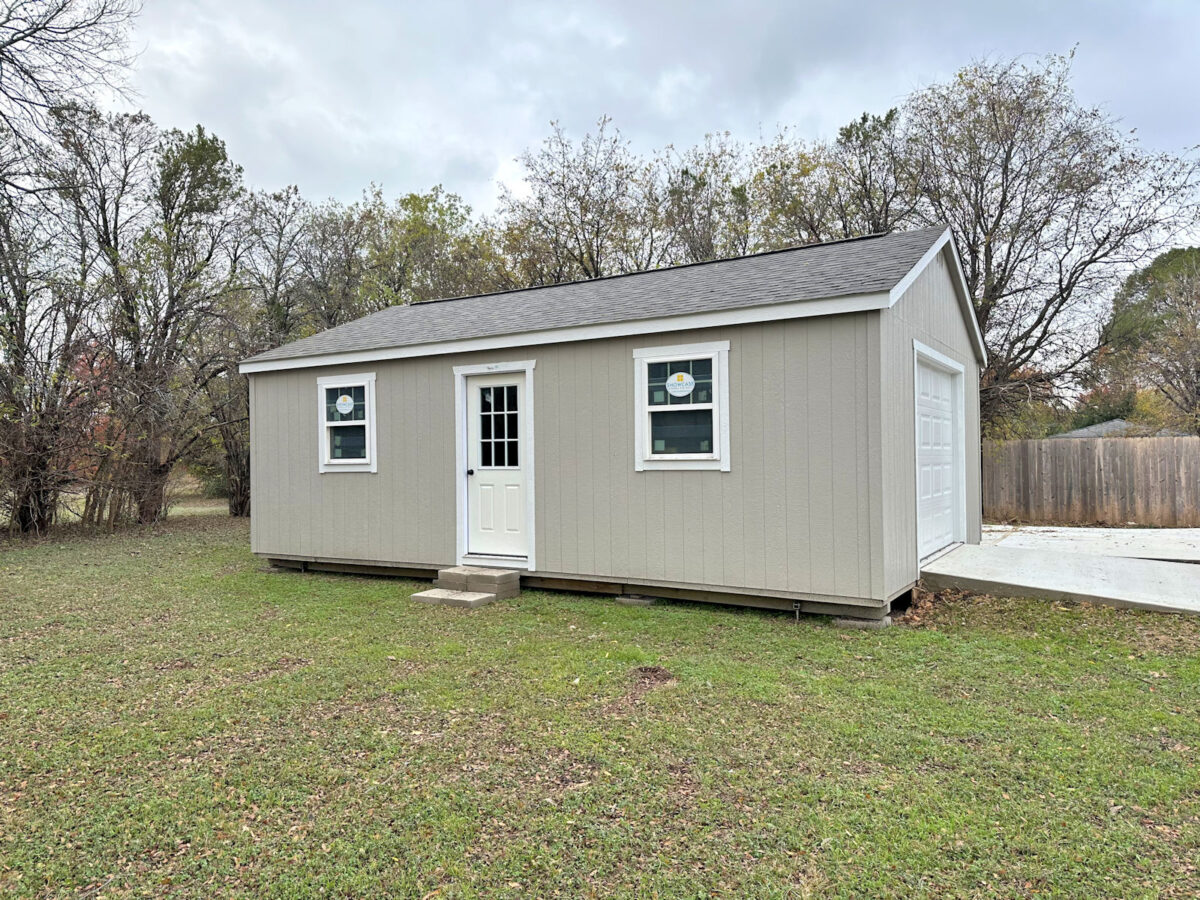
We had a ramp poured from the carport to the workshop at the same time we had the driveway poured.
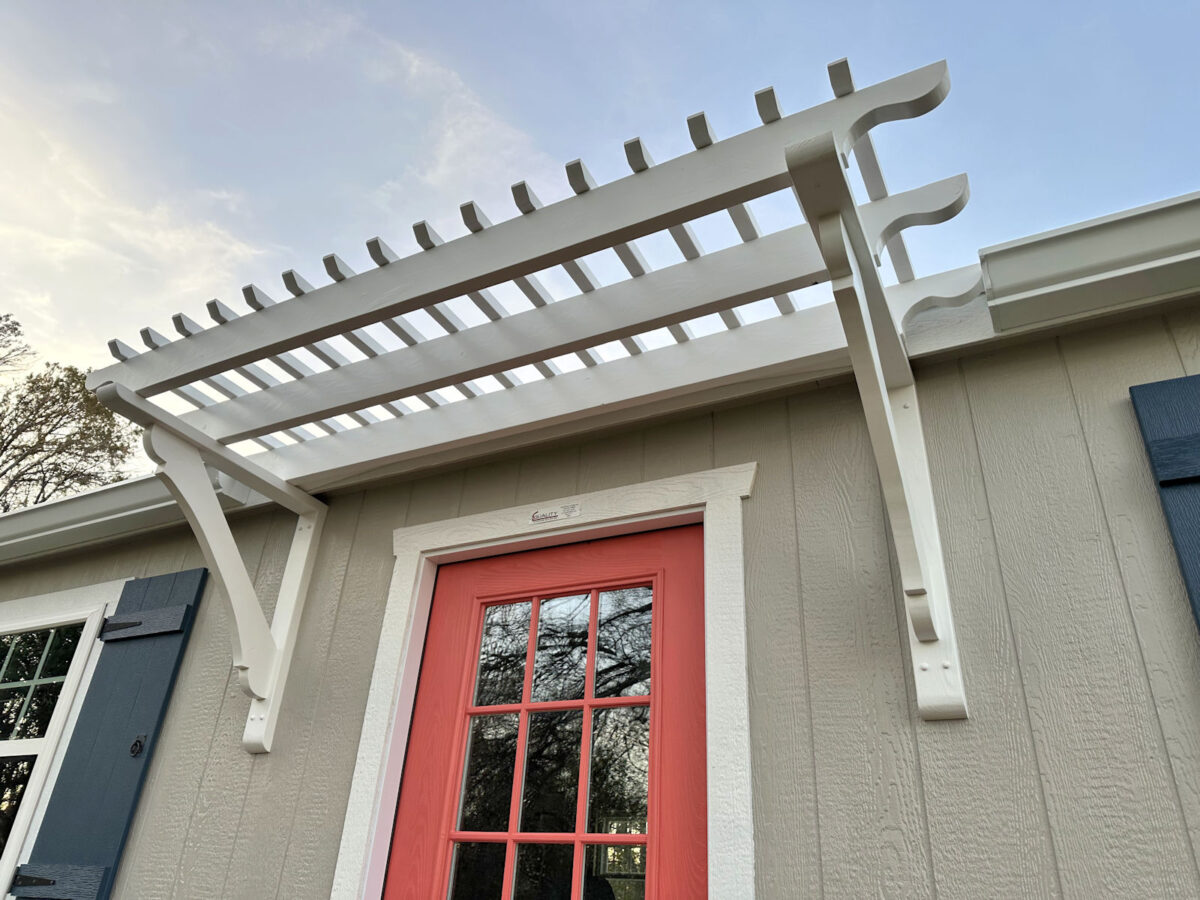
CURRENT:
This is what my workshop looks like now.

I haven’t done anything to the inside of the workshop yet, but I wanted the outside to look like a little cottage sitting in our back yard. I added skirting, new front steps, shutters, window boxes, and a pergola over the front door. I still have a few projects I want to do to the exterior, including installing exterior lighting, a pergola over the garage door, and landscaping. So it’s much improved now, but the exterior is still not quite finished, and I still have the entire interior to build.
Paint Colors:
- Siding: Sherwin Williams Mindful Gray
- Trim: Sherwin Williams Extra White
- Shutters: Benjamin Moore Gentleman’s Gray
- Door: Benjamin Moore Bird of Paradise

Your house is turning out BEAUTIFUL! And coming from such a small 850sft condo, your huge house must seem daunting at times!
That being said, since it is your “forever house”, taking your time and doing it right really is the way to go! You’ve got all the know how and talent to transform it the way that it needs to be to become spectacular!
I’ve been following you for a while now, and it really is a journey that I’m totally enjoying watching, as it unfolds! It really is something to behold! Keep up the great work!!! 🙂
Hi I was googling remodeling ideas and found your website. LOVE it! Thank you for your ideas. Please keep us updated on your house. Cant wait to see the whole thing finished. You have brought back my spark for decorating and remodeling.
Lynn in VA
Your progress is amazing. Your blog is the only one I read! Can’t wait to see each project.
I am enjoying your website. The remodeling and projects are very informative and gorgeous. What you have done at the condo and in your home thus far is outstanding, and am eager for each posting.
I have learned that what I was proposing to do would not be easy as you have just demonstrated (LOL). On top of that, I do not have your vision, skill or stamina in order to do the work.
Anyway, I find one problem with the current and ultimate floor plan is access to the dining room from the living room. If you have formal guests and entertain in the living room, and will serve dinner in the dining room, you must access by going back through the entry, then the music room, into the kitchen and then into the dining area; or alternatively back through the entry, then the music room and through the den (in order to avoid the dinner-in-progress kitchen space), and then enter the dining room. Of course, I could be blowing the dining room access from the living room out of proportion. What do you think?
This was wonderful! Thanks for putting this together. It makes so much more sense to me now. Comparing the befores and afters reinforces my belief that you are indeed a force of nature! Whoa. 😉
The front of your house is going to be delicious! And what you have accomplished so far is wonderful…very impressed with your vision and skill!
Looking forward to more from you…like a gal above, your blog is the only one I read.
Plus you are not a hoarder…let me show you MY garage..lol..you are far from it sweetie.
I think this whole page is GENIUS!! (caps necessary for this level of awesomeness!)
I absolutely love that you have the patience to live in a house that needs so much work in order to get things done in your own special way. It makes the process interesting and reading your blog great.
Just amazing – your talent, your vision and hard work.
Thank you for sharing so much.
You do inspire me to try.
WOW. Just found your blog and I have to say, the title of it is SO misleading. You are SO MUCH more than just a “decorator”! Great great work. 😉
Agreed!
Kristi, do you ever scroll through your before and after photos when you feel a little despondent at how long this is taking. I’ve just done that and my goodness you’ve done so much and so beautifully. When I look at the before photos I think what made them fall in love with this place, and then I look at what you have done to it, and it is simply amazing. You really are a remarkable woman and an inspiration to many.
I do not know if you share information on where products were purchased, but I recently purchased a townhome that was built in the 80’s. I would love to duplicate the doors you have in your “home” on the sliding doors. I would love to replace mine with something that has impact and durability.
Also, is it difficult to do a paneled ceiling, or what material is used on the ceiling especially in the bathrooms.
Would you be so kind to share the door and ceiling information. If not, keep up the great work, I stumbled on your website and have enjoyed your before and after pictures.
Thanks —-Jewell
If you click on the “DIY Projects” tab for each room, you’ll see links to all of the DIY projects that I’ve done for each room. Under Music Room, you’ll find the rolling doors, and under Hallway Bathroom, you’ll find the wood ceiling. Click on those links and you’ll find all of the detailed info for those projects.
Looking amazing! I cannot believe how much you can do and how beautifully you do it. You are an inspiration girl!
Wow! You are so talented! Living room, bathrooms and kitchen are just beautiful. LOVE the green kitchen, it’s the perfect green and the cabinet lighting is inspired. Now I’m feeling inspired.
Thanks for sharing your talent and ideas, just great.
wow! your work is just beautiful.
You’ve such talent.I have been following you a while now.it’s so refreshing that the house isn’t finished..it just makes you human.I find that encouraging.
Best of luck with it Im so lookig forward to meeting all the finished rooms.keepd doing what you do as you do it so well.
You go girl! I have found a kindred spirit. Just like you, doing it myself is a beautiful journey that I must take. I have been looking for a sight just like yours to follow. Thank you for sharing.
Wow you are doing an amazing job! I can’t decorate to save my life. Did you go to school for design? I read that you wanted to. Looks like you did. ?? I lived in Turkey 33 years ago. I love your web site!!!!
I didn’t go to design school. 🙂
I am so impressed. Wow! I especially like the tufted ottoman coffee table and will try to tackle that project. Can you tell me how much extra fabric you measured based on size of board. You have an awesome talent. God Bless
I like to add about 18-20 extra inches on the length and width to allow for the tufting.
Hi, Kristi. I just found your blog and have really enjoyed reading about all of your projects! Your bathroom is beautiful, and I love your kitchen too! We used to live in Waco, and I certainly never saw a kitchen like yours- very European feeling, stylish, and unique. I also appreciate how honest you are about your design process and life in general. It’s so nice to hear the perspective of someone who’s extremely practical, yet loves a beautiful home. I look forward to reading about more of your ideas and accomplishments, and I wish you the best!
The sunroom could be a beautiful greenhouse/3 seasons room.
I think you might just be the coolest person I have never met,lol. Wow, just wow. You have amazing taste, imagination, and vision. Wow….I keep looking at oyur pictures thinking,”I would never have thought of that.”
Thanks for brightening my day today by sharing your home and your journey.
Wow. It gives me hope for my own house and what I might try to tackle once we finally get possession of it! You are really inspiring me! Greetings from Canada!
It’s a really cozy and nice home, that has a modern feel to it.
Just started following you… You are amazing ! Such talent and creativity.. Okay now come on over and help me ! LOL PS: your kitchen cabinets were good enough to keep? our house was built in 1978 and even tho the faces look good still the insides are just horrible.. I need a match 🙁
What a great project! The house is coming along nicely! I hope you saved that cool antique TV that was sitting in the sunroom! The floors are turning out great, and I love the wainscot in the entryway. Living in an old house myself, you are giving me some ideas!
What a great way to present your project! Love it 🙂 I look forward to seeing how it goes along.
You are so awesome. Thank you for being so transparent with your readers.
I really like how you illustrate renovation for real people. Most people have time and budget constraints and you show how to make it possible given those realities, unlike DIY Network, where a professional goes into a house and does a makeover in an hour – lol. I’ve often felt overwhelmed watching one of their shows, while I get inspired by your enjoyment of one project after the next.
Accomplishing one thing at a time makes the journey so much more fun and worthwhile, doesn’t it?
You have a seriously great eye for color and design!
I don’t even remember how I cam upon your site few days ago. I kept looking at your bathroom and comparing the before and after pictures. It finally dawned on me thats my in-laws bathroom! Well, except with pink and purple tiles and minus the storage above the tub. It’s the same size same set up including the window, closet and tiny sink in the exact locations and it so needs to be remodeled. Can’t wait to show my mother-in-law. Hope it will motivate her when she sees it can be done. Thanks for sharing. You are awesome!
By the way I want to open my den into my living room with a french style doors. Any tips on cutting an opening in a wall? You think it can be completed in say 14 hrs while my spouse is at work?
Sorry for the late response! The main thing you have to know before cutting into a wall to create an opening is whether or not that wall is load-bearing. Do NOT cut into a wall without knowing for sure. If you cut into a load bearing wall and start removing studs without taking the necessary precautions, the consequences could be devastating. You could certainly open up a wall and get quite a bit done in 14 hours, but I think it would take longer to actually get it completely finished, especially if you’ve never done it before. I would also strongly suggest that you have a helper. You’ll definitely need one if you find that the wall is load-bearing and will require temporary support during the project.
First off….love your home and what you are doing to it. I am also a DIY gal who loves to see what I can create. Everything is coming along so beautiful. But I must say….your hall bathroom looks twice the size after your remodel. can’t wait to keep following and see everything finished.
I am in awe that you are able to take such a basic looking house and make it look historic and beautiful. It makes me jealous that you have such skills. Absolutely beautiful!
So lovely, I love how you’ve added panelling to the walls, I think it’s really maintained the character of the house, while the decor is so modern.
Oh my such talent; your ideas and results are gorgeous; I wish the right side of my brain was as creative as that. I just bought a house and have to finish the inside; I am so overwhelmed with the details and the only thing I have done yet is put pine on the ceiling.
Love your work and colour choices. We will be borrowing your trim idea for our 1970 bungalow reno coming up in 2017!
Julie from Ottawa
Kristi,
Maybe I missed it, but did you ever consider moving the kitchen into the Breakfast Room space and turning the kitchen into a dining room? If so, I would love to hear your thinking about that.
Love your blog and anxiously look forward to each new post!
Thank you for sharing your journey with us. I bought a 1941 rambler about 3 1/2 years ago and have been steadily refurbishing it on a toddler-size shoestring budget. I’m finally working on my kitchen and hope to have it finished by the end of March. You’ve inspired me!
You SHOULD be a general contractor. I’d hire you, that’s for sure. The areas you’ve finished are simply astounding. I LOVE that bathroom. So unique and classy!!
Absolutely LOVE your vision and design!!!!Can’t wait to see all the things you will be doing to the rest of your home!!! Just beautiful……and the Entry Way???? Knocked my socks off…love it!!
Love the way you put this remodel together old by new. I’ve clicked back and forth several times to try to capture how you got to new. Hope to see the project finished, it’s like watching a movie and can’t wait to see how it ends. I’ll be checking back!
You have such a great sense of line and composition. First decorating site I’ve subscribed to!
I love your entry way mural! I stumbled on your site on how to make Euro shams and then read your other diy projects. I love diy (to saves $) and I deplore purchasing anything with “retail” mark ups. Your diy projects are so inspiring! I also hang my curtains as high as the ceiling too to add a drama, theatrical look. Looking forward to see more updates on the rest of the rooms in your house.
Hello! All I can say is OMG!!! I have become an “empty nester” recently. To improve my mood from missing my boys, I decided to spruce up the house. I found your website when I was looking for ideas and am so glad I did. I love seeing the transformation of your home. You have me hooked!
You are quite the inspiration, young lady!
Thanks for the tour!!!
Hi, Kristi. Having just found your site gives me more appreciation of what a lady (YOU) can do! I live in a small 1950 built house and am trying to come up with a solution for basement ceiling cover. Cannot use drop ceiling due to pipes lower than joists. Fabric tacking doesn’t appeal to me … all that trapping of dirt. Yuck. Is there a way that I could send pictures to you? Your other followers may get some
Sure! You can email me at [email protected]
Just found your site. Girl, you are so talented! Your vision is truly a gift and I don’t have it. Another amazing thing…your website is so easy to navigate. I appreciate the way you’ve set up your tours for each home and room (before, current, DIYs, etc.). So glad I found you. Thank you for sharing your abilities and progress with us!
You did a great job. I was a lot of hard work but I’m sure it was worth every effort.
Hi Kristi, I found your site through a random search along the lines of “do people get depressed during a home renovation” which led me to the blog article you wrote describing just that! I want to thank you for so candidly and kindly (and in such an organized way!) sharing your projects + thoughts on renovation/remodel/redecorating. Good for you for following your dreams and going back to your interior decorating passion, you are an inspiration to follow your heart! Your website gave me some much needed comfort in knowing renovation blues are real, and some much needed inspiration + hope from seeing the beautiful results after the hard work that you put in. Thanks for sharing your updates, and like other interior decoration admirers here, I do hope you will continue to share the progress of your projects.
Love everything you have done so far! Looking forward to your house being finished 🙂
Hi Kristi. I gotta make a guess what you do next. Garage and half bath? Or Matt’s game room? Or did I guess both wrong?
Kristi – Gosh, I’ve been following you since ‘way back in the condo days. I get a kick out of reading comments of newbies to your site. They’ll become fellow blog addicts, I’m sure, in large part, because you are a dynamo and don’t keep us waiting for much of anything. You’re always on the move! But the comments/questions that always get me are the ones that start, “Did you ever think about doing…..such and such………?” I think it takes a long time fan to understand how thoroughly you think through every teeny detail, and then sometimes re-think, and then do, and then re-do, because you want it the way you want it! I love that, by the way! Every iteration of each project is more beautiful than before. I’ve said it before, and I’ll probably say it again: There must be something in the water in Waco!! Much love!
Yes Kathy. I so agree with you on the newbies 😂 I too have followed and watched for a long time and sometimes laugh out loud as I’m reading wondering…..haven’t they ever gone back and looked at/read other things as well? I followed a long time before ever posting, to just get a feel of how Kristi does things! I love it!
I love your story. For a long time, I couldn’t WAIT for that pantry project. I loved every minute. Now I can’t WAIT for that studio project. I am excited that Matt wants to start the addition (TeamMATT! Go Matt!). I barely watch TV anymore. I follow you and a handful of YouTubers. Better than anything on TV!
I have walked into houses like yours, or looked at them on line, and thought: “Oh, no, no, no, no. There is no possible way to even work with what is there. And yet you have transformed the areas that you have done in such an amazing way, and they are gorgeous spaces. I look at them and think, “Oh my god, that’s gorgeous,” even if they are sometimes have a wee bit more color than my heart yearns for. I love your blog. I love that you love what you love and have no f*cks to give for those who want you to paint things white. And I love that you can just put some of those rooms on the back burner and let them wait their turn until you can make them fabulous. And that you just kind of quietly turn it into a house that is accessible for you hubs and just beautiful. Did I mention that I love your blog? Go you.
❤️❤️
Ahh, your house looks really lovely! You did an amazing job and I love how you styled everything. Thanks for the lovely pictures!
I’m a newbie to your website! Love and amazed at your energy and talent. Would like to know if at any time you had to consult an electrician, plumber, or structural engineer in your remodeling. We are redoing our master bathroom ourselves, and its taking a lot of time and
learning. You’ve helped out in some of that learning BTW 🙂 You do such beautiful work!
I LOVE all the color in your home! White and gray is so boring to me, and it’s refreshing to see big and bold pops of color throughout your house (and your old condo.) Love your style! <3
Hi Kristi! I’ve been following you for many years (condo days). Your creative inspiration has helped me in many of my DIY ventures. While no where near your level, I’m very proud of what I accomplished on a super tight budget. Been a mostly SAHM to 5 kiddos (now working PT). Kids are now ages 5, 9, 18, 19, 23. This used to be a sad rental home with mismatched gloss white paint on every surface. Old cheap beige carpet throughout. The kitchen amounted to 1 wall of counters & cabinets. We repainted everything before leaving to sell. Expanded the full bath, added half bath, added tons of storage, moved laundry to main level from bsmt, changed floorplans on both levels to maximize function. https://www.zillow.com/homedetails/651-Albemarle-Ave-Cuyahoga-Falls-OH-44221/35317237_
Thanks, Ella
Kristi! You’re so inspiring. Ive been toying with taking on my own picture frame molding project but I usually just end up hiring high end carpenters. The problem is I have very particular taste and I’m nervous I won’t pull off the same quality job my contractors can do. I just paid several thousand just for small picture frames to be added to a small area. I’d like more in different places but can’t help but thinking I can do it myself. I really want to tackle some built ins in my home library, too. The quote I just received was staggering, and they’re not even large.
Thanks for so much inspiration! I may go buy a nail gun & miter saw today :).
I bought my house in 2017, and I’m still working on it. I have no one but myself to go to when I want something done, unless I pay for someone to come do it. Between a full time job, and my other responsibilities, it feels impossible to get things done! You are an inspiration for me. I see what you have accomplished with your skills that you have learnt, and on a budget, and it makes me strive to accomplish making my home, my forever home, the home I have always wanted. Thank you so much for these posts, and for showing how you always work thru the doubts, the stress, and the insanity of taking on something like this by yourself. You really inspire me when I am in doubt that I can do it.
I have followed you for years and love everything that you’ve done. I think it’s great that you teach step by step, how to do all of it. So many blogs are not so generous and I’ve learned a lot, especially your woodworking and framing techniques. Thanks for a wonderful blog!
Your house is stunning. I have a friend (my decorators as well) who turned her carport into a party room/carport. She still uses it to park her cars but she also uses it for parties and it is stunning. The back wall of the carport is a wall of various colored bottles on rods. Like yours hers has an open soaring ceiling with exposed beams. Anyway I thought I would pass that on to you. I don’t know if you do a lot of entertaining. She does so it just made sense to make the room do double duty. Your house is nothing short of stunning. I love your decor because it is unique, imaginative and dynamic and nothing is expected or predictable. You have your own style and nothing you do is cookie cutter. Most online decorators have a very predictable hotel boutique look but you do not. Your house looks like a house and a home not a hotel. It is comfortable looking and so inviting. I love it. I took a long hiatus from Facebook so I am just catching up on your progress today and loving it.
I must say, in my opinion, you are a master carpenter with a doctorate degree in creativity. I was amazed at the AFTER photos of every room in your home. I just subscribed yesterday and do not know all the details of your projects here in your home yet, not do I know your background yet. I’m going to enjoy reading everything about you and all your work on ADDICTED 2 DECORATING. I am curious about how many square foot in your home. It looks very spacious….giving you a nice large canvas for your many talents and super designing skills. I will be making more comments as I scour you site from time to time.
You are a topnotch designer that knows gorgeous colors well!
I really enjoyed stumbling upon your work; absolutely amazing.
Love the colors throughout your home and your details are great.
Blessings and keep doing what you are doing. You are a master at
creating lovely spaces that come alive with freshness within a home.
SarahKate
Nov. 1st, 2021
yes, just found your lovely work
I used to regularly check your home remodels years ago and happily came up on them randomly today. You have come a long way and its just as beautiful.
I don’t even know how I reached your blog but I’m so glad I did! Your use and balance of colors is amazing to me. I can’t believe that I would love this much color in a home! It’s so thoughtfully put together. I wish I had your DIY chops and eye for color. Brava!
Absolutely in ling with your design choices. They’re all just os much fun, and they really make me want to put a bit more of myself into my living spaces. (though admittedly, I rent st the moment, so I probably can’t go but so far.)
Thanks for sharing this 🙂
t’s been such a joy following your incredible journey from that cozy 850-square-foot condo to your beautiful, spacious house. The transformation has been nothing short of breathtaking, and I can imagine that managing such a big space must come with its challenges, but you’re handling it with grace and expertise.
The fact that this is your “forever house” speaks volumes about your dedication to creating the perfect sanctuary for yourself and your loved ones. Taking your time and doing it right is absolutely the way to go, and your know-how and talent shine through in every step of the process.
I’ve been an avid follower for quite some time, and watching your journey unfold has been a true pleasure. Your attention to detail and commitment to excellence are truly something to behold. Keep up the amazing work!
Now, if I may offer a little tip from a fellow home enthusiast: consider investing in some luxurious duvet covers for your new bedroom. They not only add a touch of elegance but also make life incredibly comfortable. After all, your “forever house” should be the epitome of comfort and style. Keep shining, and here’s to many more beautiful transformations in your future! 🏡💫 #HomeSweetHome #InteriorInspiration #DuvetCoversForComforthttps://homesweetlinens.com/product/brome-down-duvet-by-cuddledown/
WOWZA!!! I realize that these rooms were done several years ago but I discovered your site today via Facebook and I must say I’m completely blown away by your ability to see the before condition of that property and have a vision of what it could be. I felt excitement with each room I viewed. I’m not even able to pick a favorite room because they are all so terrific.
I love how well-organized your blog is! It’s wonderful seeing the progress and projects. It has come so far. As of right now, the link lists with all of the posts and projects for each room aren’t showing up. Not sure if you were aware that they broke!
I’ve been perusing your site and OMG! What talent(s) you have! I’m blown away by the transformations and very much admire what you’ve done. I’d love to hear how you learned to do all this??
WOW! I was looking for some inspiration and boy, did I find it. Your home is beautiful. Did you always have a knack for design or how did you learn it? I struggle with creating spaces that I love. What is your secret?
I’m mostly self-taught on everything I do, and it all came through lots of trial and error. 🙂 Mistakes are the best way to learn!
I love that you are not afraid of color! Your home is beautifully done and feels like a Monet painting to me! My husband is having physical challenges and may need a new bathroom layout! Can’t wait to explore the designs and layouts of your new bathroom! Thank you! Your home sparks great joy and sunshine!
Lisa Elliott
North Texas
Your journey from condo living to restoring a 1948 fixer-upper is truly inspiring! Excited to see how each space transforms with your DIY projects.
https://www.fenceanddeckconnection.com/decking/
I am so inspired. You have such an incredible vision for your surroundings, but more than that–such discipline and follow-through! I work from home, so I’m constantly thinking I should be able to do this stuff; however, I’m an AUDHD Capricorn, so more often than not I end up hyper-fixating on work (I’m an author and editor) rather than making my living spaces more beautiful and efficient. Thank you for sharing your journey with us.
One question: where on earth do you keep the litter box? Constant struggle here!
The white cabinet that I built in the hallway had a cat entrance on the bedroom door side of the cabinet, and that whole bottom section housed the cat litter box. When I removed that cabinet to turn that whole area into the master bedroom suite, I moved it into the studio closet. It’s not ideal, and I hope to find a better place in the future, but it’ll do now. For now, I keep the door cracked so she can get in and out. If I decide to keep it in there, I’ll put the cat entrance (just a cute circle cutout of a cat head with ears that has a cat-sized hole in the middle that you can use in a door or wall that I found on Amazon) in the wall so that I can close the closet door.