My Bedroom:: Closet Progress
Good morning, all!! Happy Monday to you!
Well, I admit that I didn’t get nearly as far on my closet this weekend as I had hoped, so this post may seem a bit boring. Also, the photos aren’t the best. I had to take them with my phone, because I’m trying a little experiment with my regular camera, and it can’t be moved until the closet is finished.
Anyway, moving on…
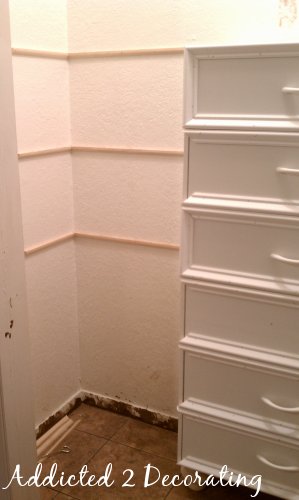
Remember what my closet looked like in its “before” state?

I know, I know! Awful, right? If you think that’s bad, you should have seen it before I removed all of the clothes and the jumbled heap of shoes and random items that had found their way into the closet. But I didn’t take that photo, because while I try to be an open book, that would have been a little too humiliating.
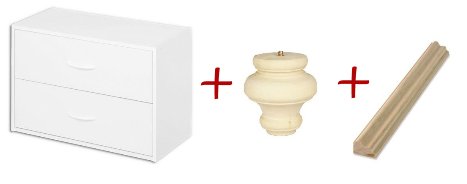
So as I mentioned on Friday, I went to Lowe’s and picked up three of these guys…

These were the cheapest storage units with drawers that I could find, at around $36 each.
To the equation, I also added some 4-inch turned bun feet and some trim (mine is pre-primed) from Home Depot.
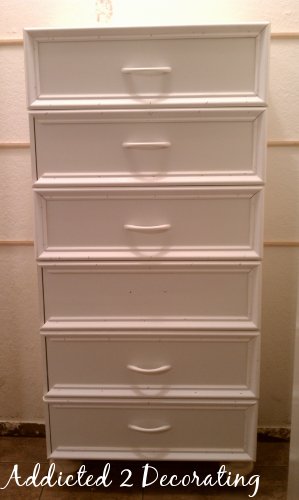
I still have four drawers that are missing trim on the left side (because I have a rule that I don’t use my saw after a certain time in the evening), but here’s a glimpse of what it looks like. The horizontal lines on the wall are the support for the shelves that will be going in soon.
You can see how the trim covers the gaps beautifully. I will also be adding new drawer pulls in place of the cheap plastic ones that came with the drawers.
This next picture was taken just after I got the horizontal strips of moulding on the drawers. Unfortunately, with this camera, I forgot to take a picture before any moulding went on. But you can still see how each drawer had gaps all the way around, making it looks very cheap. Ha! It was cheap, but when it’s finished, hopefully only you and I will know that. 🙂

And one more picture of the whole piece, again with only the horizontal pieces of moulding installed, but you can see the cute little turned bun feet.
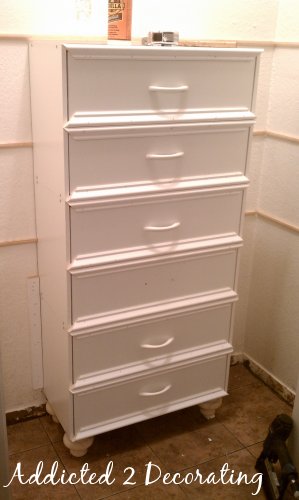
I actually had no idea that Home Depot carried feet like that until about a week ago, when I just happened upon them. I was incredibly excited, and even more excited at the price! They were $7.77 each, which is cheaper than I’ve been able to find them online in the past. I think I paid about $10 each for the ones I used on J & A’s dresser.
As you can see, I still have all of the detail work to do…fill in nail holes, corner cracks, and paint. Yep, I’m going to paint these. I know lots of people say you can’t paint melamine, but I’ve done it several times with wonderful results. You just have to sand it, just like anything else, to give it some “tooth”, and then use a quality primer and paint.

There’s still so much more to do!! The closet walls will be painted the same wall color of the bedroom, and the shelves and drawers will be painted the trim color. I’m still debating whether or not I want to use baskets as storage in the closet, because when I was wandering the aisles of Home Depot yesterday, I had an idea for something I’d possibly like to make instead of baskets, so we’ll see. We’ll see how much energy I have when the big items in the room are done. Those finishing touches will come last.
So there it is…that’s my progress so far! Sorry about the not-so-exciting photos today. I’m really hoping my little experiment with my other camera works out, because I think it’ll really be fun to see–kind of a time-lapse video of sorts showing the progression of my closet transformation using still photos.
Alrighty, time to stop rambling and get to work. Hope you have a wonderful day!!

Addicted 2 Decorating is where I share my DIY and decorating journey as I remodel and decorate the 1948 fixer upper that my husband, Matt, and I bought in 2013. Matt has M.S. and is unable to do physical work, so I do the majority of the work on the house by myself. You can learn more about me here.
Wow, you're dedicated. I have a chest of drawers inside my master bedroom closet, too. It sports the very first faux finish I ever tried, some 20+ years ago, and it matches n.o.t.h.i.n.g. I occasionally look at it and think "I need to do something about that." Then "Eh, it's in the closet!" Looking good, Kristi. 🙂 (BTW, my posting problem appears to be a glitch with Safari. No problems with Firefox.)
Wow, what a fantastic idea. I may do a shameless copy in my master. Can't wait to see the finished project.
It looks fantastic already. What a great idea. I have those plain looking, builder's special closet organizers. I'm getting my miter saw out right now.
It looks fantastic already. What a great idea. I have those plain looking, builder's special closet organizers. I'm getting my miter saw out right now.
Wow, what a fantastic idea. I may do a shameless copy in my master. Can't wait to see the finished project.