Thinking Through Storage Room Details
I’m still working away on the concrete faux “stones” for my front porch skirting, and it’s looking like I won’t meet my goal to have my outdoor projects finished up by my birthday this weekend. I’m a little disappointed, but I’m working as fast as I can, and I’m not going to leave projects unfinished just because of an arbitrary deadline that I placed on myself. So I will be finishing up the front porch (finishing the concrete faux stone skirting and painting the wood porch), installing the new front porch lights, and painting the area around the new bedroom door. Then I’ll get all of those areas, as well as the area around the side studio door, cleaned up, and I’ll be done with the outdoor projects for now. I hope to return to them in the fall.
After I reach that stopping point outside, I’ll finally be working on the storage room in our bedroom suite. If you’re new here, the room I’m talking about is a hallway bathroom that used to be our main guest bathroom, but has since been subsumed by our master bedroom suite. And since it’s rather odd to have a guest bathroom inside of a master bedroom suite, and I really need more storage for Matt’s equipment, I’ll be turning that guest bathroom into a storage room.
For now, that bathroom is hidden behind closed doors in the foyer of our bedroom suite.
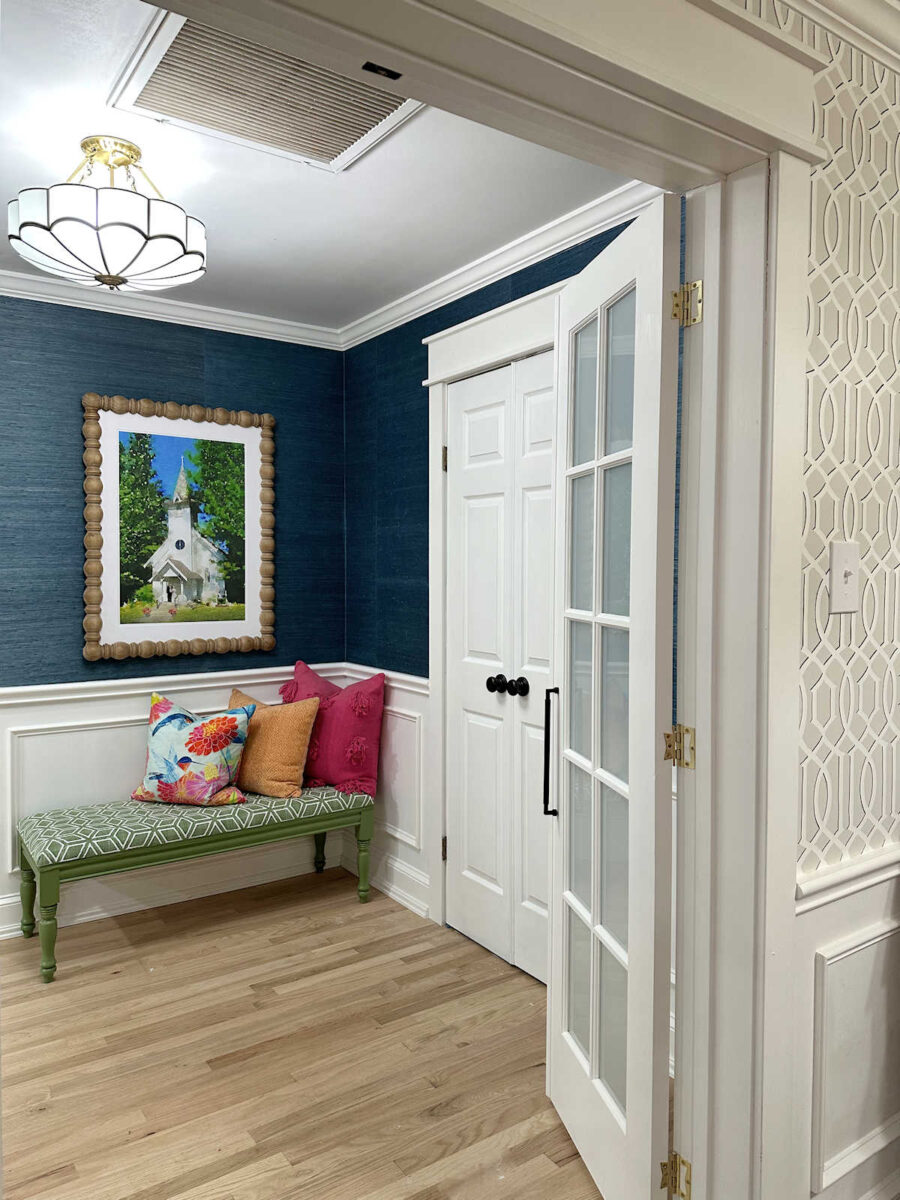
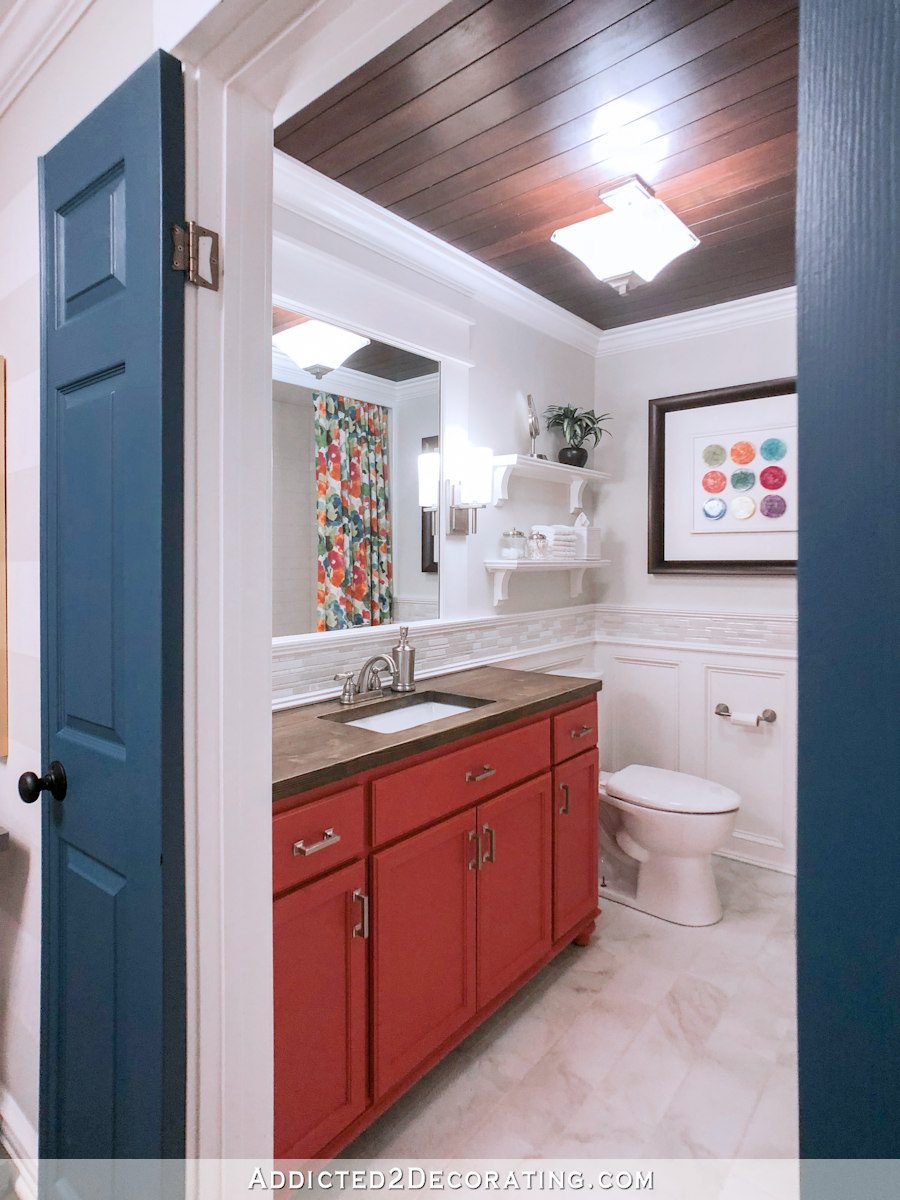
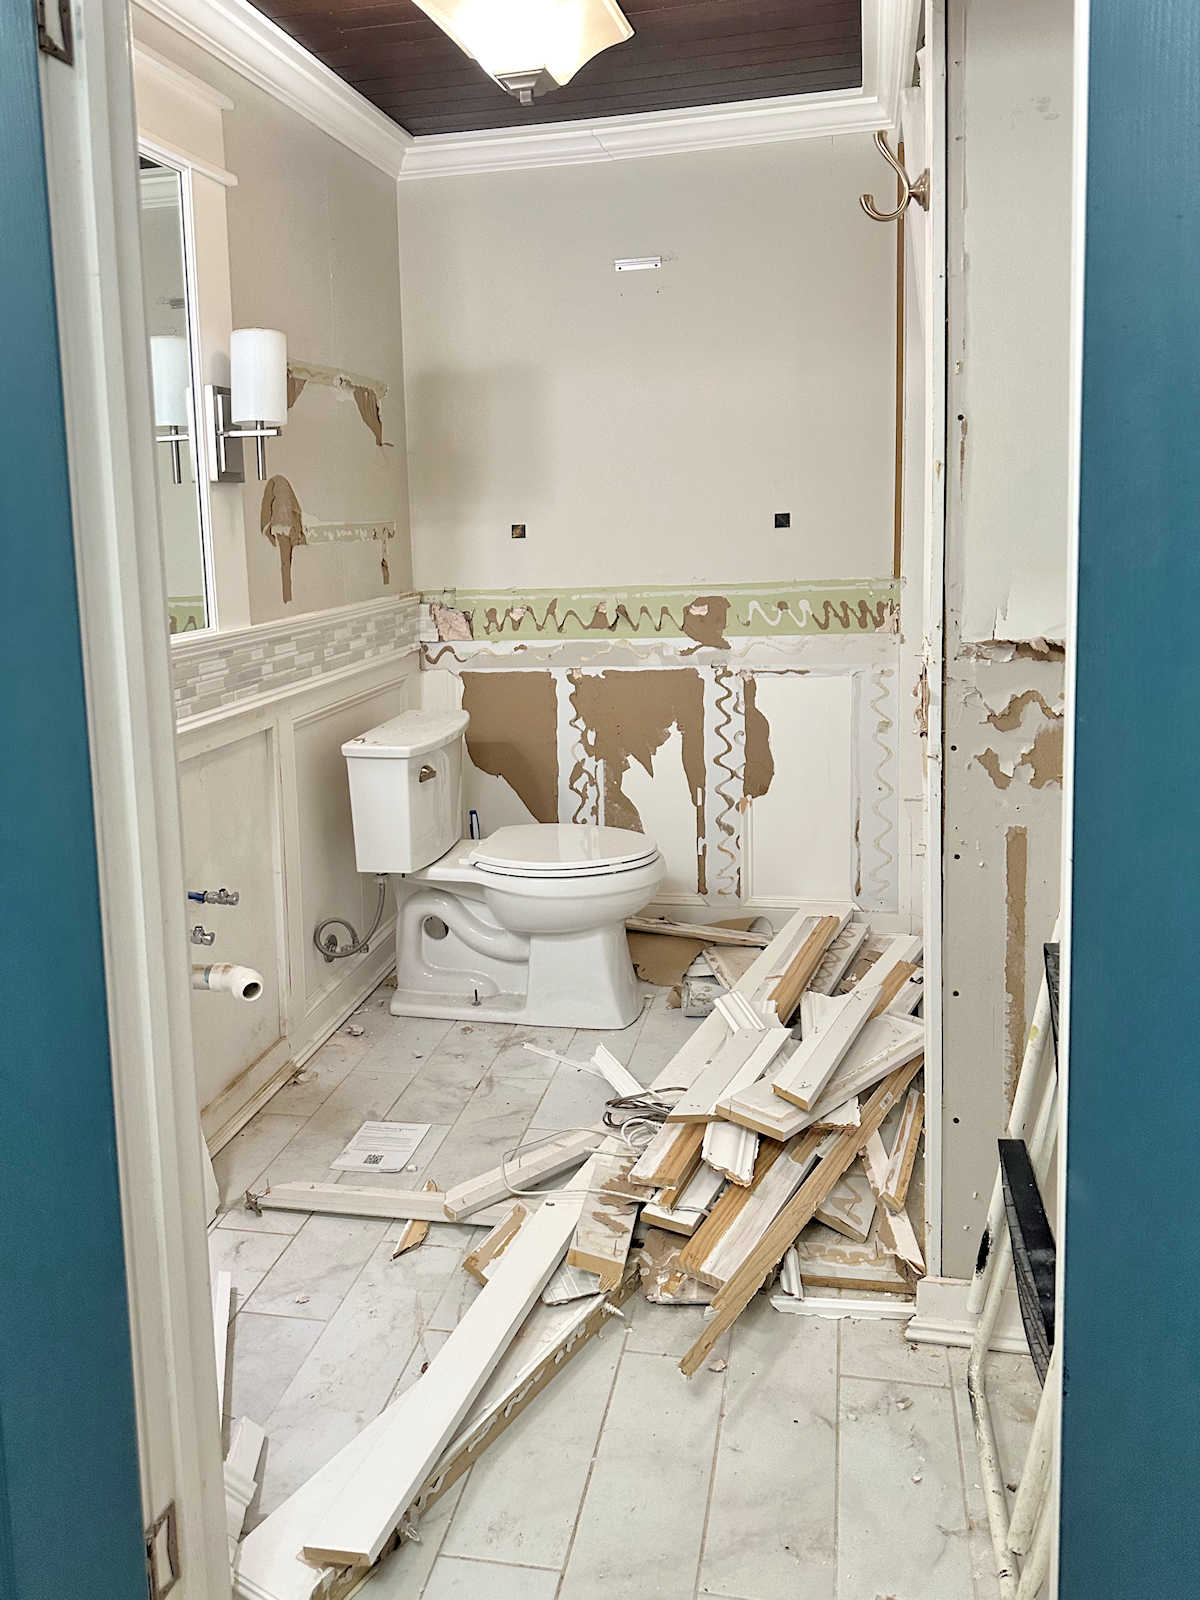
I’m so glad that it can be hidden away because that bathroom/future storage room, which used to look like this…
…currently looks like this…
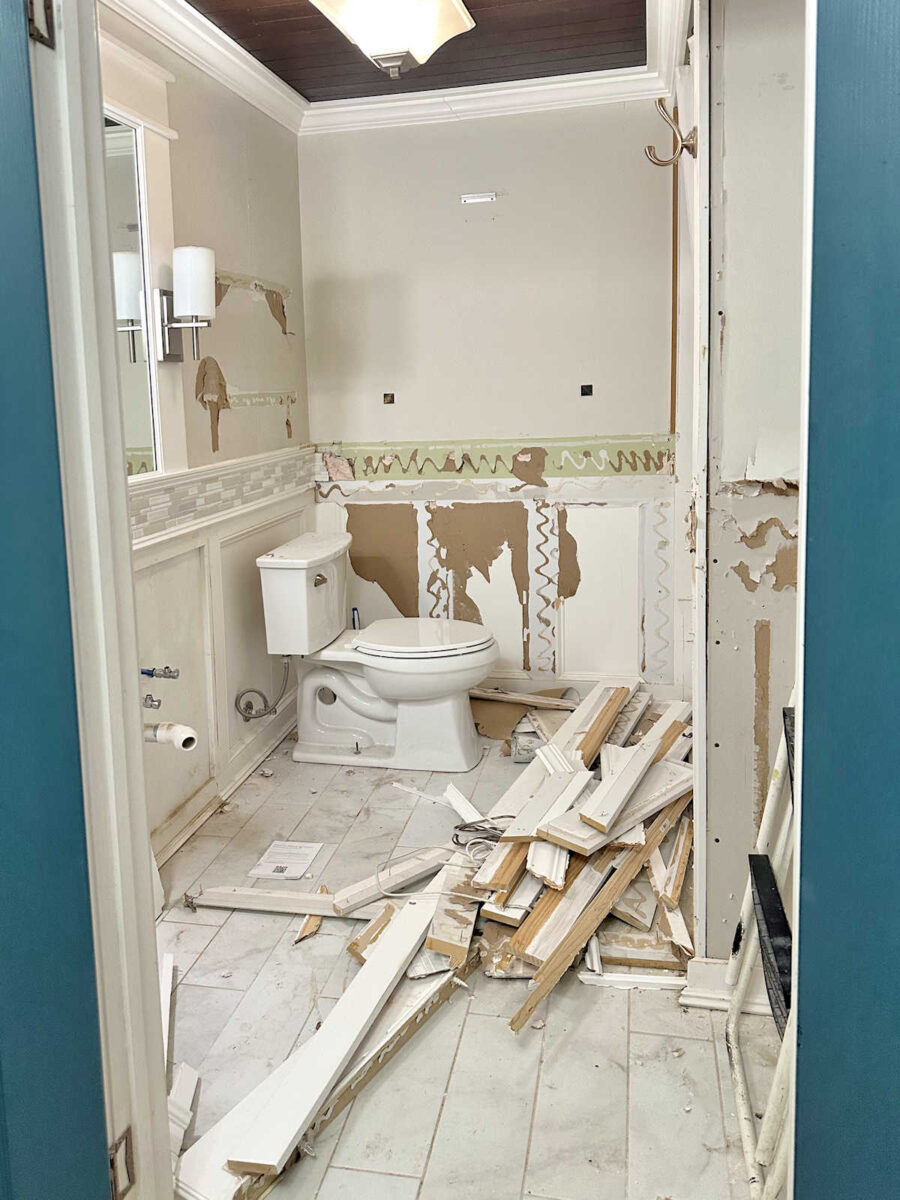
I started on it, and then decided that I just wasn’t prepared to jump into another major interior project right on the heels of finishing my bedroom-to-walk-in closet conversion and our bedroom remodel. So I closed the doors, walked away temporarily, and turned my focus to some out-of-the-norm exterior projects for now. But as soon as I wrap up these last few outdoor projects, I’ll be starting back on this storage closet project. I’m feeling prepared and geared up for another interior remodel project now.
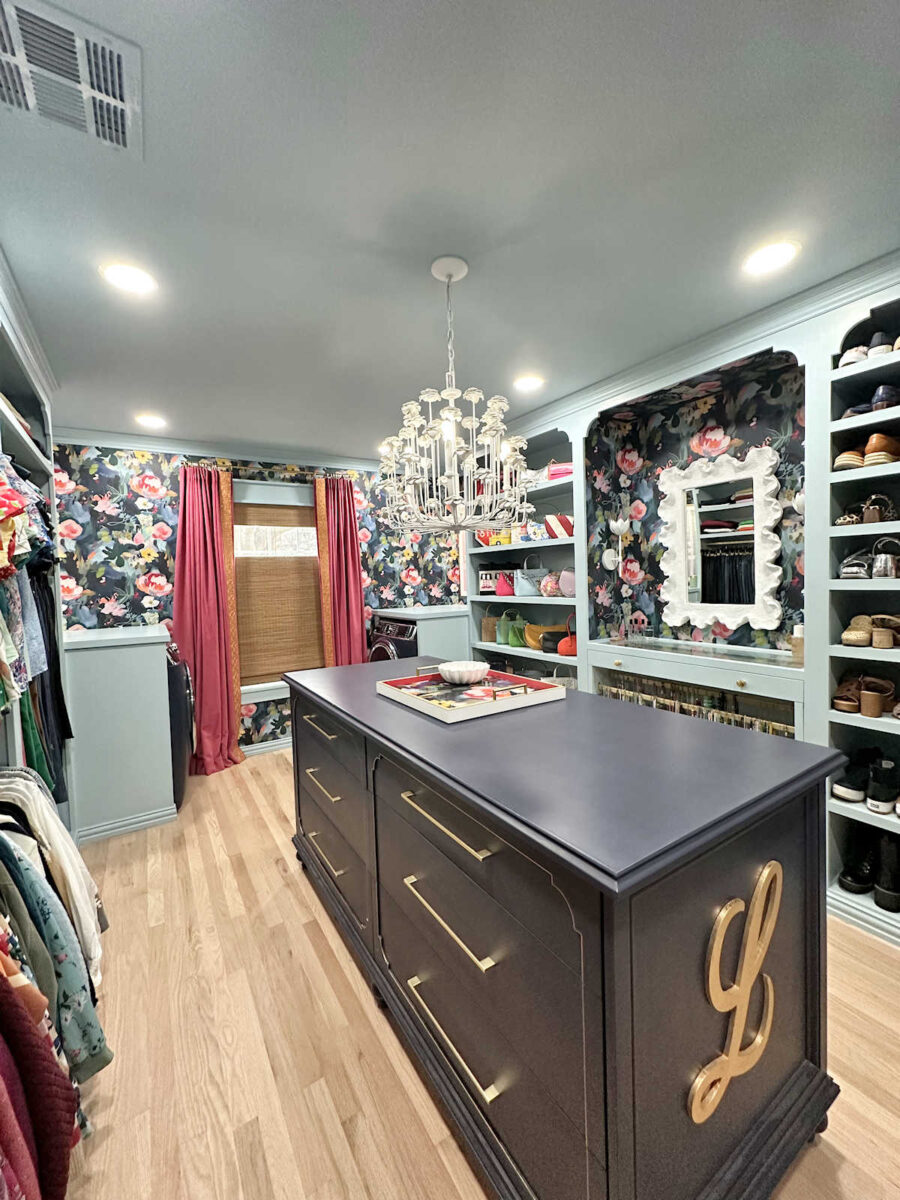
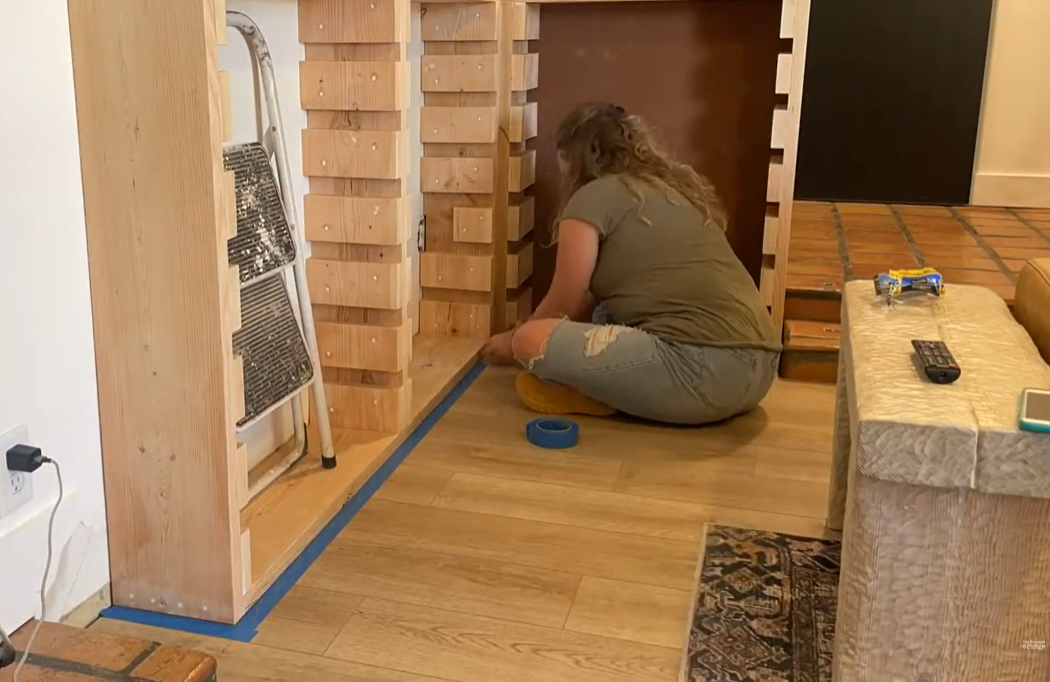
But before I get there, I need to make some decisions. I’ve already worked through the basic layout of the room. When standing in the doorway, I want cabinets on the right wall to be arranged like this (which you’ve already seen in a previous post). The large, blank area will be where I store Matt’s power wheelchair and shower wheelchair when they’re not in use…

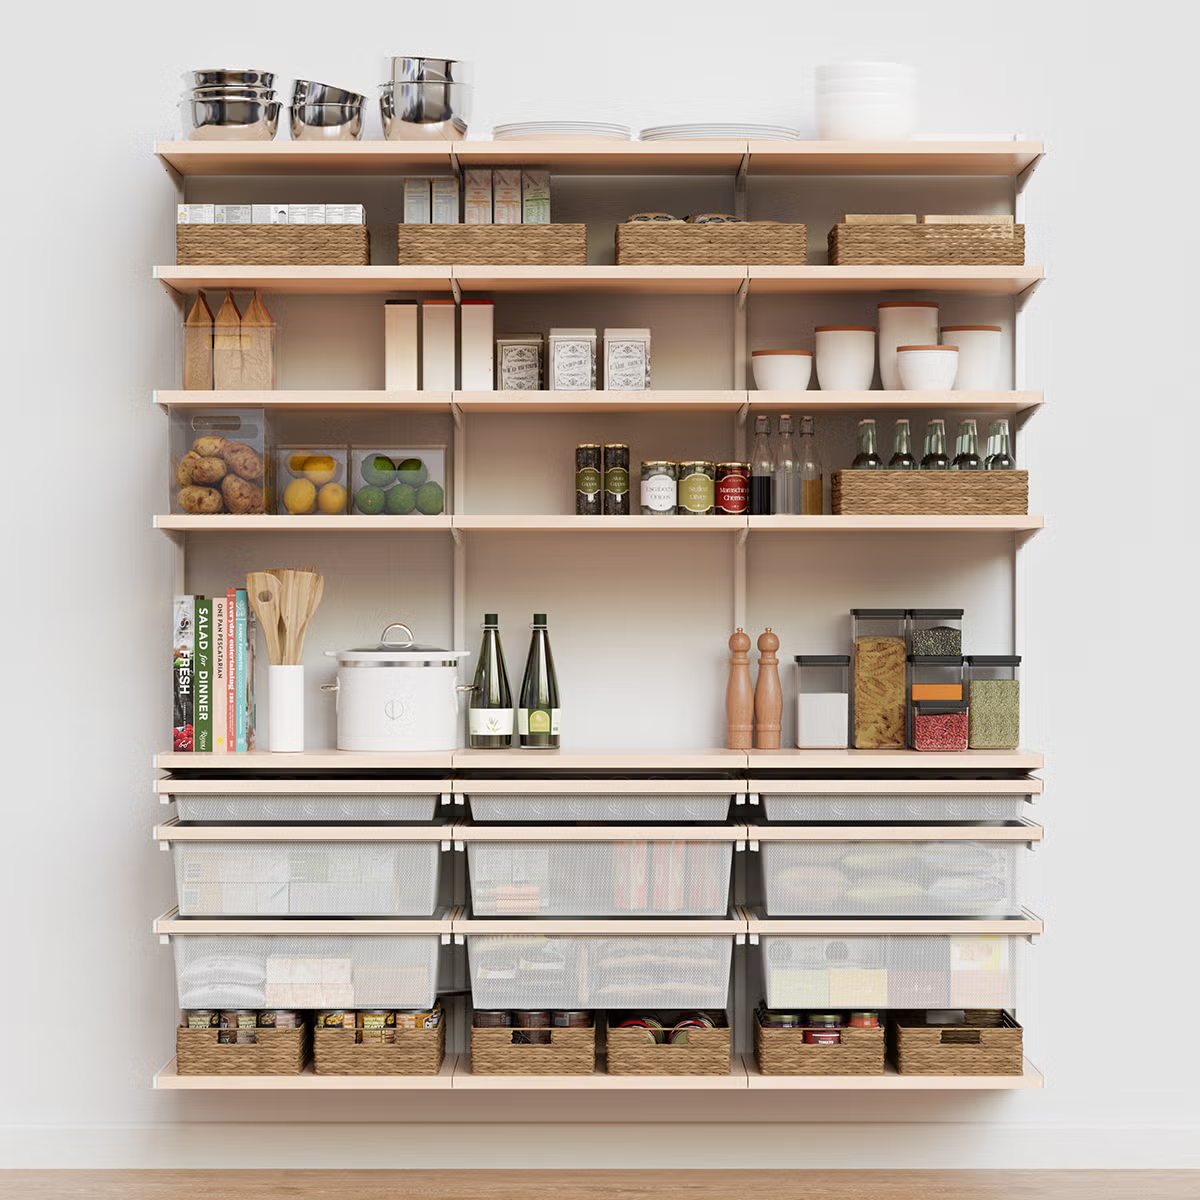
And then the wall on the left will be arranged to look something like this…
I’ve been trying to think through exactly how I want to build these cabinets. Since this is just a storage room, and I’ll really be the only person who ever accesses this storage room, it really comes down to what I want and how much effort I want to put into this room. I have two options for the cabinets.
First, I can go all out and build actual cabinets like I did in my closet.
If you followed along during that project, you know that each section in my closet is a separate cabinet, and each one has its own sides, back, bottom, and top. Then I lined up the individual cabinets against the wall, screwed them together and anchored them to the wall, and then added all of the trim. That’s the more involved way of building a closet, but to me, it results in a more custom look.
But a much easier and faster way to create a lot of usable storage would be to use wall brackets (like these from Home Depot) and put shelves directly on the wall.
If I go that direction, I would still need to build or buy the drawer sections, but then above those drawer sections, I could have continuous shelves spanning the entire length of the wall.
The second option would obviously be cheaper and faster, while the first option would look more custom and tie in with the walk-in closet. But here are a few more considerations:
- The first option (i.e., full cabinets) would cost more and take more time, but it would allow me to have adjustable shelves in each section.
- The first option would make the cabinets be the star of the show with very little wall space showing in the finished room.
- The second option (i.e., full-length shelves on brackets) would be faster and cheaper, but I wouldn’t have the option of adjustable shelves.
- The second option would make the walls more prominent in the room, so whatever I do on the walls would be the focus.
I really haven’t been able to decide which direction I want to go. What I do know for sure is that I want to use this wallpaper in the room…
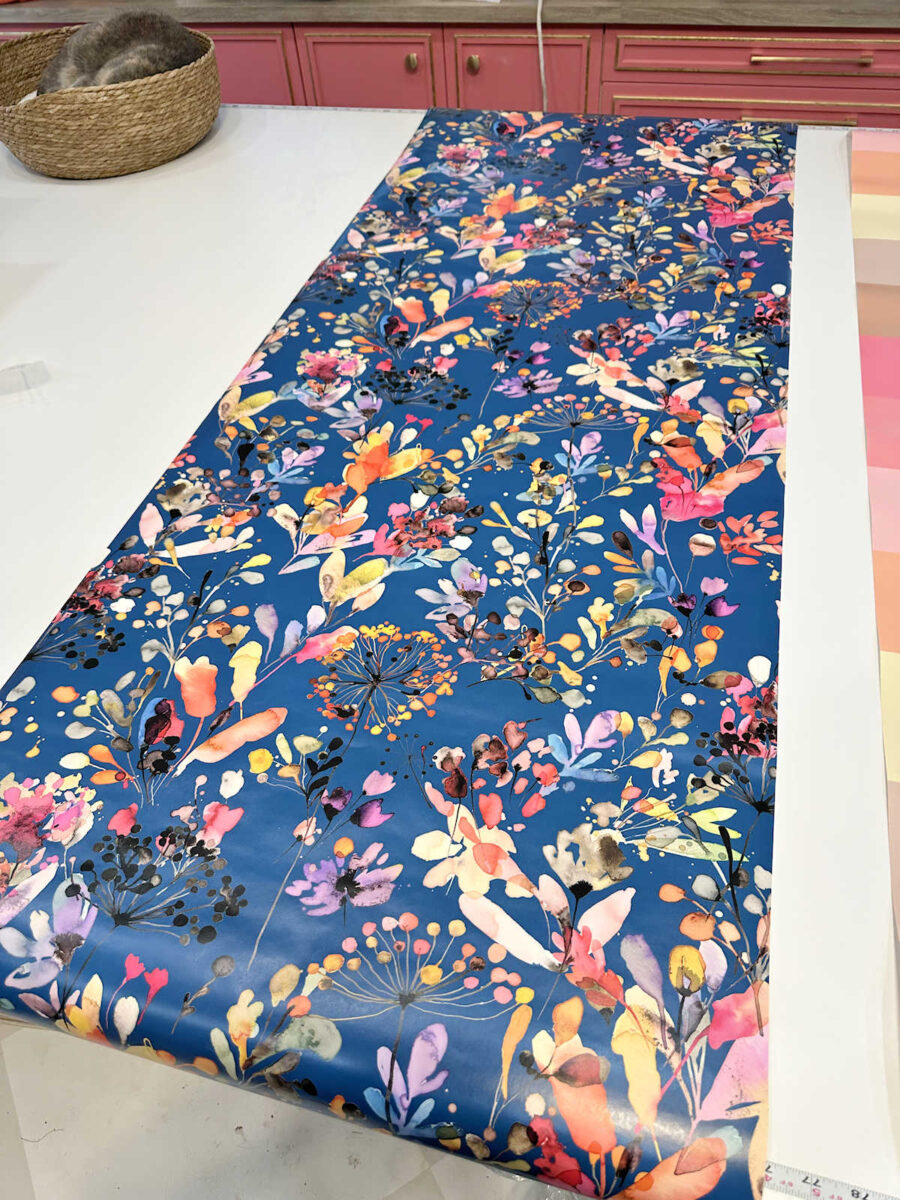
And I want the cabinets and/or shelves (and probably the ceiling) to be painted either pink or orange. I haven’t even looked at paint colors yet, but I just grabbed these two colors directly from the wallpaper.


I know I’m in my pink era right now 😀 , so pink seems like the obvious choice. But don’t forget that this storage room is in our bedroom suite, and our bedroom is the one pink-free room in the house. That room has a lot of orange in it.
Anyway, as I’ve been working these last few days, these are the thoughts and plans that have been swirling around in my mind. As you can see, I’m still working out the details. If I go with the full cabinet option, the paint color will play a much more prominent role in the room, and the wallpaper will be an accent. If I go with the open shelves on brackets, the paint color will be less prominent, and the wallpaper will show much more. Plus, there are those other considerations that I listed above with each option.
I’m still thinking through it, and I still have a while before I need to make my final decision. Even when I’m finished with the outdoor projects, I still need to finish up on the demolition of the room before I can even start building. I have some time, but I’d like to have a solid plan in place within the next couple of weeks.

Addicted 2 Decorating is where I share my DIY and decorating journey as I remodel and decorate the 1948 fixer upper that my husband, Matt, and I bought in 2013. Matt has M.S. and is unable to do physical work, so I do the majority of the work on the house by myself. You can learn more about me here.
Have you thought about buying some shelving units/cabinets and painting them? For instance, Ikea Ivar shelving has many components and comes ready to paint. Of course, they may not come in measurements that would work the best for your room.
I’ve never looked at those. I’ll check them out. Thanks!
Fwiw, I’ve purchased and built a lot of flat pack furniture, and probably around 80% of it is Ikea.
I bought the small 6-drawer Ivar dresser because it was the only thing I could find short enough to fit under a loft bed. It was, far and away, the absolute worst flat pack item I have ever worked with. The components are a chintzy plastic, one of the drawer sides split, and the construction process itself was a nightmare. It is now partially deconstructed (only way I could get it out) and sitting in a little used room while I determine its fate.
It’s entirely possible that finishing the piece with paint would have helped with the splitting wood, but the other issues are 100% you get what you pay for.
It’s also possible the shelving in this line is lovely and easy to use, but I was not at all pleased with the quality of my Ivar item, and my experience with IKEA is that each line shares certain quality and performance criteria.
Option 2. You are the only one using the room unless you want to show guests your storage room. You are putting a lot of work into one room to make it pretty. You know it will be cluttered in a short time so do the easiest and get on to another project.
I agree! Not sure what else you plan to store there, but a “storage” room to me means stuff you want out of sight. So why spent the efforts making it “pretty” when it’s not going to be seen . Even you don’t need it to be fancy! I would get those metal shelving units normally seen in a garage, with adjustable shelves, and paint the walls and ceiling and call it finished!
I don’t want to assume that it’ll be cluttered. My closet isn’t cluttered. Having a pretty closet has kept me motivated to keep it clean and organized. I can see the same thing happening with this room as well. When a room is ugly and utilitarian, that’s when I lose interest in keeping it looking nice.
Your art studio is beautiful but many times you post pictures of the clutter. Ibthink your closet and bedroom are not cluttered because you use them everyday. Maybe I dont understand but if you use the storage everyday then make it beautiful to make you happy.
You could also consider using the track rail system in several sets, so that you could have some flexibility in the sections and their heights. Then if you cased the opening you might be able to run some vertical dividers to make it feel a little more built in and less like one big open space.
Something like these: https://www.homedepot.com/p/Everbilt-84-in-L-White-Steel-Heavy-Duty-Vertical-Rail-90290/314586379
I was thinking the same thing. Something like the Elfa system from the container store (although they are way too pricey IMO). Menards has some that are much better in price and I’ve DIY’d their closet systems before very easily.
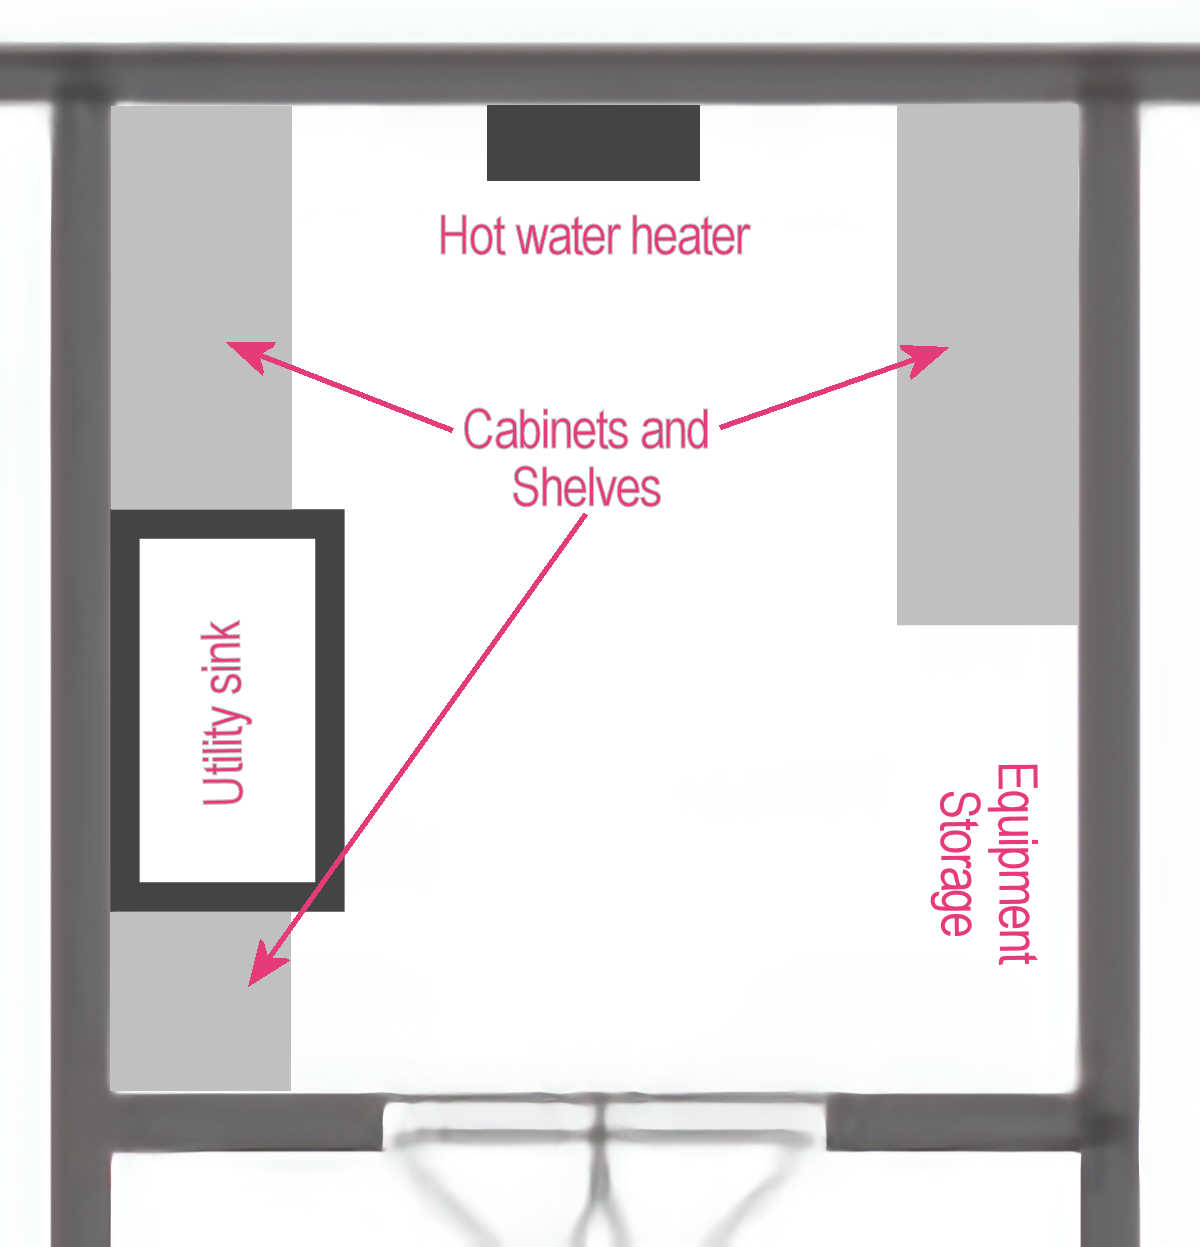
Kristy, Another question was about the water heater. Did you make a decision to put it somewhere else or are you still planning to put it the storage room?
After talking to my plumber about it, I’ve narrowed down the options to either (1) putting a tankless water heater in the attic, or (2) installing an exterior tankless water heater. He said we can talk through the pros and cons of each option when I’m ready to have him order and install it. He told me that when they install them in an attic, they always include a leak detector with an automatic shutoff. So I’m not sure which one I prefer right now, but at least that frees up space in the storage room.
I was thinking something like this too as it can be adjusted as household needs change. I have in several places in my home.
I was looking at those just this morning. I also noticed that the ones made for garages have brackets made for deeper shelves.
Have you thought about getting a shelving system from IKEA or The Container Store? They use wall bars that run vertically that you then attach brackets to for shelves, etc. It’s not the prettiest unless you spend money, but it allows for adjustable shelves. And they even have basic drawers you can get.
I’ve used the Elfa system from Ikea in 3 homes, from bedroom to bathroom closets and basement and garage storage. I love the system and have been able to rearrange closet as needed. I know this is your forever home but when we sold our last two houses, the elfa shelving was a huge selling point. I know it’s pricey but it goes on sale from 20-30% off several times a year (I think late summer usually). I
We have wallpaper behind the units in our house now and it looks terrific.
What about the track shelving where you anchor the tracks on the wall and then you slot in shelves where you want them? That would be simple and straightforward and would give you maximum flexibility.
So rambled and appologise. It started shareing that we did a shelf system with DIY shelves. SIL had a whole wall of desk, we adopted it after her move. (tends to be sold on marketplace) It was made from a bunch of Elfa. Over time we’ve found Rubbermaid’s system (fast-track?) is a close enough alternative to mix/match brackets. Elfa is the most STRUDY and cleans up best. Skip Ikea’s version It is finicky & frustrating to install. We repurpose shelving or make trimmed shelves out of actual wood for on top of the brackets.
The nice thing is you can make minor adjustments easily. As you load it in, if you want to shift, you can. It doesn’t have to be perfect everything. Also the perk of this is you minimize holes near your plumbing in the back corner and reduce oops moments once the verticals are hung.
Maybe you can make a drawer box you place like a shelf on the brackets. I suggest you can wallpaper the top half of the wall above where you’d install the drawer box. Do try a system with a top horizonal (least holes). The horizontal top bar allows adjustment where the vertical support hangs to get the symetry you crave.
Super DIY version is French cleats and install boxes on cleats vs shelves. You can get the drawers. But this requires 2x-3x more plywood for the cleats. The wood is likely the same cost as the adjustable shelving hardware. Personally I’d avoid the drawers alltogether and make boxes to sit on shelves that fit the want, collect like items together but minimise clutter. The height of the drawers they’d be once you install, may be difficult to look in usability-wise.
Do you need the shelves or cabinets above the open space to be reachable while the power chair, etc are stored? If so, I’d do custom cabinets with a blank space behind, or extra deep cabinets with pullouts. I’m 5’2″ and I have enough trouble reaching cabinets when I can get close. I’d have to pull the chair out whenever I needed something.
As for the rest, is it something you’ll access frequently? Is it something you want to look at on an open shelf? I like closed or ventilated doors in general for dust control and to reduce visual clutter.
I’m sure whatever you do will be fun!
Shelves on brackets can be overloaded and pull out of a wall (ask me how I know!). I’m sure you’ve done this but ask yourself what will be on those shelves? Will it be better to have a cabinet with doors to hide the clutter? Will shelves or a closet jut out too far and get in way of equipment M uses? Is there room to get the constantly used piece of equipment out easily with nothing stored around it? Will you need hooks to hang stuff?
Like I said I’m sure you’ve rolled these ideas around and around like bingo numbers, but always a good idea to measure twice, cut once.
Make a list of what you will actually need in this room other than Matt’s equipment, the water heater and utility sink if you are still needing that. most cleaning supplies would best be accessible via open shelves for quick and easy access. Make the list and you may find you don’t need as many cabinets as you think….less money, time etc for you. Off hand, what else do you want in here? You will still keep a door, correct?
Love the ideas, and you can of course always make the shelving to be adjustable for you, I know that best laid plans and all can sometimes change with upgrades to equipment. I am leaning towards the open shelving and the wallpaper; I love wallpaper and since you are the only one who will be seeing and using this space, go for it. It’s your home.
Cheers to you, Matt and the Fur Babies!
It seems that the room is going to have a LOT of storage capacity, both closed and open. Are the things you store in there going to change over time?
Do you really need adjustable shelves? I suggest taking stock of all the things you intend to store in there and factor them into your decision.
I like going with more wall paper versus more cabinetry. The room is small and to make it feel less overbearing, open shelving with the beautiful wallpaper would be my choice. The bottom drawers would help anchor the room. What about wallpapering the ceiling too? that would be unexpected and fun!
I see custom cabinetry in your future so you get exactly what you want. (How many people would mold their own faux stone to get exactly what they want?) I also envision the cabinetry in that lovely soft orange which would coordinate with the bedroom. Didn’t Matt request the bedroom be free of pink? I love the idea posted previously about using that pretty floral wallpaper on the ceiling where you would be able to see more of it than on any of the walls.
I think the first question is, what am I storing in here, and how am I going to contain it on the shelves. I.e., is it linens that you’d want in pretty baskets, or are you just going to put them on the shelves. You seem to prefer less visual clutter, or at least, that any visual clutter is pretty and something you want to look at. Are you going to want to look at whatever you will be storing in the room? If not, I’d go custom cabinets, even if you don’t immediately add the doors.
One thing to consider with brackets is that they interfere with storage space. Maybe you could buy stock cabinets for the uppers and build in around them. I’m sure you’ll be painting them regardless of the option you choose so it will al blend in the end.
Looking at your plans for the storage room, where are you putting the water heater that you mentioned you were putting in there?
Look at Knape and Vogt 82/182 series.
Kristi: Back to your list on June 16 regarding the bathroom/storage closet you are refinishing I have a comment. You state that you will have an area on the right side of room to store Matt’s power wheelchair and his shower apparatus. Why would you not store the shower apparatus in the shower area? I’m assuming it is used frequently enough that it would be easier and more efficient to store in the shower room. If I remember correctly that room is quite large enough to keep it there even when you are using the shower to not get in the way. Also, I would think it would be more convenient having it in the shower area rather than moving it back and forth every day/few days to shower Matt. That way it could air dry in between uses. No water stains or messes to clean up from the shower to the storage area during transport. Just my thought and opinion.