John & Alice’s Master Bedroom — Before And After
Well, if you like lots and lots of pictures, then today is your lucky day! 🙂 I am absolutely tickled pink at how John & Alice’s bedroom turned out, and I’m so excited to show it to you. So excited, in fact, that I’m pretty sure I had my mom document every square inch of the room. So, you ready? Here goes…
First, let’s remember where this room started:

All of the furniture in the room matched. The walls were a very light blue.

The corner windows were dressed with custom window treatments, but they were just a tad outdated. 🙂

There was also a matching chest of drawers that I didn’t get a picture of.
And now, the room looks a little bit different:


Quite a difference, huh? Okay, I have about 100 more pictures, so go grab a cup of coffee and get comfy. 🙂

The headboard is made of fence pickets, and cost under $40 to make. The side tables are made of MDF, and cost about $20 for both (not including the skirts). I found the lamps at Marshall’s, but the color was all wrong, so I painted them and then covered the lampshades. The linen bedskirt is custom, but the rest of the bedding came from Marshall’s. I added the linen ruffle to the shams to pull the look together.

The chair was a Goodwill find for $30 and originally had bright yellow-gold fabric. A canvas dropcloth from Home Depot gave it a new look. The ottoman was already in the house, and I gave it a slipcover to coordinate with the chair. I added ribbon and jute accents to both.

The draperies are also made from Home Depot canvas drop cloths. I lined them with blackout lining and added ribbon trim to dress them up. The shades are my favorites from Home Depot.

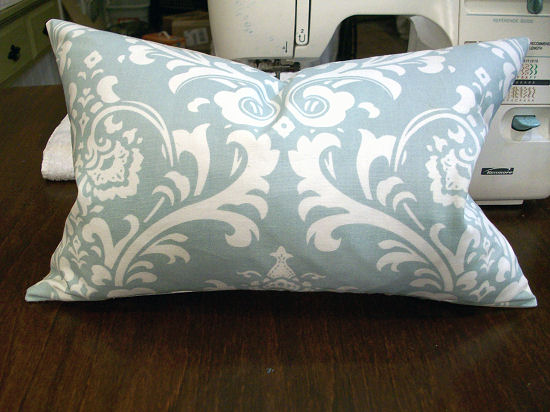
The pillow in the chair was made from a scrap of fabric from the bedside table skirts, and the ruffle edge is made from the leftover selvage from the fabric. For the chair, I made little jute “buttons”.

A closer view of the ribbon trim added to the draperies. I used 1 1/2″ green satin ribbon, and 3/8″ brown satin.

Adding a ruffle to a ready-made sham is an easy way to get a customized look for less money. The pillow on the right is a very easy pillow to make, and requires very basic sewing skills.

The planter cup is from JoAnn Fabrics, and it was on clearance for around $3.75 because it had a chip in the rim. It also had a crazy color and pattern on it–nothing a coat of spray paint couldn’t fix. The books that I used in the room were all different colors, so I just covered them in brown packing paper.

I bought the dresser on Craigslist, and then gave it a complete makeover–I removed the apron and added feet, and then painted and antiqued it.

The doors in the room got a coat (or two) of black paint, which took them from dull to dramatic.

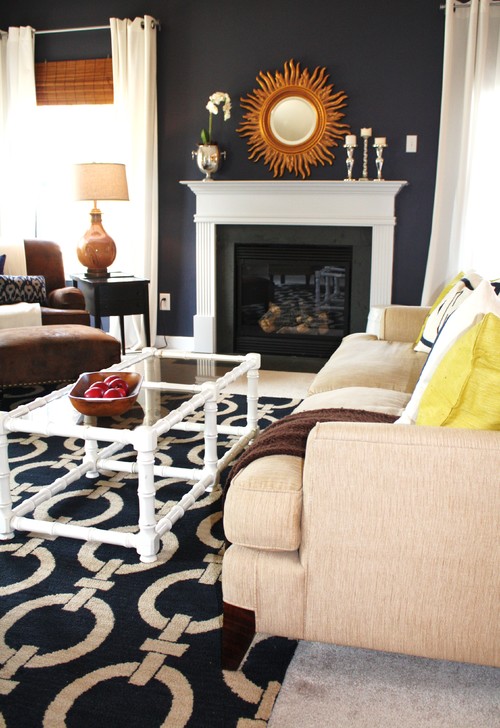
The lamp belonged to the homeowners, but was brass. A coat of spray paint (Rustoleum Painter’s Touch in Oregano) and a new shade from Lowe’s gave this lamp new life. The mirror was a “special buy” mirror from Home Depot, and I covered the cheap factory finish with a dry brush technique using some black and green paint to give the frame an antiqued look.


Glass jars were covered in jute to create some budget-friendly accents.


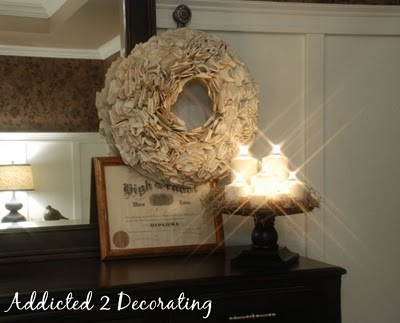
A wreath made from pages of a book adds texture to this area, and underneath sits my favorite find from “shopping” the house for accessories–the homeowner’s high school diploma. I love the touch of nostalgia it adds, plus the colors of the frame and paper are absolutely perfect for the room.

Disclaimer: Please don’t ever put candles on a wood plate and surround them with very flammable dried Spanish moss and leave them burning unattended!!
Did you notice the little jute rosettes I put on the front of the ottoman to coordinate with the jute buttons on the chair? I forgot to have my mom take a closer picture of it. Oh well.

Well, that’s the whole tour. I hope you enjoyed it!! If I counted correctly, I have 15 d.i.y. projects in this room, and I’m working on getting all of the instructions written up for you–things like how to do board and batten walls, how to make an ottoman slipcover with a pleated skirt, how to recover a cane chair with tufted back, how to make a book page wreath, how to make lined draperies with ribbon detail, and much more. I also have one more project that I’d like to do for this room eventually–a patchwork bench using all of the leftover fabrics, to go at the foot of the bed. But that will have to wait, because now it’s time to move on to the master bathroom.

Addicted 2 Decorating is where I share my DIY and decorating journey as I remodel and decorate the 1948 fixer upper that my husband, Matt, and I bought in 2013. Matt has M.S. and is unable to do physical work, so I do the majority of the work on the house by myself. You can learn more about me here.

Fantastic!! I love the wreath, maybe not that close to burning candles… Seriously though, love all the colors, great job!
wow these are great, u have quite the imagination hon, well, u have to, to do this great work, im impressed….Nancy Smith
Wow, the wainscoting makes the biggest difference and it so beautifully done! And I think I recognize those table lamps, I redid the same pair for my master bedroom! Great job! Janell
BEAUTIFUL!!! They must be absolutely thrilled with the results! Everything is just perfect 🙂
This looks absolutely amazing…..you are truly talented and I know you worked really hard on this room. So very warm and cozy and all on an incredible budget! You totally rock!
It turned out AWESOME.. not that I doubted that it would…. Thanks for sharing….
Great job! Just curious… what was the total cost for this make-over?
I'm still figuring the cost of the bedroom. 🙂 The biggest expense was the walls–board & batten and wallpaper. I wouldn't doubt it if half the budget went to that alone.
But I'll figure the details and let y'all know.
I really love everything about this room, you did a great job. My favorite thing is the covered chair and pillow accents. It will be perfect for reading on a cold day!
The room looks wonderful. Great job. I would add that if you want to put candles on a wood plate and surround with moss, flameless candles would do the trick.
The room is beautiful! Thanks for sharing.
Great to see the finished product after all your sneaky peeks! Thanks for sharing!
Love it! It looks so serene and warm!
It looks amazing!
Very nicely done! The word I can use here for you is — Resourceful… Especially on the the chair – a goodwill find, wow…
And the fact that you used left over fabric and materials from the project, again very resourceful.
Keep up the good work!!!
Looks really good girl! Thanks for sharing. I love the dresser.
I like the room, but i would get rid of the wall paper . GREAT job, keep up the good work
It's beautiful Kristi! You absolutely should be proud!
I've been following your blog for a few months now. Love it. This room came out gorgeous. Can't wait to see what you do next.
This is the first time I've visited your blog and I just have to say GORGEOUS! I want that bedroom! I'll be checking back to get more inspiration…thanks!
Holy moly! It looks like a high-end B&B! I love, love, LOVE the board-and-batten treatment. Beautiful!
I am new to blogging, so this is my first time here but not my last….I LOVE what you did with this room, it is truly stunning. I am now a follower!
What a gorgeous room! I love it all!
This is such an amazing transformation. It's a completely different room! I love all the ruffle accents. So great!
Hi! I am visiting from Thrifty Decor Chick, and I must say, "WOW!!" I LOVE this makeover!! I am not normally a fan of wallpaper, but I love this! And the board and batten being taller makes the ceiling look taller! Very very VERY nice job!!
What a beautiful room! I love the inexpensive but thought-out details that make the room look so polished.
Here from Thrifty Decor Chick and I'm totally amazed by the transformation. Isn't it great what a little molding and fabric can do for a room! Great job!
Wow – that is FABulous! Nice job!!
absolutely amazing! love it
I LOVE this! Gorgeous!
I LOVE what you've done in this room! Found your site on accident, googling for how to make over a dresser. Can you list exactly how you added the trim on the bottom?
Thanks so much for the look into your world!
I LOVE this! Gorgeous!
Love it! It looks so serene and warm!
Very nicely done! The word I can use here for you is — Resourceful… Especially on the the chair – a goodwill find, wow…
And the fact that you used left over fabric and materials from the project, again very resourceful.
Keep up the good work!!!
I love the way the room turned out..amazing!
I want that bedspread!! I will follow you from now on.
It looks so much bigger!
Kristi,
What is the brand/name of that wallpaper please? Thanks!
Holy Moly, this is AMAZING!! Your site is truly my favorite…you are so good at what you do!!
I love this make-over! I’m in love with this room and all the details! Great job!
Beautiful job!
BEAUTIFUL transformation! Loved every bit of it, and although i’m still working to get rid of my 90’s wallpaper, I love the wallpaper in this room. Thanks for sharing!
Oh no! I really want to see the during and after pictures but they won’t load. Any ideas on how to load them? Sadness.
Oh no! I read every single page from the start of this makeover through to the end and was so excited to see the finished pictures and they aren’t there anymore! I’m dying to see what this room looked like all finished.
Amazing! You did a very wonderful and beautiful job. I love the new look.
For some reason I can’t see any of the after pictures anymore. Are they removed or is there just a glitch somewhere with my computer and/or the site?? Thanks- I can read the text but really want to get a glimpse at what the after pictures look like!
Hi Beth~
It’s not your computer. 🙂 It’s the post. I’m not sure what happened to the pictures…LOL. They just disappeared! I’ve had this on my “to do” list for quite some time. I’ll see if I can find the pictures and add them right now. Thanks for the reminder!
It’s fixed now! 🙂
Curious about the cost breakdown? I just saw your bathroom makeover and aam so inspired to fix up my own space now!Thank you
Wow! Great job. That flooring really warmed up the room. I love what you did with the walls too. That dresser is gorgeous…okay I love everything!! I always find dressers on Craigslist that I’d like to try making over, but everyone I know is always too busy to come help me get the thing from the seller and up to my apartment. =(
Lovely bedroom with superb views! You are undeniably gifted when it comes to interior designing. What you did to John and Alice’s master bedroom is a really big development. I can only imagine how happy they must be right now. And all the furniture and décors you’ve used are urbane and beautiful. Keep it up!
Wow! Gorgeous! You are so very talented. You should start doing online consults if you don’t already (with all that ‘not spare’ time you have . 🙂 ) Found your blog recently and so enjoy seeing your updates. They are so real compared to astonishing before and after photos that do not show the in between mess, decisions and pain. Thank you for encouraging others so much!