Naked Chairs (and the Easy Way To Refinish Wood)
Remember these chairs that I purchased at Goodwill for $60?

Well, now they look like this:

So, yeah…there seems to be a little problem. Do you think anyone will notice? :~D
Oh, it’s no big deal, really. Just one of those little surprises that often accompanies thrift store purchases. The chair was broken, and I didn’t even notice it, because it was being held together pretty well with the fabric! Once the fabric was removed, the top piece broke right off.
Oh well. Two steps forward, one step back. It’s nothing that can’t be fixed. BUT…let’s focus on something a little more pleasant–the EASY way to refinish wood.
I know that the idea of refinishing wood is very daunting for some people, as you envision having to remove every speck of the old finish, right down to the bare wood, by tediously sanding the intricately carved details on chair legs, etc. Yeah, that’s no fun. But it’s also not necessary!
The method I used on these chairs was quick and easy, and made a world of difference. I simply used some 150-grit sandpaper and manually (not with an electric sander) sanded all of the surfaces and edges just to smooth the surfaces and remove the very top layer of…well…who knows what. Dirt? Grime? Polyurethane? Cigarette smoke? Yeah, gross.
Then I used a sponge brush and a clean rag to put a layer of new stain over the top. So simple! I’m going to polyurethane them also, but the stain alone make such a huge difference. See for yourself!
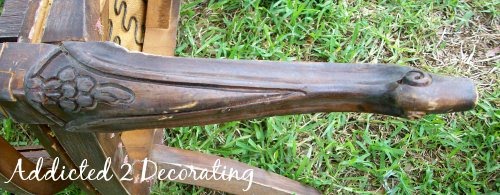
Here’s a chair leg before I sanded and stained:
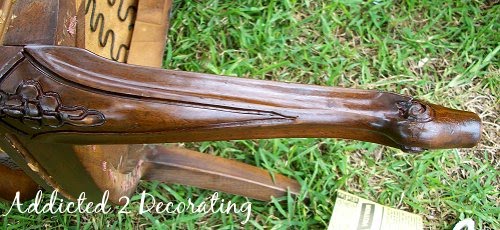
And here’s what it looks like after a bit of sanding and new stain:
Here’s a side-by-side view of legs on different chairs. The left leg has been sanded and stained. The right one is the original finish. See how orange and dull the one on the right is?

And here’s a comparison of the arms. The one on the right just looks so dull!! The one on the left–gorgeous!
 So, I just need to sand, stain, and repair the one chair, and I’ll be ready to reupholster them. And wait til you see the fabric I’m going to use! I’ll give you a hint…I didn’t purchase it from a fabric store. I purchased it from my favorite store. Any ideas?

Addicted 2 Decorating is where I share my DIY and decorating journey as I remodel and decorate the 1948 fixer upper that my husband, Matt, and I bought in 2013. Matt has M.S. and is unable to do physical work, so I do the majority of the work on the house by myself. You can learn more about me here.
Good for you tackling the stain! You are so right, It's so daunting of a task to most. If you have a specific place in mind for the chairs, I would go for fun fabric that you can't normally use anywhere else 🙂 If you're not sure, go for a neutral and get amazing pillows made to adorn the chairs. I love Goodwill too!!
Well, it WAS a nice pair of chairs!! I know you'll be able to make it better than new, but sorry for the hassle! Thanks for the tutorial on refinishing. I have one more hint. I buy TSP concentrate (Trisodium phosphate) at Home Depot, and wash it down. It removes all the old dirt and grit and lifts the grain so you can sand it down to a smooth finish. Be sure and wear gloves because it's pretty strong stuff. I also use TSP to clean old iron pieces, even concrete. It's pretty good stuff.
I'm guessing drop cloth??? Tell me I get bubble gum for guessing right! I also love TSP…
It looks great. But I'm confused. I thought stain sank into the grain of the wood. If the wood is covered by shellac/polyurethane/varnish, where does the stain go.
By the way, Kristi, you'll be proud. I just scored a solid maple twin bed for my son off craigslist. I'll have to refinish it before he outgrows his crib 🙂
Thanks for posting these tips. I like the bedore and after pictures-you really notice a difference. The chairs look brand new!
Hi Kristi,
Love your blog! How did you refinish the cane sections on those chairs? Did you just sand and stain those areas too?
Fiona, on the caning, I sanded it VERY lightly with a 220 grit sandpaper, and then just rubbed some stain over it. The stain didn't really soak in to the cane, but I just left it alone and it dried. Then I used polyurethane on top.
It’s a pretty interesting tool. I will definitely be using it once I get the chance. Thanks for sharing!
Terrific work! This is the type of information that should be shared around the web. Shame on the search engines for not positioning this post higher!
Terrific work! This is the type of information that should be shared around the web. Shame on the search engines for not positioning this post higher!
Kristi-
great post!
I am refinishing 2 Thonet chairs, and boy are they dis-Gusting! I was hoping Murphy's Oil Soap would suffice, but I got impatient and started scrubbing with a non-oil based cleaner.
Bad idea. Just made more work for myself. Now I have to wait for it to dry out and then sand (which I was trying to avoid)
I shouldn't try and use my set dec. short cuts at home ;-(
Thanks for posting these tips. I like the bedore and after pictures-you really notice a difference. The chairs look brand new!