Why You Need To Learn How To Build Furniture (And The Tools You Need To Get Started)
There was a time when the thought of building my own furniture (or cabinets) intimidated the heck out of me. I thought you had to have a big workshop filled with all kinds of fancy, specialized and high-priced tools in order to build furniture.
But that was many years ago. Since then, I’ve learned that just about anyone can build furniture, and it doesn’t take a large workshop filled with specialty tools, either. If you have just a few basic power tools, you can build furniture.
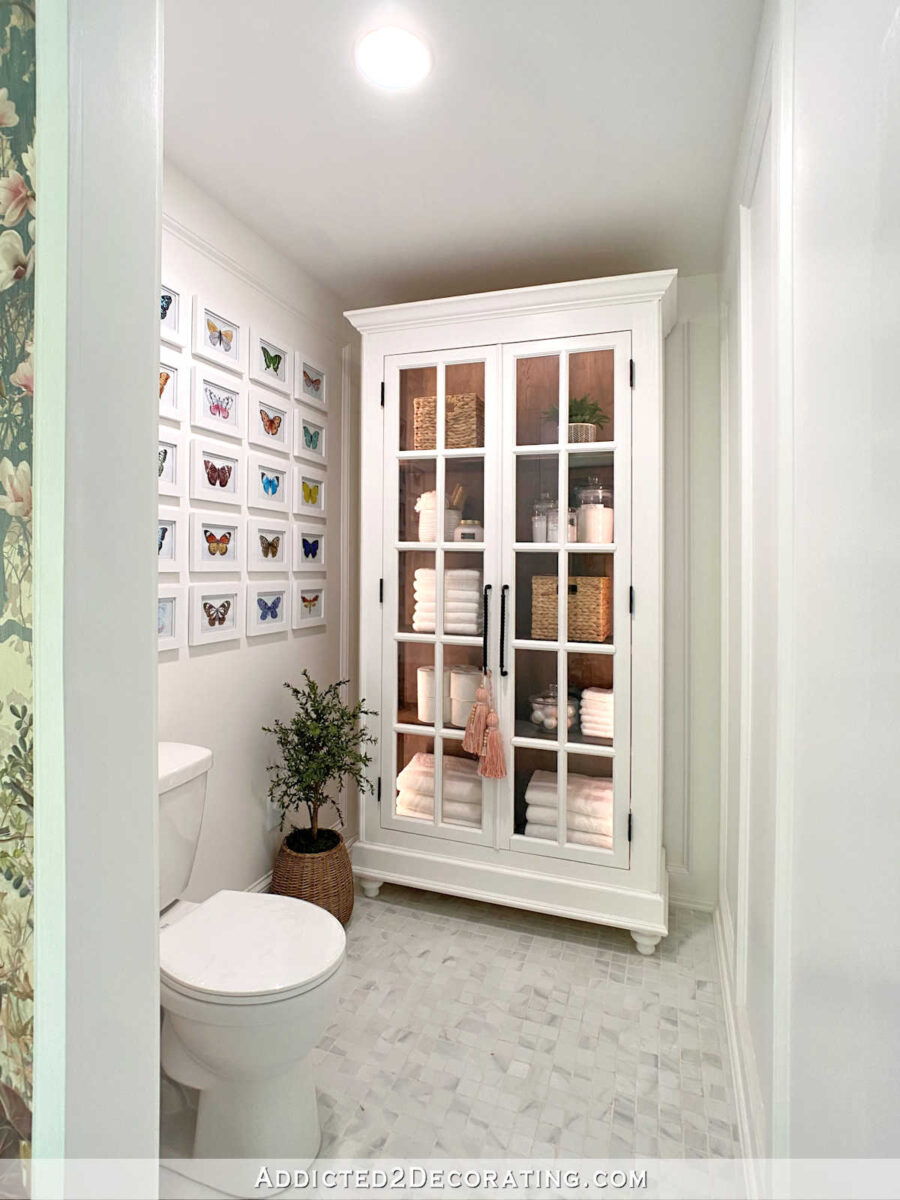
So why would you want to build your own furniture? Well, just last week, I showed y’all a cabinet that I built for our bathroom. That cabinet is pretty big (about 43 inches wide, 88.5 inches tall, and 15.5 inches deep). I painted it white on the outside, and stained the inside a dark walnut color.
*This post contains affiliate links.
Of course, I could have just purchased a cabinet for this room. How much would that have cost for a similar cabinet in a similar size? Here are three that I found online:
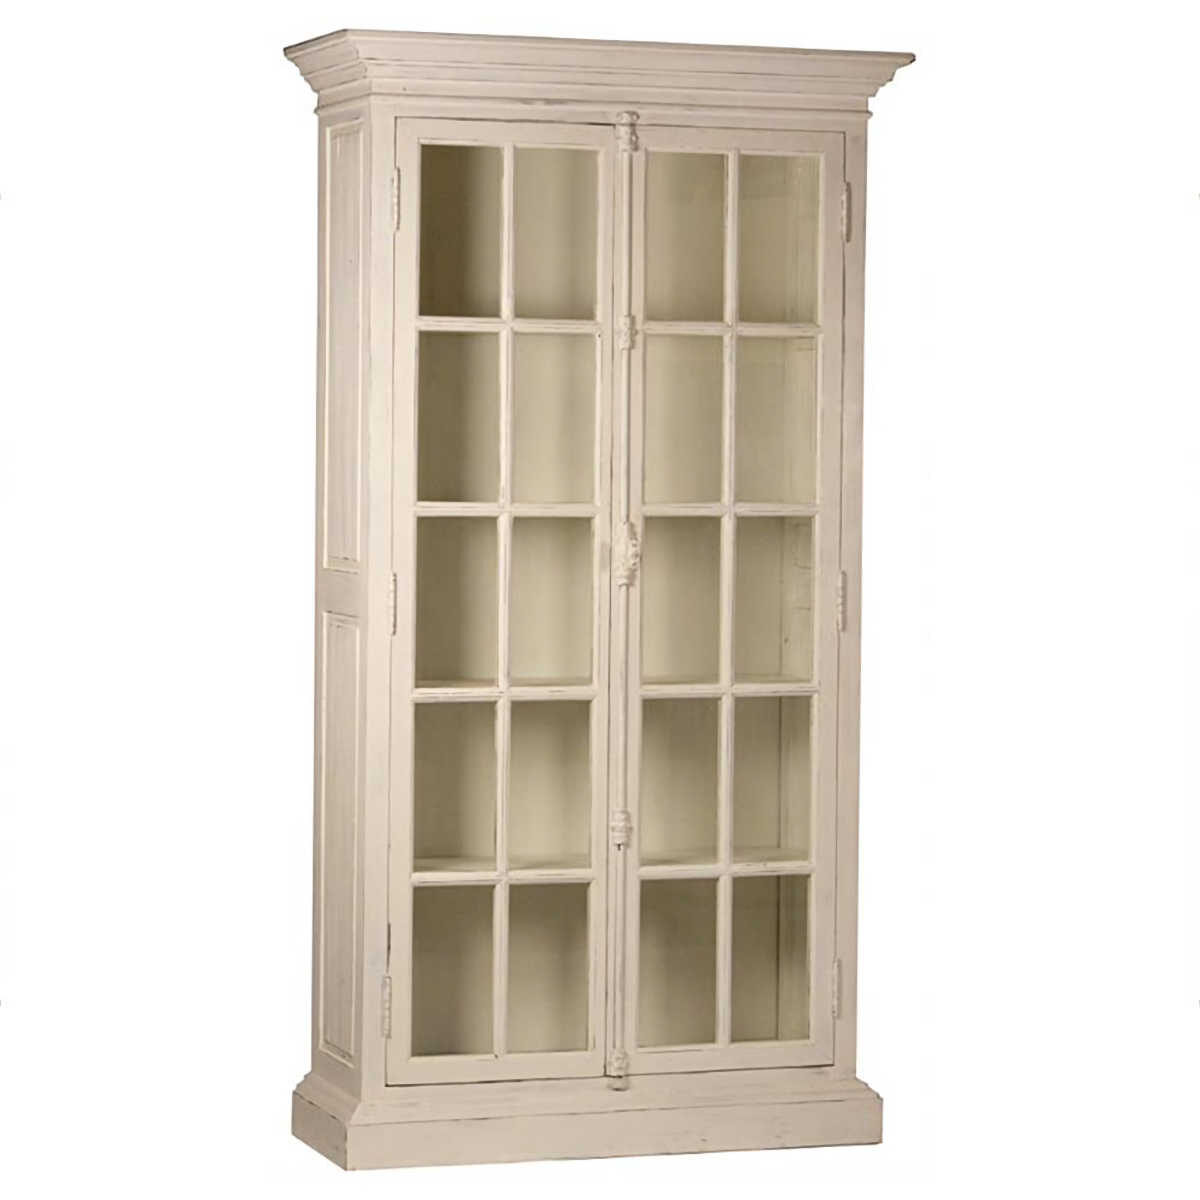
This first one is the Yael French Country China Cabinet from Kathy Kuo Home. It’s a little bigger than mine, measuring 91 inches high x 49 inches wide x 19 inches deep. The price for this one is $2713 with free shipping.
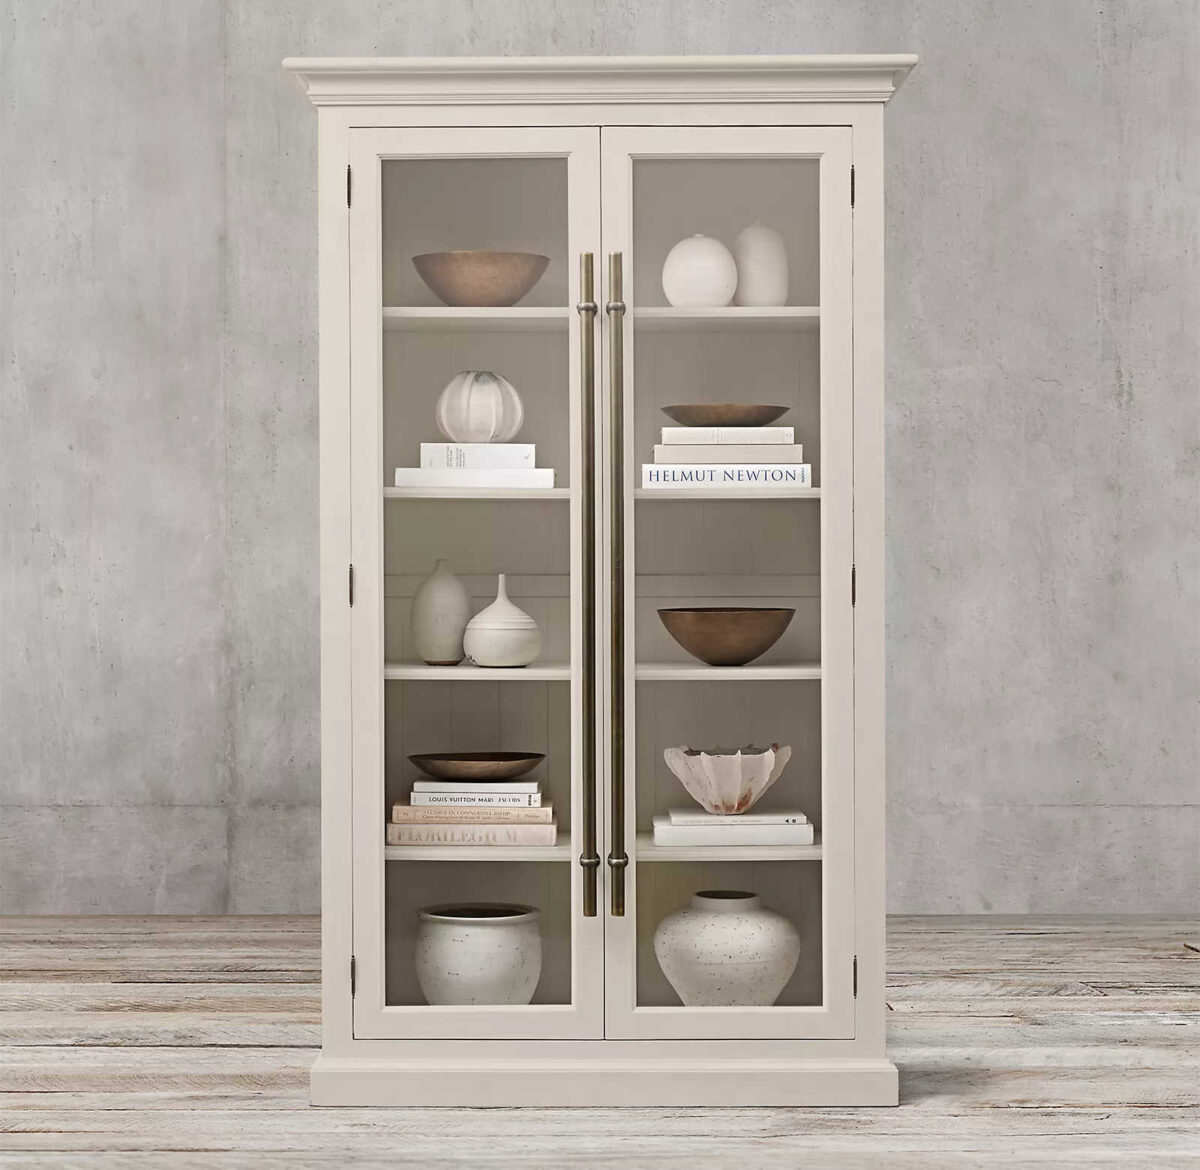
Another similar cabinet is this 20th Century English Brass Bar Pull Glass Double Door Cabinet from Restoration Hardware. This one measures 44¾ inches wide x 24 inches deep x 91 inches high. This one costs $5010 for non-members or $3757 for members, plus about $400 for shipping.
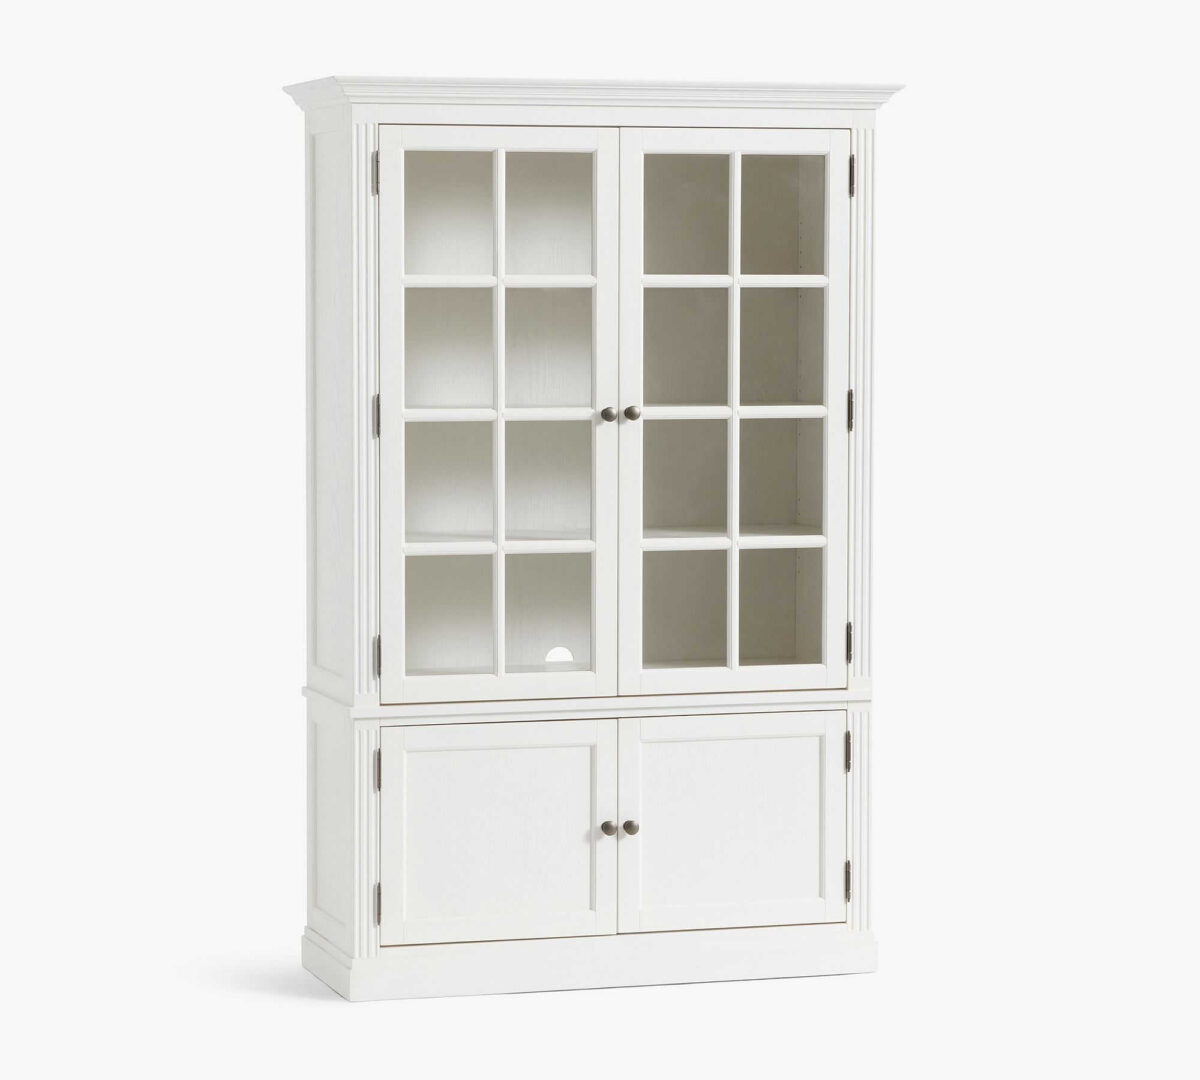
And finally, Pottery Barn has this Livingston Glass Cabinet that is very similar, although the bottom section has solid doors, and it’s considerably shorter than mine. This one measures 48.5 inches wide x 18 inches deep x 73.5 inches high. The cost is $2399 plus shipping.
So what what the cost of mine?
- 1 sheet of plywood — $65
- MDF — on hand (leftover from previous projects)
- Crown molding — on hand (left over from bathroom remodel)
- Trim & square dowels — $80
- Furniture feet — $68
- Wood for shelves — $96
- Stain — $13
- General Finishes clear topcoat — on hand
- Glass doors — on hand (from the pantry)
- Nails, wood glue, etc. — on hand
- TOTAL: $322
Granted, if you had to purchase everything and didn’t have anything on hand (like the doors or the second piece of MDF or plywood), that cost would be more. But even at that, you’d still save an incredible amount of money over purchasing something similar that is ready made (or ready to assemble).
It’s just so worth it to learn to build your own furniture! And it’s really not that difficult. Once you figure out that just about every credenza, buffet, cabinet (both freestanding and built-in), bookshelf, bookcase, etc., all start with building a simple box that’s open on one side, and then fancying it up with facings, trim, feet, legs, and other details, it becomes really simple.
Not only will you save yourself a fortune that can be put towards other things you really want to splurge on (or things you really can’t do yourself), but finishing these pieces will give you such a sense of accomplishment and confidence to take on gradually bigger and more complicated projects.
Tools You Need To Get Started:
There are really just a few things a new DIYer needs to get started building their own furniture.
Air Compressor & Nail Guns
An air compressor and nail guns are essential. I have the Porter Cable pancake air compressor that comes with three nailers. I use my 16-gauge and 18-gauge nail guns constantly. I can’t imagine trying to do the projects I do without those.
The 16-gauge nail gun is great for assembling thing, while the 18-gauge is useful for attaching trim. So on my bathroom cabinet, I used the 16-gauge nail gun to assemble the main box and attach the face frames, and then I used the 18-gauge nail gun to attach all of the small trim and the crown molding around the top.
Using the smaller nail gun on the trim reduced the chances of the nails splitting the wood trim, and also gave me smaller holes to have to fill and sand smooth.
Miter Saw
A miter saw is a must for any DIYer. I love my Dewalt 12-inch compound miter saw, but you can do just about anything you need with a 10-inch saw, which will generally cost less.
You’d be surprised at just how much you can do with an air compressor, a nail gun, and a miter saw. Those are the absolute most essential tools that any aspiring DIYer should start off with.
Kreg Pocket Hole Jig
A Kreg Pocket Hole Jig is a must-have tool specifically for furniture and cabinet building for those of us who don’t have the big workshops filled with the fancy woodworking tools that the professional furniture builders have. Kreg Pocket Hole Jigs make it easy for us non-professionals to build sturdy, quality pieces of furniture.
Drill and Drill Bits/Screwdriver Bits
The final tool that you need is a drill, and with it you’ll need a set of drill bits as well as screwdriver bits. I have this corded Ryobi drill, and I love it. I prefer corded tools because they’re more powerful and reliable, but that’s just a personal preference. I do also have this cordless combo, and I do like these and use them often.
Optional — Table Saw
So what about a table saw? Well, I DIYed for years and years before I ever owned my own table saw. Fortunately, both Lowe’s and Home Depot will cut your MDF and plywood for you to any sizes you need. And while they say that they charge per cut, I’ve never once had them charge me for cuts.
Before I owned my own table saw, I would just figure the measurements I needed, and always draw them out on a diagram so that I would know what cuts needed to come from each sheet of plywood (never leave it to them to figure that out for you), and then I’d leave the store with all of my pieces already perfectly cut to the sizes I needed.
But if you prefer to have your own table saw without spending a fortune, I highly recommend the Dewalt Portable Jobsite Table Saw. It’s the one I currently have, and while it’s not super light (which is a good thing because a saw that’s too light will move around as you’re pushing plywood or MDF through it), it’s also fairly easy for me to move around if I need to move it from one location to another. Just be aware that you’re not going to be able to push whole 4′ x 8′ sheets of material through this saw. For that, you really do need a big workshop with the big saws, which is why a lot of times, it’s still just easier for me to let Home Depot or Lowe’s cut the material for me.
Anyway, it’s so worth it to buy a few tools and learn how to build. You can save a fortune, and have fun while you’re at it! And just think of the sense of accomplishment you’ll get when you get to tell visitors, “Oh that? Well, I built that myself.” 😀

Addicted 2 Decorating is where I share my DIY and decorating journey as I remodel and decorate the 1948 fixer upper that my husband, Matt, and I bought in 2013. Matt has M.S. and is unable to do physical work, so I do the majority of the work on the house by myself. You can learn more about me here.
A clarion call of common sense., so wonderful to read.
The one thing that does stop any large projects, is lack of space, but if you have the space, give it a go.
We have evening classes at our local school that teach the basics, along with safety, so there really is no excuse not to give it a whirl.
You might just surprise yourself!
Always, always so inspiring! Thank you!
Thank you for this post! Those prices knocked me off my chair!!
I have a Kreg Accu-Cut and a circular saw and I have not needed a table saw. Yet. lol!
Yes! I should have added these. This is how I cut full sheets if I don’t have Home Depot do it for me.
Thank you for sharing this list and the encouragement to consider buying and learning to use these tools!
It was just what I needed to move me from indecision to “2 thumbs up!” on two of them I still didn’t have.😊👍🏻👍🏻
For cutting down plywood/MDF/etc. sheet goods, DH loves his Makita plunge cut track saw! You might consider one if you don’t have a table saw.
I forgot to mention that it’s cordless as well.
That’s a tool that’s on my wish list. 🙂
Wait. I just looked it up. It’s the Festool that has been on my wish list for a while now. I didn’t even know about the Makita one! I just saw a review of it by someone who’s used both the Makita and the Festool (which is more expensive), and he says the Makita is great! I’m so excited to know about this one. Thank you!
DH did his usual analysis paralysis on this one 😉
Festool is nice but, yes, pricey. The Makita we have is XPS01Z with a 55″ guide rail.
The money you saved on this bathroom cabinet more than paid for ALL the tools you used, I’m sure. And once they are paid for, you can use them over and over for other pieces of furniture. Plus you have the satisfaction of getting exactly the dimensions and style that you want/need for the space where it will go. Your home-built furniture is beautiful and functional, and it is delightful to see what you will do next! Keep on buildin’, Kristi, you’re an inspiration to many!
I fell in love with her kitchen as she built every cabinet. I thought, if she can do that, anybody can. Kristi is just amazing at everything she does.
And yours looks so much nicer than those other ones!
I have to admit the thought of building furniture has never crossed my mind until I found your blog, Kristi. And I was an experienced DIY-er at that time, but for some reason have never considered furniture making. So a BIG THANK YOU for this!
I was so thrilled to see your construction process and completion of the cabinet that I have cancelled the kitchen cabinets that my builder wanted to buy and got RTA cabinets. Savings was 6K. 24 cabinets to assemble.
Going to totally steal the trim idea for windows and doors and install myself. Savings 11K!
Kristi, I need to buy you dinner!
I have most of the tools mentioned. Got a birthday and Christmas coming up for a second nailgun.
Get an electric screwdriver, it will make your life so much easier! I assembled my IKEA kitchen myself (though hanging it was a totally different story), it wasn’t hard (even though I didn’t had my aforementioned screwdriver yet). Don’t be intimidated by the ton of boxes that will be arriving, just take your time to look at them, read what they contain and sort them across a wall or something before you begin. You totally got this!
I’m one of the lucky ones that has a full shop of tools so I have built almost all the furniture in my house, my kitchen cabinets, bathroom vanities and did all the finish work on our California room. I have saved a LOT of money but besides just loving woodworking I like that I can build something to the exact size and style that I want. I encourage everyone to give woodworking a try. I started by taking classes at my local community college.
Amen, Bobbi!
It’s amazing what NOT having money can do for you! I built a linen closet (with drawers and everything!), pull out kitchen shelves, a mud room conversion and other things around here just because I could not afford to hire someone else to do it for me. It’s a lot of work, but it is SO satisfying!
I’m lucky that my little ranch house already had built in plywood cupboards, so I could copy their assembly and make my own. And, I do have a lot of tools, but I don’t have a table saw, so it can be done without owning everything!!
I will have to look at the community college!! I never thought of that!
Wow Christy…you are such a great DIY…more of a craftsman than a DIYer. Great job, lovely home and hope your happiness continues to flow thru during this reno.
Of all the furniture you’ve built, what has been the easiest…..suitable for a beginner?
Actually, a modified version of the storage cabinet I just built for our bathroom would be very easy to build. If you make it a big smaller and leave off the doors to use it as open shelving, it would rank among the easiest building projects I’ve done. Things get a bit more complicated when you start adding doors and drawers.
Ive had HD and Lowes cut down 4×8 sheets numerous times, and they always warn me that their cuts won’t be perfect. They’ve never charged me either, but I have noticed, they are correct–their cuts are off by 1/8″-1/4″. Has this happened to you? What do you do about it? Your finished products always seem PERFECT! And I have all the tools you mentioned, but a small table saw, but I am beyond intimidated to use it. My hubs uses it but says he never gets straight cuts. Advice? I don’t know where to even start with youtube videos. Your cabinets are AMAZING! I would love to get more serious about custom builds.
The cuts are never perfect (but neither are mine 😀 ), but I’ve never had a cut from Home Depot be off by 1/4 inch. That’s quite a discrepancy. I have had them be off by as much as 1/8-inch, and depending on the project, I’ll either just go with it, or I’ll clean it up using my own table saw.
If your table saw is on the smaller side, it might only be appropriate for cutting smaller pieces of plywood and MDF. You might need to cut one side really straight using a circular saw and guide, and then cut the other side using the table saw. If I’m cutting something on the smaller side like a drawer front, I’ll often use my table saw to cut the two longer opposite sides, and then take it to my miter saw to cut the shorter sides. That gives me the best chance of having a perfectly square drawer front.
I have everything you list, except the jigg. I want to build in bookshelves in 2 rooms and add wainscoting and window trim. I just need to DO it! I’m hesitant because I’ll be doing it all by myself. My biggest fear is that it will be off square and doors won’t shut or it won’t be level. Can you give us some tips on that? I’m not concerned as much with measuring and basic construction, as I’m sure a lot can be covered with paint.
If you’ll be adding inset doors, keeping everything perfectly square is THE most important thing. It’s imperative that you use a speed square or framing square every step of the way to be sure that your cabinet frames are perfectly square. This will make installing the doors so much easier. If you’re using overlay doors, that makes things much simpler. While it’s still important just for aesthetics to make sure things are square, overlay doors can cover over small discrepancies and still look good and be perfectly functional.
I like the feet on your cabinet