My New IKEA Butcher Block Countertops!
I have finally have some kitchen progress to share with you!! Okay, they’re not ALL installed, but at least I do have SOMETHING to show you!! I am so incredibly excited about my new IKEA butcher block countertops. They’re absolutely gorgeous!!
The countertops I used are the Numerar butcher block countertops in oak from Ikea.
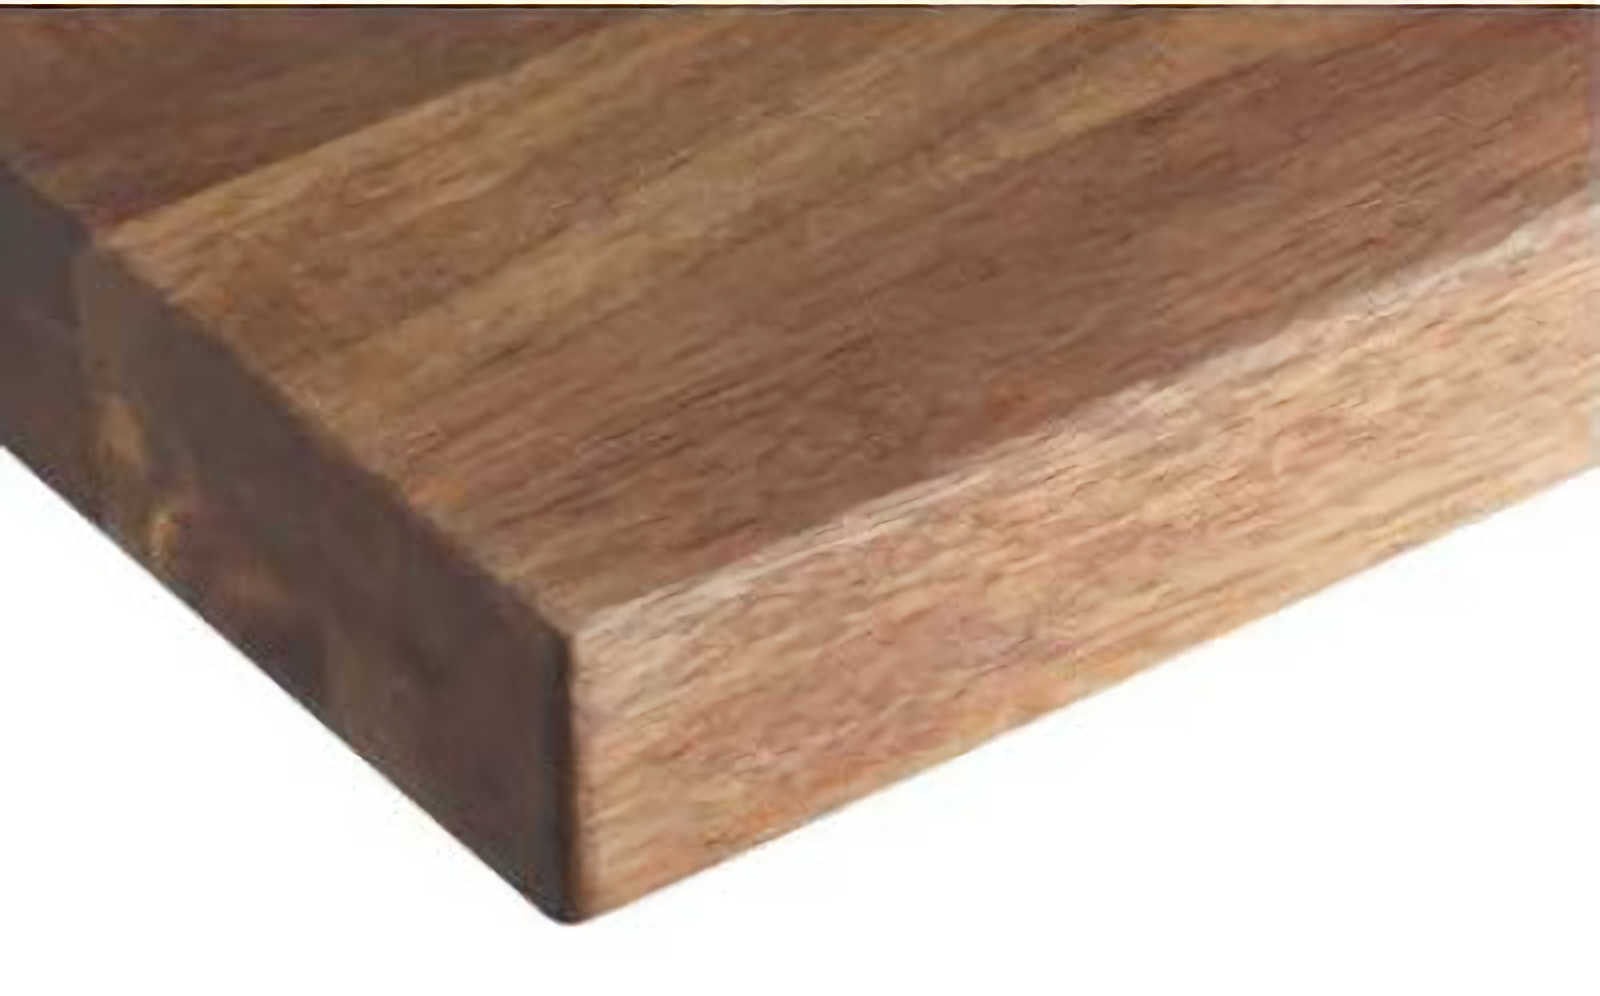
I wrestled and wrestled with deciding what countertops to use, if to stain them, and if so, what product to use, how to seal them, etc. Every website I came upon while researching butcher block countertops seemed to recommend different methods and products. It all became very confusing. To add to that confusion, the color of the Ikea countertops in the picture on their website was very misleading. This is what the picture looked like:
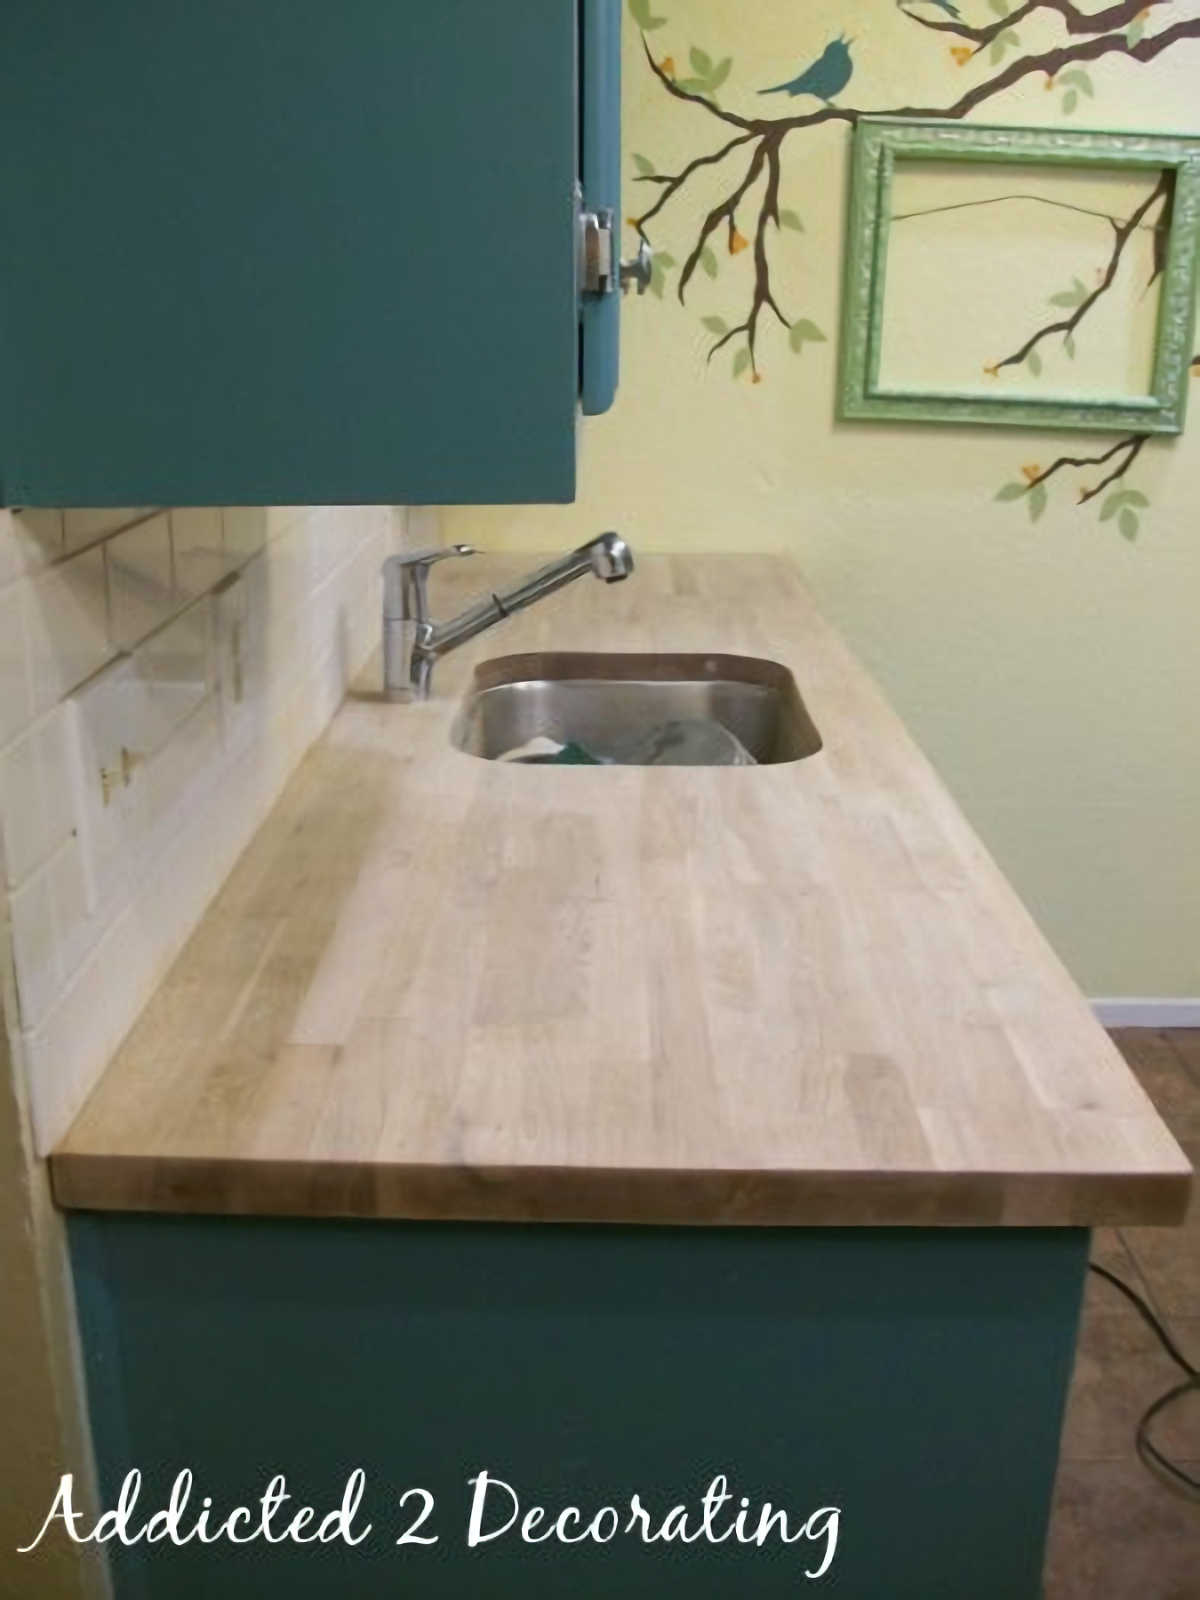
Those look like a nice, rich, medium-brown color, right? In reality, here’s what the oak Numerar butcherblock countertops looked like right out of the box:
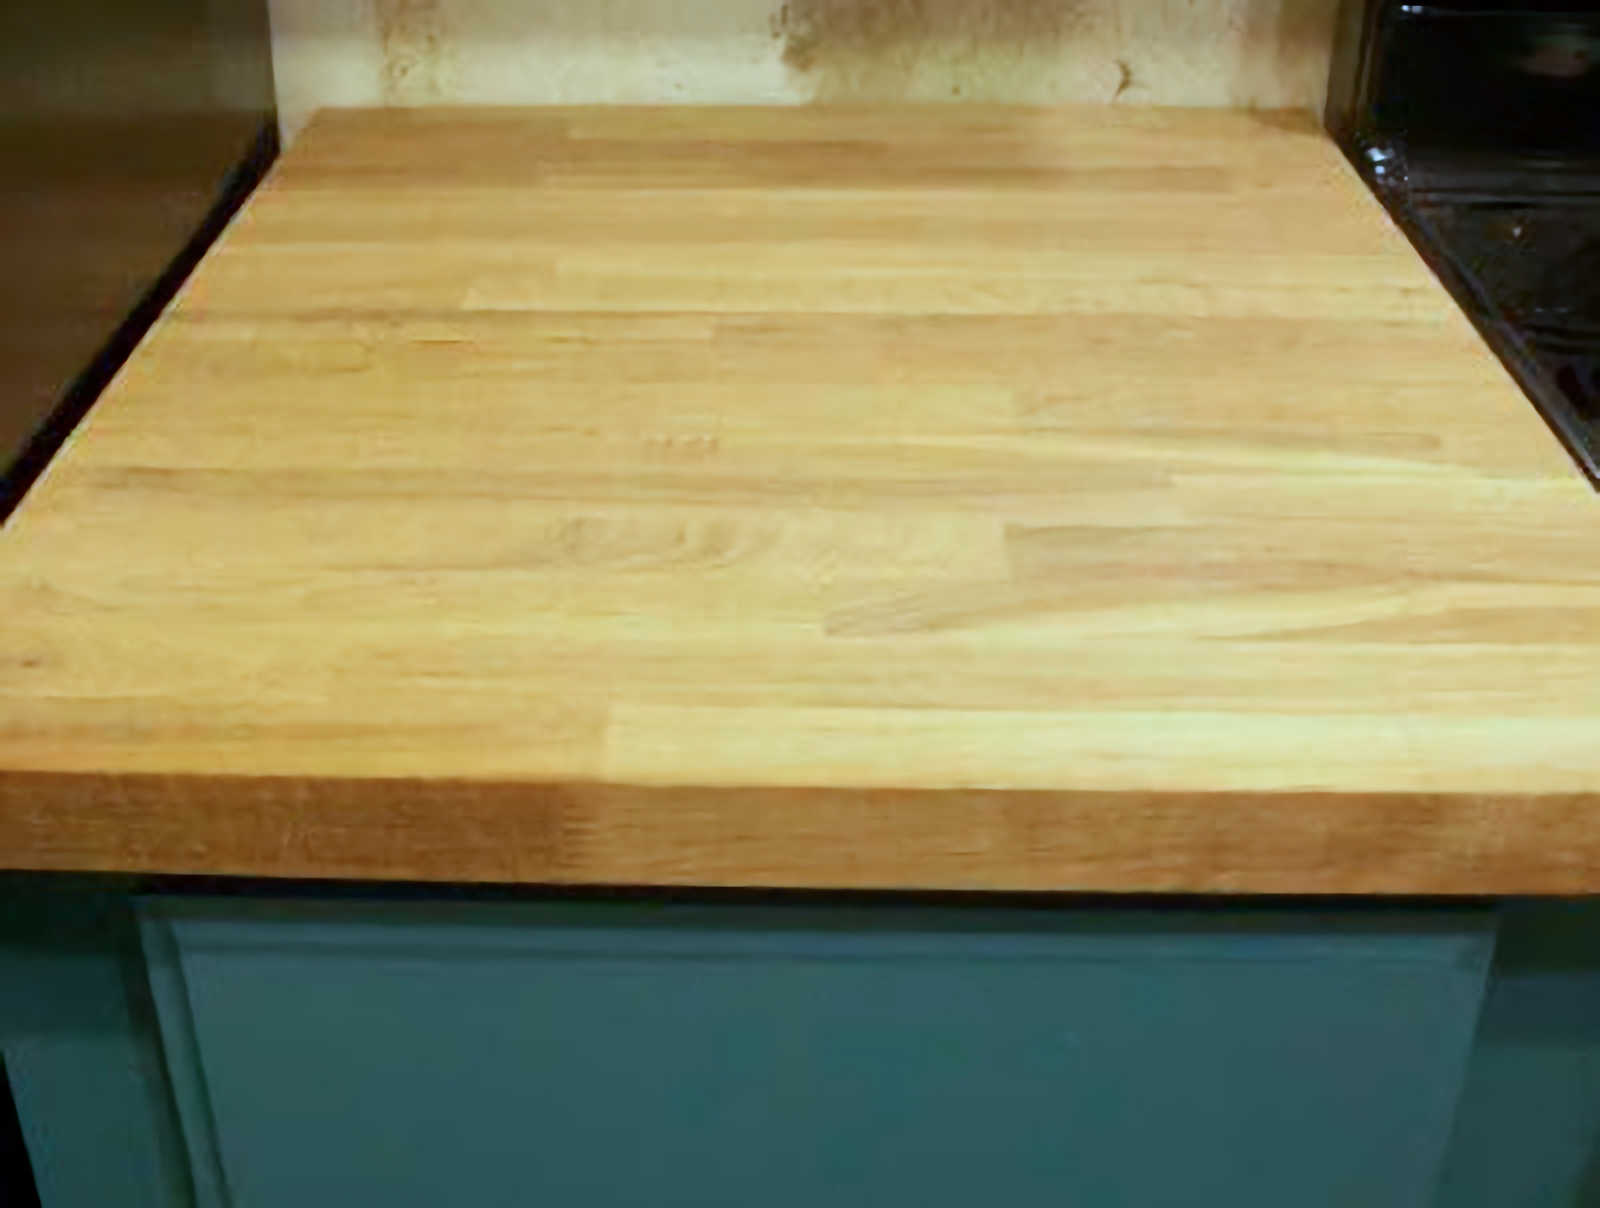
QUITE a difference…and not really what I was hoping for.
So…after doing more research, I finally decided that this is the process I’m going to use to stain, seal, and protect my countertops.
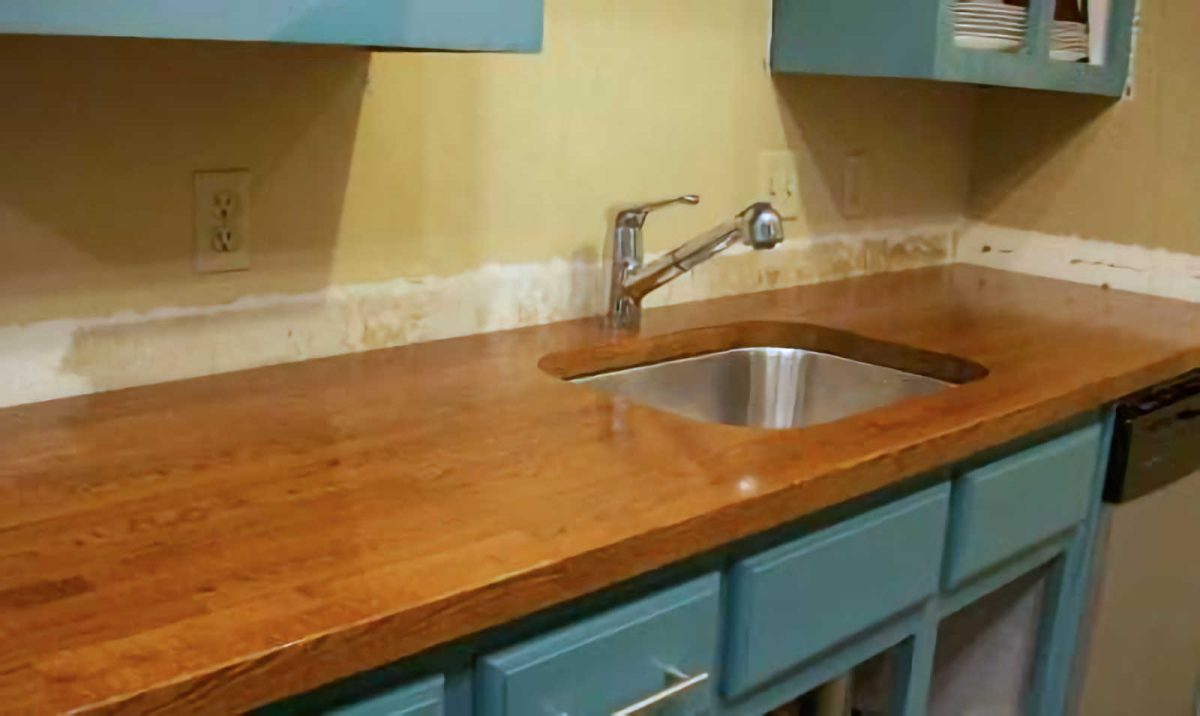
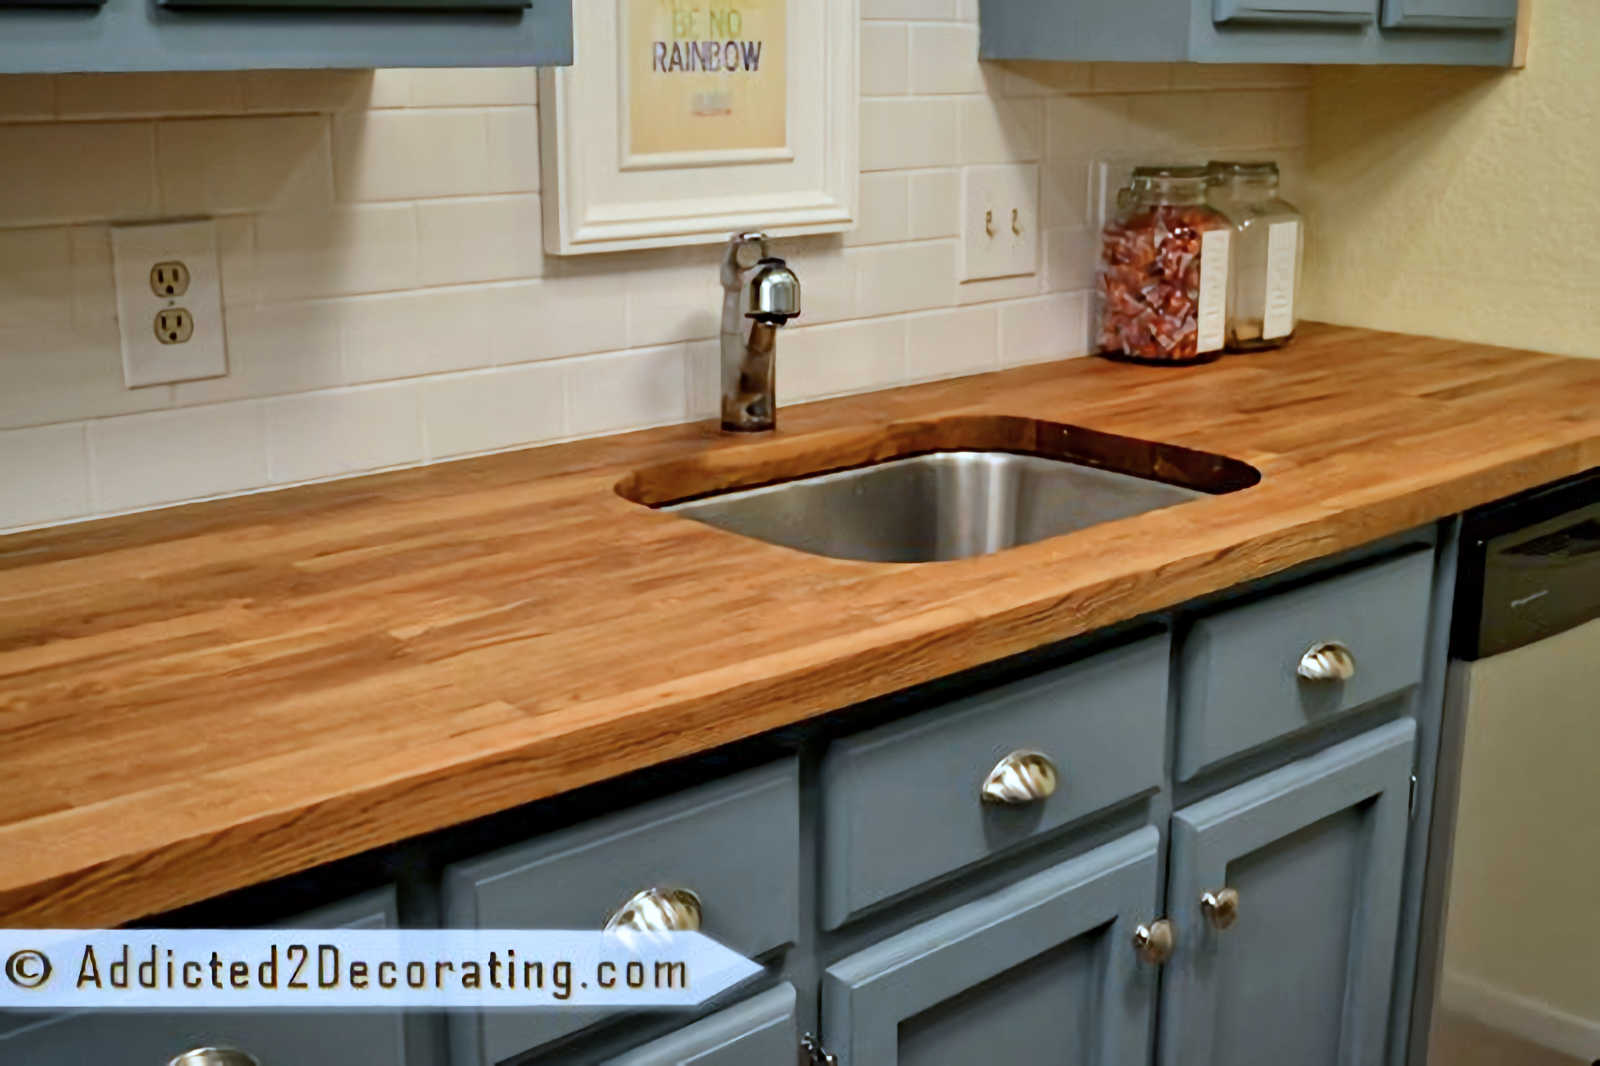
First, I used a coat of Minwax stain in English Chestnut. I wanted a medium brown–not too light, not too dark. I’m very pleased with the color.
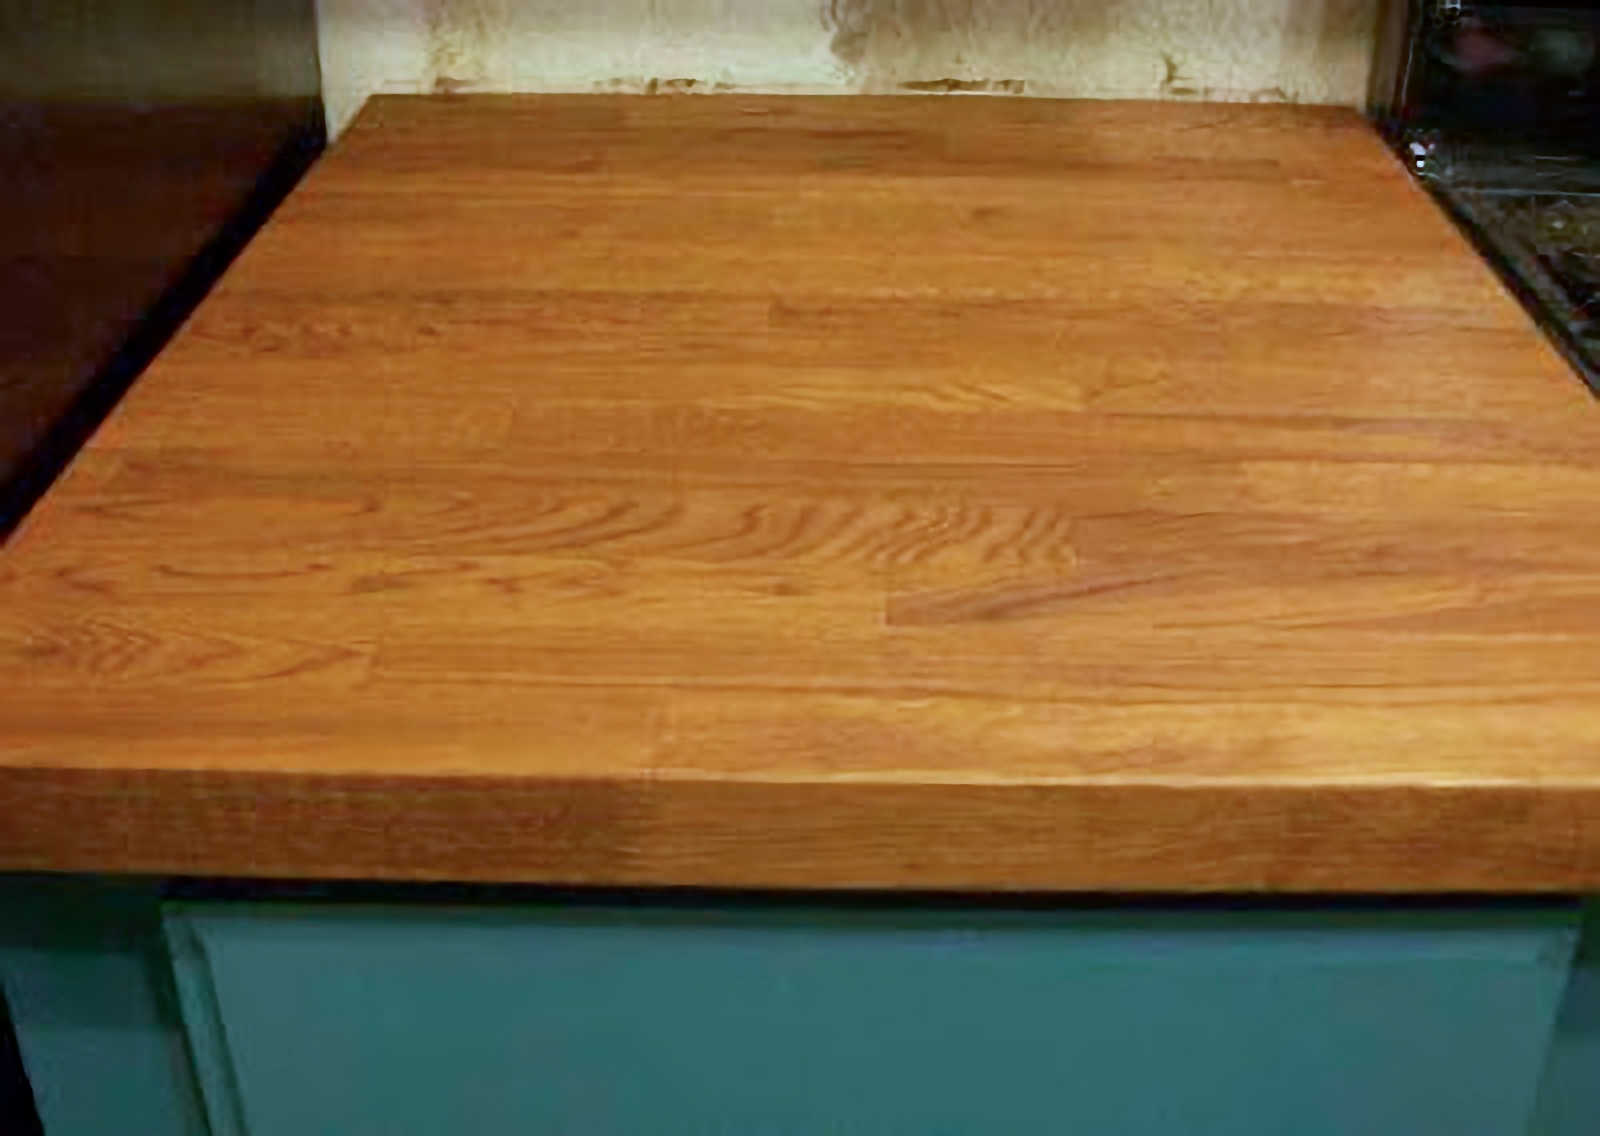
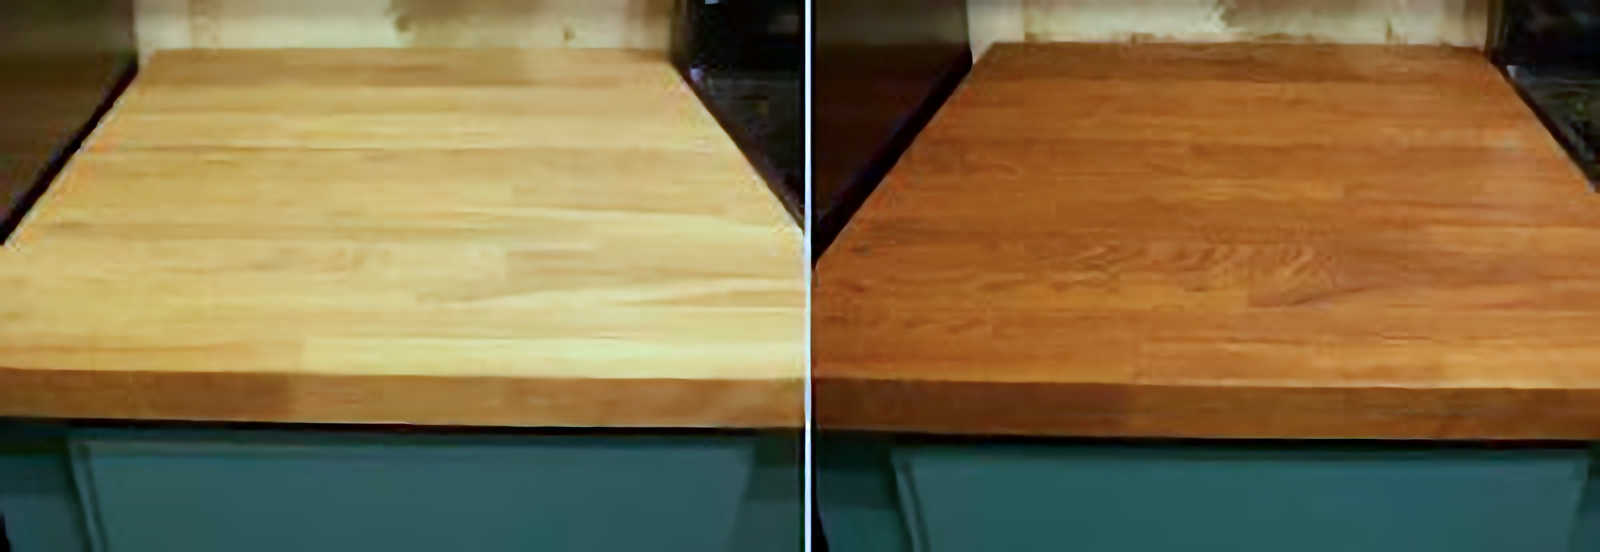
This is just regular ‘ole stain–the kind you buy at Home Depot. There’s nothing special about it. It’s NOT food safe, which is why this can’t be used alone. There are more steps to follow. But first, here’s a side-by-side of the before and after staining:
After this cures for 72 hours, I will follow up with a product called Waterlox, which is a blend of tung oil and resin. This is the same product that was used on these countertops:

I decided to use Waterlox because it acts similar to a urethane product, in that it seals the wood and protects, while at the same time, it won’t scuff like pure wax/oil products or peel/crack like a urethane product can. Also, once all of the necessary coats are applied, there’s really no need for re-application of the product with normal use, whereas oils must be maintained and reapplied even with just normal use of the countertop.
Waterlox comes in different sheens, but the first coat HAS to be the original Waterlox, which is a medium gloss sheen. After that, a satin finish can be used. I would really prefer a satin finish, but since the product isn’t quite cheap (especially with shipping added), I’m going to try the original first by itself to see if I like it. If it’s just too shiny for my taste, then I’ll go ahead and order the satin. I’m REALLY hoping not to have to do that, though.
Now the main question regarding products used on butcherblock countertops in kitchens is usually food safety. According to the website: “Waterlox finishes are non-toxic when dry for at least 7 days, when properly applied (e.g., spread rate and adequate drying conditions), and when overnight dry is allowed between coats… Many customers use Waterlox Original Finishes on items such as butcher-block counter tops and cutting boards, salad bowls and bowl turnings, knife handles and eating utensils, children’s toys and furniture, etc.”
So, I feel pretty confident that I’ve made the best choice for me, while at the same time, keeping food safety in mind. I called the company directly and asked if using a stain underneath the product would affect the food-safety quality of Waterlox, and they said that it would NOT. Waterlox will seal in the stain (which has to be fully dry and cured before adding Waterlox), and still keep the surface food safe. Yay!
I’m so anxious to get it finished. I only have the three short pieces installed right now. The long, main piece can’t be installed until I get my new sink (which should be delivered today), and then the countertop man has to come out and cut the hole for my undermount sink. That’s a job I WON’T be doing myself.
So how about you? How are your projects coming along? If you have pictures/updates to show, don’t forget to leave a link in the comment section!!
UPDATE:
Click here to see my stained and Waterloxed countertops…along with my new sink!

Addicted 2 Decorating is where I share my DIY and decorating journey as I remodel and decorate the 1948 fixer upper that my husband, Matt, and I bought in 2013. Matt has M.S. and is unable to do physical work, so I do the majority of the work on the house by myself. You can learn more about me here.

I can't wait to see the finished product! Are you going to have to join pieces at all?
That bottom sink…I am all kinds of in love with that! Wow, so pretty and nice. Your counter tops are gonna look fab.
mythriftytreasures.blogspot.com
Lucrecia, fortunately I won't have to join any pieces. I guess that's one good thing about having a postage stamp-sized kitchen! 🙂
Lissa, I love that bottom sink, too! Sadly, a farmhouse style sink wasn't quite in my budget. 🙁 I had to settle for a stainless undermount that I found on Ebay. Actually, I quite like it. I think I'm going to be very pleased with it.
I am anything in love with it! Wow, so pretty and nice. Your counter tops are going to see the fabrics
I have a really dumb question: How do you buy the Numerar? Do you tell them dimensions and they cut, or did you have to cut? Also, I noticed it is not on the ikea website; Did you just drive to Ikea to get it?
If you dont mind, can you reply to: whitney.leach[at]gmail.com
Hi Whitney, I sent you an e-mail, but I'll also answer your questions here in case anyone else is wondering the same thing.
You can order the Numerar countertops on the Ikea website (at least you can if you're in the U.S.). I chose to drive an hour-and-a-half to purchase mine in the store because the shipping charge was going to be more than the actual countertops.
The countertops come in pre-cut sizes, and they don't do custom cuts. However, they're not difficult to cut. I purchased a hand held circular saw from Home Depot (it cost about $40) and then measured the length I needed, used a piece of 1 X 4 and two clamps as a straight edge guide, and then cut the countertop. I was definitely nervous to do it, but it worked perfectly. You can the use a palm sander to take the hard and rough edges off.
If you already have a circular saw, I would certainly recommend purchasing a brand new sharp blade to use on the countertops.
I did NOT cut the hole for the sink myself. Since I have an undermount sink, it needed to be pretty close to perfect, and I didn't trust myself to do it.
I called local cabinet makers in my city, and one of them referred me to a countertop fabricator/installer who came out to my home and cut the hole for $50.
After watching him, I'm convinced I could have done it myself after all. After tracing the pattern onto the countertop (a template comes with undermount sinks), he used a hand held circular saw for the straight edges on all four sides. He then used a jigsaw for the rounded corners, and then finished off everything with a palm sander.
When you cut the countertops, you may find some "voids" in the edges of the wood. These can simply be filled with wood filler, sanded, and then sealed with your countertops (or stained and sealed).
Hope that helps!
We're installing beech counter tops next week. I was wondering, before you stained yours, did you sand them? Did you use wood conditioner? And did you apply the Waterlox only to the top of the counter tops, or did you apply it to the bottom, too? (I read somewhere that it can help prevent warping. We live in a dry climate and I'm not sure how much we'd have to worry about that anyway.) Did you get the foil thingy for the counter above the dishwasher? From the package, it looks like just a small strip and I can't figure out how that's really going to help.
Yeah. That's a lot of questions.
Your counters look gorgeous! I can't wait to get started on ours.
Hi Suzanne~
Before staining, I did sand them just manually with a piece of 150 grit sandpaper. If I had to do it all over again, this is the one step I'd take more time on. I wish now that I had used my electric sander with a super fine sandpaper (220 grit) and gone over the entire surface and the edges. Oh well…I'll know better for next time.
I did NOT use wood conditioner. I did purchase it, but I tested the stain alone on the under side of the countertop, and it went on very smoothly, so I decided to forgo that step.
I DID apply Waterlox to both sides, and all of the edges–even the edges that went right up to the wall. This is especially important for any area that will be above a dishwasher.
I did NOT use a foil thingy above my dishwasher, but I DID use plastic sheeting. It's not even something that's intended for that use. I just picked it up at Home Depot…I think in the paint section. I adhered to the top of the cabinet opening on the dishwasher section before placing the countertop on top to create a barrier between the dishwasher compartment and the countertop.
And again I'll stress, if you want the satin finish, according to the Waterlox website and the instructions on the can, you ABSOLUTELY MUST use the original finish (semi-glossy) first. Once you have one or two coats of the original finish, you can follow up with a satin finish if you desire less sheen.
Hope that helps!!
One more thing I remembered…
I applied about six coats of Waterlox in all. After doing much research, and reading the instructions on the can, I decided that I would apply my Waterlox with a clean rag (I actually used one of Matt's old white t-shirts).
According to the directions, if you apply it with a rag, you have to apply twice the number of coats. I chose to do it this way because I read other sites and comments where people said that they had trouble with brush strokes showing in the Waterlox.
BUT…after four coats wiped on with the rag, I decided that the process was going way too slowly (especially since you have to wait forever between each coat), so I decided to take a chance on brushing it on.
I'm SOOOO glad I did!! When I finally brushed it on, it's almost like it gave the countertop new life. I mean, it was gorgeous. So the last two coats were brushed on, and I didn't have any problem whatsoever with brush strokes showing.
I just made sure to use a quality brush (probably a Purdy brush–that's what I generally use for all of my projects), and I used long smooth strokes. Brushing definitely gave me a finish that I wasn't getting with wiping it on. I may have eventually achieved that look with wiping it on, but it would have taken forever.
Yours are beautiful. Love the stain shade. And your sink really makes the countertops!
I am in love with the countertops. Did you have to piece any of it togeter. I have a 101" contertop and I noticed Ikea longest piece is 96". Was wondering how and how difficult it would be. Thanks
Traci, fortunately, I didn't have to piece any together. My longest countertop is only 7' long. However, I remember when I was doing my research before buying these countertops, I found several people who had pieced theirs together. I remember one in particular that looked really good. Unfortunately, I don't remember the source, but if you google, you should be able to find info on that.
One more thing I remembered…
I applied about six coats of Waterlox in all. After doing much research, and reading the instructions on the can, I decided that I would apply my Waterlox with a clean rag (I actually used one of Matt's old white t-shirts).
According to the directions, if you apply it with a rag, you have to apply twice the number of coats. I chose to do it this way because I read other sites and comments where people said that they had trouble with brush strokes showing in the Waterlox.
BUT…after four coats wiped on with the rag, I decided that the process was going way too slowly (especially since you have to wait forever between each coat), so I decided to take a chance on brushing it on.
I'm SOOOO glad I did!! When I finally brushed it on, it's almost like it gave the countertop new life. I mean, it was gorgeous. So the last two coats were brushed on, and I didn't have any problem whatsoever with brush strokes showing.
I just made sure to use a quality brush (probably a Purdy brush–that's what I generally use for all of my projects), and I used long smooth strokes. Brushing definitely gave me a finish that I wasn't getting with wiping it on. I may have eventually achieved that look with wiping it on, but it would have taken forever.
Looks great! Did you sand the butcher block before you stained?
I've been doing a good bit of research myself and gleaned that there is information everywhere, but it's nice that you have it all here in one spot. I'm curious as to how yours turned out, especially because I think I'm going for the same look you had been. Do you remember off hand if you used more than a quart? Thanks!
I didn't use a whole quart. I actually had plenty left over, but I also have a tiny kitchen.
I wish I had seen this about half an hour ago!!!
I bought the numerar oak, and thought is looked a little “light” in colour, but went ahead and put on the IKEA oil treatment. I have so far just done 1 coat, and I am not very happy with the finish. I was hoping for a richer colour. Do you think if I let the oil treatment dry, I can sand it off, tac cloth it, then miniwax it, then treat it with a sealer?
Thanks!
I am editor of http://www.CountertopResource.com and I really like how your new countertop looks. However, i have a question – how did you go about deciding how dark to stain your top. There are so many options, it seems like that woul be difficult. I look forward to your insight on this. Thanks!