Inexpensive DIY Wood Slat Ceiling

On Monday when I posted the before and after of my kitchen, I left out the info about my DIY wood slat ceiling. Many of you noticed that it was different than in the original kitchen, and wanted to know more, so today I’m spillin’ the details.

Before I added the wood slat ceiling, my ceiling was really in sad shape. It all started when we added the recessed lighting. We didn’t remove all of the drywall because…well…something to do with the way that the ceiling joists lined up.
So when we replaced the drywall that had been removed, the new drywall was slightly thinner than the old stuff. So I was left with awful ridges in my ceiling. I’m sure that someone a lot more skilled at taping and floating could have hidden those ridge much better than I did. But taping and floating isn’t my thing. At all.

So I decided that a wood slat ceiling was the answer. I purchased four sheets of 1/4″ plywood at Home Depot, and because I don’t own a table saw, I had them cut the plywood into 4″ strips for me. Then I cut those strips into 4-foot sections with my miter saw.

Then, because I was doing this ceiling by myself, I used construction adhesive on each strip, and then nailed it to the ceiling with my nail gun.

I used a scrap piece of plywood as a spacer so that all of the pieces were evenly spaced.

And yes, as you can see from the picture above, I originally had the idea of staining the boards before installing them. Bad idea. Not only did it waste tons of time, but my kitchen looked like a cave.

So then I tried varying degrees of drybrushing and whitewashing. Those didn’t really work out either.

I finally decided to paint the ceiling, but since I had gone to all of the trouble painting the cracks black, I tried to keep those black. I thought it would somehow add depth. It just ended up looking really harsh and overpowering.

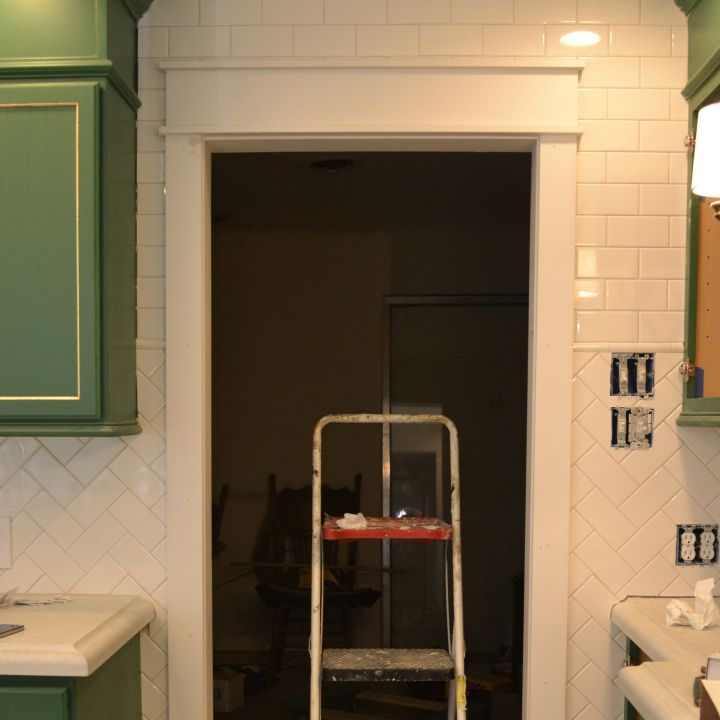
So in the end, I just painted the entire thing white…cracks and all. It didn’t completely disguise the fact that my ceiling was uneven, but it definitely looks better than the drywall….and a thousand times better than the original popcorn ceiling that was in the whole condo when we bought it.

I think I ended up using about 4.5 sheets of plywood for the ceiling in my kitchen and dining area. So at about $20 each, the whole ceiling came to somewhere around $100. And overall (without the awful staining/drybrushing/whitewashing/painting the cracks black detour), the process is fairly quick and simple.

Addicted 2 Decorating is where I share my DIY and decorating journey as I remodel and decorate the 1948 fixer upper that my husband, Matt, and I bought in 2013. Matt has M.S. and is unable to do physical work, so I do the majority of the work on the house by myself. You can learn more about me here.


Looks great, Kristi! We did something similar to my son’s bedroom wall.
Nice fix, Kristi. I need to do something similar to the ceilings at my house. I may borrow your idea.
If you need to cover an uneven surface like this again, use something thin underneath to even out the surface. You could have glued up some cereal cardboard or something as a spacer.
Why did you use a spacer between the boards? Expansion worries? I’m thinking of doing this on my laundry room wall instead of beadboard. Looks great!!
It looks fantastic! We have plans to do something similar in our kitchen/dining room and I hadn’t thought of using plywood!
It really looks fabulous! So much better.
Debbie 🙂
Great save!! I think it looks fabulous!!
That looks great!
Just had an idea…why not use wood grain laminate or real wood flooring on the ceiling? Afterall, the ceiling is a fifth wall, right? Love your makeover!
I Have Ugly Popcorn Ceiling.And have tons of Laminate Flooring Many different Brands & Colors. With Different T&G SYSTEMS. I have removed Popcorn CELINGS in THE PAST,A tedious job,& dirty ! Being I have a household of popcorn & don’t belive I am at the age or physically capable of DOING BOTH & EXTREAMLY LIMTED INCOME. Ihave vaulted ceilings as well .You can see the joists every 18″ what would you suggest ? I Have Thought about trimming off the T&G ,the variations in colors don’t really concern me being mosaic type colors & grains may look MUCH BETTER than POPCORN!! But the mounting does concern me the GLUING on popcorn will not hold the weight of laminate wood flooring. The laminate all has same width&length Stratling those according to joists dimensions should work a ok but would you recommend the stats that you use with drop ceiling or WHAT!!!!! & how would you mount the laminate certainly finshing nails will not be a option I haven’t tried drilling 1ST & to prevent chipping &splitting.Anyway let me know if your laminate project on CELING WORKED PLEASE ! ILOVED the suggestion on Cutting the 1/4# plywood in4″ Piecies Ibelieve this is the MOST REASONABLE answer I have FOUND! Ibelieve I would ROLL STAIN THE ENTIRE SHEET then touch up cuts.PLEASE HELP with MY DILEMA!!! THANK YOU BEV G.I have even checked on paintable wallpaper that looks like tin& can be faue paintedit says it can be put on ceilings but nobody will answer if I can put it on the popcorn it is prepasted however I believe if vi went this rought I Would Have To Primer the popcorn ceiling with a GOOD primer ! PLEASE HELP!!! THANKS AGAIN BEVG>
I believe you can get some 3/8 inch plywood and cut into 1 1/2 straps. Just have to scrape about a 2 inch path down along each joist. Nail these to the joists. That creates a gap and you can glue and nail the 1/4 inch plywood planks to these spacers.
I totally missed the ceiling in your makeover photos because I was looking at everything else. : ) It looks great and the white was the right color with the dark color of the cabinets. Nice job!
What a great fix! I had a similar problem when I removed the popcorn ceiling in my kitchen but not with unevenness but just bad lumps everywhere. I was going to put up wood, but did textured paint instead. Like the wood better. That’s what I would like to put into our great room.
It looks really good! I would love to do something like this, but we are renters.
I found your blog because I have been looking on pinterest for tutorials on how to reupholster two wingback chairs, and I just wanted to say thank you for posting details!! Im still pretty intimidated by the ones I have, but I think I can do it! Gosh I hope so.
I love this look, I just saw it in person recently at a historic Inn in Georgia and was saying how much I’d love to try it someday… I’ll need to save this to see how to do it!
Thanks,
Shirley
This is a great idea! I love the look of old, weathered barn wood so purchased used privacy fence, dismantled all the pieces and used them on my lanai (screened patio) ceiling. But first, I painted the entire ceiling Black Bean (SW) so that I wouldn’t have to worry about the cracks between the planks. Gives the entire lanai a very laid-back, southern charm. Love it!
Your ceiling looks awesome!! I’d like to know how you “stopped” it? I saw your kitchen makeover post too and it seems that the ceiling from your kitchen/dining area flows into another space in your home? Is that right? So how did you handle the cutoff?
Impressive! The steps are simple and no need to call an expert to do this work. My home is currently undergoing renovation and will try this wood slat ceiling in one of the rooms. This is my first time to visit your blog and I found it very useful and helpful for homeowners.
Hi there! I could have sworn I’ve been to this blog before but after checking through some of the post I realized it’s new to me.
Anyhow, I’m definitely happy I found it and I’ll be book-marking and checking back frequently!
As I was reading about the wonderful way you did your ceiling it came to mind, that painting the ceiling white 1st then add the plywood strips, which I would paint before applying to the ceiling. I hate painting ceilings, any nail areas that showed could then be touched up. Fantastic Idea, on I think I will try on an ugly ceiling of my own! Thanks!
I love this! We have a house where they wallpapered every room…including TWO ceilings!!!
My bedroom is like a cave because the put grasscloth wallpaper on the ceiling. I’m afraid to try to take it down, as the walls have at least four layers (we tried steaming it off and gave up and painted over the wallpaper on the walls) I’ve been thinking the ceiling needed something…this could be the answer, you did an incredible job. I’m glad there is one thing you can’t do (mud/drywall like a pro) you do everything else so perfectly (just kidding). You are incredibly talented and skilled.
Hi again, love this. Question: did you remove the popcorn gunk with the “wet and scrape” deal, or just go over the ceiling with the boards? I have popcorn throughout and HATE it but also know how expensive it’d be to do pine T&G, and I just don’t have the patience or the time to go through the messy process.
I have uggo popcorn ceilings and I am SO doing this! Glad to be able to learn from your mistakes too so thanks!
I have been thinking about doing this to my living room ceiling except I had seen where you can curve it around a support to make the ceiling appear taller. I think Genevieve Gorder did it in a railroad car! It looked really cool- as does yours! Great job!
I was remodeling my basement and I did NOT want to keep the drop-ceiling with the “cheezy” tiles. I had my brother look at your plywood ceiling and he came up with the idea of using wood siding. It was already in the 8 inch planks and so we just cut them different lengths to give an interesting pattern. We painted the ceiling bright white and it looks FABULOUS! Thanks for the inspiration!
Would love to see some pictures of your remodeled basement ceiling Mindy. We have cathedral ceilings in the master bedroom and, they have that horrible textured ceilinga….love the idea of a plank ceiling!! Love this Kristi! I was also wondering if you removed the popcorn ceiling first?
My ceiling didn’t have popcorn texture. We ripped down the drywall, installed recessed lighting, and put up new drywall. So mine had no texture on it at all.
Do they charge anything to cut the plywood?
Officially, they’re supposed to, but I’ve never been charged for cuts.
That’s amazing. I guess all I can do is ask right? Thank you.
They charge if you have a large amount of cuts (that’s what they told me earlier tonight). Anything over 2 cuts is $0.25 per cut, which isn’t bad. I have all the tools but don’t have a set up to cut 4′ x 8′ sheets of ply wood. I have other priorities since buying a foreclosed home and needing to do a lot of work on it. I knew it used to be 3 free cuts so I called and asked since I’m in a different area now then I was than.
Actually, the uneven areas almost look on purpose. LOL. Looks decorative. Great job!!!
I love this! I am going to do this in the remodeling of our house. The popcorn ceilings all throughout our house is disgusting. How did you go about putting the planks up around lights and such?
I cut those areas out with my jigsaw.
Thanks for sharing the results of your efforts. Now I know that white would be the best colour for my plywood ceiling.
I love this and will be doing it in a room I’m converting into a closet. Depending on how it goes because of my shoulder surgery, I may do a few more ceilings this way. I just trying to figure out the board lengths for my closet. It’s 100″ wide. I’ll just have to play around and see what I like.
This is great! I am turning my 2-car garage into a “tiny home” for myself and will rent out the primary house space. I am on an extremely limited budget and I couldn’t come up with an inexpensive yet decent ceiling covering to put over the insulation I will be installing – and something I could accomplish unassisted. This fits the bill. There is no ceiling, just the joists in between which I’ll put the insulation. I think if I tack these up perpendicular to the joists, it should go ok. Thanks for the great idea!
2018 and you are still helping people with this post. We have to quickly dress up a failing plaster ceiling for a guest room in the next few weeks. The cost is right for a temporary fix and my wife will be able to do this while I work on the bathroom!
HI there, was this done over a previously flat or a stipple ceiling. TIA
It was a smooth ceiling.
Thanks so much for the instructions. I will be doing my bedroom ceiling soon (ugly popcorn)
and was wondering how I would manage work and save some $.