Closet/Laundry Room Progress – I Finally Built Something! (Building A Washer Cubbie)
I finally started building my closet yesterday! When I placed my order for all of my plywood on Monday, I didn’t include the plywood for the washer and dryer cabinets (or cubbies, or surrounds — whatever you want to call them) because I wanted to get started building ASAP, and I those were the only pieces that I could have cut in the store and fit into my van to bring them home with me that day. And then, after getting my order placed and asking if someone could cut a piece of plywood for me, I was told that their saw wasn’t working at that time. 😀
He assured me that it would be fixed by the next morning (Tuesday morning), so I decided to wait. But it wasn’t fixed the next day. So instead of waiting, I ended up going to Home Depot to have them cut it for me. They have the exact same plywood that I purchased from Lowe’s for the rest of the closet.
All of that to say that I haven’t received my delivery yet (it’s coming today between 9:30am and 1:30pm), but I did at least have one sheet of plywood cut and brought it home so that I could at least build something. I just needed to see some sort of progress in this room.
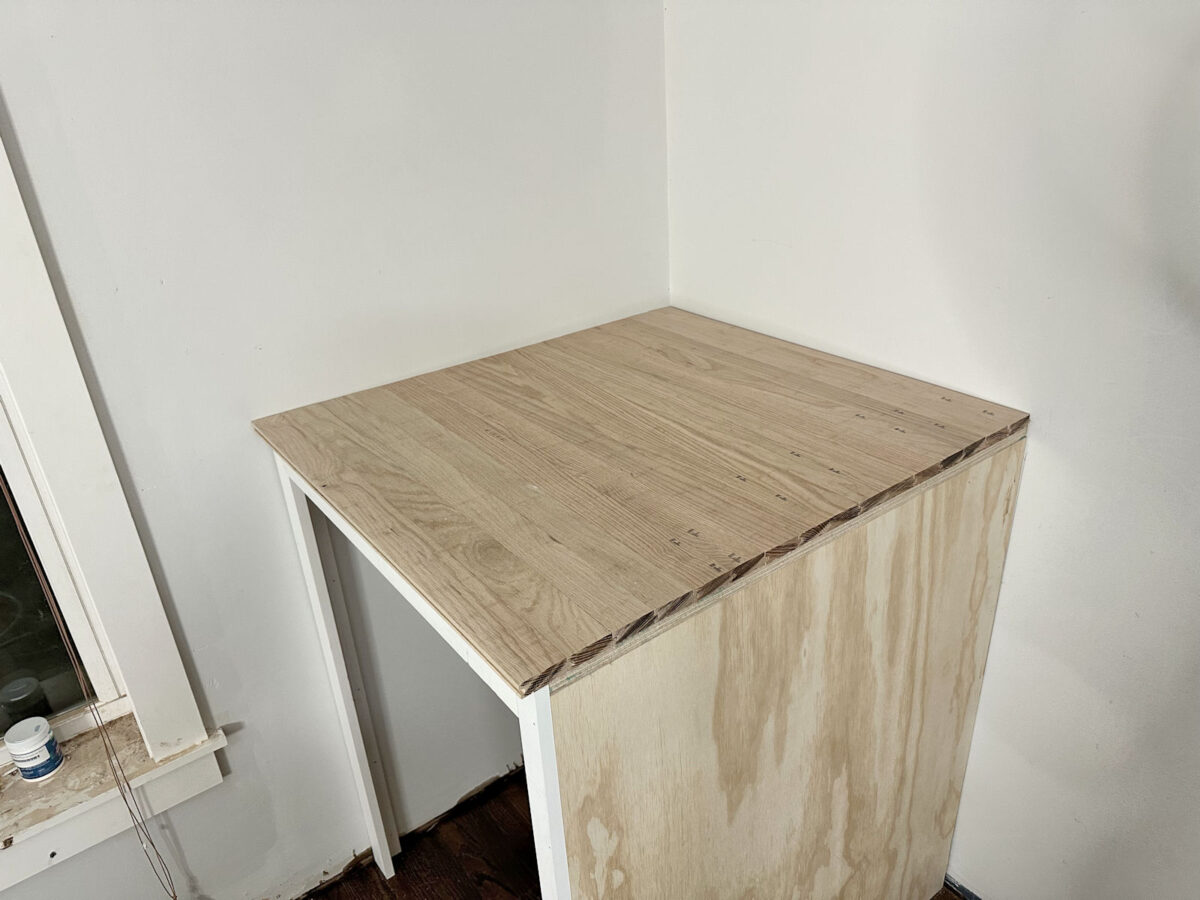
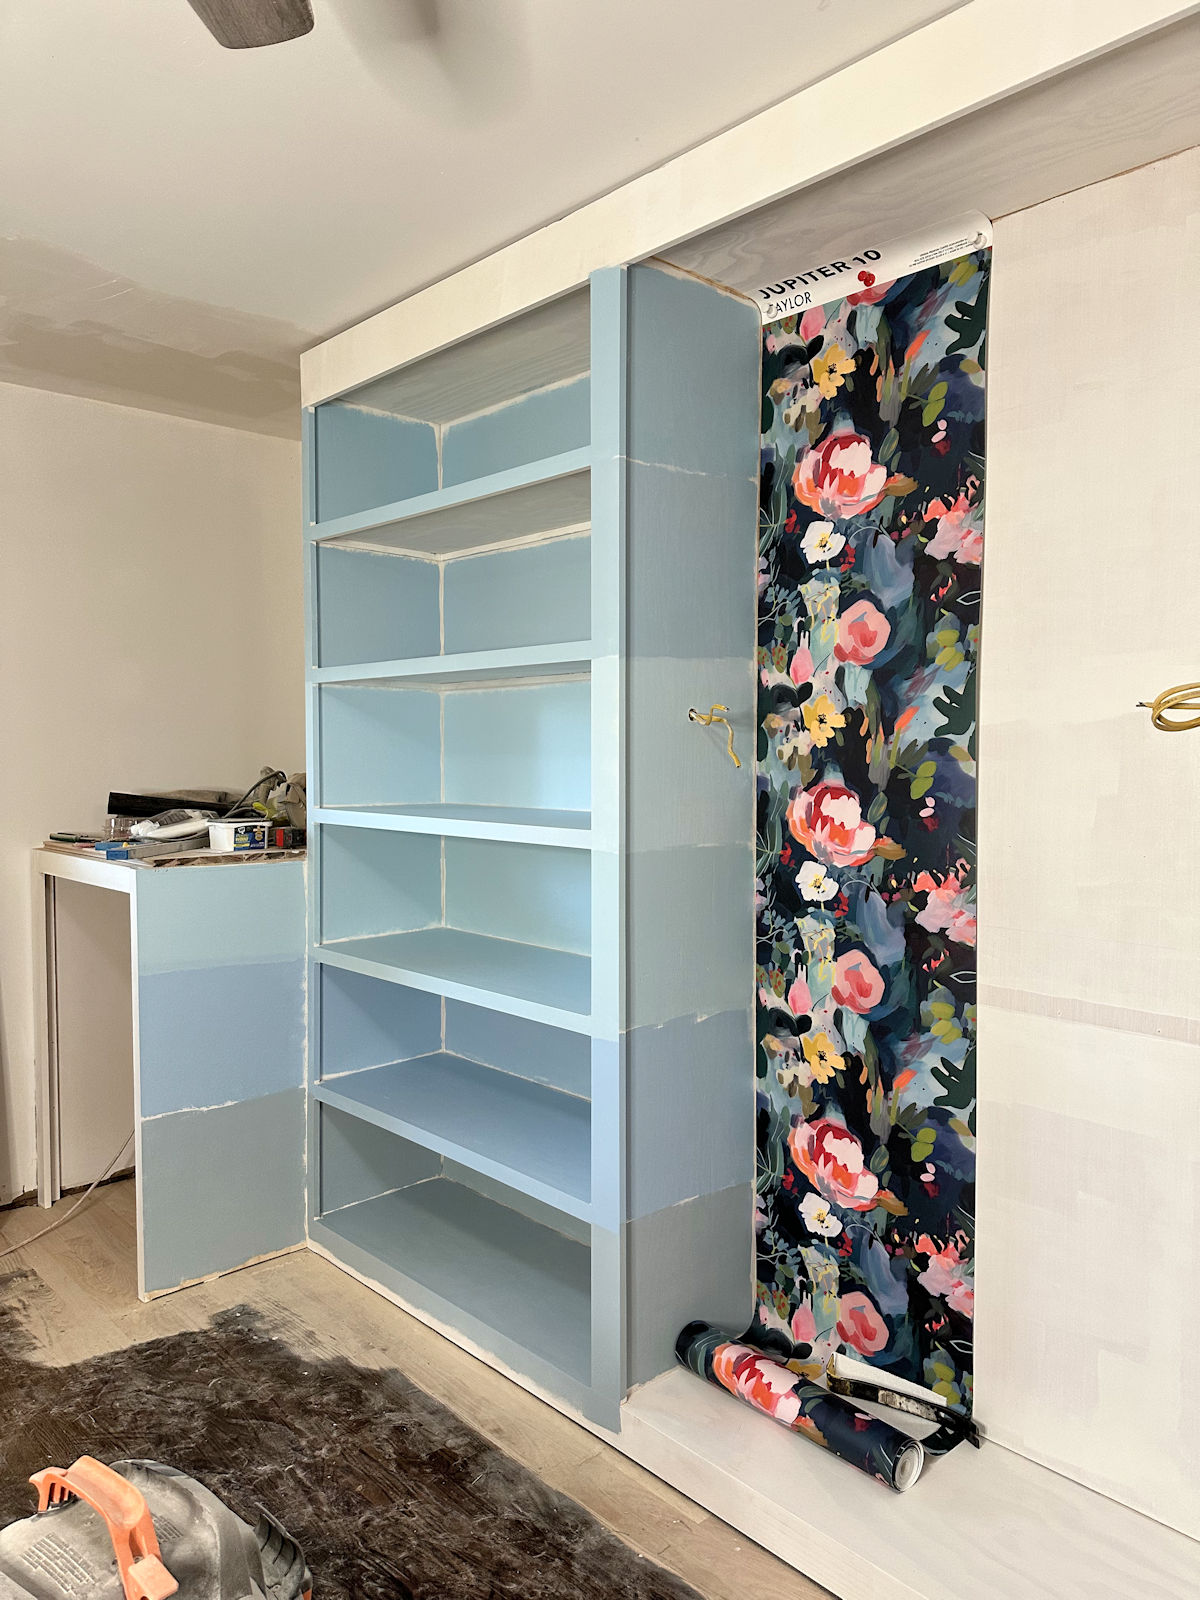
I only got the washer cabinet built yesterday because I don’t want to build the dryer cabinet until the electrician has run the new wire. The last thing I want to do is build something that will make his job harder and potentially cost me more money because of it. But here’s what the washer cabinet looks like so far.

The washer will actually stick out a few inches from the cabinet, but at least we can actually get a visual of how big and how far out the washer and dryer will go, and how much distance there will be between them.
Building this cabinet was incredibly simple. I didn’t want to use a lot of plywood that wouldn’t even show or serve a real purpose, so I didn’t use plywood on the back or the side against the side wall. Instead, I measured the finished width (33 inches) and then placed a 1×2 vertically at that measurement minus 3/4″ to make room for the 3/4″ plywood that would serve as the side of the cabinet.

Then I measured the depth on the side wall and placed another 1×2 vertically at that measurement.

And then I attached two more 1×2’s at the height of my plywood, which is 41 inches.

I nailed the plywood into the side edge of the 1×2 to form the space for the washer.

And to complete the form of the cabinet, I attached a piece of plywood to the top and nailed it into place all the way around, nailing it into the 1x2s on the side wall and back wall, and into the top edge of the plywood on the right side.

With each step, I used my framing square and level to make sure everything was square, level, and plumb before attaching them.

Then I trimmed out the front of the cabinet using 1x3s and 1x2s. I used a 1×3 at the wall so that the opening of the cabinet would clear the window trim and window sill with some additional width to spare since the door of the washer will open in that direction. And I used a 1×2 on the other side because that’s the side that will show, and I’ll be trimming out all of the closet cabinets with 1x2s. My floor isn’t perfectly level, so I have a feeling I’ll have to remove the top trim and cut it down a bit on my table saw for the washer to fit.

I had been looking at different options for countertops, and found myself gravitating towards butcherblock. I came very close to purchasing butcherblock from Lowe’s, and then I realized I have plenty of flooring left over from the flooring installation in the master bedroom suite. So I decided to use that instead since I’ve already paid for it. I cut the leftover red oak hardwood flooring pieces to 33 inches wide and placed them on top.

I haven’t actually attached them yet because I need to figure out if that top trim piece needs to be trimmed down before I finish the countertop. So right now, those boards are just lying on top, but they’re not glued or nailed down. And of course, I’ll add a 1×2 piece of red oak to the front edge and side edge to finish the countertop.

I’ve also purchased wood bleach for the countertops because I want them to be a light, natural wood color, so I need to remove some of the red from the red oak. I’ll tackle that later because I had to order the wood bleach on Amazon. This is the one I use (affiliate link), and it works very well.
So that’s as far as I got. But, hey! At least I finally built something! 😀
I really wanted to build the other one for the dyer, but again, I don’t want to make the electrician’s job any harder and possibly have to pay more. So I made myself wait on that. But y’all, I’m so anxious to build!! I’m so excited that the rest of my supplies will be delivered today by 1:30, and I’m hoping to have the rest of the day to build.
I also need to get the floors covered before I start the big stuff. This was such a small and simple project that I didn’t worry about the floors. But I’ll have to build the big cabinets inside this room, and there’s no way I’ll be building those big cabinets in here right on top of my newly finished hardwood floors. So I need to get those covered and protected before I go any further.
But I’m so happy to see a little bit of progress…finally. Now I just need to figure out how I’m going to get the washer and dryer out of the sunroom and moved into this room. I’m sure I’ll need to call in reinforcements for that. I seriously doubt I’ll be able to do it by myself. But y’all probably know me well enough by now to know that I’m at least going to try to do it myself before I call for help. 😀
The A2D Daily:
More About My Walk-In Closet/Laundry Room

see all walk-in closet/laundry
room diy projects
read all walk-in closet/laundry
room blog posts

Addicted 2 Decorating is where I share my DIY and decorating journey as I remodel and decorate the 1948 fixer upper that my husband, Matt, and I bought in 2013. Matt has M.S. and is unable to do physical work, so I do the majority of the work on the house by myself. You can learn more about me here.


How will you connect the washer in such a tightly enclosed space? Maybe you shouldn’t screw that top down before sliding the washer in.
The hoses and the power cord are six feet long. The cabinet is only 35 inches deep.
I hate to say it after you’ve done all that work, but don’t you need access to the washer shut off? Not terribly attractive, but you can get a single handle shutoff that will cut both hot and cold water in case of bad things. I have little to no trust in appliances.
I am assuming you took a look at the plugs for both the washer and dryer and allowed for the depth of those plugs. The dryer outlet is thick, will you place it in a spot where a void is on the back of the dryer? Making sure you thought of everything! Hooking the washer and dryer up in an enclosed space is the hardest part of the process—been there—done that!! 😂
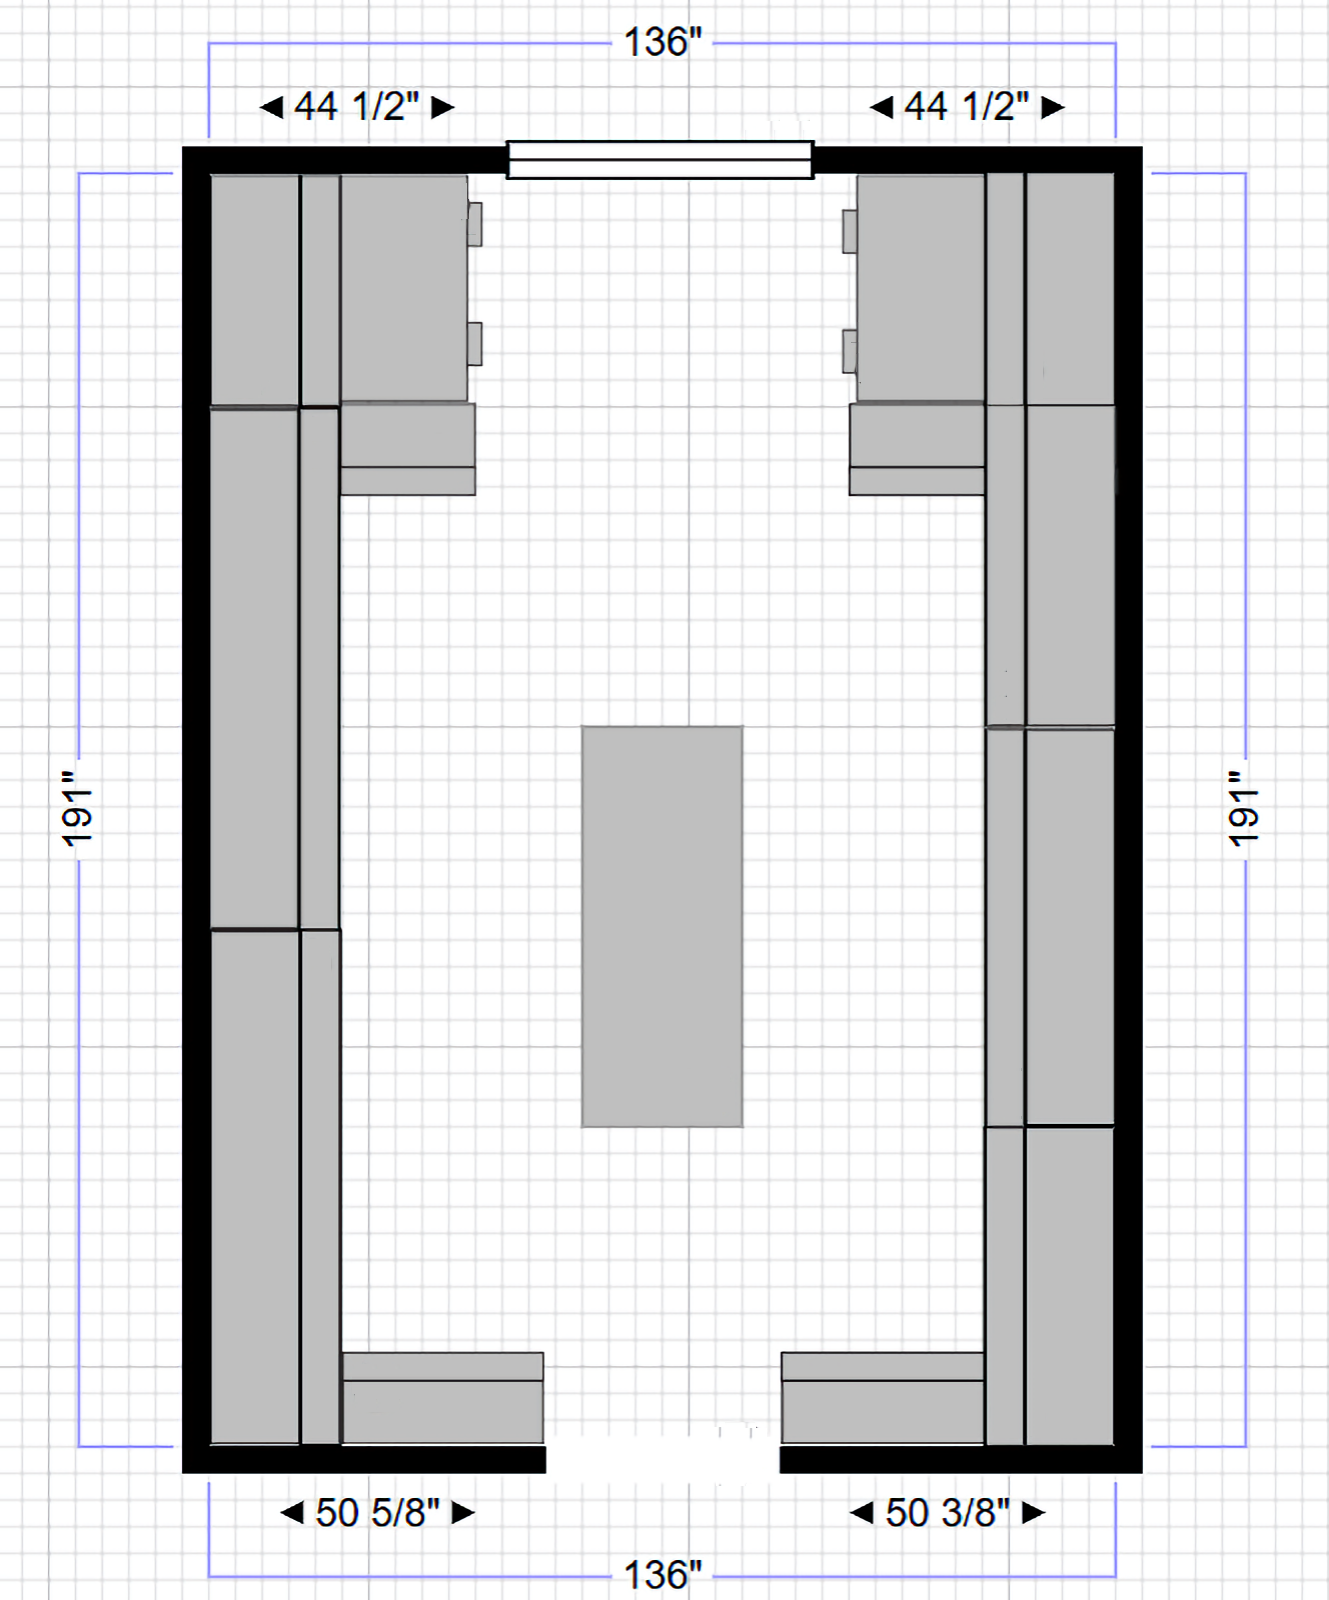
Both the washer and dryer will sit away from the wall several inches. I know for most people, their goal is to get them to sit as close to the wall as possible so they’ll take up less space. My goal is to have them sit far enough away from the wall without them looking awkward so that the front of the washer and the front of the dryer aren’t a mile apart. There will be 9 inches of open space between the backs of the washer and dryer and the wall.
Yippee! Yahoo!!! Getting the laundry machines in the closet is going to make your life so much better.
I cringed at the sight of the power tool on the wood floor. Then I read you plan to cover the floors before proceeding. Please put an old rug or folded up blanket under the tools. I’m freaking about scratching or denting floors, table tops, etc. I would never have thought of using wood flooring for a butcher block countertop. It looks very nice. You’re making good progress!
Maybe use a couple of boards with casters to slide under each side of the washer and dryer and roll them in.
Please, please cover that beautiful floor before you start to work. ‘Fixing it later’ — i.e. after it gets damaged, will not be necessary. I can’t be the only person who dreads seeing you neglect to do that so often.
Would having a hinged top make it easier to attach the hoses in that tight space? Also, did you decide on a floor tray for the washer to sit in for leak protection- and is that added height figured into the measurements? Inquiring minds want to know😁, and we love hearing all the thought processes!
I’m not going to worry about a hinged top. The cords and hoses are six feet long, and the cabinet is 35 inches deep. There will be plenty of extra cord/hose to connect it.
I decided to stop obsessing over the washer and dryer and just connect leak detection alarms to them. I may even get one of those automatic shutoff leak detectors. I’m still trying to decide, but I’m going to make it as simple as possible.
Man, you are so inspiring! Couldn’t you shim the cabinet/cubby to make it level? Anyway, I’m so excited!!
The cabinet is shimmed. It’s perfectly level, square, and plumb. But that doesn’t do anything to make the floor level, and the washer sits on the floor.
Awesome job and using the flooring is genius on the countertops. Gives me ideas for our butler’s pantry/laundry room, I too want butcher block, but was going to use end grain 2X4’s. I have some of the solid hickory leftover from the whole house job. As for moving the washer, I have a set of furniture dollies. We’ve got them in sorts of sizes. I am sorry I don’t have a link for them, but I am sure a quick search at Amazon will help you out. I don’t know where we would be without them here on the farm, we ain’t getting any younger if you know what I mean. Everything looks great, keep going, and patience, it will all get done.
Cheers to you and Matt!
Now that I have seen the latest video with you standing next to the washer surround I just want to ask if you have thought of how you might decorate the space above the appliances and next to the window. I can’t imagine that you won’t want some kind of art work and I would definitely be obsessing about how that art might be attached to the tile you are considering without having to put holes in the tile. Just how my brain works. Having the videos in addition to the blog is so helpful!
Most washers and dryers have adjustable feet on the bottom to level them. Especially with modern front load washers and the precision of the machinery, keeping them level is important to prolonging the life of the washer. So maybe that will keep you from having to trim very much.
I have a plumbing/electrical anxiety issue. I have 3 laundry sites in my new home. I had the plumber & electrician set everything up so I can shut off everything quickly in an emergency. My Dad was a plumber/electrician and taught me to position both someplace where I can turn a valve or pull the cord without having to move an appliance. I don’t like anything in out of the way places that could cause real damage if I couldn’t mitigate it immediately.
I do like your setup but I think I would have a hinged area on top of the washer cabinet. Maybe 3 or 4 boards that I could flip open at the back if I needed to get to the valves quickly. I have a dear friend who is 4’11” tall. She’s like a spider monkey climbing on furniture and cabinets to get to what she needs to do. Somehow, I imagine you are in the same sisterhood. With all the hardwood floor and everything you’ve done, it would be a crime to have it ruined. I’ve got everything cut to make a rolling pallet for my W/D in my side of the house. Saw it on FB.
Look at U-Haul movers. We slow moved from
Fl to Tn over last 6 months and it was time for the heavy items. Hired contract movers on both ends and both were excellent. Well worth the money (cheap) and wondering why we didn’t hire help for all of it. I don’t think you have to rent equipment from U-haul. Check out Between Naps on the Porch blog about her recent experience.
From angles of the photos, that window ledge is sticking out from the wall more than the cabinet. I am guessing that’s just the angle, but check that view from your wall to prevent installation delays.
My dad had a frantic call from the neighbor one day saying she needed help shutting off her laundry room water valve. She was half his age and in the National Guard. It took both of them holding shields to deflect the water to get close enough to reach the unobstructed valve. A hose had failed dramatically. There are heavier duty hoses designed to last longer and prevent that style of drama. You too have hard water buildup in pipes and hoses.
Level your washer and dryer feet. Tedious, yes, but proper drainage is priceless. If your washer tends to lurch around during spin cycles, you can find the weighted feet to stop that nonsense.
Given your situation, I’d go with the valve cutoff style of alarm sensors. You do not want to cleanup after a flood or geyser in that room, or anywhere else.
Waving at Matt.
I love that last sentence! But I’ll at least try it myself before I call in reenforcement! My life’s motto too, wrapped up in once sentence.
Kristi, I thought you’d appreciate this livestream of Up North Cat Condo for feral cats in Minnesota.
They have ‘pans’ to put under the washer incase it leaks water. With your wood floor I would definitely add one.
How are you coping to access the hose connections? I must have missed it. We had our hose come out one time. If the connections had not been easily accessible, it would have been a bigger mess than it was. Putting the counter top on a piano hinge might be a good idea.
Have you double checked your washer and dryer manufacturer’s guidelines for clearance on all sides of your built-in cabinets? You will want to make sure that you have at least their required minimums for them. Also, be sure that you have plenty of room for any movement they make while spinning at highest speeds. Lastly, get a supply of the special adhesive pads for under the leveling feet for both washer and dryer. You don’t want them shimmying out!
I checked. My washer and dryer require zero clearance on the top and sides.
‘ . . . square, level, and plumb before attaching them.’
I understand square and level, but what does plumb mean in this context?
It means that the vertical pieces (specifically the side plywood) are perfectly vertical.
I appreciate your passion and enjoy your creativity. Love it!!!!