The Uncertainty Keeping Me From Starting On Our Bedroom Suite (The Details I’m Still Trying To Figure Out)
I have a process that I work through when I’m about to tackle a building project. I envision the entire building process, from beginning to end, to make sure that I understand every step of the process, the sequence in which the steps need to be done, and how the various parts and pieces fit together before I even begin the project.
When it comes to something like building a piece of furniture, I don’t necessarily have every trim detail figured out before I start. Sometimes I like to figure out the trim and finishing details as I go. But at the very least, I’ll figure out the basic build of that piece and envision the process of building the basic piece from beginning to end before I start. That way, I can work through the whole process in my mind and figure out any roadblocks before I even cut that first piece of plywood. Once I can go through the entire process start to finish in my mind at least two or three times with no roadblocks, I know I’m ready to start the project.
That’s just how my mind works, and that has been my process for years now. When it comes to building furniture, that whole process is generally pretty easy and straightforward. For example, building a small writing desk with a drawer doesn’t take much planning. This is about as easy as they come.

Even a larger piece like the console table I built for the entryway was a fairly simple process.
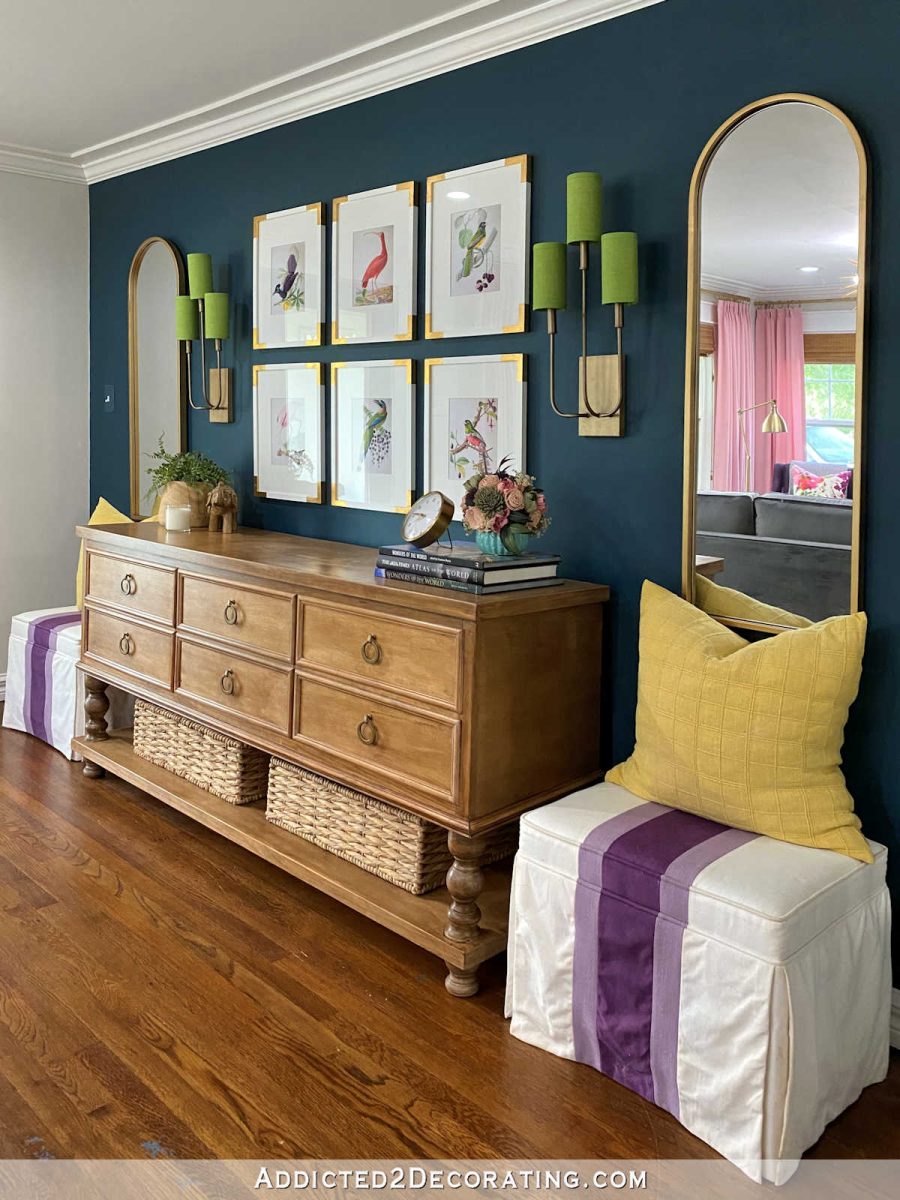
So those types of projects don’t take a whole lot of planning and thinking through the process.
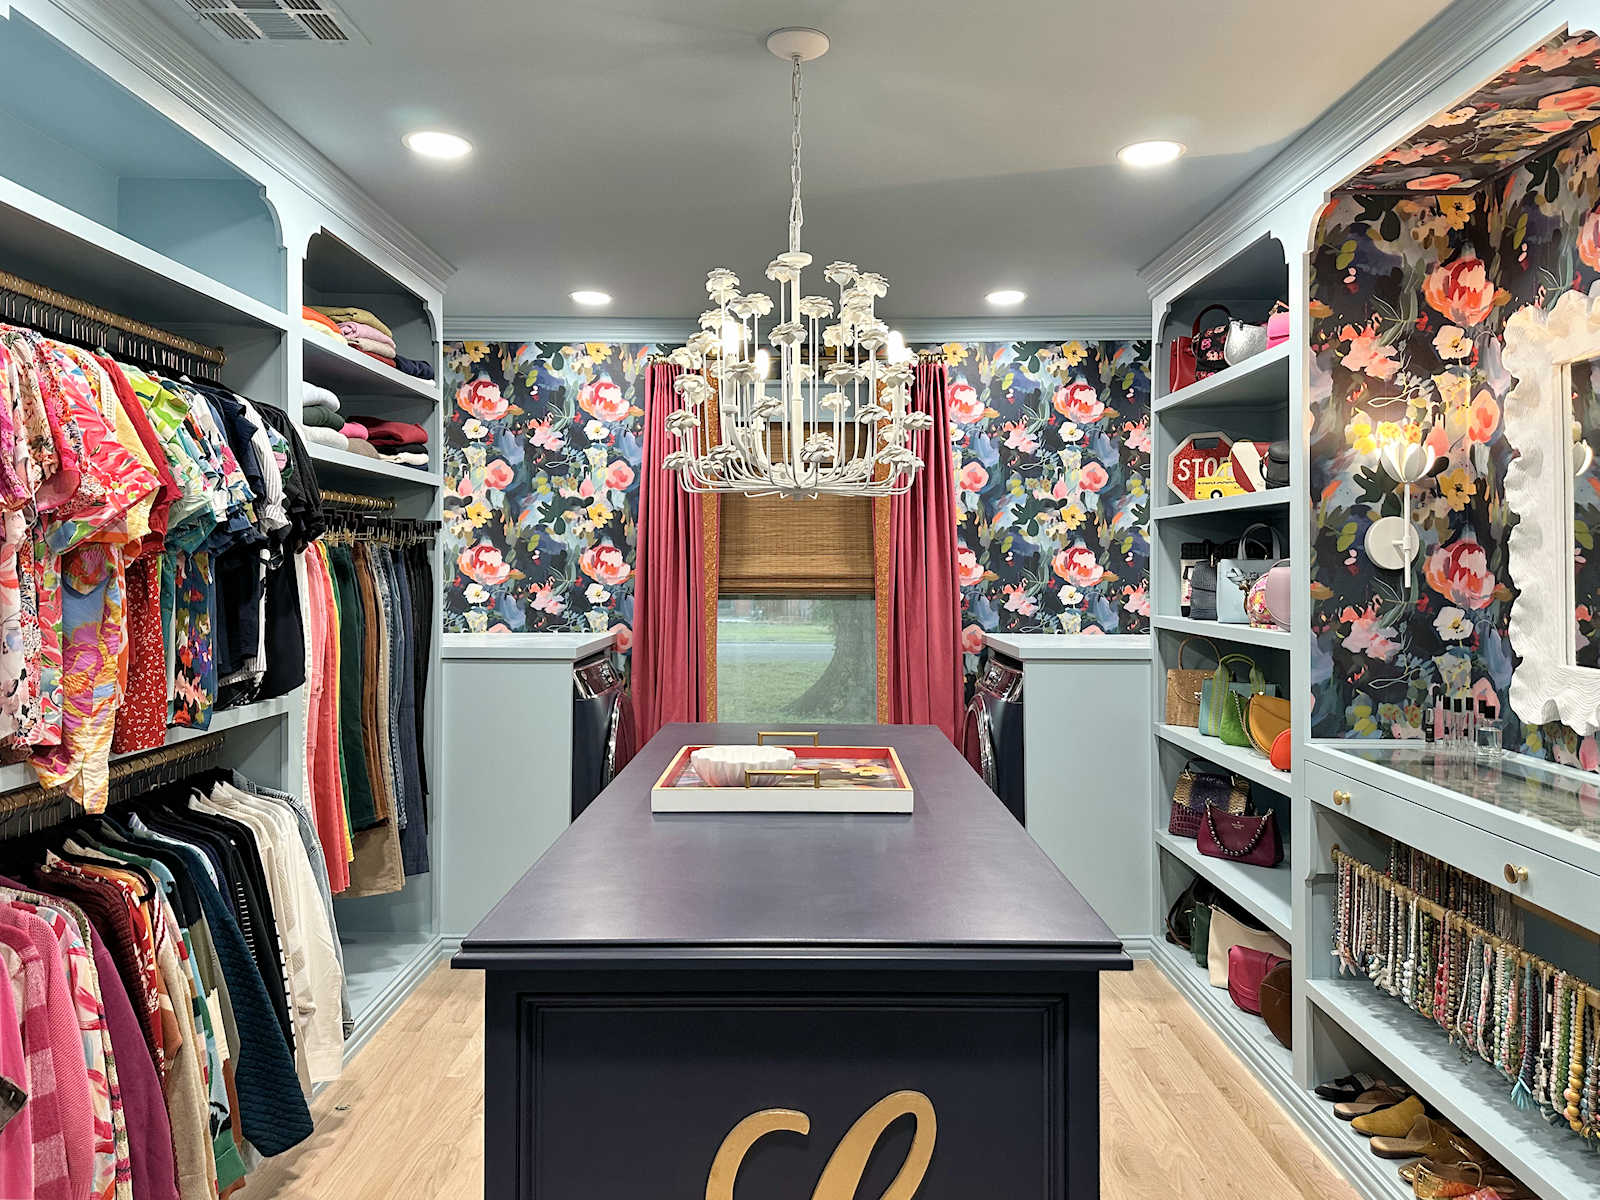
But when it comes to an entire room filled with built-ins, like a pantry or a kitchen or a walk-in closet with a laundry area at the back, the process becomes a bit more complicated. And that’s where I’ve found myself stuck for at least a month now. There are just certain details that I haven’t been able to work through just yet. I know I’ll get there, but it just takes a bit more time.
Our weather lately has been cold, windy, and wet, which means that my outdoor projects have been moving along at a snail’s pace. So many times, I’ve thought that I should take advantage of that time by getting started on the flooring in our bedroom suite. But one of the details I’m still trying to work out may affect the flooring. So I’ve kind of been in a holding pattern until those details get worked out.
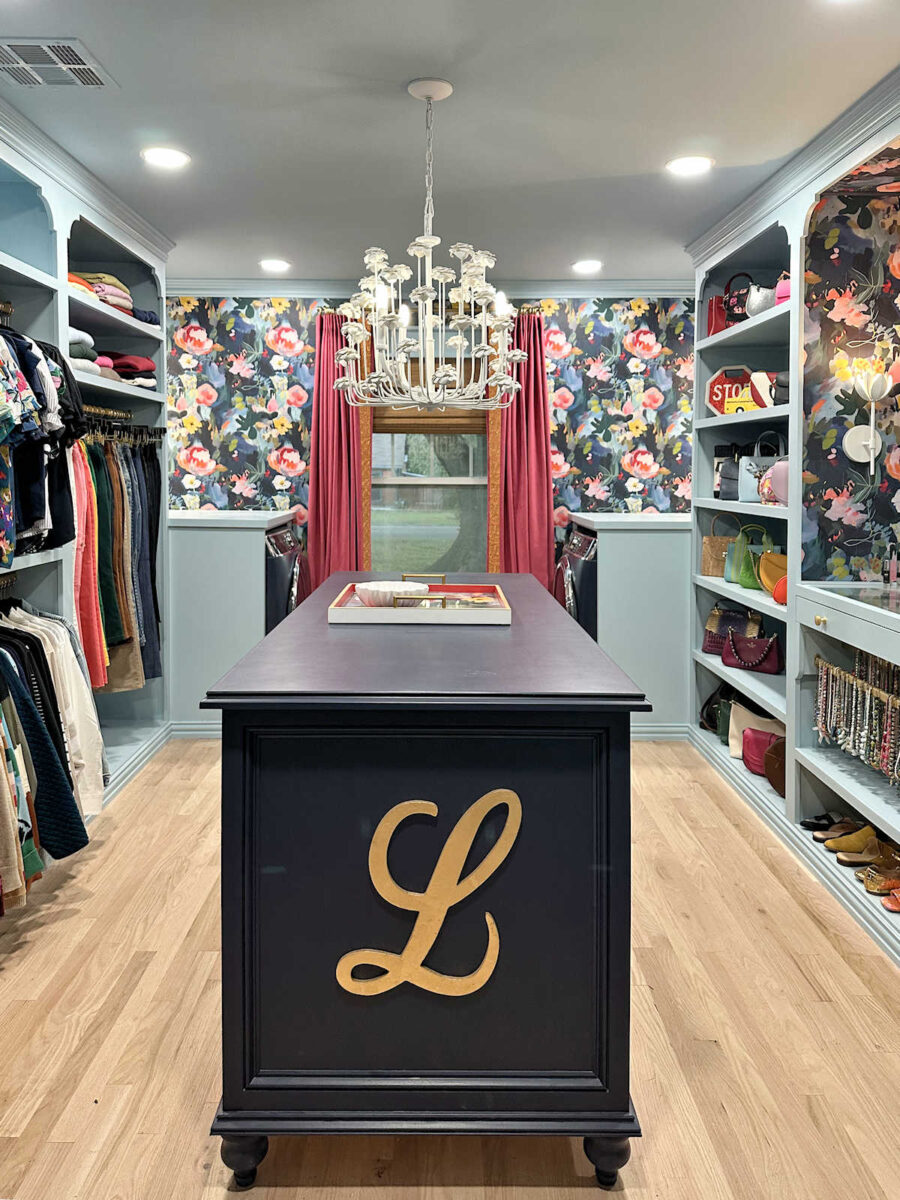
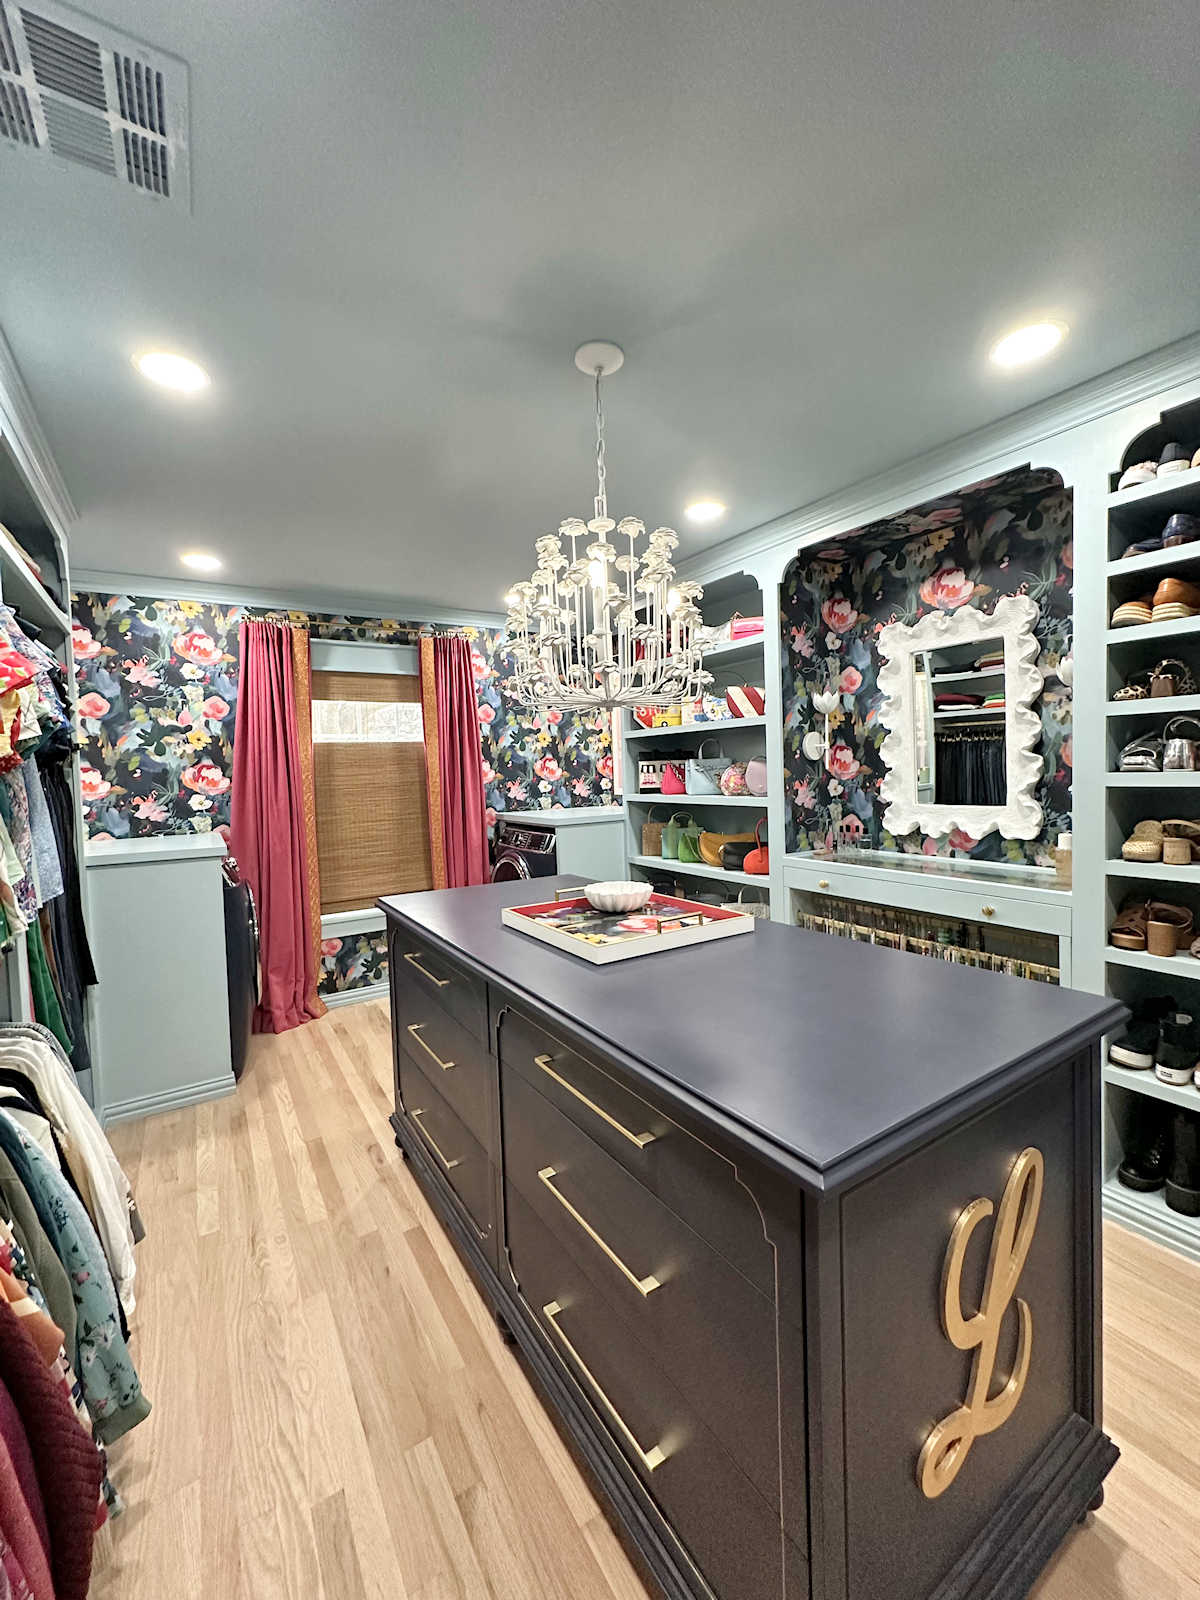
But I’m getting ahead of myself. Let me back up a bit and start with one of the roadblocks that I just figured out yesterday. That roadblock had to do with the center island in the closet area.

I have a 2′ x 5′ island planned for the closet area of the room. If this room were just going to be a closet, there would be no issue at all. I’d just build an island and be done with it. That’s a simple as building any other piece of furniture with drawers, and then adding baseboards, basecap, and quarter round along the bottom so that it looks built in.
But this isn’t just a closet. It’s also a laundry room, and the washer and dryer will be at the back of the room. That means that if I ever need to buy a new washer and dryer, I need to be able to get these out easily. Or if the ones I have ever need repair, I need to be able to move them in and out. I can’t do that if there’s a big island built into the center of the closet.
So I’ve been trying to think of how to make an island on wheels while also making it look built in. I just couldn’t think of a way to do that in a way that I was satisfied with. And then yesterday, I realized I was making this way too difficult. Why does it need to look like a built-in island? I could just build it to look like a freestanding piece of furniture that has been repurposed as an island. I’ve seen it a thousand times. I’m sure we’ve all seen pictures of people repurposing pretty dressers as kitchen islands, or even new kitchen islands that are built to look like a freestanding piece of furniture.
So that’s what I’m going to do. The island will be a freestanding dresser of sorts, and I won’t even bother with making it look built in. That way it can be easily moved out of the way if need be. I was making that way too difficult, and I had gotten it stuck in my head that it needed to look built in. Once I got past that idea, the solution seemed obvious. So as of yesterday, the first problem has been solved.
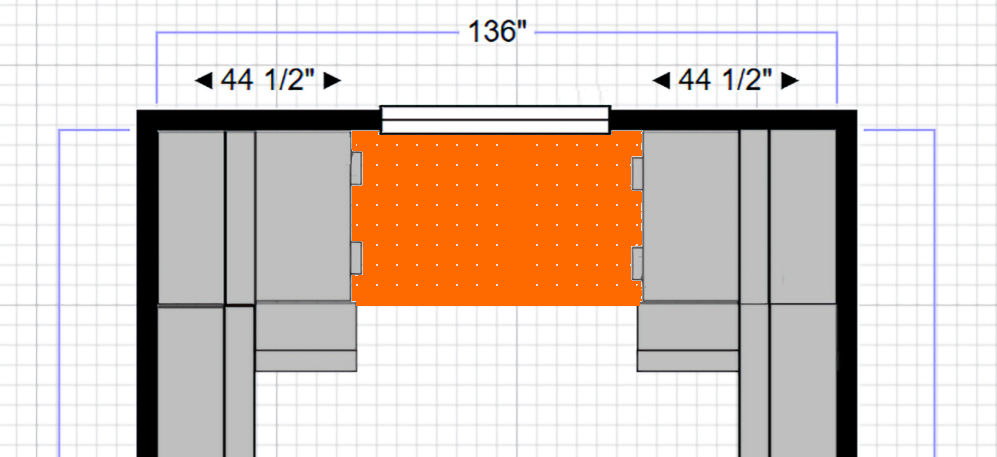
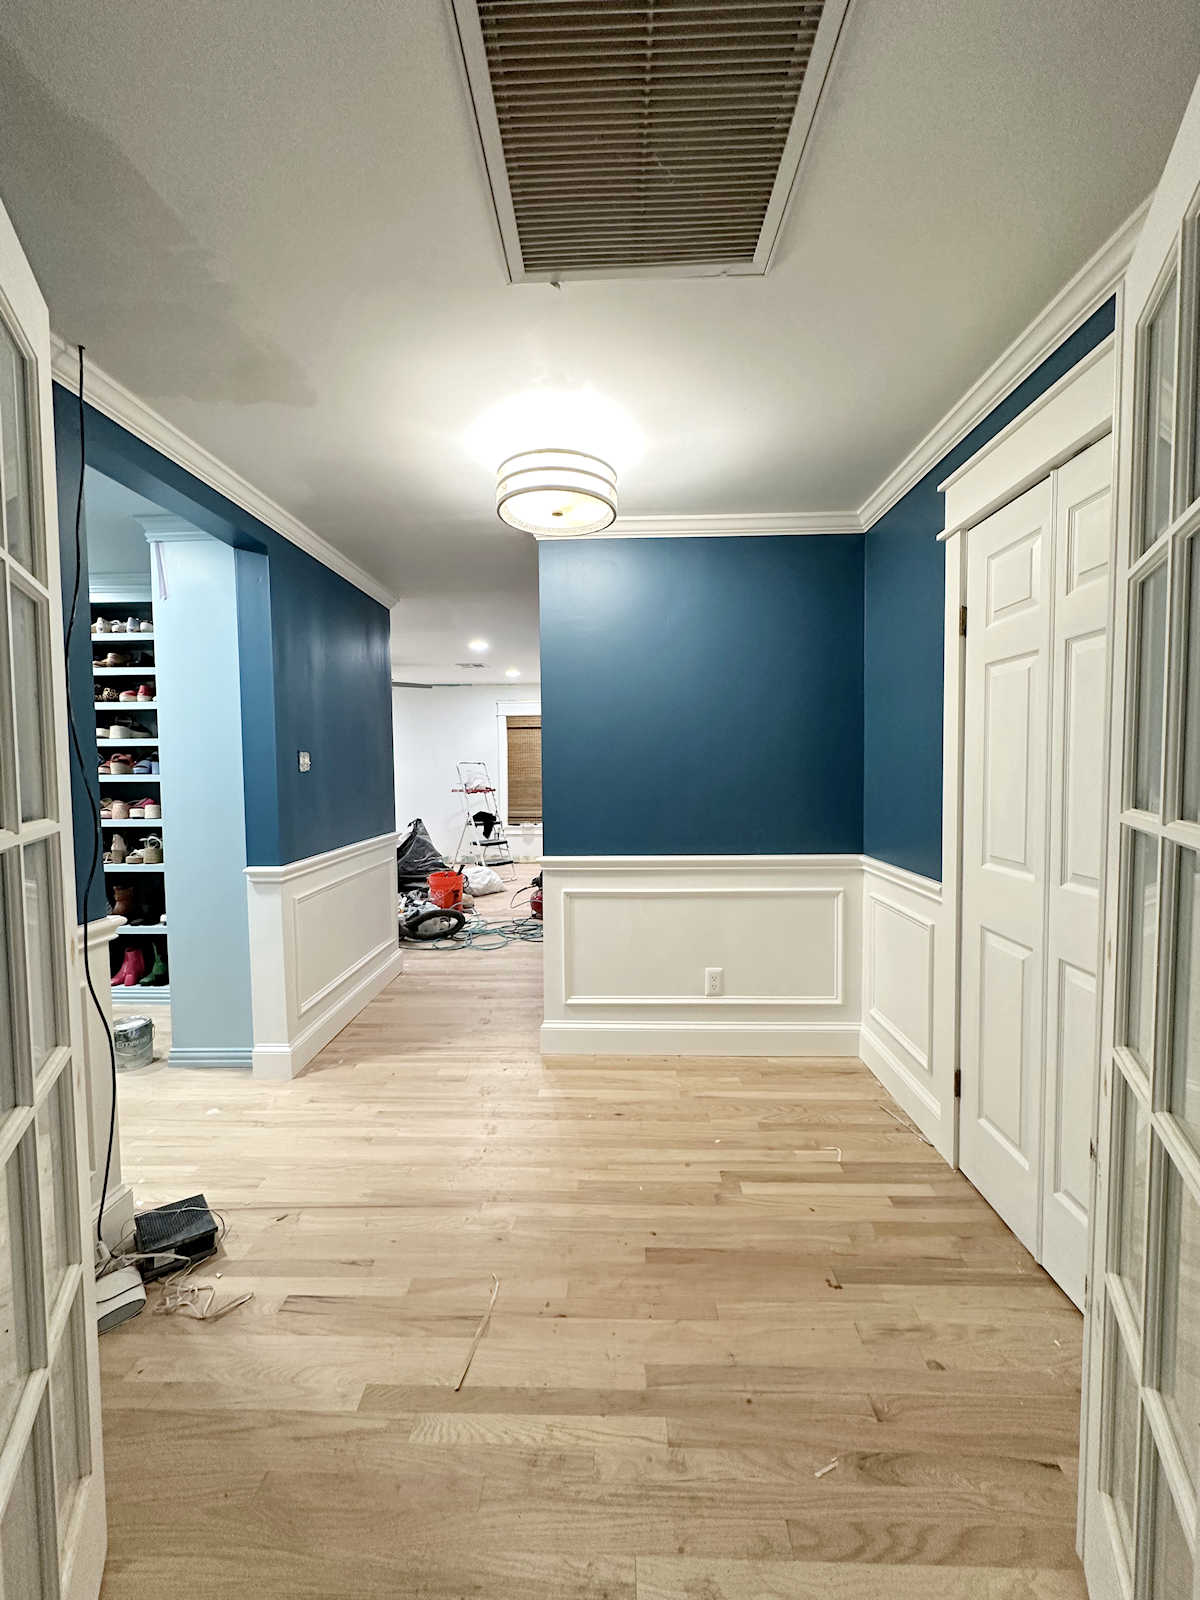
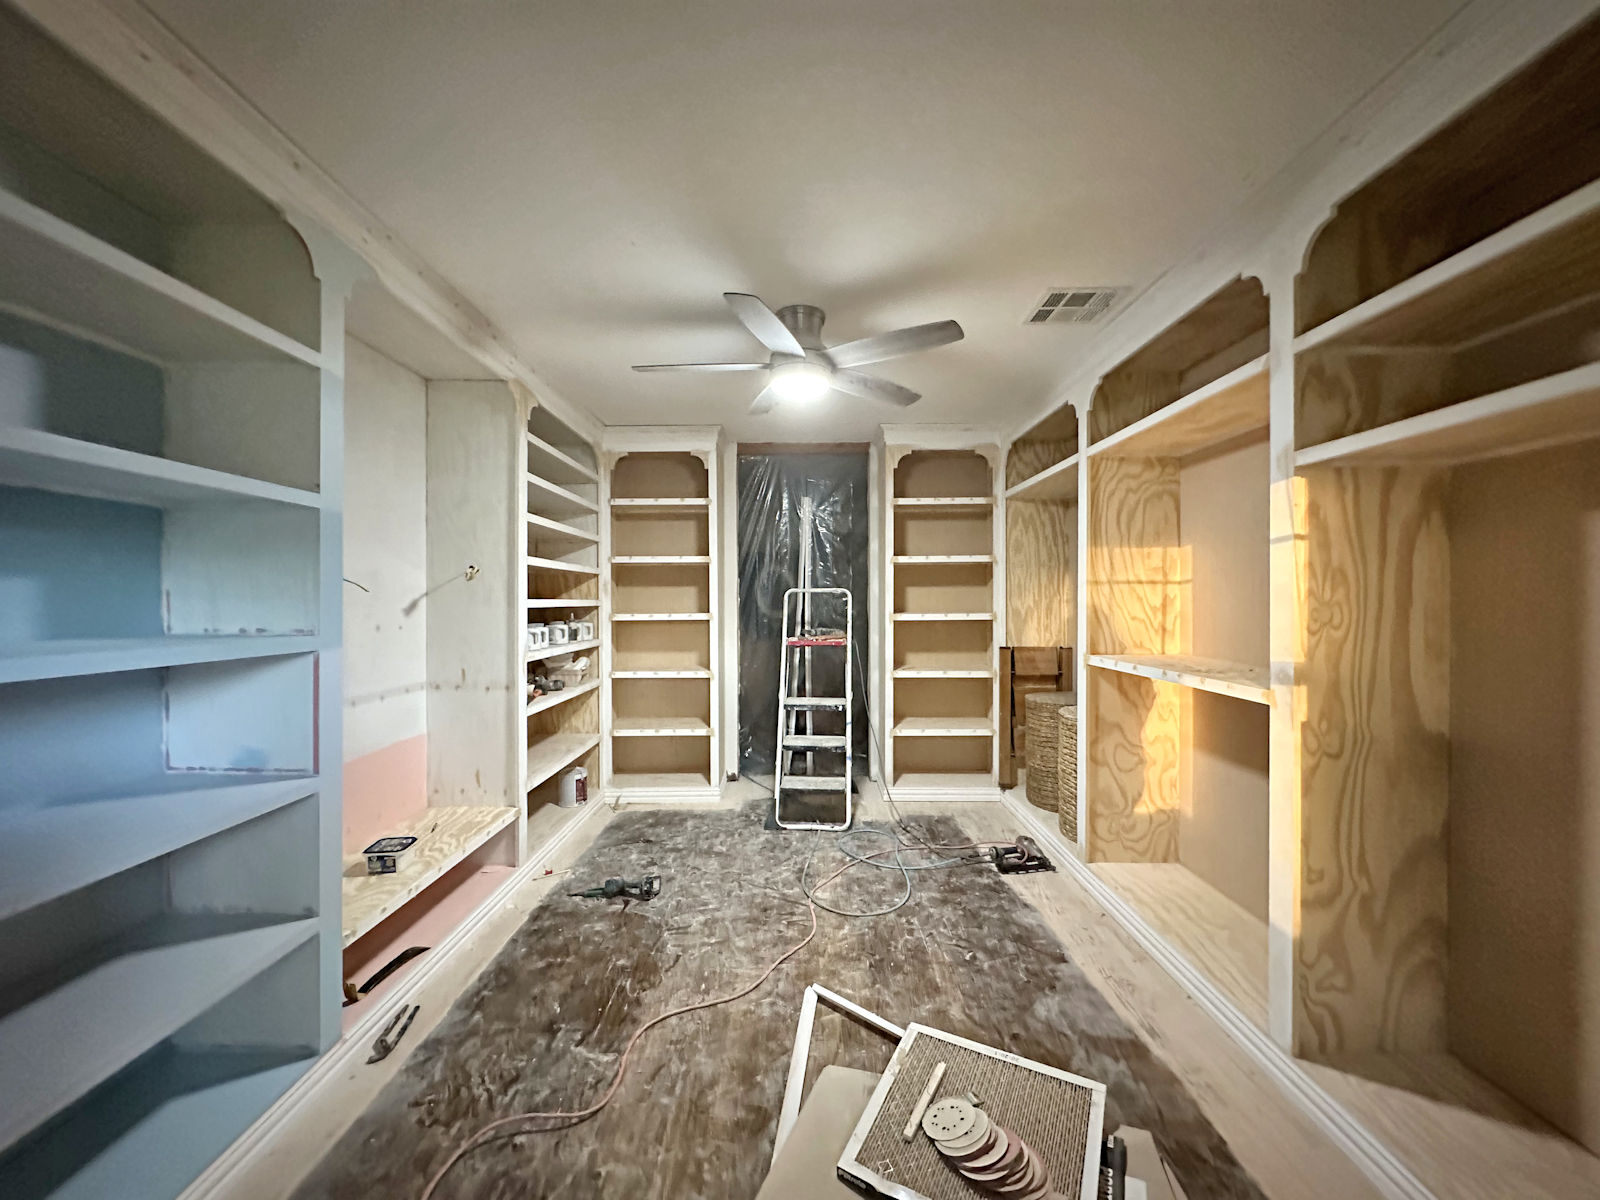
But the other roadblocks all have to do with the laundry area at the back of the closet. When I think through the whole process from beginning to end, this is where I keep getting stuck. The first thing I can’t decide is the flooring. Back at the beginning of December, I shared with y’all that I was considering using penny tile for this area and doing something really creative and fun with the penny tile. But that was when I had planned for this area to be larger, with the washer and dryer sitting side-by-side with a bank of floor-to-ceiling cabinets on the opposite wall. So the back laundry area was going to be between five and six feet deep from the back of the closet cabinets to the window wall. That was going to look more like this…

Now that the area is going to be much smaller, I’ve abandoned the idea of doing a fun design on the floor with penny tile. But I’m still contemplating putting tile in that area just because it seems more practical than hardwood flooring in an area where I have water lines coming into the room to both the washer and the dryer. That still seems like a good idea to me, but is it really worth it? I mean, let’s be honest. If the washer or dryer starts to leak, that area is so small that it seems like it would almost certainly affect the hardwood flooring. In other words, there’s no way to guarantee that the leak would be contained to that small area.
Any leak in that area would almost certainly affect the cabinets that are backed up to the sides of the washer and dryer, and I would imagine that the hardwood flooring right there would also be affected.
So then I wondered if I should basically tile the whole area — floor and walls. And since the backs of those cabinets are basically acting as walls, maybe I should tile the backs of those as well. Do you see how my mind spins out of control with these ideas? And am I planning for something that will probably never happen? I do, after all, have a new washer and dryer. I know that’s not a guarantee that they won’t leak, but I think the probability is pretty low.
But then another roadblock is trying to figure out how I will get the washer and dryer in and out easily. In the event that I do need to have work done on these, and the person doing the repair needs to pull them out, I need to think through how they’ll be removed and put back easily in such a tight space. And that led me to the idea of building bases for them that are on locking casters.
My first idea was to purchase the pedestal drawers that are available for my washer and dryer. The drawers would be useful and would match my washer and dryer, and then I could set the whole thing on a low rolling platform. But I also looked for other base options and I found that there are pedestals with a top that is built like a pan and that has an overflow drain (affiliate link).

That might be the exact solution I need, but I can’t find one that actually looks nice. So I’m considering building my own. That way, I can make it look like I want it to look, and that would eliminate the need for any tile in that area at all. I could do hardwood flooring throughout, and be confident in the fact that any leak would be caught and redirected. And if I put leak alarms on the two appliances, I could certainly catch any leak before any damage is done. Plus, I could put them on casters so they can be easily moved in and out of that tight space.
And finally, I’m still trying to figure out how the duct for the dryer will be hooked up/unhooked in such a tight space. There won’t be any space to walk around the dryer, so everything will have to be done from the top. Right now, there is no duct for the dryer in the room, so I can put it wherever I want it to go. I’m considering purchasing this magnetic duct connector (affiliate link) and putting the duct in the wall so that it’s directly behind the duct on the dryer.

That seems to be the best option I’ve found so far. According to the reviews, it has really strong magnets and works very well. But that will take some very precise measurements to get it in just the right spot so that the two pieces will pretty much connect themselves (maybe with a bit of guidance with me on top of the dryer and using a long grabbing tool), but I won’t know where it needs to go until I get the plans for the pedestals ironed out.
So those are the details I’ve been thinking through. I know y’all are anxious for me to get started on our bedroom suite, and I can guarantee you that I’m even more anxious to see this project get underway. But until I get all of these decisions made and the roadblocks moved out of the way, I can’t even get started on the flooring. I feel like I’m very close to working out these details, though.
More About My Walk-In Closet/Laundry Room

see all walk-in closet/laundry
room diy projects
read all walk-in closet/laundry
room blog posts

Addicted 2 Decorating is where I share my DIY and decorating journey as I remodel and decorate the 1948 fixer upper that my husband, Matt, and I bought in 2013. Matt has M.S. and is unable to do physical work, so I do the majority of the work on the house by myself. You can learn more about me here.
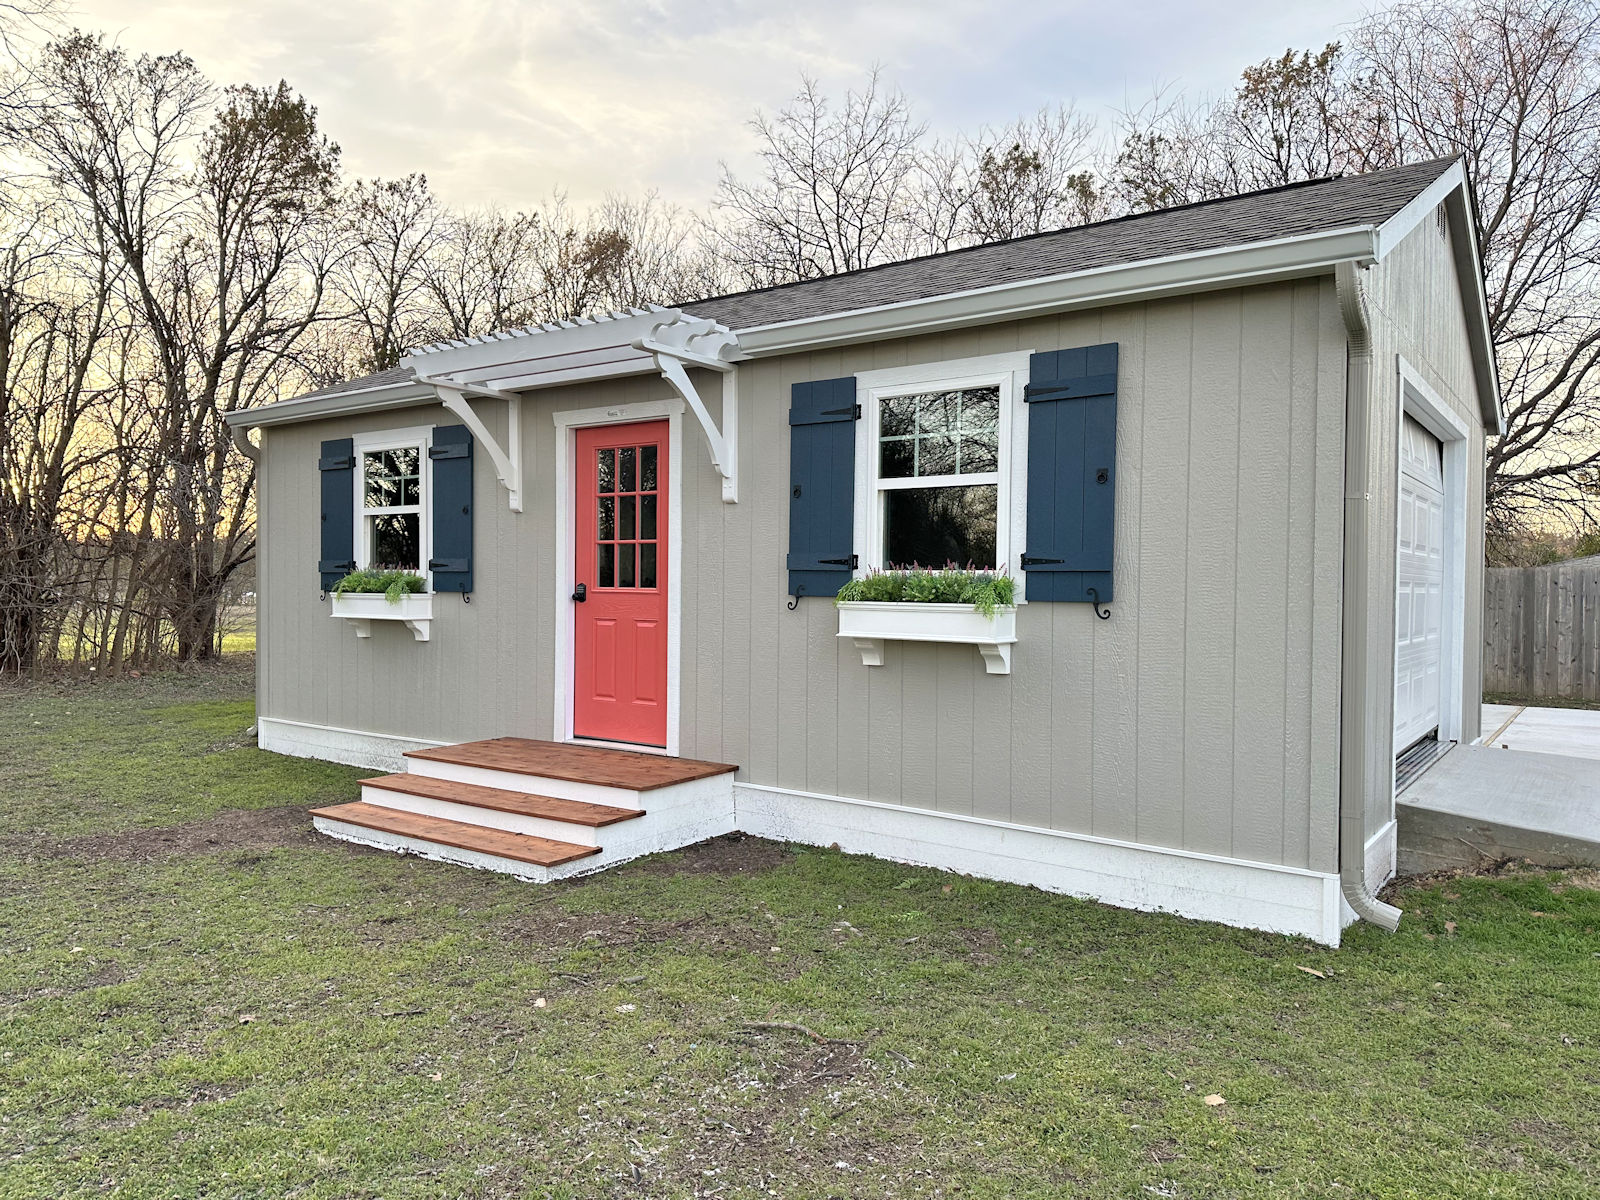
Just curious if you would be interested in replacing the window with an exterior door. Might solve your problem with access for the washer and dryer?
No. That’s the front of our house, and it’s the section that juts out right next to the front porch. It would look strange and very confusing to have two exterior doors right next to each other.
I think something that is perhaps worth weighing is whether the time and effort it takes to build a pedestal to prevent water damage in the bad luck event of a leak is more or less effort that the time and effort it would take to repair the leak damage. For some of us (me included) repairing or replacing hardwood flooring would be something that we’d have to outsource and it would be very expensive. That would make the efforts to prevent water damage make sense. However, hardwood flooring and cabinets is entirely in your skillset. Is it worth all the hassle right now to avoid those maybe repairs in the future?
Genuine question, not sure of the answer. I’m also fairly risk tolerant, and so the worrying about the potential leaks seems like a busy mind borrowing problems thing to me – but admittedly I know my way of thinking wouldn’t be for everyone.
Get/Build Island on wheels, or change the window to a door, it’s right by the machines and they should go in and out easily.
I don’t want a door there. That’s the front of our house, and it’s the section that juts out right next to the front porch. It would look strange and very confusing to have two exterior doors right next to each other.
A door but it doesn’t look like a door from the outside? It’s camouflaged with the same exterior materials like siding, etc.
I like the magnetic vent. The first thing I thought was “Oooh! That would be great…. until my dryer died and I need to buy a new one.” Appliances aren’t built to last and eventually I’ll need a new dryer (sadly, sooner than I expect). What are the chances the new dryer vent will align to the magnetic hole in the wall? Probably very slim. That’s how my mind works. 🙂
I thought about that, too. But another good thing about making the vent go straight back and through that wall is that it would be such a short distance that I think I can remove the vent cover on the outside of the house and literally reach my hand through and connect them. I don’t know for sure, but I’m looking into that possiblity. As long as it’s magnetic, and I just have to get it in the vicinity for them to connect (rather than using one of those frustrating connectors that have to be screwed on to tighten), I think it can be done.
I have this kind of a vent for my dryer. It’s a very tight space this one has some flexibility with distance between the port on the dryer and the vent to the outside – and it has the virtue of not needing as much space as a round hose – which the one with the magnetic attachment has.
Whirlpool 4396037RP Genuine OEM Dryer Telescoping Vent Kit For Dryers
On the topic of leaks – I feel like you are overthinking that issue. I know leaks happen but they really are rare – especially when you plumbed in for input and outflow. I don’t know that a platform is necessary – why not just use one of those trays? It seems less complicated to me.
Agree, we have our washer and dryer on the 2nd floor in a closet with carpeting under them but the washer sits in a little plastic pan that if it were to get water in would run out a tube I. The bottom and into another pipe and drain outside. We do not have one for the dryer, I’m not sure what would leak out of that. The are sold at Home Depot and Lowe’s and they we not that expensive
My dryer has a water connection for the steam function.
I looked at those but couldn’t use them with a 5″ vent hole. The magnetic rings are fixed to the wall wherever you want and the opening from the dryer is attached to flexible vent tubing which then attaches to the dryer. Used for any 4″ dryer regardless of position. It doesn’t show this, just the 2 magnetic pieces. If it wasn’t able to be used on any 4″ connection, it would not be worth manufacturing. Nobody’s dryer would hook up to it. There is ALWAYS a flexible vent involved. Even if just 12″ altho I suspect more so you can disconnect it.
Speaking of your washer/dryer, how are you liking them? I will be in market for a new set and am considering my options. I too want them on pedestal and will be interested to see your final decision there. I had never heard of those carts with drains.
I LOVE my washer and dryer! My mom has come over on a few occasions to help me get my house in order 😀 and when she does that, she always does a couple of loads of laundry. She loves them, too, and has said that if she ever needs new ones, she’s going to get the ones I have.
Carla –
I bought the same washer and dryer that Kristi has (based on her stellar research and review). I love them and my husband loves them. (Yes, he does laundry too. :D)
My son and his wife also bought the same washer and dryer based on my recommendation. They love them as well. My DIL’s grandmother bought them after that and she loves them!!
They are great! Go for it!
I am glad to see that you and think a lot alike. I’ve got to be able to see the end result or I cannot go forward, sometimes I throw caution to the wind, but that is not how I usually operate. OK, we used luxury vinyl plank in the mudroom/family room addition, and it is practically bulletproof. We used luxury vinyl tile in the laundry room/butler’s pantry, and it too is bulletproof. You’d be amazed and surprised at how many choices they offer. The one we did for the family room, matches the solid hickory floors in the rest of the house and there is very little difference in it. As for the pedestal’s, please remember the extreme centrifugal forces that your washer can generate, you sure don’t want that thing walking across the floor, or heaven forbid, fly off the pedestal. I have the washer in one of those pans you can get at Home Depot, and it is plumbed to our crawlspace and to a drain there if it decides to be naughty and overflow. The new washers thankfully don’t use as much water as the old ones, so what water can overflow is not as much as it could be, but water on anyone’s floor is terrible. It’s the one thing, besides fire that just flips my switch into panic mode. If your appliance doors are not touching each other when you open them up, your appliance repairman has room to operate in. Don’t overstress about the room they have to work in. It’s their job to figure these things out, the fact that folks like you and me put in the extra effort to think about it ahead of time, does make their job a lot easier and they like that. Stuff to chew on. I know you’ll get perfect.
Cheers!
You might want to rethink getting on top of the dryer. I used my knee one time to reach a curtain rod, and the dryer top dented. The metal used now is much thinner than it used to be.
I live in an apartment but I own my own washer and dryer. For safety reasons my washing machine sits in a shallow tub makes (maybe 3” deep) for washing machines to help prevent issues from leaks. I think I paid $20 for it and I can just take a shop vac to it to clean up leaks. I can still move my washer easily in the tub as well for repairs. Granted, my machine is white, so the tub it sits in isn’t noticeable, but might be an easier fix to your concerns.
Have you considered porcelain tiles that look like wood and come in various lengths and widths
I realize that your bathroom isn’t right next to this closet, but you could use the floor tile from there in the closet. That would give you a more practical flooring for the room while still being cohesive within the suite. I think ceramic wood-look tiles or LVP could look fine on their own but look odd right next to real hardwood.
Over the years, and many moves, my husband and I have learned that if you insert a small child behind the dryer, they can accurately connect the vent and then climb out. Works every time. Good luck
LOL!
We have needed that child many times…my husband and I have to use ladders, and hang off the washer to attach the dryer hose. We hate when we have to clean the hose…ours go through the roof like most of them here in Florida…I hate that too. But our laundry rooms are off the garage, and not near an outside wall. We are building a new house and still had to do it that way. 😠 Not happy!
Hahahahahahhahahaha
Could you put a wooden skirt around the bottom edge and tuck the casters right behind them? They would still be close to the corners but not visible.
“(maybe with a bit of guidance with me on top of the dryer and using a long grabbing tool)” —– We’re going to need pictures.
I would put a drain under the washer. It could just drain away from the house. Drip pans do look rather ugly. You can get an alarm that would let you know of a leak.
I would also tile the whole area, just because accidently spilled soap or bleach would be even more of a problem with carpet. I keep a rug/runner in front of my washer and dryer. It is amazing how dirty it can get.
When I first started reading about the island my thoughts were locking casters hidden by side panels held in place by magnets. It could look like a built-in but you remove each side to unlock the casters (and aren’t there ones that also kind lift up or down so they are up when you want it to stay put and down when you want to roll?) so you can move the island easily. But I do think the look of a piece of furniture on feet will be nicer.
Morning Kristi,
I love when you share this process with us! It helps me to work out some of my own design/build dilemmas 😁
About the dryer connection, if you used the drain pedestal it might be easier going underneath and give you a little more wiggle room.
why not put in tile that looks like hardwood? Many are pretty convincing.
I love the process you go thinking through all of this. In addition to the magnetic vent hose, consider a recessed dryer vent box. They come in a couple different sizes. If you get the 4″ one, the hole going into the wall is made oval to fit in the 4″ space, or you can get one that allows for the hole not to compress but may need to build your wall out in that section.
Think about the heights the pedestals will add to your washer & dryer in figuring out where your cabinets will go. I’d like to have pedestals. In fact I bought pedestals when I bought my washer and dryer, but the vibration was so loud, I took them back. I’d like to have solid wood pedestals that would not vibrate like the matching one that came with the units. It would be nice to have when getting clothes in & out. I’d go with tile in the “wet” areas, then you just would have to deal with flooding. Period. Why are you making your washer & dryer space so tight? Seems like you don’t need to do that.
You do have to have closet space or drawers to put all those shoes! I understand that. Making your island movable is an excellent idea.
I really don’t think it’ll seem so tight once it’s done. Now if I were putting a regular 36-inch doorway into the laundry area, it would definitely feel tight. But as I have it planned, those cabinets that back up to the washer and dryer will only extend towards the center of the room as far as the washer and dryer go. So they’ll be tucked away without feeling closed in. At least, I hope so. But I decided to do that so that (1) I could have more storage space in the actual closet area, and (2) so that I could have a much larger island. But just because the storage is in the closet area, that doesn’t mean that it has to be dedicated to clothes and shoes. I’m thinking through which closet area cabinets I want to put doors on so that I can use them more as multi-purpose storage.
There was a video on FB that showed the OP building a simple tray on wheels for her vertically challenged mom to move her W/D out from the wall. Basically a frame of 2x4s with plywood on top. Wheels under the 4 corners attached to the 4×4 corner blocks. Once the platform was built, she put quarter round around the top perimeter which turned the plywood into a “tray” with a 3/4″ lip & rounded outside edge. Painted and caulked with silicone. Set the W/D on it and push in place. Yours would require 2 smaller platforms since they are not sitting next to each other. I’ve already got my plywood cut, wheels close buy and scrounged some 4x4s from a friend’s porch build. Just need to get my frozen butt in gear after having 10 inches of snow in the FL Panhandle.
Another thing I did was put a floor drain in the floor in front of my washer. Has a P trap and drains to the outside.
I’d love to see that! Please send me the link if you come across it again. I do like the idea of a simple tray on casters. I’m afraid that if I build actual storage underneath, they’ll be too tall for me since I’m so vertically challenged. I mean, I would still be able to reach the controls on the machines with a drawer underneath (I’m vertically challenged, but not so much so that a drawer underneath would put those out of reach for me). But I do hope to have a pulley drying rack above either the washer or dryer, and I’m afraid that if my washer or dryer is sitting on a drawer pedestal base, that would put the drying rack out of my reach for practical use even when it’s lowered for me to hang or drape wet clothes on.
Hello, I wanted to tell you of a project I did recently and did a moving island as you first described. I just recessed the wheels under the toe-kick portion of the cabinet and trimmed the whole piece with base so it looks more like a piece of furniture. I don’t know how to attach a photo of it, but it looks quite nice. Feel free to reach out if you’re interested.
I’d love to see it! You can email me a picture: [email protected]
Check out the Almetal Dryer Vent at almetaldryervent.com I don’t work for them…I just watch his videos 🙂 and his vent is pretty snazzy and I really really really like how it eliminates the flexible dryer hose which is so easy to kink and traps more lint, which is a fire hazard.
Even the all metal hose connectors used for our washing machine did not prevent leaks. A mouse chewed through the vinyl tubing that delivered water to the tub. That caused the tub fill indicator to never turn the water off. This resulted in gallons of water flooding our laundry room & part of our carpeted family room- it doesn’t take very long. Drywall, carpet, vinyl plank, destroyed. A washer containment pad would have been worthless. The cost to repair was in the thousands. Use ceramic or porcelain tile on the floor. Do a tile wall edging. If there is water damage any wall tile will need to come down for replacement too. The wood floor sills wick up water like a sponge.
You have a lot of great advice on the dryer duct here already.
Love the idea of a rolling island. Great choice! It is going to be beautiful!
Are you 100% committed to having the laundry at the back of the closet? It seems like from a convenience factor it would be better to have it when you first walk in (carrying large items like comforters, wet towels, etc and potential repairs) and it might make some of these problems easier to solve. I’d also consider using tile and installing a drain in the floor. Surely that would manage a leak better than a pan with a 1/2 – 1″ drain hose. (This is what we did in our 2nd floor laundry room.)
I believe she’s already had the water piped to those areas, so it wouldn’t make sense at this point to move them.
I am committed to it. I know there are practical reasons to put it at the other end of the room, but there are practical reason to put it at the back of the room (i.e., the front of the house) as well. I already have the hookups in place, so that’s a factor. But the reason I finally decided to go with them on either side of the window is because those are exterior walls. That’s the part of our house that juts out to the side of the front porch. I like the idea of having both appliances on exterior walls because (1) it makes noise less of an issue, and (2) it makes venting so much easier. With the dryer being right there on an exterior wall, the dryer vent can be very short and go straight out through the exterior wall. That means there’s much less of an issue with lint getting clogged in a long duct and it will make for much easier duct cleaning. At first, I didn’t love the idea of having the dryer vent right there on our front porch, but it’ll be hidden behind the left column on our front porch, so I don’t foresee it being a problem. Plus, it’ll smell good. 😀 There’s always drawbacks, of course, like lint on the front porch. But if I select a good vent cover, I think that issue will be minimized. But another reason I chose to separate the appliances rather than having them side-by-side was so that the dryer could vent through an exterior wall where we have siding. The window wall and the wall where the washer will go both have stone on the outside, which is a real challenge for getting ductwork through.
I think making a custom piece of furniture for the center of the closet will give a lot in terms of visual interest and have it be a contrast from the built-ins. In addition, more functional and easier to move in and out of the space. I know you’re planning on building the built-in closet components but you may want to factor in building a framed wall between the closet and laundry area. I know our closet installer would not put closet components without a full wall behind it for stability. You may also want to allocate a bit more space in the laundry area just to maneuver. Think laundry baskets and hampers or places to hang dry items or even just spread your arms to fold sheets. Not to mention maneuvering around the machines. I know from experience, big box stores will give you a hard time if they can’t easily maneuver a delivery or haul away in and out of the space. (they left our larger broken dryer in the basement because it wouldn’t fit up the steps and we had to take it apart ourselves to get it out)
You’ll figure it all out. The results will be wonderful. I have a very small laundry room that was once a part of our garage. Have to jockey the appliances when replacing. Tiled, well insulated. As we can occasionally get down to -20F in winter ran the pipes exposed in the room, foam wrap insulated in the wall between the addition and the main house. Given the recent temperature incidences in Texas do you now insulate pipes? Run inside? Just wondering if Texas building is changing. We had an exterior frost less valve to an outside hose not perform. Mere inches from the outside…. 5-10 inches, the copper pipe split during a below zero weather spell. Upon thaw, it did $20,000 damage to the adjacent family room. Frozen pipes can be expensive incidents. I think here we even have to use heavier gauge copper pipe to be code. As an extra precaution I did put multiple coats of polyurethane on the adjacent laundry tub cabinet, caulk sealed the exposed edge corner of the high definition formica and the base of the cabinet at the floor…… JUST in case of leak or water malfunction from the plumbing or washer. Veneers seem to buckle with so little water exposure. In recent kitchen & this laundry sink remodels I silicone sealed IN the cabinets as well just in case of leaks. Again, leaky water goes into those seams, soaks into the compressed wood bubbling and weakening it. Sounds silly but I had a home canner bubble over on the stove, splash an exposed counter edge corner, soak in, damage it. Happens so fast. It didn’t occur to me before to seal such things but now is standard practice for me.
All of our plumbing is under the house in the crawl space, and it’s all PEX. I think we’ve gotten rid of all of our metal plumbing pipes now. I can’t even imagine -20F temps!!! When it gets down into the 20s here, life stops. 😀
You could always build a faux surround for the pre-made pedestals for the washer/dryer, use magnets or velcro tape etc. to hold it to the metl of the stand, easy to put on and pull off if needed. Also, I’ve had numerous problems lately with delivery personnel NOT being willing to put the washer/dryer on my existing pedestals. Same manufacturer etc, and they just won’t do it, so beware of that. Last time I had them just install the new washer and then my husband and I had to put the new washer on the old pedestal.
For your design and the hose, I would consider putting the hose connection above the dryer in the wall. There is no guarantee every dryer will have the same location for the vent hose in the back, and it’s far easier to make the connection on the dryer side more secure, push the dryer back with the hose over the front, and then just connect into the wall. You could install a cabinet above the dryer with a hole in the bottom if you wanted to hide the connection point. I fight my hose connection every time I have to work/move my dryer and wish I could move it up, even with tht making it far uglier.
That definitely makes sense to have it higher so that it’s within reach, especially considering that my current dyer has the duct about 2 inches from the bottom of the dryer.
Regarding your washer and dryer areas, some suggestions:
1. Put drains under both appliances. It will be easy for your plumber to do before you do the finished flooring. He will connect them to the waste pipe that is already there to take away the water from the washing machine.
2. Have the contactor put waterproof drywall in your laundry room, up to a few feet high, all around. I recall that it is purple in color? https://www.goldbondbuilding.com/products/mold-resistant-drywall-panels?productType=193
Our city required it when we needed to redo our shower because the originalhot mop tar shower pan leaked. This special mold and mildew proof sheetrock does not have gypsum in it, but some sort of impervious compound. No damage or water absorption if there is a leak!
After this drywall was in, the building inspector required us to wrap the lower parts of the wall and and about 18 inches of the shower floor with a special material, Ice and Water Shield.
https://www.homedepot.com/pep/GCP-Applied-Technologies-Grace-Ice-and-Water-Shield-36-in-x-75-ft-Roll-Self-Adhered-Roofing-Underlayment-225-sq-ft-5003002/202088840?g_store=&source=shoppingads&locale=en-US&pla&mtc=SHOPPING-BF-LNC-GGL-D22-Multi-NA-NA-NA-PLALIA-NA-NA-NA-NA-NBR-NA-NA-NA-LINC_All&cm_mmc=SHOPPING-BF-LNC-GGL-D22-Multi-NA-NA-NA-PLALIA-NA-NA-NA-NA-NBR-NA-NA-NA-LINC_All-21005763990-156644039737-1458551822341&gad_source=1&gclid=CjwKCAiA-ty8BhA_EiwAkyoa325p1wjuGtDmeLj5auiIu4pLGGhDWHSuUTOx84R49kP2cVYjPJYq5xoCg8gQAvD_BwE&gclsrc=aw.ds
This stuff is used under roofs in mountain areas instead of tar paper, and it’s self healing around nail holes. After this is up, the tiling starts. Do use some sort of tile or waterproof flooring for your laundry area. And the leak detectors are a smart addition, too.
4. The appliance people can easily in dolly your new machines and scoot them into place. Some of the high efficiency ones need to be on the floor, because they spin so fast. Check with the manufacturer before deciding what to do. I do not think you will want your machines on platforms with casters, but you will need more information to decide.
5. Last thing is an automatic vent fan in the ceiling of your laundry area! It should go on automatically any time the humidity level in the room is too high. Save your clothes!
I was wondering why you are putting the laundry in the back of the closet instead of in the front. Like reverse what you are planning now.
I explained here: https://www.addicted2decorating.com/the-uncertainty-keeping-me-from-starting-on-our-bedroom-suite-the-details-im-still-trying-to-figure-out.html#comment-1575529
I happened to get this month’s Better Home and Gardens today. When I saw the article on page 12 I thought of you immediately. Not sure if you have access to Jan-Feb issue but I would suggest a look see. Absolutely beautiful tile treatments.
If your washer will be on an outside wall be sure the waterlines are very well insulated. The leak alarms are a good way to go. I used the ones from my SimpliSafe alarm system and it worked when my disposer leaked! I know YoungHouseLove has a recommendation too. Then I’d check all city codes for the duct work placement as well. Personally I’d lay tile in that area and add a lovely rug for warmth and decor.
I’m probably missing something, but if the dryer is on a rolling base, wouldn’t that solve the issue of the vent hookup?
Also, I bet you could dress up one of the ugly pedestals.
Could you take the practical metal base and finish it out the way you want? Use plywood, mdf or similar panels and add trim? Seems sturdy and easy. Do 3 sides and if necessary keep back open?