Dining Chair Makeover – From Cane Back To Fully Upholstered With Tufted Back and Skirt
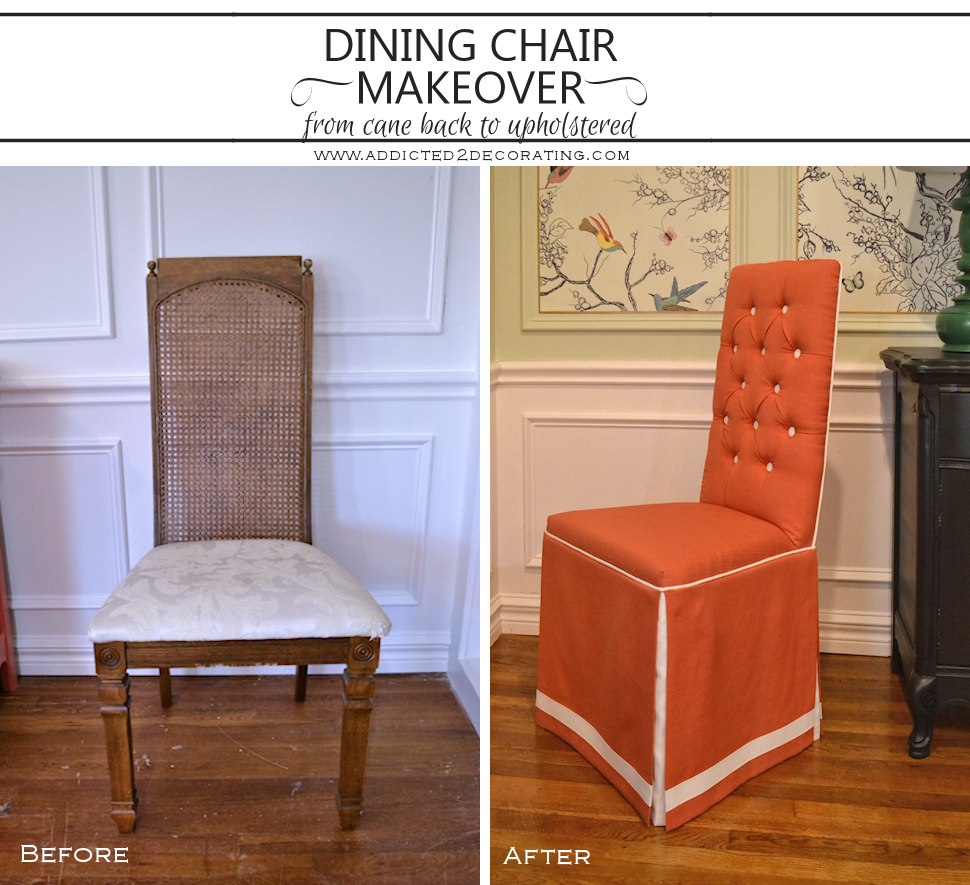
I finally got my first dining chair done, and it only took me three days. Just seven more to go! 😀 Just kidding. I’m only doing one more like this. The other six that go around the dining table will be different, and I’m hoping they’ll also be quite a bit easier.
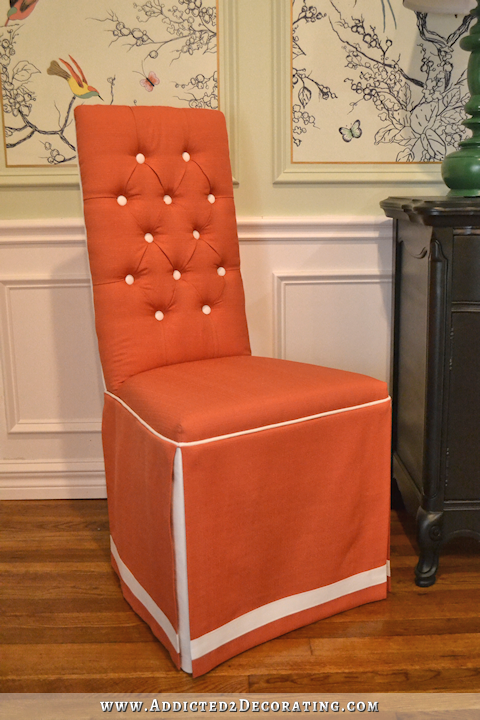
But let me show you how this chair turned out. This was my first time to do an upholstery project like this (although I’ve done quite a few others), and I’m pretty proud of how this chair turned out!
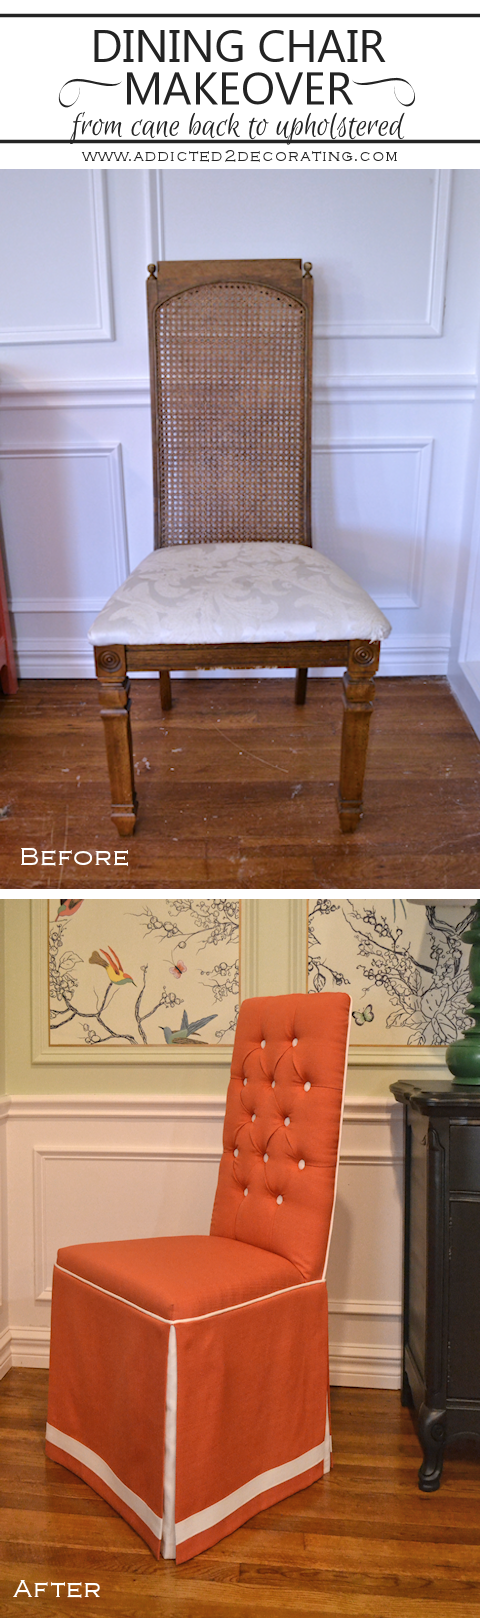
Can’t even tell it’s the same chair, right?
If you missed Part 1 of this project, you can find that right here.

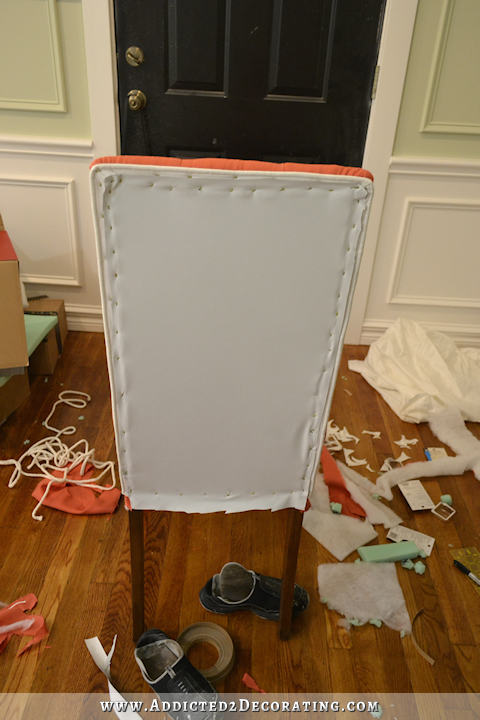
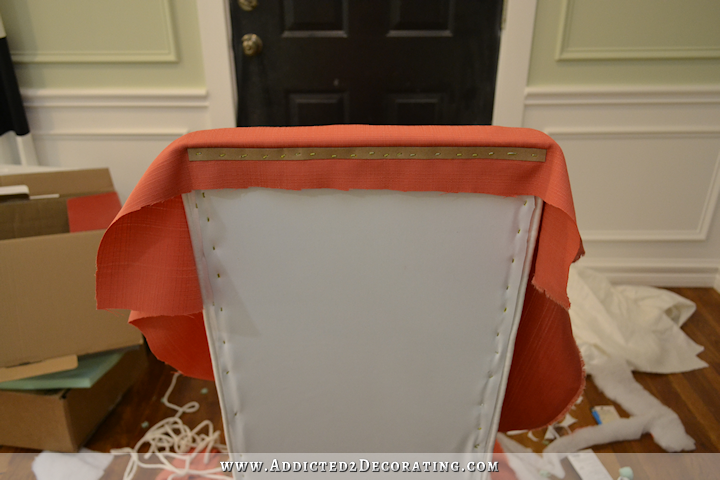
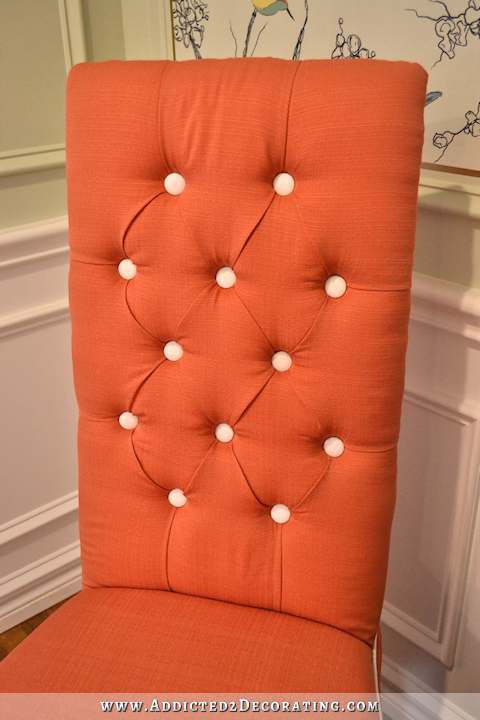
And when I left off, I had finished all of the tufting on the back, but the edges were still unfinished. So to finish off the front of the chair back, I just continued pulling and stapling the fabric all the way around the back. When I trimmed off the excess fabric and batting, this is how the back looked.

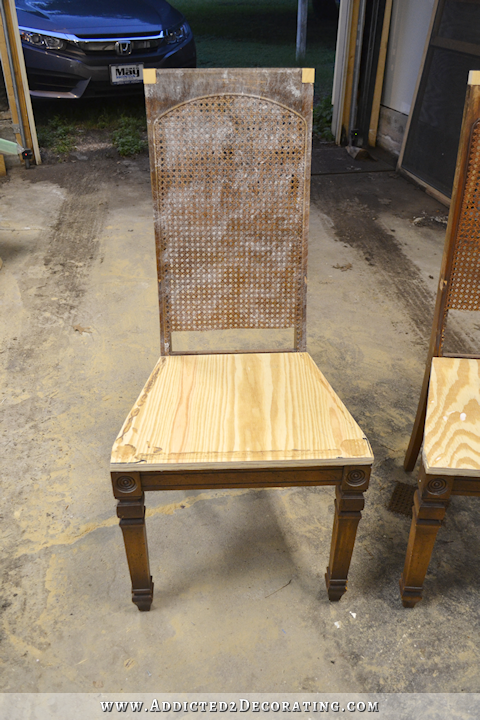
The next step was to finish of the back of the seat back, but before that could be done, I had to add one more support piece to the bottom. I just cut a piece of scrap wood to the correct width, and attached it by toenailing some nails through this wood piece and into the chair frame.

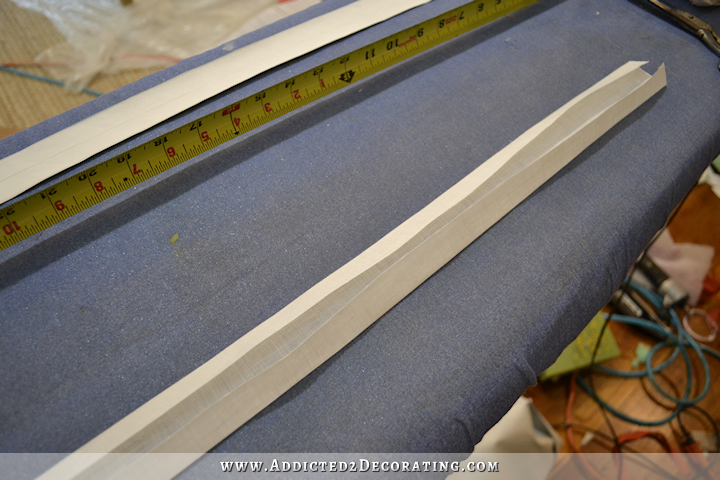
Next I prepared some covered welt cord and stapled it around the edges of the back.

And by the way, I have a tutorial on how to cut continuous bias for welt cord/piping so that you don’t have to cut strip after strip after strip and then waste time sewing all of those strips together. You can find that tutorial here.

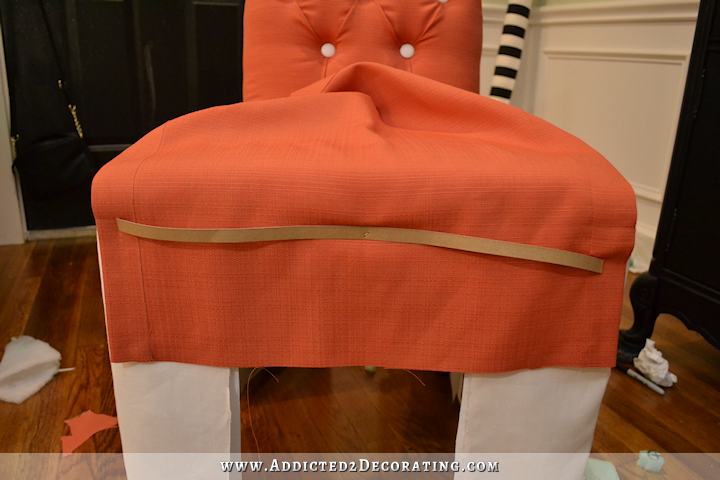
Next I attached some upholstery cardboard strips around the seat. The only purpose of this was to serve as a guideline for where I would attach the covered piping. I used the plywood base as a guide for where to attach the cardboard strip.
To be clear, I’m talking about this plywood base to which the seat foam was adhered.
I just felt for the edge of the plywood through the batting and fabric, lined up the top edge of the cardboard strip with the top edge of the plywood, and stapled it into place.
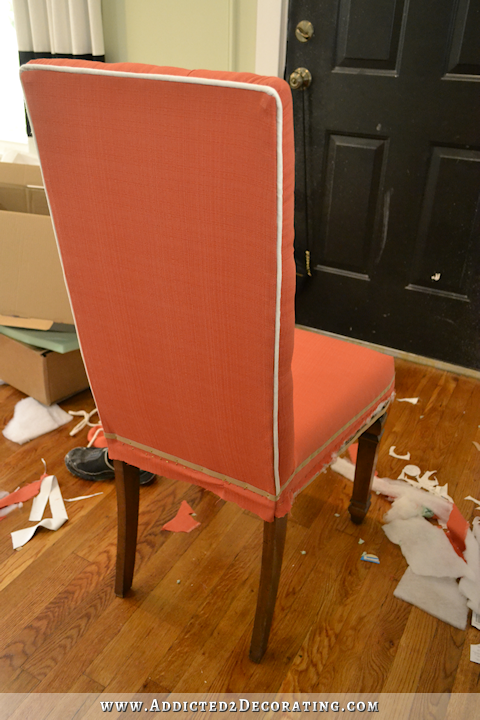
Next I finished up the back by first attaching a piece of blackout lining just to give the back some stability.
And then I attached the fabric starting with the top edge using a cardboard strip just below the piping and stapling the fabric into place.
This is what that edge looked like with the fabric flipped down over the cardboard strip.

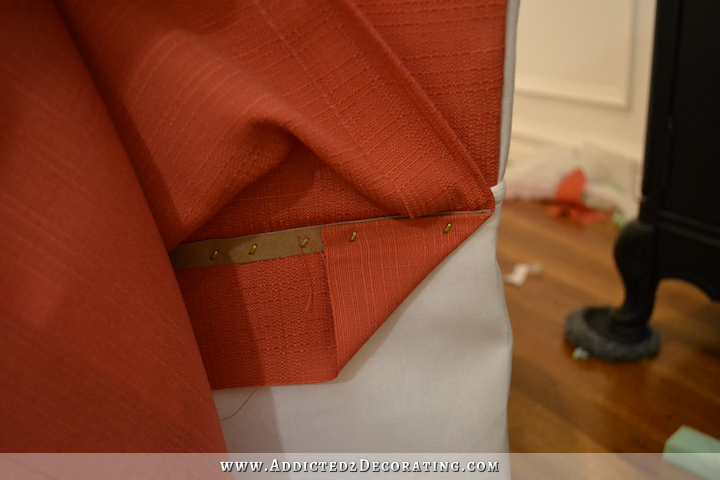
Then I did the sides using this tack strips.

This was my first time using these tack strips, and let me just say, it’s not easy. It took me several tries to get it in the right place. I’ve watched pros do this part, and they make it look so easy, but I’m guessing it takes quite a bit of practice to get it right.

Since it was my first time, and it was basically a lot of trial and error, I don’t know that I have any helpful info to give on how to use those strips. The basic process is that you hold the strip so that the tacks are facing you. Then you line up the inside edge of the strip with the inside of the welt cord (i.e., just along the stitched line where the fabric is sewn along the cord). Then you pull the fabric taut and press the fabric onto the tacks. Then you flip the tack strip and the fabric under so that the tacks are now facing the chair frame, and you use a mallet to nail the tacks into the chair frame.
And yeah…it will be frustrating the first few times, unless you just have the touch. I can assure you that I did not have the touch. 😀 My corners are awful, so just kindly overlook those.

Those tack strips will definitely require quite a bit more practice before I feel confident with my work. But since these two chairs will be going against the wall in the entryway, I’m not too concerned.
Anyway, moving on…
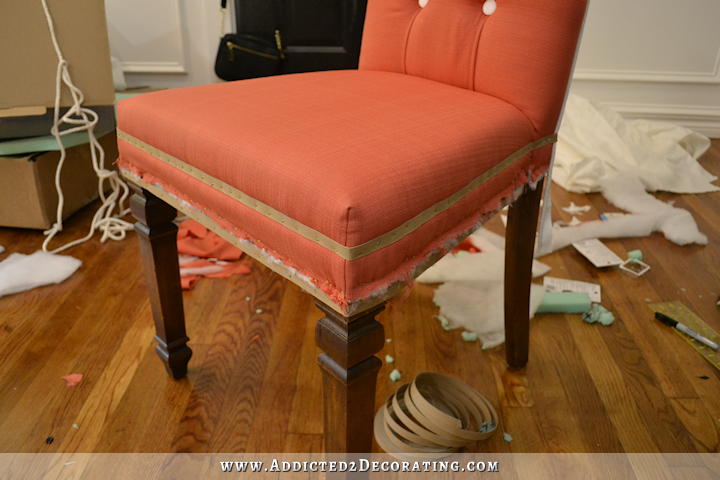
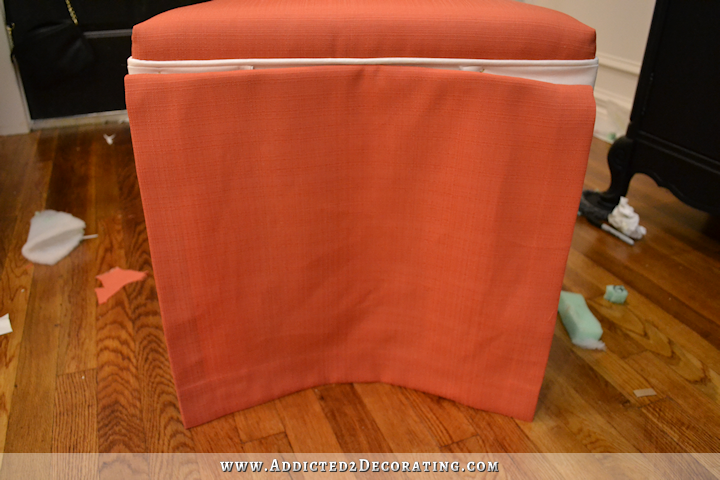
With the back done, I attached the piping all the way around the chair, using the cardboard strip as my guide.
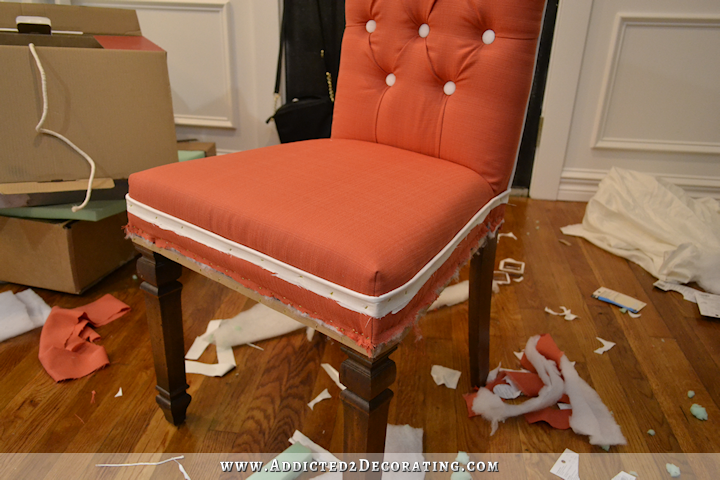
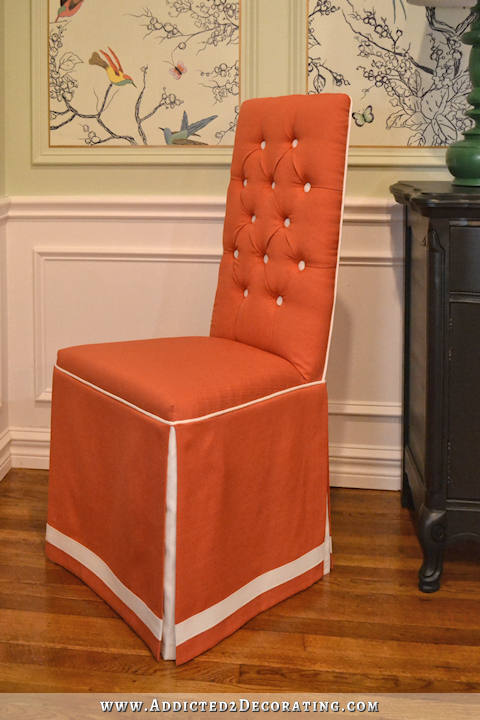
Next I cut four pieces of the white fabric, hemmed the bottom edges with a blind hem stitch, and attached those on the corners. I just left the edges raw, which I’m sure a professional would never do. But since those edges would never show, I didn’t bother. You can also see that I used a layer of blackout lining behind the fabric. I did this because the fabric I used is so thin, and actually looks a different color without the white lining behind it. With thicker fabric, that step would be unnecessary.
One thing I wish I had done is iron a crease in the fabric where it folds around the legs. I think that would have given the finished chair a much cleaner, tailored look.
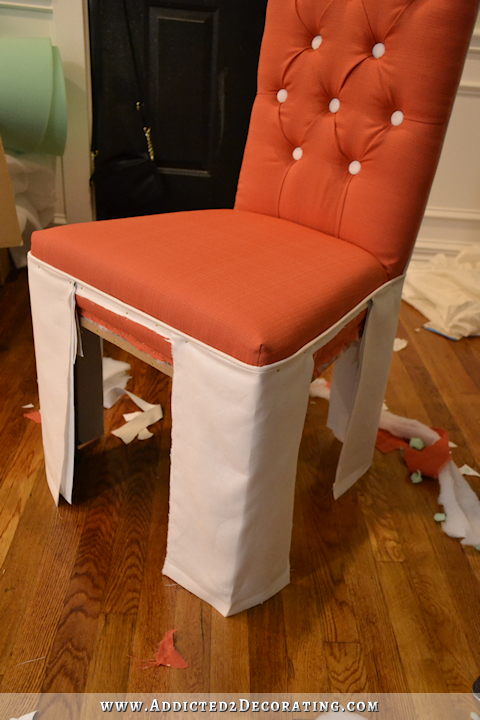
Next I prepared the main sections for the skirt. I debated whether or not I should hem the sides and bottom of each piece using a blind hem stitch, but in the end, I decided not to do any sewing on these pieces. Even a blind hem stitch can leave tiny stitches showing. I don’t find that to be distracting on big items like draperies, but on pieces this small and front-and-center on the chair, I thought any stitches showing would be distracting and obvious.
So I opted instead for Heat ‘N Bond Ultra iron-on permanent adhesive tape. I first ironed in my hem, and then I went back and added the adhesive tape following the instructions on the package. I used that to hem the bottom and the sides, but I left the top edge raw on each of the four skirt pieces.

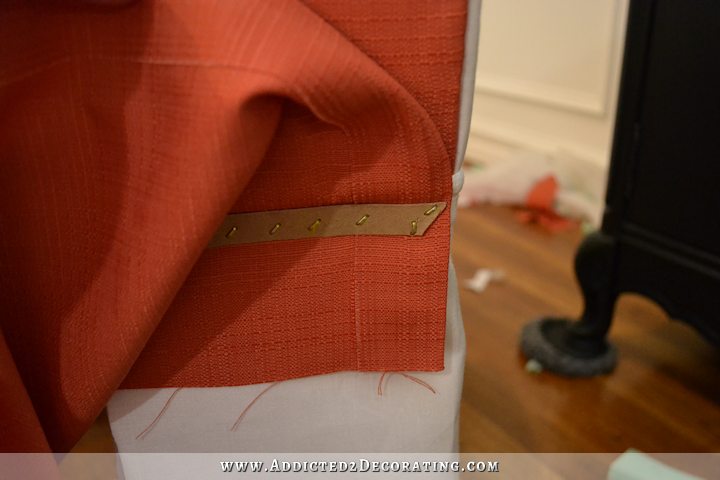
To attach the skirt pieces, I again used the cardboard strip just underneath the piping, and stapled it into place.
I started in the middle with one staple, and then flipped the skirt down.
Then I continued to adjust the fabric to the right length, slip my hand behind the fabric to hold the cardboard strip in place, flip the skirt up, and staple it into place. Then I’d flip the skirt down and repeat that process over and over until the whole thing was stapled all the way across.
To finish the corners, I avoided stapling the fabric about 3/4″ from the edge, and you can see that I also had excess cardboard strip.
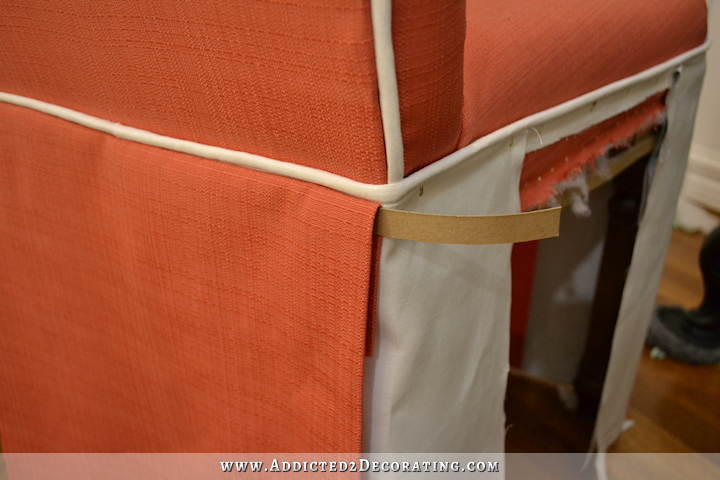
I flipped the skirt up, cut the cardboard strip at a 45-degree angle, and then added some staples right on the corner.
Then I folded the fabric up to cover the cardboard strip, and stapled that into place.
One mistake that I made on the back is that I didn’t make sure that I was pulling the fabric taut to the sides as I was attaching the skirt. This resulted in some puckers.
I’m not too concerned since its the back, and it was just another learning opportunity. I did much better on the front and sides.
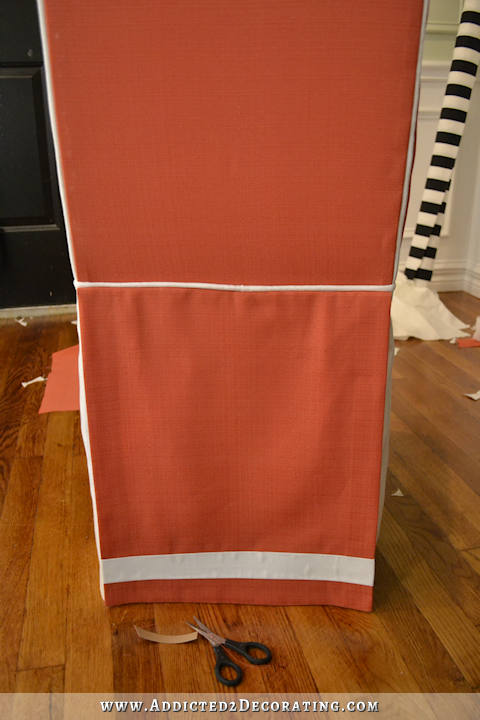
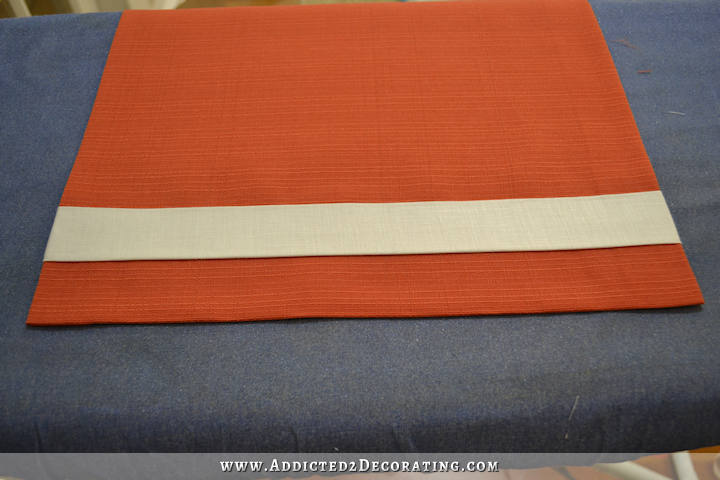
You’ll notice that the back piece had an accent band on it, while the front didn’t. I wanted to try both ways to see which one I liked better. I decided to go with the accent strip.
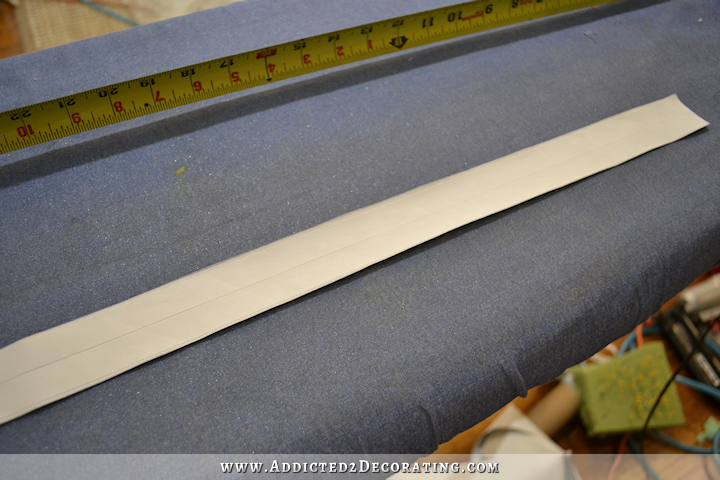
To make that, I used the same white fabric that I used on the cord and buttons, and cut a three-inch-wide strip. Then I folded it over on the top and bottom so that the edges met in back, and I ironed the folds into place.
To give it some stability, I cut a piece of 1.5-inch-wide blackout lining to fit inside, and used the iron-on tape on the front AND the back to adhere it inside the folded fabric.
And then I attached the accent strip using a permanent adhesive tape (made by the same company as the Heat ‘N Bond, but it doesn’t require heat).
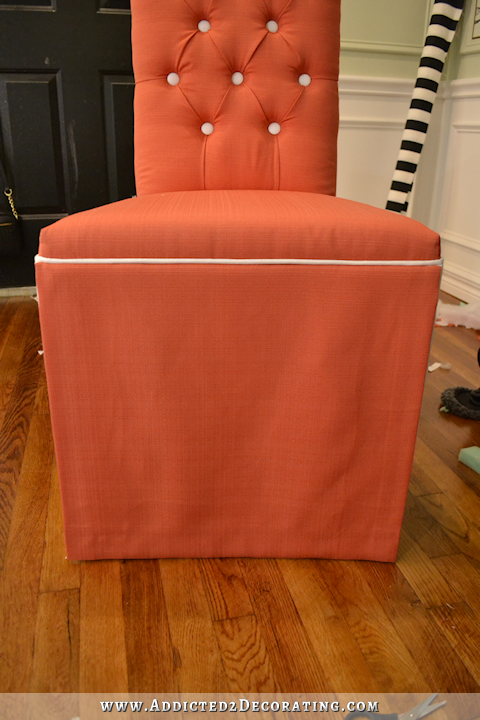
After all of the skirt pieces were in place, the one final detail I needed to address were the corners. They just looked a bit disjointed to me.
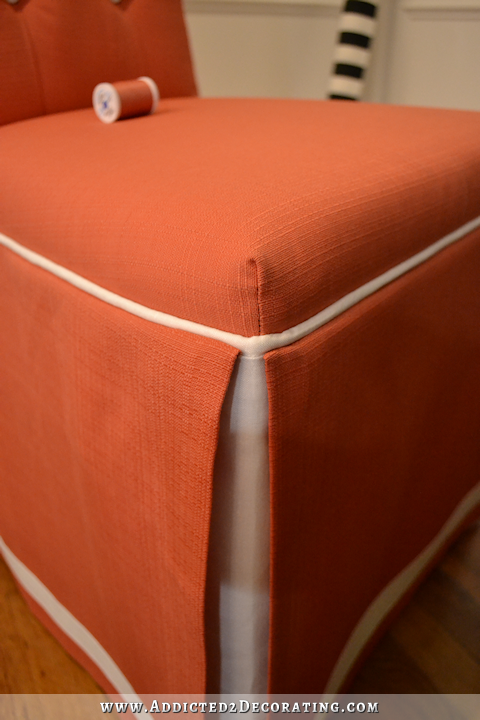
So I used some matching thread and cut four long pieces, and fed those four pieces through a large-eye needle. Then I fed the needle from back to front on the left corner, and from front to back on the right corner, and then I removed the needle and tied the ends into a knot and cut away the excess. I like how it pulls the corners taut and also “bridges” the color over the white corners and under the white cording.

And that was it! It’s done! So simple, right?! 😀
Okay, no, not really. This is definitely not a project I’d put in the “quick and easy” category. But if you have any experience with upholstery at all, it’s very doable.
Overall, I’m very pleased with the way it turned out.

Now I just have one more chair to do, and that will be the last big project for my entryway wall. Just a little accessorizing, a fresh coat of paint on my front door, and my entryway will officially be finished! And it’s only taken me a year to get to this point. 😀

Addicted 2 Decorating is where I share my DIY and decorating journey as I remodel and decorate the 1948 fixer upper that my husband, Matt, and I bought in 2013. Matt has M.S. and is unable to do physical work, so I do the majority of the work on the house by myself. You can learn more about me here.

Wow…love how you take something ordinary and make it fabulous. Love watching your process. This will be beautiful in front of your mural…which I love.
You are amazing !!!!
Great job!
Beautiful! I love how you will tackle ANYTHING and how you face everything with a “learning experience” attitude.
Once again, Wowza! Your courageous spirit inspires me. Love it
Gorgeous!
Gorgeous!! Absolutely Gorgeous!!! WOW!
This looks beautiful. You’d never recognize the original chair from the remake. Though I don’t know if I would have the patience to do upholstery. Kudos to you.
Very pretty Kristi…was a little surprised you didn’t line the skirt…did you have a reason for not?
Honestly, I didn’t know I was supposed to. 🙂 I’ve never done this type of chair before, and I didn’t look at one in person before I got started. My fabric is pretty thick, so it didn’t even occur to me that I needed to line it.
You’re right to be proud! That chair looks fabulous!
A. Maze. Ing. Beautiful! Is there something special in the water in Waco?
Beautiful!! You deserve every compliment you get!!! Great Job!!
Amazing! It looks very professional to me!
Hi Kristi,
Congratulations – absolutely beautiful. And, you should be proud. You are so amazing and talented. I love the way you break these projects down for us with detailed explanations of each step. Thank you.
I second that!
LOVE! You are anazing!
What a great transformation. Amazing
What an amazing transformation! Thank you for sharing the tips, tricks and photos. I have absolutely zero experience with upholstering, but I will be making my first attempt in the next few weeks. Blackout liner might be just the thing I need. It would have never occurred to me. I am sure that I will be referring to this post often as I work through my project.
Very pretty chair!
Beautiful work! Your tutorials really help me understand the cost of custom upholstery, and (knowing that I will never attempt something like this) its value when done well.
These chairs a amazing and so are you. I hope you know there are those of us who live vicariously through you! lol Great job.
Welcome back, Kristi. Three things I want to tell you:
1. I love the format you used above to link to past posts. I use your website as a resource a LOT, so this will be really helpful in moving around.
2. Lowe’s is no longer carrying Rustoleum stain in my area! It has long been my preferred product, especially with pine, and now I have to get it at Walmart or on Amazon. Is it still carried at your Lowes store?
3. I have used Waterlox in the past at your suggestion and absolutely love it. I used their satin finish for the first time this week, and it is terrible. I’ve never had so many brush marks in my finish. I had to sand down the entire countertop and begin again. I don’t know if you’ve ever used the satin finish before, but it will only be the original formula for me from now on.
Sadly, Lowe’s in general is no longer selling that stain in their stores. 🙁 I’m so frustrated about that, because it was the BEST stain I’ve ever used! I think you can still find it on Amazon.
I’m so sorry that you had so much trouble with the satin finish Waterlox! I’ve only ever used it on floors and butcherblock contertops. I didn’t have any brush stroke problems with mine, but on the floors I used a lambs wool applicator, and on the countertop I used a sponge brush, so I’ve never used a bristle brush with it.
Amazing and beautiful transformation! Great job, Kristi!
Another awesome job/tutorial! Love the color you chose, it will set the area off beautifully!
I was trying to visualize in my head the part about the tack strips, but can’t quite wrap my head around it. Would it be possible to maybe see your steps thru that section on the next chair? I’m sure I could search you tube for a video, but it would be nice to see it here with the rest of the process. If you can’t I would totally understand! I’d like to pin this tutorial for future reference. Thanks for the visuals! They are very detailed, and helpful for almost anyone to understand.
When I do the back on the second chair, I’ll see if I can get some pictures of that process and add them to this post.
Thanks, I appreciate it!
Just lovely Kristi! I learn so much from you! I really love how only one shoe came off during the whole process 🙂
So, this entry made me really appreciate what upholsterers do. The tutorial so encompassing, so detailed… so impressive. And while you may not think the corners are well done, I assure the rest of us are longing for these skills. Very nicely done! And with so much work going into this project, I hope you do not change your mind about the color of these chairs. But if you do….. Love your blog!
I don’t how , but all you touch and do just amazing and can be put in a book as a manual for many people, me too.
You have a very nice ( what a word!) taste, style, and you are so skillful that often i hardly believe you are just one of us.
CONGRATULATIONS!!!
Always yours Lydia, Minsk, Belarus
Looks beautiful and you did an amazing job. It looks like you have done this forever.
Lovely little chair – in very happy colors. What an intricate sewing job. That was sure labor intensive, but very nice with the bird mural and black buffet.
You not only have talent bit patience. Great job. It looks like a professional did it!!
OMG…Beautiful!
Love the chair but PLEASE tell me about your walls!!!
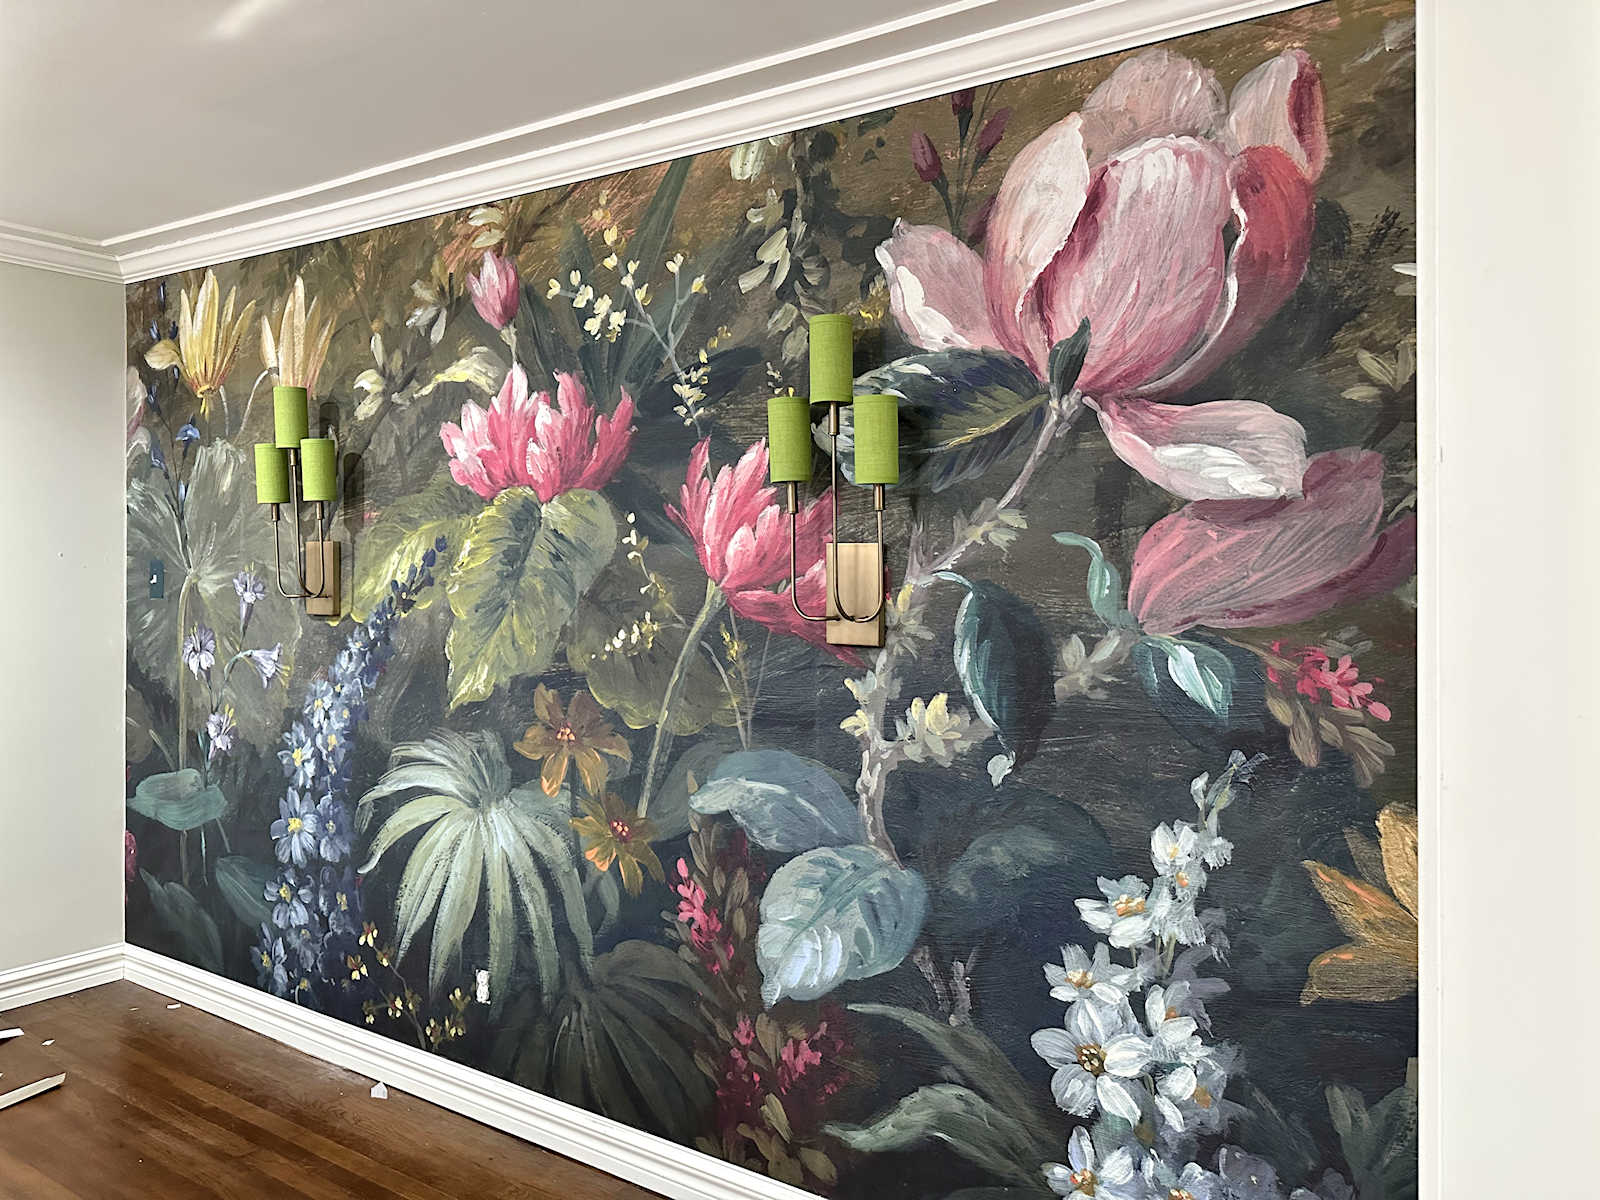
Linda, you can see my post about the picture frame moulding here:
https://www.addicted2decorating.com/my-finished-dining-room-walls.html
And then I shared the hand drawn “wallpaper” mural here:
https://www.addicted2decorating.com/hand-drawn-birds-butterflies-entryway-wall-mural-almost-finished.html
gorgeous!
Very helpful explanations! You always hit the nail on the head. I want to do some tufted projects but i am so intimidated. I love your tutorials, I think even I may be able to do it right with your advice.
Wow what a wonderful transformation. Sounds like a lot of steps,ending in a beautiful looking chair xx
That looks amazing, but difficult- great job prevailing!!! I can’t wait to see what you do with the dining room chairs!!
Stunning!
What can I say, except, it’s absolutely STUNNING. The chair has been transformed from an ugly duckling to a beautiful swan!! Well done Kristi, you’ve done an incredible job.
Your chair is just lovely, I love the colour and detail, it makes me want to attempt to do my chairs.
Beautiful!
Wow………..just wow!!!!
Very nice upcycle. The color looks really good in front of the mural. How does it sit? Looked like you used enough padding to be very comfortable.
WOW! It’s amazing how different the before and after look! Fantastic job! I’m guessing that if your fabric is (mostly) cotton those “puckers” in the back could be steamed out.
I am impressed. I am a diy girl
Just learning
You are awesome
I love the color!!!!