DIY Upholstered Dining Room Bench – How To Build The Frame
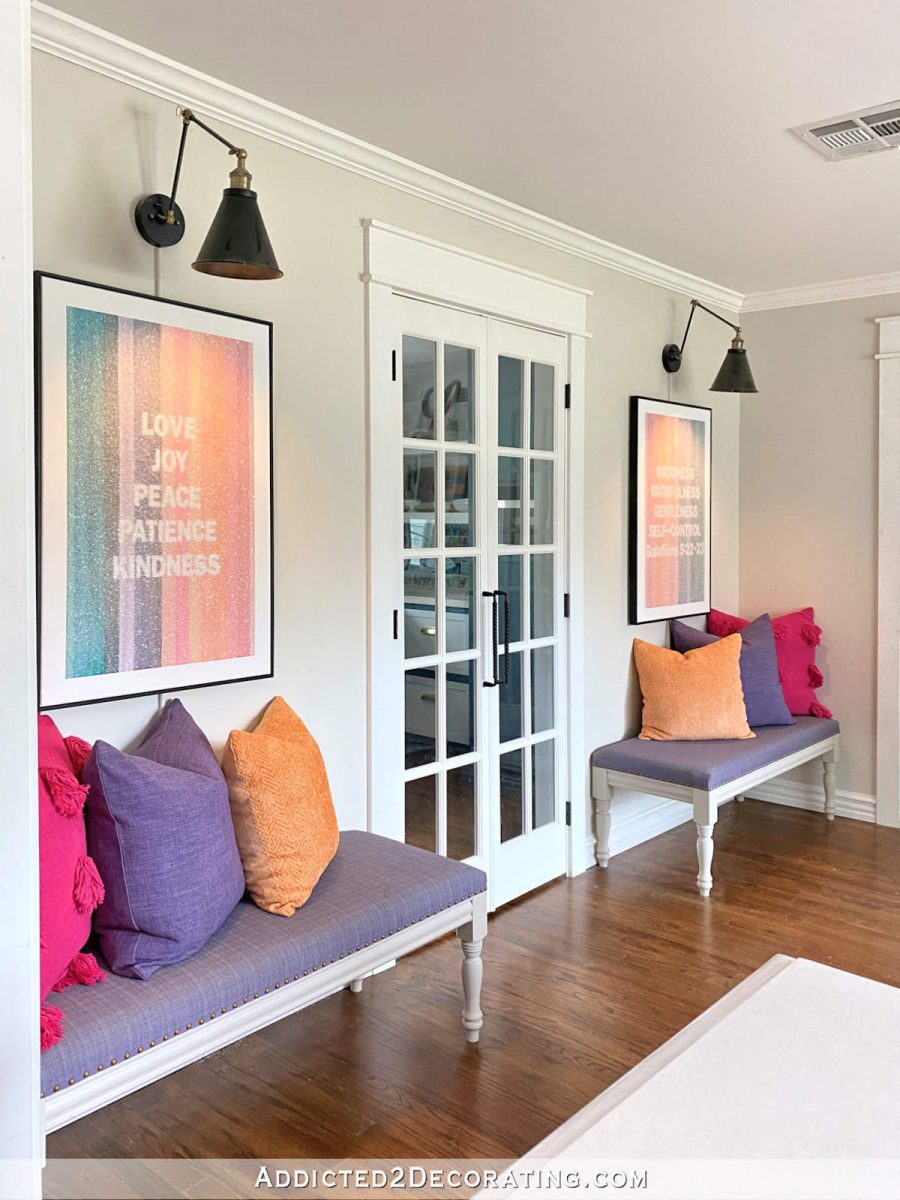
You know those two stretches of blank wall in my breakfast room on either side of the pantry door? I’ve decided that each of those areas needs a DIY upholstered dining room bench.
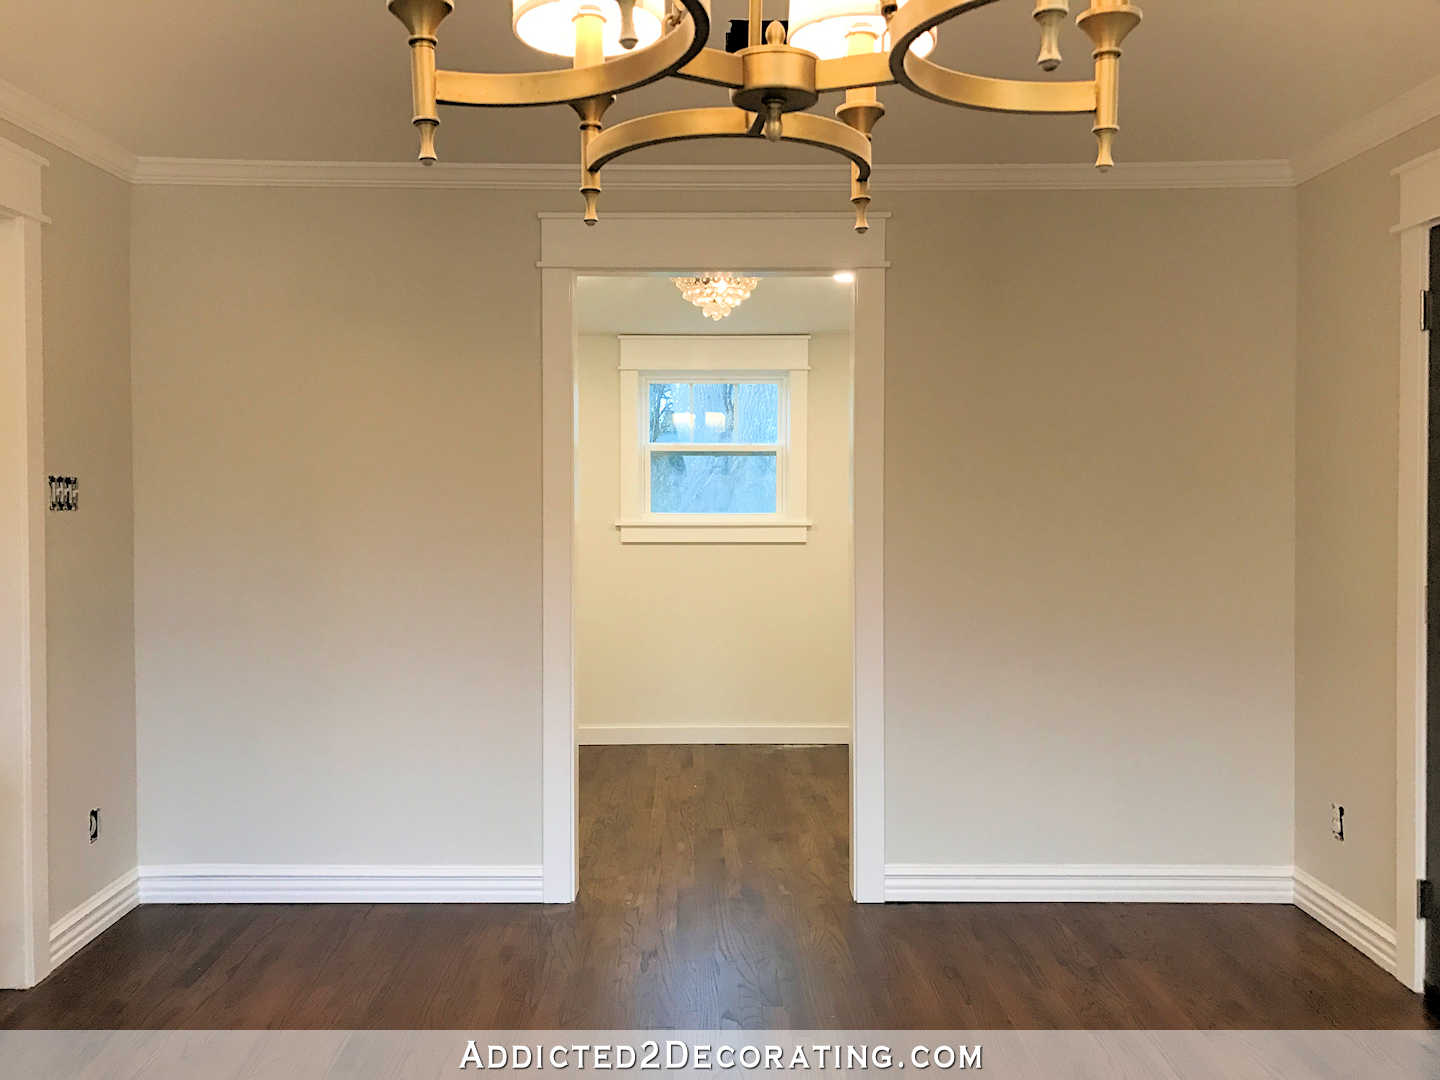
Before I could consider my breakfast room completely finished, I had to address those areas. I considered several options for those spaces. At one time, I thought about adding built-in storage, but I decided against that for a few reasons. The biggest reason is because I was concerned that it would make the room feel quite a bit smaller.
So after considering all of the options, I finally decided on a simple look where I can bring in some needed color on this side of the room — upholstered benches, pillows, framed artwork, and interesting lighting. And since I love symmetry, I’m doing the same thing on both sides. Well, the artwork will be different. Or perhaps it’ll be a diptych, and I’ll hang one piece on either side. I haven’t really decided yet. But it won’t be completely identical.
So the artwork is still undecided. But what I do know for sure is that I need two upholstered benches for this plan. I found several pretty benches that were the exact size I wanted (48″ x 18″), like this one from World Market…
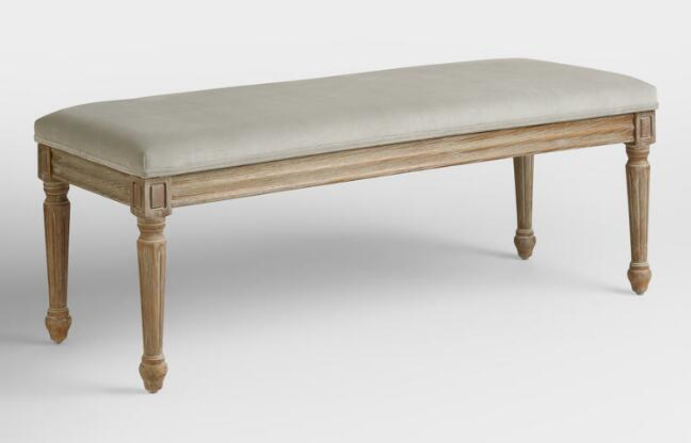
…but I just wasn’t satisfied with any of the colors I found. So naturally, I decided to build my own so that I could get a customized look and color that I wanted.
If you’ve never build furniture before, you probably think that this is a really advanced project for people who have lots of woodworking experience. But I’m here to tell you that with the right tools, this project ranks as one of the easiest building projects I’ve done. If you’re just building one bench, you can easily get it done in one day. A weekend, at most.
The necessary tool to make this project very easy is a Kreg Jig. Click here to see the set that I have. I also have a right angle clamp (click here for that), which is sold separately and pretty invaluable in building something like this bench.
How to build the base for an upholstered bench seat
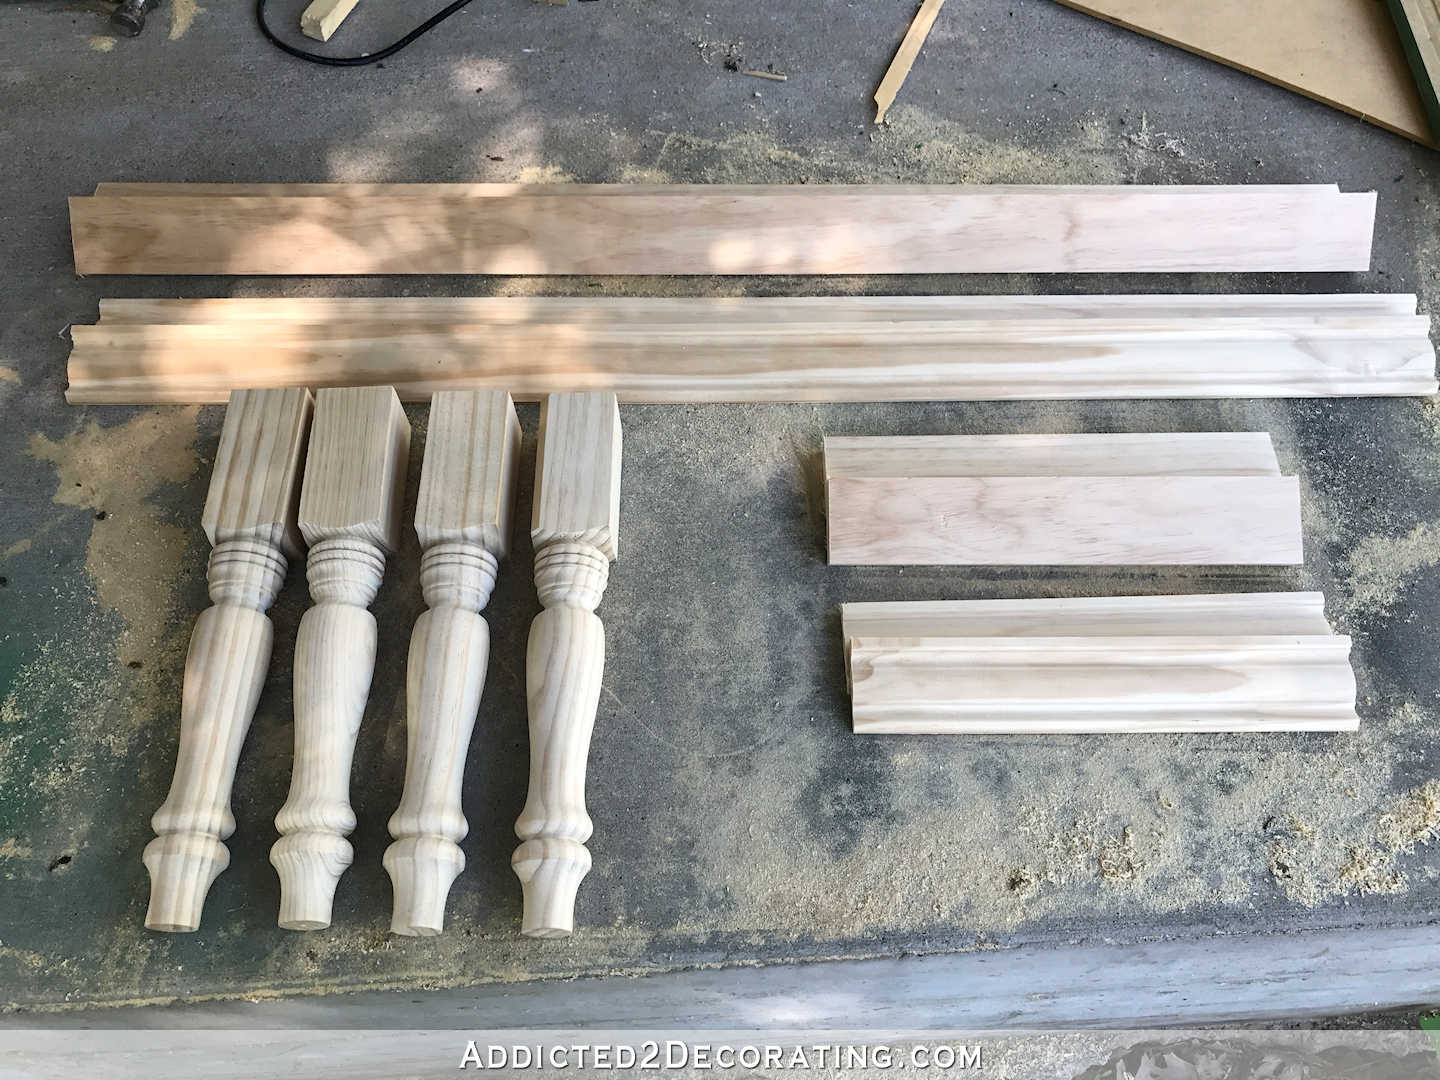
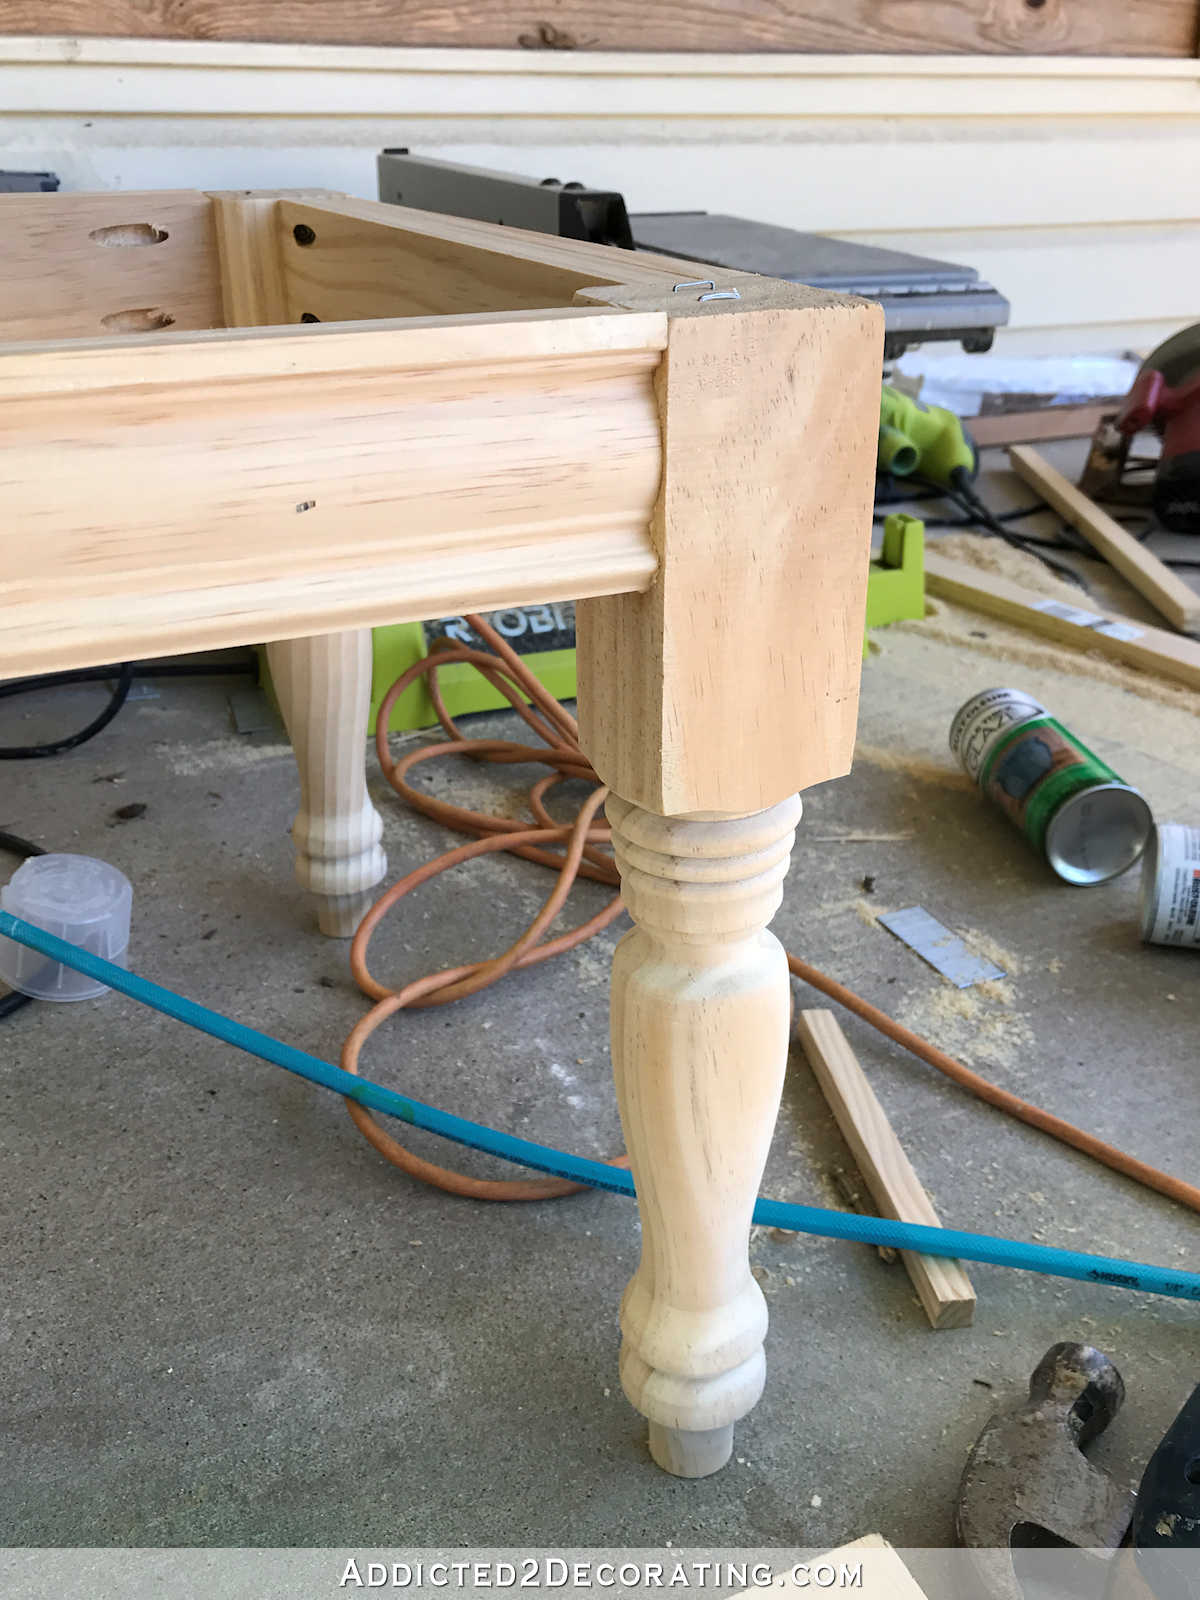
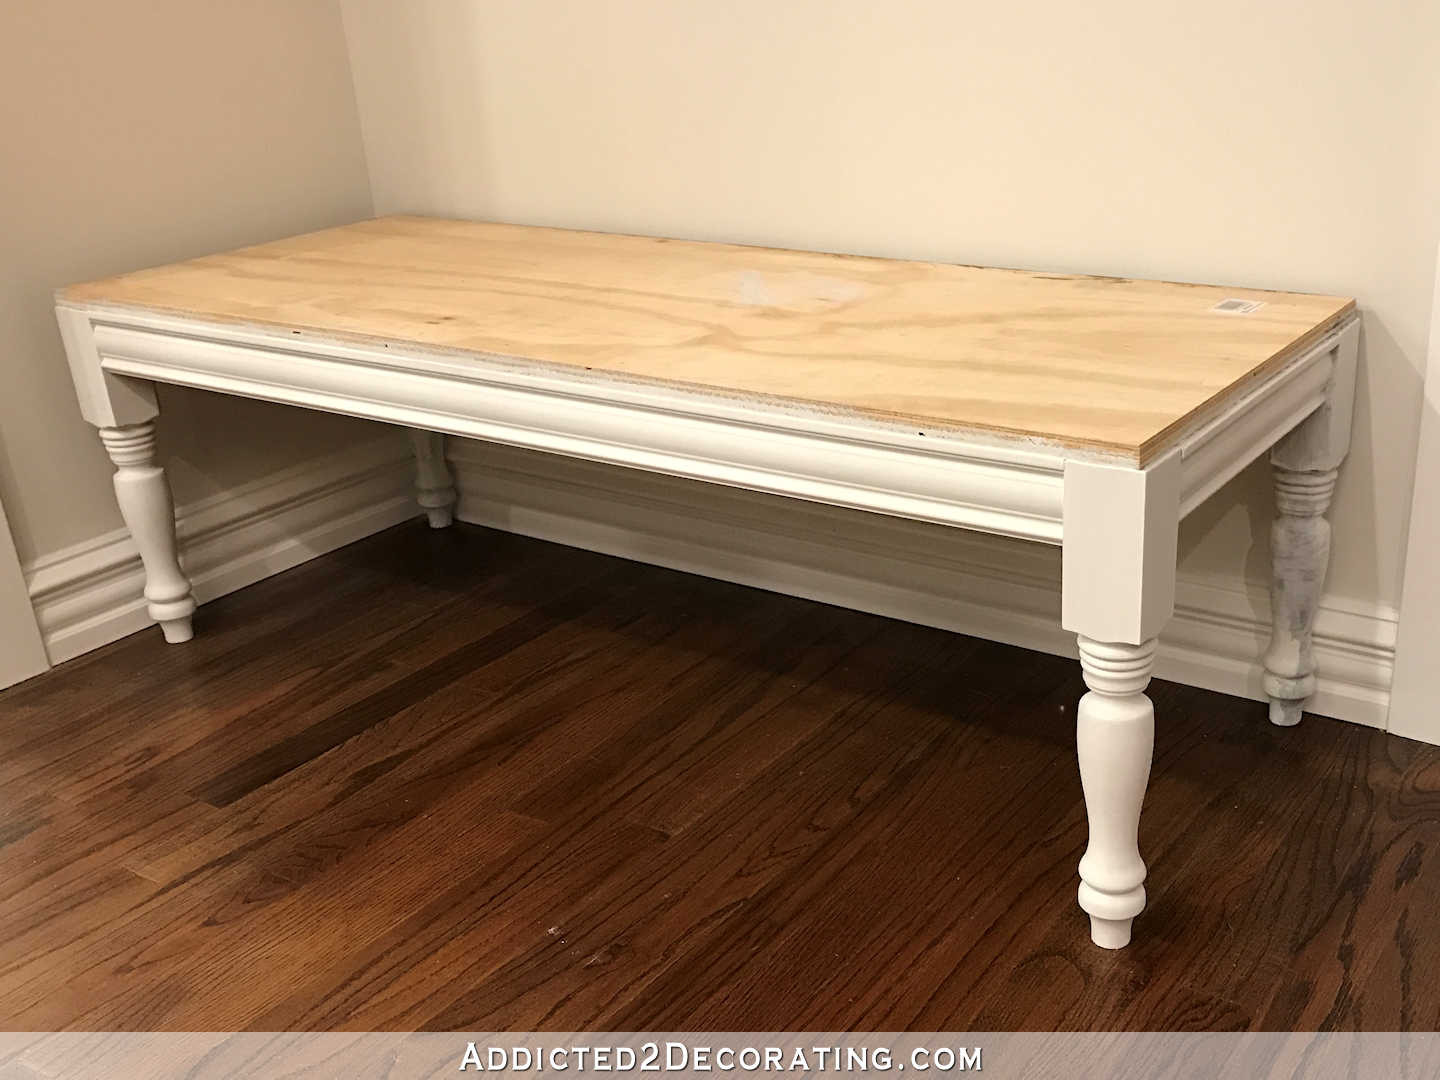
I want my bench to seat two people, so I made it 48 inches long by 18 inches wide. The basic parts to build the base for a bench that size are four 15.25-inch legs (from Home Depot), two 1 x 3 boards cut to 43.5 inches long, two pieces of decorative trim (you can use casing or baseboard trim) cut to 43.5 inches long, two 1 x 3 boards cut to 13.5 inches long, and two pieces of decorative trim cut to 13.5 inches long.
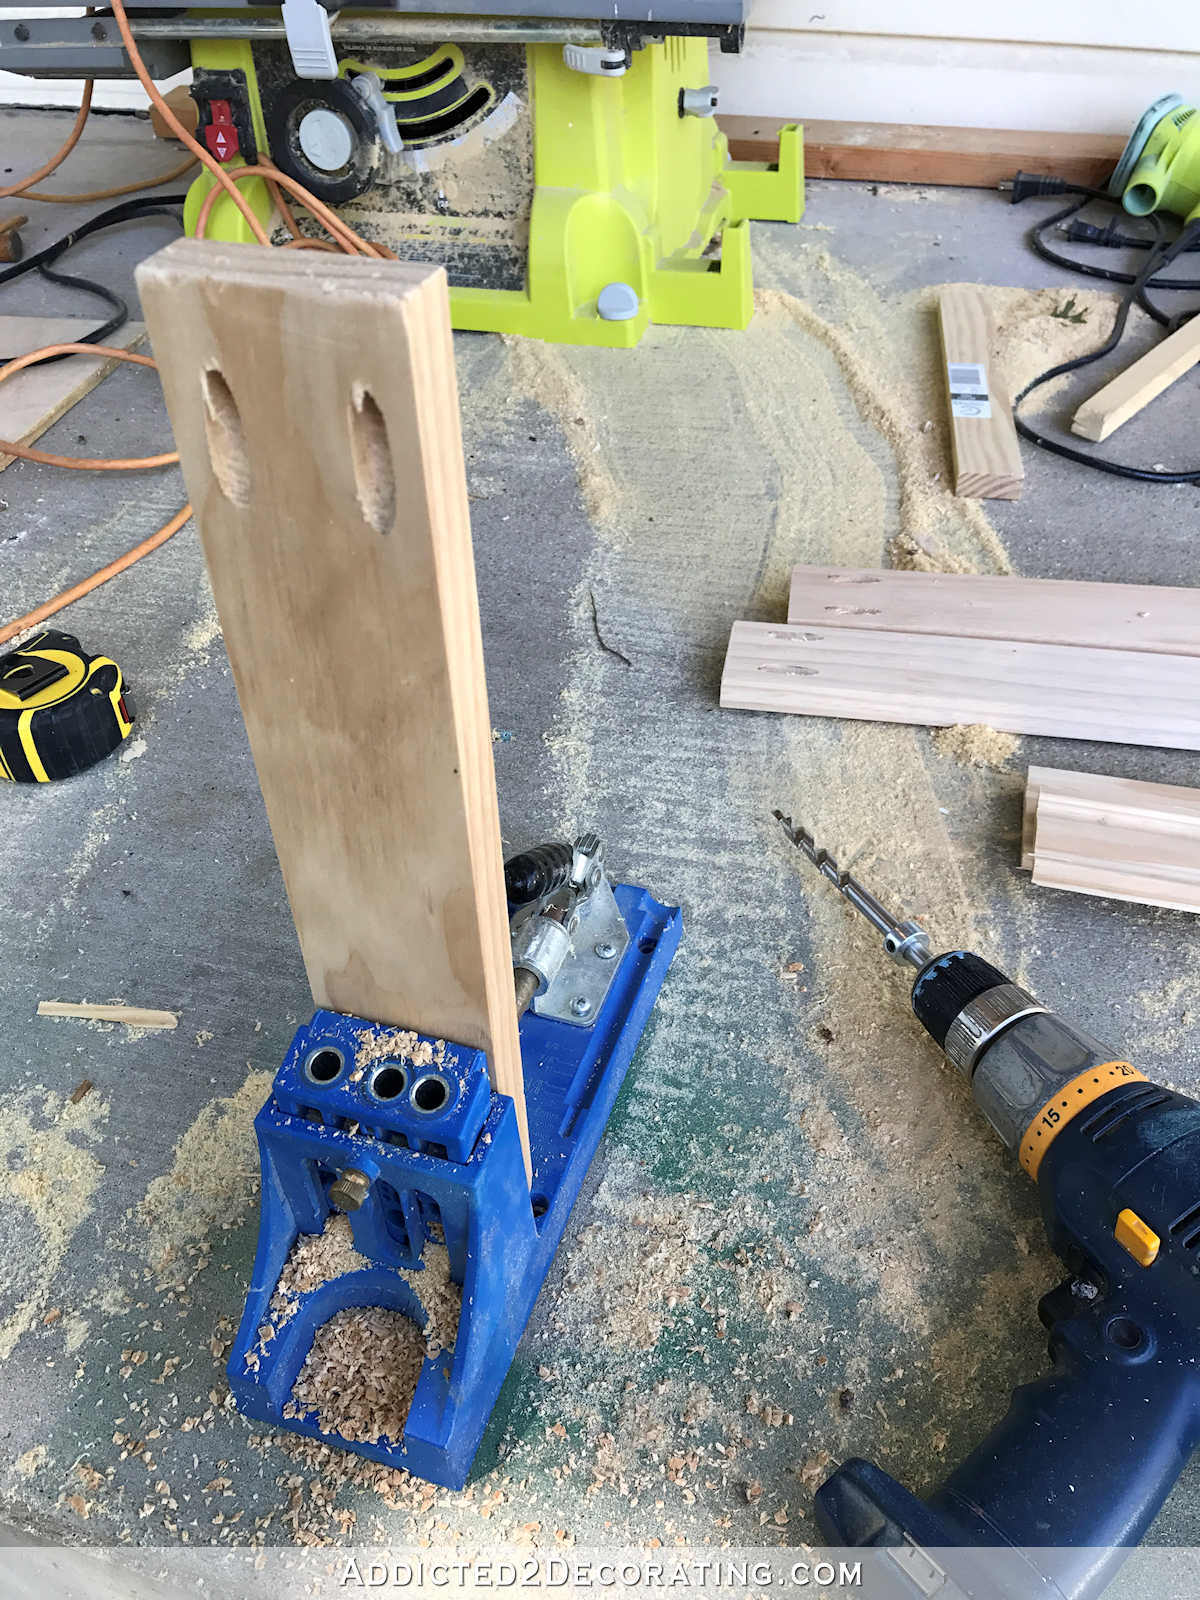
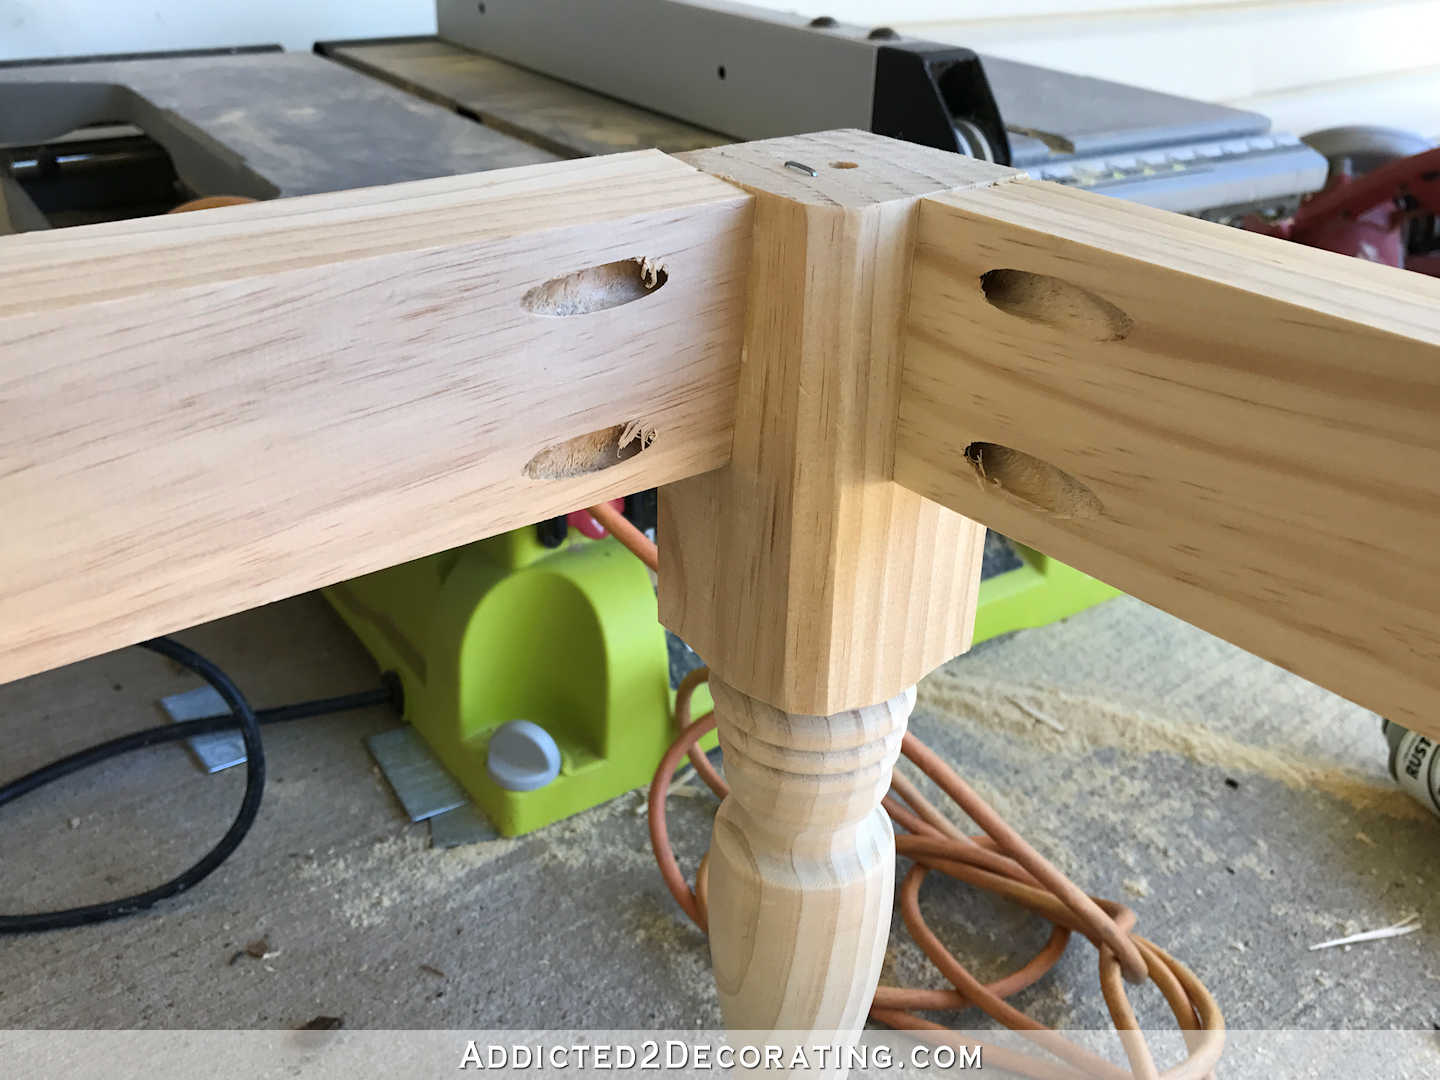
Using the Kreg Jig I drilled two pocket holes into each end of each 1 x 3 stretcher boards…
Then I placed each stretcher board on my work surface so that the pocket holes were face down, and added wood glue to the top…
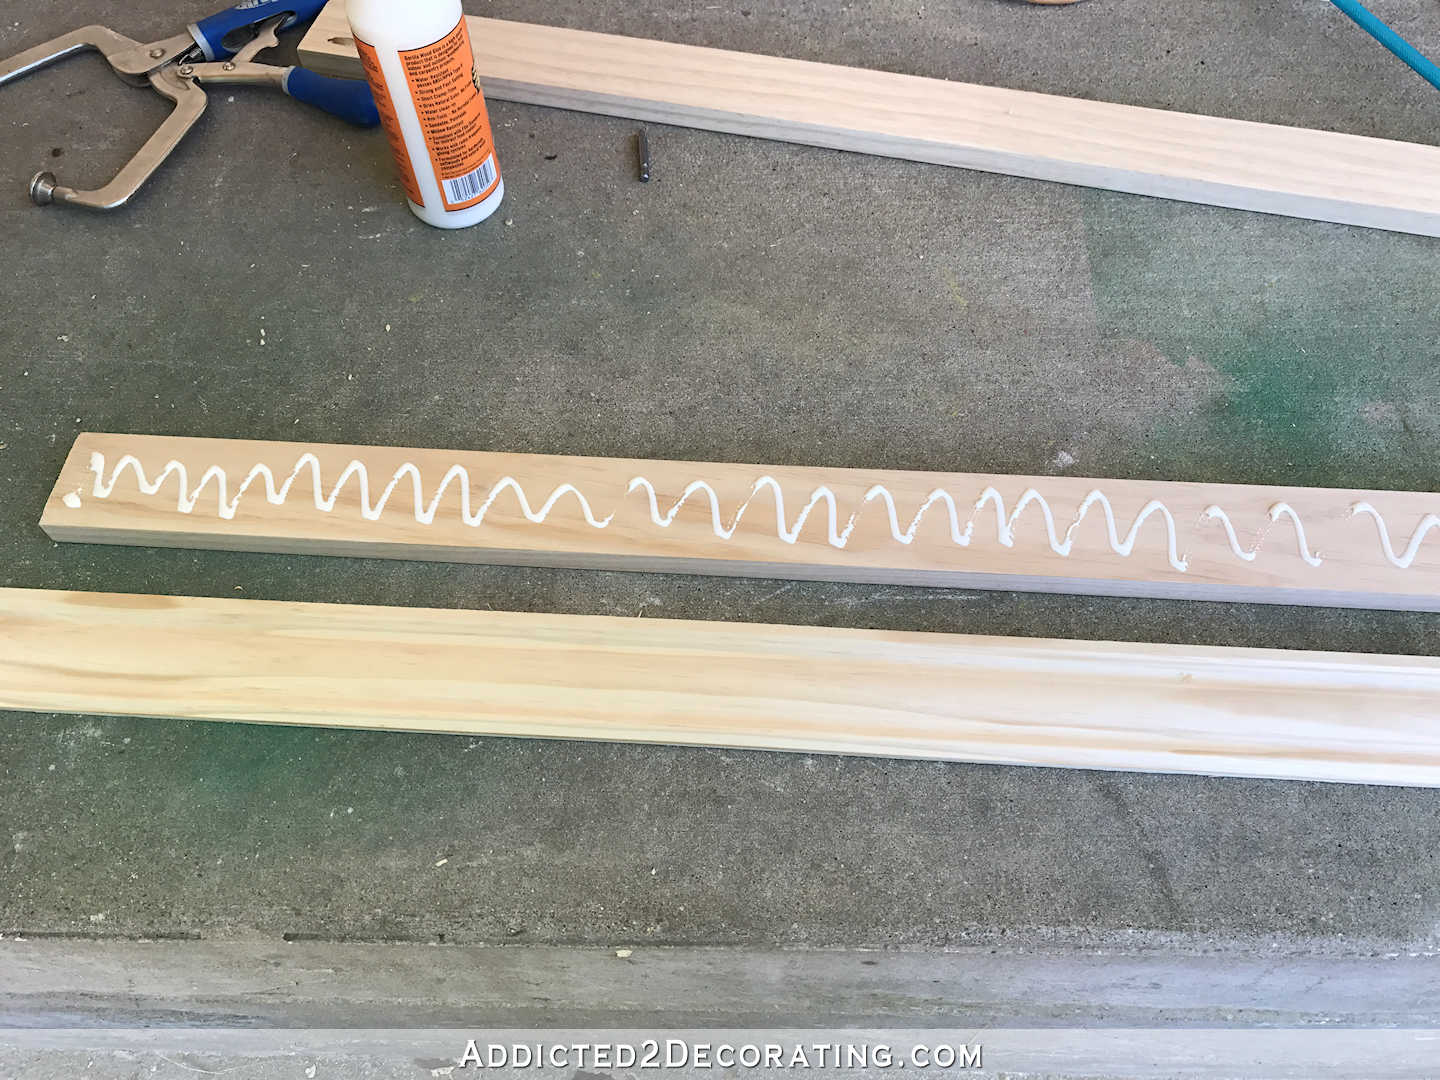
And then I glued and nailed the decorative piece of trim on top of the stretcher boards using 1-inch 16-gauge finishing nails.
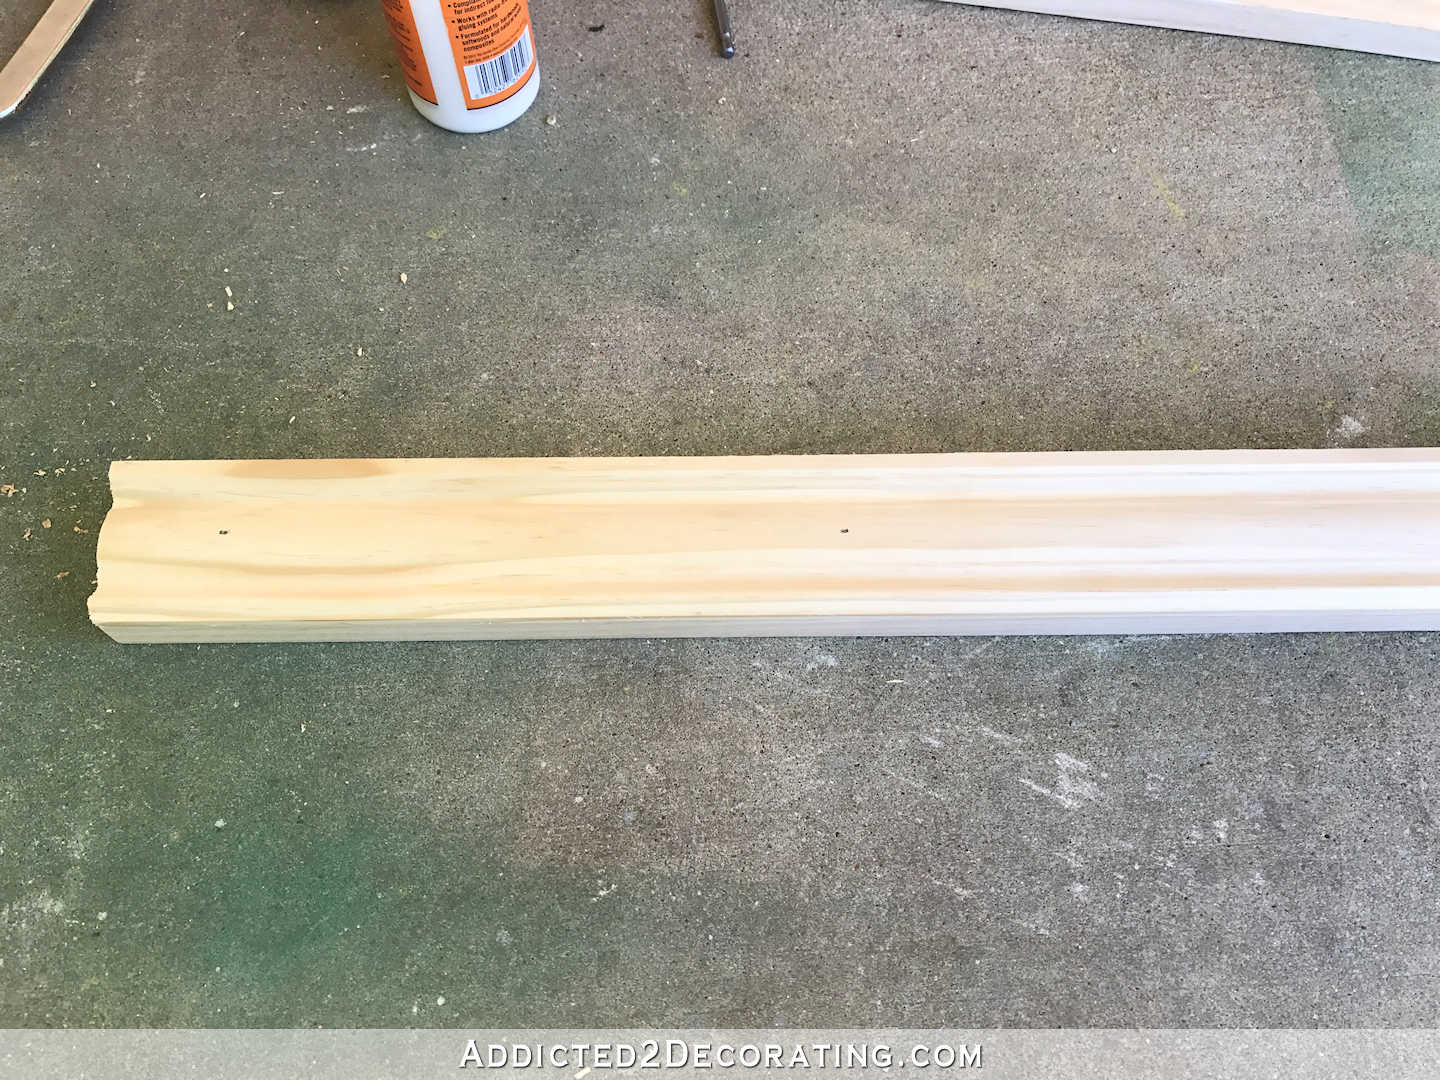
With all four of the stretcher + trim pieces glued and nailed, I was ready to start assembling the bench base. I started with the short ends by placing the short stretcher piece face down with the pocket holes facing up, and after gluing the ends to the legs with wood glue (making sure that the pieces were flush on top), I attached the pieces using Kreg screws through the pocket holes.
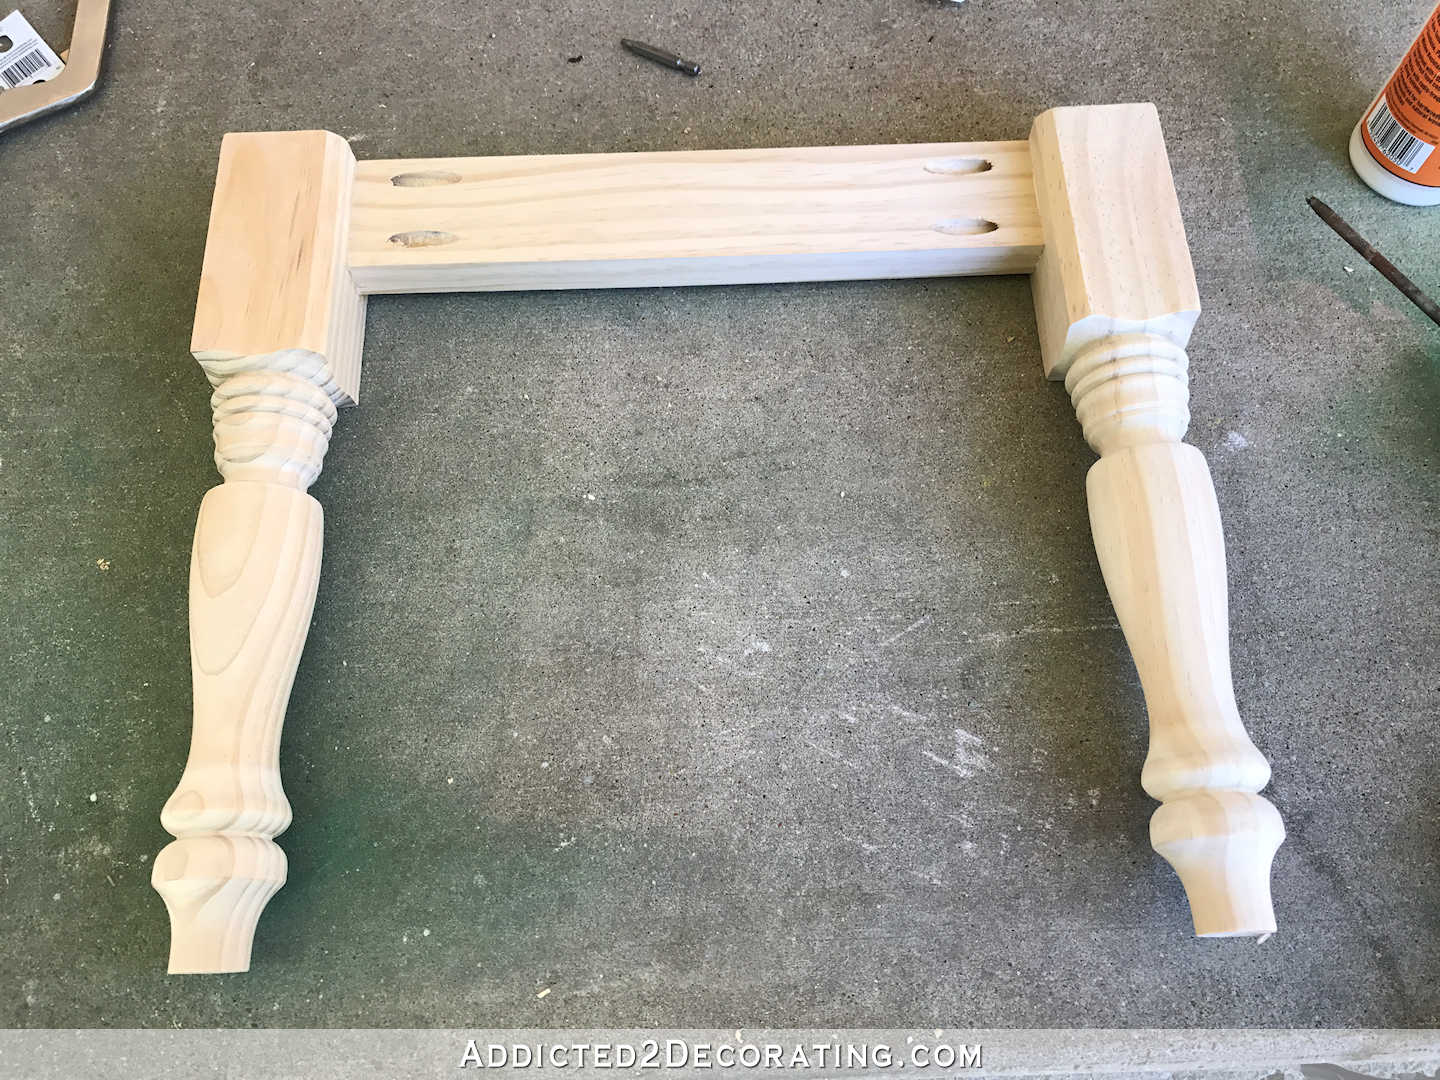
Here’s what it looked like from the front…

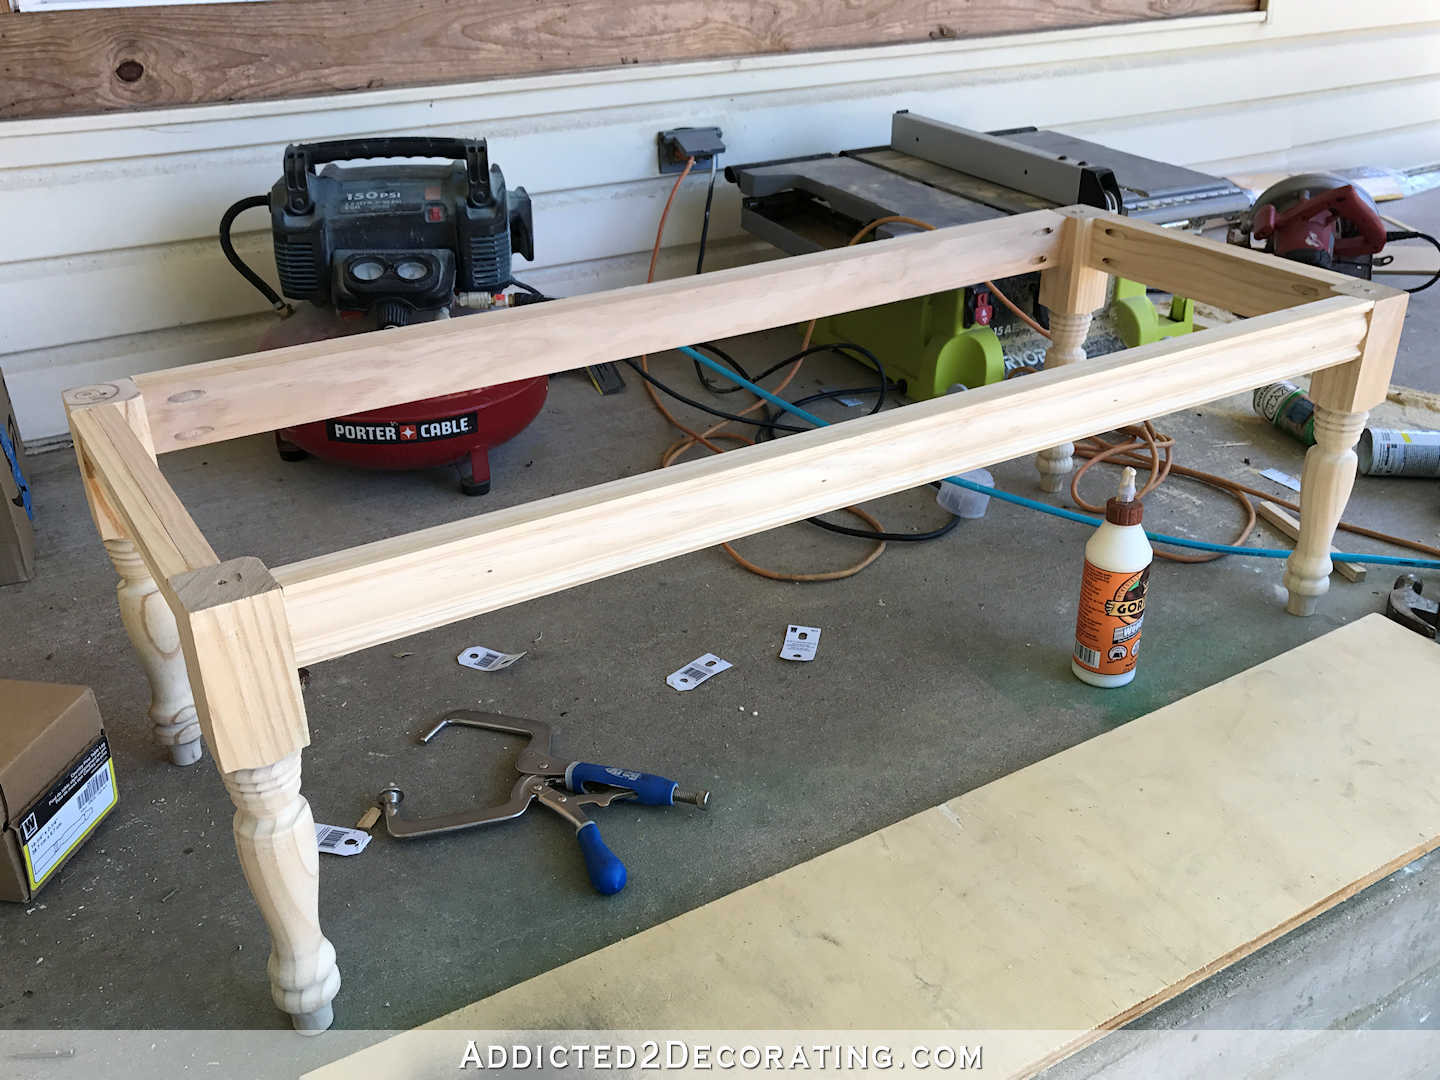
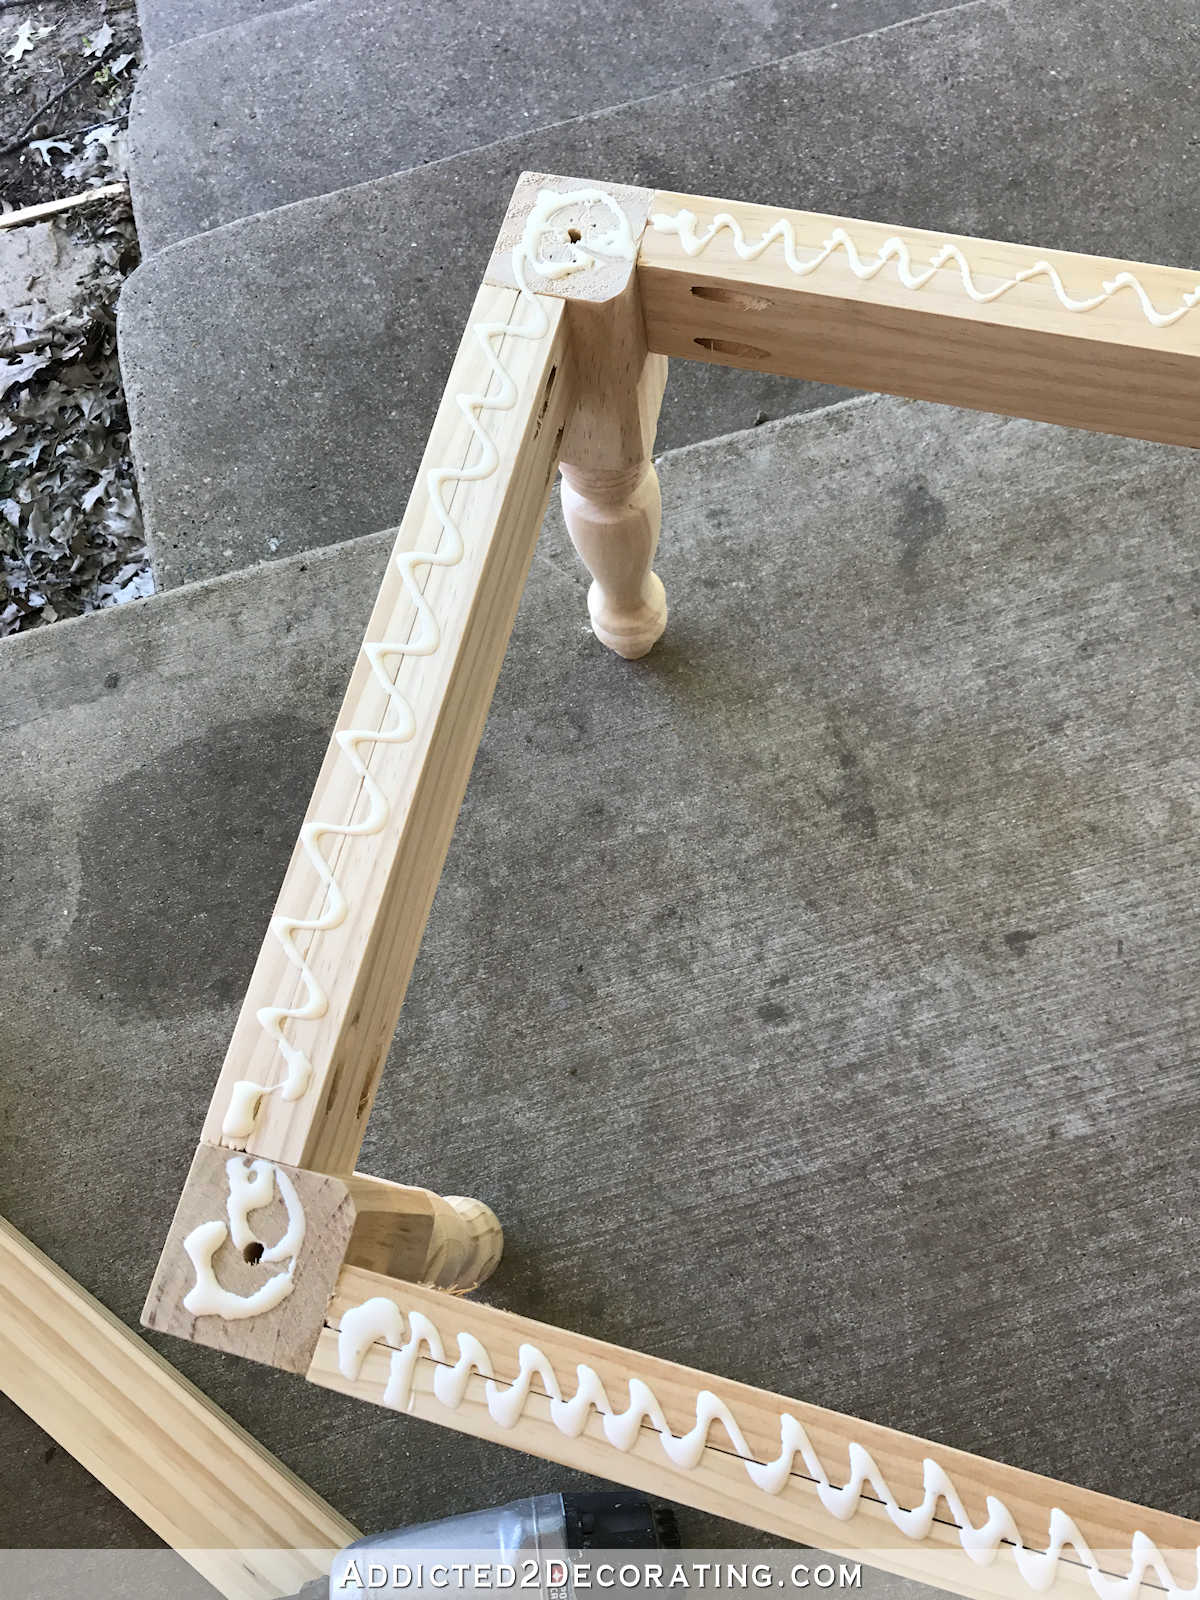
Then I made the other leg-stretcher-leg section for the other end the exact same way, and then attached those two sections with the long stretchers, again using wood glue and pocket screws.
Here’s what it looked like at that point…
To finish up the base, I added wood glue to the top edges of the stretchers and legs…
And then added a piece of 3/4″ plywood that I had cut to fit the top. I secured it with 1.25-inch 16-gauge finishing nails.
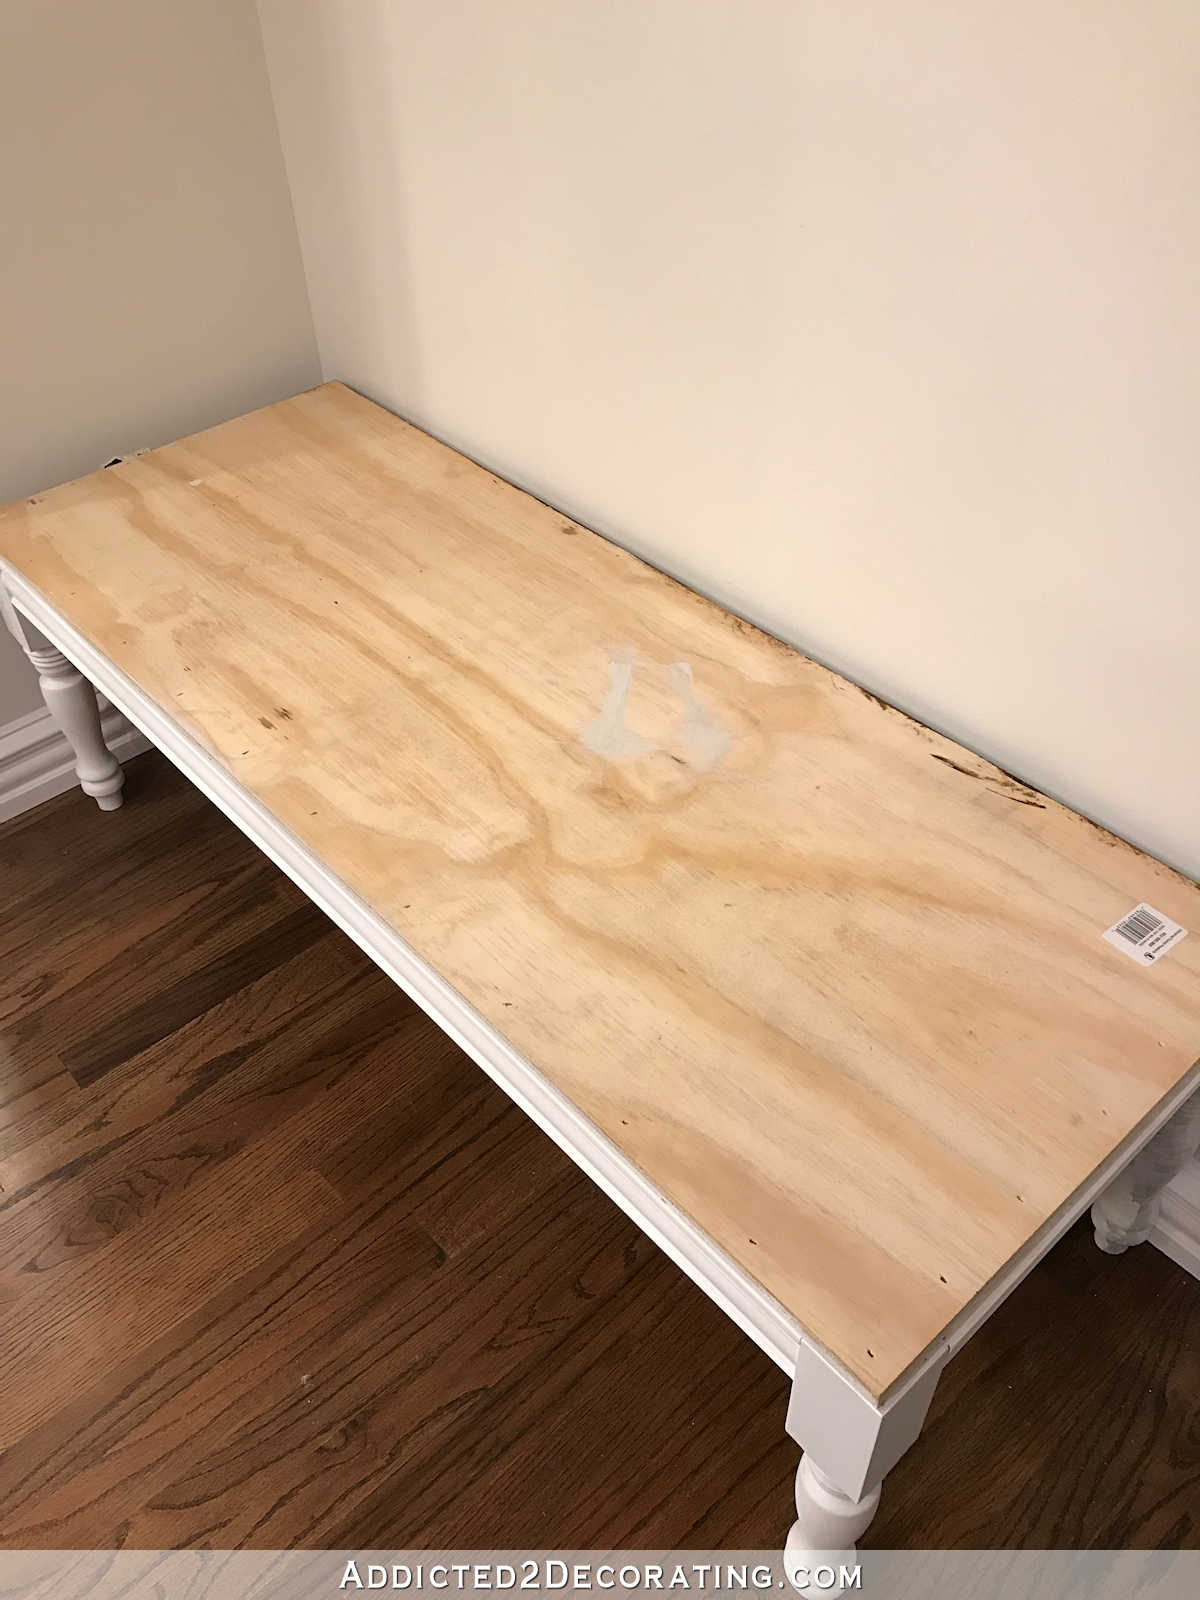
At this point, the base is ready for whatever finish is desired. I originally tried to stain the base (which you can see from the back right leg), but I didn’t like the way it was looking so I let it dry and then primed the whole thing with oil-based primer. Today I’ll sand it smooth, give it a couple of coats of paint, and then move on to the upholstering the top of the bench.
And of course, any time I bring anything new into the house, Peeve thinks it’s for her. 😀

So I’m hoping to get both of these benches done today, but whether or not that’s feasible depends on how I trim them. I’m debating a double welt cord, which would be the easier option, or a nailhead trim, which would be the time-consuming option. If I go the nailhead route, I probably can’t get them both completely finished today, but I can certainly try!
UPDATE: The benches are finished! You can see the rest of this project here: DIY Upholstered Dining Room Bench (Finished!) – How To Upholster The Seat
More About Our Breakfast Room
see all breakfast
room diy projects
read all breakfast
room blog posts

Addicted 2 Decorating is where I share my DIY and decorating journey as I remodel and decorate the 1948 fixer upper that my husband, Matt, and I bought in 2013. Matt has M.S. and is unable to do physical work, so I do the majority of the work on the house by myself. You can learn more about me here.

Beautiful! Can’t wait to see the finished benches! You’re an amazingly talented person 😉 Thank you for sharing!!
Wow! Are there any skills you DON’T have? You can do it ALL!
Ditto
Amen!!!! I’m in awe!!!:)
You are amazing!! Will you need to add a door stopper to your garage door to prevent it from banging into your bench? I’d hate to see all that hard work damaged.
I probably won’t bother with that since the door won’t be there much longer. Once the garage is converted into my studio, that door will be removed.
No lie. Just last week, I said I wanted to build my own coffee table. My adopted son doesn’t think I can do it. I pointed out that my bedside table was hand built by me before he came to live with us. I told him I have a favourite DIY decorator who gives me great tutorials. I just wished she’d show how to build a bench or coffee table!! And here it is!! Thank you so much! Summer project!
Very nice. I build with my Kreg all the time. I don’t have the one you do, but it works and is AWESOME. I wish I had your ability to pick trim, I never find what I am looking for, sigh.
“And of course, any time I bring anything new into the house, my cat thinks it’s for her.”
Yes, of course it is! 🙂 🙂 🙂
My thoughts, exactly. Everything in my house is for the cat. I just pay the bills. lol
Can you tell me about how much this bench ran (just the wood portion – not including foam and material)? I realize wood costs vary location by location but would appreciate an estimate.
I like that you’re using nicer wood, beautiful legs and moulding. Most DIY benches that I’ve seen (and made) use cheaper quality pine – which is fine – but I’m actually looking into making a similar bench to what you’ve made and wonder if I would be better off buying a store bought bench due to the added cost of materials. Thanks!
The legs were $10 each. The 1 x 3 stretcher boards are $10 for an 8-foot length (this size bench requires two of those). And the decorative trim was around $1.05/linear foot, and I needed 11 feet per bench. And the plywood was around $14 per piece. I bought the 2′ x 4′ pieces rather than the big 4′ x 8′ pieces. That way I just had to make one cut with my table saw to make it fit, since the pieces were already 48 inches long.
So that makes the wood pieces for the base come in at around $85.55.
Well worth $85.55 because it is made from solid wood and not pressboard type wood that most furniture pieces are made out of. It is just beautiful and I love it. I may very well copy you on this or have my woodworking husband do it for me. I refer him to your sight all the time…Thanks again for your step by step instructions.
Thank you so much. I thought the price would be higher so I’m really pleased 🙂 I tend to focus on furniture legs – which happens to be the most expensive part of a build! Looking forward to seeing your final product!
I can’t imagine dreaming up a project, and then having the skills to just pop out to the work room and BUILD it! You truly are amazing, and very blessed. Now, one question, will your door not bang Into one of the benches ? I’m sure you have it all figured out though! I can’t wait to see them finished.
That door won’t be there much longer. As soon as the garage is converted into my studio, the door will be removed. I’ll replace it with something that either slides open (pocket door, barn door, etc.) or a regular door that swings into the studio.
Ooh La La!!! Love them!!!
Very very nice indeed. Can’t wait to see how you finish the benches!
Why does it seem so much easier when someone shows you how to do it? I’ve kind of been avoiding the benches for my mud room. 😉
About the nailhead trim… I wonder if there’s some sort of jig or nail gun that would make applying those easier? With the volume of nailhead trim you use, it’d almost be worth the price if there was such a device.
I’ve only ever been able to find one nailhead gun, and it’s a pretty serious tool made for upholstery shops. The website didn’t even have a price on it. It said you have to contact them for a quote. That scared me off. 😀
Yeah, that sounds scary. 🙂
I can’t wait to see the finished project. I have a Kreg jig and never thought about a bench but you’re right, it makes it a pretty easy project.
Whenever I see your breakfast room light from the angle in the top photo where I can see the half circle motif, I’m reminded about just how much I love it.
Thank you for the tutorial! I am planning to build a bench that will seat three and am just curious about how much weight you think this 48″ inch bench will be able to withstand?
I don’t know exactly, but I’m confident that it’ll hold two adults. On a bench wide enough for three adults, I’d definitely use six legs and center two of those legs in the middle of each long stretcher.
Thanks for addressing that. I wondered how long you could make it before it needed a center supporting or more legs. Well done!
Oh these will look gorgeous! Kristi your creativity, design and workmanship is again amazing! Looking forward to the finished reveal.
I love this Kristi!!! Great job:)
Quick question: Any thought about putting a cross brace, across the middle, for stability? Or would this withstand my ACTIVE NINJA 6 year old boys jumps?
If you make it the way that I show in the post, with the 3/4″ plywood actually glued and nailed to the frame, then the plywood actually acts as a structural brace all around. There’s no need for any additional bracing.
However, if you make it where you just do a simple wrap-and-staple upholstery job on the plywood and then attach it to the base with four or six screws after it’s upholstered, then it really doesn’t offer much (if any) structural support. In that case, you would need to add extra bracing to the base, such as corner bracing as well as a cross brace or two near the center of the bench.
I personally prefer to glue and nail the plywood to the base specifically because I feel that it is the most structurally sound option. And it’s not any more difficult to upholster it with it already attached than it is to do a wrap-and-staple upholstery job and then attach it. In fact, I think this way might be a bit easier…just a bit.
Okay. Thanks for getting back to me😃
Eager to see the upholstery part next!
You might go with 2″X3″ for your sides, instead of 1″X3″ or even 2″X4″ for your frame. Boys can be rowdy!
You totally “should” go with the nailhead trim! 😉 Just kidding! Do whatever you think looks best. 🙂 Love these! Great idea! And it goes without saying, great execution!
LOVE this project. You make me want to get my own power tools and go for it. Thanks for the great tutorial. I’m looking forward to seeing how you finish it up.
Have you thought of or ever tried the nailhead trip “tape” like this https://actionup.com/shop/nail-head-trim-matching-nails/ ? That might make it easier.
I don’t use nailhead strips like that because I can always (ALWAYS) tell the difference between nailhead strips and individual nailheads. On the strips, there are about four or five in a row that are fake (often plastic) nailheads, and then one real metal nailhead. The real ones are always slightly misaligned from the fake ones, and they’re also almost always a slightly different color. They stick out like sore thumbs on the finished piece. So my personal policy is that if I’m going to do nailhead trim, I just resign myself to the fact that it’s going to be a long process, but the result will be well worth the extra time. 🙂
Totally agree. Those nailhead strips look cheap.
I love how you constructed the bench, I would have thought of the corner brace method. But doing the plywood top as you did makes more sense, and is sturdier as well! You are a wonder Kristi! 🙂
Awesome!!! Wow, it is going to be great!! I love your upholstery jobs. Can’t wait to see it finished!
I’m thinking a Kreg pocket hole tool may be handy. There are many versions do you have any input for someone using it for stuff like you do? Picture frames benches etc.?
I linked the one I have in the post, but if I were to get one now, I’d get the new model (M5). If I didn’t have a Kreg Jig or any clamps, I’d purchase this set (an affiliate link)–> http://amzn.to/2qOfqgO
Since I do already have the clamps, I plan to get this set in the very near future (also an affiliate link) –> http://amzn.to/2rcSZlj
Thank you!!
Your post was just in time!!! I want to make a bench for our lake house table. It needs to be about 9′ long. So you think I would need to do a center support, if I made mine just like yours? I would love to see you do the railheads, cause that’s what I would like to do on mine. Then I can follow your instructions!!! ha ha Would you mind posting the link for the legs. I looked on the Home Depot site and could not find them. thanks for sharing.
I want to make a bench for our lake house table. It needs to be about 9′ long. So you think I would need to do a center support, if I made mine just like yours? I would love to see you do the railheads, cause that’s what I would like to do on mine. Then I can follow your instructions!!! ha ha Would you mind posting the link for the legs. I looked on the Home Depot site and could not find them. thanks for sharing.
Those benches will be perfect on either side of the pantry AND provide some extra seating. Can’t wait to see them completed.
Oooh, me like! Are you going to do the diamond tufting on the top?