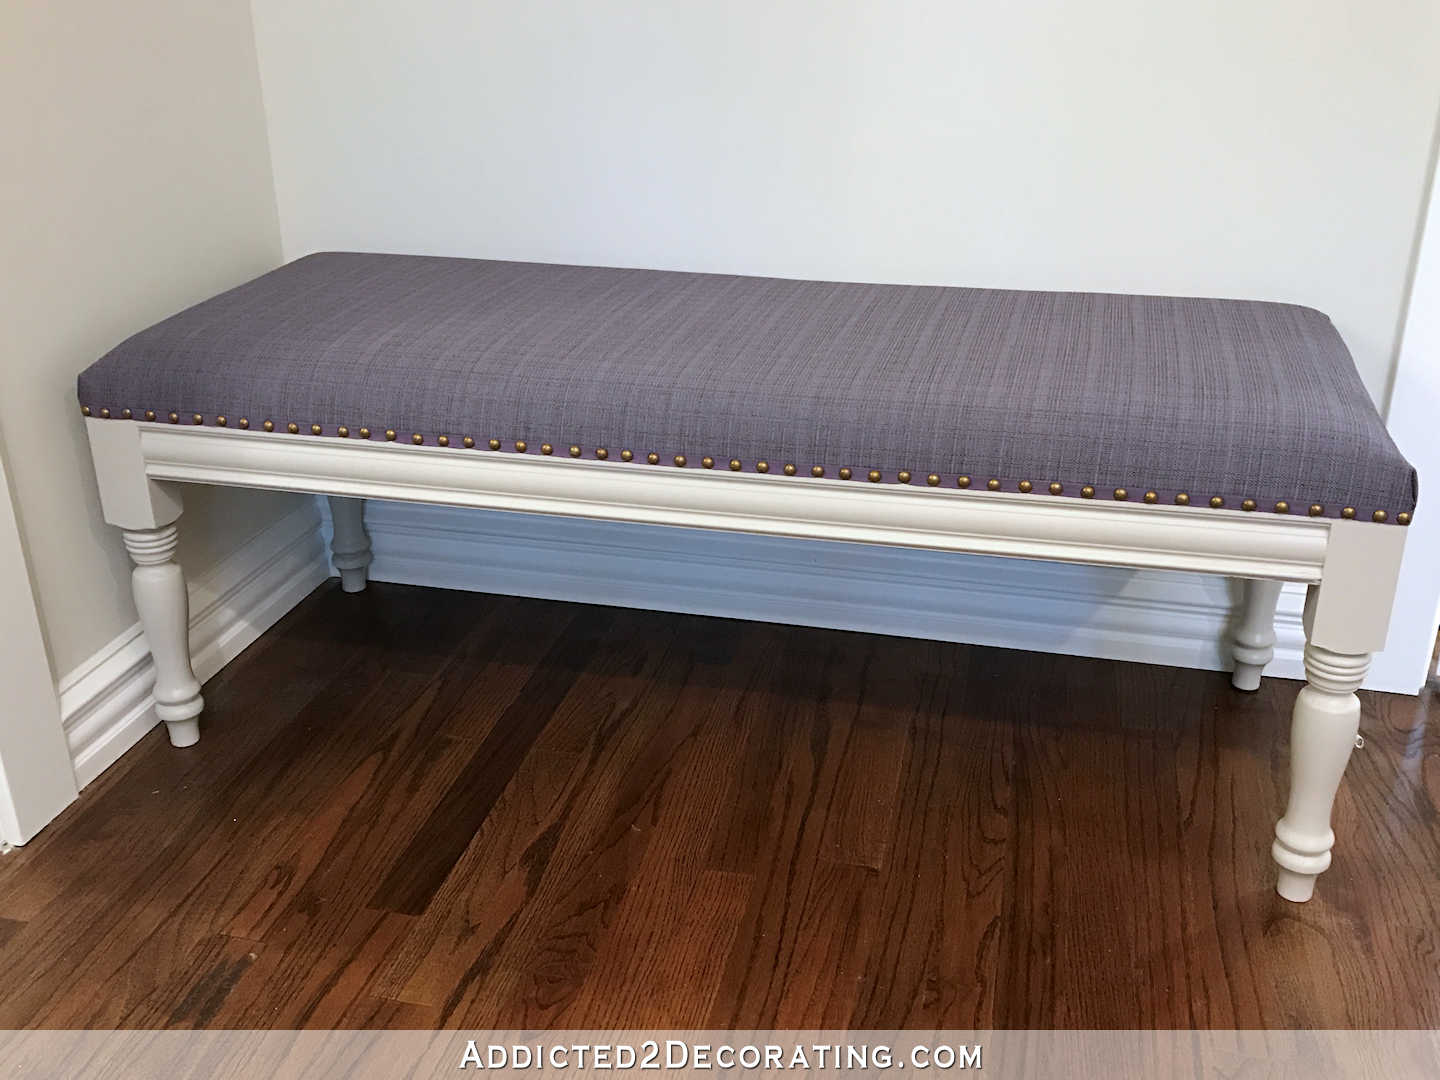
DIY Upholstered Dining Room Bench (Finished!) – How To Upholster The Seat
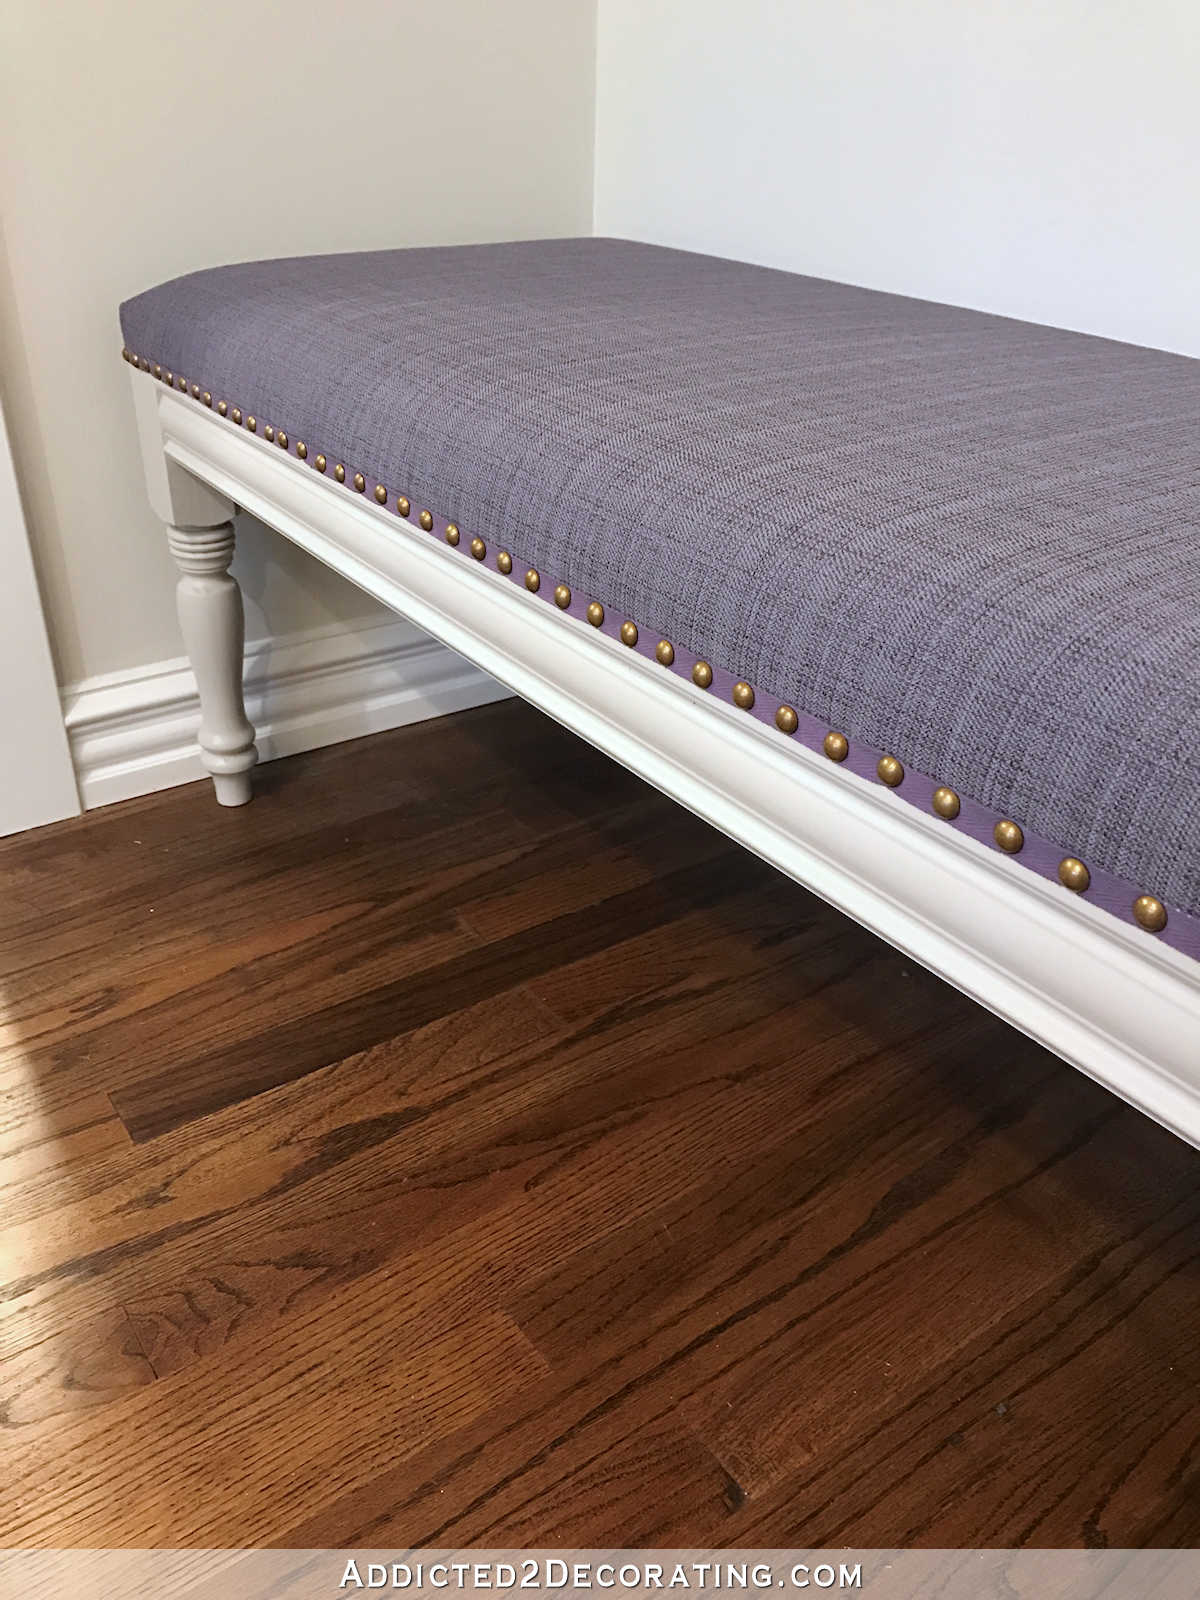
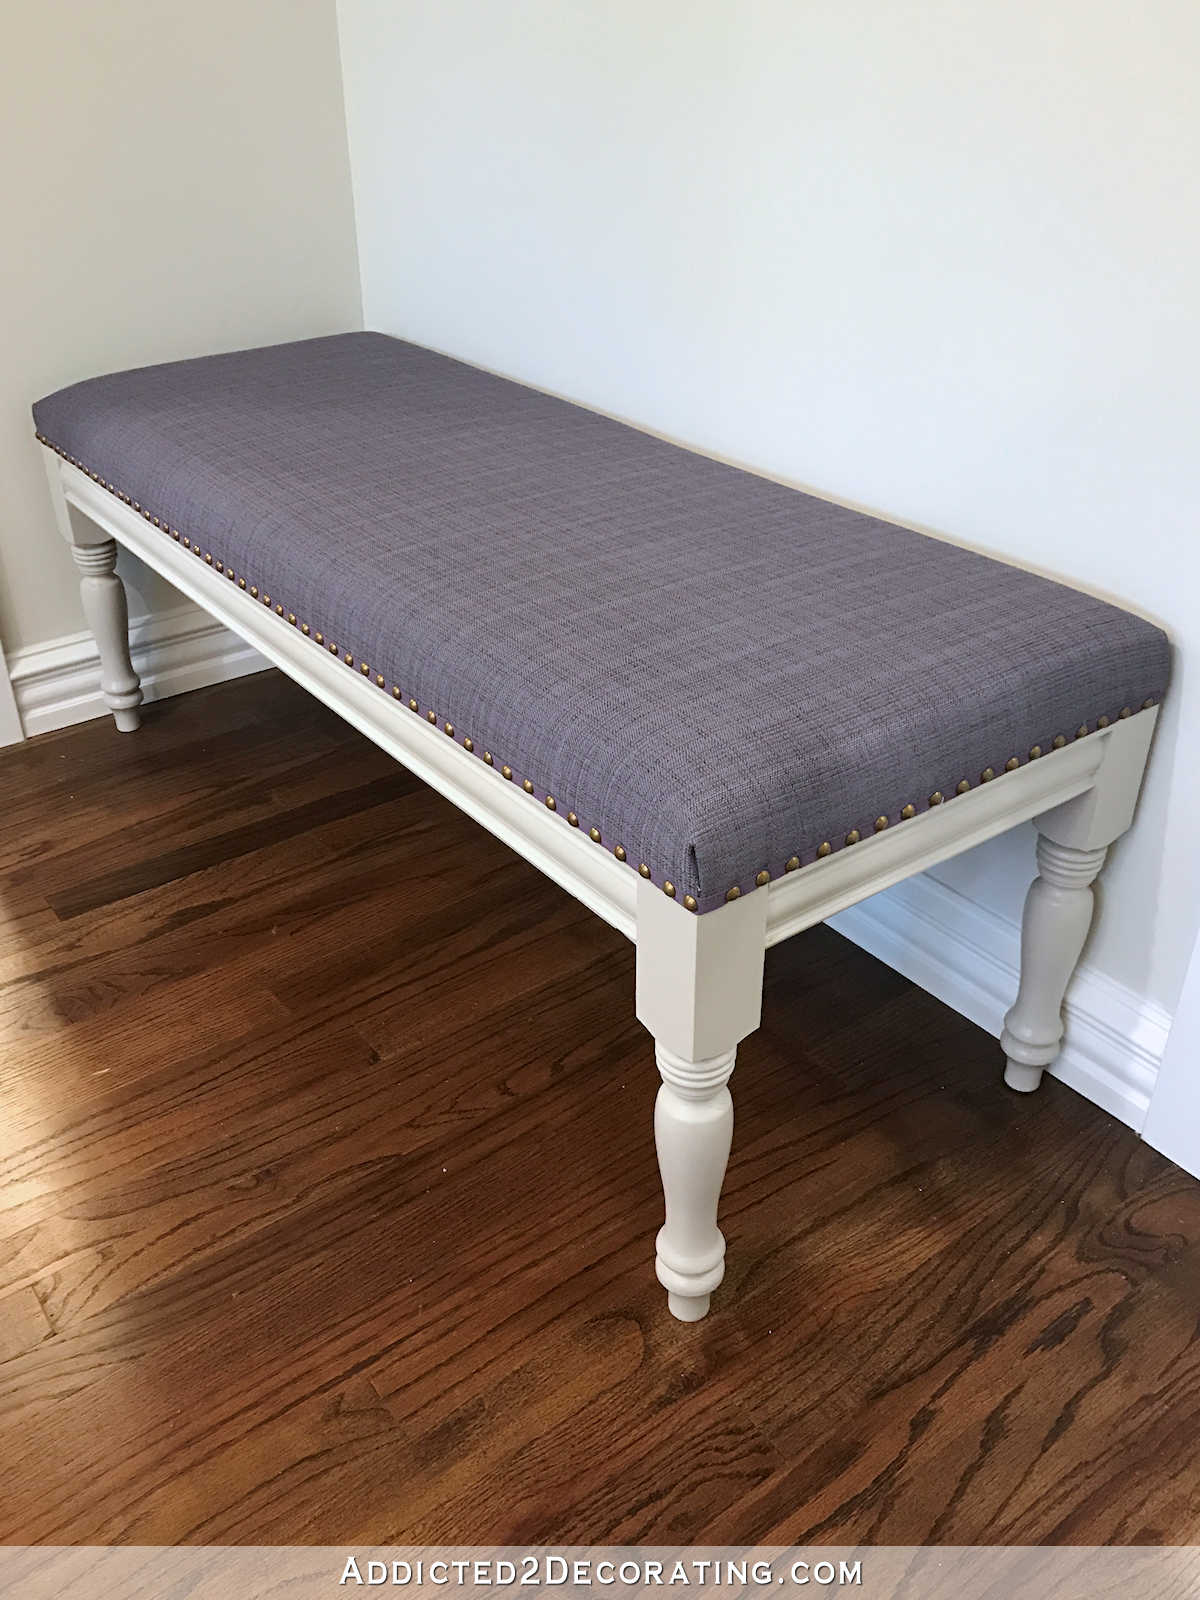
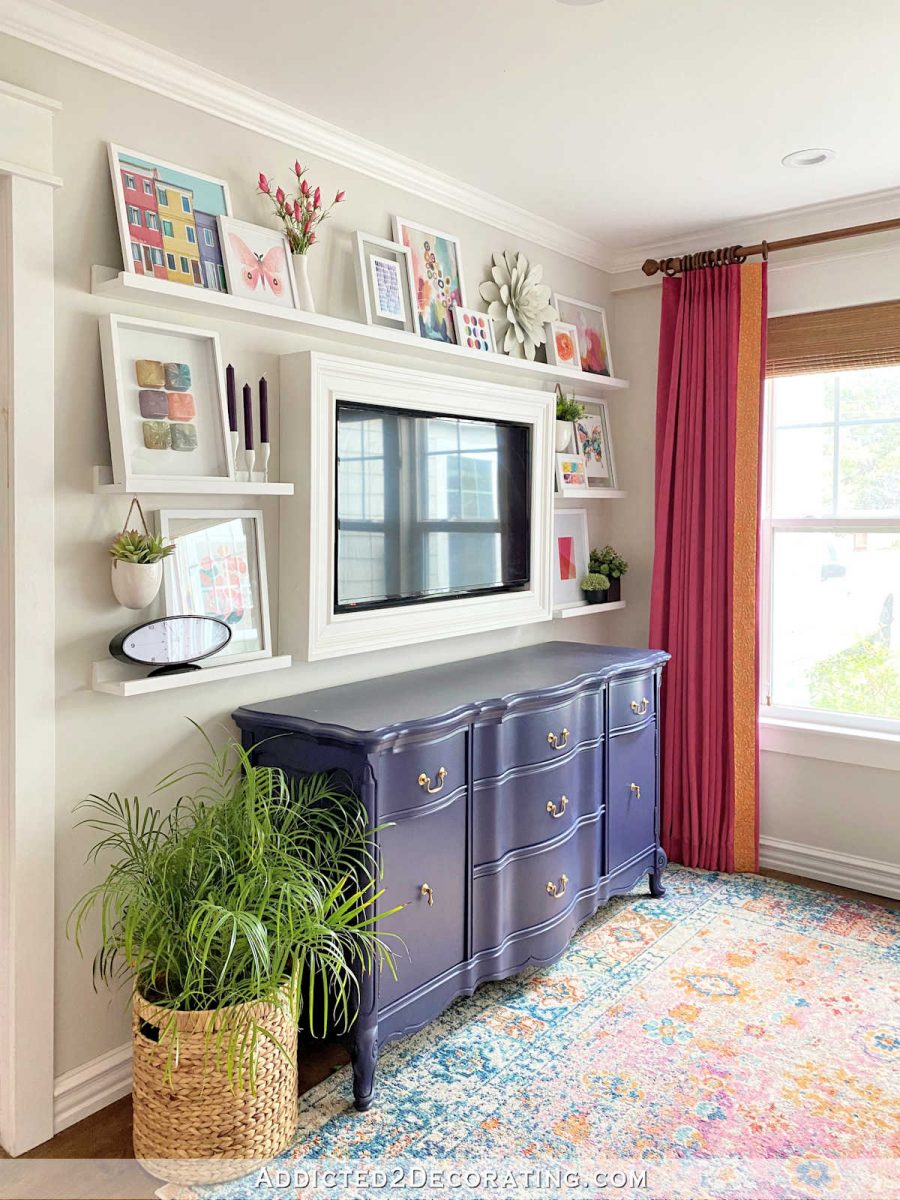
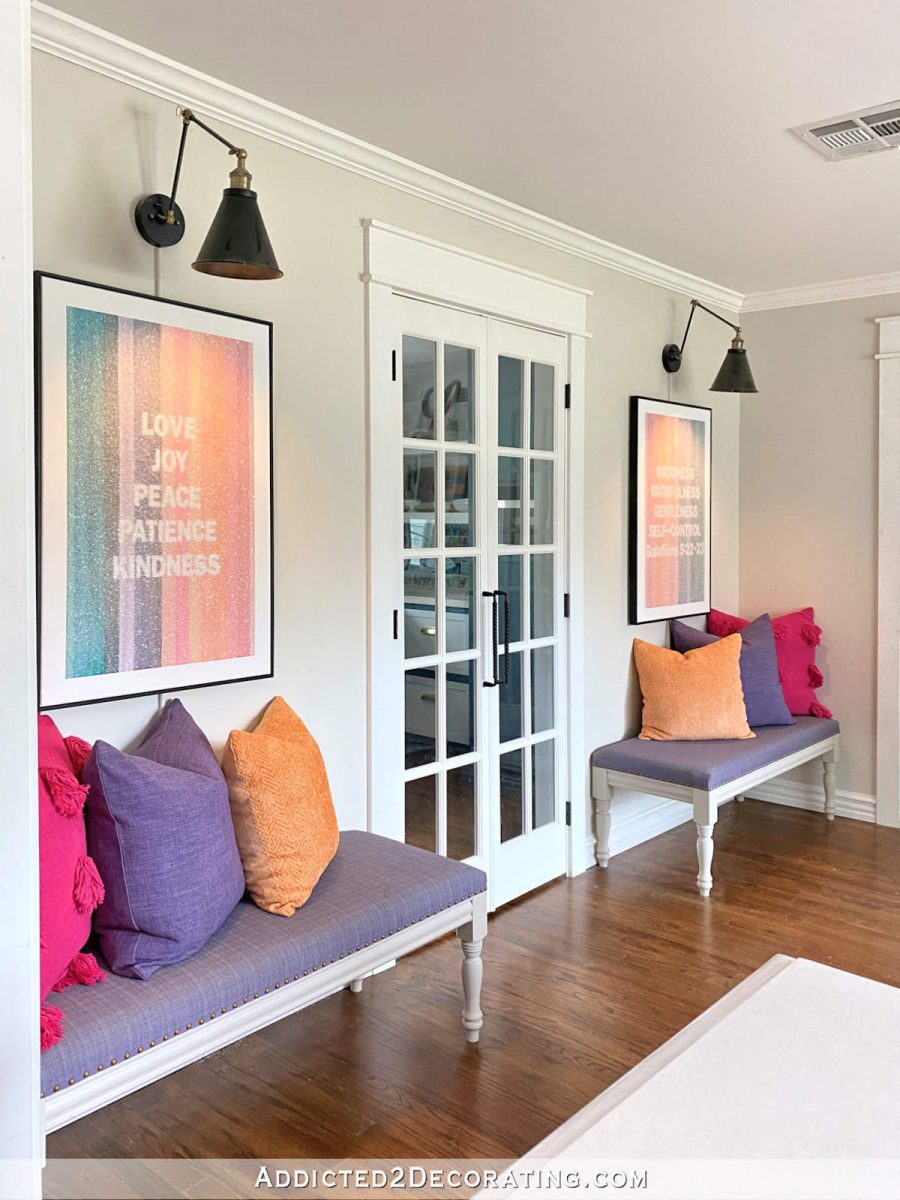
Yesterday I finished both of my DIY dining room benches! In a previous post, I shared how I built the bases for these benches. I painted the bases the same color that I used on the dining chairs — On The Rocks from Sherwin Williams. It’s a barely-there gray. The fabric that I used is a Crypton fabric called Savannah in the color Wisteria. I added some trim and nailheads around the edges, and here’s how they turned out!
Note: This post is Part 2 of this project. If you missed Part 1 of this project, the building of the bench bases, you can find that post here: DIY Upholstered Dining Room Bench – How To Build The Frame
After building the frame, I then primed it with oil-based primer (my favorite Zinsser Cover Stain), sanded it with 150-grit sandpaper, painted it with two coats of On The Rocks (I sprayed it with my Critter paint sprayer, which you can get here), and then sprayed it with my new favorite clear topcoat, General Finishes High Performance Top Coat in a satin finish, which I purchased here. I sprayed the top coat as well.
With the base completely finished, I was ready to start on the upholstered top.
How to upholster a dining room bench seat
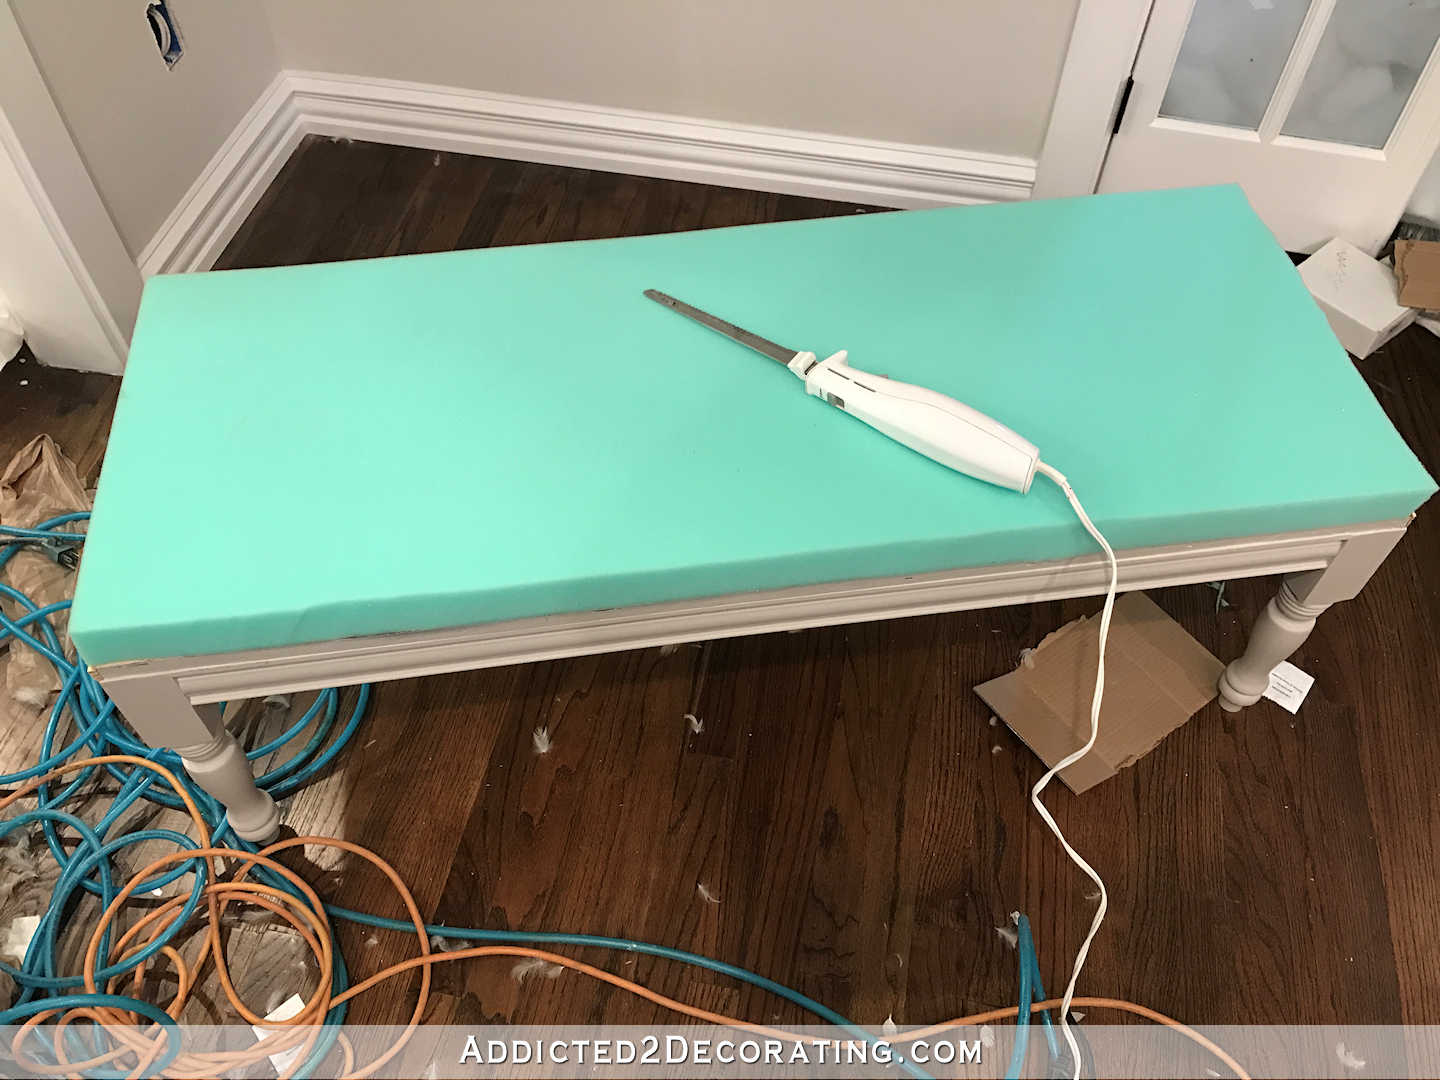
I began by adhering a piece of 2-inch foam to the 3/4-inch plywood using spray adhesive. The best and only spray adhesive I use is Loctite 300 (you can get it here, but I get mine at JoAnn Fabric). I prefer it because it’s a very strong hold, and it also sprays the adhesive as a web rather than a mist. The mist adhesive sprays are so messy and leave everything around it sticky. The web adhesive sprays are so controllable that I often spray them inside. Just be very sure the area you’re working in is well ventilated!! Open some windows for air flow because the stuff is stinky.
Once the foam was adhered to the top, I trimmed it to size using an electric knife (a.k.a., the fastest and easiest way to cut foam).
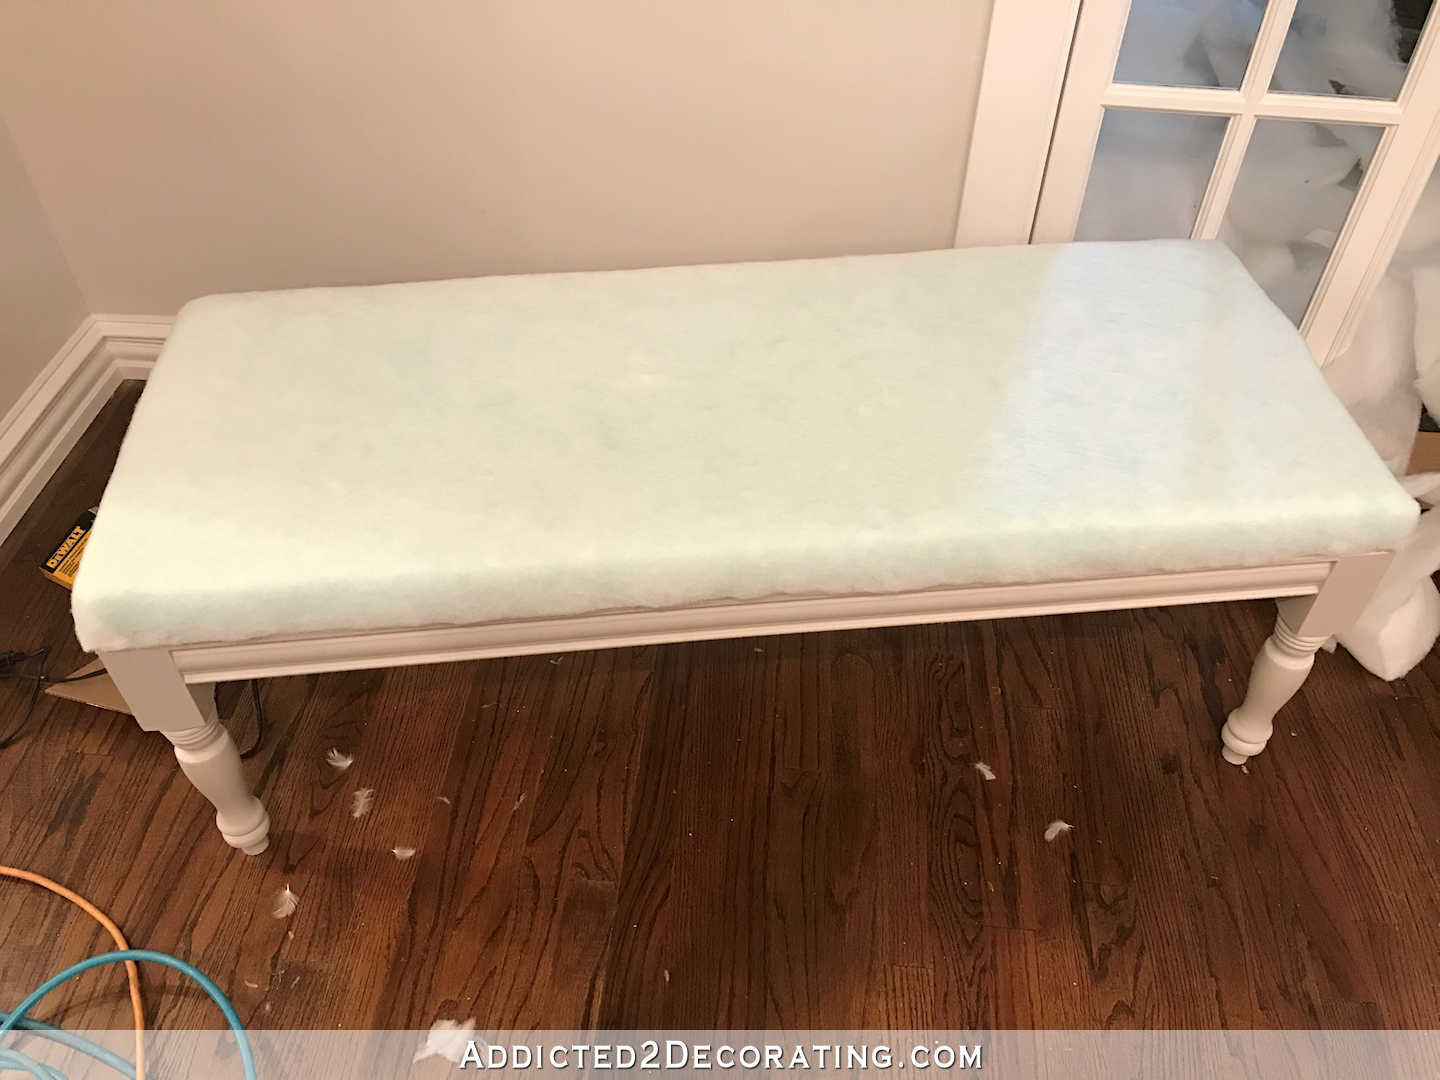
Next I wrapped the top in high loft polyester batting, using a hot glue gun to adhere it around the edges of the plywood and then trimming it just along the bottom of the edge of the plywood where the plywood meets the base frame of the bench.
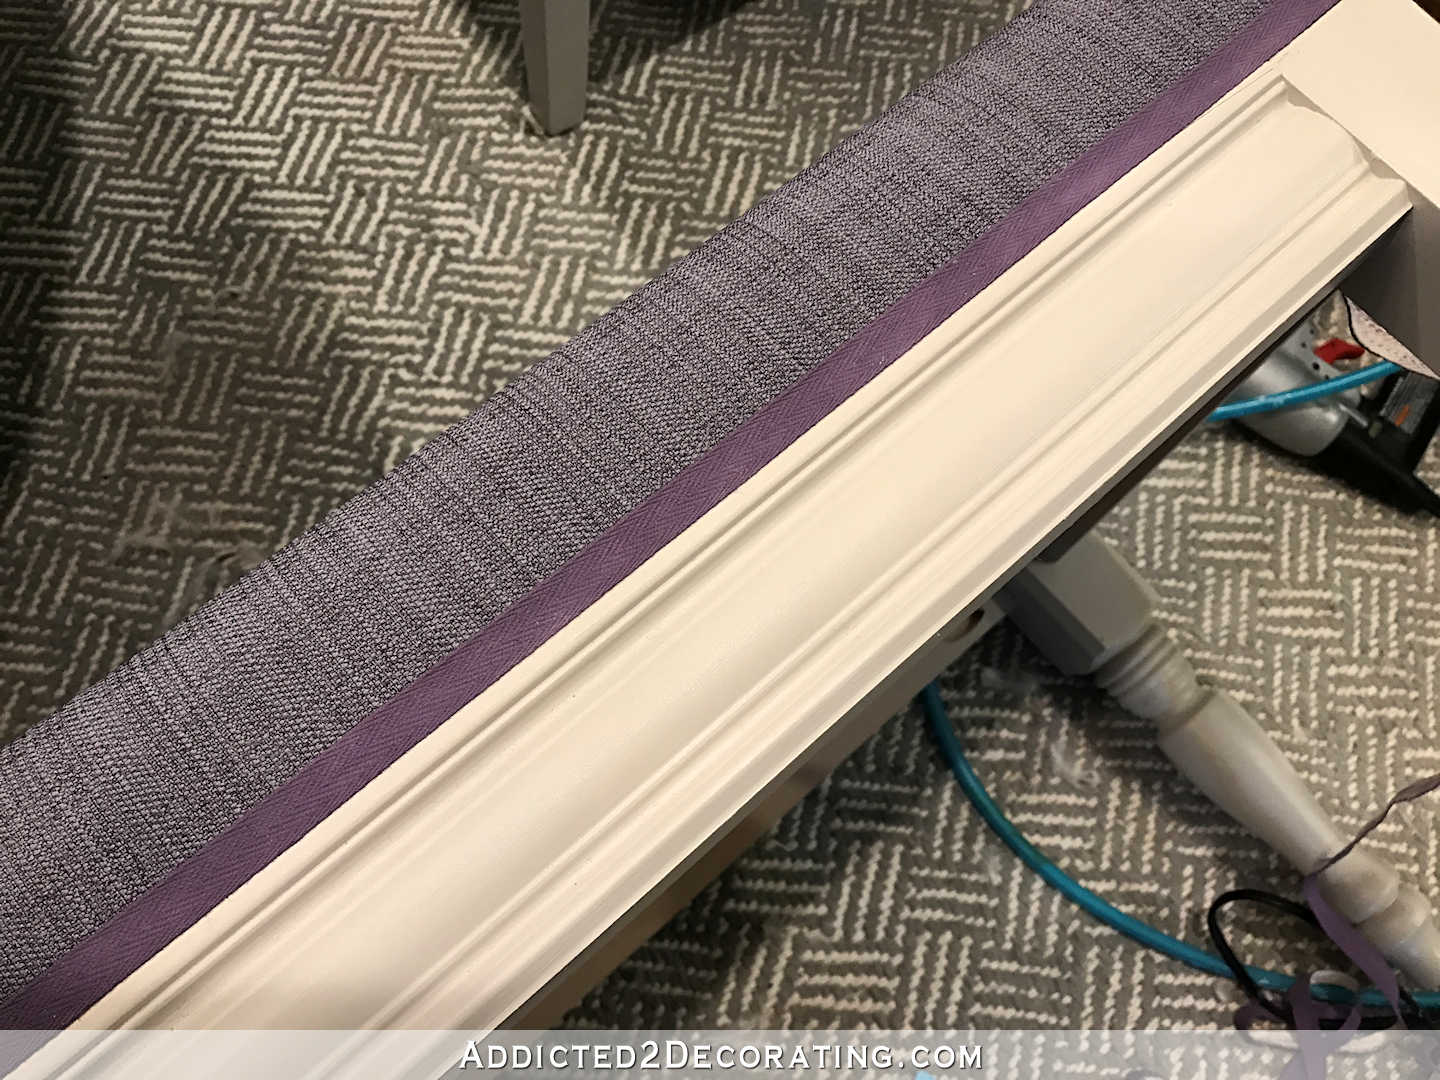
And then I covered the batting with the fabric, pulling it taut and stapling it about 1/8 inch from the bottom of the edge of the plywood. For projects like this, I use my narrow crown staple gun (you can find it here, but I purchased mine at Home Depot) with 1/2-inch staples.
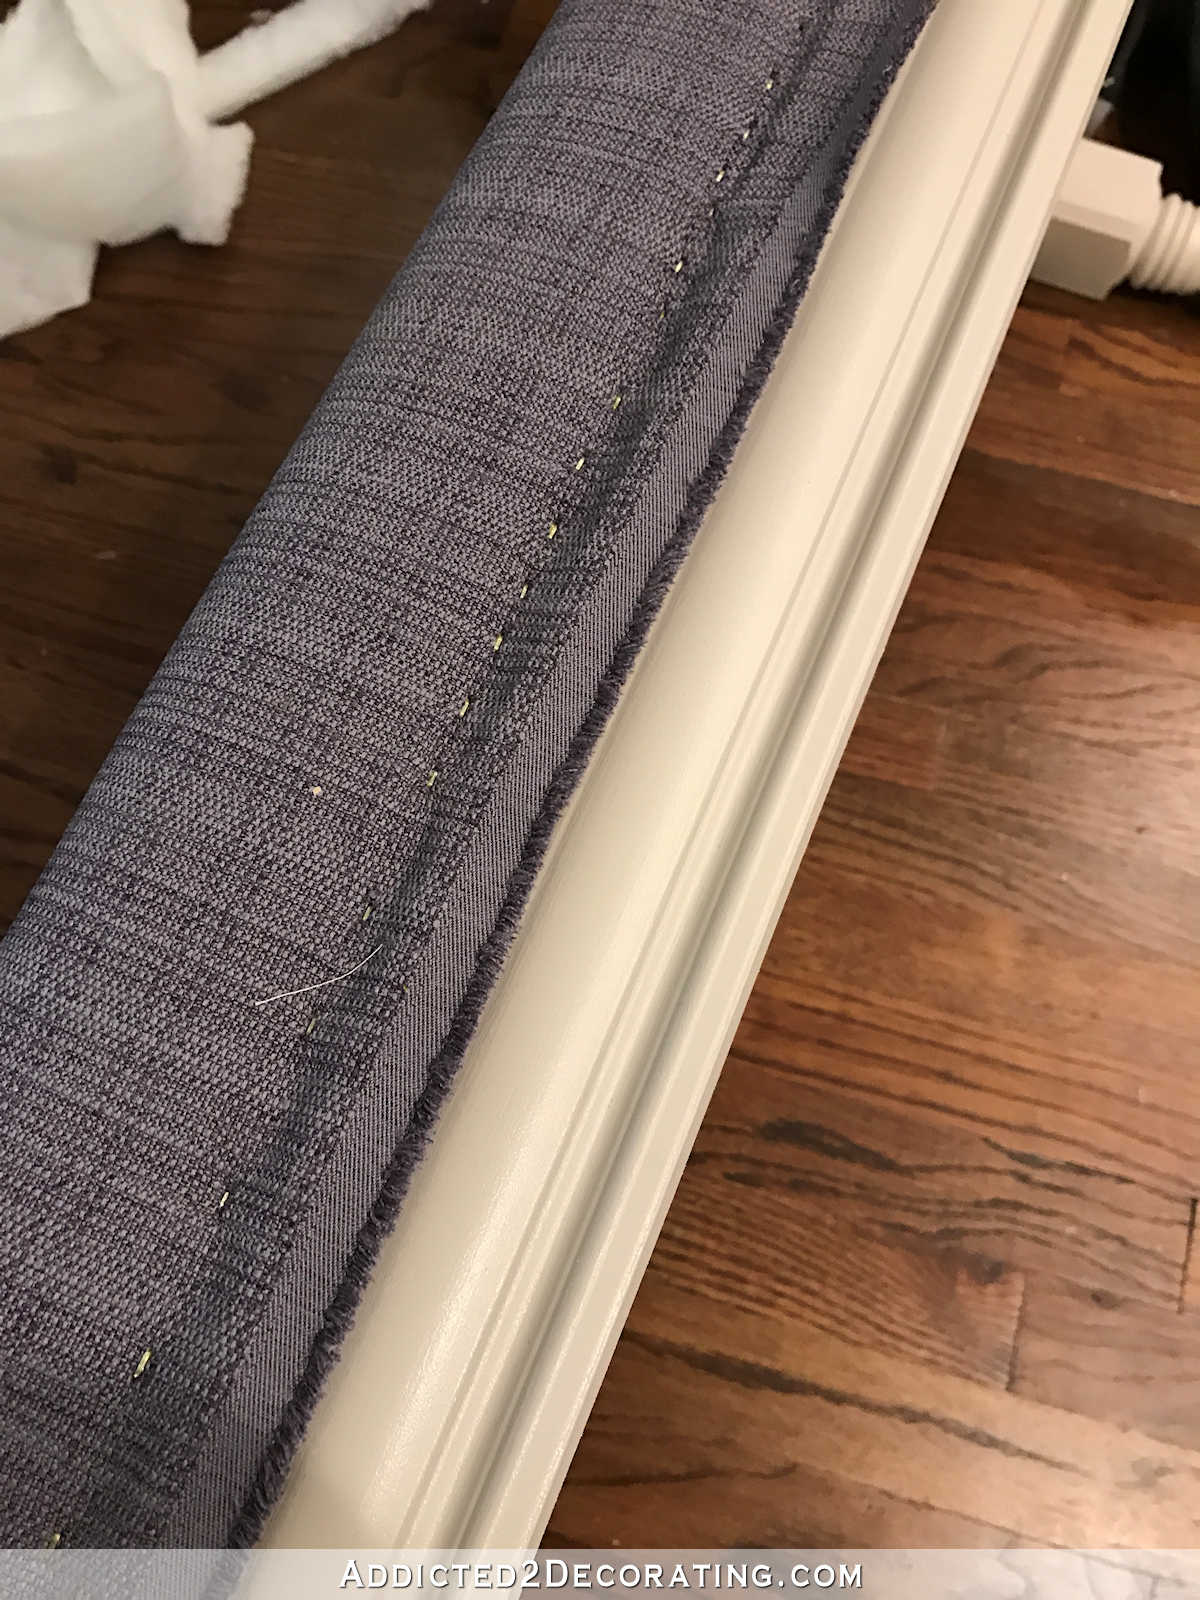
And then using a new and very sharp razor blade in my utility knife, I trimmed the fabric right at the bottom of the edge of the plywood. Fabric dulls blades very quickly, so I went through about three brand new blades (using both sides on each) on my two benches.

Next I used my hot glue gun to adhere trim to cover the staples and the raw edge of the fabric. This trim also covered the very top edge of the wood frame about 1/8 inch. I used twill tape, but any comparably sized trim will work for this.
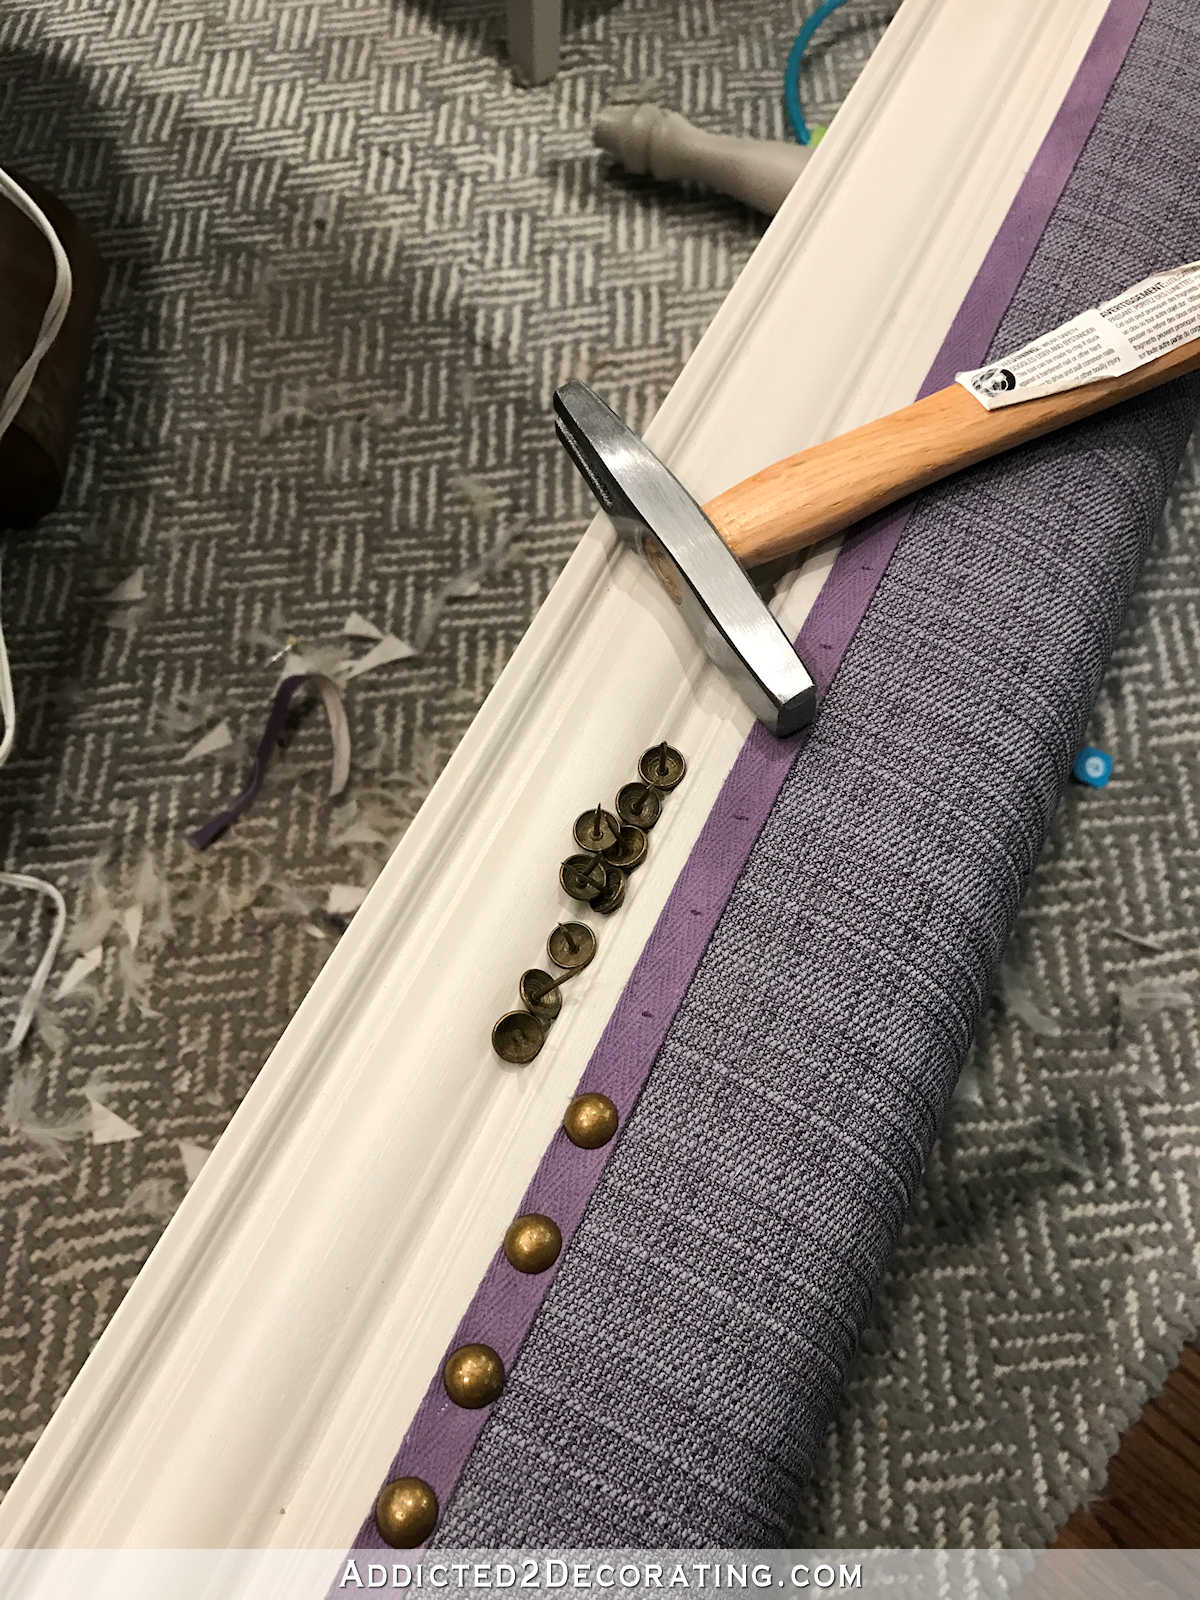
And finally, I added some naiheads. I don’t ever use the nailhead trim strips. I much prefer the individual nailheads, and I like to place them about one inch apart. So I used a pen and tape measure to mark the placement for the nailheads, and then tapped them in one by one. I know this step sounds incredibly time consuming, but I promise that it’s not. I timed myself (because I knew people would be curious, and heck, I was too! 😀 ), and the entire nailhead process on one bench, including the measuring and marking, took 32 minutes from start to finish.
And that’s it! That’s an entire DIY upholstered dining room bench from start to finish.

Of course, there are other ways you can customize a bench like this. You can certainly leave the nailhead trim off and use a more decorative trim (e.g., something with an embroidered design) in place of twill tape. You can also do some diamond tufting on the top (following my instructions here, or an alternate and easier version of tufting which you can find here).
But as much as I love tufting, I wanted to keep my benches simple. A simple, smooth top just seemed more dining room friendly to me.

There are also many different legs available online. Since I failed to plan ahead and then didn’t want to wait for an online order to arrive, my leg selection was very narrow. I basically had two different styles to choose from locally.
Had I planned ahead better, I probably would have chosen something a little different (less country and more classic). But these are fine. I did try to dress them up a bit by using decorative trim for the rails rather than using plain 1 x 3 lumber.
But overall, I’m very happy with how my benches turned out. And I’m even happier that this finished project means that my breakfast room is that much closer to being finished! I just have an art project to do, a few finishing touches to attend to, some throw pillows to purchase for the new benches, and this room will be completely done.
More About Our Breakfast Room
see all breakfast
room diy projects
read all breakfast
room blog posts

Addicted 2 Decorating is where I share my DIY and decorating journey as I remodel and decorate the 1948 fixer upper that my husband, Matt, and I bought in 2013. Matt has M.S. and is unable to do physical work, so I do the majority of the work on the house by myself. You can learn more about me here.

I don’t know if you have art in mind yet, but I’m wondering could you actually paint the mural that you loved that was in your living room on canvas for both sides of the pantry? That way if you didn’t like them you could remove them without losing the art. the birds and colors could be the paint colors of the room. Well, I know you could, but would that be something that you would like there?
I absolutely love your new plan and decorating!
I’ve considered that, but I just can’t seem to get myself on board with that idea. That pattern/design seems way more “wallpaper” than “artwork” to me. Once it goes from an allover pattern on the walls to a smaller pattern on canvas, it just seems to lose its charm for me.
They’re lovely. Great tutorial!
Beautiful, Kristi. You know I’m loving the touches of purple. 😊
You do wonderful work on whatever project you do. I have a custom drapery business and your work is as nice as any workroom I’ve seen! Would you please share the link for the legs you purchased for your bench. I could not find them at home depot. Making a bench for my farmable is on my to do list!!!! Yours would be PERFECT!
These are the legs I used, except mine didn’t have the screws on top. Lowe’s has the exact same style at the same price. In fact, I may have purchased mine at Lowe’s. http://www.homedepot.com/p/Waddell-2912-15-1-4-in-Solid-Pine-Furniture-Leg-10001533/205977484
And stop doing projects without a drop cloth on those beautiful floors! ;D (Just kidding…sort of…)
Very nice. Can’t wait to see the artwork you have planned too.
These are just right! I know some people don’t like benches for dining but I think they’re just so useful and versatile.
I agree with you on the tack strips; I’ve never seen them used where it’s not obvious they’re not individual tacks. When driving the tacks into harder wood, I find it easier to use a nail set to start the hole where I want the tack to go. This avoids bending the tacks.
I built a bench similar to yours years ago, but I didn’t know anything about that magic Kreg thing you used. I used some metal angle irons which don’t really show because they are underneath, but the piece is not as professional looking as yours. You are right about no tufting where there is food! Or cats, for that matter. You would be picking out cat hair and crumbs all the time! You always inspire me with your incredible work, and I love the trim style you chose. I have to pin this!
They look great!
So totally awesome!!!!! You’ve done yet again another amazing job Kristi. Well done!! Absolutely love the fabric and nail head trim.
Beautiful!!! I Love it! Have you ever tried using cuticle scissors to trim fabric up close – I always us them! May have worked better for you than the razor blades? Just a thought. I’ll be making a few new benches for our new Arizona home soon! Thanks for all of your tips!
I haven’t used cuticle scissors, but I do have a pair of very sharp thread scissors that I used to cut off the stray threads after cutting the fabric off.
I love the benches – clean, simple and a great addition to making the room more homey. Excellent job!
Love these benches, they look better than most you find in the stores.
I have a request. Would you consider a blog post on CLEANING your sprayer after you’re done with your paint jobs? I really want to use a sprayer but it’s the clean up afterwards that I just am afraid of. There are all the little bits and parts each probably needing to be treated in a certain way. For some reason, it’s just intimidating to me and so I just won’t buy a sprayer, though I really would like to use one.
I’ll see what I can do. It takes me about five minutes to clean the Critter.
Julie S. – Another Julie here! I bought the Critter this winter based on Kristi’s recommendation. Cleaning was my big worry as well and that’s why I put off the purchase for at least a year after reading about it here. Cleaning (for latex and chalk paint at least) is so quick and easy that I actually made a little video to show the process and posted it with my Amazon review. Two minute clean up. I suggest using pipe cleaners which I already had from the Dollar Tree having purchased them for some craft years ago when the kids (now grown and flown) were small.
If you go to Amazon and look at the Critter reviews I believe it’s the only video review because Amazon has a link to it right under the product details called “Related Video Shorts.”
If you don’t see that link it’s also under recent reviews because I just submitted it ten days ago – a timely coincidence that today I see people (you and another commenter here) asking about the cleaning process!
Julie’s video is great! I found it here: https://www.amazon.com/gp/customer-reviews/R1Q9O7U71SE6AN/ref=cm_cr_arp_d_rvw_ttl?ie=UTF8&ASIN=B00006FRPJ
Beautiful! We have a table in our kitchen with two chairs. I’ve wanted a bench to slide under it for when we have guests instead of grabbing a chair from the dining room. I’m going to make one with your great tutorial. I too would like any tips you may have on cleaning your sprayer. I bought the critter and have never used it because I’m thinking clean up and changing colors would be messy. I can’t wait for the pictures of the completed room from every angle 🙂
Simply stunning! Love the fabric on those, and they’re so understated they won’t take over the look of your breakfast room. Fabulous!
Absolutely beautiful. You are so talented at it all!!
As they say “Brava”! Very good work, the bench itself and the fabric, good choice. Thanks.
You always do wonderful work, but I have a little tip I learned in an upholstery class. At the staple line, instead of trimming oh so close, leave yourself about 1/4 ” of fabric. Fold the fabric back on itself and staple again. This small amount of fabric will be covered by the double welt cord or in your case, grosgrain ribbon. Additionally, this extra piece of fabric removes some of the stress on the original staple. I hope this is clear, explaining things is hard without a picture.
Your bench turned out fantastic! I am just curious tho’ as to why you prefer using the narrow staples for the batting as opposed to regular sized staples – I would think that the wider staple would give a bigger/better ‘bite’ to the batting and hold it better… ?
I love them! So pretty.
Great tutorial! I like to use a rotary cutter to trim fabric although the blades get dull as well.
Love the wisteria fabric, lovely color and texture. And usually I am totally team teal.
Not sure if you are aware of this company: https://www.spoonflower.com/welcome
which has a huge range of imaginative print on demand fabric (cotton, satin, jersey, linen etc), wrapping paper and wallpaper (think shelf paper, drawer lining, decoupage, covering boxes….) A yard of cotton is generally $17.50 and fat quarter $11 and wrapping paper roll $15. A splash of a few of these on cushions could complement your fabulous dining chairs. But only a suggestion.
I particularly like the designer Edsel 2084 who has a huge range of art nouveau/deco patterns which may appeal to quilters looking for new repeat patterns to play with.
Full disclosure – I own no shares, just happened on their site recently.
Kristi, thanks for all your inspiration, which has energised me to get on with stalled decorating schemes!
Kristi, do you know how much each bench cost you all together? They look awesome!