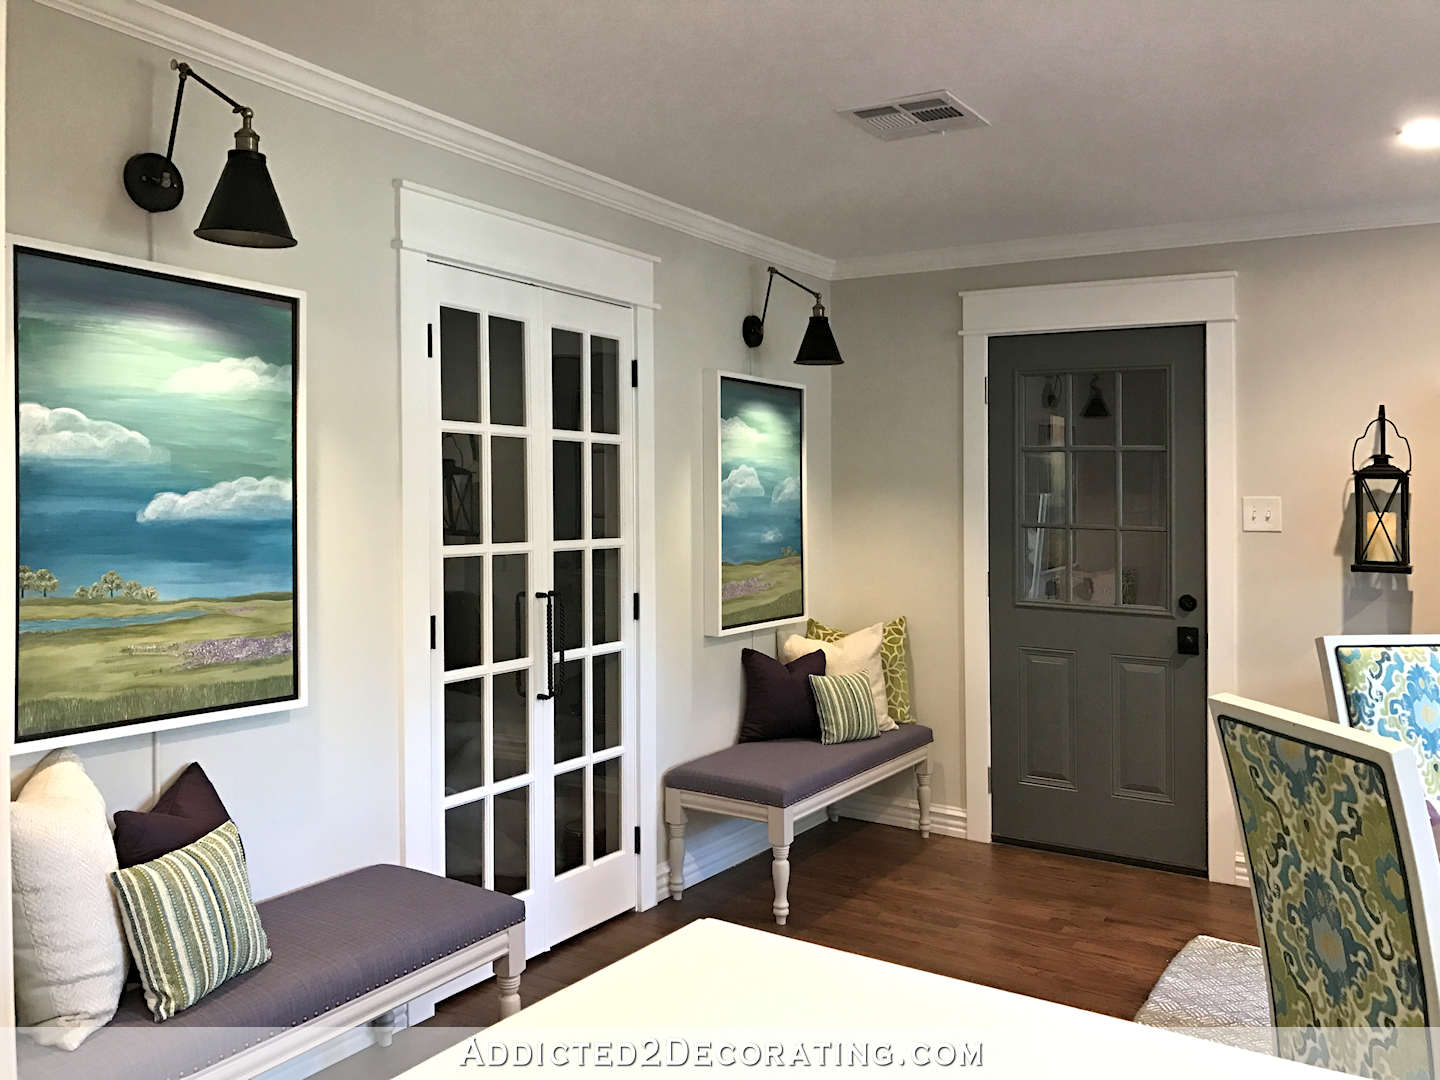
New Breakfast Room Pocket Door – Painted, Trimmed & Finished
My breakfast room is finished…once again. Last year, I only got to enjoy the completed breakfast room remodel for a couple of months before the garage-to-studio conversion started and the guys took out my new door, along with the pretty trim around it, and replaced it with a temporary unfinished hollow core door.
Now that temporary door has been replaced with a beautiful 15-lite pocket door.

Of course, right now the door opens to reveal a completely unfinished room that’s being used as part storage and part workshop, where I’ve been using my saws.

So I’m anxious for the day that my beautiful studio with custom cabinets will be visible through that door.
The door is this 15-lite unfinished pine door from Home Depot. And since the door is considerably heavier than a regular door without glass, I decided that I would use this heavy duty Johnson Hardware pocket door frame (which can hold doors up to 200 pounds) instead of one of the all wood pre-built pocket door frames that you find in stock at the big box home improvement stores. I’ve framed plenty of doors, so this is very doable as a DIY project, but I decided to hire out the actual door installation.
So when they were finished with the installation, it looked like this…
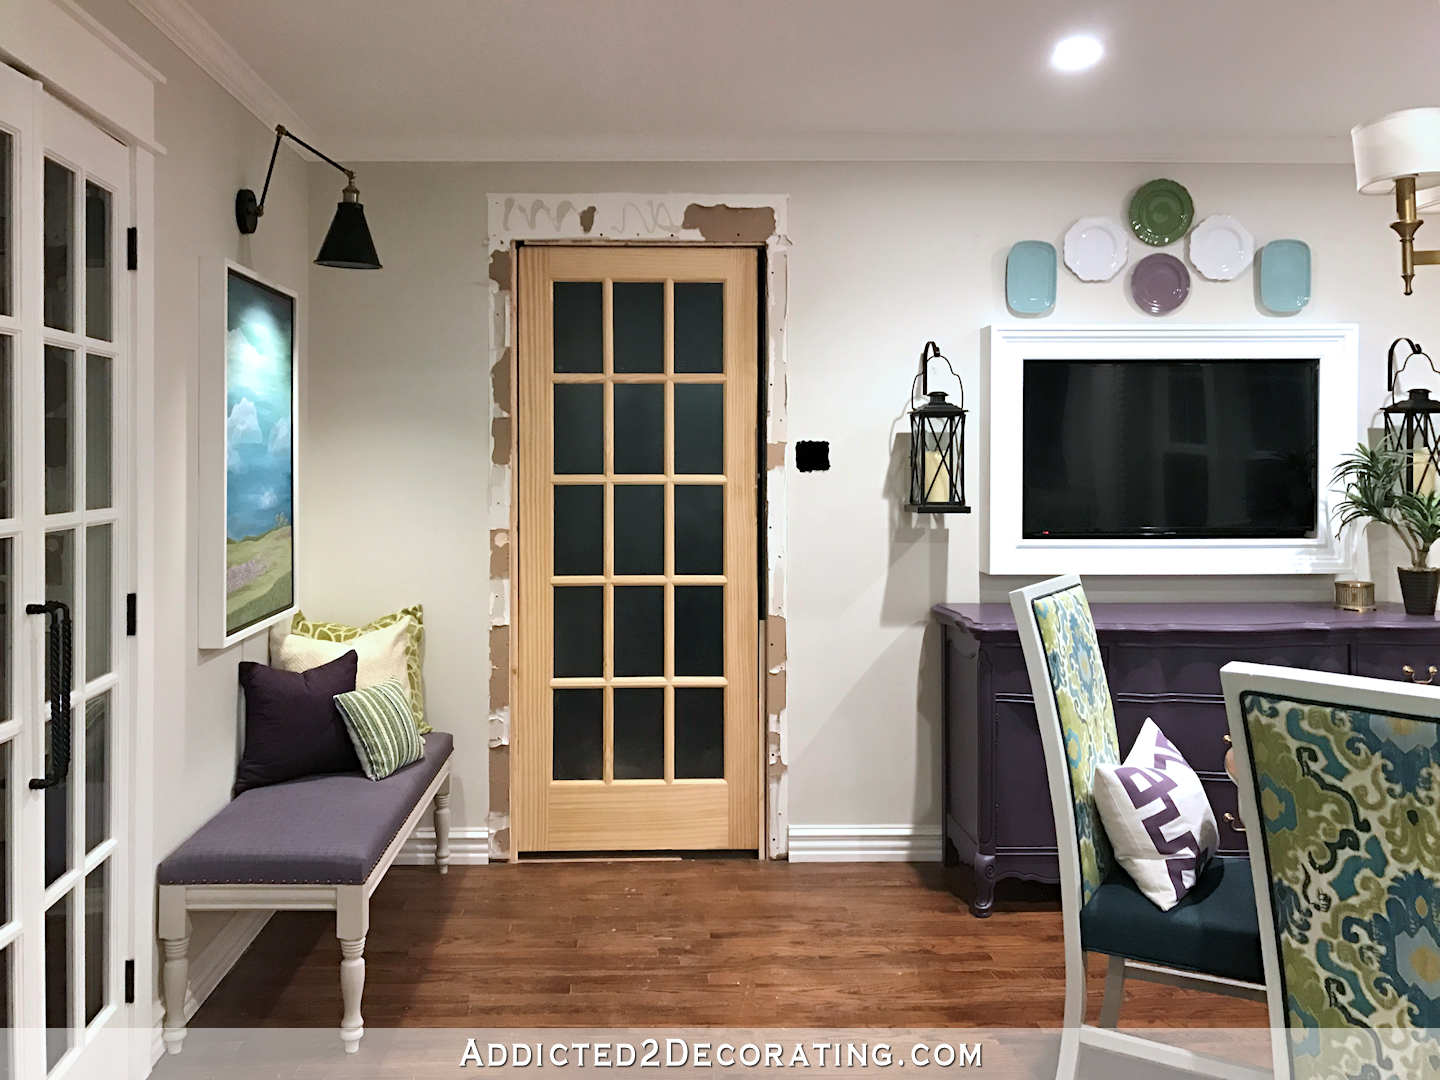
…and it was up to me to finish it.
The door required one coat of primer and three coats of paint (Behr Polar Bear in a satin finish). I sanded with 220-grit sandpaper between all coats to ensure the best possible finish. The great thing about these doors is that the glass comes with plastic covering them, so there’s no time wasted with the tedious task of taping off the panes of glass with painters tape. You just paint and then score and peel off the plastic.
I also had to repair the hole in the drywall that was left when they removed the light switch box to the right of the door. For that, I used one of these metal drywall patches.

These things are awesome and make drywall repair so easy. They’re sticky on the back, so you just peel off the paper and stick the patch right over the hole. Then cover with drywall mud, wait for it to dry, sand smooth, and you’re ready to prime and paint.
Framing a pocket door is just like framing any other door, except that the top jamb and one side jamb are basically half the width of a normal jamb since they can’t cover the slot where the door fits into the pocket door frame at the top and on one side. I was expecting to have to rip a piece of lumber down to the exact width to fit those areas, but as it turns out, a 1″ x 2″ piece of lumber fit the needed width perfectly.
I’m going to go ahead and call this project done, even though I still need to find and install hardware for the door. Unlike my music room doors, where the edges of the doors stick out from the “pockets” even when the doors are completely open, leaving enough room for actual handles, this door recesses completely into the pocket when it’s open, so I can’t have a pretty handle on the door. Any pulls I use will have to be the kind that recess into the actual door.
This doorway has been through quite the journey to get to this point. Remember what it looked like when we bought the house?
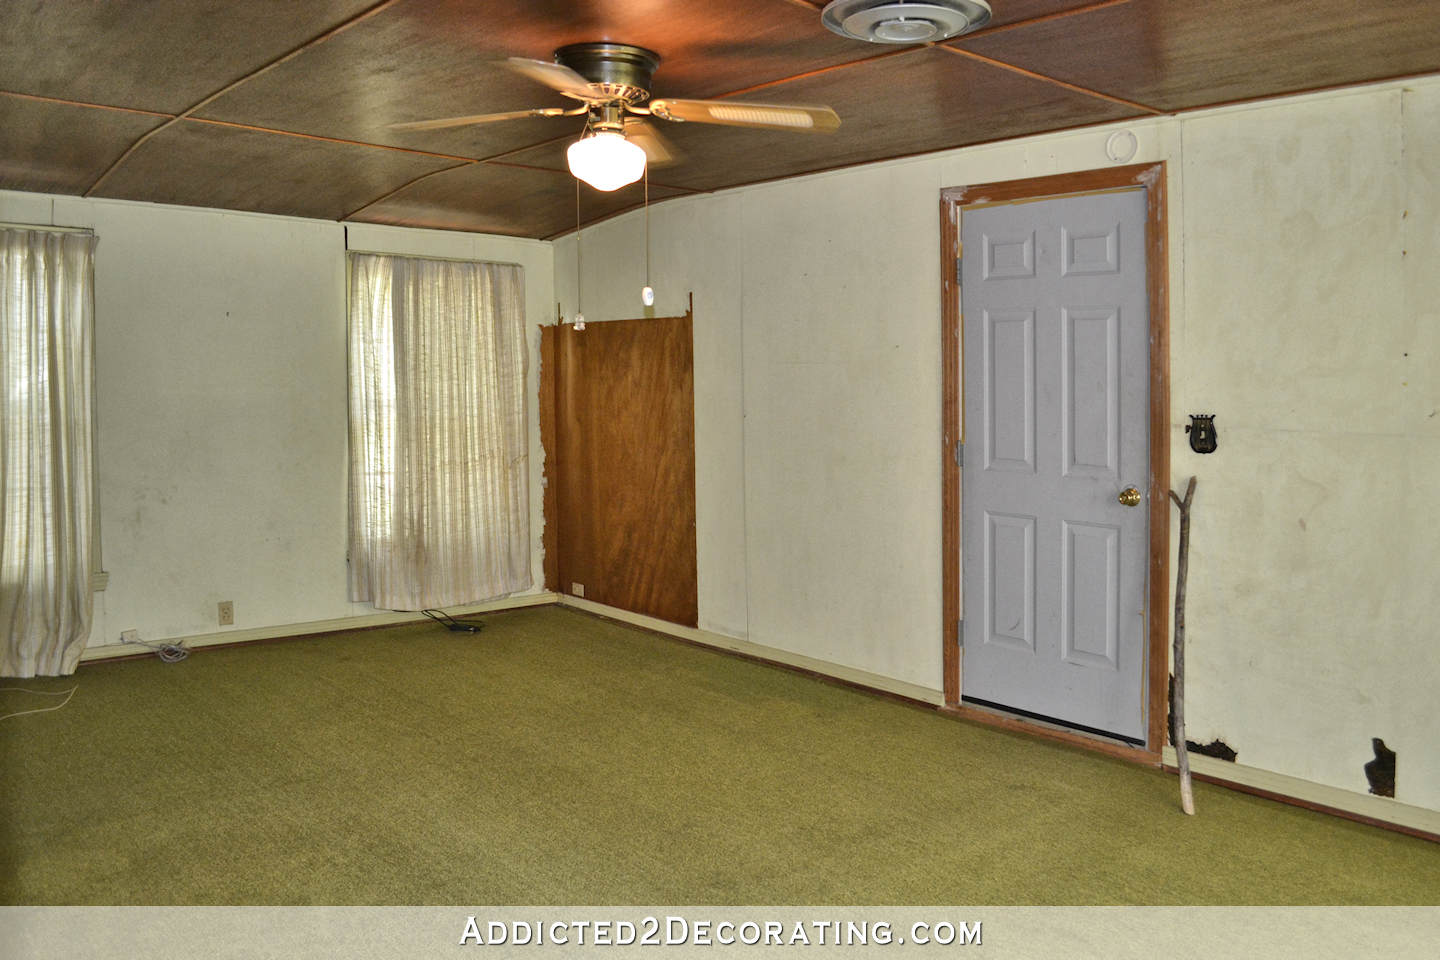
It was a garage door then, and it was metal and light blue.
Then during the breakfast room remodel, I replaced that door with this one, which still led out to the garage.
Then the guys working on my studio removed that door and replaced it with this one…

So now I’m on door #4 for this doorway. 😀

But this one is here to stay.

Addicted 2 Decorating is where I share my DIY and decorating journey as I remodel and decorate the 1948 fixer upper that my husband, Matt, and I bought in 2013. Matt has M.S. and is unable to do physical work, so I do the majority of the work on the house by myself. You can learn more about me here.

![Breakfast Room & Pantry Progress [Video]](https://www.addicted2decorating.com/wp-content/uploads/2016/08/breakfast-room-progress-August-2016.png)

Looks lovely! I do have some questions, but was the reason for changing this door to white? And also, you mentioned that they removed the outlets, I assume to accommodate the the pocket for the door? Or was there another reason? And did you opt to not have a second set of switches or were they moved to somewhere else? Either way, it looks like this is how you always had it 😊
I painted the door white because my pantry doors are the same style and they’re painted white. I thought they should match. And yes, the switches had to be removed because they got in the way of the pocket frame for the door. There were two switches there – one for the chandelier in the breakfast room, and one for the garage lights. The switch for the breakfast room chandelier was a three-way switch, and I found that I never, ever use the switch on that wall. When I want to turn on the chandelier, I always use the switch by the kitchen, so I probably won’t replace the switch that was removed. The switch for the garage lights will now be the switch for the studio lights, and it makes more sense for it to be placed just inside the studio rather than on the breakfast room wall. That’ll be done when all of the other electrical is done for the studio (hopefully soon!).
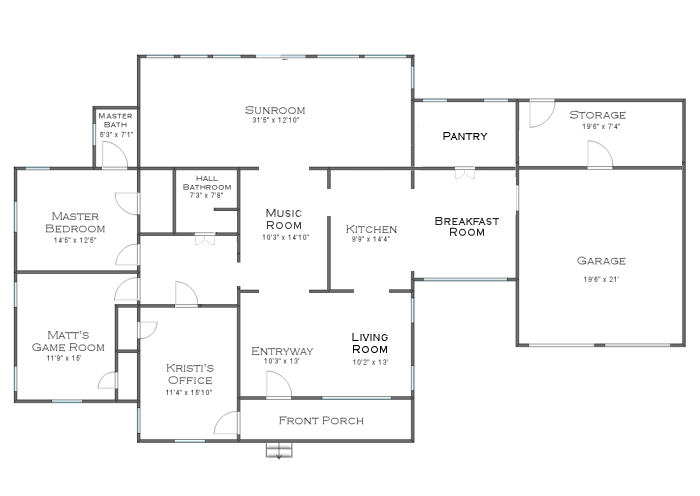
I love the door! I’m totally clueless, though. If that wasn’t a pocket in the first place, wouldn’t there be studs in the way? Isn’t a door wider that 16″? Like I said. I’m completely clueless on this. Help a sister out and explain! LOL!
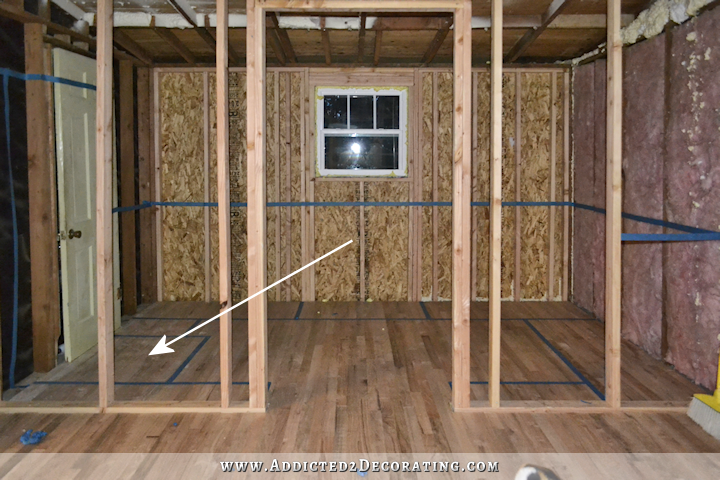
Yes, they had to remove one stud in order to make room. (My house is old, so the studs are further apart than 16″.) The very beginning of this video shows how the opening has to be reframed to make room for the door inside the walls. https://youtu.be/iy1vuz1_hgo?t=29s
When your walls are completely finished, this project is much more complicated and requires a lot more work to replace/repair drywall, etc. But since my studio is still at the open studs stage, there was no demolition needed in order to get inside the wall and redo the framing.
I get it. Thanks for explaining. I had forgotten that the studio was unfinished/had easy access. I was so confused as to why there wasn’t a giant hole in your wall! We have a pocket door that is off track. I’m trying to decide how much to spend on fixing it, since ultimately we want to redo the entire room anyway (it’s between the master and the master bath).
Making good progress on your list! Yay!
I’m with Teresa. I forget that the inside of the garage is down to the studs and i was wondering how you put a pocket door in an already finished wall. Kristi can you post some pictures of how it looks from the other side? I would be interested in seeing how its done.
The door and trim looks awesome…….and now you have yet another item checked off your list. Kristi, you’re on a roll finishing all these projects and getting rooms finished, and styled. It must feel so good and such a sense of accomplishment. Well done!!!
I love the new door, I’ve used pocket doors in my home and this one suits the location perfectly. I like that now, your studio door matches your pantry door, it has a cohesive look. You do amazing work and you have inspired many projects in my home!
Perfectly,perfect! You did a really great job.
I love this door! Just beautiful! I’m guessing you have a plan for the 3rd door in an upcoming project or down the road. Great work, Kristi, and another project checked off to boot!
I actually gave it to one of the guys who installed the pocket door. He needed a prehung hollow core door for something, and I had no use for it and didn’t want to store it. 🙂
Exceptional! Way to go Kristi!
Perfection! I really enjoy looking at your b4 pictures compared to the finished room. You really show us all what is possible.
Looks wonderful. And even better with no switch up side your beautiful sconce on that wall. Perfecto 😉
Looks great! I love our pocket door and the johnson hardware. It glides so smoothly. We went with this hardware because it mimicked our regular door hardware. Has a lock and thumb pull. We hardly ever use the thumb pull because our door is a 1 panel and we use the ridges of the door.
https://www.amazon.com/dp/B01LYPTCDO/ref=twister_B06XWQFWHQ?_encoding=UTF8&psc=1
Here’s a link to a very colorful interior…but, IMO, not anywhere near as pretty as Kristi’s!
https://www.houzz.com/ideabooks/98088751/list/houzz-tour-rainbow-of-colors-reigns-supreme-in-century-city
Kristi, I shamelessly plug your website on Houzz. You have conquered so many of the same issues, with brilliant results.
That looks great! I actually like it better than the darker door! We had a pocket door with those little recessed pulls – I am wondering how hard it will be to pull such a heavy door – I am hoping you have a choice of more than one size.
This door actually isn’t that heavy. The pocket door frame is make for doors up to 200 pounds, but this door is probably around 30 pounds. I am looking at some larger recessed pulls, though. I’d like one several inches tall. Of course, the ones that I like are way more expensive than I had expected.
I see. I thought the door was also heavy. IMO it is never overkill to get something better than you need for a pocket door. Of course the hardware you want is more expensive. Isn’t that the law of renovation – that things are more expensive than you ever thought or want to pay?
Yea! Must feel good to get it DONE! Congrats, your house is coming along beautifully!
Looks great! Look at Signature Hardware online. They have good selection of sizes and finishes. I purchased a 8 inch recessed door pull for a solid core barn door that couldn’t use a profiled pull. I thought they had great prices and good product.
Really loving the way that room is looking, and wish I could use a pocket door. But, precisely the reason you COULD easily include that pocket door, is the same reason I can’t justify putting one in….doggone it. Now I have a question: do I understand you correctly that you won’t have a light switch on this side of the door to your studio?
I’m thinking about a potential time when maybe you hear something out there, and want to turn on the lights in the studio, but don’t want to open the door to do it. Just seems like a good safety thing to me. Also, will the eventual door “handle” you choose, be able to lock? I know most recessed door latches include a sliding locking mechanism, and there again it’s just a safety issue in my mind. Not that it would stop an intruder, but might slow one down. Can you tell I spend a lot of time alone? My husband travels so I am aware of safety things like that! LOL, not paranoid….aware.
The light switch will be just inside the studio door to the left. And while I was considering a lock on the door (with the lock on the breakfast room side) for the same reason you’re talking about, I’ve talked myself out of it. I still have a tendency to think of that space as “out there,” as in, “out in the garage.” In that case, it makes perfect sense for there to be a lock on the new door with the lock on the breakfast room side. But I really want to get into the mindset where that area (studio, new half bath, mud room, etc) aren’t “out in the garage,” but are rooms in the actual house. In that case, it makes sense to either use a door with no lock at all, or to put the lock on the studio side of the door, like an other bedroom or home office would have. Does that make sense? The exterior doors into the studio both have deadbolts on them. Of course, if someone was determined to get in, they could. No door, even with a lock, is going to stop a determined person.
haha, yes I agree with you but I just like the idea of slowing someone down! At 73, I understand the slowing down process….LOL. Thanks for replying, and it’s really coming together nicely.
There’s only one thing that bothers me. I would never have the studio projects cleared away so that it looks neat when bringing guests into the kitchen and dining room. Hope you can do better than me.
Looks fantastic! Thanks for always showing us such great before/progress/after photos. It really helps to see how it all comes together.
Beautiful. I love French doors and pocket doors As the owner of both (installed when the house was built in 1939), I wonder how your pocket door opens and closes. Mine has a recessed finger grip, for lack of a better term. A brass fitting goes over it. It’s a heavy, solid door, so it takes a little effort to slide it back and forth.
Kristi, I love that pocket door and can just imagine when your studio is complete you will be able to look out there and be drawn into that studio. It’s a pretty addition to the breakfast room.
Your room is beautiful, as are all your projects. I like the new door and color; the white is perfect.
If you wanted to be able to light the studio from the breakfast room at certain times, you could purchase a plug in for an outlet in the studio. Plug a lamp into it, and operate it with a remote from the breakfast room. I do this and keep the remote in my car to light the entry upon returning home.
Kristi…..soooo happy that you are “Attacking” the jobs that can be done quickly…. think that is the best approach….. gives you a feeling of “Done….. let’s cross it off the list”. ….and then you can give 100% to biggie… w/o distraction…..BRAVO…!
So pretty Kristi
and I am always so impressed at
how crisp your paint and trim look!
By the way I seriously cannot wait to see
how your studio and pantry turn out but
I also look forward to seeing your landscape
design plans come to fruition this summer-
so much fun to look forward to 🙂
haha you have many fans!
Another job well done!
This turned out beautifully! It was fun to revisit all the doors that have been in this space!
I flipping LOVE pocket doors! Any other kind of door (interior) is a waste of space, IMO! I realize they can’t be put everywhere, but if we build new, I’m going to have as many as possible!! Looks fabulous!!
It’s beautiful. That pocket door that matches the pantry doors is beautiful, and I think you went with the right idea by having them all cohesive in appearance. You’re amazing! You have so much energy, I swear sometimes I have to take a nap after *just reading about* all that you’ve accomplished!
Looks awesome!! Beautiful!
I’m glad it’s here to stay, ’cause I love, love LOVE that door!!!