Fabulously Inexpensive Draperies
Happy Thursday to you! First of all, let me say a huge thank you to all of you who offered feedback yesterday on this post and on the A2D Facebook page. It really was so helpful to learn where my readers are coming from…and so nice to hear that the lack of comments isn’t because you don’t find my posts interesting or helpful (that was my fear–that I’ve become a boring blogger with nothing valuable to say).
So again, thank you! Let me have one Sally Field moment, and then we’ll move on.
You like me! You really like me! :~D
Okay, enough of that. Let’s move on to the good stuff.
A week or so ago, I shared with you that I’m making the draperies for J & A’s bedroom out of canvas drop cloths from Home Depot. Well, when I opened the package, I realized that I had purchased the wrong size. (Just an FYI..if you purchase a size larger than 6′ x 9′, it’s likely to be pieced together with very hastily sewn seams).
So I took those back and purchased four of the 6′ x 9′ canvas drop cloths. There are two windows in the room, and I needed two panels for each window.
But get this! This size drop cloth is regularly $9.97 each, but right now, they have a promotional package that includes TWO 6′ x 9′ drop cloths in one package for $9.97!! Wow!! So with $20 of cotton canvas, I can dress two windows. Does it get any better than that?!
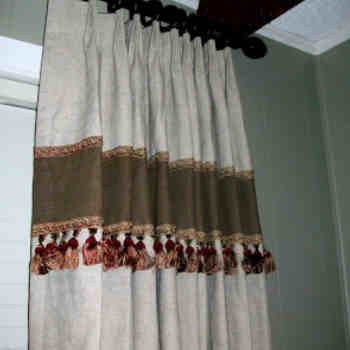
Of course, I wanted to dress them up a bit, so I started looking through my inspiration files, and I came across this picture:
I have no idea who designed this room, so please, if you know, let me know so that I can give credit to the designer.
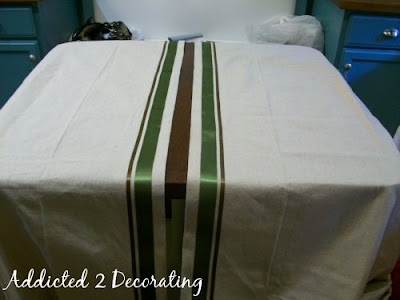
I absolutely loved the simple, yet striking, detail on the leading edge (the edge closest to the center of the window) of each panel, so I decided to try to replicate that look on a budget. This is how mine look so far (please note that the brown “stripe” right in the middle is my table):
What do you think? I love, love, LOVE the look!! The inspiration draperies had a trim detail on the leading edge of each panel AND on the bottom edge of each panel. I decided to just do my ribbon detail on the leading edge of each panel. (Please overlook the creases…I really should have ironed them before taking the pics!!)
I love that the satin ribbon gives just a little bit of shine and shimmer to some otherwise very simple and casual cotton fabric.
The process was fairly simple. I just used two sizes of ribbon (1 1/2″ and 3/8″) in two different colors, and then adhered them to the fabric with Heat N Bond. All you need is an iron–no sewing required!
It was a bit time-consuming, just because I hadn’t used this product in soooo long, so it took some patience and practice to get back into the swing of things. Also, working with the tiny 3/8″ ribbon was a bit more challenging because the 3/8″ Heat N Bond was too wide and had to be trimmed. I also took my time in measuring for placement on the fabric, because I wanted it to be perfect!
I also tried this product, and found it to be easier to use on the tiny ribbon.

So anyway, I’m anxious to get these finished up and get them installed in the room. They still need to be lined and pleated, but I’m almost there!
These inexpensive little draperies just may turn out to be my favorite draperies I’ve ever made!!
Addicted 2 Decorating is where I share my DIY and decorating journey as I remodel and decorate the 1948 fixer upper that my husband, Matt, and I bought in 2013. Matt has M.S. and is unable to do physical work, so I do the majority of the work on the house by myself. You can learn more about me here.




Beautiful! I would be intersted in knowing how much they cost with lining, ribbon, and everything. Looking forward to seeing them hanging! I'm glad you explained the brown strip in the middle. I was trying to figure that out. 🙂
Jenny, each panel, including the drop cloth, ribbon, and lining, came to just around $20. Unbelievable for custom draperies, huh?! And of course, if you decided to use unlined draperies, it would be around $12 per panel.
So forget the comment I left on the original drop cloth post, you answered my question here. These are amazing! I am thinking about doing ribbon on the leading edge and bottom as well.
Wow! The ribbon looks so smooth!!! You must have a lot of patience to do a project like that.
Laurie
Aimee, I want to see how yours turn out!! I considered doing the bottom, but I'm already over budget on this room, so I'm trying to spend as little as possible.
Laurie, the key to getting it that smooth is to use enough of the bonding tape. The more coverage, the better, and then the iron works its magic!
OH This is perfect!! I have had my living room arranged the exact same for the last 9 years. (Since we moved in and a lady much older than myself "helped" decorate. I finally am coming into my own sense of style and am slowing pushing her out. I have been looking for new curtain ideas and I think this is exactly what I have been looking for!
Thank you!!
You make me want to get out the old sewing machine out and get started on the quilt I want to make. I have a WHOLE bag of Amy Butler fabric just waiting to be loved into something beautiful.
Kim!! Amy Butler fabric sitting in a bag?! Unacceptable! 😀 Yes, drag that sewing machine out and get started!!
I have been endlessly inspired by your site for several months. I never comment bc… I have litle to say besides the very repetitive "Why did I not think of that?" and "So so pretty!" and "Wow", ad nauseum. 🙂
Since dh and I are building a house (the contractor just came to lay footers Yay!!!) I have been on the lookout for good ideas that match who we are and how I love color. I have found some here.
Now if only you would wave your magic wand and rtell me what color to paint the Living Room…
Jessica
Just a lurker, here. I love your site and will come back to visit, I'm sure. I rarely comment on the blogs I read because, as Jessica wrote, I really don't have much original to say.
I've made the drop cloth curtains. But I don't think I'm brave enough to add the ribbon…looks like it would be quite challenging to keep it straight. Yours look perfect!!! Nice!
Love it!! I want to make these for my living room. I'm glad you shared that you don't have to sew either because I still don't know how!
I did the same – getting the Home Depot steal on double pack canvases. I added ribbon to the bottom only and it is still fab!
I appreciate how you go through the process with details, so others can do it too 🙂
I just tried to leave the longest comment about this, but somehow blogger said it could not complete my request? HUH? So here's the Readers Digest version: I did this iron on ribbon treatment on pre-made curtains. The heat from the iron made the ribbon shrink. A lot! It was not fun to try to fix when one panel was suddenly three inches shorter than the other. It all worked out eventually, but I will test the ribbon and the curtain first with a hot iron if I ever try this again. 🙂 Hope this saves someone from the curtain nightmare that rocked my weekend! 🙂
This morning I was surprised to find A2D in my email; I used to subscribe, then for some unknown reason I stopped receiving it (maybe an electronic glitch?). I could never remember the name A2D in order to re-subscribe, so for months I went without it. I'm really glad to have it again because it is FILLED with good information and photographs.
HI, My sister in law just posted your page on her facebook and I was quite impressed with your honesty post about your cleaning..or hiding. 🙂 I think we have all been there and done that.
I have been scrolling through your other post and I'm loving your style. I have redone a few of our rooms but it has always had to be on a major tight budget. When i changed the kids playroom to more of a movie room i used fabric shower curtains for the window curtains (sounds weird..I know) BUt it works. I also used hemmed sheets as a curtain to cover our closet…said all that to say I am down to a few rooms and I'm really stumped. My kitchen is the worst. It's at least 30-40 yrs old and I'm wanting to paint them. I don't know if you could offer some advice for me but if you could I will send you pictures and an idea of what my other rooms look like.
I'm aware I'm asking a lot of someone who strikes me as very busy so I will understand if this is too much. THank you for sharing all these ideas for us to glean from.
a fan –
Mrs. Cheap!:)
[email protected]
p.s. I saw the post about the craigslist dresser you were redoing but I couldn't see the final result. Do you have a link to the picture?
Mrs. Cheap, (LOL!!)
I can't guarantee that I'll have time to look at your pics, but go ahead and send them just in case. [email protected]
Regarding the Craigslist dresser, if you're talking about the one that I removed the middle drawers on, I haven't finished it yet. You'll just have to check back for that. 🙂
HI, My sister in law just posted your page on her facebook and I was quite impressed with your honesty post about your cleaning..or hiding. 🙂 I think we have all been there and done that.
I have been scrolling through your other post and I'm loving your style. I have redone a few of our rooms but it has always had to be on a major tight budget. When i changed the kids playroom to more of a movie room i used fabric shower curtains for the window curtains (sounds weird..I know) BUt it works. I also used hemmed sheets as a curtain to cover our closet…said all that to say I am down to a few rooms and I'm really stumped. My kitchen is the worst. It's at least 30-40 yrs old and I'm wanting to paint them. I don't know if you could offer some advice for me but if you could I will send you pictures and an idea of what my other rooms look like.
I'm aware I'm asking a lot of someone who strikes me as very busy so I will understand if this is too much. THank you for sharing all these ideas for us to glean from.
a fan –
Mrs. Cheap!:)
[email protected]
p.s. I saw the post about the craigslist dresser you were redoing but I couldn't see the final result. Do you have a link to the picture?
I've made the drop cloth curtains. But I don't think I'm brave enough to add the ribbon…looks like it would be quite challenging to keep it straight. Yours look perfect!!! Nice!
Love these. I might be able to do something like this in my living room. Nice work!!!
I just bought myself a sewing machine, and since I’ve literally never used one, this type of product/tip is useful!