How To Make Double-Width Lined Pinch-Pleated Draperies – Part 2
Well, I didn’t get my own draperies finished, but I did get one panel completely finished and hung so that I can show y’all the rest of this “how to” for making your own lined, pinch pleated draperies. Here’s how my one finished panel looks:
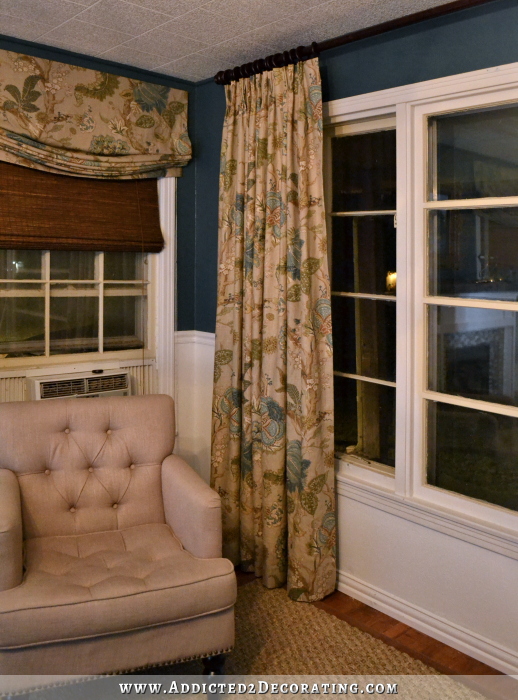
*Note: I opted for a softer look for my panels, where the folds in the fabric at each pleat aren’t really defined and structured. However, if you prefer a more structured, tailored look and want the perfect folds, I show you how to do that at the end of this post. I generally opt for the more structured look, but I’m going to live with this softer look for a while and see how I like it.
If you missed Part 1 of this tutorial, you can see it here.
So at the end of yesterday’s post, I had finished up with the sides of the drapery panel using a blind hem stitch. That means that the bottom hem was finished, and the sides were finished, so all I had left was the header.
Finishing the header
Using a measuring tape, I measured up from the bottom hem of the panel and marked my finished length using straight pins. I did this in several places going all the way across the top of the panel. (Note: It’s actually easier if you mark the front of the panel rather than the back.)
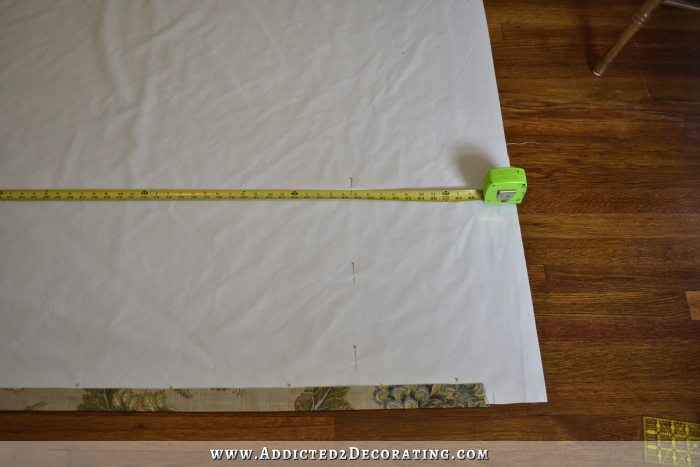
Then I folded the top along the pinned line, removed the pins, and repinned along the top fold. And then I ironed in the fold really well.
I placed the panel back on the floor, unfolded the top, and trimmed off the excess lining along the ironed-in crease. This is optional, but I do this to eliminate bulk, which makes it easier when putting in pleats later.
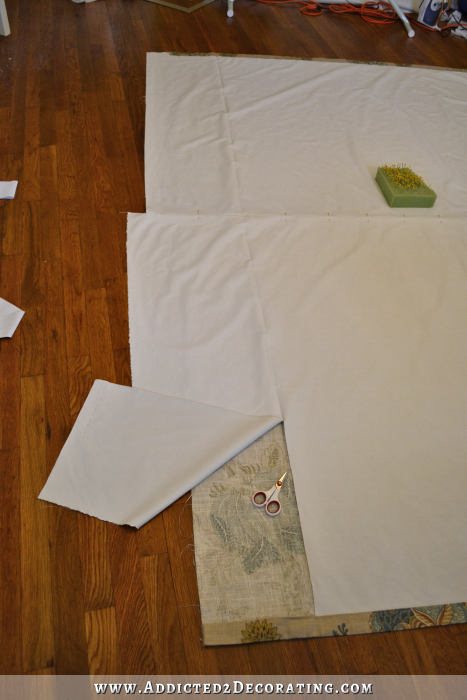
And with the excess lining trimmed off along the crease, it looked like this…
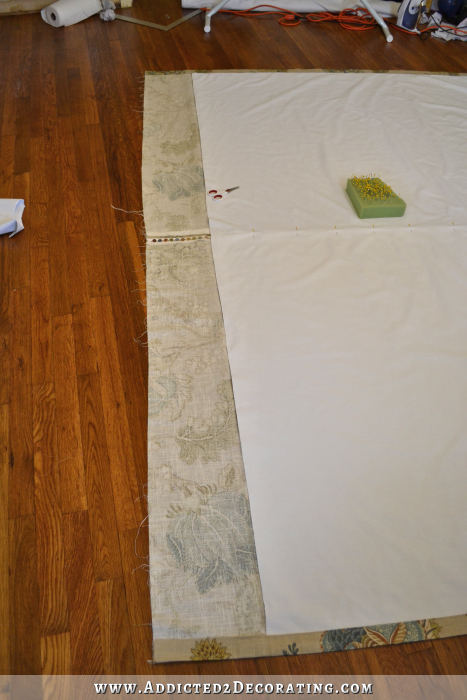
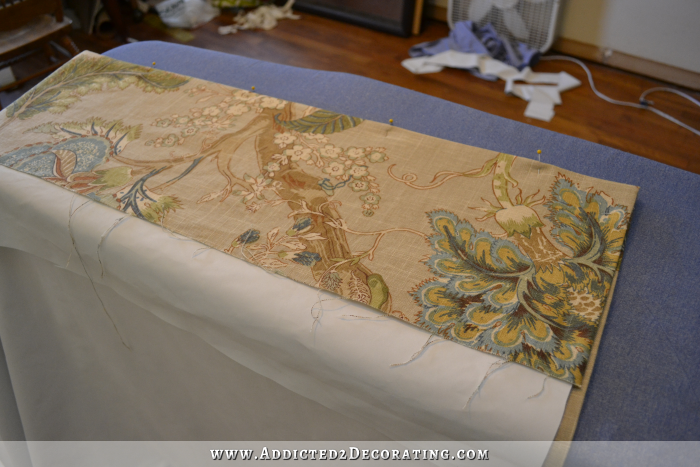
Next I took my roll of buckram (at JoAnn’s, it’s called something like Woven Drapery Header Tape)…
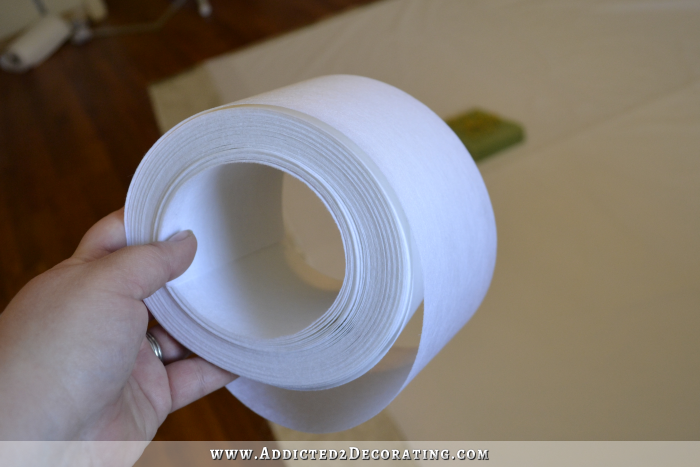
…and I cut a strip long enough for the top of my drapery panel. I lined it up with the top of the lining I had just cut.
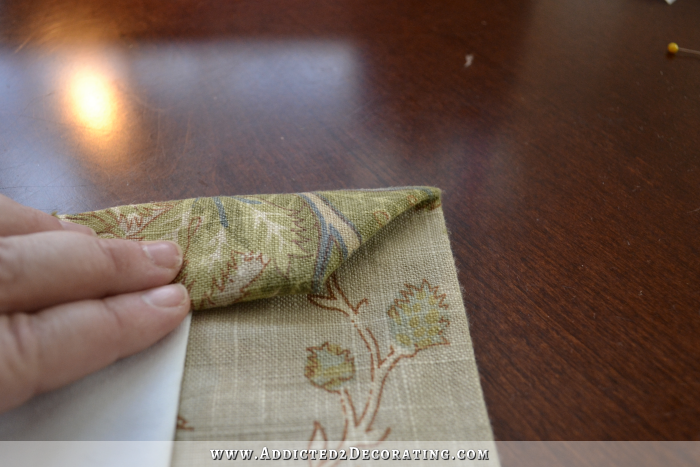
And then using the buckram as a guide, I measured an additional 2.5 inches on the fabric, and cut off the excess. So the fabric above the cut edge of the lining was 2.5 inches longer than the buckram (header tape).

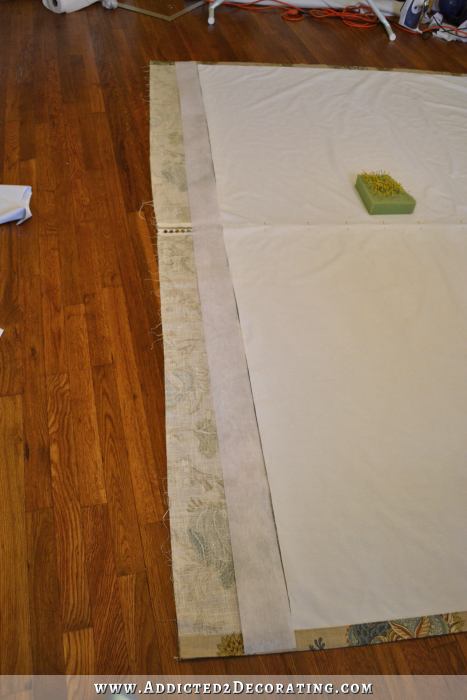
Then I moved the buckram so that the top edge of the buckram lined up with the top edge of the lining, and starting in the middle of the drapery panel, I folded the fabric over the buckram and tucked the extra 2.5 inches under the buckram and pinned into place.
And of course, I did this all the way across the top of the drapery panel.
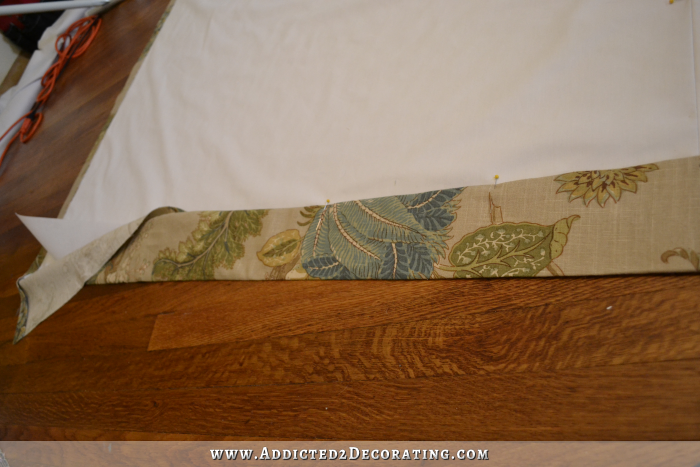
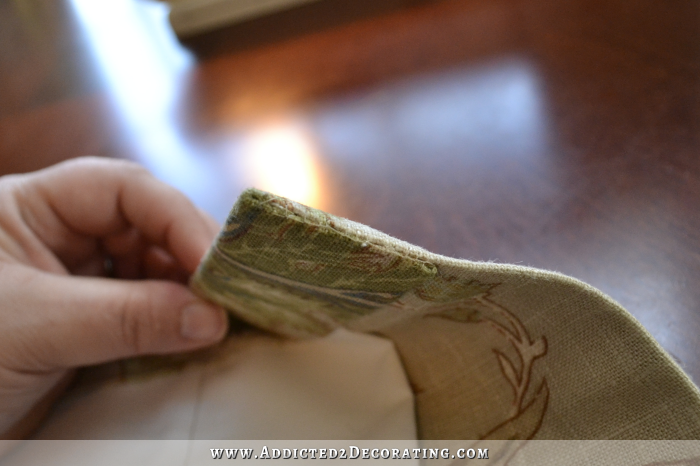
With the fabric folded over and tucked under the buckram all the way across, the top of the panel looked like this…

Adding the pleats:
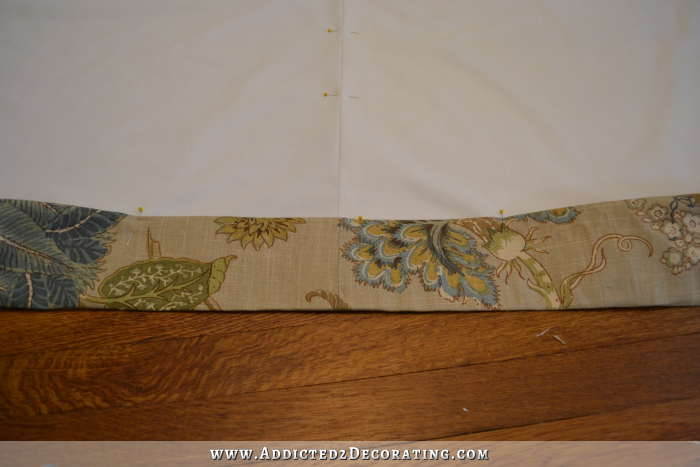
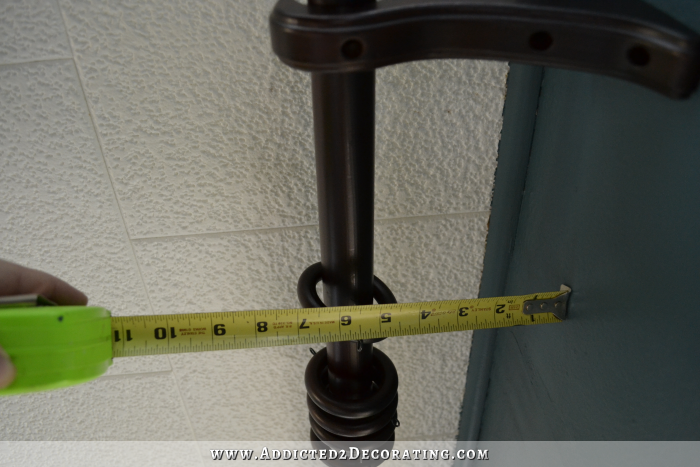
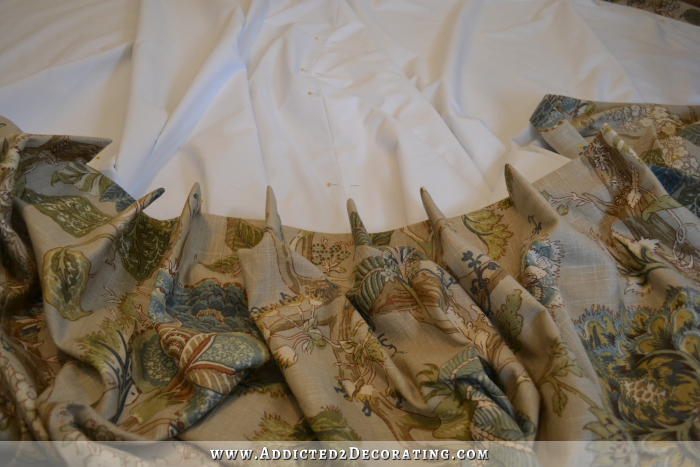
Before the pleats can be added, I had to first determine how much space I needed at the end of my drapery panel for the return. To do this, I simply measured from the eye hook on the drapery ring to the wall. That gave me a measurement of 5.5 inches for my return.
So I marked that measurement with a pin on one end of my drapery panel.
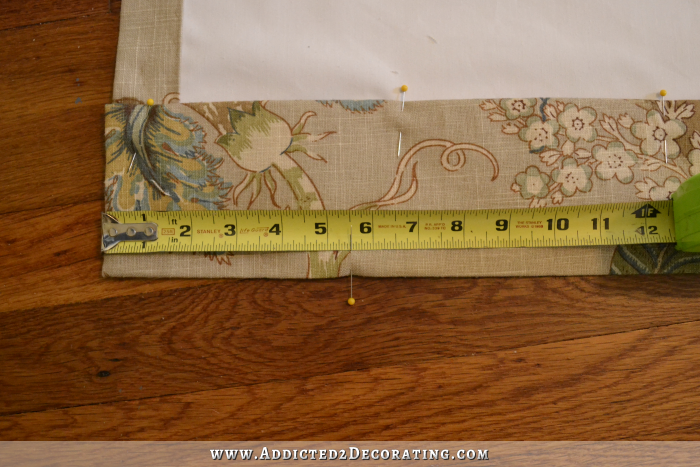
And then on the other end, I measured and marked 4 inches for the leading edge.
Then I measured the space I had left between the pin marking the return, and the pin marking the leading edge. That left me with 91 inches of drapery header in the area between those two pins.

Now I’m not going to lie. Figuring the spacing for pleats is always the biggest headache for me, and I usually have to do it at least two, if not three times before I get the spacing right.
But here’s the basic concept:
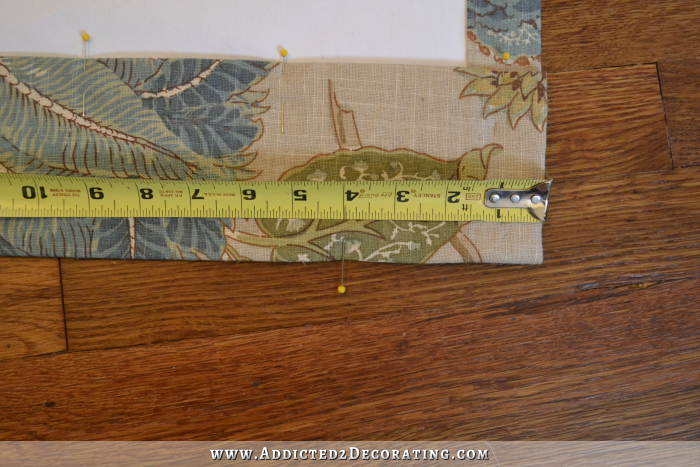
In the space between the pins marking the return and the leading edge, that area needs to start and end with a pleat. Obviously between each pleat, there needs to be a flat area. That means that I needed to mark off an odd number of spaces (one more pleat than flat areas means an odd number), and the spacing between pins needs to be as close to four inches as possible. (Using less than 4 inches of header for each pleat becomes a really difficult.)
So the area I had to work with was 91 inches. I divided that by four just to get my starting point and see what needed to be tweaked. That gave me 22.75 spaces. Somehow I needed to tweak my spacing to bump that up to 23 spaces. 23 spaces would give me 12 pleats and 11 flat areas between pleats.
So what I decided to do is to mark off all of the spaces that would be pleats as an even 4 inches, and then mark off all of the spaces that would be flat areas as just a hair under 4 inches.

Now to sew in the pleats, I started with the first space after the leading edge.

And I folded that space in half so that the pins lined up.

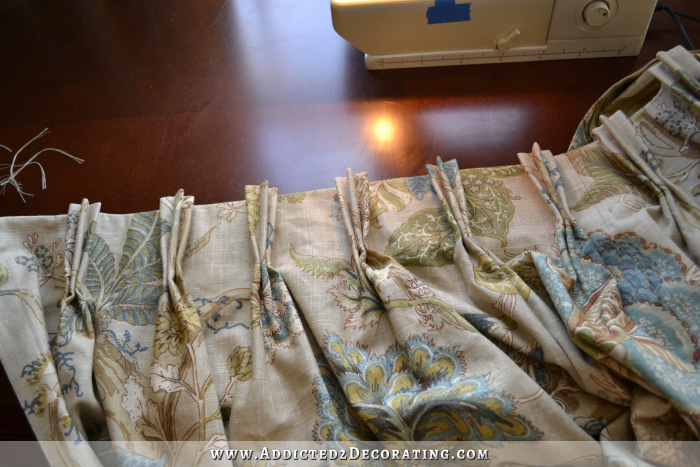
Then I removed one of the pins, and used the other to pin the fold in place. I continued along the top, pinning all of the pleat spaces together like that until I had this…
Then I used my machine and sewed in the folds. I started with my machine needle lined up with the pin, and then sewed a straight line down until I reached the bottom edge of the buckram.
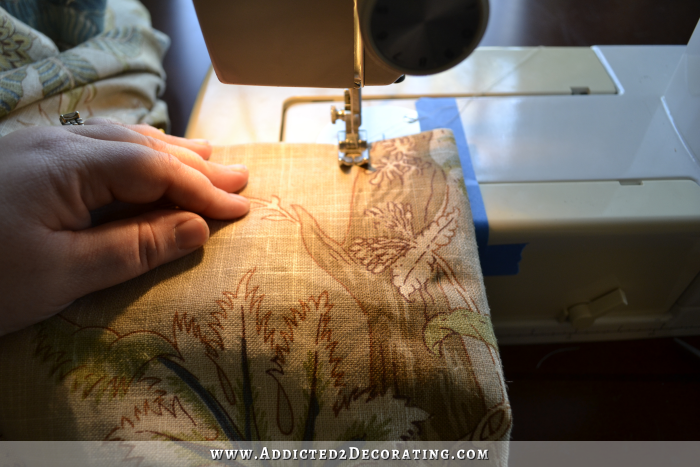
And I did that with each pleat fold until I had them all sewn in.
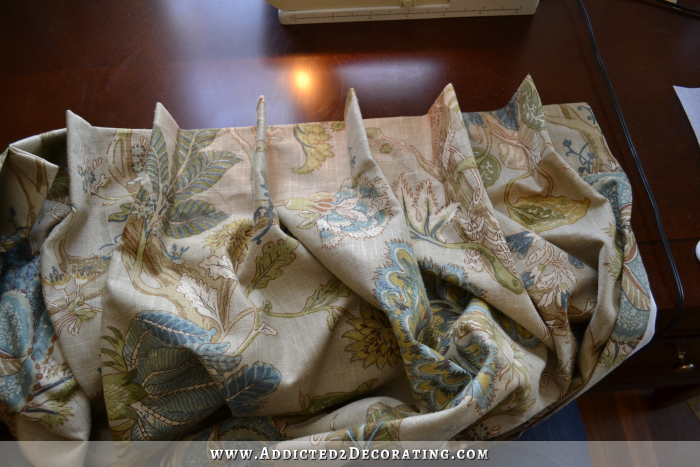
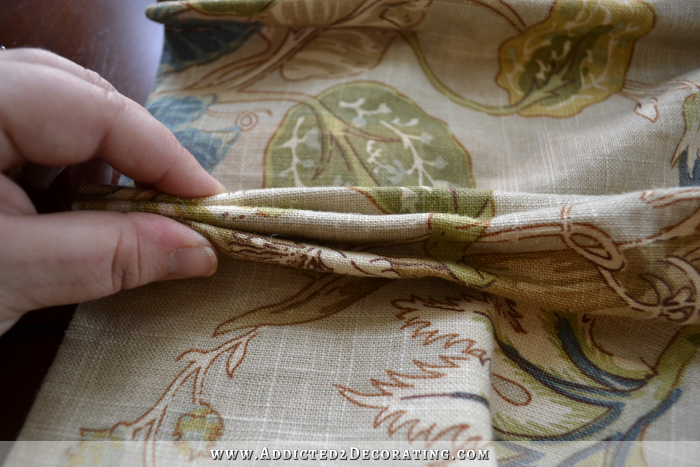
To form the pinch pleats, I squeezed the folded part together close to the fold, and pushed it down through the middle to form the other two folds.
Then I used my fingers to crease all three folds into place.
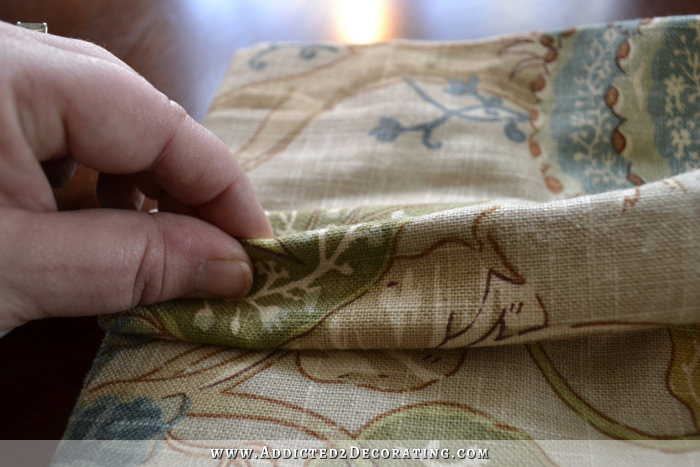
I threaded my needle so that the thread was doubled…
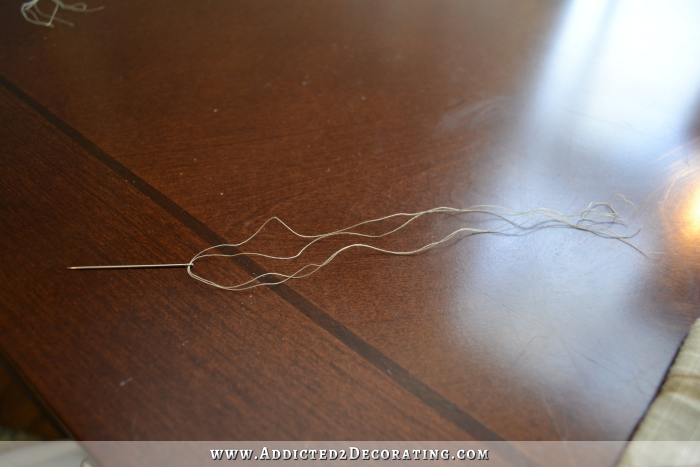
And then pushed the needle through all of the folds of the pleat. Then I moved the needle over about 1/4 inch, and pushed it back through. Since I had doubled the thread, I was actually using four strands of thread at once. This makes it so much easier, and allows me to just do one stitch in each direction, rather than stitching back and forth and back and forth several times.
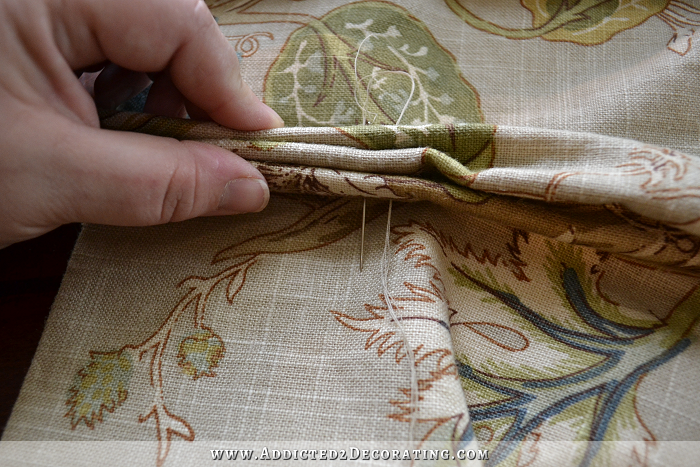
I removed the needle, tied the threads in a tight double knot, and then trimmed off the excess thread.
And of course, I repeated that with each pleat. (Note: If your pleats aren’t staying neatly folded at the top, you can use a steam iron to iron in the folds. Just be careful you don’t burn your fabric!!)
The finishing details:
The pleats are the biggest hurdle, so once those are done, there are just a few small details that have to be taken care of before this panel can be called finished.
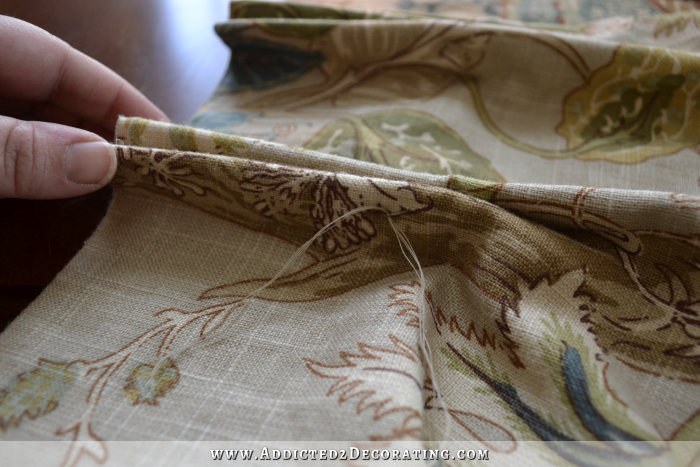
First, on the very ends of the header (return and leading edge), the folds will still be loose since there are no pleats sewn in to hold the fabric together.
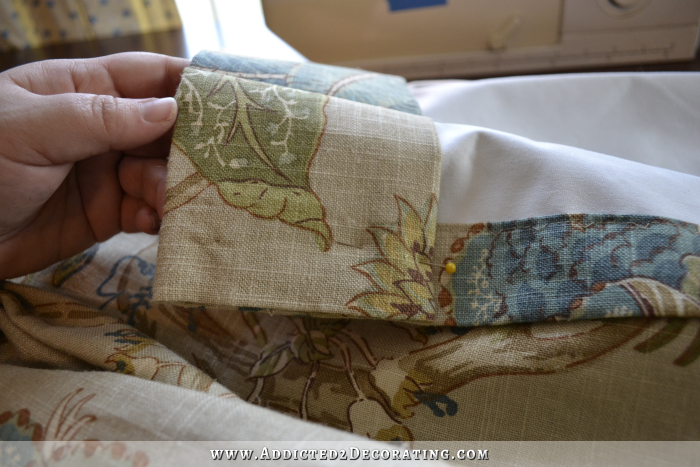
These areas need to be hand stitched along the very edge. Using my needle, I carefully grabbed the two outside layers with the needle, avoiding the middle layer.

That way, when the edge was all stitched up, the middle layer would be hidden with the outside layers pulled to hide that inside layer. And of course, I stitched all the way up to the top corner. I repeated this on the other side of the drapery panel.

The last detail is the bottom corners that still just have folds but no stitching to hold them in place.
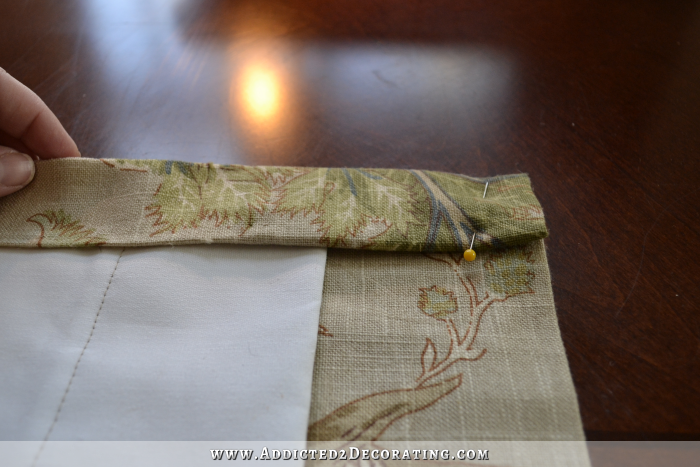
These can be finished one of two ways.
The first way is to unfold the fabric…

And then fold the corner up diagonally along the side crease.
And then refold the side to give a nice angled corner. That would need to be hand stitched and ironed into place.
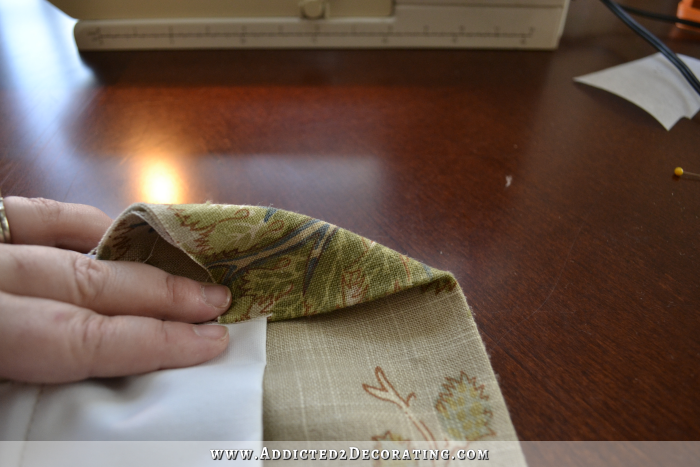
The other option (the one I used on this drapery panel), is to hand stitch the bottom in the very same way that I just hand stitched the top edges.

Again, grabbing only the outside layers of fabric with the needle, and avoiding the middle layer so that it gets enclosed completely as the stitching is pulled.
And then I also hand stitched along this folded area, from the bottom of the panel up onto the lining about three inches (until the hand stitching met where my machine stitching had stopped).

And with those final details finished, the drapery panel is complete! 🙂
Hanging the drapery panel:
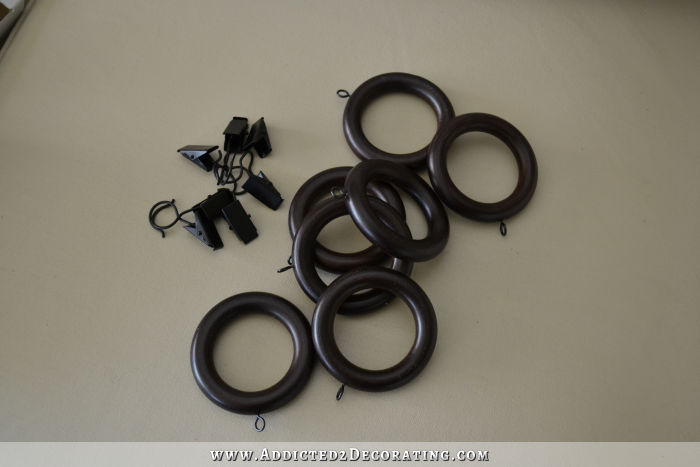
Drapery panels should be hung with drapery pins on drapery rings, not with clip rings.
Wood rings used to come with the clip rings attached, and I’d have to detach the clip rings before hanging the draperies. So I was pretty thrilled to see that the Allen + Roth brand rings (from Lowe’s) now come with the clip rings detached. You can just throw those away, or use them on another creative project, because you won’t need them for draperies.
One drapery pin goes behind each pleat, and then one drapery pin goes on the leading edge (about an inch or so in from the edge), and one more drapery pin goes on the return (about 1/2-inch from the edge).
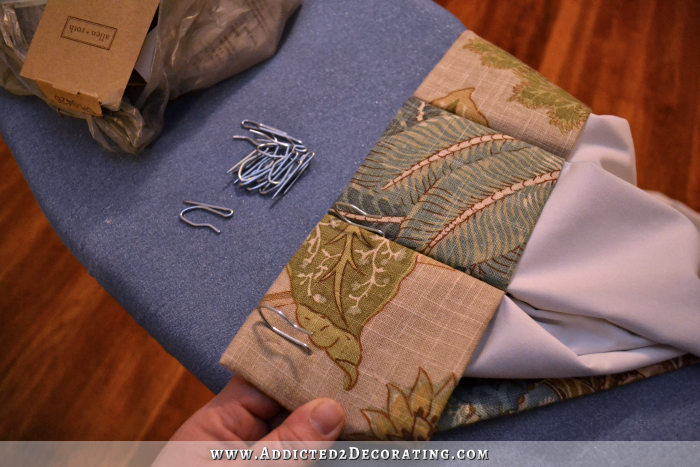
Hang the panel so that the pins on each of the pleats and the leading edge are hung on a drapery ring. But do not attach the pin on the return edge to a drapery ring. This pin gets attached to the wall. (It returns to the wall. Thus the name “return.”)
This is done by attaching an eye screw directly into the wall at the same height as the eyes on the drapery rings, and placed so that the return can be hooked to the wall at a 90-degree angle.
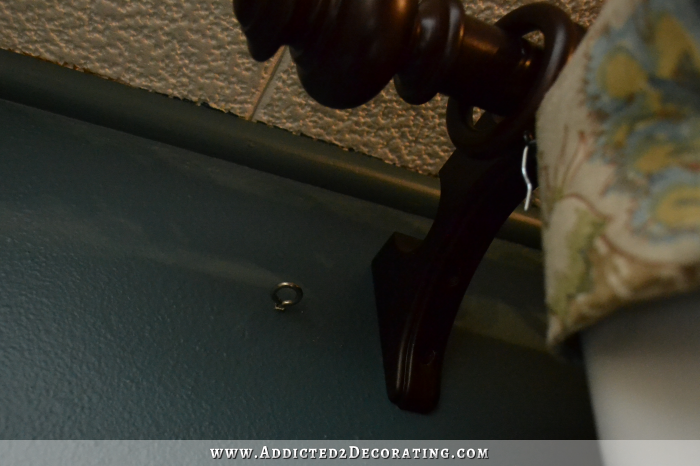
And then simply hook the drapery hook over the eye screw. (Note: I always place my pin behind the eye on the eye screw, rather than through the eye on the eye screw. That just helps it hold closer to the wall.)
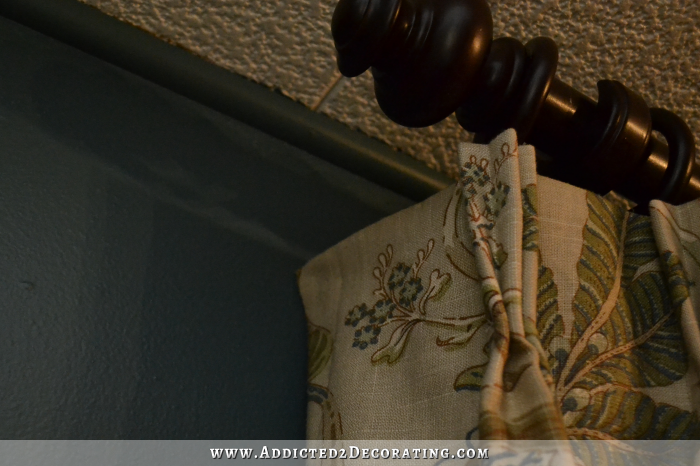
And its done!
Now if you like a more casual, softer look to your draperies, you can leave them just like this with soft, non-defined folds in the fabric. (I think I’m going to leave mine like this, but I haven’t decided for sure yet.)
But if you like a more structured, tailored look, you’ll need to grab some strips of fabric scraps (about three). Then spend some time working with the folds of the pleats so that they’re lined up perfectly, and then use the scrap fabric to gently tie around the drapery panel.

Do this in about three places (top, middle, and bottom), making sure that the folds are perfectly folded and perfectly spaced all the way down. Leave them that way for a day or two to “train” the fabric. You can even use a steamer or steam iron to gently steam the folds into the fabric. Then once the fabric ties are removed, you’ll have a very structured and tailored look to your pinch pleated draperies.
I’m hoping that I’ll get my second panel done today, and be able to show y’all my finished draperies, plus a full room view with the new artwork, painted sofa, and new draperies tomorrow!
In the meantime, I know y’all had lots of questions on yesterday’s post, and will probably have more today. I’m going to do my best to also get those questions answered today. You CAN do this! It’s a long process, and it’s time-consuming, but it’s not difficult. 🙂

Addicted 2 Decorating is where I share my DIY and decorating journey as I remodel and decorate the 1948 fixer upper that my husband, Matt, and I bought in 2013. Matt has M.S. and is unable to do physical work, so I do the majority of the work on the house by myself. You can learn more about me here.


This was super informative, thanks Kristi! Is there a specific variety of liner fabric you prefer, or is it just a standard white drapery cotton?
Absolutely wonderful. Thank you for taking the time for posting. Truly inspiring
I have been making drapes and curtains for years and they never come out looking as nice as yours do! Your tutorial addressed a couple of things that I should have been doing that will make all the difference. Thanks! I’m so glad I found your blog a few months ago. I love that you’re redoing an older home within a budget and it’s looking fantastic. Look forward to your posts every day!
What a difference drapes have made in your livingroom. Nice Job! And I will be making my our drapes, thanks to your instructions. Thanks for making it so understandable. ~Bobbi Jo
Best tutorial on this process I have viewed! If using lighter weight fabric, you can buy small square flat drapery weights (dritz makes these) to put in the corner of the bottom hem to help the drapes hang nicely. Once again, great job explainin how to measure and make the pleats!
I’m so grateful for who you are as a designer and DIY’er; that you so graciously give of yourself, your talents, your skills to enable and encourage learning for the rest of us. Thank you! ~:0)
Thank you Kristi for the very nice step by step.
I’ve made many curtains in the past, though never tackled pinch pleated before even though I do know how to do them. Bookmarking yours for the future. 🙂
Great job! Another way to train them is to put a “Memory Thread” in the bottom hem. You fold it, either on a table, floor or even hanging. Then on the back side of the folds (closest to the wall) run a thread through the back folds all along. Just about 1/4-1/2″ in. Tie off and cut the thread so that it is the width of the drape when closed together and evenly space out the thread so that when it opens and closes it is even. It will keep the folds in place and not flare out when open or closed. You can also gently steam and finger press the folds while hanging to quicken the process. If it is linen. Just a gentle finger press down the folds in the front and back will put a memory in them as well. I live that you don’t cut corners. You do things the proper way. It makes them look professionally done and will make tem last for years!! I love your blog and enjoy seeing all it do. Thank you.
Thanks so much for your lesson on draperies. What did you mean in the last step? (That you put the hook behind the eye instead of through?)
I like the unstructured folds for a more casual look, but I really like the more structured folds because of the folds in the roman shades. The draperies are beautiful and add a wonderful richness and softness to the room. Are you planning to add wooden blinds to be front windows too?
“the” front windows!
Oh Wow. Thanks for the tutorial. I think I don’t have anymore excuses to delay making those curtains that I have been putting off since 5 years.
You are correct, this isn’t hard. I will be following these instructions next drapes I make.
Great tutorial! Very easy to understand with great pictures.
I like that way you do the side seams than pillowcasing them. I use some weights in the bottom of my panels. Very thorough tutorial with pictures.
I adore you! I own and have studied books, tapes, e-books and classes on how to make lined and pleated drapes and this is the first straight forward understandable instructions I have seen! I can hardly wait to make some drapes now and will forget my complicated failures. Thank you thank you thank you!
Those are beautifully made! I can tell that when the other panel gets finished and hung that the window will be well-dressed! I love it!
Loved your tutorial. The pictures were what made them great. Thanks?
Hi Kristi:
Nice job on the tutorial. Just a quick tip to make things easier. Since you’re working on a home sewing machine you can use it to sew your pleats rather than doing them by hand. (I’ll go to great lengths to avoid hand sewing.)
If you’re machine has a zig zag stitch set it to that and put your stitch length to 0. Drop the feed dogs down to make it easier to fit the pleat under the presser foot and stich away. Instead of a long zig zag stitch the machine will make a small dash and go back and forth in the same place, making a nice strong tack.
Thank you so much for adding that, Sydney! I meant to add that to the tutorial in case people want to use that method and their sewing machines can handle it. When I had my old Kenmore machine (which was actually much newer than the one I’m currently using, probably by three decades) I would do it that way. Sadly, that machine quit working.
I’m now using a much older machine that my grandmother gave me (the brand is Necchi, which I had never heard of before). It’s a workhorse and actually a much better machine than the much newer Kenmore I was using. The one thing it can’t do is sew through a pleat. 🙁
I’m sure the needle could power through quite easily if I could just get the fabric under the foot, but I’ve tried everything, and it just won’t lift up enough to get the pleat under there so I can sew through it. So I now have to sew them by hand. It’s not too bad since I basically quadruple the thread and do it all in one stitch. But I sure wish my machine could handle it! 🙂
Hi Kristi, I just love your site!!! Your decorating and DIY ideas are so creative and helpful!! You’re makeover of the two rooms looks so lovely. I wish I had your creative juices. I used this same material to make the same style curtains in my kitchen and they do not look nearly as nice. They looked “washed out” on my walls. I’m not sure why, but I think it might be because the paint color is like an eggshell, maybe slightly darker. Since I spend much of my time in the kitchen, I wanted it to be as bright as possible. It has 5 windows and a pair of french slider doors. What colors did you use on the walls in the two rooms you redecorated? If you go to the following site, you will see pictures of the window treatments in my kitchen. Your suggestions on how I could make them “pop” would be welcomed! https://www.facebook.com/stitchingelegancebyliza/photos/ms.c.eJwtx8ENACAIA8CNTLGFwv6LGY33OwNt9gDbyVi~_t3wf5nuHUDWU6j~_HLGD07353Hn~;8EAE~-.bps.a.697033830411537.1073741831.384073608374229/700881406693446/?type=1&theaterstitchingelegance.com
These look beautiful and love when they are hung as high as possible. I love your window treatments fabric too. Thanks for sharing.
They look beautiful! Great job! And even though fabric can be expensive, I bet you still saved a bundle by making them yourself!
They are looking beautiful! I like the softer look. -Can’t wait to see a picture of the finished project tomorrow.
Kristi,
Thanks for the tutorial. Have you found any benefit of hanging your fabric before construction to allow it to relax?
I grew up using a Necchi machine. It’s an awesome machine, all metal, and will last forever.
Kristi, Thanks for clear, easy instructions. Your curtains finish the living room beautifully. Yes, I can do this! I want new curtains in my dining room. One question; Do curtains need to match from the dining room to the kitchen? I am struggling to find fabric that balances the kitchen yet gives the dining room a little elegance.
Your drapes are gorgeous! I can’t wait to see the entire room completed!
I am so happy that I read and studied each step. I understand each step completely and will now make my own drapes! Thank you so much for the great tutorial!!!
Fabulous tutorial. You really did a great job explaining each step and I love your fabric! Everything looks like it is really coming together in your new home too! 🙂
You are so talented. I was just about to give up and order new drapes for my daughter and son in law’s new home!!! I wanted to make them though!!!! And thanks to you I can do that. What a wonderful, easy to follow tutorial. Again, thank you!!!! Thank you!!!!!
Kristi, my mother-in- law has her Ph.D in home economics and demanded I learn how to make “proper” pinch – pleated draperies as a young bride instead of the more casual country ruffles, balloon shades, Roman shades, and draped valances I really preferred at the time. I also learned a little about piping and upholstery from her. I am so glad I learned how to do it now, and have used her sewing instructions many times over the years. Sshh, don’t tell her! (Of course, I’ve been able to turn the tables on her over the years and teach her how to garden and cook. She hadn’t a clue.) I have never seen anyone explain it so well as you have, though. I hope those following your blog print out the instructions and keep them handy. Someday, they will be very glad they did! Thanks!
This was super informative, absolutely wonderful. Thank you for taking the time for posting. Truly inspiring. I love that you are redoing an older home within a budget and it is looking fantastic. Look forward to your posts every day! Best tutorial on this process. Great tutorial! Very easy to understand with great pictures.
So glad you had the guts to tell people to put down the iron-on hem tape! Sewing is really intimidating to those of us who didn’t grow up around it. I took a sewing class at a local fabric shop about 10 years ago but their machines were state-of-the-art, and mine was a starter model from a discount store. Just threading the machine made me so intimidated! That, and not having someone to tell me step-by-step what to do.
Of course, now there are wonderful blogs with people like you who are wiling to share your wisdom. I know it takes 1000 times the time and effort to complete a project when you have to stop for photos constantly!
I eventually got over my sewing machine intimidation and taught myself to make pillow covers with invisible zippers. I fell in love with the process (and fabrics!!!) and even started a business, selling decorative pillow covers on Etsy.
I have yet to make my own curtains because my husband is obsessed with our Shaker-style window molding and refuses to let me cover it up. But I’m working on him … maybe at least I can do Roman shades that fit inside the window, so no trim is covered in the process!
Great instructions. I’ve been trying to make my own drapes & my biggest headache is getting the correct length. I like my drapes to just kiss the floor. I measure & measure again but somehow they end up too short. Especially at the sides. Someone told me that using weights in the corners of the hem would help.
Your drapes are the perfect length, even the edges. And you didn’t use weights. Please share your tricks for getting the exact length.
Could you also share how you got such a perfect match with the pattern repeat in the middle of your panels? There must be a trick to it that escapes me.
Thanks in advance.
Hi Kristi-
Great, great tutorial. If I were going to follow this tutorial to the letter (which I fully plan on doing in our master bedroom), how high should I hang my curtain rod so the curtains are just barely above the ground? Same situation as yours: 8 foot ceilings, high and wide, etc.
Kristi,
I came across your blog the other day when I went searching for how to reupholster dining room chairs with welting. Thanks for the wonderful tutorials!! They are very clear and so simply done that I now have the confidence to move forth with my remodel’s finishing touches. You are way better than all the books I have. One question: How do you add interlining between the fabric and the black out liner? Or is it not needed if you use blackout liner? I live in the Northeast and we have been experiencing brutally cold winters and would like the extra insulation. Thanks again for your time and effort helping decorate smarter.
If I were you (and lived where you do) I’d add the interlining for sure. There’s even a really thick interlining called English Bump. That would be the most insulating option if you can find it.
I did not see anyone ask you this question…..How do you determine how much fabric to use for the width if you are doing the pleating?
Generally you need 2.5 to 3 times the width of your window.
Hi,
I got to your blog after I’ve made my first double pleated curtains. Firstly I finished the heading part, hung the curtains and than pin the bottom part. I noticed the edge that meet the other curtain when closing, is not in a straight vertical line but it hangs under an angel. I would expect a 90degr angle with the floor, however it somewhere around 80degr. Top heading part was cut straight when I bought it, although I didn’t check it.
Do you have any idea or suggestion on how I can make it a nice 90degr angle with the floor?
Thanks in advance.
When I make draperies, I use a framing square to make sure the cut edges of my fabric are perfectly square. And I NEVER just leave and use the cut edge that the person at the fabric store cuts for me. Almost 100% of the time, it’s not straight. Getting the cut edges at a perfect 90-degree angle is probably the most important step in making draperies, and will have the biggest impact on how your draperies look when they’re finished and hung. Your only option is to take them apart, recut the fabric, and start over.
I found your directions/tutorial for this pinch pleat curtain and the roman shade very clear. You gave a link in the roman shade tutorial for the hardware (http://www.draperydiy.com), do you have a recommendation for the drapery hardware? I have two 80in windows and would like to save my budget a bit. Thank you!
~Carol
This is a great tutorial! If you’re doing double-width panels, about how wide is the panel after you’ve pleated it?
Love your tutorial and the results are outstanding. Could you please give the fabric information? Love it.
It’s P. Kaufmann Florabunda Sea Glass.
Kristi-
Such a great drapery tutorial series. I’m about to tackle my dining room drapes (6 panels). I was using your handy measurement helps for purchasing fabric but was wondering about the lining. Do you purchase the same amount of lining as fabric considering you make it several inches shorter than your panel? Also, would you recommend using buckram if not making pleated curtains? I want to use the drapery hooks and loops like you did, but I don’t want the pleats. Would the buckram add stability strength for the drapery hooks or be unnecessary?
Thanks!
Sarah, so sorry I’m just now seeing your comment! I’m sure you’ve made your panels by now. 🙁
I do purchase the same amount of lining. And I would always recommend using buckram at the top, regardless of the type of header you’re putting in. It just gives much needed strength and stability to the top of the panel. The only exception would be if you’re intentionally going for that slouchy, relaxed look that some styles have.
My husband and I recently bought a house built in 1961 from its original owners, and true to the style of the time, there are floor-to-ceiling custom pleated drapes all over the house. They were old and faded and dusty, but hung on nice solid tracks, and I didn’t want to replace those, so I found your tutorial, and started making custom drapes of my own to replace them. They are AWESOME and my friends think I am some kind of wizard now. It was a lot of work, but it was also my first solo project on the sewing machine, and your step-by-step helped me get through without any major errors or do-overs, so I had to come here and say thank you!!!
Thank you for your detailed tutorial!! One question I have … after you insert the buckrum and fold over the hem allowances, is there a reason you didn’t stitch that hem in place? It looks like you started marking and figuring the pleat placement with the hem just pinned in place. Is that correct, or did I miss something?
Thank you for your help.
Cheryl
It’s not needed. And on finished professional-quality draperies, no stitching should be seen on the front of the drapery panels. If you stitched that in place, you’ll see a line of stitching on the front of the finished panel.
I know you wouldn’t machine stitch the hem in place … but just to clarify, you don’t even have to hand sew that upper hem?
Thanks,
Cheryl
No stitching is needed horizontally, not even hand stitching. The only hand stitching that’s needed is along the very edges (vertically) to keep the folds of the hem closed on the top edges.
Thank you for such detailed instructions! Planning to get started today. I love your fabric and would like to know where you got it. It would be perfect for another project I have in mind! Thanks!
The fabric is P. Kaufmann Florabunda Sea Glass. I don’t remember where I got it, but it should be widely available online.
I have read through your tutorial and am trying to get up the courage to try making pleated drapes for my dining room. I really appreciate the detail that you provide and all of the pictures. I have been looking at fabric and have found some that I really like; however, I am wondering if it is too stiff. It is 67% Rayon and 33% Poly and is classified as “Upholstery – Medium Duty” fabric. Should I be looking at something different.
It’s hard to know just by the description. Different fabric companies rate fabrics differently. If you’ve never made draperies before, I would strongly suggest using a 100% cotton decorator fabric. It’s by far the easiest fabric to use when making draperies. It has just enough weight and body that it’s easy to sew, it doesn’t crawl when you feed it through the machine, and it always makes a beautiful end product.
Thank you so much for this wonderful tutorial! I have one question – do you just hand stitch the hooks at the lead and return edges?
Do you mean the drapery pins? They’re actually pins. You don’t sew them on. They pin into the fabric.
Hi, I am following your tutorial and I am just about to blind stitch the side hems on the panel. You didn’t say where to stop, but I can see in the pictures that you stopped just before the bottom hem stitch of the lining. Why do you not continue the blind hem stitch all the way through to the end? It seems like it would save a finishing step at the end. Does it look bad to do it that way? Thanks!
If that many layers of fabric can fit under your sewing machine foot, then it’s fine to blend hem stitch to the end. That much fabric won’t fit under my sewing machine foot.
I’ve sewn my whole life but really never knew the “proper” way to sew drapery panels (I didn’t use tape, but have used the bunchy fold over method). This post was amazing, thank you!
Can you describe how to do the hand stitching technique you do to close the bottom and side hems? I love how professional it looks, but I’m not sure how you did it exactly.
Thanks! And keep up the great work!!
This was VERY helpful and informative. You did a great job explaining. Thank you so much!!
Best instructions I have found! Thank you so much!
After about two days of searching, clearest instructions and pics. Thanks for sharing
Hi, Great instructions! Any help for avoiding space where curtains meet in centre – very hard to get them just crossing when closing curtains at night. Thank you. Lily
You should be able to avoid a gap by moving your drapery pins/rings over just a bit so that the leading edges can overlap about an inch or so.
Kristi, what did you end up doing with these drapery panels? At one point you mentioned that you might want to sell them, but I think I recall later that you thought you might use them in another room. Have you decided if you will use them? Or sell them? I would be interested in purchasing them if you decide to sell them. Love your blog. I always get so excited when I see a new post from you and read it first. The projects that you take on! Wow. You are awesome in my book. Keep on being true to yourself. I love your choices and you are making me love color more. I love the journey too. It is realistic, because we all have to find what makes us smile. 🙂
I have looked and looked for good drapery instructions. Your are the best looking and most clear instructions. Thanks!
My daughter and her husband just bought their first home. They are also grateful for your instructions!
This is always my go to method when I’m making pinch pleat curtains. Thank you so much for the great tutorial and all the photos which make all the difference! You took the fear out of it for me. Love, Anna, from England in blossom!
I want to thank you for your Blog. It encouraged me to step outside my comfort zone and I tried to make a goblet pleat curtain. It doesn’t look as polished as yours but I did it!
Hello Kristi, thank you so much for tutorial! It helped me a lot 🙂 How do you take care of your draperies ?
I vacuum them regularly with an upholstery attachment on my vacuum. I rarely find that they need more than that. If they somehow get dirty, I dry clean them.
Thank you so much for taking the time to share your projects! I’m making your relaxed roman shade now while I psych myself up to make these pinch pleated drapes. I’m stymied on how to install the drapery rod so that the curtain skims the floor. Yours look perfect even though you did the hems first. How did you do that?!
Hang your rod AND drapery rings first. Then measure from the bottom of the rings to the floor to get your finished drapery length so you’ll know exactly how long to make your draperies.
Came by way of Pinterest and though this is an old post I have to compliment you on your tutorial as a DIY project since it is one the best that I’ve read. That said; I have been making my own window coverings for over 40+ years and hope you don’t mind me including the following suggestions. If one has pleated drapes, it never hurts to a) prior to hemming let them hang for a few days to give the fabric the opportunity to relax (slightly stretch) prior to hemming particularly if they are going to be floor length and b) to train each panel to drape/fall properly … hang them first and loosely ‘bandage’ each in the ‘full open’ position using 2″ – 3½”wide strips of fabric in three places (approximately 5″ down from the header/middle/about 5″ above the hem). Leave in position for a few days then remove. Hopefully these extra tips will assist some of your readers. Great job! -Brenda-
P.S.: For full length drapes; I seldom hem first as I like mine to just ‘kiss’ the floor which necessarily isn’t always even as one would hope …. .
Very descriptive tutorial. Thanks. I must have missed a couple of things as I don’t recall reading how wide the window was and how you calculate how much fabric you needed. I see that one panel had 91 inches leftover to do the pleats but wasn’t sure how you arrived at two panels of fabric sewn together to do one side of the window.
My curtain panels are always for decorative purposes only. I don’t open and close them during the day. So for my purposes, I did two widths of fabric for each side to give the appearance of the proper fullness. These aren’t actually wide enough for closing, though. If you’re going to actually open and close the panels you’ll need 2.5 to 3 times the width of the window. That should give you enough width so that they’ll close and completely cover the window even after you pleat them.
you posted a really long time ago, but what size drapery header did you use? I have several sizes.
thanks so much, it was a wonderful tutorial!
If I didn’t specify in the tutorial, the I can’t be 100% sure. But I generally use 4-inch tape for drapery headers.
Made my very first set of insulated and lined silk dupioni drapes using your wonderful instructions – thanks so much for posting them. I hand tacked a cotton interlining fabric to the face fabric before adding the drapery lining (this took about an hour or so per double drape) because I wanted more substantial drapes in my chilly office space. They are so beautiful and I will enjoy them for a long time to come – thank you again!
I never leave comments on blogs but felt compelled to send my thanks and appreciation!!! Thank you so so much for this incredible post! I’ve managed to make gorgeous drapes for my nursery all credited to your detailed instructions and pictures! So helpful!!!
Thank you so much for your helpful site! My double panel drapes look great. Now I want to try 2.5 widths for each panel on my picture window. Any advice on handling the extra bulk?
This is by far the best tutorial I have ever seen on making drapery. I have used it to make panels with great success. Curious, do you have any guidance for working with sheers? I followed the same general steps but did not know if I should have done different size hems or spaced pleats differently.
Great tutorial! I didn’t realize that the header doesn’t get sewn. Meaning all you do is place it properly, tucking in the 2 1/2 inches of fabric, pin and the pleat. I will be making mine this way. Thanks!
Thanks – this is a really clear tutorial. I FINALLY made the curtains for my guest room over the weekend, and they look great. I now understand fully why you wanted the tables in the workroom. Many an ibuprofen was consumed while I crawled all over the living room cutting, pressing and pinning the panels.
Thank you for the easy to understand instructions. I needed help because I happened upon some super large commercial grade panels with black out lining that were being replaced in a Hotel conference room. The fabric is very thick . I have no idea what it is but it is so easy to clean with a damp sponge, it doesn’t rip or Frey, and has an almost pearlescent sheen to it. The panels were 190″ long x 60″ wide. I have standard windows 84″ length. I’ve never taken on such a large project and kind of felt like I was working on a ship sail. The pleats were going to be too bulky. I followed your directions and dismissed the idea of the usual 3 pinch pleat and decided to go with 2 instead and hope my rods can handle the weight LOL. They are older but I’m keeping them because they are made a bit stronger than the modern ones. So far , so good.