How To Edit Images To Create Art (How I Created My Butterfly Images For The Gallery Wall)
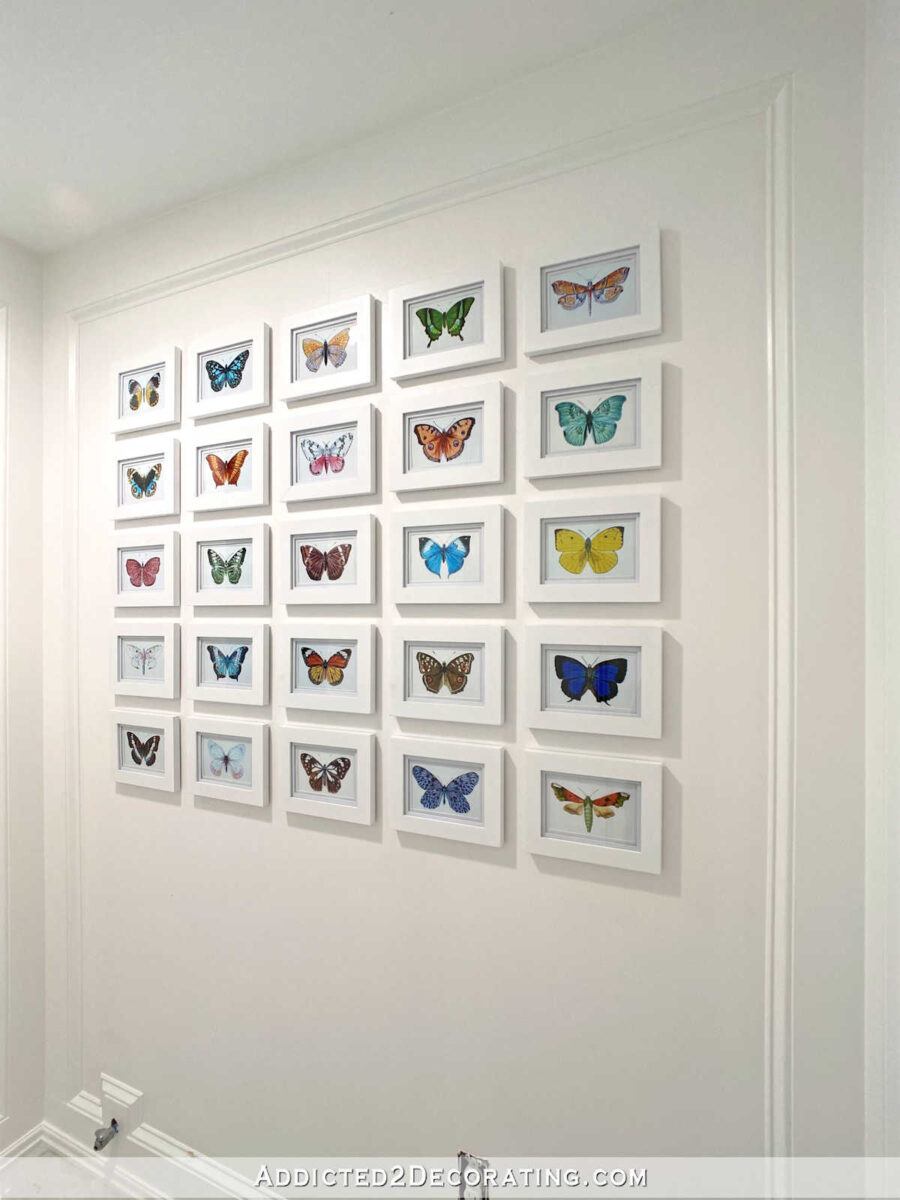
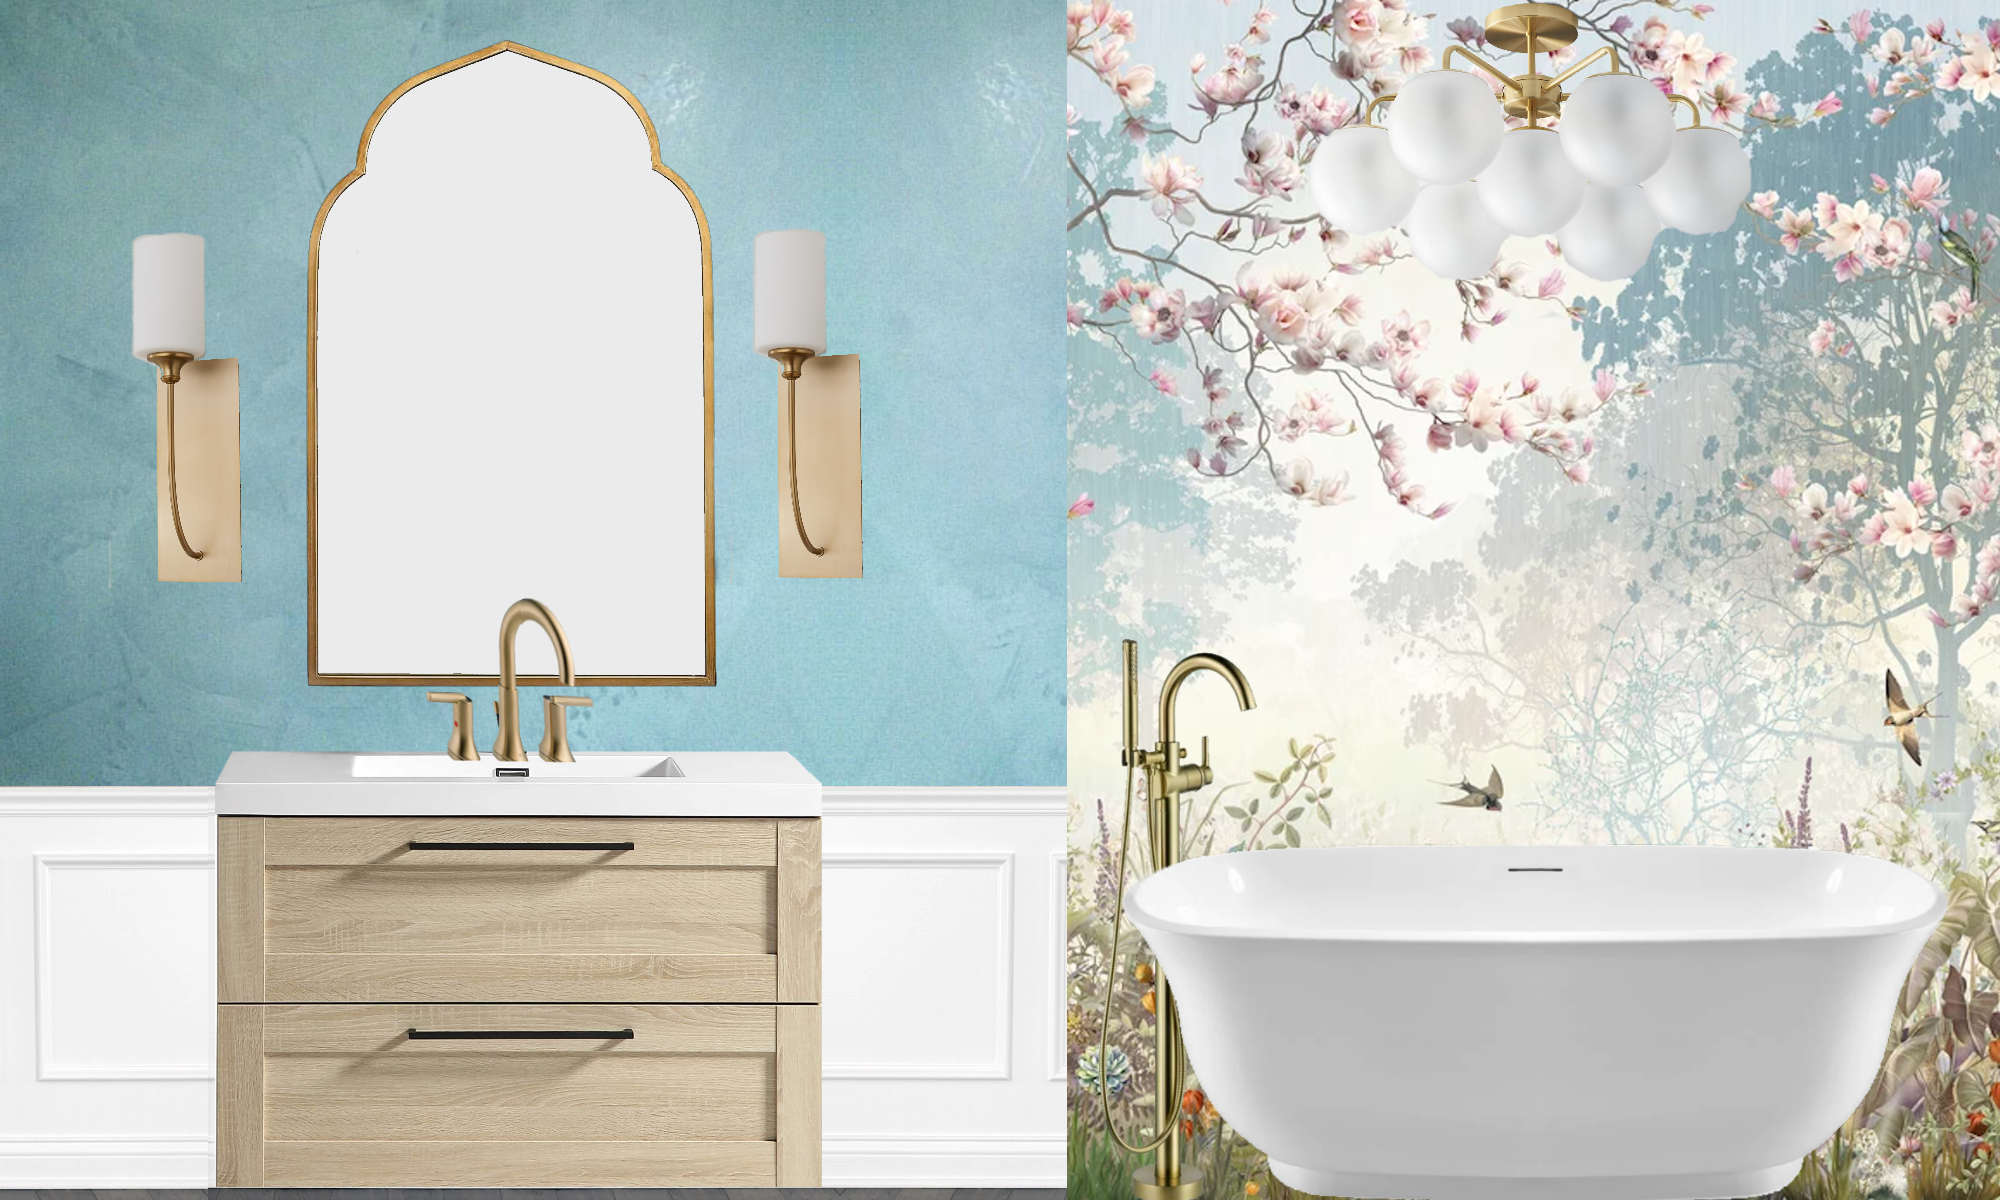
Today, I want to show you how I edited the images that I used for my butterfly gallery wall in the water closet area of our master bathroom (which is still in progress) so that you can make your own (or something similar to it) for your own home. I showed y’all how the gallery wall turned out last week. You can click here to see the details of the gallery wall, along with step-by-step instructions on how to install a grid gallery wall. But here’s another peek at it…
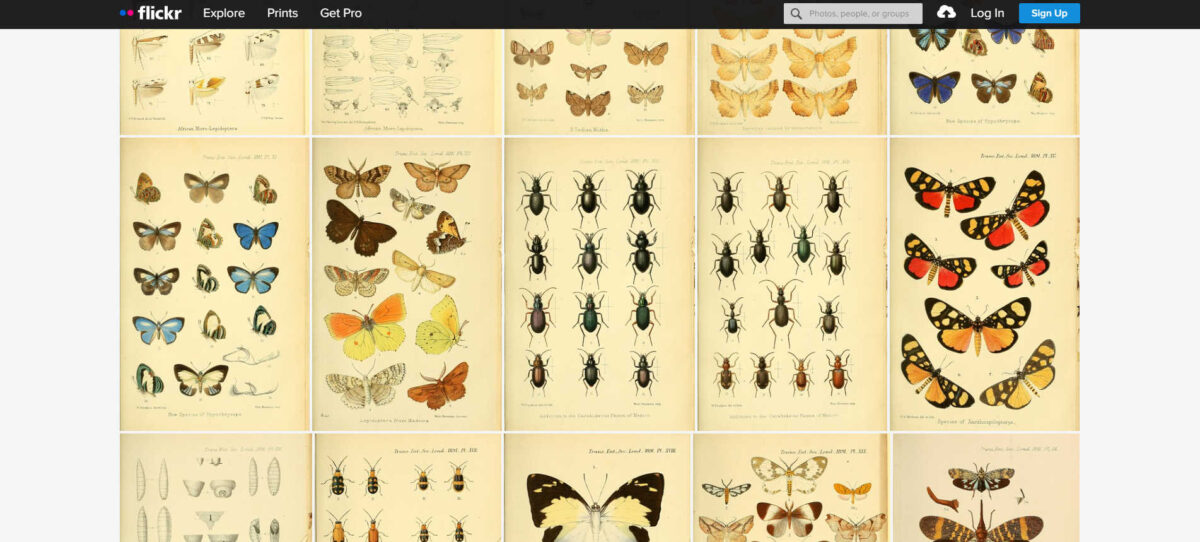
I got all of these images from that amazing treasure trove that I shared a while back — the Biodiversity Heritage Library on Flickr. They have so many images there that you can find as many images as you’d ever need for any gallery wall you’d ever want to create — beetles, birds, butterflies, microscopic organisms, ferns, flowers. I mean, the selection is mind-boggling.
But if you spend any time looking through the folders, you’ll see that those images are really only good to you if you own photo editing software and can edit the pictures to clean them up a bit, turn them so that they’re oriented properly, size them to fit the frame you want to use, etc.
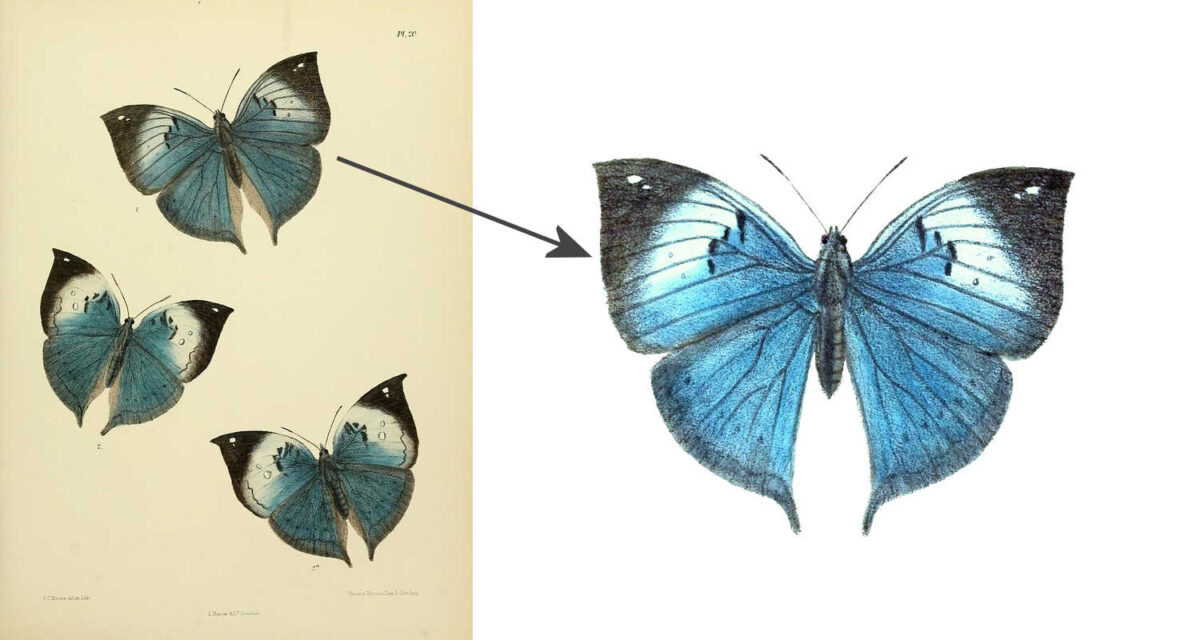
I’ve had quite a few people tell me that they’d love to use those images for their own gallery walls, but they have no idea how to take those pages from the Biodiversity Heritage Library and turn them into images that they can actually use. In other words, how do you go from a page from a book on the left and turn it into the usable image on the right that can actually printed out and framed to use in a gallery wall (or as a stand alone print)?
So let me show you start to finish how I edited the images that I used for the butterfly gallery wall, and then you can use these same steps to edit just about any of the images you may find in that library so that you can create gallery walls on every wall of your home. 😀
This is also the same process that I used to take the pages with the birds from this album and edit them to create the gallery wall in the entryway.
Here’s how those birds looked when I downloaded them…
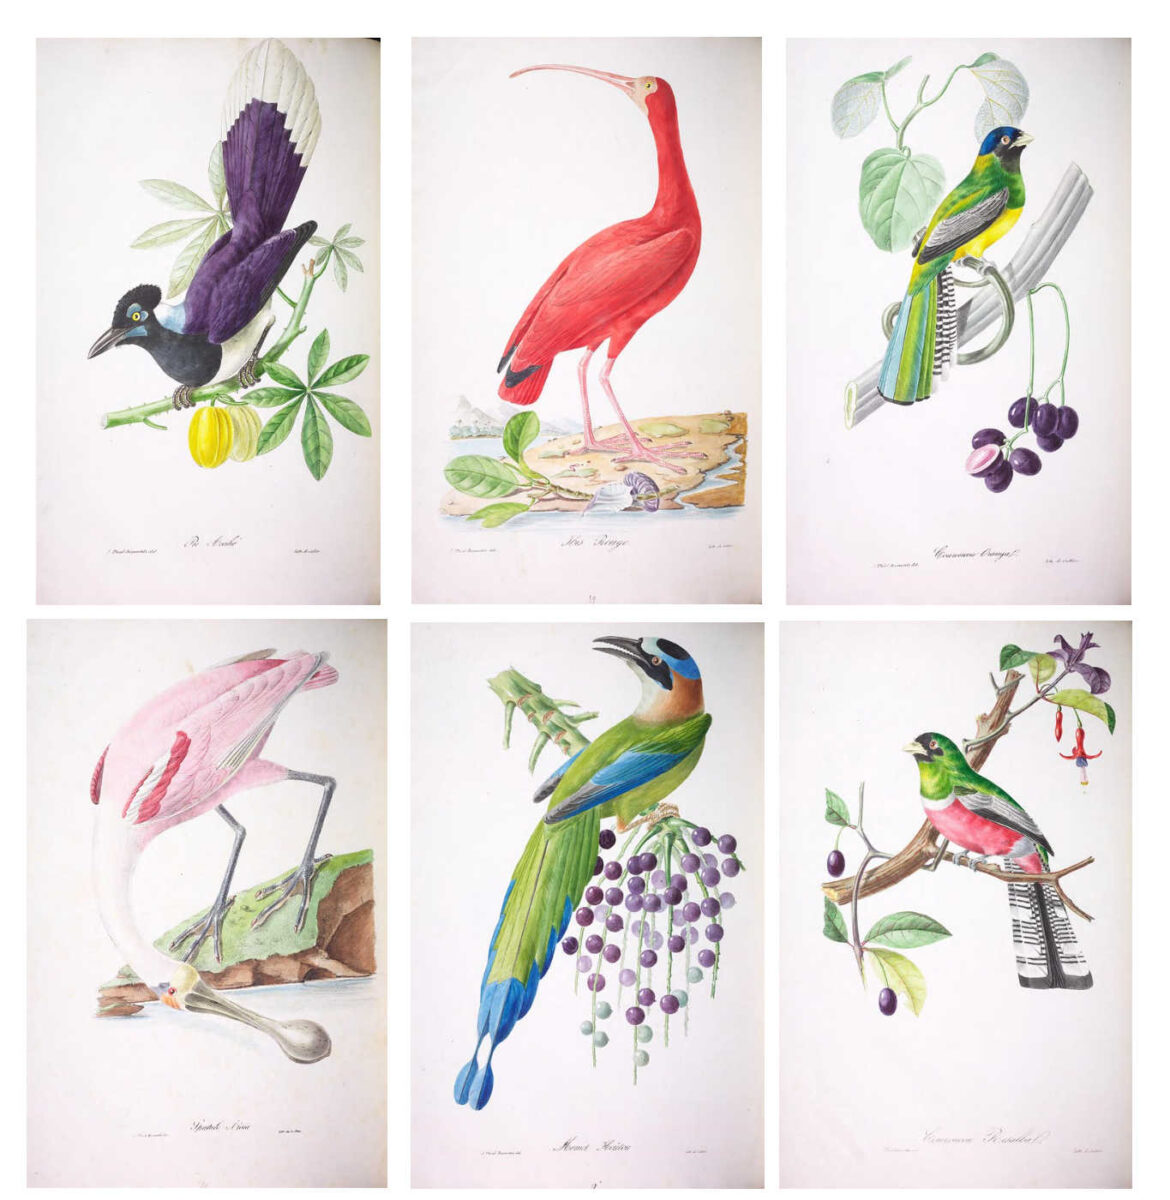
And after all of the color corrections and editing them so that the sizes would be more uniform, this is how they looked after having them printed, framing them, and hanging them on the wall…

First, the photo editing software that I use is called Corel PaintShop Pro. It’s a fairly inexpensive software, and you can download it and start using it immediately. I have the 2021 version, but the 2022 version should be pretty much the same.
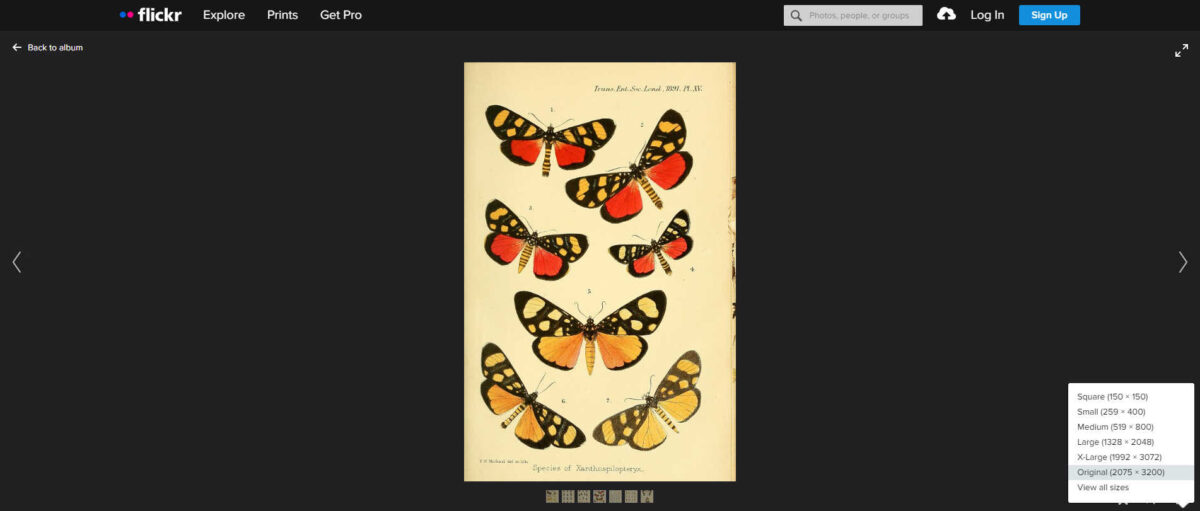
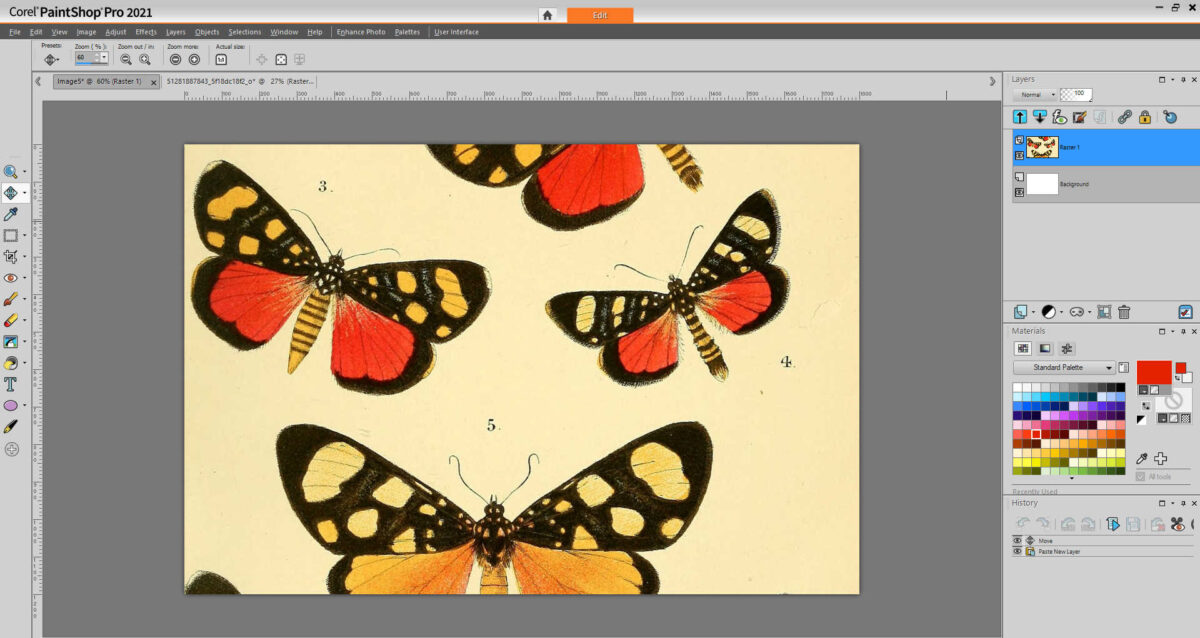
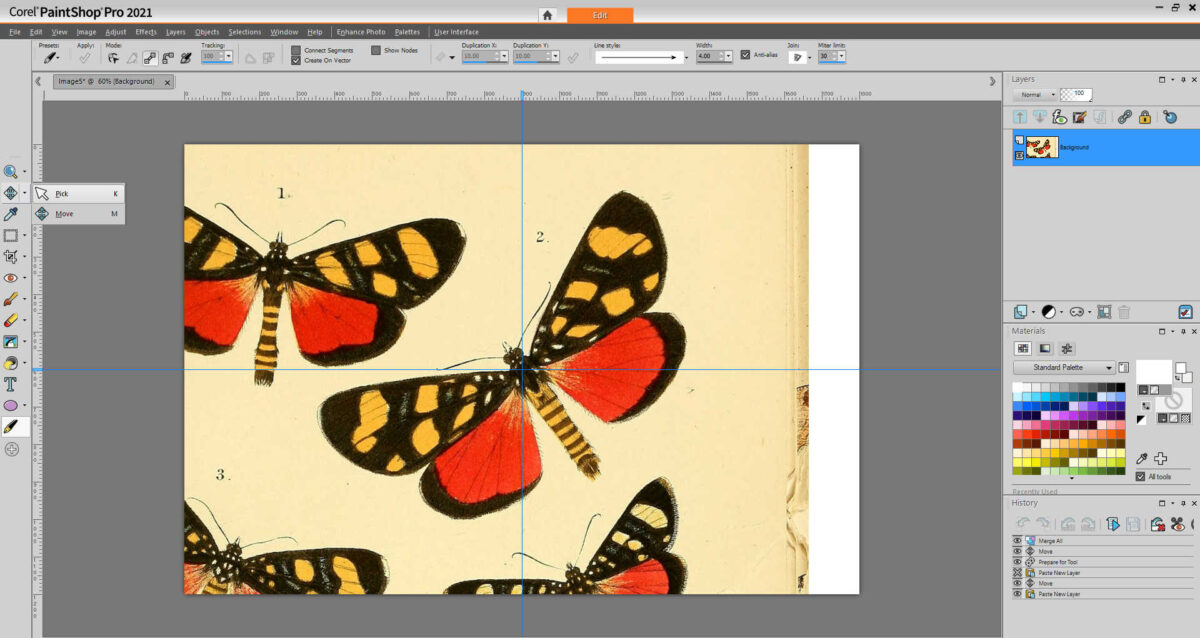
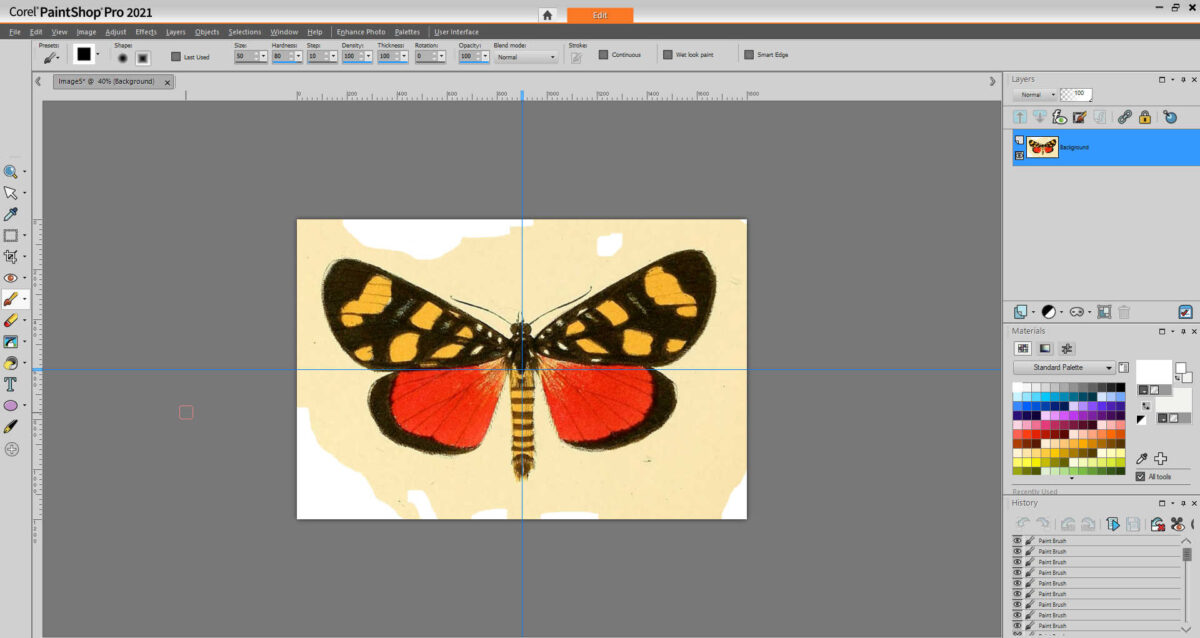
Once you have the software installed and ready to go, head to the Biodiversity Heritage Library and choose the pages you want to use. Most of the pages have several images on them, and that’s where the editing comes in. I selected the page on the far right with the orange and yellow butterflies. Click on the page you like…
And then that will bring up a larger image of that page. Then click on the arrow in the bottom right of the screen to download that page to your computer.

It will give you options for different sizes. Choose the largest size available.
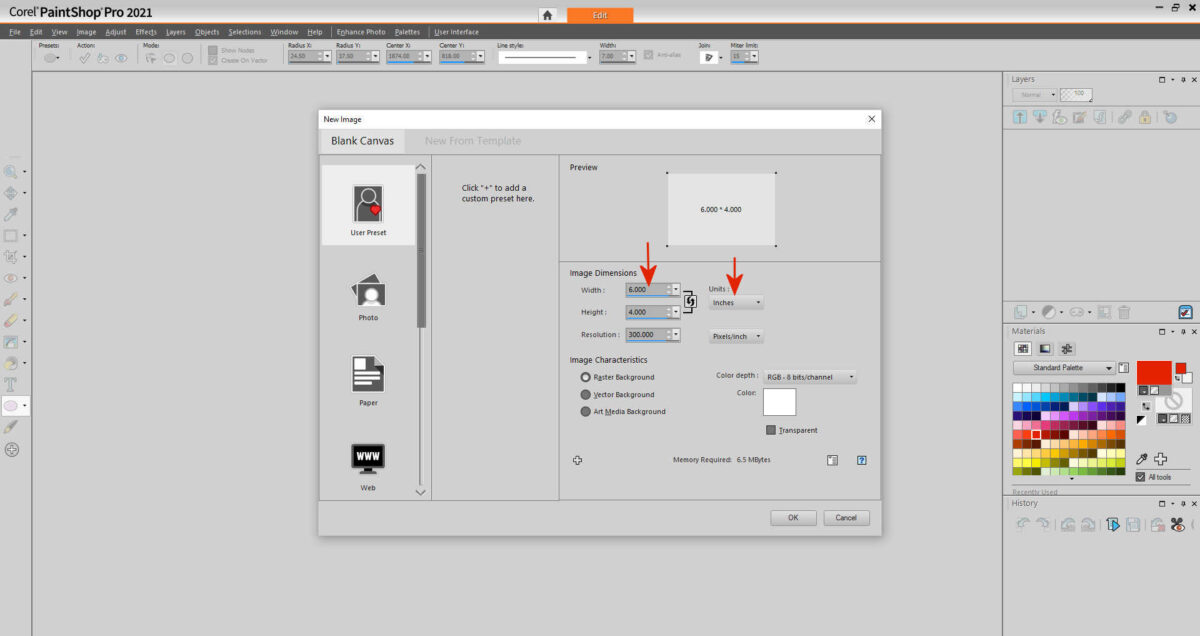
Once the page is downloaded, head over to PaintShop Pro, and in the upper left corner, click on File –> New. That will bring up this box, where you can choose the image dimensions for your new project. I wanted my images to be 4″ x 6″, so I put that in the width and height, and made sure that the units showed “inches” in the drop down box.
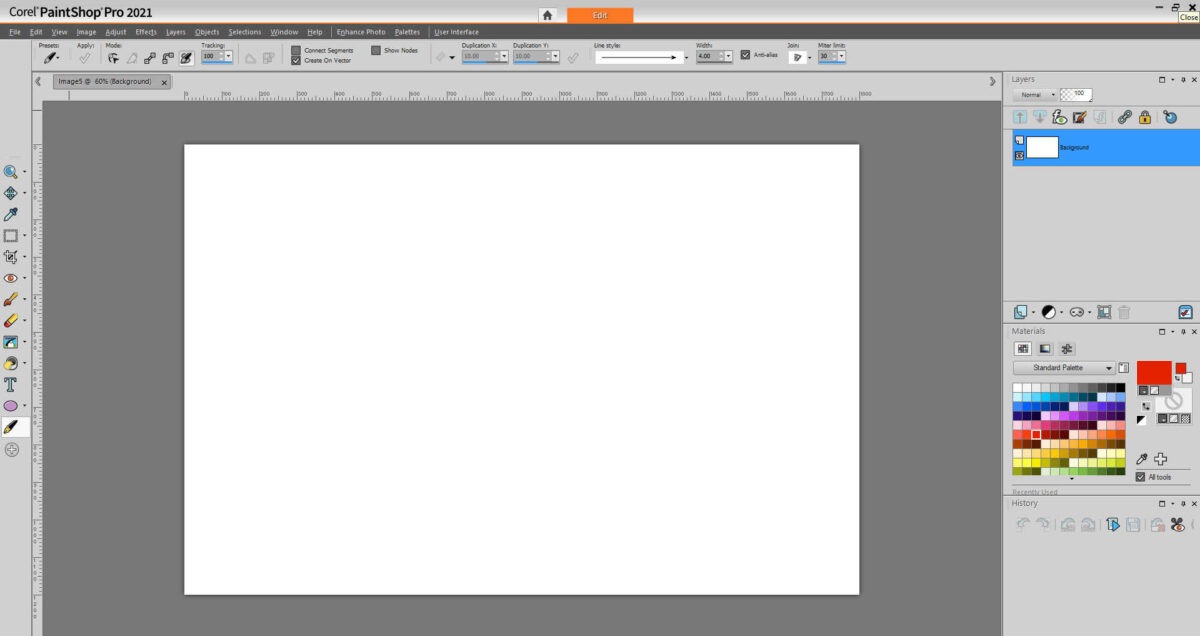
And that brought up a new blank 4″ x 6″ project.
Next, I went to File –> Open and opened up the page that I had just downloaded from the website, and it opened in a new tab. I wanted to copy and paste that large image onto the new blank (and properly sized) project I had just created, so while on this large image, I went to Edit (in the top left) –> Copy.
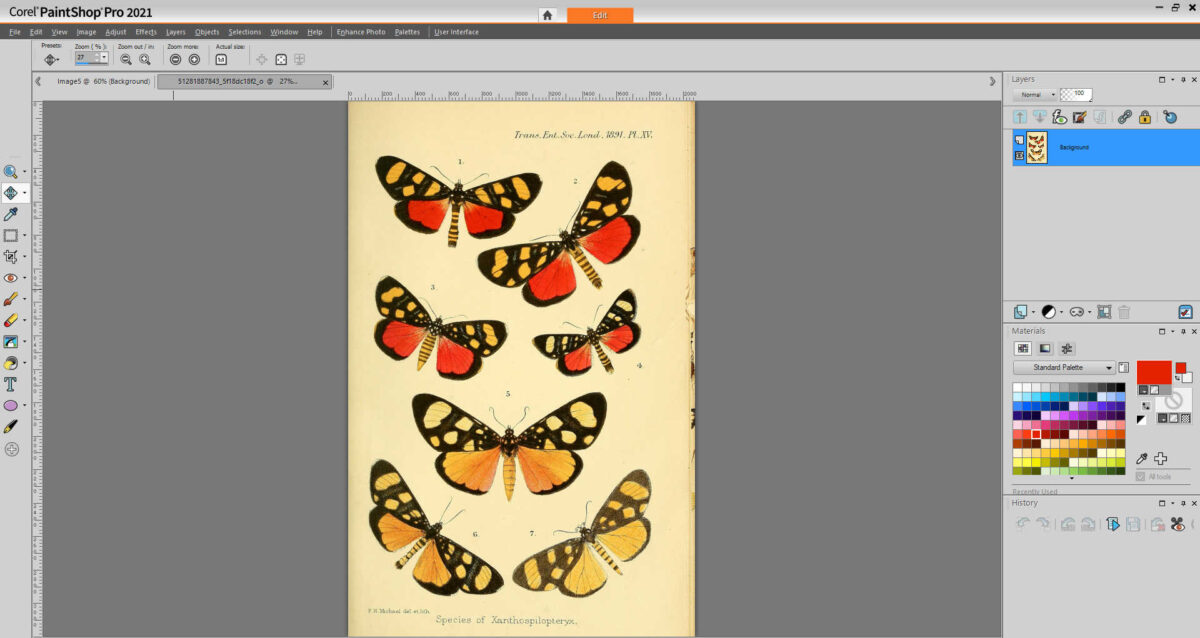
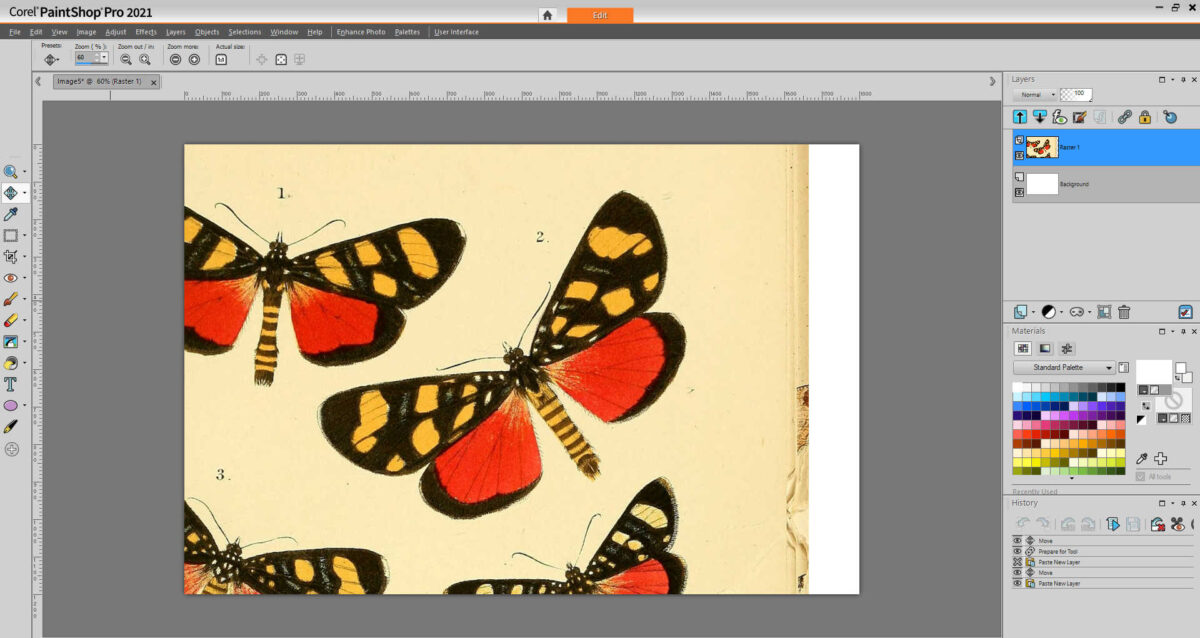
Then I clicked back to the tab with my new blank project on it, and I went to Edit –> Paste As New Layer. That pasted the large picture onto my new project, but as you can see, it pasted it so that the center of that page was featured on the new project. So I needed to move this around, and straighten it up to get the butterfly that I wanted onto the image.
In order to do that, I selected the “Move” tool on the left toolbar, and then clicked and dragged the image until I had the butterfly that I wanted to use visible in the center of the image.

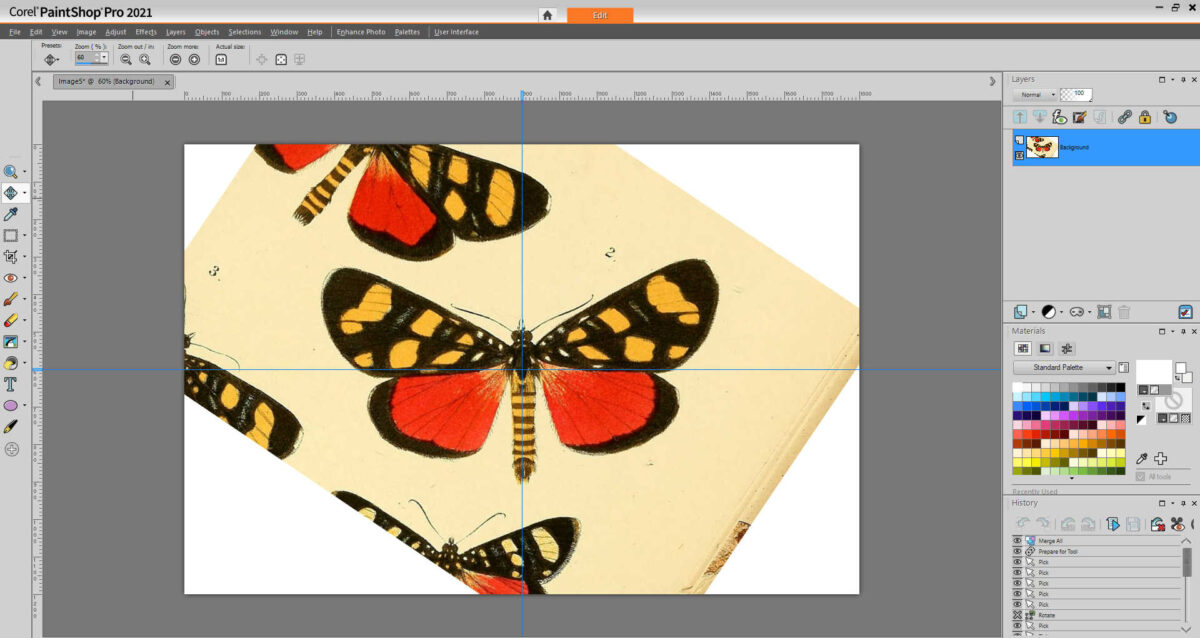
I selected this butterfly just so that I could demonstrate how to straighten images. 🙂
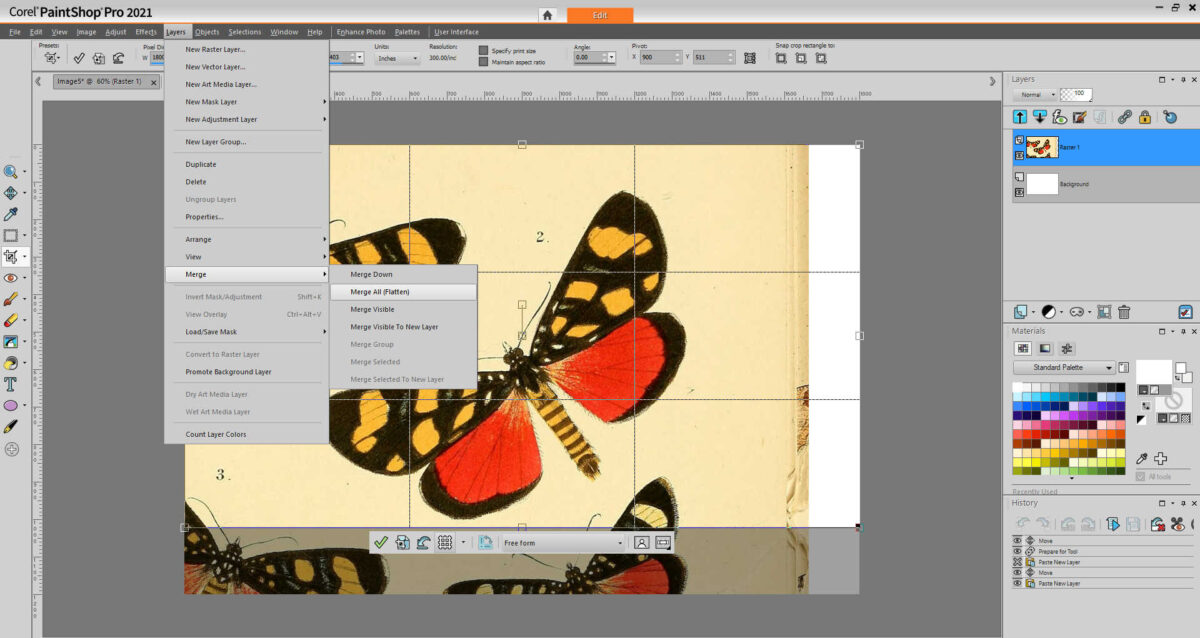
Once I had the butterfly selected and somewhat centered, I selected (on the top toolbar) Layers –> Merge –> Merge All (Flatten). This gets rid of all of the excess image that doesn’t fit onto my 4″ x 6″ image, and flattens everything that remains into one layer.
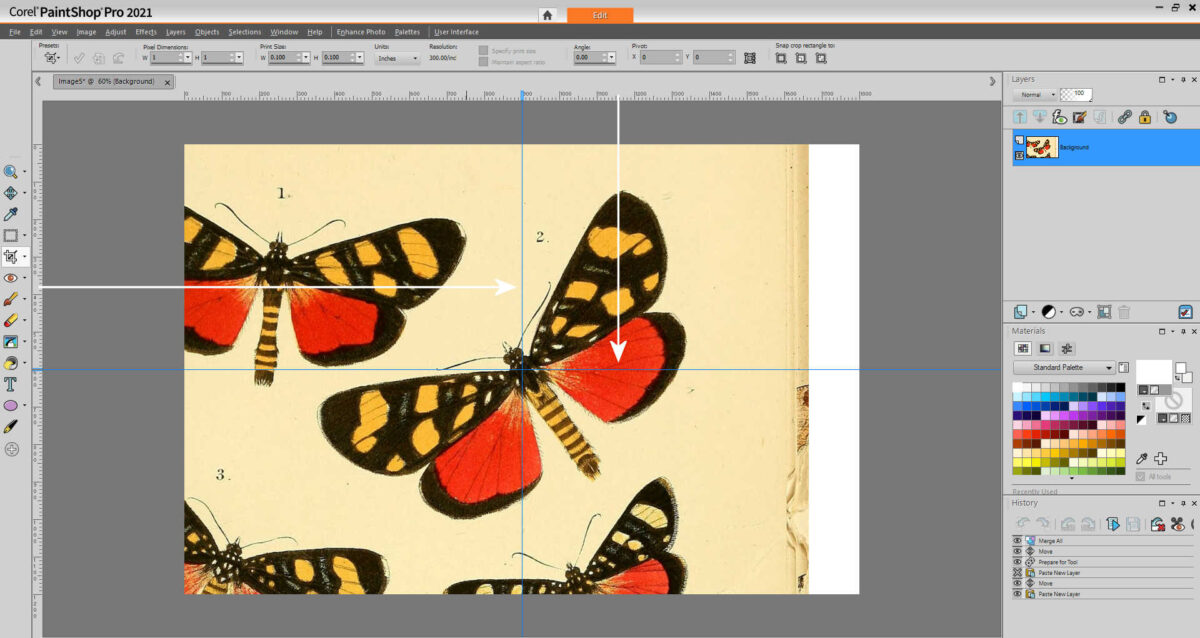
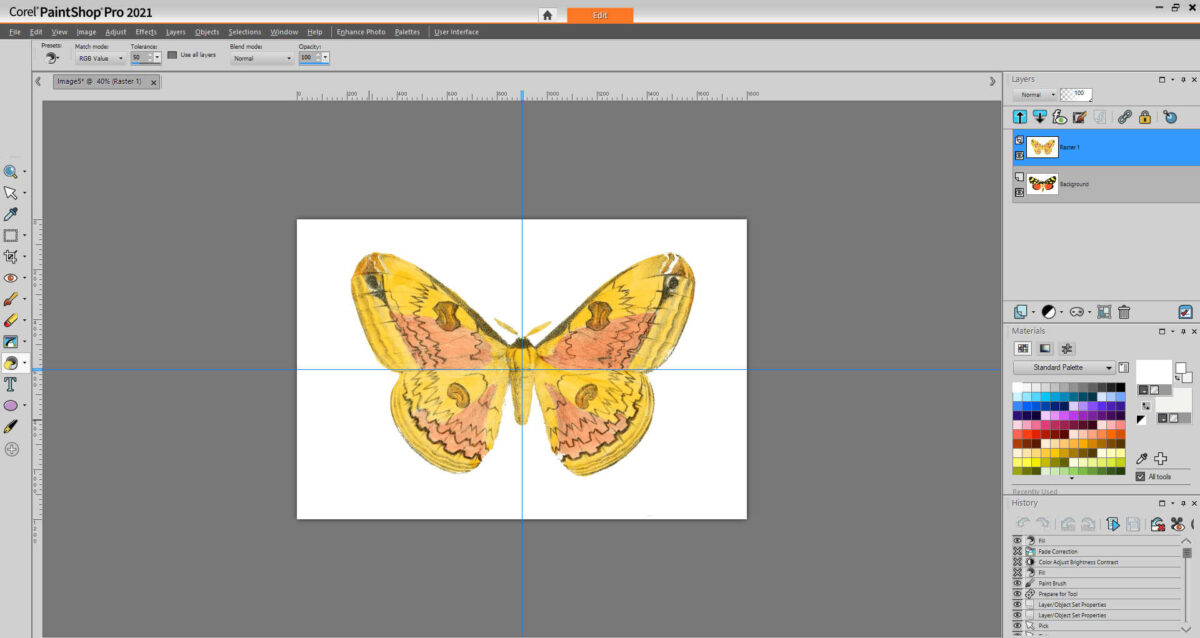
Next, I set up my guides so that I knew exactly where the center of the image was (so that I could center my butterflies). I set these guides by clicking on the left ruler and dragging a blue guide line over to the center of the image. My image was 1800 pixels wide, so I dragged the line to the 900 mark on the top ruler. Then I set the horizontal guide by clicking on the top ruler and dragging a blue guide line to the 600 mark on the side ruler (since my image was 1200 pixels high). If these rulers aren’t showing on your work space, click on View (on the top tool bar) –> Rulers and they’ll appear.
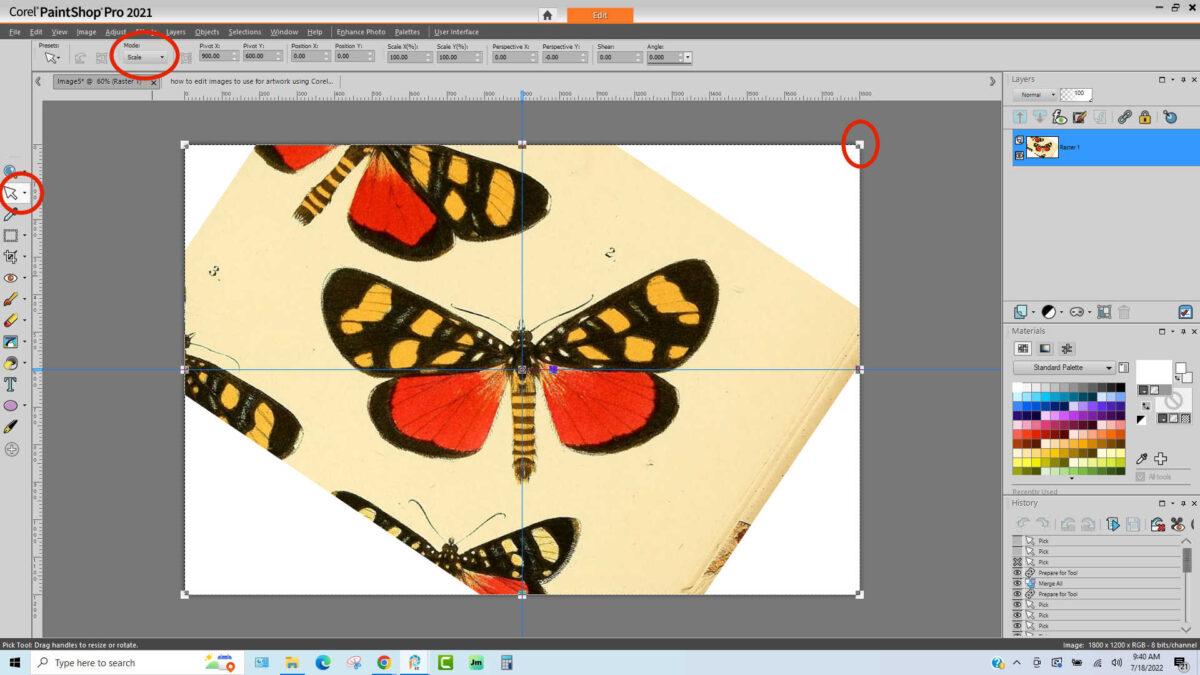
Once my blue guide lines were in place, I could then move the butterfly into place. First, I needed to turn the butterfly. I did this by changing the Move tool on the left toolbar to the Pick tool using the little dropdown arrow.
Once the Pick tool is selected, several boxes appear around and on the image. These are all areas where you can click and drag to move and resize the picture. But for now, this little blue box that shows up just off of the center of the image (circled in white) is the one I wanted to use to turn the picture.

I clicked on that little box and turned the image until it was straight with the blue guidelines.

Once I had the butterfly straight, I flattened the layers again to get rid of the excess that wasn’t showing on my 4″ x 6″ image. (Layers –> Merge –> Merge All (Flatten))
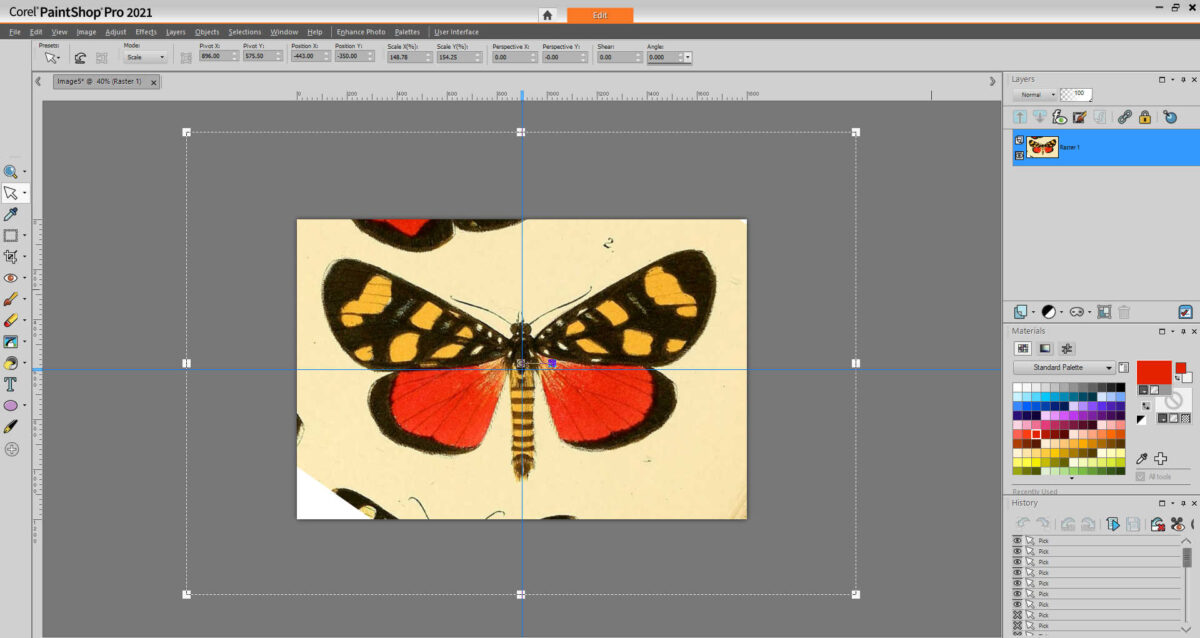
Next, I used the Pick tool to enlarge the butterfly. I selected the PIck took on the left toolbar, and then made sure the Mode on the top toolbar was set to Scale. and then I used the boxes on the corners of the image to click and drag until the butterfly was as large as I wanted it.
While it’s in Pick mode, you can also drag and move the whole image, so when I had it the size I wanted it, I clicked and dragged it until it was re-centered on the canvas.
Next, I needed to get rid of the remnants of the other butterflies that didn’t make the cut. On the left toolbar, I selected the paint brush tool. On the top toolbar, I set the size to 50 pixels (you can make this as large or small to be useful while not causing you to paint over the butterfly you want to keep), and on the right, I made sure that it was set to white since that’s the color I wanted the background on all of my butterflies.

And then I just painted over all of those remnants to remove them, which left me with this…
In order to get the rest of the background white, the process will depend on the butterfly. If you’re editing a butterfly that has very clearly defined edges that have a nice contrast with the background, then the process is very easy. Simply select the Flood Fill tool on the left toolbar (the one that looks like a paint bucket tipping over), make sure the correct color is selected on the right, and then click on the background. With one click, your background is magically perfect, and you’re ready to save this image and move on to the next one.

If you’re not so fortunate to be working on a butterfly with clearly defined edges, or the color isn’t a big contrast with the background, it’ll take a little more work to get there.
On the top toolbar, go to Adjust –> Brightness and Contrast –> Brightness/Contrast.
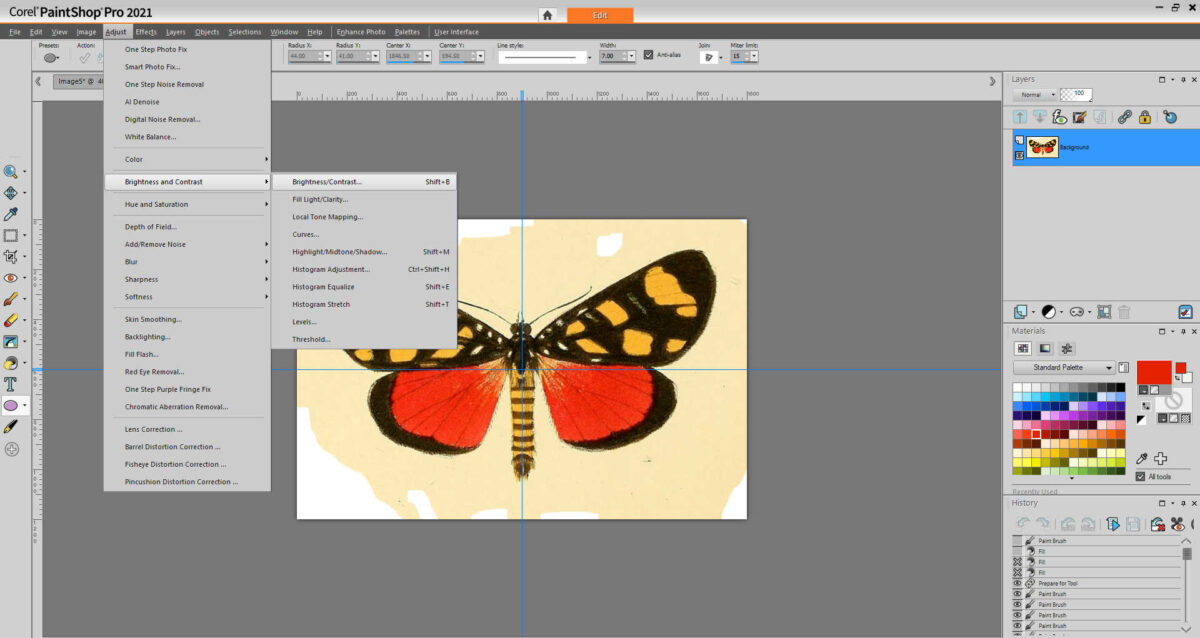
And then adjust the brightness until the background is completely white.
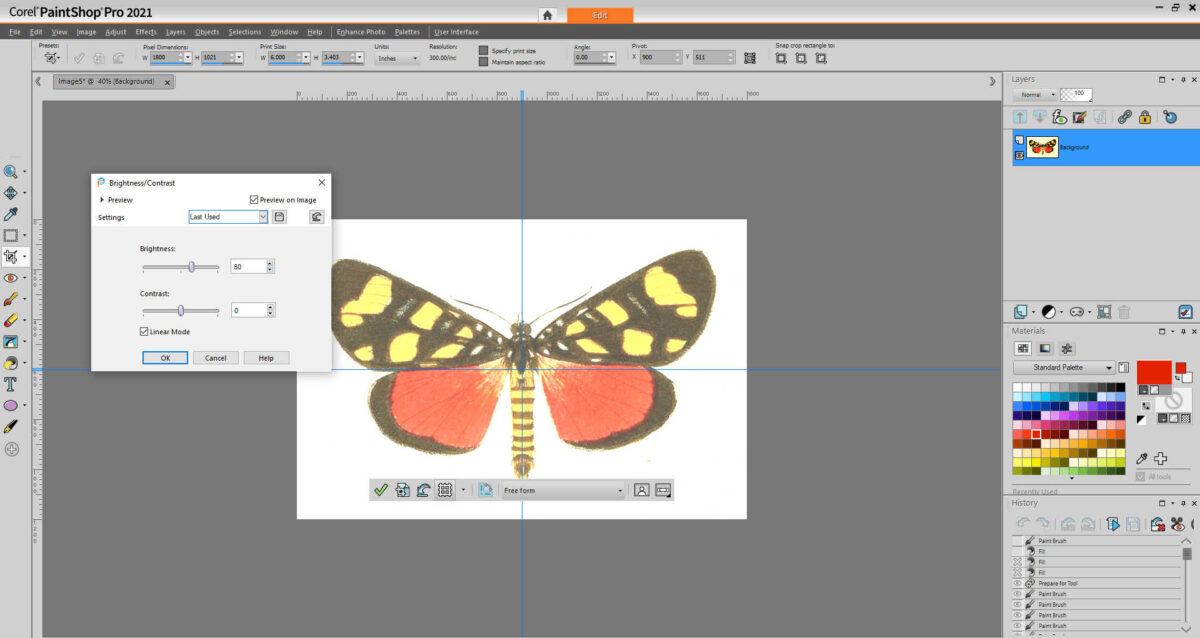
Obviously that not only made the background white, but it also washed out the color of the butterfly. So now we need to restore the color. On the top toolbar, go to Adjust –> Color –> Fade Correction.
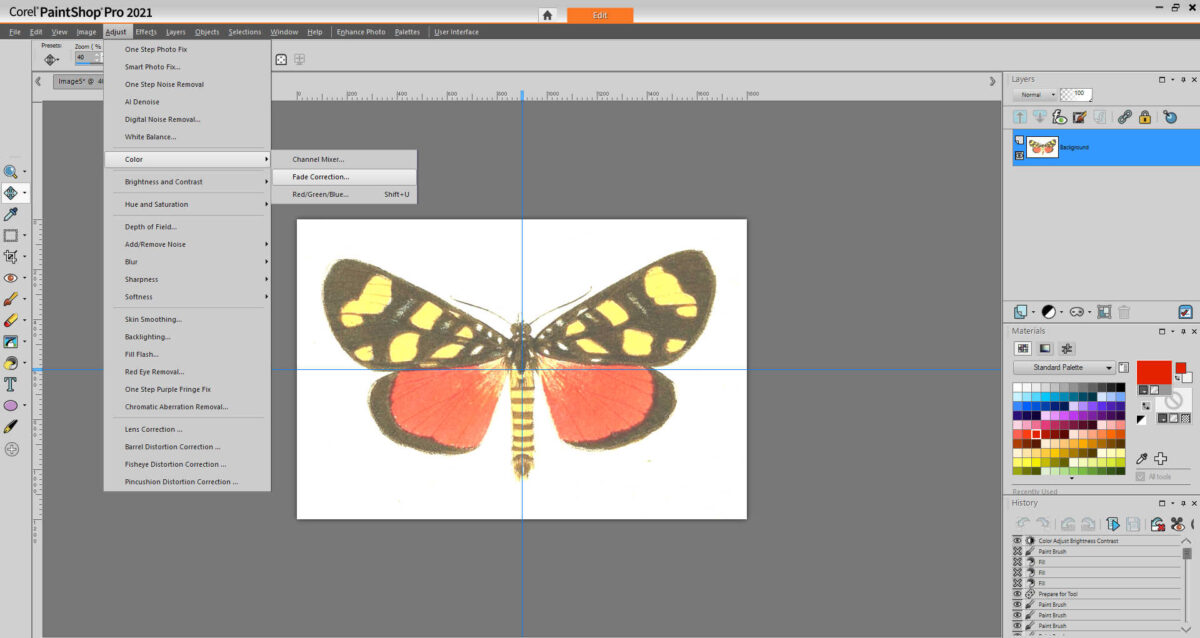
And then adjust the number until the butterfly has its color back.

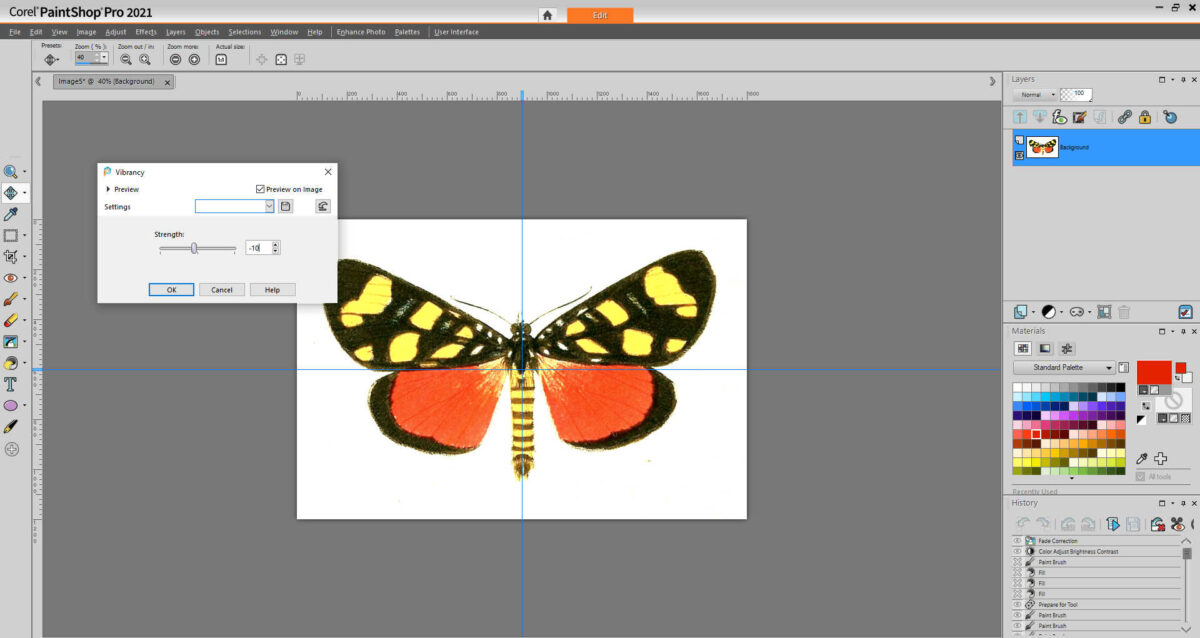
From there, you can continue playing around with the color and light and brightness tools under the Adjust section on the top toolbar until the butterfly looks like you want it to look. One of the things I did on most of mine was to adjust the vibrancy. To do that, go to Adjust –> Hue and Saturation –> Vibrancy.
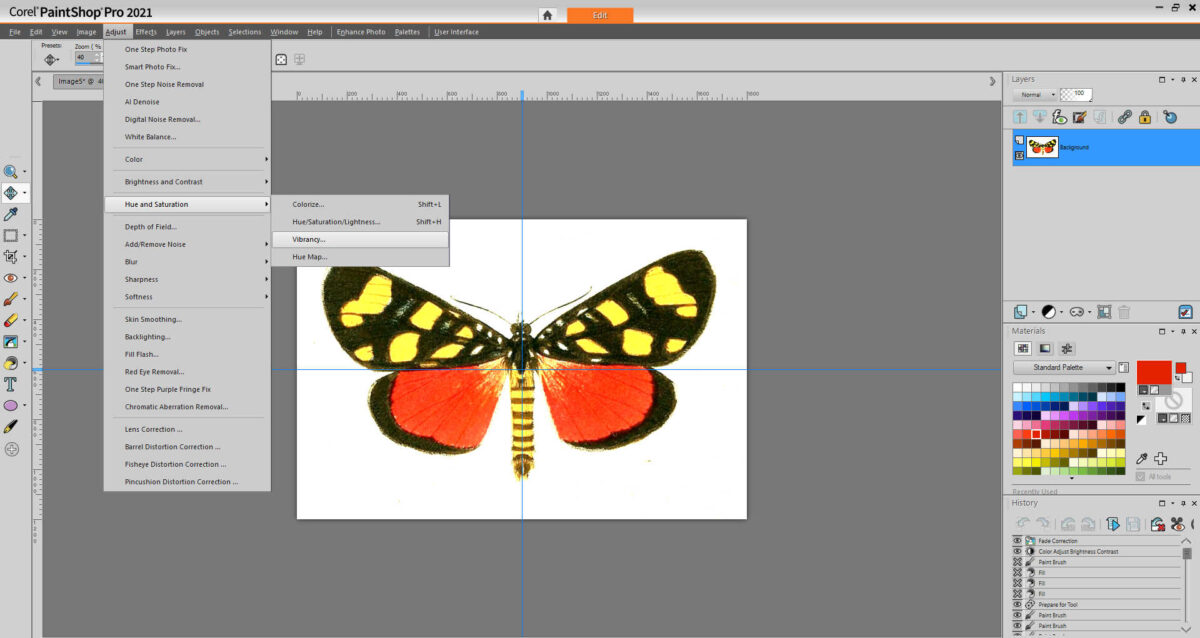
And then I turned down the vibrancy just a touch so that the colors weren’t quite so intense. Once you get everything just right, save it, and you’re ready to move on to the next one.
For all of the subsequent images, there’s no need to go to File –> New and create new projects. It’s much easier if you simply layer the next butterfly onto this existing canvas. Not only will this save you the headache of having to create a new canvas for every new image, but it will also allow you to use the first image as a template for all the rest so that when you’re done, all of the butterflies (or birds, or beetles, or whatever subject you’ve chosen) will be about the same size.
So once you’ve found your next image in the Biodiversity Heritage Library, and you’ve downloaded it and opened it into a new tab in Corel PaintShop Pro, copy the new image (Edit –> Copy), and paste that new image (Edit –> Paste As New Layer) right on top of the first butterfly that you just finished.
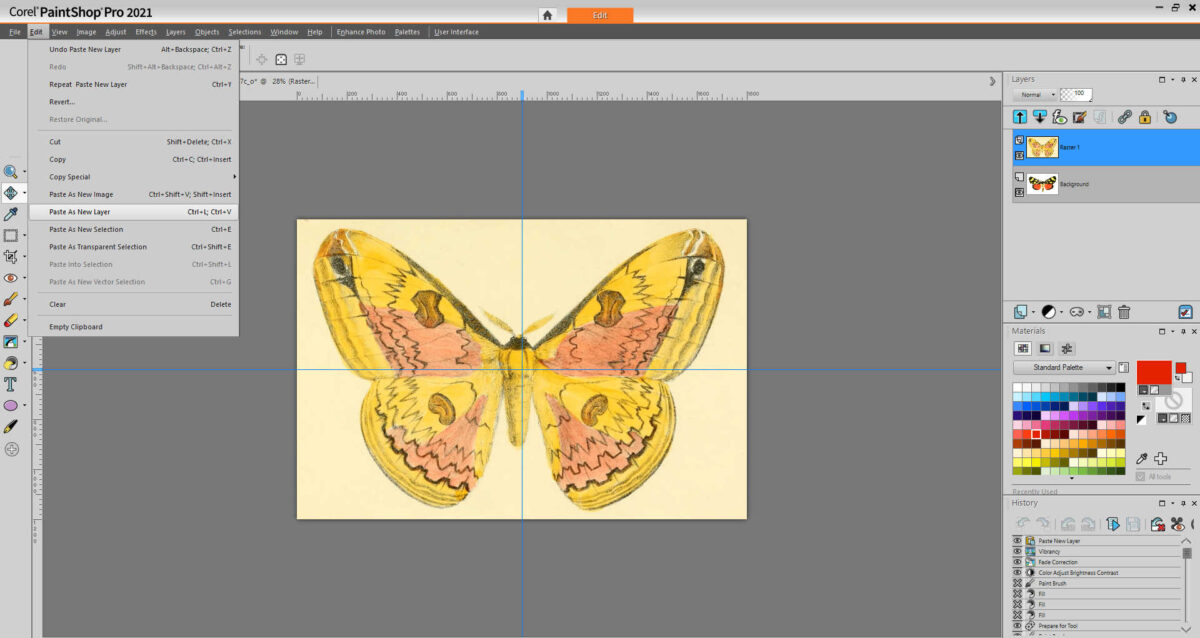
Then over on the right side, you’ll see where it displays your layers. (If you don’t see this, go to Palettes on the top toolbar, and select Layers and it will appear). Make sure that the new layer is highlighted in blue, and then just above that, turn down the opacity of this new layer to 50%.

That will allow you to see the original butterfly underneath, and then you can use the Pick tool in the on the left toolbar, set to the Scale mode on the top toolbar, and go through the same moving and resizing steps as you did on the first butterfly. But this time you can use the first butterfly as a sizing template so that the two are somewhat the same size.
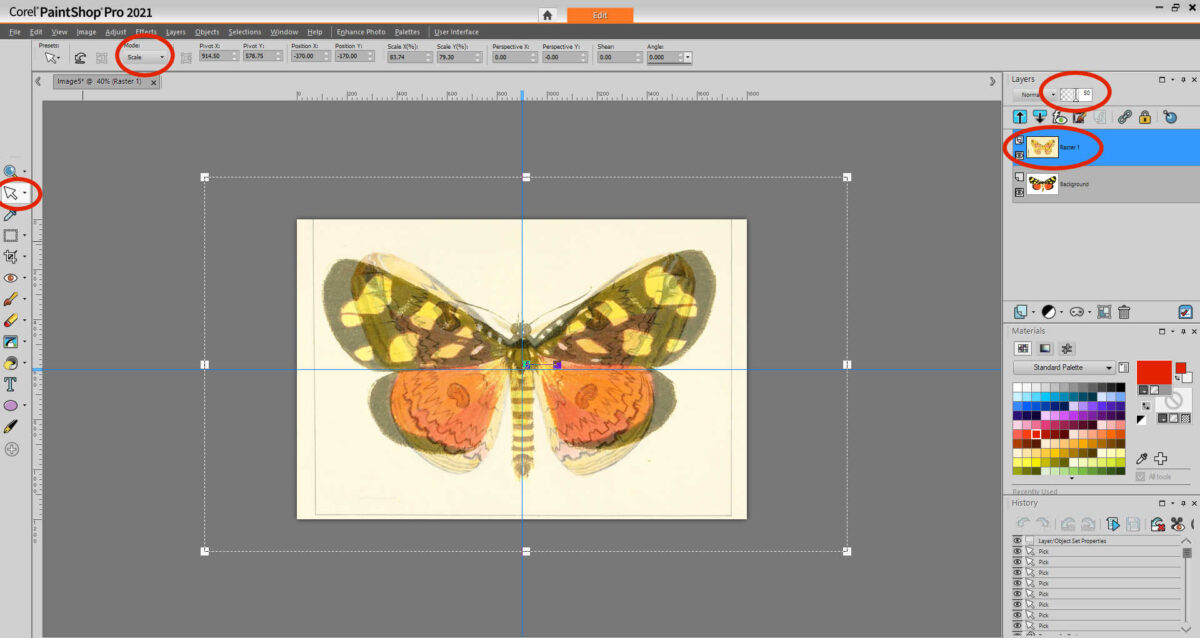
Once you have the new image sized properly, turn the opacity back up to 100% and proceed with the rest of the editing process.
Once you have the new butterfly edited and saved, you can delete this layer (right click on that layer on the layers palette on the right, and then click Delete), keeping the first butterfly as the template, and proceed with the next one.
And then keep on repeating until you have enough to create a gallery wall the size you want!
The good news is that it gets easier as you go. The first couple will be a learning curve, but it’s really not difficult. And after you do a few, you kind of get into a rhythm that makes the rest go fairly quickly. And let’s face it. If you need a whole lot of images of the same subject, those are pretty hard to find, especially at a decent price. I think hunting for your own in the Biodiversity Heritage Library and then editing your own using Corel PaintShop Pro is one of the best options for getting enough pictures to create your gallery wall.
To print the pictures, I generally upload mine to any online printing service. I prefer the ones that can do same day printing locally so that I can go and pick them up within the hour because I like immediate gratification. 😀 I’ve used CVS, Walgreen’s, and WalMart. All of those have same day printing options, and I’ve been pleased with all of them. I usually decide between them based on current sales and/or coupon options, and I can generally find at least one place that has a great sale so that I can get my prints at relatively low prices. The ones I had printed for my butterfly wall came from CVS, and they were 60% off with a coupon code. So be sure to look for those options so that you don’t have to pay full price, and your gallery wall will be an even bigger bargain than you imagined! The real challenge with any gallery wall is finding enough frames that won’t break the bank.
If you’d like to see all of the posts about this master bathroom remodel project, you can find those here: Master Bathroom Remodel — From Start To Present (Still In Progress)

Addicted 2 Decorating is where I share my DIY and decorating journey as I remodel and decorate the 1948 fixer upper that my husband, Matt, and I bought in 2013. Matt has M.S. and is unable to do physical work, so I do the majority of the work on the house by myself. You can learn more about me here.

Thank you so much for this! I’ve had the bio diversity tab open for years lol. I love that you shared that too! One day I’ll be settled and can actually create some wall art.
This is fantastic! Thank you for the tutorial!👍🏻👏🏻😊
WOW!! Your tutorial is so well done and detailed. Thank you so mcuh!
Wow, thank you, Kristi, for such a detailed expanation of how to do this! I would like to do something similar with white flowers, and you took all the guess work out of it! xo
That gallery wall is still stunning. At night, do those sconces highlight the wall? Do you have light shining on the birds? Thank you for taking the time to show us all of the steps to create such artwork. You make it look easy.
The sconces do highlight the wall at night, but I rarely remember to turn them on. 🙂 Since the shades have gold leaf on the inside, they actually cast a very yellow light, which isn’t my favorite.
Excellent information! Thank you so much!
This is wonderful! So helpful!!! Thank you for taking the time to really go step-by-step.
Good heavens! Does this level of creativity and productivity allow time for sleep? Brava, signora!