J & A Master Bathroom:: And The New D.I.Y. Framed Mirrors
Remember my crazy “Plan A” for J & A’s bathroom mirrors?
And remember how, after an entire day of wrestling with branches and sawing little pieces, all I had to show for my day’s work was this?
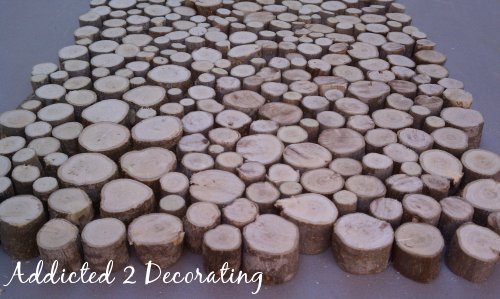
As seems to be the case quite often lately, it was time to search for a “Plan B”.
Well, my “Plan B” probably isn’t going to seem very exciting or creative. I decided to go with mirrors framed in a stained wood. The trick was that I couldn’t just go to Hobby Lobby or a similar store and pick up three framed mirrors because I needed two smaller mirrors, and one much larger mirror, all framed with the same frame.
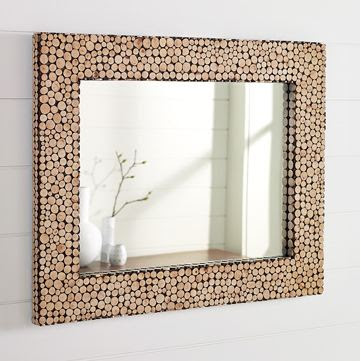
So I looked online. I planned to just have the mirrors from the bathroom cut down to size and then framed, but as it turns out, the frames alone would have cost about $505 for something like this…

I can assure you, that was not going to happen! I almost decided that I needed a “Plan C”, but before going that route, I decided to rummage through the molding department at Home Depot to see if I could come up with an alternative. Turns out they had just what I needed to create some really nice d.i.y. frames, at a fraction of the cost!
So Wednesday, my mom helped me load up the massive mirrors…

…and take them to the glass shop to be cut down to a more reasonable size. While they worked on that, we headed over to Home Depot to buy the molding. We selected these three…

The main one has this really simple, but very pretty profile.

And then the other two were used to trim out edges.
I don’t have any of them completely finished yet, but here’s a look at one of the smaller ones. It still needs a bit of trim added to the outside edge, and then (obviously) needs to be stained and polyurethaned. And of course, it will be hung on the wall above the new backsplash.

I’m pretty happy with my little d.i.y. frames, and even happier with the price!!

The other sink will have the exact same size frame above it, and then the center area will have a much larger frame.

It’s nice to have a plan…and one that’s actually attainable. 🙂 Those little branch pieces will definitely make an appearance somewhere. I certainly can’t let all of that work go to waste!! I’ve got a few ideas bouncing around in my head, but if you have a brilliant idea for a unique way in which I can use the little branch pieces, let me know!! If I use your idea, I promise I’ll give you credit. 🙂
Hope y’all have a great weekend!
Psstt…This bathroom is finished now! Want to see the completed bathroom makeover? Click here to see the whole before and after.

Addicted 2 Decorating is where I share my DIY and decorating journey as I remodel and decorate the 1948 fixer upper that my husband, Matt, and I bought in 2013. Matt has M.S. and is unable to do physical work, so I do the majority of the work on the house by myself. You can learn more about me here.
Perfect! This is exactly what I had in mind for my kids bathroom mirror…it was my plan B. I was originally just going to glue the molding around the mirror that's already on the wall, but once I installed their new lighting I discovered the top edge of the mirror is to close to the light fixture to put anything behind it. Any chance on getting a little tute on how to do the back of the frame so the mirror sits down in it. Not sure if you routed out the back or what?!?! Thanks for any info you can give. Love how it's all coming together!
L
That turned out GREAT!!! And going to Home Depot with you was quite an experience. I was shocked when the guy called you by name. And after some of the stories you have told me, I was even a little shocked when he didn't turn and run when he saw you walking toward him. 🙂
Could be a little bit of a pain, but those little branch pieces would be so cool included in some type of hand painted wall art. That would put all your hard work front and center somewhere.
I noticed branch bathmat/floormat in bathroom and bedroom pics in Crate&Barrel catalog (I think). Not sure how comfy they would be to actually stand on but they sure looked neat!
We also DIY'd our bathroom mirror out of plain old 1x4s and I love them…but I love yours with the molding! Great work 🙂
Here's a link to my pic if you're curious: http://diy-my-home.com/2010/07/mirror-mirror-on-the-wall/
Leigh, I'll definitely post a tutorial on this. I know most people just leave the mirror right where it is, and glue molding right on top of it, but I didn't want to go that route. I wanted SMALLER mirrors. The original mirrors were much too large and overpowering, and simply gluing molding around them would not have improved the look at all. Anyway, hopefully, I'll finish them today and have all of the pictures needed to write up a tutorial.
Mom, as I was writing this, I was wishing we had a video of our little Home Depot adventure, with us trying to figure how much of everything I needed, using a regular shopping cart and piling the molding on top, and then having all of the molding go crashing to the floor in a heap, not once, but twice, and then us trying to maneuver the cart with the 12-foot molding through the aisles without endangering those around us. I'm sure we were quite the spectacle!
what about a cute picture frame as an accessory with the branches…same concept, much more manageable scale…
I agree with Green Gracie Home, a smaller scale one would do the trick too! I always feel like a spectacle when I am in Home Depot no matter what I am buying.
this is great..looking smart…
Hi Kristi, any chance you can tell me where the mirror with the tree branches is actually from. I am absolutely in LOVE with it! Here in S. FL we don't have the necessary trees to even make something like that.
Lindsey, sadly that mirror isn't available anymore. It was from West Elm.
Not sure how you can use the branch pieces – but I recently saw a large art project using corks, from wine bottles,in the same manner as your reference mirror. The artist didn't use glue – only pressed them together inside some sort of frame. Very cool look.