Framed Mirror From Builders-Grade Plate Glass Mirror
I know that about five thousand other bloggers have written posts about framing their bathroom mirrors. But from what I’ve seen, most of them simply purchase molding or trim, and cut and adhere it on top of their existing mirrors.
That’s a fantastic idea if you want to keep the mirror size the same. But what if you have a massive bathroom mirror, and want to minimize the size of the mirror in the room? Simply gluing some molding around it certainly won’t do the trick.
That’s the problem I ran into with J & A’s master bathroom mirrors, where there was not one, not two, but three huge sections of mirror that were much to imposing in the room.

So I actually had to remove the mirrors and basically start over. The cost of having the mirrors framed professionally, or even ordering ready-made frames online, was much too expensive, so I made my own framed mirrors with simple molding found at Home Depot (and saved just under $400 in the process). Here are the steps I took:
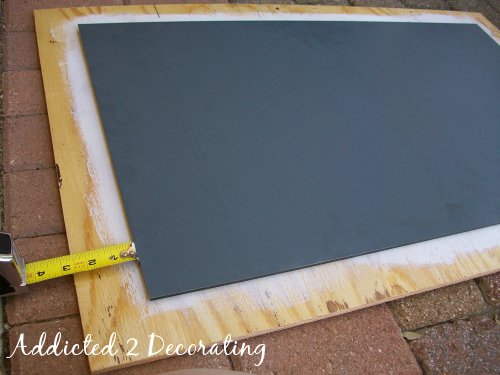
First, I determined the desired finished size of the mirrors. This is completely subjective, and a matter of personal taste. I decided that I wanted two mirrors that were 25 inches X 38 inches to go above the sinks, and one larger mirror that was 38 inches X 38 inches to go in the middle section.
After looking at the molding available at Home Depot, I selected one to use as the main decorative molding for the frame. The molding was 2.5 inches wide.
I subtracted the width (times two) of the molding from the finished width and the finished height to determine the sizes that I would need the mirrors to be cut. So for my 25″ x 38″ framed mirrors, I had the mirrors cut to 19″ x 33″. For my 38″ x 38″ framed mirror, I had the mirror cut to 33″ x 33″.
I cut a piece of plywood to the finished size of the mirror. (I actually subtracted about 1/8 inch from the width and the height for the plywood size). If you don’t have a way to cut plywood, most home improvement stores will cut it to size for you.

I used Kilz to prime the area of the plywood that the mirror would cover, and let it dry for about an hour.

After positioning the mirror in the center of the plywood, I used a pencil to mark the placement of the mirror.
I applied mirror mastic to the back of the mirror according to the instructions on the tube, and then turned the mirror over, adhering it to the plywood, and lining it up with the pencil lines that I had marked as guides for placement. I weighted the mirror with heavy items, and let it dry overnight. **Regular construction adhesive cannot be used to glue a mirror.

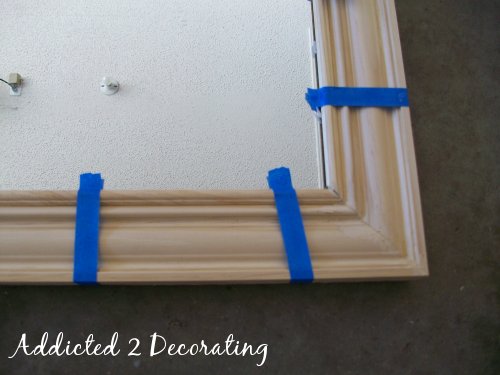
Using the 2.5-inch decorative molding, I cut pieces to fit around the mirror. I used a miter saw to make the cuts at 45 degrees.

When I had all four pieces cut and fitted correctly, I glued them to the plywood around the mirror. I used both wood glue and construction adhesive, which was overkill, but I like to be on the safe side. Also, the construction adhesive holds immediately, while the wood glue dries slower, but holds much stronger. If I had to choose one over the other, I’d definitely use the wood glue.

When I had all four pieces in place, I clamped the corners with C-clamps, being careful not to overtighten, which would leave marks in the wood.

While that was drying, I cut strips of very thin trim (about 1/2-inch) to cover the edges of the mirror. These also had to be mitered at a 45-degree angle.

I also learned the hard way that the stickers on the back of this trim needed to be removed (which required sandpaper to remove all of the adhesive), and these strips also needed to be stained before attaching them to the mirror. If I had been planning on painting this mirror, the back of this strip would have needed to be pre-painted.

As you can see, anything on the back of this strip of trim will show in the mirror.

After all four pieces of the small trim were cut and fitted properly, I attached them using a thin bead of wood glue along the inner edge of the 2.5-inch molding, and then secured them with painters tape while they dried. The trim on a couple of the corners had a tendency to pop up a little bit, so I used weighted items to weigh them down while they dried.
After about an hour of drying time, I used wood filler to fill the cracks in the corners.

The last step of the construction was to cut pieces of 1-inch lattice to cover the edges where the plywood showed. I set the lattice back about 1/4-inch for a decorative effect, but also to hide the space between the back of the frame and the wall that will be created by the French cleat that I use to hang items like this. I attached the lattice with wood glue and a brad nailer. After all four sides were attached, I filled the spaces with wood filler.

I used a 150-grit sandpaper to sand everything smooth, especially the areas with wood filler. Then used a dry brush to remove all of the dust.

After taping around the inside of the frame, I was ready to stain the frame. I used Minwax Special Walnut, and applied it with a piece of a white cotton t-shirt.


The last step, which I haven’t done yet, will be to apply at least two coats of polyurethane. Then they’ll be done! I love the way they turned out!


And the best thing is that these are actual regular ‘ole framed mirrors, that can be taken down and moved to another room in the house. Sure, it was a bit of work (especially making three of them!), but I saved a bundle of money doing it myself!! And I also have the tremendous satisfaction of being able to say, “Look! I made those!”
Generally, that satisfaction is worth all of the time and effort for me. Do you feel the same? Or are you just as satisfied purchasing something ready-made as long as it looks good in your home?
Psstt…This bathroom is finished now! Want to see the completed bathroom makeover? Click here to see the whole before and after.

Addicted 2 Decorating is where I share my DIY and decorating journey as I remodel and decorate the 1948 fixer upper that my husband, Matt, and I bought in 2013. Matt has M.S. and is unable to do physical work, so I do the majority of the work on the house by myself. You can learn more about me here.


That looks so good. I just may try this. I have had a mirror leaning against the wall for a long time thinking I would take it in some day and have it framed. Now maybe I will do it myself. Thanks for the tutorial!
Thanks also for posting the tip about the back of the trim. I never would have thought about the reflection. I don’t know that I’m up for this, especially since I’ll have to patch and paint the wall after, but It is nice to have the step by steps to get it done.
I framed the mirror in my master bathroom but instead off removing the large mirror and cutting it, I just glued the molding right on the mirror. Luckily before I glued it, I held it up to the mirror and realized that I needed to also paint the backside.
The mirror looks great, I may have to give this a try! One quick question…what was the thickness of the plywood you used?
Oh man I love it! I have a big plain mirror I want to frame and hang in my living room. Maybe I'll get around to following your tutorial one of these days!
Earl Grey – a little blog full of big inspiration.
bifty, I used 1/2" plywood for the mirrors. I almost used MDF, which I use for almost everything, but then realized that plywood would be much lighter than MDF. Plywood is also cheaper, which I like…especially since it wasn't going to show.
after finished w/ frame and mirror…how do u affix it to the wall?
Hi, Jim – I think she just used regular heavy weight picture hangers. She references it in the step where she applies the lattice trim to the frame.
Yay! You're so awesome. Thanks for posting this…and doing it so quickly!!!
Thanks for all the information, especially about preparing the back of the molding strips before attaching them. That is one mistake I would have made.
Hey there! Am visiting you via Frugal with a Flourish. You have a great blog! Some of your projects are more than I can imagine tackling (If you go to my blog, click on Spooky For All The Wrong Reasons to see the level of DIY I am up for!)but you are definitely inspiring me to step it up a bit! Thanks!
CC of Currently Chic
http://currentlychic.com
Would love to have you stop by for a visit!
Hi Kristi! Wow, the custom mirror looks beautiful. I love how you carefully thought and planned it all out–very precise and (dare I say it) PERFECT! Love the depth of the finish on the frame, too. Can't wait to see this bathroom when you finish.
Sindy 🙂
Redoing these mirrors the way you did looks super complicated! If anybody ever wants to just pop up a frame on an existing mirror that doesn't need modification, check out how to frame a mirror with MirrorMate. Great looking frames, and best of all for the novice DIYer like me, no special tools needed to assemble or install!
I'm curious did you take down and reuse the same mirrors from the before pictures? I'm assuming you didn't, but just wondered. I have two walls of mirrors (ugh) in my bathroom and we are taking them down this summer. Wondering how to do safely. Any suggestions would be great!
I actually did use the same mirrors. I removed them, and took them to a glass & mirror shop to have them cut down. I was very fortunate that they weren't adhered to the wall with any type of adhesive. I just had to remove the clips and cut away the caulk that was between the mirror and cultured marble backsplash
FYI, the Mr. Clean Magic Eraser does an awesome job of removing the sticky from anything. Caution on a finished varnished or painted piece of wood but otherwise I find it takes sticky tags off anything! I love your blog!
A great project. I never though about constructing my own mirror frames. Another good wall mounting concept would be shelving. I've had a hard time finding blogs about this. Only one I came close to finding was here: http://www.woodenyoushelving.com
Oh I found what I was looking for, if anybody else is interested you can see their website here: http://www.airshelves.com
THANK YOU THANK YOU THANK YOU THANK YOU!!!!!! I have been TRYING to find out how to hang a mirror, as I have had our huge old mirror cut down, and I want to frame the pieces, but I couldn't figure out a good way to hang it! The french cleat was something I had thought of, but then how to hide that (one in particular hangs on the wall to the side of how you walk in, screaming for the side to be looked at!) and your lattice piece was just what I need to know! Thanks again!
I remember reading that the back of the trim should be painted in black so it will not reflect on the mirror.
What do you think ? Have you tried ?
Monique~
I didn’t paint it black, but I did stain it. On the first couple of pieces, I made the mistake of not staining the backs, and it looked horrible. I had to go back and stain them. Another thing to look out for is price tag stickers on the backside of the trim pieces. Stickers close to the edge will definitely show. (And yes, I made that mistake, too…LOL)
Omg, I’m so excited that I found this website! In both of my both rooms in the house we bought they just put just plain mirrors on the walls. I was thinking about buying mirrors like these but so expensive, but now something I can do and won’t hurt my pockets! Thank you for sharing!
Thank you so much for your awesome postings, advice and pictures. What a treasure trove of valuable information. I am incredibly impressed with your expertise. I was wanting to paint my bathroom fixtures and shower trim, but was afraid it wouldn’t work and I’d be left with an expensive mess. Now, I know it can be done and beautifully too. Thank you so much!
This is a fabulous tutorial. I found you from a pinterest search and will be following your great instructions to frame and repurpose a large mirrored closet door. Thanks so much!
I really like the frame you made. Where did you get the molding from? I can not find it anywhere by me….
You did a great job with the frames! Where did you buy the molding from?
How did you remove the mirrors?
Why do you paint the plywood before affixing the mirror?
It’s primer. IT’s just a good habit to always prime a surface — drywall, MDF, plywood — before using any kind of adhesive on it, whether it’s mortar for tile, mirror adhesive, construction adhesive, etc.
Beautiful work! Just wondering what technique/s you used for staining especially over the wood filler?
Hi . My husband recently made a frame for our builder grade mirror and attached it tonight while I was out. First thing I noticed was that he forgot to stain the back you can see the wood reflected. If we can find some thin 1/2″ trim i wonder if he can make a smaller frame with back stained to fit inside the one up there to hide the reflection. It’s too badas he framed our huge masterbath mirror last yr but stained the back on that one