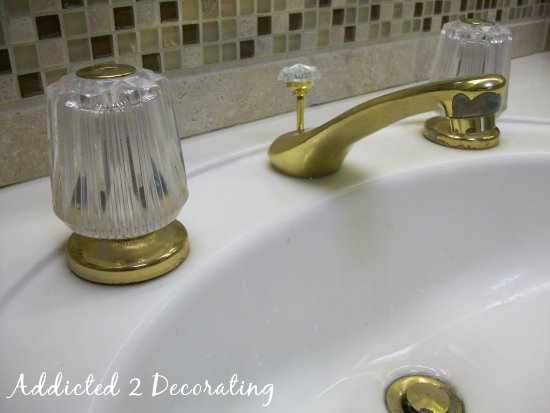
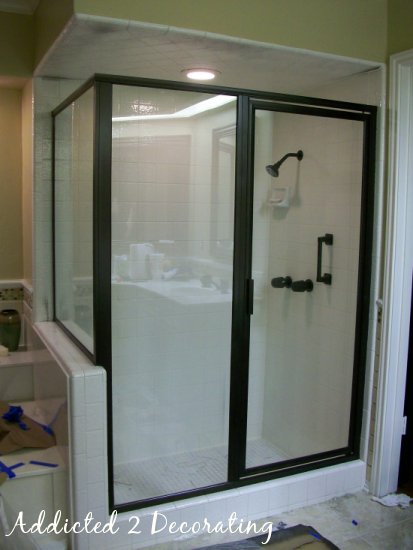
J & A Master Bathroom:: The Final Painted Faucets & Shower Enclosure
I know some of you thought I was absolutely crazy to do this, but after researching the process, I felt confident that it could be done successfully. No, it probably won’t last forever, but what metal finish does?! The good thing is that this can actually be touched up if need be. And like I said before, almost anything would have been better than this…


The process definitely wasn’t quick and easy. The hardest part was getting everything taped off and covered. That process alone took me more than one entire day.


And the process was messy and frustrating, as my shoes kept sticking to the plastic that I had used to cover the floor.
But I think the outcome was worth the effort. And even though I wasn’t able to change out the handles like I had hoped, I still think the “afters” are a vast improvement over the “befores”.


And I’m so incredibly proud with how the shower enclosure turned out!! I did get a little overspray in some places that I now need to clean off, but that should be pretty easy.
The only real frustration with the whole process was the tub faucet. It still looks like this…

…because I had to paint it three times. Yes, three times!! The first time, the paint wrinkled for some reason. I’m convinced that spray paint has a mind of its own. Sometimes, you can do every single thing right, take all of the necessary steps, and it still just decides to wrinkle.
So I got a razor blade, scraped the paint off, and started over again. I repainted the faucet on Monday right before I left to go home. When I arrived Tuesday morning, I saw that the plastic drop cloth that I had taped to the wall around the tub had come loose and had fallen right on to the faucet.
Soooooo…after peeling the dried-on plastic from the faucet, I got out the razor blade once again, scraped off the paint again, and started over…again!
I’m about to head over there and see if the third time will be the final time.
But all in all, I’m very pleased with how everything turned out. It’s a drastic improvement!!
**Move your cursor back and forth over the pictures below to see a quick before and after view of the faucet and shower enclosure.**


I’m actually debating whether or not I want to do one more step. One professional painter I talked to said it wasn’t necessary…another one said he would recommend it. So, I’ll make a decision on that, and then give you all of the step-by-step instructions tomorrow.
Edit: Click here to read the step-by-step instructions and products used.
Psstt…This bathroom is finished now! Want to see the completed bathroom makeover? Click here to see the whole before and after.
I’m linking this post to:
- The Power of Paint Party at Domestically Speaking
- Paint Color Party at Less-Than-Perfect Life Of Bliss
- Transformation Thursday at Shabby Chic Cottage
- Hookin’ Up with House of Hepworths
- Show Off Your Stuff Party at Fireflies & Jellybeans
- Weekend Wrapup Party at Tatertots and Jello
- Frugal Friday at Shabby Nest
- Feature Yourself Friday at Fingerprints On The Fridge
- Saturday Nite Special at Funky Junk Interiors

Addicted 2 Decorating is where I share my DIY and decorating journey as I remodel and decorate the 1948 fixer upper that my husband, Matt, and I bought in 2013. Matt has M.S. and is unable to do physical work, so I do the majority of the work on the house by myself. You can learn more about me here.
awesome
The shower enclosure is just stunning! They're such eyesores most of the time, but you did a fantastic job modernizing it!
That is some time consuming, painstaking taping off! I would like the drains would be the hardest!
Beautiful!!! You are amazing, Kristi!
The shower enclosure looks great! We also have the same gold fixtures in our master bath, and I have been considering painting them as well. Did you just use spray paint, or did you rent a sprayer and use a special paint to adhere to the metal? This is my new inspiration to bring my bathroom up to date!
What a transformation! This looks great!
How awesome but what a job taping everything! I am curious to know what type of paint you used. I would love to do our shower surround but I hate it so much I think I just want to replace it!!!
WOW! I know my readers would love to see this. I'd love it if you'd link to my Paint Color Party going on now:
http://lessthanperfectlifeofbliss.blogspot.com/2011/01/paint-color-party-link-up-your.html
Get out…. I would be scared to death, but you are one brave cookie! Way to go, feels good to see improvement without a huge bill in the other hand!
That looks like a lot of work! I never would have thought to spray paint bathroom plumbing fixtures. Great job!
WOW!!!! Everything just pops now! You did a great job.
Great work! I am thinking about painting mine, but dread the prep work lol. Would loev to see you at my weekend linky party!
Bless your heart..sounds like you really worked hard on this. Let me assure you that it was worth every thing you went thru. Why girl…this is AWESOME.
You did a wonderful job on it all.Why, you did so good, I am now going to follow you. 🙂
Come by to see me sometime.
xo bj
Wow! We have cream and gold fixtures everywhere in our new home … I hate them. Gold accessories just irk me. Black or even a pewter grey would look great in my home … perhaps I will show my Hubs this makeover and he might relent and let me 'fix' everything!
That black really stands out and modernizes your bathroom. You did a stunning job!
Wow! I can't believe the difference. It totally updates the whole look!
Wow! I can't believe the difference. It totally updates the whole look!
Hello.
I am curious to know what type of paint you people use. I would love to do our shower surround but I hate it so much I think I just want to replace it!!!
Wow! I can't believe the difference. It totally updates the whole look!
That looks like a lot of work! I never would have thought to spray paint bathroom plumbing fixtures. Great job!
You have your own way of changing the theme of your bathroom. That's great!
The kitchen faucets are the Focal point of the home.You can put the faucets in your home areas such as bathroom,garden,and kitchen.The faucets is a design also for our home.
Ultimate guide to Faucets Direct. Choose what best fits to your criteria for Faucets Direct. Top rated kids bathroom
http://www.delta-bathroom-faucets.com/faucets-direct.htm
Love it!
To give old retro bathroom fittings a new lease of life, have the worn old chrome tarnished (or removed if it’s peeling) at the eltro-platers then take them to be powder-coated, which will last for year’s and there’s no end to the range of colours you can have. Why settle for boring old chrome.
Just wondering how this has held up? Looks amazing, I’m just wondering on the long term look!
Thanks
Ok, we want to attempt bronzing our bathroom. Do you have the step on how to? I see that we have to tape off everything and use rustoleum, but do you treat the area or sand it before painting? How do you get all the crevices and edges of the shower doors? Do we have to sand everything everywhere, if we miss a spot does it fleck off and not stick? Yes, we have never done this and want to do it right without killing the bathroom! Please give us whatever advice will help us. Thanks! Your redone bathroom is amazing and we too are on a strict budget.
How’s it holding up? It looks fabulous!!
I’m debating on painting my (builder’s grade) faucet vs. buying anew. With hindsight being 20/20, what would you do if you were only doing a faucet?