Lined Pinch-Pleated Curtains — A Follow Up
Last week, I posted perhaps the longest and most thorough tutorial I’ve ever posted on my blog. That two-part tutorial on how to make lined, pinch-pleated curtains, had a total of 107 photos in two posts.
If you missed the lined, pinch pleated curtains tutorial, you can cick here to see Part 1, and click here to see Part 2.
I did get some questions that I wanted to answer, plus I want to add a little more information that I hope will be helpful.
A Clarification
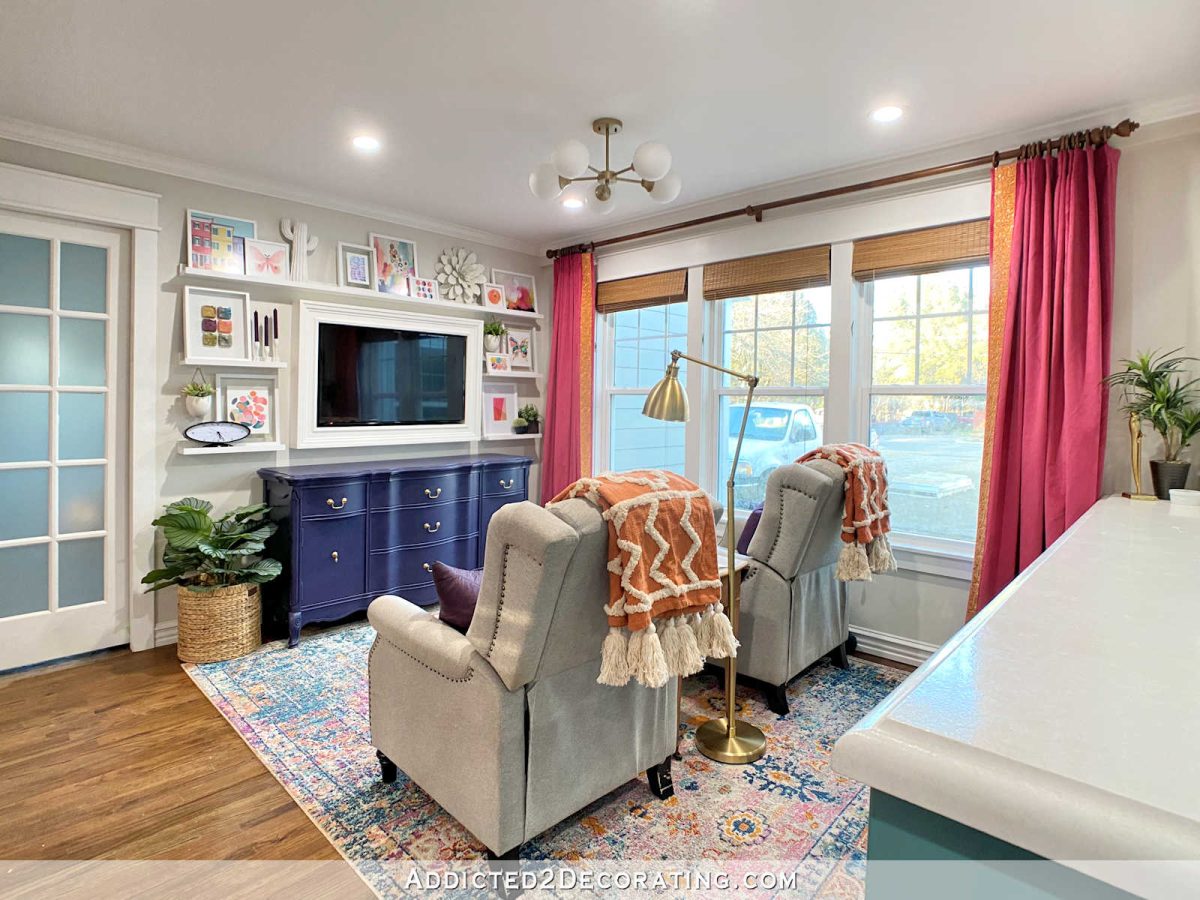
First, I want to clarify that the tutorial is only for making single-width (obviously), stationary, decorative curtain panels. I pretty much never use my curtain panels to actually cover a window for privacy or to block out light. That’s why my windows are almost always dressed with both curtain panels (to add softness, color, pattern, etc.) and woven shades (for privacy and to actually block out light).
For example, the curtains in our sitting room are not wide enough to cover all three windows. Their only job is to hang there and look pretty by adding color, texture, and visual height to that wall. If we want privacy or light control in there, I close the shades.
If you want to make operable pinch-pleated curtains, that’s a whole different thing. First, you have to figure how many widths of fabric to use for each panel (the total width of the curtains is generally 2.5 to 3 times the width of the window(s)), and then you have to do some actual, real math to figure out how many pleats to use, and how much fabric can be used by the pleats in order to have enough width left to actually cover the window when the curtains are closed. I mean, it’s not a project to be tackled by the faint of heart. 😀
Now I will say that even if you’re panels will be stationary and decorative, it is much better to sew a double-width panel if your window (or span of windows) is really wide. If you need that for your window, I have this old tutorial for sewing double-width lined drapery panels.
In a perfect world, the curtains for our sitting room windows (pictured above) should have been double-width panels. But I really wanted to use that fabric, which I had purchased for another project, and I only had enough to do single-width panels. It’s fine, but it makes it very obvious that they’re only decorative. That’s just a matter of personal preference. Some people don’t mind that. But if I were to do those over again, and actually purchase fabric specifically for those windows, I’d make sure I used two widths of fabric for each side.
Why I Prefer Blackout Lining
I had someone ask me why I use blackout lining when there’s no direct sunlight coming in through the back doors of my studio. Those doors are covered by the carport, so direct sunlight never reaches those doors. Of course, you can use whatever kind of lining you prefer on your draperies. I got in the habit of using blackout lining on my draperies years ago for two different reasons.
First, I love the weight that it adds to the curtain panels. Because blackout lining is thicker and heavier than every other kind of lining (at least the ones I’m familiar with), it adds a weightiness to the panels that I think is very nice. The substantial weight and feel of a pane lined with blackout lining makes them feel more luxurious to me. Plus, I’ve never even once had to use drapery weights on any panels I’ve made using blackout lining.
But the main reason blackout lining is my go-to lining is because I don’t like even the slightest bit of sunlight coming through my drapery panels, especially when I’ve used a colorful patterned fabric. Any light that comes through the panels can potentially distort the colors, and that bothers me tremendously.
I notice this in our living room where I have the pink, unlined curtains. Because I broke my own rule in that room and used a stretchy apparel fabric (I couldn’t help myself because the color and weight of the fabric was perfect), I wasn’t able to make the fabric work with lining. So they’re unlined, and anytime light shines through them (and it doesn’t have to be direct sunlight), they look like a different shade of pink.
You can see that in this photo below. Those two curtain panes in the corner look like two different colors, and it’s not just the area getting direct sunlight on the panel on the left that looks different. There’s also a strip of the far right panel that is a different color even though that never gets direct sunlight since it’s under the front porch.
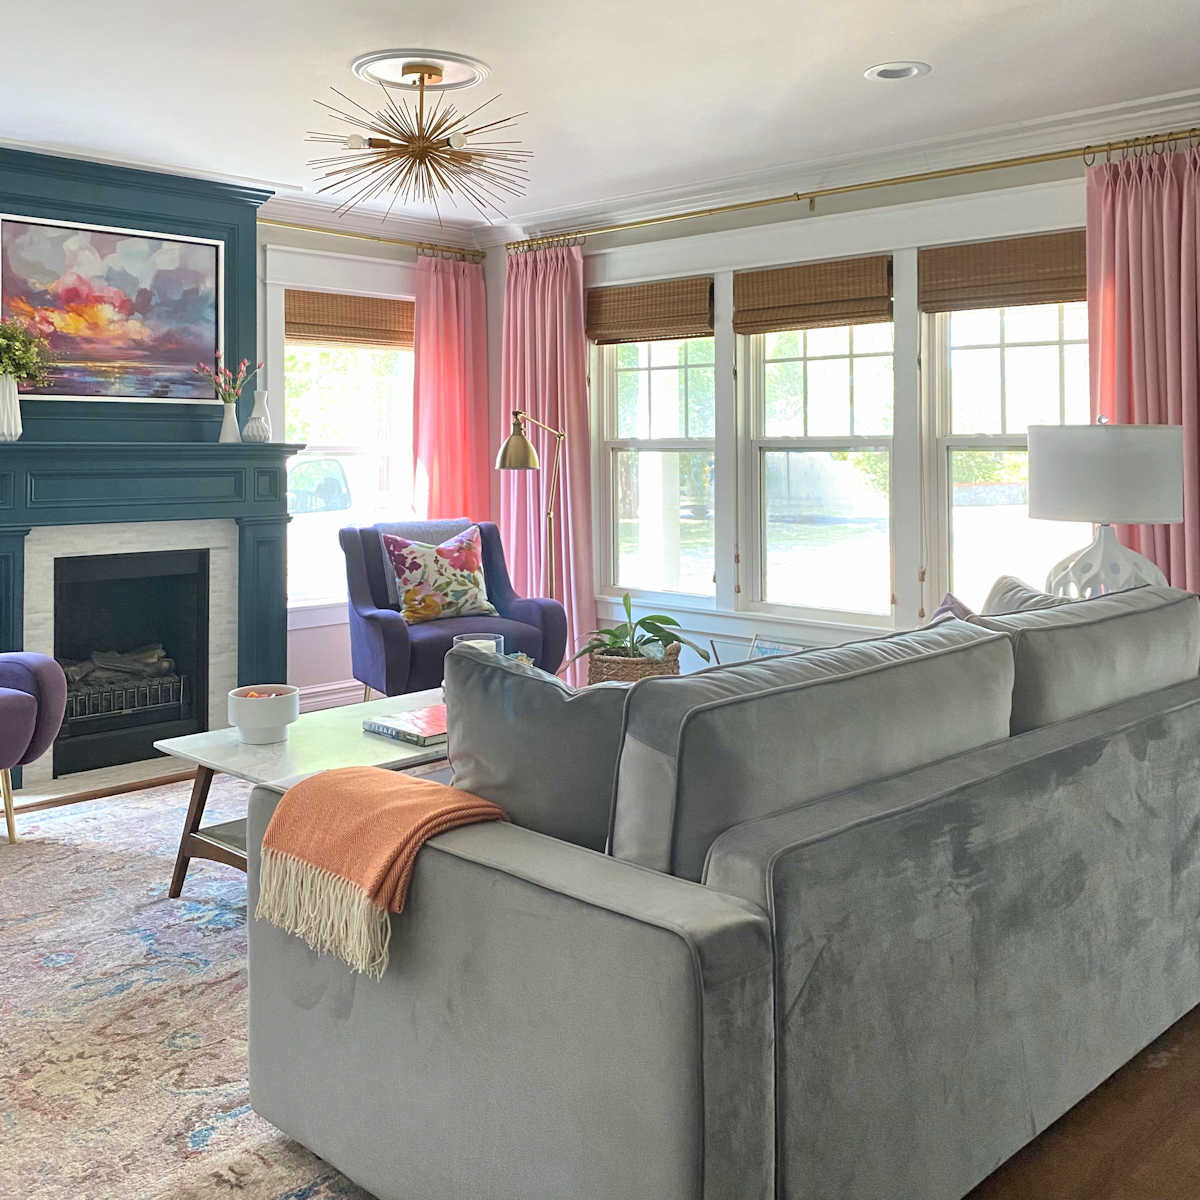
It’s a personal preference, but I don’t like that. Some day in the future, I plan to find some actual decorator fabric in this pink (even if I have to have it printed myself at Spoonflower) so that I can make new pink curtains for this room, and I can actually line them so that they’re always a consistent color no matter how sunny it is outside.
I learned this lesson the hard way when Matt and I bought our first house in Albany, Oregon, soon after we got married. It was my first opportunity to decorate a whole house all by myself, and I found a pretty (to me at the time) plaid fabric that had all kinds of colors in it — red, yellow, green, blue. I loved that fabric, and made some unlined curtains for one of the bedrooms. And as soon as I hung those curtains, the light coming through that fabric made them look orange. All of the detail of the small plaid design was lost, and they just looked orange. I was so disappointed, but I learned a valuable lesson that day. So when I later learned about blackout lining, I knew that would be my go-to lining for that very reason.
A Clarification On Blind Hems
As I was writing the tutorial, I knew that if one part was going to be confusing, it would be the part about the blind hem stitch. And sure enough, I got a few questions about that step.
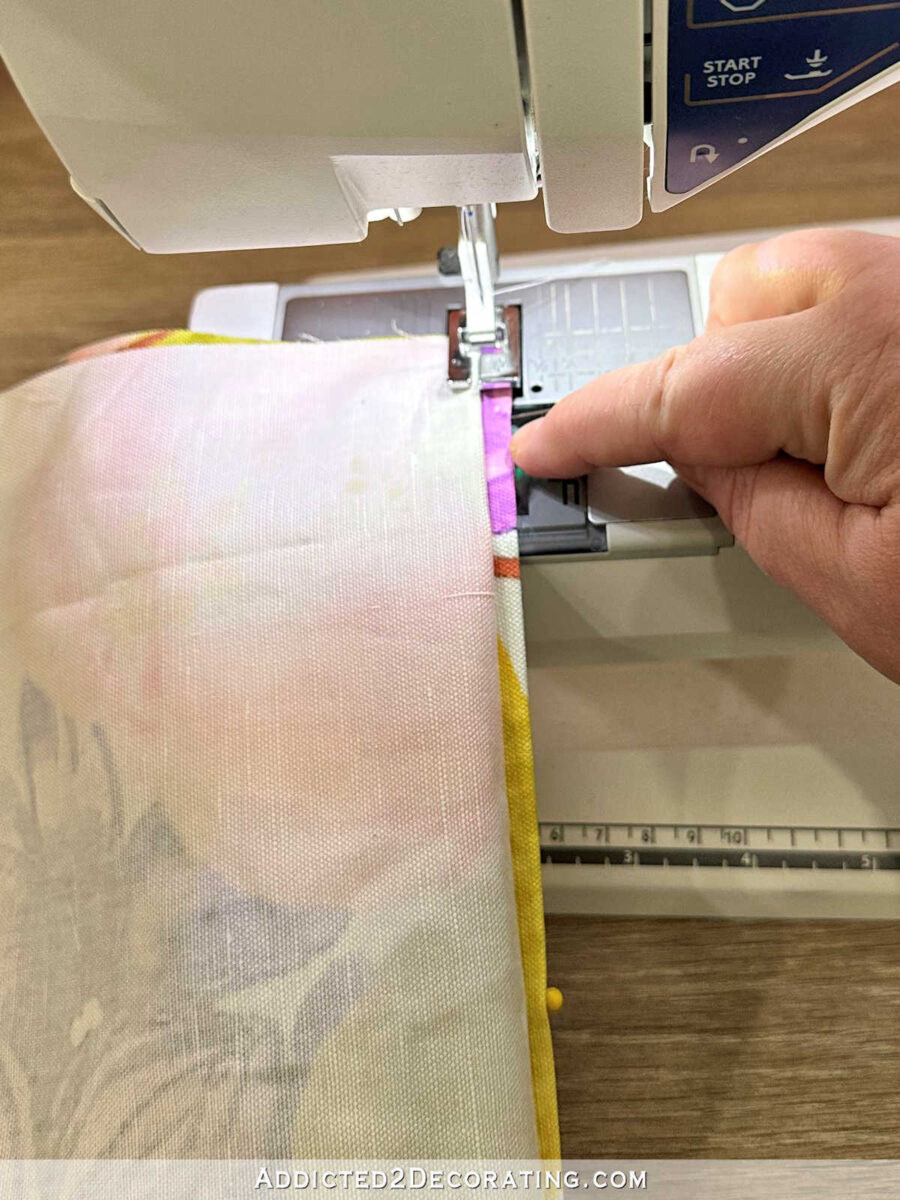
So as I made the second panel (which I finished last night!), I took some additional pictures of this step for further clarification. I’ll add these to the original post, but for those who were confused, this is the detail I was missing in Part 1 of the tutorial showing how to do the blind hem.
After turning up, pinning, and ironing in the double four-inch hem in the bottom of the face fabric, it looks like this…

In order to sew the blind hem stitch, you simply turn the double folded fabric back under the panel like this…

So that when it’s lying flat, all you see is about 1/4-inch of the top fold of the hem sticking out because the rest is folded back underneath the panel.

And then you can take that to your machine and sew using the bind hem stitch setting. It’ll do about four stitches on that top fold of the hem, and then about once every five stitches, it’ll reach over to the left and put a single stitch through all of the layers, and then it’ll go back to the right four another four or five stitches.
Anyway, I hope that clarifies that step. I’ll get these photos added to Part 1 of the tutorial later today so that this step will be easier to understand.
My Suggestions For Fabric Selection
If you’ve never made lined draperies before, I strongly suggest that you choose your fabric very carefully. If you try to jump right into making lined draperies using a challenging fabric, you’ll probably want to give up, and you’ll be cursing me for convincing you that making lined curtains really isn’t all that difficult. 😀
My suggestion is to use a fabric that will very easily lie flat on your work surface, won’t crawl every time you touch it or when it’s sewn, has a bit of thickness to it (but not too much!!), and can easily be “pressed” with your fingers. This would be 100% cotton fabrics, cotton/linen blends, and the like. The fabric I used for the panels in my studio is from Spoonflower, and it’s their linen cotton canvas. I think this is a perfect fabric for a beginner. And always, ALWAYS use an actual decorator fabric.
So what fabrics should you avoid? Avoid any fabrics that are thin and crawly, like thin polyesters, rayon, silk, thin linen, etc. Any fabric that has a stretch to it should be rued out completely. Also avoid anything too thick, like velvet and most fabrics intended for upholstery. Trust me, you do not want your first time making pleats to be on a fabric that’s too thick. Also, no matter how tempting it is, DO NOT use an apparel fabric to make curtains. Just don’t. (Do as I say and not as I do. 😀 ) I’ll say it again. Always make sure you’re using an actual decorator fabric for your curtains. And don’t wash the fabric first. You’ll ruin it.
I think that’s it for now, but if I think of any other helpful information, I’ll add it to this post. And of course, if you have any more questions, just let me know!

Addicted 2 Decorating is where I share my DIY and decorating journey as I remodel and decorate the 1948 fixer upper that my husband, Matt, and I bought in 2013. Matt has M.S. and is unable to do physical work, so I do the majority of the work on the house by myself. You can learn more about me here.


This has been a great tutorial. Very clearly written and easy to follow. Thank you!
Your instructions and tips are very clear. Please show us the finished panels on the French doors!
Great job, once again, in explaining details that could be confusing. I appreciate you sharing your reasons for choosing blackout lining.
Back when I had a workroom and the designer was paying for the lining, I got really spoiled with the 100% cotton blackout lining by Hanes. But it’s so expensive! I’ve used synthetic blackout lining, but I’m never as pleased with it. It has a tendency to flare and it’s harder to train into folds. So, what lining do you use?
I think this is Hanes Outblack that I used on these, but I’m generally perfectly happy with RocLon Budget Blackout.
Years ago, I made fully operational lined, pinch-pleated drapes for my master bedroom. The learning curve was steep, but it was the most rewarding and practical thing I have ever done.
So are your curtains finished? I’d like to see them hanging up, please.
They’re finished. I got them hung tonight. I still want to get some paint touchups done before I take pictures and show y’all the finished studio back entry.
Great tutorial, well done! Thank you so much.
Amazing as always! Thanks.
Agree with patterned curtains, no light should come through – but with your pink ones i actually love those subtle changes.
Question please –
Care of these things.
I was blessed to buy second hand some incredible curtains, i believe they are Belgian Linen with a heavy duty silk bottom panel, extremely heavy, and a 3metre drop. Also with very good blockout at the back. Can i wash them on a delicate cycle? That’s my plan – how to clean them? They are in almost perfect condition, just have a slight smell from being in storage and the hem in a few places looks like it went thru some water.
Any advice? Please and thank you 😉
I always pre-wash my fabrics. Why do you say not to? What happens when they do need to be washed? Shrinkage, bleeding, etc???
Here’s some good info.
I am smiling large because I just finished on Christmas Eve my first ever lined pinch, pleat drapes. I followed your old tutorial and would have never finished it without your expert tips. I bet this new tutorial is even better. Thank you for taking the time to take so many pictures as I am a visual learner.
I think I bought my fabric too long ago and I learned so much in this post. I was so glad when you wrote about making the punch pleat curtains because I hadn’t done anything with the fabric I bought. Guess I’ll rebuy the fabric.
I always enjoy reading your posts. Thanks for the effort you put into them.😊
Thank you for this WONDERFUL tutorial. I have only sewn pinch pleat curtains once about 3 years ago for my granddaughter’s room so needed a refresher. This was PERFECT. (I actually liked this way better than how I did them 3 years ago.) I just finished the curtains for my about to be born grandson! Grandkids get me motivated! Thanks again!!
Thank you so much for this tutorial! I’m getting ready to make double pinch pleat curtains for the first time and your easy to understand instructions and pictures are so helpful! Can you tell me what length drapery hooks you used? When I went to order mine, I noticed they are available in 1″ and 1 1/2″. Appreciate your help!!
I used the 1.5″ drapery hooks.