My Electrical Scare (Plus, How To Rewire A Pendant Light)
Yesterday I showed y’all my brand new lighting in the studio. What I didn’t share was the behind-the-scenes story about an electrical scare that made me lose sleep the night before last. Fortunately I found the problem, and all I had to do was rewire a pendant light. But until I discovered the problem, I was kind of panicking.
I spent about three hours on Monday installing the thin downlights that I showed you yesterday, plus everything else on that circuit so that I could at least hook up that one circuit and have lights. So after all that time up and down the ladder, cutting the holes in the drywall bigger to fit the lights, and installing the lights, I thought everything was ready to go.
So I flipped the circuit breaker on and headed to the studio to test everything. I flipped the light switch for the ten downlights, and they worked perfectly. I flipped the switch for the ceiling fan, and it worked perfectly. But then I flipped the switch for the portico light, and I literally heard a surge of electricity and then everything went dark.
Yeah. I panicked. But it was already late at night, and I was exhausted, so I didn’t feel like that was the appropriate time to start troubleshooting my electrical problem. So I went to bed, but I could just imagine having to remove drywall, run new wires, etc. I was imagining the worst.
So yesterday morning, I got up ready to troubleshoot. I shut the power off, disconnected the two light switches that controlled the fan and the portico light (which are in the same box by the portico door), rewired everything all over again, flipped the breaker on, tried the light switches again, and the same thing happened.
That meant that the only other culprit could be the actual portico light. Something had to be wrong with the way the light was wired.

I installed that light as soon as I finished building the portico over the door, so it’s been there a while now (a year?). But it has never had power until now.
So I decided to take it down and see if I could figure out the problem.
Well, it didn’t take long to locate the problem. This is what I found…
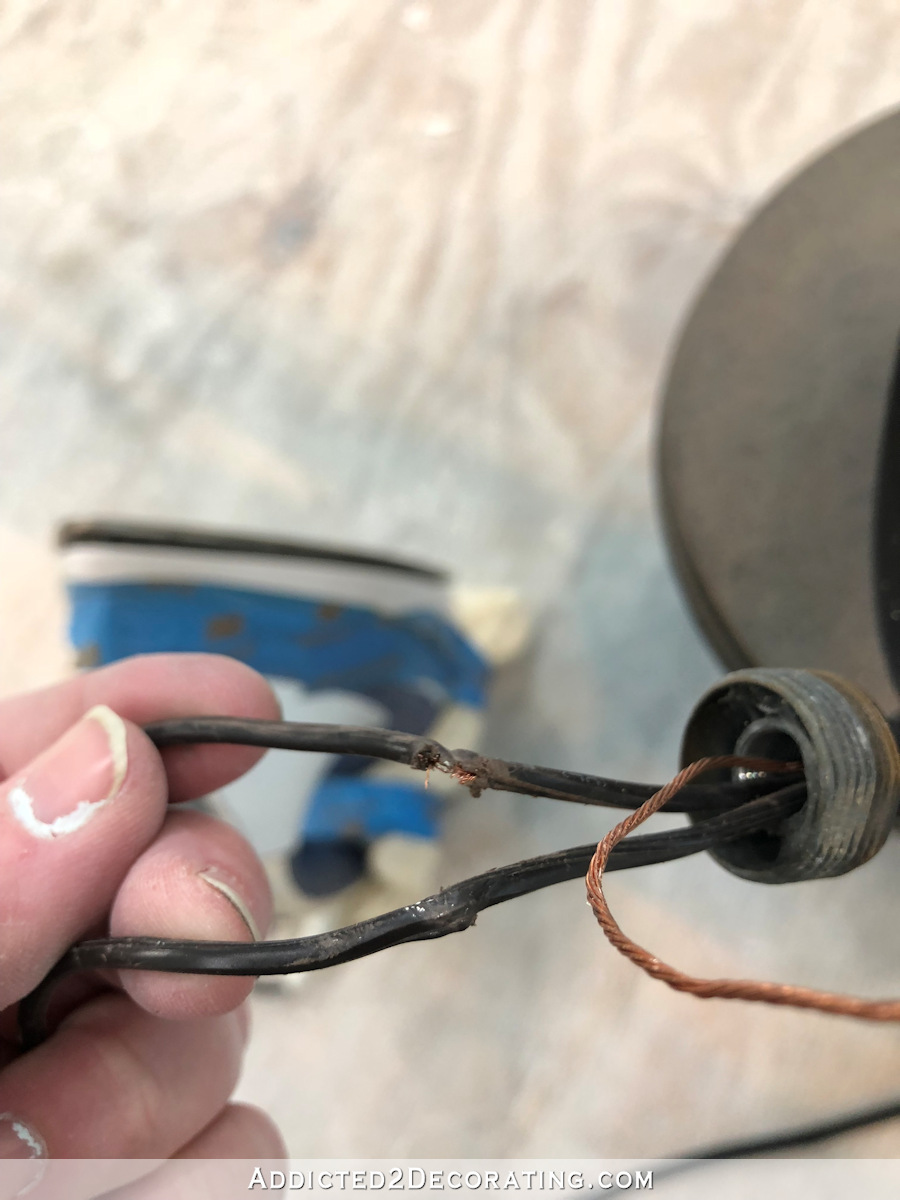
Excuse my primer-covered fingernails. I’ve been doing a bit of painting lately. 😀
When I installed the light, I forgot to close the one chain link that I used to connect the light to the decorative canopy, and at some point over the last year, the light came off the chain link and was just hanging by the wires. I probably bumped it with a ladder at some point over the last year, and didn’t realize that I knocked it off of the chain link.
So as that light has been swinging in the wind, those wires have been rubbing against the metal piece inside the canopy, and it finally wore through the protective plastic on the wires.
That meant that every time I turned on that light switch, it was literally electrifying the metal junction box and probably the entire metal fixture for a split second, which was causing that surge of electricity that I was hearing. Fortunately, the circuit breaker did its job, sensed the surge of electricity, and cut off.
So it was just a matter of rewiring the pendant light, reinstalling it, and this time making sure I closed the chain link so that this couldn’t happen again.
Rewiring a pendant light
If you’ve never rewired a light before, I promise you that it’s much easier than what you probably imagine in your mind. In fact, it’s really quite simple.
The first thing you have to do is locate some replacement wire. You can purchase it at any home improvement store, but I found some wire in my house that I could use. It just so happens that my old, leaky steam iron (which has been replaced now) uses the exact same size and type of wire that the pendant light does, so I decided to just use what I had.
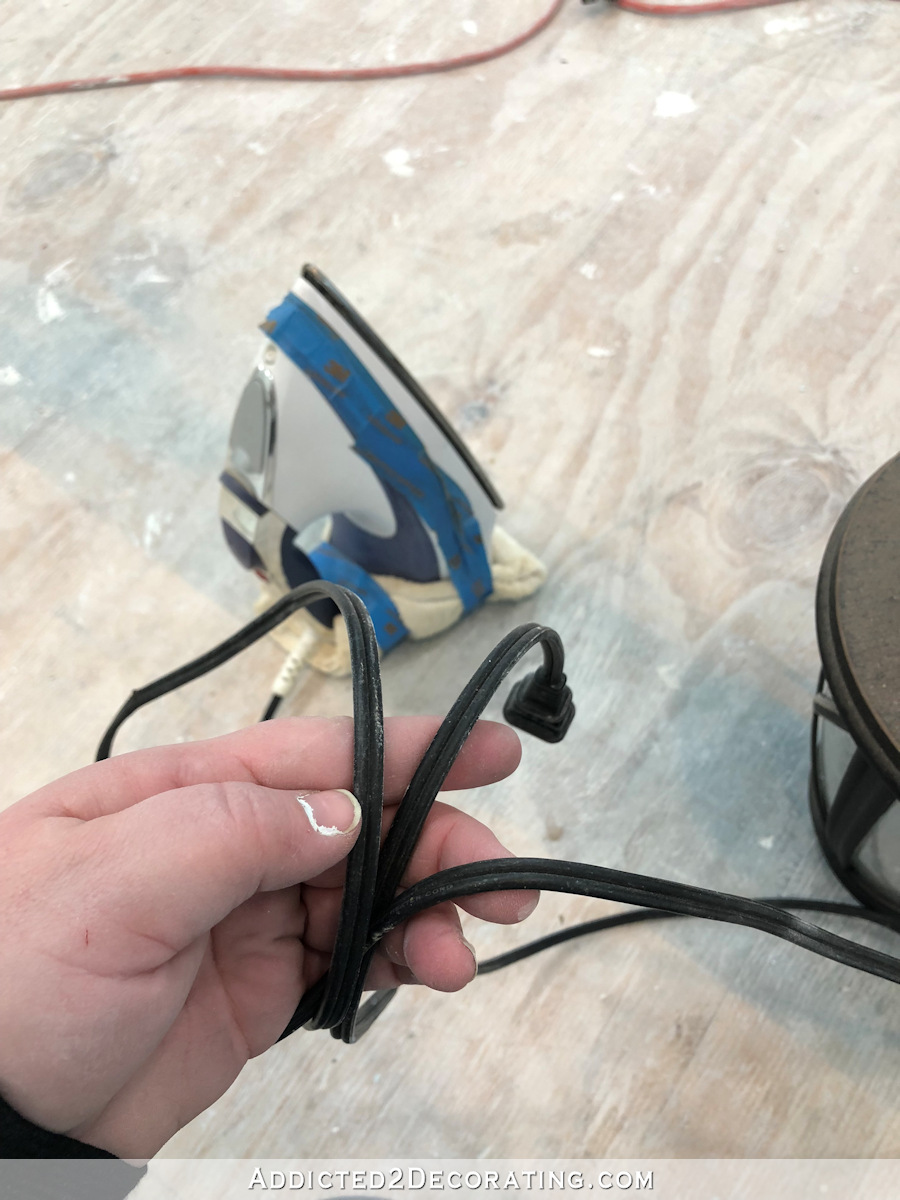
Then I needed to take the light fixture apart. On pendant lights, you almost always start at the top and work your way down. Everything just screws together, so you might need a pair of pliers to get things apart. But just start at the top, and start unscrewing the pieces.
I like to place the pieces in a row, keeping them in order from right to left as I take them off of the fixture. That way when I go to put the fixture back together, I can go from left to right, putting them back on in the exact opposite order that I took them off, and it eliminates any confusion over what order they go back onto the light fixture.
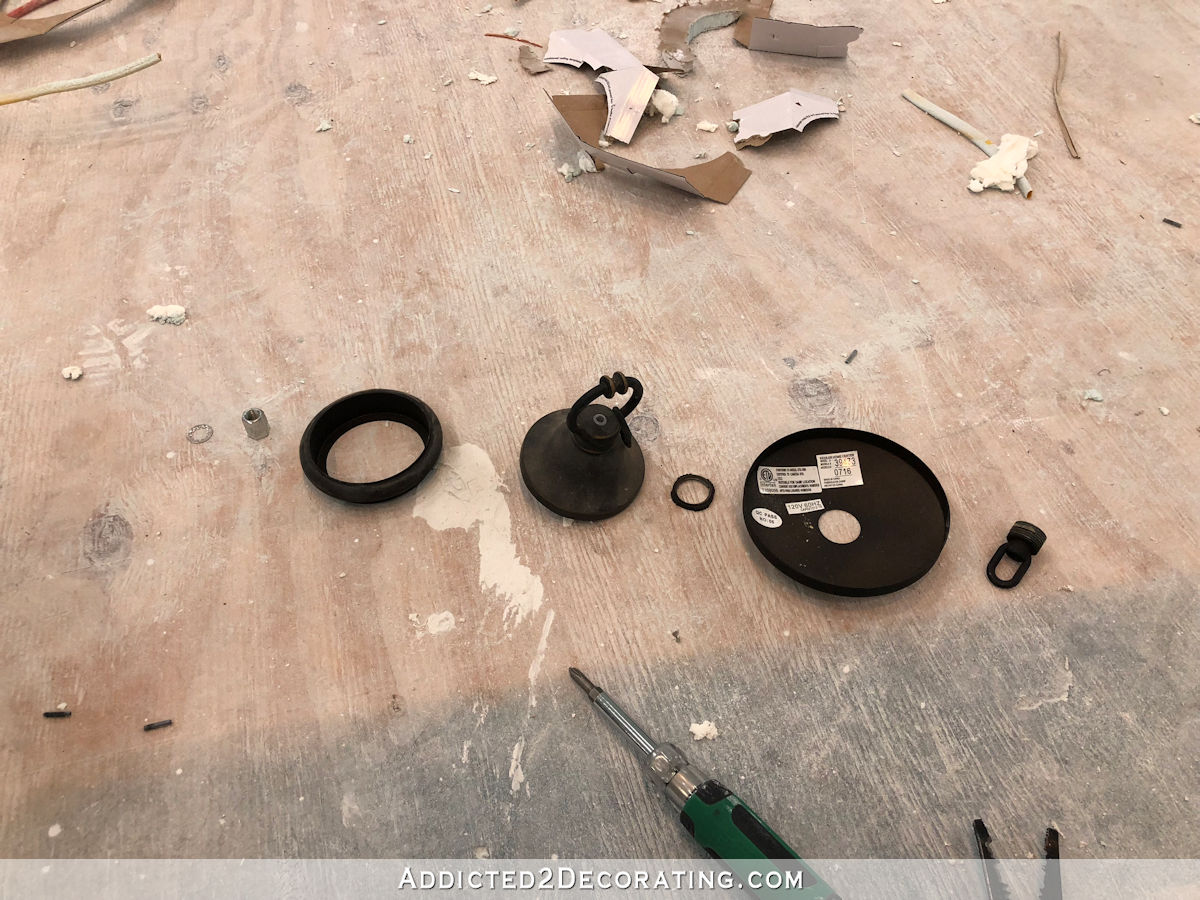
If your light fixture design seems particularly tricky, it might also be a good idea to take pictures after removing each piece to help you reassemble it afterwards.
But the goal here is to get down to the actual socket since that’s the part that needs to be wired.

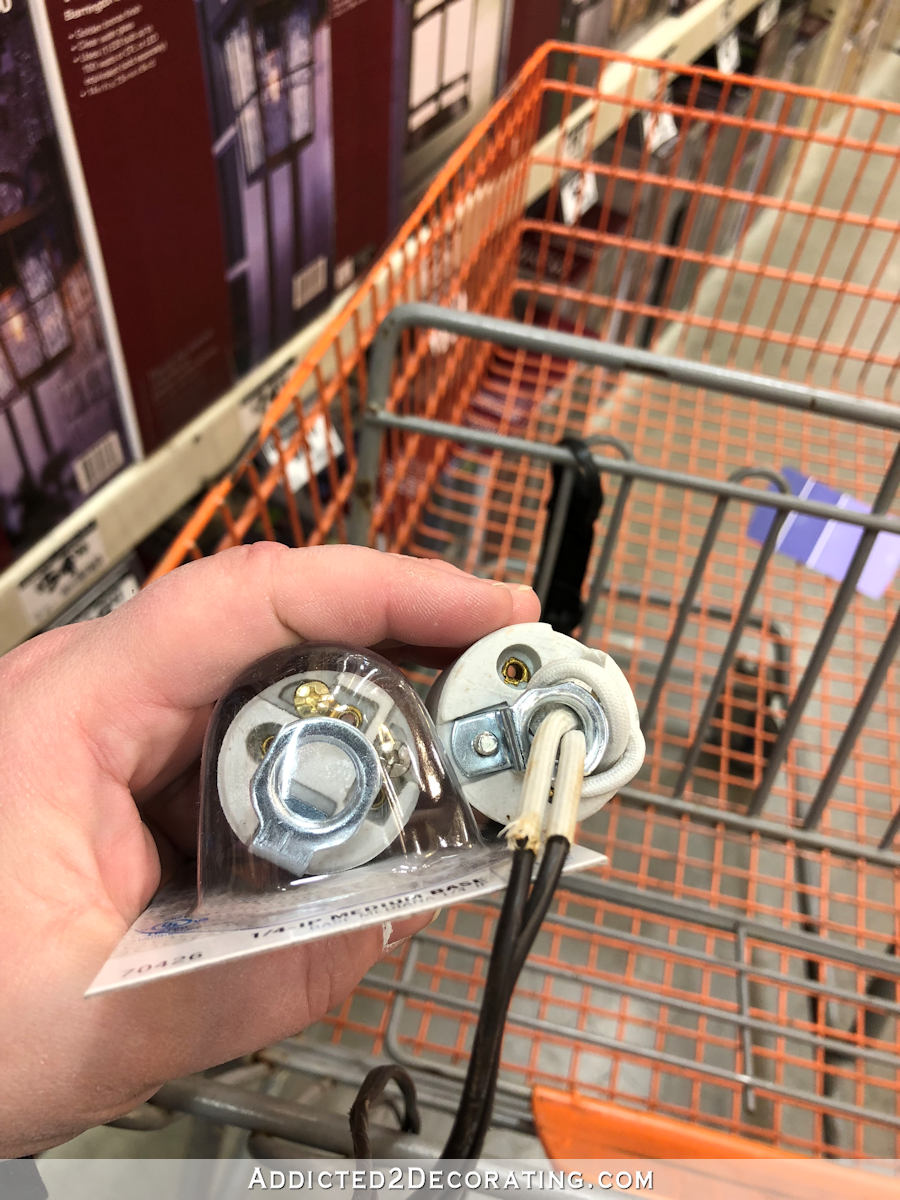
Some sockets can be rewired. You can recognize these if the wires are held on by screws that you can unscrew to remove the wires. Other sockets (like the one I have here) can’t be rewired because the wires are held on by what look like tiny little grommets or eyelets that can’t be removed.
In that case, the socket needs to be replaced completely. My suggestion is to replace the socket with the exact type you removed. If you removed a metal socket, replace it with metal. If you removed a ceramic socket, replace it with ceramic.

And you also need to be sure that the connectors are the same. The connector on the replacement socket that I found was a different size, but since those are held on with one screw, I could easily swap the connector on the new socket with the connector on the old socket so that it would work with my light fixture.
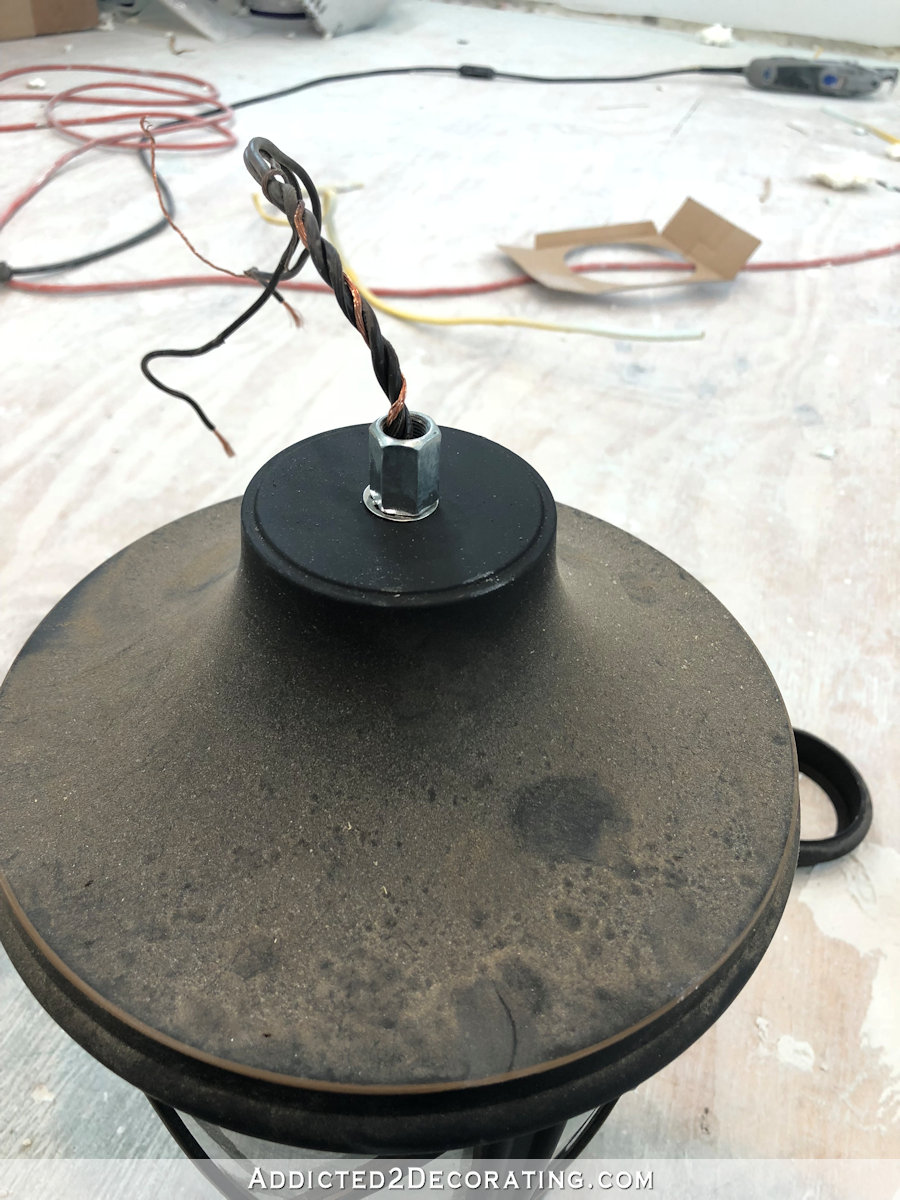
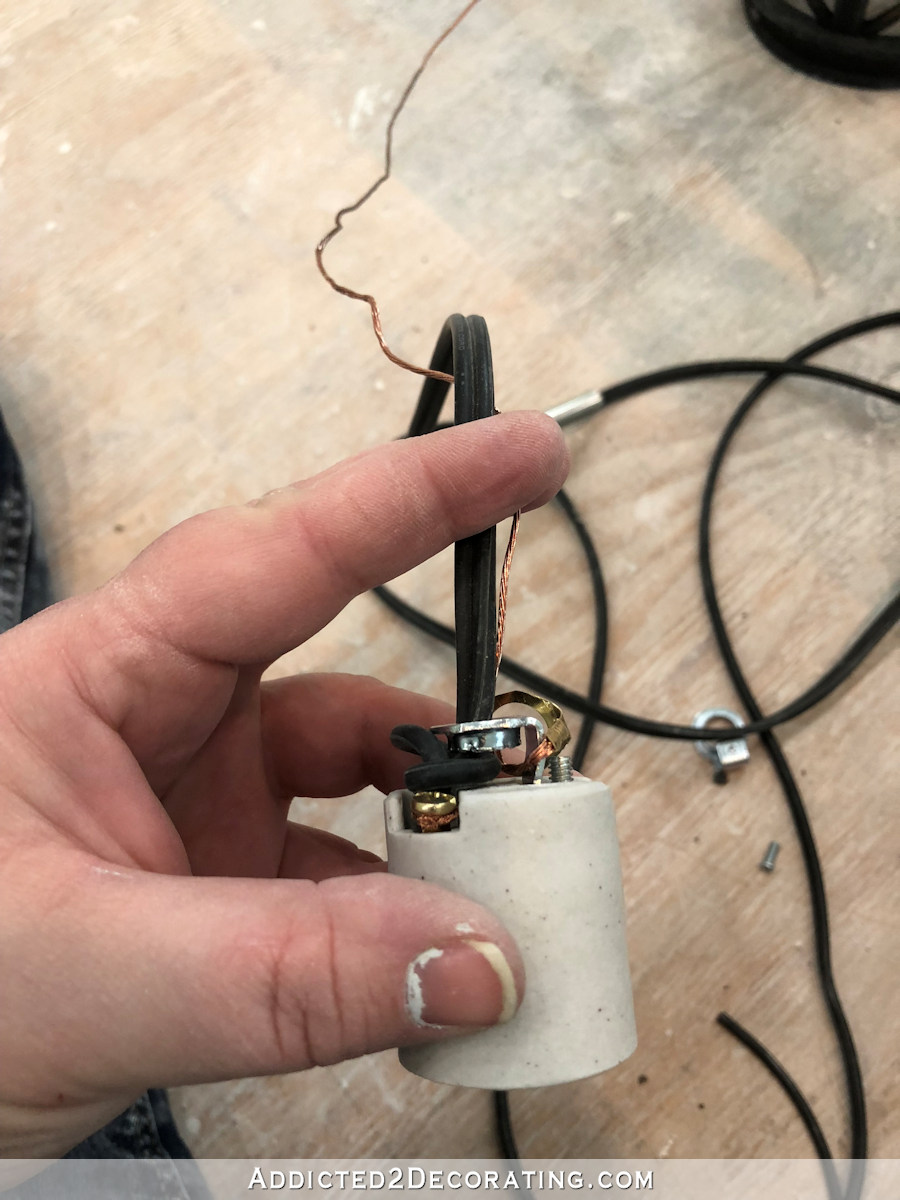
To wire the new socket, I cut a much longer length of wire than I actually needed. Then I separated the two individual wires at the ends. These just pull apart.
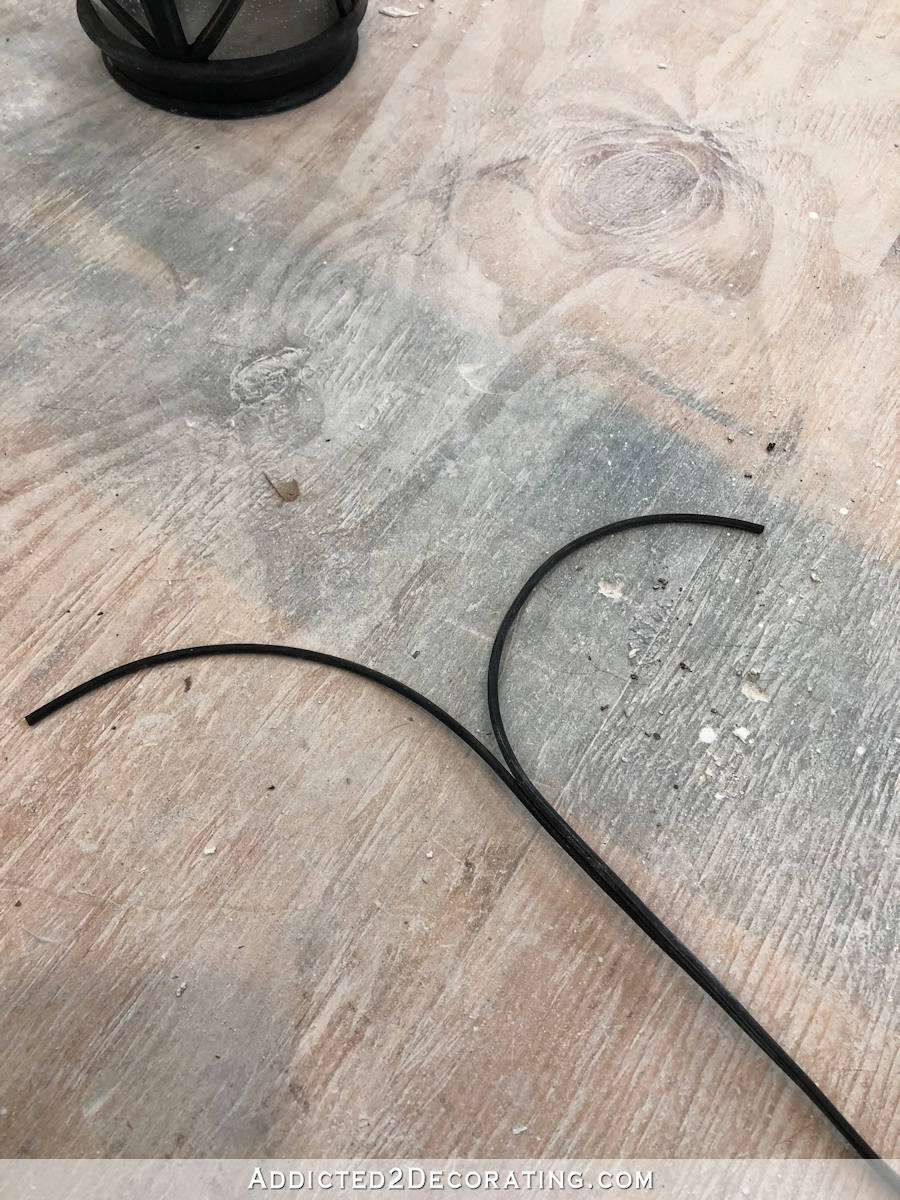
Next I tied an underwriters knot. I loop one piece of wire to the back like this…
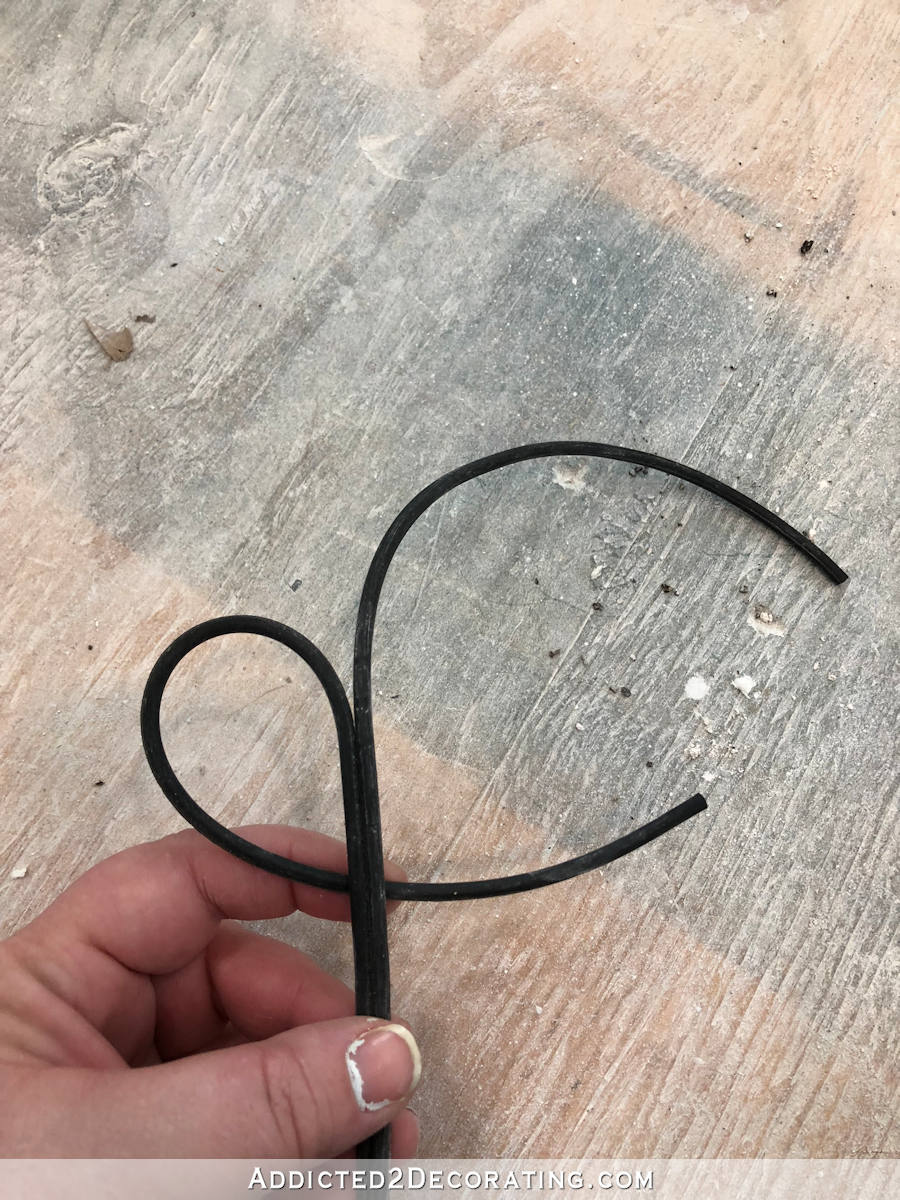
And then the other side goes to the back of the tail end of the first wire, and then over the front of the main wire…
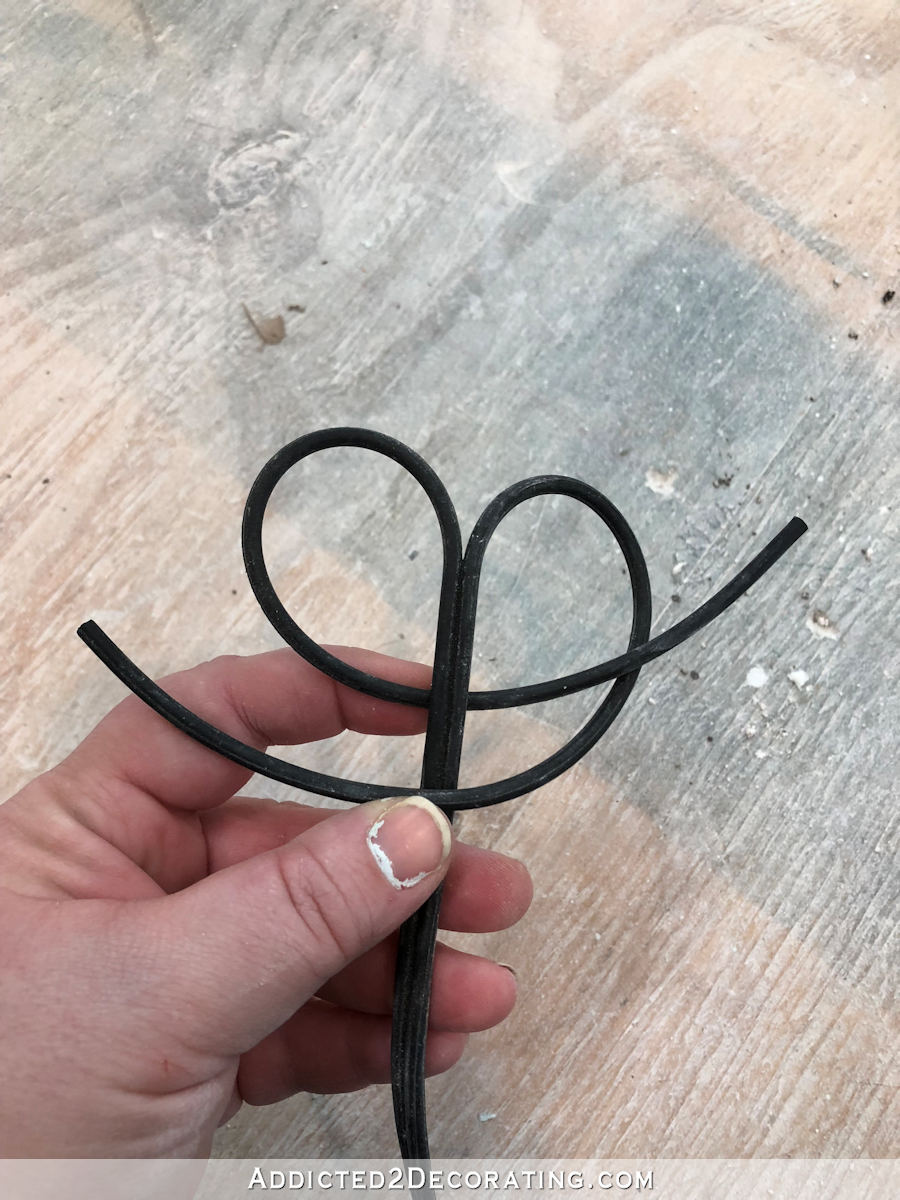
And then that tail end goes through the loop…
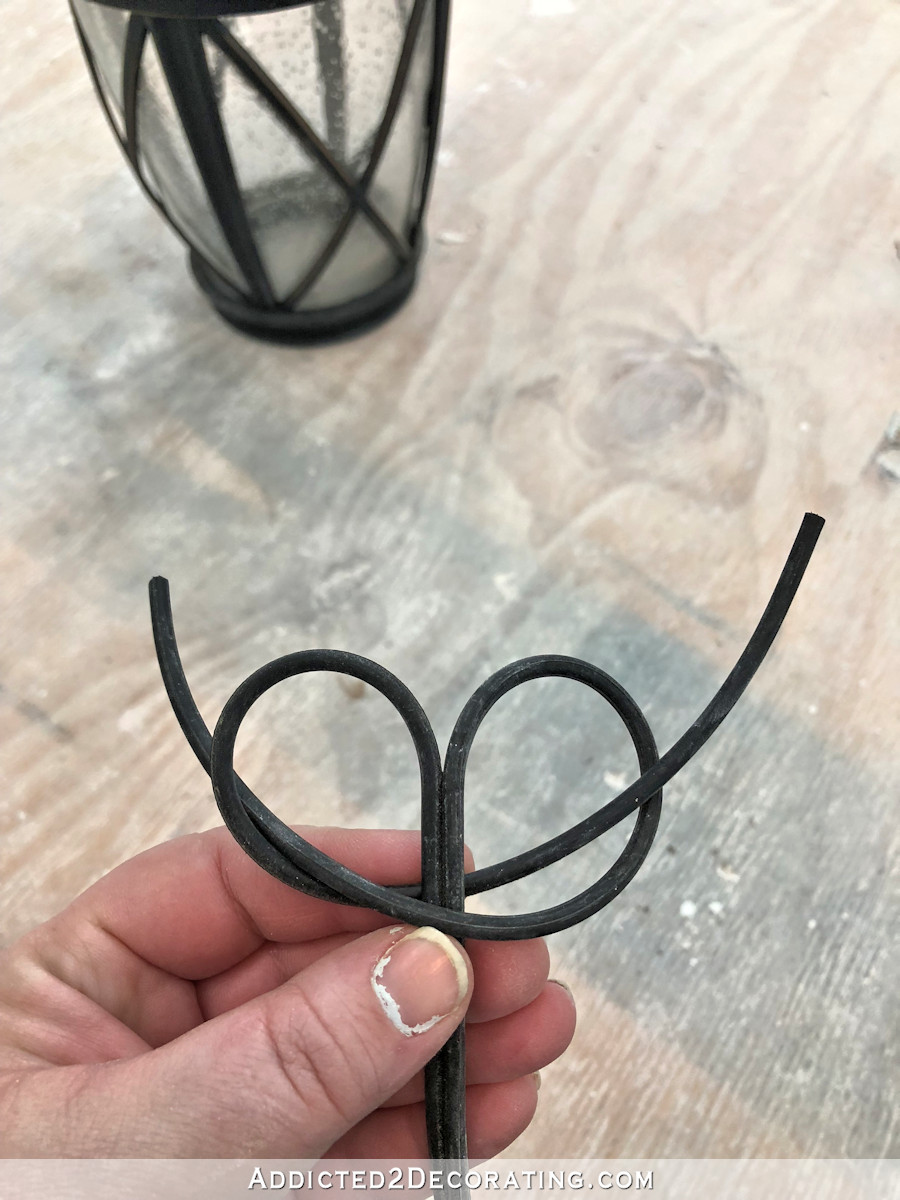
And then you pull it tight and strip the ends of the wires.

I actually ended up cutting a lot of that excess wire off and then re-stripping the ends, which you can see below.
Then you’re ready to connect the wires to the screws on the socket. If your wires are black and white (which isn’t very common with lamp wire like this), then the black wire is the hot and goes to the brass screw, and the white wire is the neutral and goes to the silver screw. If your wires are the same color, as mine are here, then one will be smooth/solid color, and the other will be ribbed/striped. The smooth/solid wire is the hot, and that goes to the brass screw. The ribbed/striped wire is neutral, and that goes to the silver screw.
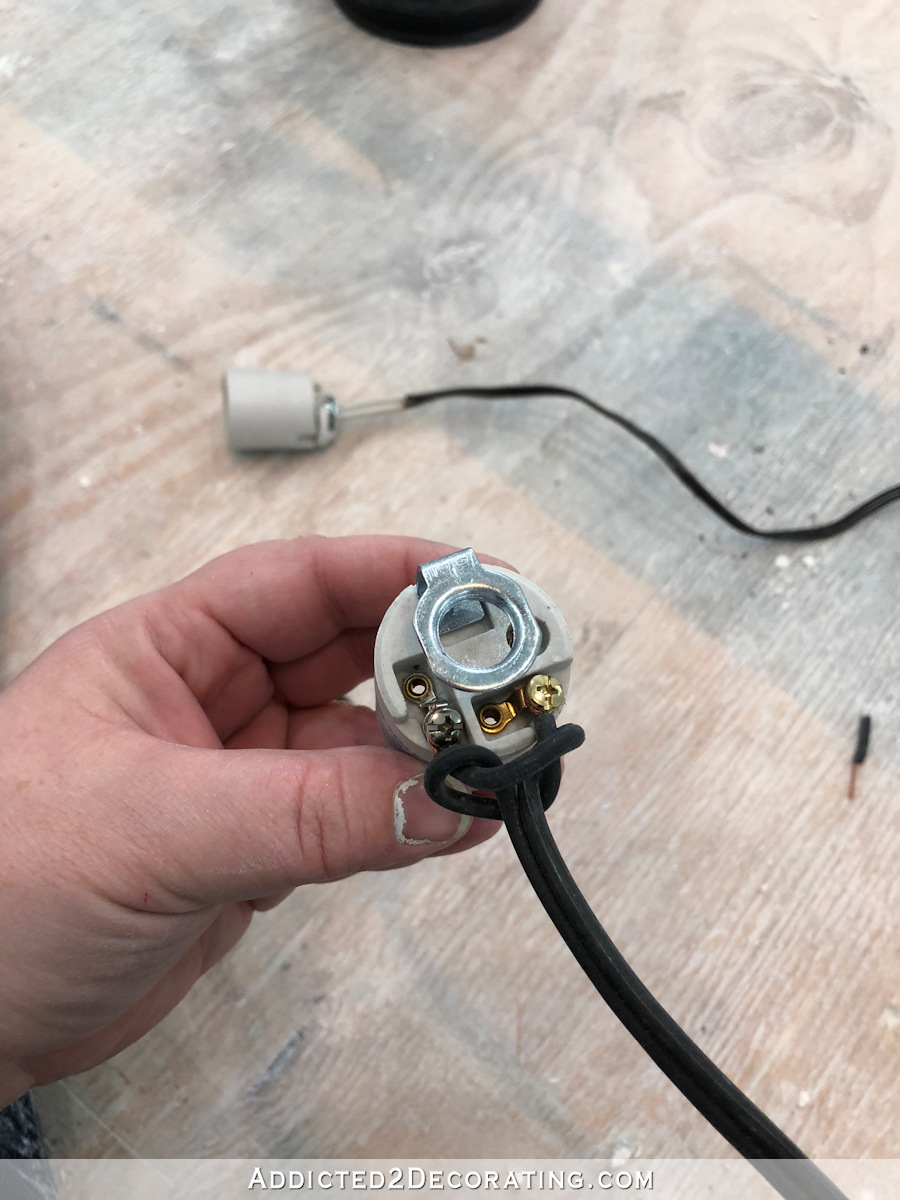
Wrap the wires clockwise under the head of the screw, so that it wraps around 3/4 of the way around the screw, and tighten the screw to hold the wire in place.
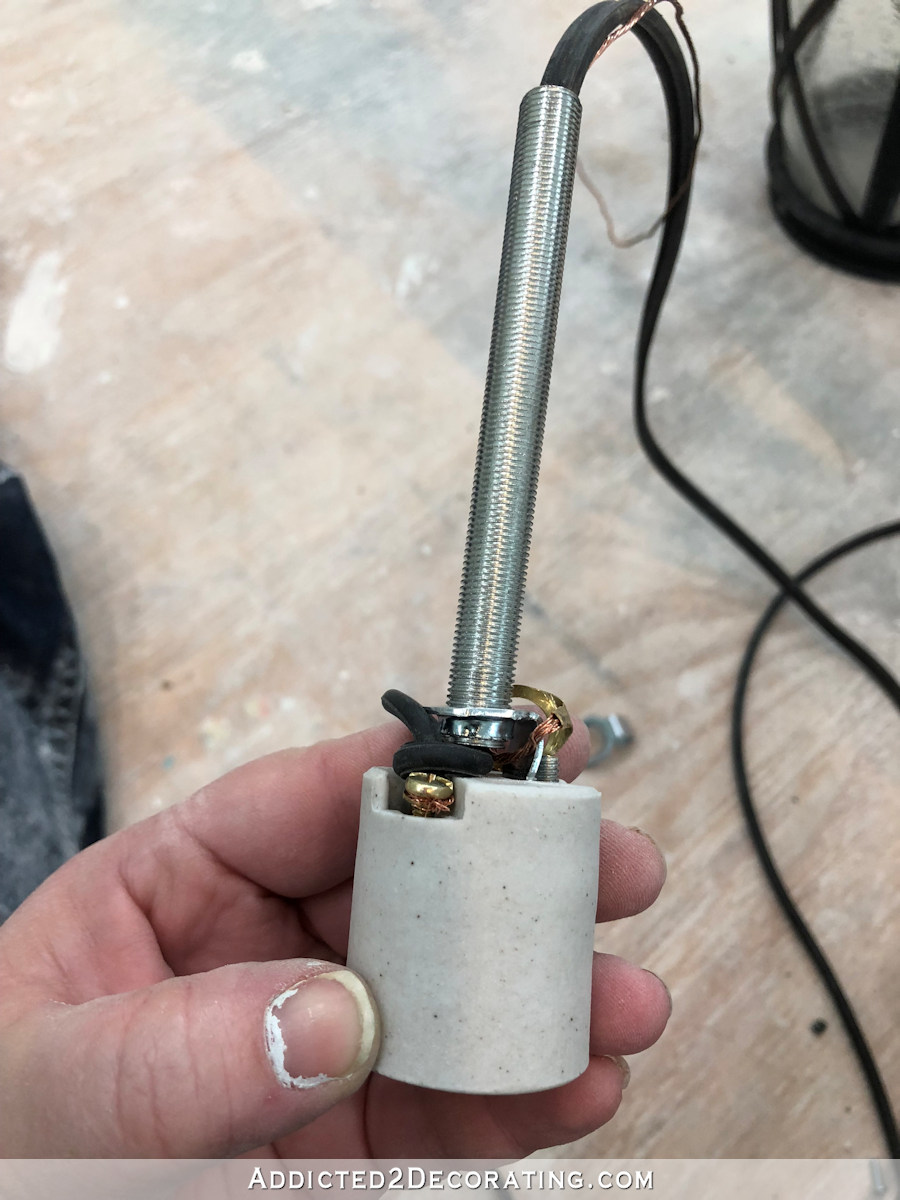
If you need to swap out the threaded connector, as I did, you can remove it with the screw inside the socket.
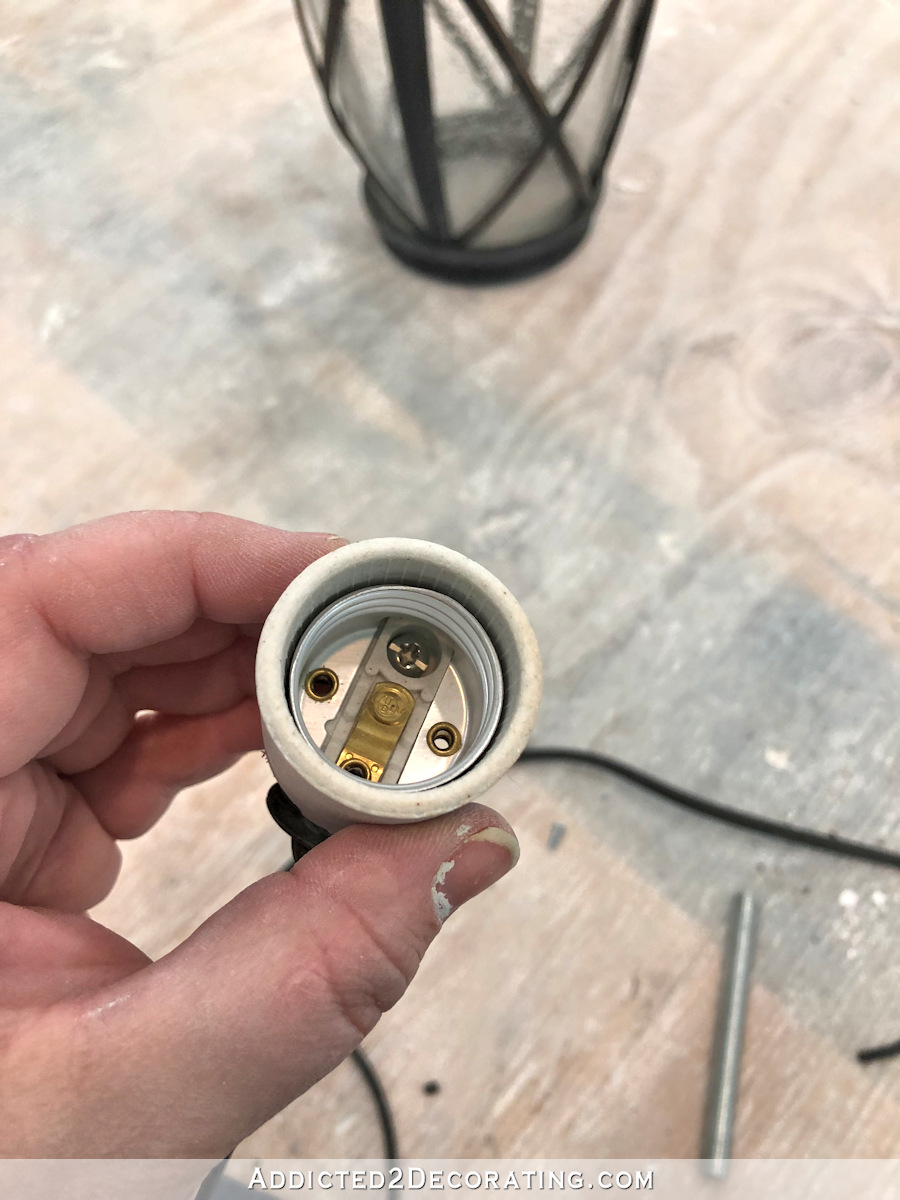
And here’s my socket with the new, smaller threaded connector.
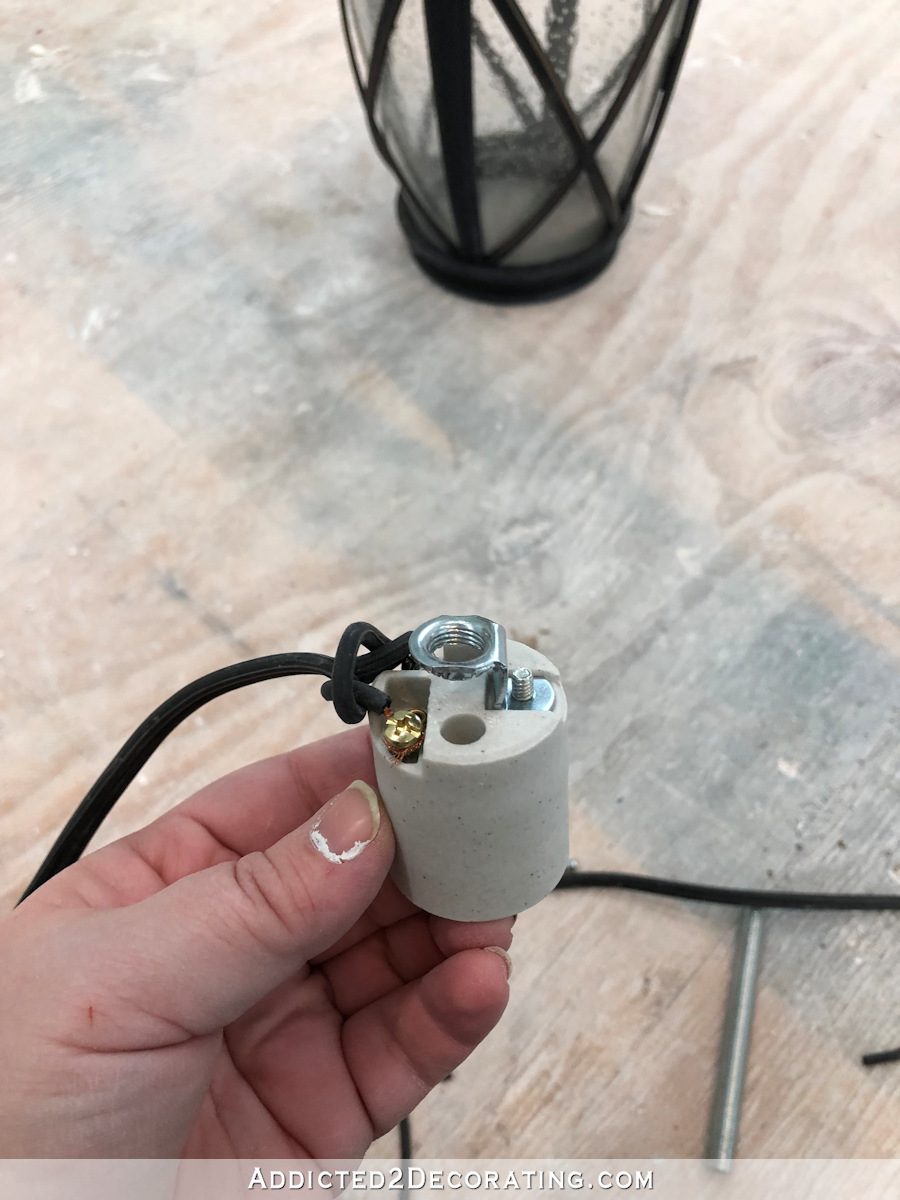
Next I reattached the ground wire that I removed from the old socket (that’s the one wire that can be reused) by wrapping it around the metal connector post. It has a loop in one end that you slip the wire through so that when you pull it, it holds the wire on.
Then those wires go up through the hole on the connector post, and through the threaded nipple, which then gets screwed into the connector post.
And with that, you can start reassembling your light. If you lined up your pieces like I demonstrated, and took pictures of the process if your light design is particularly tricky, then you should have no problem reassembling it in the exact opposite order than you took it apart.
And here’s my light! After a year of just being a decorative pendant, it finally has power and gives off a really pretty glow at night.

While I was a bit frustrated at having to spend a good deal of time yesterday uninstalling, rewiring, and reinstalling a pendant light, I have to say that I’m so unbelievably relieved that that’s what the problem was. I had worst case scenarios swimming around in my head Monday night. This was so much better and far easier than the horrors I had imagined.

Addicted 2 Decorating is where I share my DIY and decorating journey as I remodel and decorate the 1948 fixer upper that my husband, Matt, and I bought in 2013. Matt has M.S. and is unable to do physical work, so I do the majority of the work on the house by myself. You can learn more about me here.


Nothing is scarier than being able to “hear” the electricity. Except maybe hearing running water when you’re not supposed to. Glad it was an easy fix!
So true! Glad you were able to get that fixed!
Very interesting post! Thank you. I have great respect for you and your work, especially the electrical installations – if have a somewhat unnatural fear of that specifically. I have done many, many projects with a decent degree of proficiency, but cannot add any type of electrical work to my (limited) repertoire. Have a blessed day, Kristi, thanks for all the great posts.
Whew! Good thing you know about these things so you could fix it. That outdoor fixture looks great and now it works!
We bought (2) fixtures from the Re-Store for $5, that had the GU24 sockets. We re-wired/swapped it out like you did. We destroyed one of the fixtures (well, an essential metal connector bit, can’t remember it all) taking it apart.
I didn’t realize you could change that one threaded connector, I may re-visit my parts to see if I can re-purpose that particular project’s scrap.
Your tutorial posts are so clear and informative, easy to follow! Glad you were able to sleuth out and fix that lovely light.
I agree completely! I so appreciate such great explanations and photos.
Wow! So glad you have the experience to troubleshoot electrical. Saving this for future reference if my electrician friend is not available.
You m’ame are amazing
My first thought…as always: HOW does Kristi know all these things? I know those around me get tired of hearing me on the subject of Kristi, ‘Wonder DIY-er,’ but let’s face it! She is Amazing…and such an asset to all of us who are somewhat less so.
Kristi, you with all your talents and your ability to make the complex seem so much simpler (with all your hints and suggestions and great photos) are just a treasure. We are all so fortunate to have found you. Any day with words and pictures from Kristi is a better day than it otherwise would have been. Thanks for all you do…and share so beautifully.
This is such a good tutorial and I’m bookmarking it. The bit about making sure you buy the same kind of socket is a great tip. Going to check out all of your other tutorials, now!
Really great, easy to understand tutorial!
Thank goodness your circuit breaker did it’s job! And so glad you knew how to find and fix the problem. We had to take down and fix wiring in a bathroom fixture after we had only been in the newly built house a short time. Found that it wasn’t wired tightly enough, so we re-wired it and had no problems afterwards. Guess the “pro” was in a hurry or got interrupted. After replacing about four bulbs in a matter of months, we had to see what was going on! I have a question on your instructions though. When you were attaching the wires to the socket, you said one was smooth and one striped – I can’t visualize that, and it really doesn’t show in the photos. Am I missing something? Also, the ground wire through the threaded part, I assume it goes in underneath that connector?
The wires will be black and white, or smooth and ribbed, or solid and striped, depending on the specific wire you’re using. When it comes to lamp wire, the most common I’ve seen is smooth and ribbed, and that’s what I’m using in the photos in this post. However, the ribbed wire isn’t really something that’s going to show up in a photo. You’d have to see it in person, and you can feel it when you’re handling the wire.
The ground wire follows the same path as the other wire — under and through the connector, and through the threaded nipple.
Thanks for clarifying!
HOW do you know all this stuff? You amaze me. Did you apprentice with someone or what???
I’ve just picked stuff up from various people over the years. 🙂 My brother-in-law is the one who originally taught me about electrical wiring.
You are brilliant and fearless!! I love the way you tackle problems, also love your blog!
Ever since you showed the job of insulating the garage I have wondered where the electrical wires are. Are they behind the insulation? Would you have had to chisel away the insulation to try to find the bad wire?
Yep, with spray foam insulation, the wires get buried in the insulation. I’m not sure how easily an electrical wire pulls out of the foam insulation, but I’d imagine it would require some digging out to free the wires.
My husband was rewiring some outlets and light switches a couple of weeks ago, with the help of his electrician brother on the other end of the phoneline. (My husband knows how to do basic wiring, so his brother was mostly necessary for moral support and affirmation that he was doing it right). It required some annoying climbing up into the attic, so it was nice to get it all done. We turned the circuit on, pressed the light switch and heard a sizzle, and heard the breaker flip in the basement. So with my brother-in-law’s guidance, my husband did a bunch of trouble-shooting, and retaping and stuff. The same thing happened. Grrrr! In the end, it turned out that all he had done wrong was tighten the wires exiting out of the one light switch box too tight. The wires were pinched a bit and caused the breaker to flip when we tried to turn the lights on. So annoying, but we were glad that that’s all it was!
Kristi, some times your posts scare me, because with your perfect demonstrations, I feel so compelled to wire up somethin and I don’t know anything about electricity, but you make so so easy to do. I did get one very good idea from you,, when I take something apart, to line up the pieces in the order I removed them. I know in the future that will help me tremendously. I love your blog and never want to miss any of them!! Thank you for all the photos and great instructions on anything you make or do!!
I have looked all over my computer and I did not get the post about your new lights. Could you resend it or cover it again briefly in at another time? I got the one about the paint color then rewiring the portico light but nothing in between. Sorry for the request.
Hi Karen~
I think for some reason, that post didn’t get sent out. But you can find it here: https://www.addicted2decorating.com/ultra-wafer-thin-led-recessed-lights.html
I’ve really been tempted recently to buy a chandelier and a few sconces from sellers on Etsy or eBay that are selling vintage light fixtures from overseas. I know they’d have to be rewired for our voltage, and I certainly wasn’t planning on tackling that myself—but is that something that a lamp repair person should be able to do easily enough? Would it be something that should cost a fortune to do? I love all the changes that are taking place in your studio—have you thought about putting the wallpaper somewhere in the back part of the studio, too?
Yes, they can be rewired so that they’ll work here. I’ve always done my own wiring, so I have no idea how much something like that would cost.
I used to know how to do all this when I lived in Turkey, because I did know more than the locals did about American stuff. But, that was about 45 years ago, and now, my husband thinks I will fall off a ladder, so I am looking for someone to rewire my 50 year old Turkish wrought Iron chandelier made by a guy who also repaired thousands of copper pieces that all the Americans bought from him and his son. I loved living there and working, 1969- 1978, and only left because of a brewing civil war. Time to go elsewhere. I still speak Turkish. I loved the place. And I still have my chandelier, but the locals want $125. an hour to rewire it. What’s your rate? Just kidding. you have enough on your hands. Anne