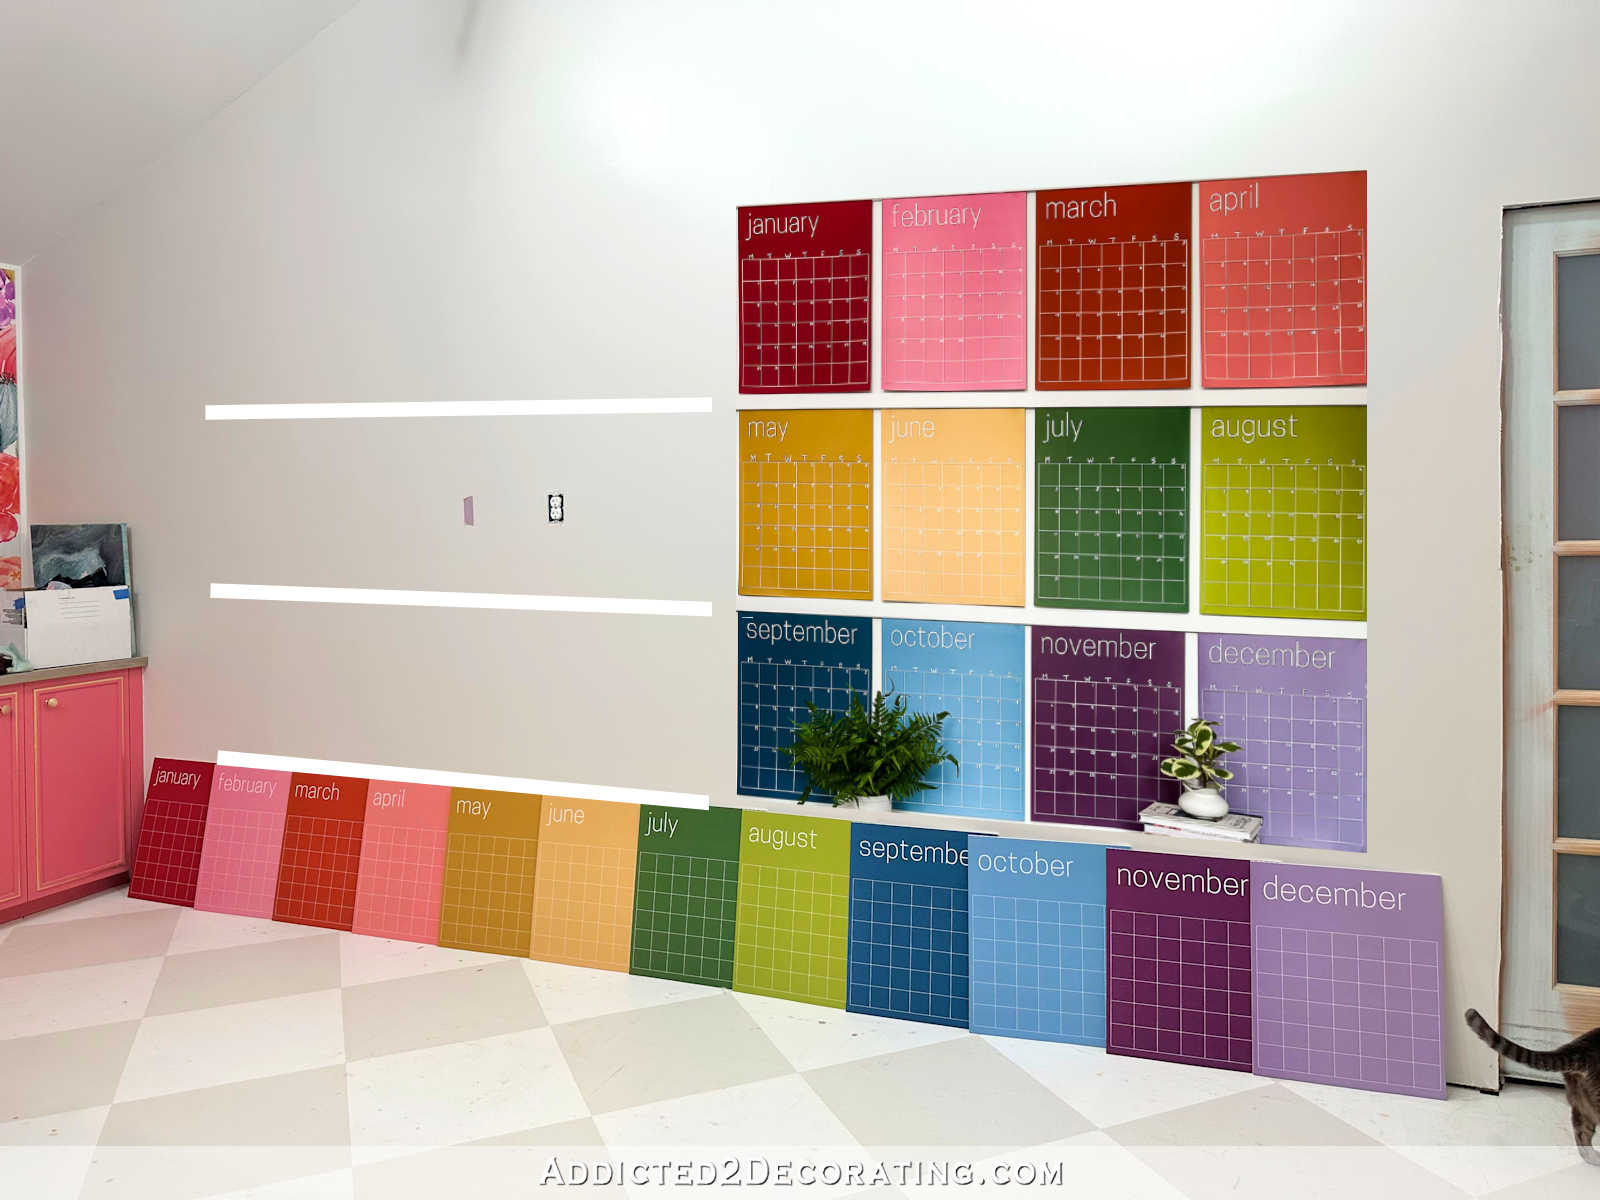
Planning The Most Important Thing In My Studio
I said a few days ago that while I’m excited to get started building my studio cabinets, the two priorities for me were (1) building a desk, and (2) building my workroom table.
The desk is done. And oh my gosh, I love it! It’s amazing how much more productive a person can be sitting at a proper desk as opposed to a piece of plywood sitting atop two saw horses. 😀 If you missed the very simple writing desk that I built, you can see how I built it here…
And you can see how I finished the desktop and painted the base here…
But there is no question that the most important thing going into my studio is my large workroom table. And those of you who have (or have dreamed about having) a huge craft room/sewing room/art studio/drapery workroom know exactly what I’m talking about. I dream about workroom tables.
For years now, every time I’ve wanted to sew draperies, I’ve either had to spread out the fabric on the floor, or I’ve set up a full 4′ x 8′ sheet of MDF on saw horses to use as my work table. For years and years, it has been my dream to have a space all my own that will accommodate a HUGE workroom table that can hold one full length and width of fabric for a standard drapery panel. That means the table needs to be at least 60 inches wide and 110 inches long. Bigger would be better, but those measurements are the minimum.
That’s a HUGE table!! The good news is that I have plenty of space in my studio for a table like that. The bad news is that I’ve been looking at inspiration and trying to plan this table for so long now, and I’m no closer today to deciding what I want than I was two years ago.
This decision seems so daunting to me that I’ve been kind of paralyzed with fear of making the wrong decision. I mean, this workroom table is literally the entire reason for my studio to even exist. If it weren’t for this workroom table, I could have gone on using one of the spare bedrooms as my office/work space.
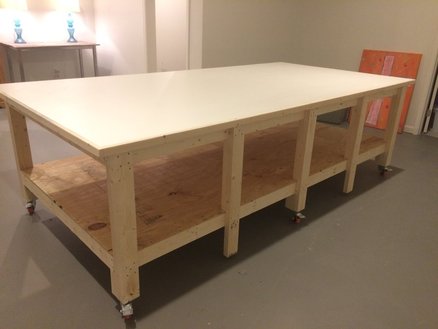
I could make a very basic table, like the one pictured above. I’d want to dress it up a bit so that it’s not just rough lumber showing. I could take that basic design and Kristi-fy it a bit with some pretty molding and paint.
But then I’ve had this big craft room table from Infarrantly Creative saved in my inspiration pictures ever since she shared it a few years ago…

The main difference is that the first one would only allow standing since there’s no place to pull up a chair. That’s generally how tables in drapery workrooms are designed. But I’m not running a full-on drapery workroom here, and my table will be used for far more than just sewing draperies. So perhaps I need to make room for some bar stools as well. And maybe add some cubbies for baskets.
I do know for sure that I want mine to be on wheels so that I can move it around, which would obviously be easier with the first design. But the second design could be modified for that as well, like this one from Family Handyman. I could still have cubbies on a rolling platform, and have the countertop extend more to allow for leg room if I want to pull up a barstool and sit.

So I’d love to hear from those of you who either have a large workroom table, or who have been dreaming about and planning for a large workroom table. What are the most important features for you, other than the large, unobstructed work surface?
In other news, tomorrow is my birthday, and I probably won’t get much work done today or tomorrow. I thought I might do a Q & A post, if y’all are interested in that type of thing — something like a Reddit AMA, but not slimy or weird. 😀 It would just be a post where I answer questions like, “How did you and Matt meet?” or “What’s your favorite country that you’ve traveled to?” Or you can ask home-related and DIY-related questions as well. Pretty much, anything goes (except politics — I try to keep that junk far away from my blog).
So if you’re interested in that, and you have a question you’ve been wondering about, ask away! If there are enough of them, I’ll do a Q & A post and give you a glimpse beyond the DIY.

Addicted 2 Decorating is where I share my DIY and decorating journey as I remodel and decorate the 1948 fixer upper that my husband, Matt, and I bought in 2013. Matt has M.S. and is unable to do physical work, so I do the majority of the work on the house by myself. You can learn more about me here.

Hi Kristi:
I really like that work table from Family Handyman but you probably would want the top to hang off more than they have for functionality purposes. Maybe some corbels underneath for support and a decorative effect. I love the idea of having both cubbies and drawers; however, if you you use an extended table top, that might impede access to drawers. If you used a larger table top, you could maybe use doors and have real sturdy pull-out drawers inside, with an partially opened, angled front for access, similar to what you have in your pantry.
The studio is really starting to come together. Can’t wait to see your updates!
Have a wonderful Birthday Day, Kristi
🌺🌷🌸🌺🌷🌸🌺🌷🌸🌺🌷🌸🌺🌷
Happy birthday, Kristi! Here’s my unimportant question: I’ve noticed that you seem to say “artwork,” as opposed to “art,” exclusively. Is there a reason?
My mom uses a ping pong table to cut and work with large pieces of fabric. The most important item for her is the height of the table so you can easily work at it standing up without wrenching your back.
How exciting for you!
One thing I’ve always thought that I’d want in a complete workroom table is slots like you see in a kitchen cabinet for cookie sheets. I have some (in the kitchen) and use them often. Why the craft room? Well, as a paper crafter, I keep some items on the floor that are used flat but store well vertically, for example, paper trimmers. I keep 2-3 of those on the floor at my feet at all times but wish I had those cookie sheet slots to slide them into; it would keep them safer and up off the floor. Also in it would be cutting boards (or whatever flat surface you tape your water color paper to), my ATG, and various work surfaces I don’t always need but want handy to pull out when I do need them (like a non-stick mat). These are items I don’t use daily but often enough to not want to have to get up to go search for them.
Also, if I had a tall table (vs. a desk), I’d want a couple shelves or drawers just beneath to raise them up so they’d be handy while I was seated.
I can’t wait to hear everyone else’s dream lists for organizing.
I’ve always loved Infarrantly Creative’s table and whole room for that matter!
I think that design, adapted for your height/needs would be spot-on👍👍😉😉
I like the one from Infarrantly Creative and see that working really well. For me, if the bookcase portion could be on casters separate from the table, but still fit under the table when not in use, would be helpful. That way, if I was working, I could swing the book case out and around at an L shape to me, to have access to the items I need, as opposed to pulling them out and putting them on the table. I know the table is large but I always seem to need the extra space beside me for “tools” etc., within easy reach, and the space in front of me for working space.
This is a genius idea! I was going to suggest splitting the tabletop, then using hardware to connect it like a dining table extension, but this is better.
I was thinking this too, solely for flexibility’s sake. Splitting it into two might give you options you don’t have with one large table.
I can’t seem to post a comment unless I reply so here’s my unrelated Q….
What resources do you recommend to get from greenhand to your level? I love your projects, but I’m at the “how do you apply stain?” level, so I’m too afraid to try them! I don’t expect you to make tedious tutorials/videos on all your projects, but can you recommend a good place to learn the baby steps??
She has lots of videos to answer all your questions, including about tools
I have a very large work table on wheels and have always wished it were spit into two tables that could be latched or unlatched. That way it would be easier to get out of the center of the room when I needed for something large . Also if it split I could more easily figure a way to lengthen it without being permanently that size . I also wish I had bought an older hydraulic beauty shop chair at one of the auctions , removed the chair and added a table top for upholstery and painting small furniture pieces . Being able to adjust a table saves the back.
If you are having it really large and on casters, there are good casters and not-so-good (cheap) casters. Since it will be heavy you need a good quality caster. If just stationary, ignore my suggestion.
Happy Birthday!
Hey, Cindy, your idea about the rolling cubbies under neath the table gives flexibility for sitting up and under the table. Genius! I like to glide on my sewing chair between my large cutting table and sewing machine. Time and back saving!
I can see this as a very good option to a lower shelf. May be even be able to swing one set of them over to her writing desk! If it was me, I would think the two table tops and have them come together, and open one for your moveable cubies to roll out or back under when needed or to store them. If you did two 4×5 tables, with a 12″to 18″, to maybe even 24″ fold down extension, on the back sides, that would flip up for wide projects, and leave at least one of them open, so you could sit if needed, that your roll out cubies would be stored under.
Don’t be frozen on this, because we know you will evolve an even better version over time, and your original will of course not go to waste, because you will have a shop for it to go live in, so get crackin”. LOL! and have a Blessed and Happy Birthday, too!
Height is everything! Being able to reach what you are doing is another. As far as storage, what would you store in cubbies under the overhang? Anything that couldn’t be stored elsewhere? Sure you want hooks on the edge for your scissors, maybe a basket to hold white pencils and tape measure, your bracelet pin cushion….maybe hooks for your rulers (do those come with holes in them?). Think about just what exactly you need to store up under your tabletop? Maybe it would be easier to store those things in the nearby cabinetry, making a simpler table more fitting. I have handle-style baskets to accommodate my tools for each type of craft I do. They store in closed cabinets and I just pull out the basket I need to take to the work table that day. If you build the simple version now, get to using it, live with it awhile, you will know better how you might like to improve it later, if at all.
Hi Kristi,
A while ago you asked if any of us would be interested in traveling to your home to for a building/decorating workshop. I just wanted to let you know that I still think about that trip and look forward to standing or sitting around whatever craft table you build.
Happy birthday to you!
Personally, with the vast size of your studio, I would likely build two different work tables: one for sewing and crafty artsy-fartsy needs and the other to fit building and construction needs. I don’t think I would be happy with one table trying to fit so many needs and likely not being able to, as well as two could.
Plus, as much as many of your projects make dust debris of varying kinds, anything not closed away is going to collect that debris. Even closed away the dusts will still get into everything, without one of those vac systems that sucks it all up as the tools make it.
Whatever you come up with to build, there is no doubt that it will best meet your functional needs as you see them.
What if you built two tables that could connect to form one big table when you needed it. That way you have more flow around two smaller tables, but still have the big table when necessary.
this, This, THIS, *THIS*!
Yep this is what I was thinking as well. Each could be more designed towards what the storage needs would be, and then they could easily roll together when you need a large space.
My comment was a reply to KRIKIT, not to A Brown.
I also liked PAM’s comment, later in this comments section, about making an L-shaped work table for sewing. I made 132 YARDS of garland for my daughter’s wedding and that configuration would have made it much easier. For that configuration, I’d vote for having the left hand sewing section be an attachment that can be put elsewhere when not in use.
The L part could be a drop leaf part with a single fold down leg for stability!
Absolutely two tables that go together when you are doing drapes but separate when you aren’t. There is absolutely no use for a table that is so wide you can’t reach the centre of it. If both sides had an overhang that met in the middle you could use stools when you wanted to just pull them apart. You could even stagger the two sections so you could put stools on the narrow sides and a wide portion in the middle.
If I were in a position to have a huge work room table, I like the second table best. Two things I would change – low backed stools that can tuck completely under the table, and something to hold rolls of fabric on one end. When I sew, I do all of my cutting at the kitchen table and two things that constantly irritate me are chair backs in the way, and trying to keep my fabric off of the floor.
The fabric roll would be a great idea! Instead of lifting the roll, unrolling, measuring, cutting and then lifting again and putting away…just pull and cut😃
I absolutely agree with Vanessa. Chair backs are the pits. And yes, yes, yes, an anchor for the fabric. If you are using rolled bolts, a roller system would be fantastic.
I would love a huge work table and would be thrilled with any of those. Ever thought of having half of it collapsible? Just an idea. I would need that as my sewing room is quite small.
You mean like a drop leaf table? That’s an idea!
Drop side or end was what I thought too. It would give more space when the side is dropped and against the wall. I would like the ability of keeping the fabric in a bracket of some kind, like at the fabric stores, for bolts. I used to make a lot of drapery too, and also worked in a design store. Storing fabric bolts on end was a no-no, and a few rollers at the end of the table made rolling so easy! I would make a separate cart on wheels with storage nooks for supplies. And the work table would have measuring on both long ends for ease of cutting.
Question I have for you is: When you were young and thinking about what you would do as a career, what was it, and how did you finally arrive at what you do now? Did you have an “Aha” moment, or did it come along gradually? And what did Matt do before he became handicapped, and does he have a career now? ( If that’s too personal, I understand!)
Any updates on Felicity Smoke, Cooper and Peeve? Are the kitties getting along? How do you like the new carport?
Qs for the Q&A:
What/where would you recommend doing/going to in Texas?
What is in Matt’s game room?
What project that you’ve done makes you smile the most?
And happy birthday! My only suggestion for the work table would be to consider making it in two separate pieces that lock together so you have even more flexibility and can spread out further if needed.
Somehow I pictured a table that had half of the work surface fold down (hotdog, not hamburger) so you could park it along your wall at times for a big space if necessary.
When I’ve had a big surfaces, it gets filled with “stuff”. Some off this stuff is the stuff that takes time to store (because its bulky) or set-up, so it stays out longer than needed. I finally go to put it away, and it’s old storage spot was taken, then the cleanup job turns into more an organisation project/mountain. Maybe closer or specific storage can help, maybe just large open storage can help.
I don’t think in “pretty” well, but If it’s open storage, an interesting idea is to place metal (ferrous) J or corner bead on the shelf edge to use the strip magnet labels like your tool box. So there is purposeful open storage. You could paint the metal a color to hide it a little.
I can so clearly see you taking the best of these three (possibly more) and configuring into a dream work table for your new studio! Which is coming along fabulously. I can’t get enough of your posts, it’s the first thing I seek in my mail each morning (or afternoon).
The Q & A would be cool. You know us girls always like details.
And I wish you the happiest of Birthdays tomorrow. Enjoy yourself.
I had a workroom a few years ago with a table I designed with the help of CHF forums. Mine was about 60”x120”. I made it with a 3/4” plywood top with a deep overhang so I could use clamps on any edge. I used the area underneath mainly for fabric rolls. I also had full length and full depth pockets on the long sides so I could drop fabric in there instead of on the floor.
I also had some brackets that I built to hold rolls of fabric off the edge of the table. If you’re interested, I can send pictures or diagrams.
Like real estate, location is everything, and by location I mean height. Customize it for you to work ergonomically, elbows bent for measuring, cutting or assembling, or whatever. My best height is not your best height. Also, the overhang is very practical, and I know you will make it beautiful as well. Prevent constant toe stubs as you move around the table. Cubbies and shelves for baskets are good because you can organize your items by project or by type of tool. Make them deep enough to hold those sealable plastic bins and you won’t have to worry about dust creation too much. Finally, consider those corners. Rounded vs squared off. Your hips will thank you. Yes to the locking wheels and yes to spaces to pull up rolling chairs to work on projects. I’m so envious! Enjoy! And happy happy birthday. Your projects and fearlessness are always inspiring.
What about creating two or three tables that can come together and set up each one for a dominant function? So, in other words, one may have shelves, while the other has drawers , while yet another allows for you to sit comfortably. With brakes on the wheels you should be able to set them up, one next to the other, and lock the wheels in place to give you a perfectly level and coherent surface.
I was thinking the same thing – If they’re all on casters, you could even set them up to have eye hooks that lock them together on the sides. That way if there’s something that might be completed easier by having a smaller table so something can hang off two ends, it would be nice to be able to split them apart. Might allow for more internal storage, too. You can flip them around to be hooked together in multiple configurations, and allow for places to sit, if one of the ‘pieces’ doesn’t have anything underneath. You can put that piece in wherever it’s convenient. On the edge, in the middle, etc.
You can actually buy hardware specifically for locking tables together. Lee Valley sells it in the section with all of the table leaves hardware. Some of them look like window locking mechanisms.
Yes, our dining room table has the leaf stored underneath. You open the table (it has a ratchet-type mechanism that the ends slide on) pull up the butterflied leaf, push the ends tight and there are locks underneath that keep the seams together. Love it! Those locks would work great for this purpose! Happy Birthday Kristi!!!
This is what I was about to write. I was thinking 2 or 4 that lock together. The guy from ILikeToMakeStuff made one that holds together with magnets: https://www.youtube.com/watch?v=PcrTKmO6ttA
This is amazing! I also like the storage underneath the top itself.
Wow, super simple and so versatile! These could also each have a flip up, to extend their surface!
Holy cow!!!! This is amazing!
Happy Birthday Kristi! Enjoy your day!
I want a giant table too! For me, the height is important. It has to be ergonomic for me. Also, happy birthday!
Happy Birthday, Kristi! May your new year be blessed beyond imagination!
Already there are many great ideas to consider as you dream and design your new work table. As someone who overthinks things, I truly understand your dilemma. Hopefully the ideas shared will help you develop a concrete plan.
As far as questions… It would be wonderful to get to know Matt as you two seem to have a wonderful relationship through this incredible challenge that has been dished out on you. Tell us how you work together, I’m guessing Matt does some work for your business, what else does he do, is his game room a dream room or is it functioning for him right now in some way, and how does he (and you) remain so positive while dealing with MS? And let us know how you enjoyed your BD. Just a few questions… 😉
Have a wonderful day celebrating YOU!!
Beckie’s table (Infarrantly Creative) would be my choice for me! Had that pic saved for years!
Love the family Handyman version but would suggest you pick a side or 2 for enough overhang to be functional and maximize the under table storage on those sides and minimal overhang on the other sides you maximize storage on. The overhang makes access to even cube storage difficult to reach. I have worked in the apparel industry and used cutting tables like this for years https://www.alibaba.com/product-detail/High-Quality-Industrial-Fabric-Cutting-Table_60612942048.html
This company uses some of the best features and more in their designs. https://emir.co.uk/product/cutting-tables/
I am lucky enough to have a dedicated craft room–13×15–in my present house, and l made a simple, inexpensive large work table using 4 three-shelf laminate bookcases, about $20 each, and 2 sliding closet doors, free from my BFF who remodeled her bedroom. l just assembled the bookcases, and put a door on top of one at each end. Since l am 5’8″, the height is perfect for me to work, and l have room underneath to store a big dresser, 4 huge bins, and a card table/chairs! It measures approximately 72×80, and l love it! l too make draperies and other projects for the home, and it is wonderful. However, as another reader mentioned, large spaces are often piled with “stuff,” and my work table is no exception to that! I did not put mine on wheels, but the bookcases are light enough for me to move if l want to, and the door tops are also easy to move. l didn’t bother to screw anything together, since l thought l might be moving it more than l do, but that would be easy enough, especially for someone like you! Looking forward to seeing how you finish your work shop; so far it is fabulous, especially that wallpaper! And, happy b’day!
I really like the 3rd pic of the table from Family Handyman. It has a lot of potential for customizing to fit a person’s particular needs/wants. It could be made with an overhang for seating on only one side, or more, depending on how it will be used. Any overhang depth on the other sides could also be customized, depending on the type of storage you want underneath. But, definitely, storage cubbies that are movable, fixed, or both, for tools you use frequently. And what about a pressing station? How are you planning on handling that? Any possibility that it could slip under part of your table, or will it be nearby? Then you would need storage for irons and pressing equipment. You always have great ideas so I’m sure you have been thinking about all of the different types of projects you will be doing, the supplies/tools you would use, how often you use them, and how easily you want to be able to access them. It’s exciting to see how you work through each step of these projects to make them meet “your” needs/wants. I love that you don’t give up, you keep adjusting until you get something that you feel really works for you. You will be so proud of your finished studio–something really special that you created and brought to fruition–and you should be! You go, girl!
Q&A/AMA is so fun! LET’S FOCUS ON RAMPART. lol!
I’d love to hear updates on Cooper, and if you’re willing to share your history with Matt? You two are truly an inspiration- the way you talk about his disabilities so constructively and matter of fact is refreshing. No sympathy garnering woe is me stuff. Props to you guys for sharing your DIY with the world.
Kristi – Wishing you a wonderful birthday! I would really like to know how you became so talented. You can basically do EVERYTHING. Did you grow up with a family of DIYers? Would like to know a full background.
My mom made draperies years ago. My dad built her a L-shaped table with her sewing machine close to the center so her long fabric was fed into the machine from the long side (left). It kept it straight and off the floor.
Remember that you will age and sometimes i simply need to sit down when working on a “stand up” project!
I suggest not to add to many items underneath the table if you really want it to be easily moveable. I would only store those items underneath, next to or on the table that you really need to have handy while working – I, for instance, have all the essential gadgets for sewing in a portable cubby-type thingy which I can take whereever I work (as I don’t have a large workroom table, I use the kitchen table to cut the fabric and thus can take everything there in one go). My experience from other DIY spheres (such as workrooms in schools etc.) is that it is really important that the table is still movable and not too encumbered by stuff such as shelves, cubbies and the likes which are full… I like the idea of having part of it foldable, as that way you don’t use the table as “horizontal storage” while you’re not working on a project there 🙂
A question for your Q&A: Do you consult Matt on decisions when you waver between two or more ideas or do you keep questions like that to us? I’m forever asking my husband’s opinion about small (and big) details in my projects (and not always following his advice, rather using him as a sounding board for my thoughts….)
A very happy birthday to you tomorrow, hope you can take some time off (you will surely do the Q&A the day afterwards?!?) , have a wonderful, hopefully sunny day!
Renee, who blogs at Miss Celie’s Pants, recently made a cutting table using Ikea bases for the loft in her new home. She sews and knits, so her needs are a bit different than yours, but interesting to read her thought process and what worked and what she wishes she did different.
https://missceliespants.com/2019/01/22/ikea-kallax-cutting-sewing-table-hack/
Happy Birthday!!
My husband and I created a large table to work at for me, but had to stay small enough to use in a spare room. We also used Ikea cabinets – a pretty teal color, and some have doors, some drawers, some just shelves. (all options available for the same cabinets) We used a prefinished wood panel for the top, and he mounted all on a platform with wheels to be able to move around when needed. It is more or less a U shape, so I can sit on the one end to work if I want. I just love it, and of course was much easier on us than starting from scratch like Kristi – but I wish we could! (we also made it tall enough to be comfortable working while standing up.) I know Kristi will zero in on what will be best for her – but I think some of the ideas mentioned above are all awesome!
PS) Happy Birthday Kristi, and wishing you a fabulous new year on this beautiful earth!!!
I would suggest having a large table made from 2 or 3 sections that could be fastened to make a large area when needed. All on wheels. This way you wouldn’t have to walk around “ the block” if your project was on a smaller scale. Also cubbies for storage. I would also add a ruler for top like at the fabric stores.
Wishing you a very Happy Birthday too🎂🎉🎁
Kristi -my husband built a table for me several years ago that has worked very well. I hope I can explain the design for you. This table is built with stacks of drawers on both ends for all of my sewing needs. Each drawer stack has 5 shallow drawers on each side. The stack is similar to a kitchen cabinet but 48 inches deep, so that each stack has ten drawers, 5 opening on one side and 5 on the other. The drawers vary in depth, so that some fit my scissors and so forth and others fit things bulkier items like velcro, sewing machine parts, elastic . Each stack is on casters with a total of 20 drawers. The top is 4 x 8. The stacks are on the ends with space between them for a stool to be recessed. If my sewing room were bigger, I would have had my husband put 2 fold down flaps to make it even longer. I also made a padded 4 x 8 ironing board thingy to place on top for ironing those huge sewing projects so I could iron a big piece of fabric. I like the drawers over open shelves or baskets because they keep the dust and threads and stuff out.
Happy birthday! I’ve had two large tables in my life: a stationary one similar to your inspiration photos, and the pingpong table we bought for the kids. Believe it or not, the pingpong table was way better than the large, solid one. The pingpong table folded up so could be completely gotten out of the way. It was much lighter-weight than the other table and could be slid around easily. And it was “used” and cost almost nothing. At 108″ X60″, it’s very close to your minimum measurements. I mostly worked with large amounts of fabric on the pingpong table, but it had its share of crafts with things like acrylic paints and such. The stationary table had storage underneath and looked really nice. I would caution you to think through ALL the ways you will use this table, and plan the storage sections accordingly. Some of my storage got in the way when I was sitting at certain points along the table. I wouldn’t want the one in the first or the third photo for that reason. Also, I found that having storage for little items underneath was irritating. I was always having to sort and clean at a physically low level. I would consider what large items could be stored under the table and store smaller items in a cabinet where I can stand up to find/sort/clean. I’m an artist who currrently has a two taborets near my work space, and I find myself throwing all my supplies on the open shelves behind me–the ones that are waist height or higher–to avoid digging around in the beautiful but low-in-height drawers of my spectacular taborets. The second photo appeals most to me because of the space for human legs and the fact that the storage is accessible without contortion.
I have a big workroom table and I find myself sitting at it on my tractor seat rolling stool, so it was important for me to have leg room. I have cubbies on each end and I really love it. I also bought two huge cutting mats to cover the entire top so I could cut on it too. It is always loaded with machines and “stuff”, but I really love the size. I could use a few more, but have run out of room in my 24 x 24 room.
Two questions: Where did you and Matt meet, etc.
and a technical question for number two. You posted some time ago about a brush cleaning product that you said was miraculous. I just ruined my best paintbrush by forgetting to clean it and am desperate to know what that product was. THANKS
And HAPPY BIRTHDAY!!!!!
As someone who recently started sewing, I’ve been waiting to see this project since you started the studio. 🙂 I don’t have a room big enough for one and I struggle with my “cutting table” every time I need to work with even a full yard of fabric. It’s just not wide enough.
I think making use of storage below is a definite must, as is space for a chair or stool. It could be as simple as adding multi-level shelves to the first design (with an overhang) or it could be as complex as adding the cabinetry below like the second example. I think if you build the base strong enough, you can probably do the cabinets and still have it on wheels. Your base will just be uppercase-I shaped instead of rectangular.
Something else that might be interesting/useful to explore is mechanisms that use a worm-drive to raise or lower the table from chair height to standing height. I personally like to sit when working on small fiddly stuff but I don’t love my legs dangling or hopping up/down on a stool. I’ve seen such mechanisms on plans for wood shop benches and some of them might even be DYI with long threaded rods and such (not having to order expensive hardware).
To me, one of the most thoughtful pieces will be what you use for the top surface. For a cutting table, you’ll want a nice smooth, not-easily-scratched or nicked surface. For a “crafting” table, you’ll want something that’s easy to clean. If you might do small woodworking projects, you might want something that can stand-up to heavy items and tools being banged around on it. As a sewist, I love rotary cutters and think how amazing it’d be to be able to cut something as big as a drapery panel with a rotary cutter and a huge custom-made straightedge/square. So maybe you want some sort of sacrificial or self-healing cutting surface (they actually make HUGE self-healing mats but they’re $$$$). It’d also be handy to be able to iron on a section of it (not possible on a self-healing mat as they’re heat-sensitive).
If the surface thing is as important to you as it would be to me, I’d consider making a couple-inch tall shelf the whole width and length of the table just below the work surface (think map drawer height) where maybe you can store different “cover surfaces” for the table like cutting mats, sacrificial pieces of paneling or plexi (that you can goop-up, ding-up, etc.). I think I’d also make a big flat piece of wood padded and covered to use as a giant ironing board.
Another thing I’d do is find a way to embed, etch, glue-on, or stick-on “yardsticks” to either the top edge or the side edge for quick measurements without taking out the measuring tape. I bought some stick-on yardsticks for both my sewing and cutting table and I love them. If you tinkered around in Photoshop, you could maybe even make your own that measures the full length of the table (in pieces) and resin the paper right to the table top. An alternative would be to draw a 1″ grid on the top surface and topcoat it (think like the grid on a cutting mat).
One more thought… You know how every time you do a large resin project, you have to make yourself one of those little “kiddie pools” to work in and catch drips? I wonder if you could make a permanent tray that’s half the size of your table with 3 sides built with a lower lip so they slip over the edge of the table top (to hold the tray in place) and then rig it in such a way that all you need to do is pop it on, add some plastic sheeting to the bottom, work, and then take it off and store it somewhere.
Man, I’m having fun with these ideas. 🙂
How about outlets for your sewing machine and other electrical equipment? How would you connect the outlet to the source of electricity. Outlets in the floor would have been nice, but too late for that. You don’t want to be tripping over extension cords.
Hope your birthday tomorrow is amazing! 😊
While my craft table would never work for you, I used an old door, painted it purple (I love to use a lot of color as well), used plumbing pipes for legs and spray painted them gold. I put a piece of glass on the top and I have the perfect table for my 11×13 room. I love having enough room to lay out large pieces of fabric. I really like the Family Handyman option built to the size you need and with enough overhang on one side to accommodate a stool. I can’t wait to see what you end up with.
Maybe some sort of sectional solution so you could change the layout of your table as needed. 2 or 3 (or even 4) sections on wheels that can lock in different ways depending on your project? … they could lock underneath or on sides so the surface is still continuous. Hmmm
I have wanted to ask you for a long time how you so efficiently make decisions, in spite of imperfect choices, and just move on with your project? I don’t know if it’s possible to explain such a thing or not but I hope you can provide some insight. I get stuck in the decision phase of every project and things drag on and on. Sometimes it takes so long that my tastes actually change. Thanks!
Happy almost birthday! I am a garment sewer so I love love love cutting tables. My current sewing room is small, so I have a table that works perfectly in the space: 4 Brimnes (Ikea) chests bolted together with a think piece of plywood on top. The plywood is covered with vinyl, and I have a custom cutting mat on top of that. I don’t have wheels on mine because there’s no place to roll it! But, another garment sewer I follow, just built a great cutting table with wheels. Her blog is Miss Celie’s Pants (.com) and here’s a link to her cutting table. It would be easy to make this as big as you want. Good luck! https://missceliespants.com/2019/01/22/ikea-kallax-cutting-sewing-table-hack/
I too came in to suggest ways that would allow you to change the height of the table without breaking the bank or introducing instability. Electric, crank and pneumatic systems are available and there are numerous scissor-lift systems designed for lab and industrial applications. I started thinking about jacks and wound up being drawn to the devices people use to raise and level trailers and mobile homes, which are narrow, and, from there, to motorcycle and ATV scissor lifts, which often (but not always) have bigger platforms.
However, once you get over a lift height of about 30 inches or so they get expensive. Consequently, the narrow lifts might be best. They could sit on a rectangle support, to match your desk such that at the lowest height it was comfortable for sit-down work and you could raise the entire table for stand-up applications. Something like: https://www.amazon.com/RecPro-Trailer-Stabilizer-Leveling-Scissor/dp/B013H12B3W?th=1
or https://www.amazon.com/Extreme-Max-5001-5047-Motorcycle-Scissors/dp/B0196PAYP0/ref=sr_1_17?keywords=motorcycle+lift&qid=1561055886&s=gateway&sr=8-17
Some lifts allow you to raise/lower them using your drill. Others have foot pedals. You could disguise them with a wooden “skirt”. There are many choices and it might be worth a google or two to see if it makes sense for you. Anyway, happy birthday!
Hi Kristi!
I love reading your blog, you are beyond talented, I only wish I was! As a lover of all woods, I’m curious why you didn’t use a white oak or just oak to make your desk, knowing that it’s not only beautiful but also a hard wood.
Thank you,
Gayla
I bought a bar height dining room table from Ikea for $169 to be my work table. Since I bought it last August, it has been totally covered in crap that I don’t know where to store yet 🙂 I have no helpful input, except I think you should definitely plan it so you can pull up a chair!
Happy birthday!!
I have no suggestions, so just want to say, Happy Birthday tomorrow! Hope you have an awesome day!
I have a 12′ oak dining table that is also my work space. I love it! Do you have people over often? Would you want the table to serve a function for large dinner parties? …just something to keep in mind.
https://www.facebook.com/photo.php?fbid=10212000900004071&set=a.10212116814901871&type=3
I don’t have any questions, but I would like to wish you a very Happy Birthday! You inspire all of us, all the time. My own two work spaces each contain a dining table from a former house, neither of which worked here in this house because the DR here is smaller and squarish. Both tables open up REALLY big. The largest is in the garage/studio where I paint and do all the messy stuff. I painted that one red with ASCP in Emperor’s Silk. I keep it covered with an old mattress pad and a very large drop cloth. For my sewing room/library (former guest room) upstairs, I use my old farm-style kitchen table. That one I have painted orange and white to go with my design scheme of hope pink, orange and navy/black in there. Both of these allow me room to keep things underneath — if I need to. I have silicone sliders on the legs so I can push them around — if I need to. I have various shelving units and furniture in both spaces which afford storage for what I need.
Yes, Yes, Yes to the storage in the second one. Drawers with dividers that work for the smaller sewing notions that you need all the time along with cubbies for storage baskets or tools that you may want to store. One person mentioned paper cutters and I can think of many other uses for them.
Also, just a thought about the table top. Have you considered making it like a drop leaf table? When you said it would have rollers when you needed room for something else, I couldn’t help but wonder how many places would you move it given its size and the fact that you will have other things in the room. Your storage would be in the center section and drop sections could be any size that would work for you. I’m certain you have already thought of this but just thought I’d through it out there. Room is looking great.
I’m sure you
Happy birthday to you! (and me!) We share the same birthday. 🙂
I like the looks of the last two tables but somethong about them really bothers me. Visually they just look like big blocks. And as big as you want to make this table it might really block the beautiful open airy flow of your studio.
Being able to pull up a chair would be the most important option for me. This would not have mattered to me in the least up until a year ago. My knees have become foremost in anything I plan now and as much as I hate that it’s the reality. Second would be slots like you have in kitchens for cookie sheets. They would be so helpful for cutting mats etc. I’m looking forward to whatever you build as it always surpasses anything I could dream of.
I’d probably want my drawers/cubbies on wheels and a separate unit from the table, but still fitting under the table. Then the table could still be easily moved without having to drag around the whole shebang. Or you could drag just your cubby stuff and not the table to another spot when needed.
Really give thought in “how” you work, not just what you want it to look like. Imagine yourself doing a project, sewing, crafts, upholstery etc. What things where would make it easier, faster, simpler?
Think about the weight for a table that big. Even if it’s on wheels it could be difficult to move the more you add to it. Consider the size of wheels you will need(for weight) before building. It could add substantial inches.
OMG! And I thought YOU were creative!!! My goodness! Your readers are top-shelf, for sure! I have no suggestions at all (but I know whatever you decide will be fabulous)! So, Happy Birthday! And how, in fact, did you and Matt meet?? I love hearing those kinds of stories!
Happy Birthday!
I don’t (alas) have space for a large cutting table any more, and I miss it. Things that I think are important – right height, right width (I am short, and I have to be able to easily reach the middle), toe room, knee room. For me, I want a stool so that I can sit if I need to, so for me there needs to be either stool cubbies or more overhang. Things that are nice – I like rulers on the sides, a cutting channel at one end, a hole with acrylic to make a large light box, a very smooth surface that will withstand paint and watercolor without staining, cup holders, and an easy reach shallow channel like drafting tables have for pencils/pins/scissors. A thing I plan to add to my next art desk is a wallmounted paper roll of lightweight kraft paper that I can pull out and cover the entire desk area.
Oh, hmm.. I would also design an ironing board cover for it, and a sewing table that could use it to support large draperies!
I have a 4′ x 10′ drapery table with the drapery clamps on one end. Did not work well for my needs b/c it was too short for my height. Use it more for storage. I have dreamed of a real table 5′ x 12′ but built in 3 sections and everything on castors. Each section is 4′ x 5′ and has a locking mechanism so I could make a T shape for managing a quilt on top since I don’t have a longarm. The one thing that I loved about the drapery table is that it has a Formica surface on the plywood. Fabric slides well on it. I like the idea of having padded cover for it that could be used for pinning or ironing large fabrics. I’d give that up in a second for an Iron-Rite Mangle tho! LOL
I don’t know about craft tables but here in UK, it is already “tomorrow”. So, dear Kristi, Happy Birthday and many happy returns! Your blog is my favourite. All the best to you and Matt!
Hi Kristi!
Happy Early Birthday!
Not sure about the table (and I’m a sewist! but don’t really do drapes, etc.) – I like the Infarrantly one – I do agree to possibly make it two pieces. Is it possible you’ll ever need to move it from the studio?
Questions: Did you ever tell us what your original profession was? Why did you go to Turkey? What is/was Matt’s profession? And YES! How did you two meet? How’s Keto going?
Tomorrow is my husband’s birthday. He is a woodworker and is currently constructing kitchen cabinets. Have a Happy Birthday.
Happiest of happy birthdays, Kristi! Thank you so much for such a wonderful blog, it’s so creative, colorful, and chock full of great information! I’m a big fan, I read you every day and have for years, and just marvel at your talent and skills — you never cease to amaze me. I’d love to hear updates on your critters, such as how your kitties are getting along, and how Cooper is doing. He looks amazing, he’s really thriving with you and Matt, and I’m wondering if he’s calmed down and if his anxiety has gotten any better? Hoping you have a fantastic birthday this year! Bless you!
Maybe there might be something helpful here:
https://sawdustgirl.com/?s=craft+room
Maybe there might be something helpful here:
https://sawdustgirl.com/?s=craft+room
Happy birthday. My ideal work table would be similar to the first design, with a space in the centre to sit at. Cubbyholes are too restricting for me. I prefer the large shelves to store things in baskets, yet still have room to store larger items.
Happy Birthday, Kristi! Silly questions, but very timely for me. Which product do you use for filling cracks and nail holes? You always include filling, caulking and sanding as steps in your finish work but I have lost track of your go-to products. When you caulk, do you ever use a flexible caulk? Do you prime filled and sanded area before painting? Thanks so much!
Happy birthday, Kristi! It seems we share a birthday! 🙂 I personally LOVE the idea of having storage and cubbies on what will be a gorgeous expansive work table. I like someone’s earlier comment about combining your favorite aspects of all 3 tables. With your creativity I KNOW you will come up with something spectacular!
Hope you have a great birthday and a wonderful weekend too!
Happy Birthday! I would to hear more about you and Matt, how, where you met and your other family members too. My husband and I each have large, vintage drafting tables in our respective offices. the tops are wood with 4 metal legs inset at the corners and a wide brace across the bottom. I was a draftsman in my former life, now sewist/painter/crafter & Nana. I glued in place a measuring tape along the edge and use the bottom brace for baskets storage. I have a bookcase the barely slides beneath the table edge but presently don’t place in there because I do everything standing up and it interfered. the table legs are set pretty in so the top extends well over & that keeps them out of the way and saves you from stubbing your toes. I have 2 sewing machines on the table & even sew while standing. we do have wheeled draftsman chairs for when we want to sit but I have severe nerve pain aggravated by sitting or bending at the waist therefore I need a tall table. Even a slight hunching over a table sets me off so be aware of the perfect height for your body. I’ve sewn lots of draperies and slipcovers and I think a padded ironing surface like those mentioned would be wonderful too. I do have an extra wide & long ironing board nearby. A metal T-Bar and laser level are helpful too for cutting.
I would love a studio/craft room like this someday. For now I am content with using our spare bedroom. I purchased an old hollow core door and some 4 cubbie cubes from Ikea and just have the top sitting on it. I can have my chair under the work table and it’s long enough for MOST of my projects. Have you checked shanty-2-chic.com, they have some great ideas and plans. I can’t wait to see what you decide to do. Happy birthday!
My Mom made curtains out of our home for clients for several years. She had a work table with a padded top covered with a canvas type cloth that had lines in 1” increments permanently marked on it. It made it very easy for her to press in hems and headers without using a seam gauge or tape measure. There were also 2 vertical lines in 1” increments along the long edge for the side hems/attaching lining The padded top made it easy for her to pin the fabric down to keep it in place as well as for pressing. The bottom edge had a metal bar that she would use to cut a straight edge on the fabric. You might consider making a separate top similar to hers that you could lay over the main work surface for that purpose. I’m sure you could design the top so that it could be folded up for storage. Now that my Mom is older and no longer sews drapes, I sure miss that table. I never realized how much easier it made sewing drapes until she took the table down.
Happy Birthday Kristi!!!
I am so impressed with all your reader’s suggestions. They blow my mind and if you were confused before all these great ideas, now what?
A thought, why do you need one table to do it all, maybe that is why you are having issues with designing a craft table.
How often do you need a huge table? I know you need it for draperies, upholstery, and possibly your artwork. When your table is full of fabric it would be tied up with that project. You seem to work on multiple projects at a time switching back and forth from one to another.
The craft table should accommodate how you work not just what you do. Why does the cutting table have to be the same one as the sewing table, other projects and your artwork? Won’t that limit you to working on one project at a time?
Maybe the cutting table could be a temporary table that is easy to set up and move around when needed. It could even be reduced in size to use for smaller projects (such as folded in half).
The craft/sewing table could be a separate table, also be on wheels, but would also store all your stuff and be another work surface.
Then there is your artwork which seems to be messier than your other work and requires a special container you build to hold the resin. Shouldn’t that be separated from the fabric projects?
I guess what I am trying to get at is the need for flexible permanent and temporary work stations/tables of different sizes. Maybe they incorporate drop leaves or extensions that could be added as needed? I have no idea what new projects you will be tackling over the years going forward.
Think about how you concurrently work on multiple but different types of projects. Then imagine how you would work on them in the craft room moving back and forth between the projects. How would you do that with one table?
Good luck designing your space. You seem to have the storage and office parts thought out, now for the “work space”.
For the Q&A: I doubt Matt plays games all day long so I wonder how involved he is with your business or if he has his own work.
Happy birthday Kristi! Enjoy each moment. Love your blog and have for a long long time
Have you thought of making two tables? One for sitting if needed and one for standing? But then make them in such a way that they can be connected to make one big table for your bigger projects? Just a thought.
I agree with the concerns about dust. You might not want to have any of your shelves fully open, depending on what all projects you plan to complete in there.
I also agree with the points about a table being so big that you can’t reach the middle of it. That would be so frustrating to me.
Other than that, I have no idea!! This is all new territory for me!!
Well you want it to move, so using it as storage sounds contradicting – besides, you will have the cabinets for that. And also, unless you wanted to store an entire roll of fabric or planks, the space under the middle of the first table wouldn’t be very useful anyway, due to problematic accessibility. I think that the most practical use for the storage spaces would be to keep your tools/materials while you work (instead of, say, looking for your pins under a curtain’s lentgth of fabric, or having to go to your desk to get them, or tripping on an auxiliary table). So I would go for a variation of the Infarrantly Creative table. You could maybe use the spaces under the table in different ways e.g. a drawer, shelves, a vertical surface to hang tools etc.
Also: HAPPY HAPPY BIRTHDAY KRISTI!!!
Something to think about is if you are comfortable sewing at a tall table. I would think having a section that is lower where you could sit at a normal height chair would be preferable, especially if you have a foot pedal for the sewing machine. I’m not super tall so I dislike sitting for long period of times on the tall tables where my feet aren’t on the floor. Just something to take into consideration.
Wow!! So many wonderful suggestions for your worktable! Lots of good ideas. My head is spinning. Kristi, you are amazing! (Would love to see a Kristiti show on HGTV.)
Q/A: What do you use to take care of your hands? Wood, sandpaper, paints, solvents, cement, glues, etc., have to do a number on your hands and nails.
Q/A: How do you stay so motivated day after day? Do you ever have days that your body hurts and it’s a struggle to get out of bed?
Q/A: How do you handle housekeeping and cooking along with all the work you do on your house and writing your blog? Do you ever take time for yourself?
I know I’m late to the party. Just catching up after a lot of travel without internet access. I think I’d want to build a work table that can fold up similar to a ping-pong table with storage cabinets in the middle. You could build access on each side and then also in the middle that can only be accessed when that side is folded up. This would allow you to fold it up and put it to the side and have it all out of the way when you want a large floor area to use. Plus it would allow to add seating as needed on the sides as well when folded down. One side could also be folded up and against the wall where only a smaller area of the table is needed for use.