My Finished DIY Writing Desk
Yesterday I showed you how I built a large no-frills writing desk for my studio. I didn’t want any drawers or a fancy design. I just wanted a simple but attractive desk, and this is the design that I came up with…
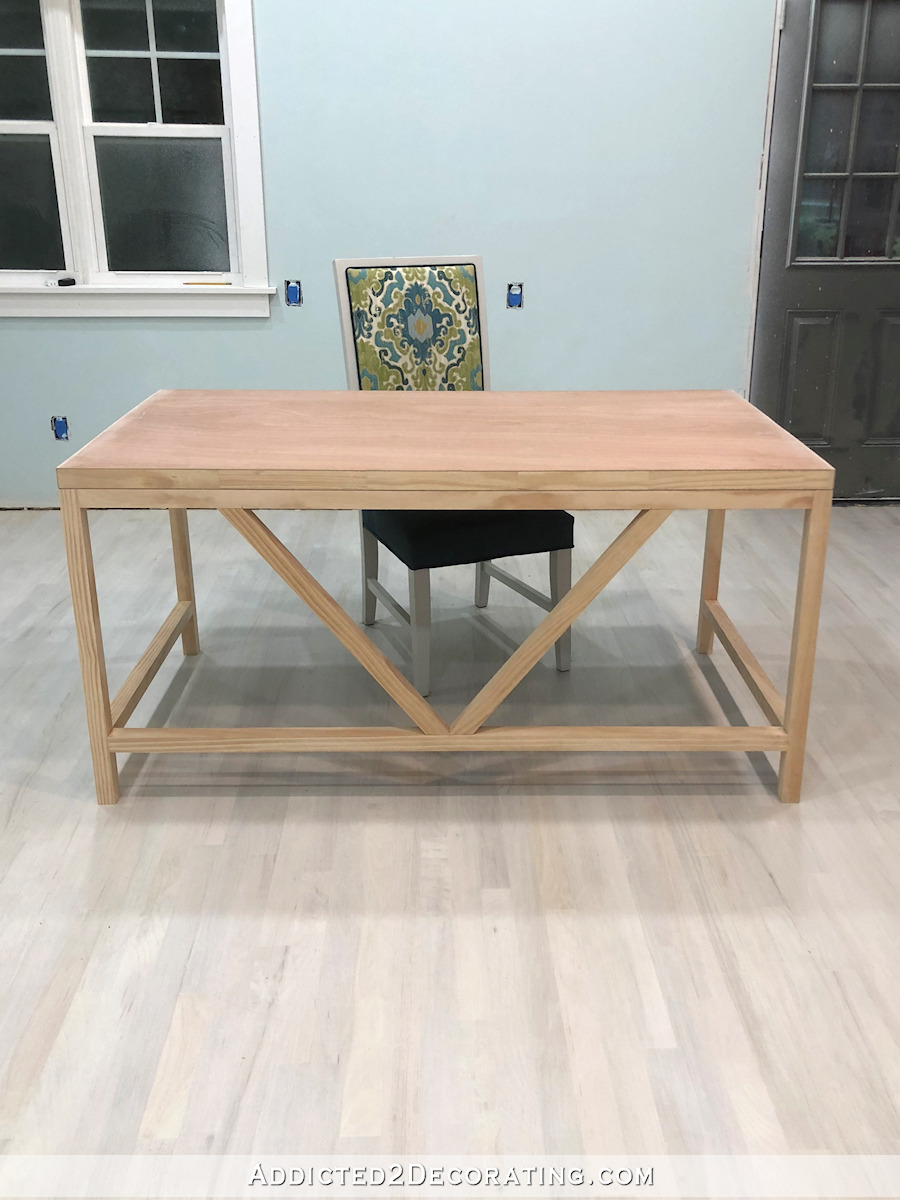
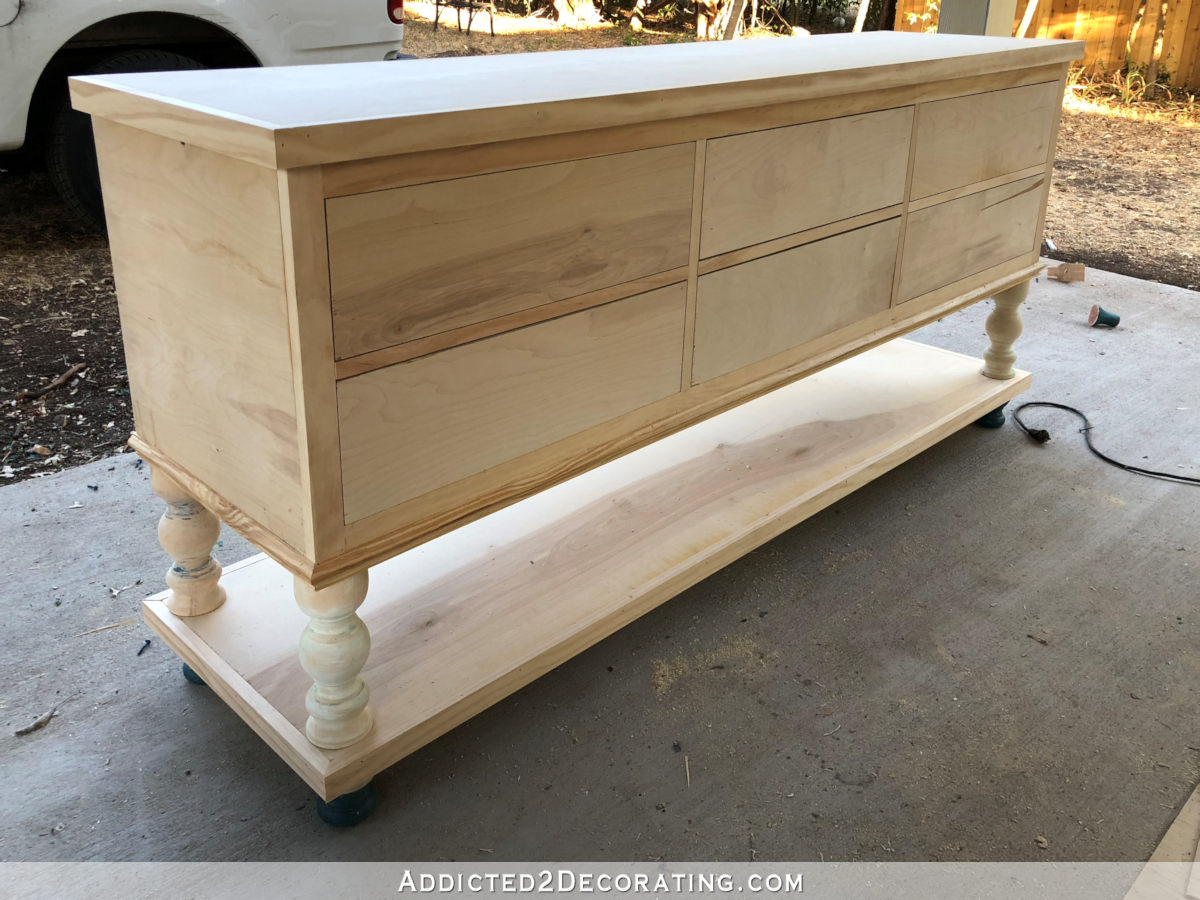
If you missed the post where I showed how I built this desk from a solid core door and a few pieces of lumber, you can find that here…
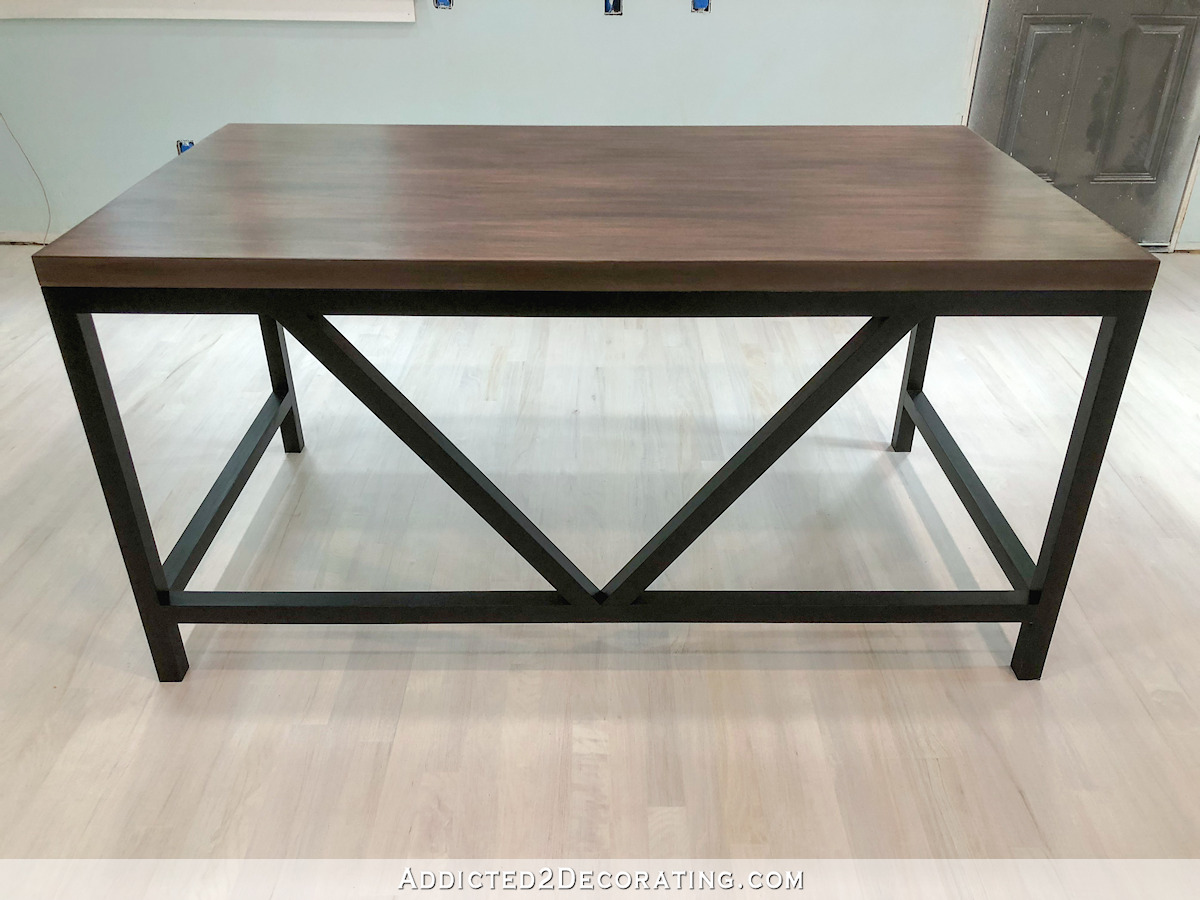
So yesterday, I set out to finish the desk. I knew I wanted a stained top and a black base. The base was easy. I painted it with Behr paint in a solid black matte finish. (When I want black, I don’t use a paint swatch. I just go to the desk and ask for pure black.) Then I topcoated that with General Finishes High Performance Topcoat in a flat finish.
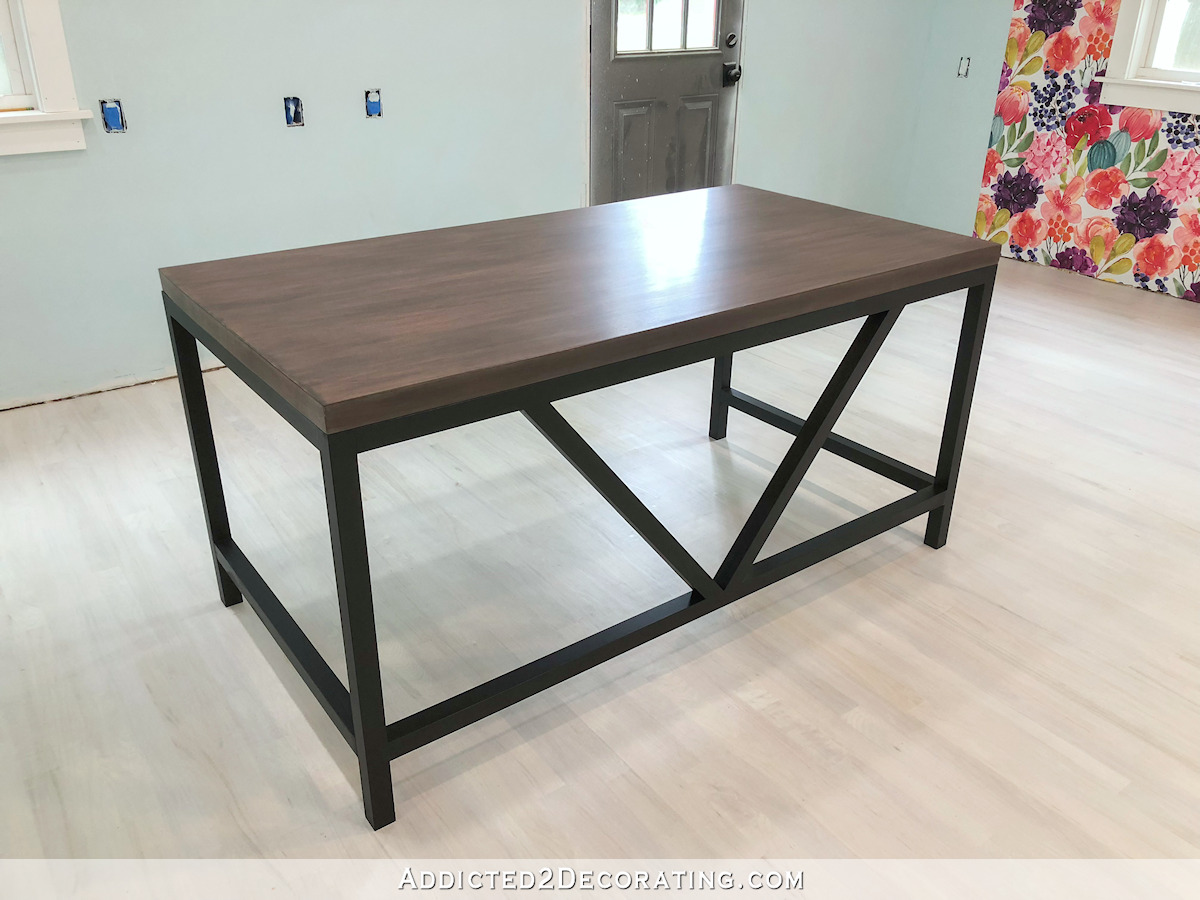
But the stained top wasn’t quite so easy. It was such a pain to get just right, but I will admit that the pain was self-inflicted. I made one mistake after another that made the whole staining portion of this project (which should have been simple) such a huge headache. But after many hours of frustration, I finally got it looking decent. Here’s how it turned out…
I actually really do love how it turned out. But have you ever worked on a project for hours, and it just isn’t going well, and you just get tired of looking at it? And even when it turns out fine, you still feel like you just need about a week before you want to look at it again?
Yeah. That’s about how I feel this morning. I really do like the final look, but my desk and I just need to take a break from each other. 😀
As I said, the pain was self-inflicted because right out of the starting gate, I used the wrong product, and that set the tone for the rest of the day.
The original unfinished color of the wood on the solid core door that I used for the top was very red. So I had intended to use my new staining process (minus the bleaching step) that I use on pine to get rid of the undertones that I don’t like.
That means that I needed to start by staining the desktop white. I just happened to have some stain left over from the studio floor, and it’s white with a bit of green tint. That’s exactly what I needed to reduce the red undertones of the wood on the desktop.
The problem is that instead of grabbing the bucket with the stain mixture in it, I grabbed the bucket with the white-tinted polyurethane in it. So right out of the gate, I used the wrong thing and sealed the wood.
“No problem,” I thought. “I’ll just have to let that dry, lightly sand, and then use a wiping stain instead of a penetrating stain.”
It was a great plan. Since wiping stain kind of sits on the surface similar to a gel stain (but much better than a gel stain) and evens out tones, it wouldn’t matter that I had accidentally sealed the wood.
And that plan would have worked beautifully if I had grabbed my Old Masters Dark Walnut stain. But instead, I grabbed the can of Old Masters Spanish Oak, and oh my gosh, that stuff is dark! I mean, it’s almost ebony with undertones of purple.
So from there, it was just a series of chasing bad decisions with more bad decisions.
Finally, I had to tell myself to STOP. Just…STOP. Stop and think about what will fix this. Come up with an actual deliberate plan and stop just reacting with more bad decisions. Sanding wasn’t an option because the veneer layer on a solid core door is so thin that I would have sanded right through it.
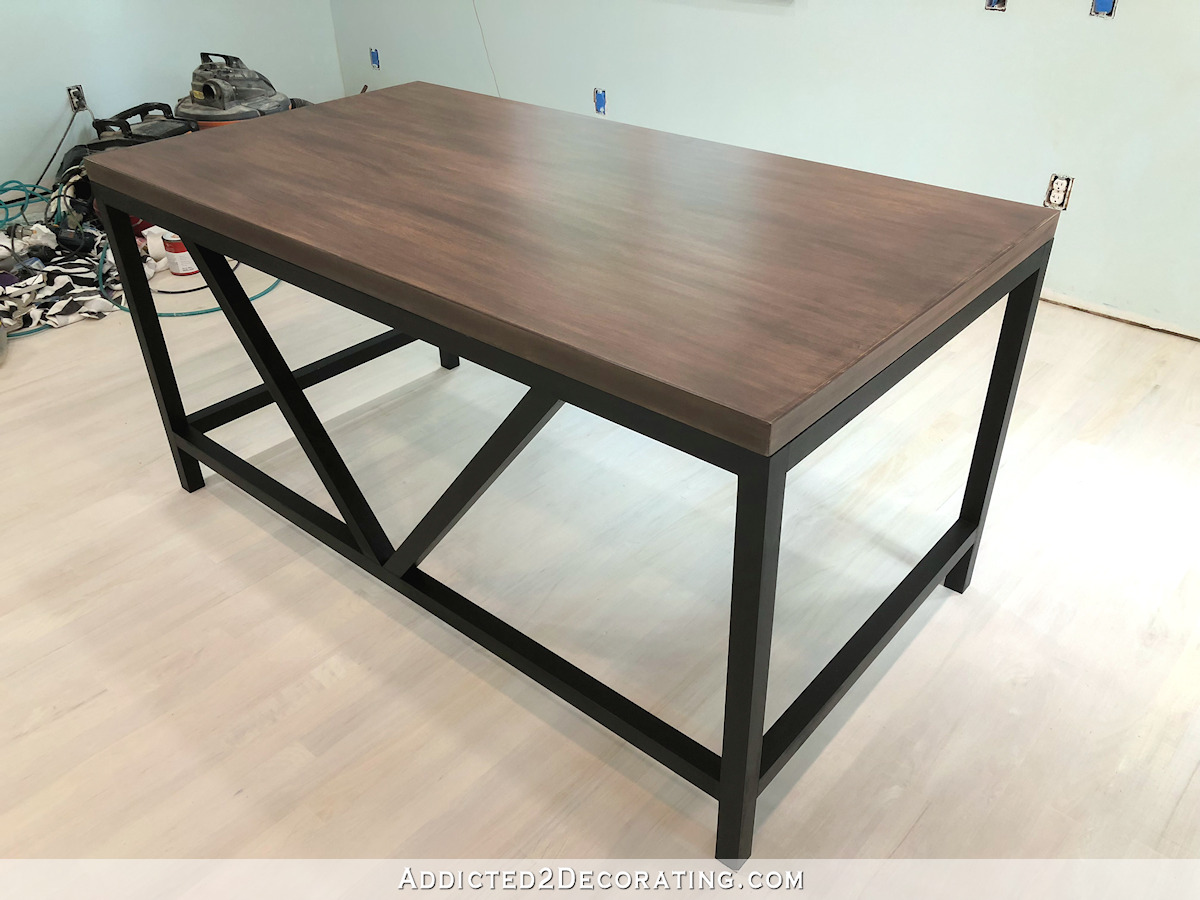
So I came up with a plan, and headed to Home Depot where I purchased three different colors of Varathane stain. Their premium wood stains are wiping stains that don’t penetrate the wood, but they sit on top and even out wood tones. They’re really great stains, especially if you’re trying to cover up ugly grain, bad undertones, or (in my case) a series of previous bad decisions.
I chose three colors — sunbleached, golden oak, and dark walnut — and I used them in that order.
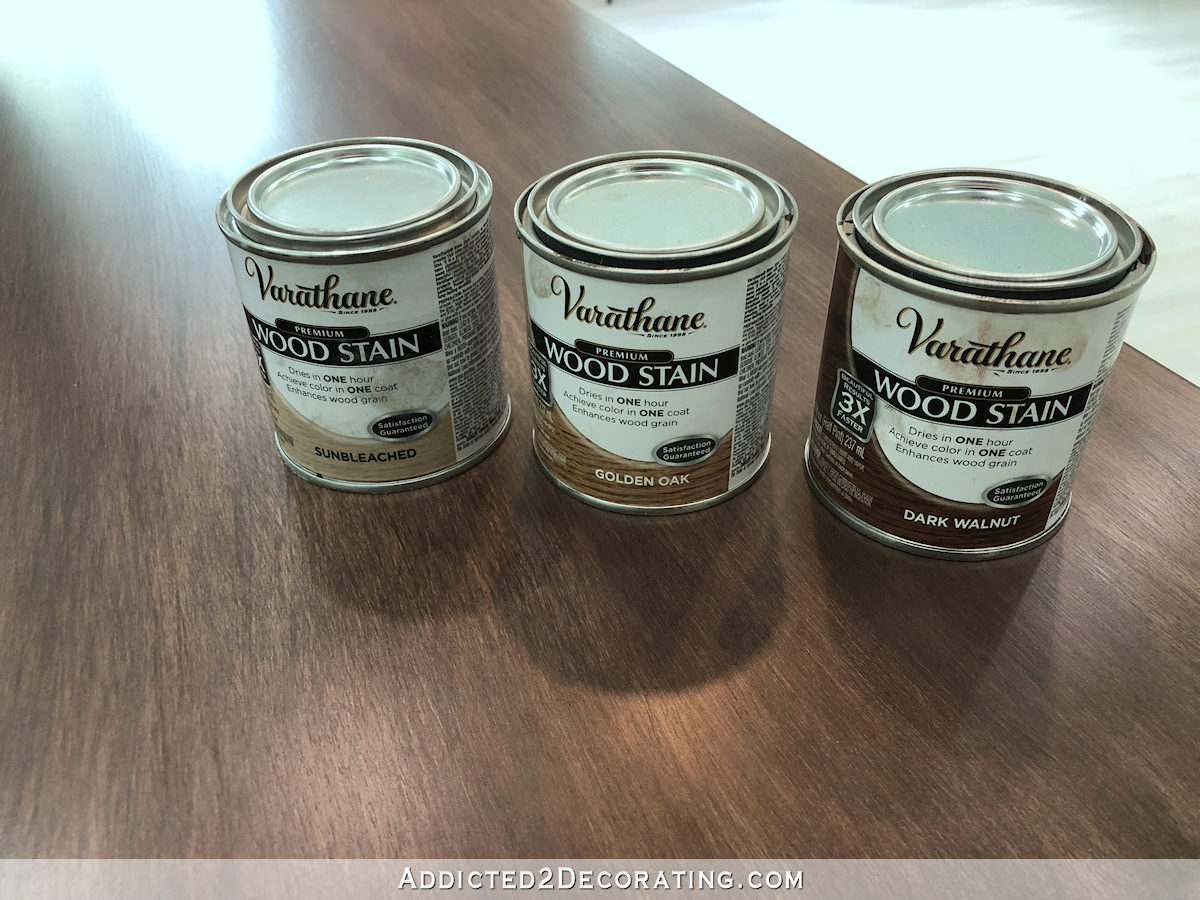
I gave each coat about 45 minutes to dry, and proceeded with the next coat while the previous one was still a tiny bit tacky. I applied each coat with a 2-inch brush for oil-based paints and stain, and while I used a generous amount of the sunbleached color to cover up my previous bad decisions, I used quite a bit less of the following two colors.
So with the golden oak and dark walnut, my brush was pretty dry, while I tried to create more of a streaky (but not in a bad way) effect with color variations showing through. My goal was to recreate the look of wood grain since the actual grain in my wood desktop had been pretty much completely covered up.
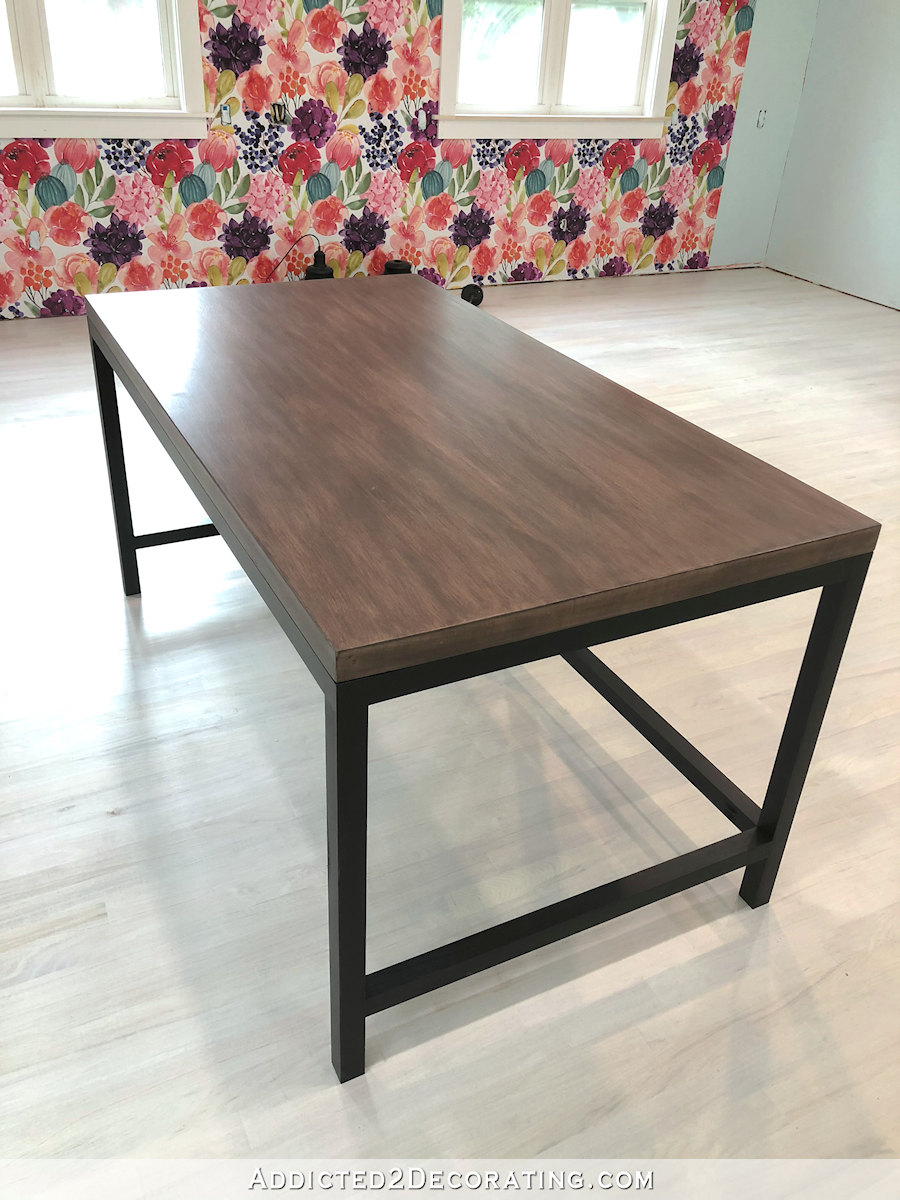
It’s far from perfect, but I did get it to the point where I could live with it and even be happy with it.
I let that dry overnight, and then early this morning, I put three coats of General Finishes High Performance Topcoat in a flat finish, smoothing the finish with “000” steel wool between coats. So while the “grain” of the wood top may not be exactly what I had hoped, it has an amazingly smooth, gorgeous, and buttery soft finish. Seriously, if you’re still using another clear topcoat (Polycrylic…bleh!), I encourage you to just give General Finishes a try.
They don’t even pay me to say that. 🙂 But after years of trying big box brands like Polycrylic, getting so frustrated with those products, and deciding that water-based poly just wasn’t for me, I gave General Finishes a try, and now I swear by the stuff.
So this certainly wasn’t one of those “really easy from start to finish” types of projects, but it could have been. And had I been paying more attention, it would have been. The building process was a breeze. Painting the base was easy. But the top had me wanting to pull my hair out. But considering how much trouble I had with it, I have to say that I’m very pleased with how it turned out.
Now I need a desk chair! I came so close to clicking the buy button on the green velvet chair I showed y’all the other day, but one thing that’s holding me back is the height of the chair. It’s only 34 inches high, which means the back is only four inches higher than the desk. I generally prefer a higher back just because I think it looks prettier. But unless I want to build or reupholster a chair (spoiler: I don’t want to do either of those things), then my choices of green velvet desk chairs are pretty slim. I think it’s safe to say that there’s not a huge market for green velvet desk chairs. 😀
Helpful sources and products:
Want to see how I built this desk? You can find that tutorial here…
Have you seen my process for staining pine so that there are no ugly yellow and orange undertones? You can see that here…
- General Finishes High Performance Topcoat — This is my go-to water-based polyurethane for general purposes. I’ve used it on bathroom countertops, trim, furniture, and now my desktop. And I’ve also used it over painted surfaces as well as stained wood. I’ll never go back to the big box store brands of water-based poly after using this.
Please note: This post contains affiliate links.

Addicted 2 Decorating is where I share my DIY and decorating journey as I remodel and decorate the 1948 fixer upper that my husband, Matt, and I bought in 2013. Matt has M.S. and is unable to do physical work, so I do the majority of the work on the house by myself. You can learn more about me here.
The finish looks great. Sorry it was so frustrating.
Ooo, pretty! But I do know how it is when you just want to be done and go on to the next thing!
Question about General Finishes: do you know how it would be on a kitchen counter? I have Polycrylic on my kitchen island and really have to baby it. Even lemon or lime juice leaves a mark if not wiped up right away.
The GF finish would definitely be more durable than Polycrylic, but I’m still not sure that water-based poly is ever going to be the ideal topcoat for a kitchen countertop. I’m guessing you’re talking about butcherblock? If so, have you ever tried just using mineral oil? After trying so many things (Waterlox, Waterlox with stain, Rust-Oleum water-based poly over stain, and more) on my butcherblock in the condo, I finally just sanded everything down and used plain mineral oil on it. It was BY FAR my favorite. It even worked beautifully around the sink, and I had an undermount sink in butcherblock. And if I ever got stains or scratches, they could be sanded out easily by hand and re-oiled, and they would look as good as new.
What about a dining table? I am wanting to refinish a pine dining table and am not sure what supplies to use? Your desk looks fabulous in the photos!!
This will forever and always be my process for finishing pine from now on: https://www.addicted2decorating.com/how-to-refinish-pine-wood-countertops.html
How do you apply your General Finishes topcoat? I just bought some after a horrible experience with a different product that I had to completely sand off because the brush left actual ridges in the surface. I decided to wait and actually order General Finishes instead of going back to the store to pick something else up since you always rave about it. But now I’m nervous about application. What would you suggest for a table top?
Peggy,
I put GF high performance on my re purposed antique kitchen table. put 6 coats. i have left water spots on it for hours, coffee drips, food spills and i have not had any issue with rings or water spots. it is 3 years and still wearing like . we are a family that sits down for dinners every night and have put trivets under hot pans on table with no problems. I love this High performance finish.
I did spring for the GF matte topcoat you recommend and it is SO nice to work with, and looks SO good when it’s done. I’ve used it recently on a bathroom vanity and so far so good, and I’ll be using it for topcoat projects in the future. It hasn’t stood the test of time for me but I trust your experience! Polycrylic was horrible compared to this stuff.
Hard to tell from here that it’s not wood grain showing! You did a fab job saving it! How do you apply your topcoat?
If I’m using it over a stained wood, I use a quality paint brush, which for me, means a Purdy XL Cub 2-inch angled brush. If topcoating a painted finish, I’ll either use a brush or a 6-inch foller for smooth surfaces. I’ve also sprayed it, which is what I did on my kitchen cabinets, and that works beautifully as well.
Oh, man, I hate those projects where nothing is going how you envisioned. But you did a great job saving it! I’m sure once you have a break from each other, you and your new desk will be best friends.
I will have to give General Finishes a try because I am not entirely sold on Polycrylic at all. Thanks for the recommendation!
Could you have flipped it over and started fresh on the bottom side or did you stain both sides?
P.S. it looks great
I had already screwed the base to the underside of the desktop during the building phase, so that side had screw holes in it. 🙁
Oh bummer! I love natural wood grain but from the pictures it looks very nice. The progress of the studio is looking so good.
Ohoh my! This is gorgeous!!
Great job. Waiting for the total finished room!
It looks great. Maybe it will be covered with papers, photos, tools, etc., so you may not even see the wood grain surface often! Sometimes done is better than perfect!! 😃
It’s gorgeous and I love the color of the wood. You did a fantastic job and can’t wait to see that room completed.
You just never cease to amaze me! Looks amazing!
Kristi – Check Overstock.com. They have several green velvet chairs.
Great, great job! Maybe you need to sell these, ha! Bravo!
Well you took the long way around O’Leary’s barn, but in the end it is FABULOUS!!!!!!!!👍👍👍❤️❤️❤️
Could you find a non-office green velvet chair and convert it into a office chair by changing the base?
I just tried to post the same comment, not seeing yours. I ran across this on Overstock. I’m thinking there might be more options under dining chairs or side chairs.https://www.overstock.com/Home-Garden/Lemele-Tufted-Velvet-Dining-Chairs-Set-of-2/14578630/product.html?option=28268969&recset=e8b42445-13dd-4a07-882c-f4f160fb6e93&refccid=BYHRJIFUZDHZNDKAPLBNSI27ZY&searchidx=30&recalg=63&recidx=29&option=28268969&kwds=green%20velvet%20chairs&rfmt=
I thought about that, but it’s challenging finding an adjustable height base for a desk chair that actually looks pretty. The only ones I’ve found so far are black plastic that aren’t very pretty. But I keep looking! 🙂
I think it turned out beautiful.
I’m wondering if you could broaden your search for chairs by including side chairs or dining chairs and then swapping out the legs for a pedestal base on wheels (if you can find that sold separately). Just a thought. Love the desk!
I think Lee Valley sells desk chair bases. they sell everything else. then you could any chair. what about a regular chair with slides on the feet bottom
What a frustration you’ve had. But it ended up looking great in the pictures. I really want that table!
Could you help me with a problem I have? I bought an old table that had some dishes piled on it when I bought it, and didn’t discover until I got it home that it had apparently some kind of oil spill where the dishes were sitting. As I tried to clean it, the stain was coming off where the oil is, and it has creeped along the grain. Also the area is sticky. Can I sand it down and coat it with something that will prevent the oil from resurfacing? Will I not ever be able to re-stain it? Any ideas would be welcome!
Getting completely rid of oil that has soaked into wood is tricky business. If it were mine, I would mix up some Palmolive Oxy dishwashing liquid in warm/hot water and scrub the area. Let it dry, and then repeat as often as needed until the oil stops appearing. I’d probably wait a few days after the last appearance to make sure it doesn’t resurface. Then I’d sand it completely and refinish using oil-based stain if possible.
Thanks, I ‘ll try that!
Kristi – here’s a green velvet office chair. Expensive, but the shipping is free.
https://www.highfashionhome.com/beatrix-swivel-office-chair-green.html?gclid=Cj0KCQjwl6LoBRDqARIsABllMSYMRw5WDupBSYB0eSz3BMVaG86Par6I16fyEKyhnL6ovn2xxuKDRAsaAqoQEALw_wcB
Yep, that’s the exact one I’ve been on the verge of buying the last two days. 😀 But see how short the back is? I wish it was about 40 inches high so that it would really stand tall behind my desk, more like an executive desk chair. Well, maybe not quite as high as an executive desk chair, but I’d just like it more if it were a few inches taller.
Your desk came out beautifully! One would never know it was such a trying experience for you! As for the chair, I’d lean a little toward finding the chair you like and then reupholstering it, if that doesn’t seem like too much for you, after all you’ve done so far! But I can’t wait to see what you’ll come up with!
Wow! That turned out gorgeous!!! Did you tell us why you’re not using the bleach on wood to eliminate the red tone? Did I miss that?
I didn’t have any on hand, and didn’t want to wait to receive an online order. 🙂
Love your desk! How about a chair from Carrington Court? They seem to have many that are 39-41 inches high, and, include an option to add casters. You can order fabric swatches, or, send your own fabric to them.
https://www.carringtoncourtdirect.com/buy/Scroll-Back-Parson-Chair-with-KickPleat-Skirt/
https://www.carringtoncourtdirect.com/buy/Scroll-Back-Parson-Chair-with-KickPleat-Skirt/
https://www.carringtoncourtdirect.com/buy/Straight-Back-Parsons-Arm-Chair/
https://www.carringtoncourtdirect.com/buy/Straight-Back-Parsons-Arm-Chair/
Oops, just realized the colors I chose did not show up on the links. I found two I thought you might like. Check out Addisyn Aloe and Laney Green.
I was just looking at the Laney Green. I love it!
I thought the Laney Green looked like you the minute I saw it! The Addisyn Aloe looks like your inspiration chair color. Either way, if you decide to order, they are great quality chairs. My friend has purchased chairs from here.
A beautiful accident, I think. I adore the top! Sorry about the stress along the way. Your desk is so unique. Gotta love that!
Hello Kristi,
I am really in awe of what you achieve. I like to diy as well , but you are beyond anything I could ever do. Question: Do you do this projects all yourself? With no help at all?
My brother had to help me unload the door from the truck, and then carry the door inside once I had cut it down to size. (A solid core door is too heavy and bulky for me to carry by myself.) But yes, I built the desk by myself. I almost always do my building projects by myself, unless I need help lifting or carrying something that’s too large or too heavy.
It’s a beautiful desk! But it’s not what you were aiming for in color and it’s taller than the chair you want will work with. Would a desk with shorter height that does work with the chair you like work for you? If so, maybe you should sell that desk, make a little profit and start again. Probably won’t be a popular idea, but if going forward with that desk creates a stall or an upholstery project that you don’t want, it might be the best option.
The desk is a standard 30-inch height. That’s not something that needs to change. The issue isn’t the height of the desk, it’s the style of the chair. The chair seat is the correct height to go with a 30-inch-tall desk, so the two are completely functional together. It’s just a style issue for me. The height of the chair back is lower than what I like. But that’s an aesthetics issue, not a function issue.
Never would have guessed that wasn’t the actual wood grain of the desk top. You did a great job.
Been scouring the internet for a diy desk that I can build myself (because… why not?) WITHOUT legs using sawhorses or industrial pipes. Your’s looks perfect. I’m starting on it this weekend.