Shower Wall Tile Is Finally Underway!
I didn’t make as much progress on the master bathroom shower this week as I had hoped, but now that the shower wall tile is finally underway, I hope to really plow through this project this weekend. I still don’t think I’ll finish (that shower is huge!), but I hope to get very close.
I didn’t do any work on the shower tile on Tuesday because, quite honestly, I was paralyzed with doubt and indecision after reading all of the comments on the last post. (See: Two New Shower Wall Tile Design Options) And I don’t work on Wednesdays, so yesterday I made myself get started. I wasn’t going to allow myself to waste another day on indecision. I figured that if I just get started, things would become clear to me as I made progress.
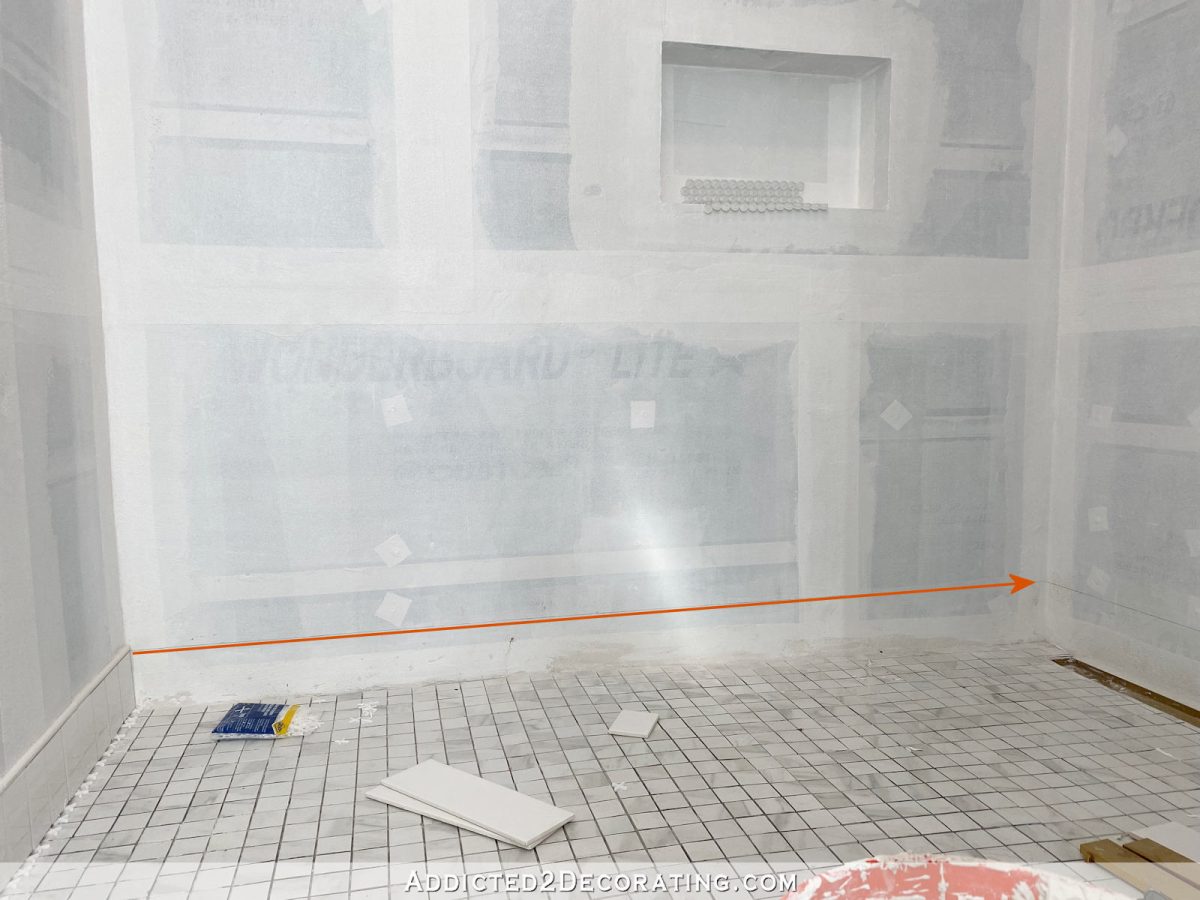
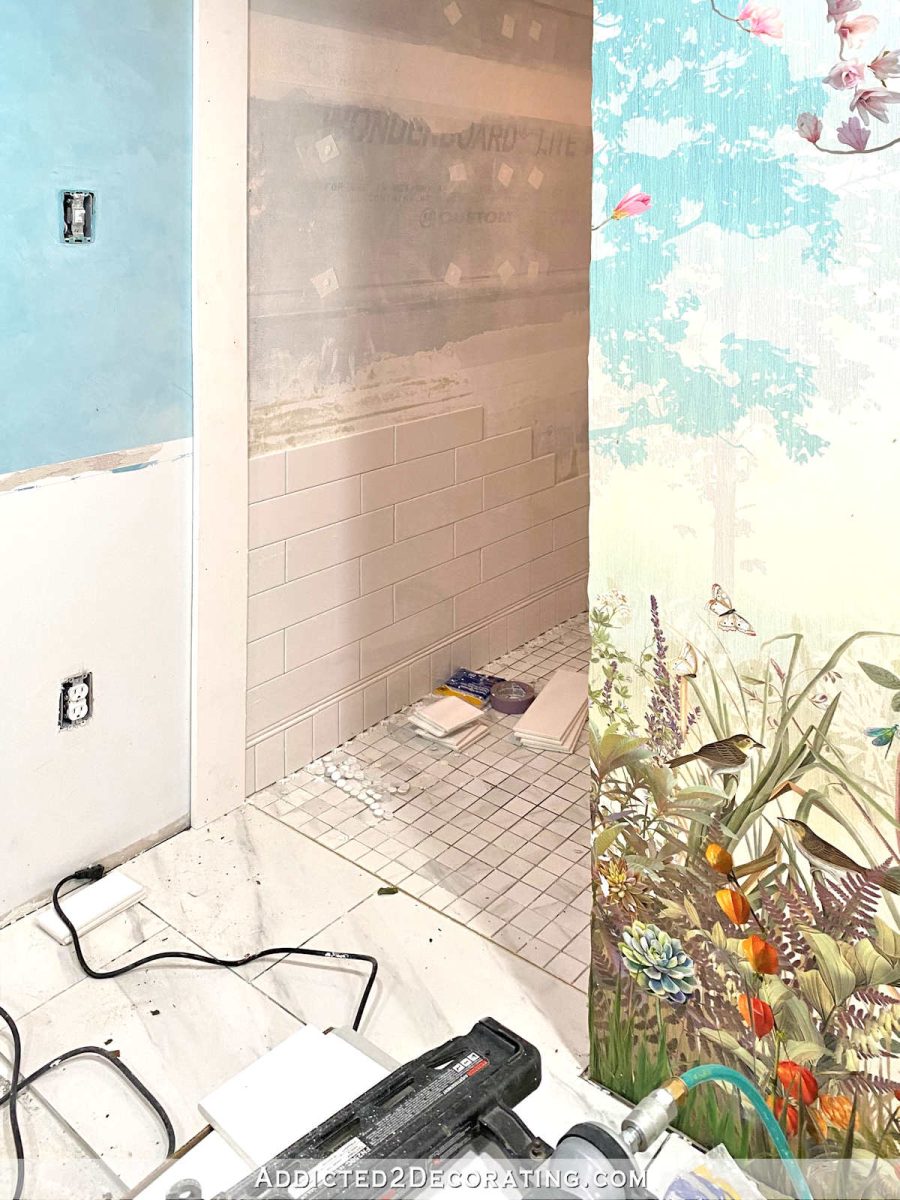
My first big hurdle was to figure out how to do the row of tiles along the floor of the shower. Since I have two linear drains located along one wall (the shower head wall) instead of a round drain in the center of the floor, that created a bit of a challenge with tiling along that slope. You can see what I mean in this photo.

The perspective in that photo is a bit strange, so you’ll have to take my word for it that the floor to the left of the circled area is actually a level floor. The circled area is where the slope changes, and then the area to the right is sloped towards the linear drains.
I didn’t even want to try cutting long 12-inch tiles with the perfect angle to fit just right because that created an issue of where to start. If I started on the shower head wall at the bottom of the slope, and used whole tiles on that wall, then I’d have to cut the tiles at angles going up the slope, and that would leave me with cut tiles showing on the opposite wall that’s visible from the bathroom. That wouldn’t have been horrible, but I didn’t love the idea.
If I started on the most visible wall (i.e., the wall opposite the shower head wall) with whole tiles along the bottom, that means that as the floor started sloping, I’d have to fill in below those whole tiles with cut slivers of 12-inch-wide tiles. I could just see me wasting a whole box of tiles trying to get those smallest slivers right where the floor starts sloping.
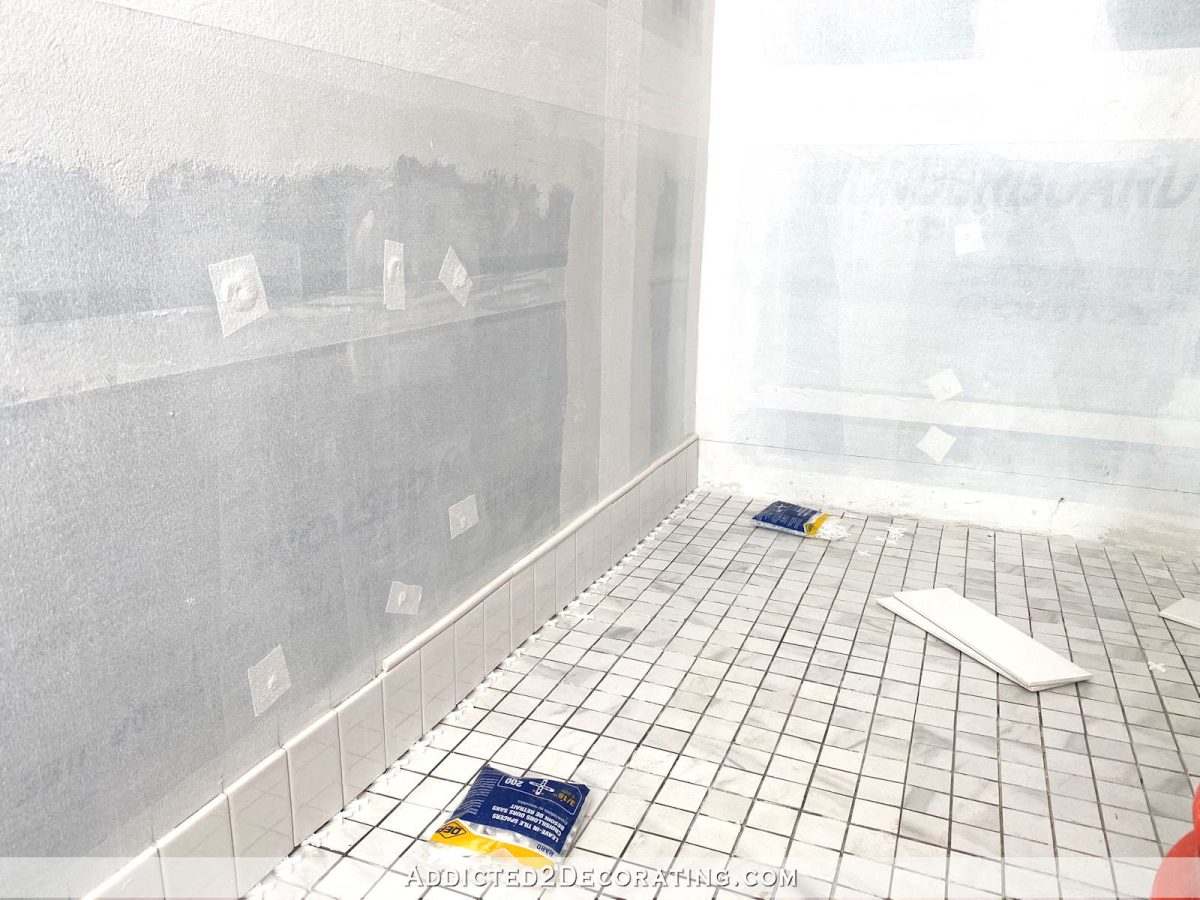
So after scouring Houzz for some ideas on how to handle the slope, I finally found the answer. I saw two bathrooms with what looked like a tiled “baseboard” design along the floor in the shower using small rectangle tiles (like standard 3″ x 6″ subway tiles) installed vertically with a long, thin accent tile on top to create that baseboard look. So I decided to try to replicate that look, which would allow me to more easily cut those narrow tiles to fit the slop of the floor.
I started by using a long bubble level to draw a level line around the shower at baseboard level…
And then using 3″ x 6″ white subway tiles that match the larger rectangle tiles that I’ll be using on the main part of the shower walls, I cut and installed them vertically to fit long that “baseboard” line that I drew. Then I added a thin 1/2″ x 12″ jolly trim tile along the top.

This design will go around the entire shower along the floor, allowing me to cut the smaller tiles to fit the slope of the side walls much more easily, while creating the visual appearance of a “baseboard” in the shower.
I used two rows of the jolly trim tile above those “baseboard” tiles to create a type of basecap trim look…
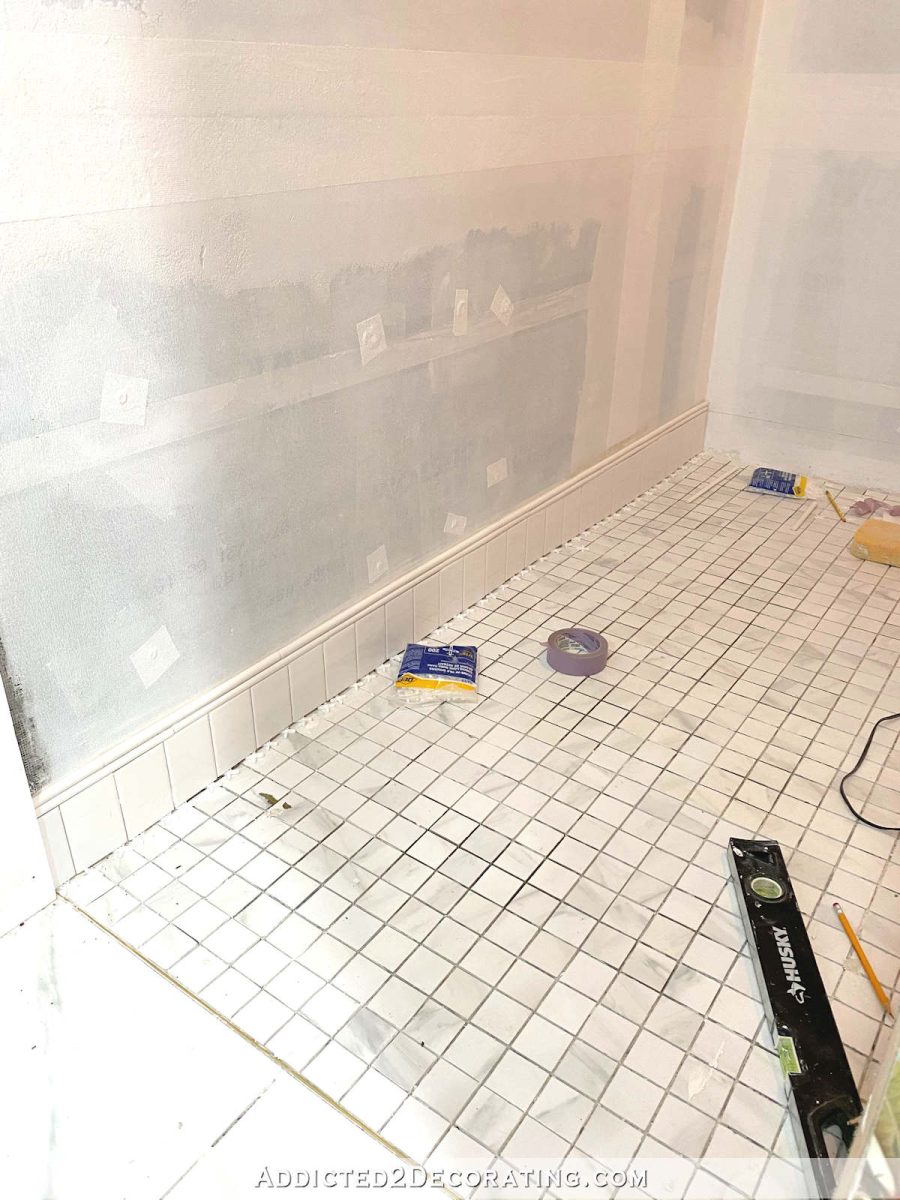
Once those “baseboard” tiles were installed, the rest was very simple.
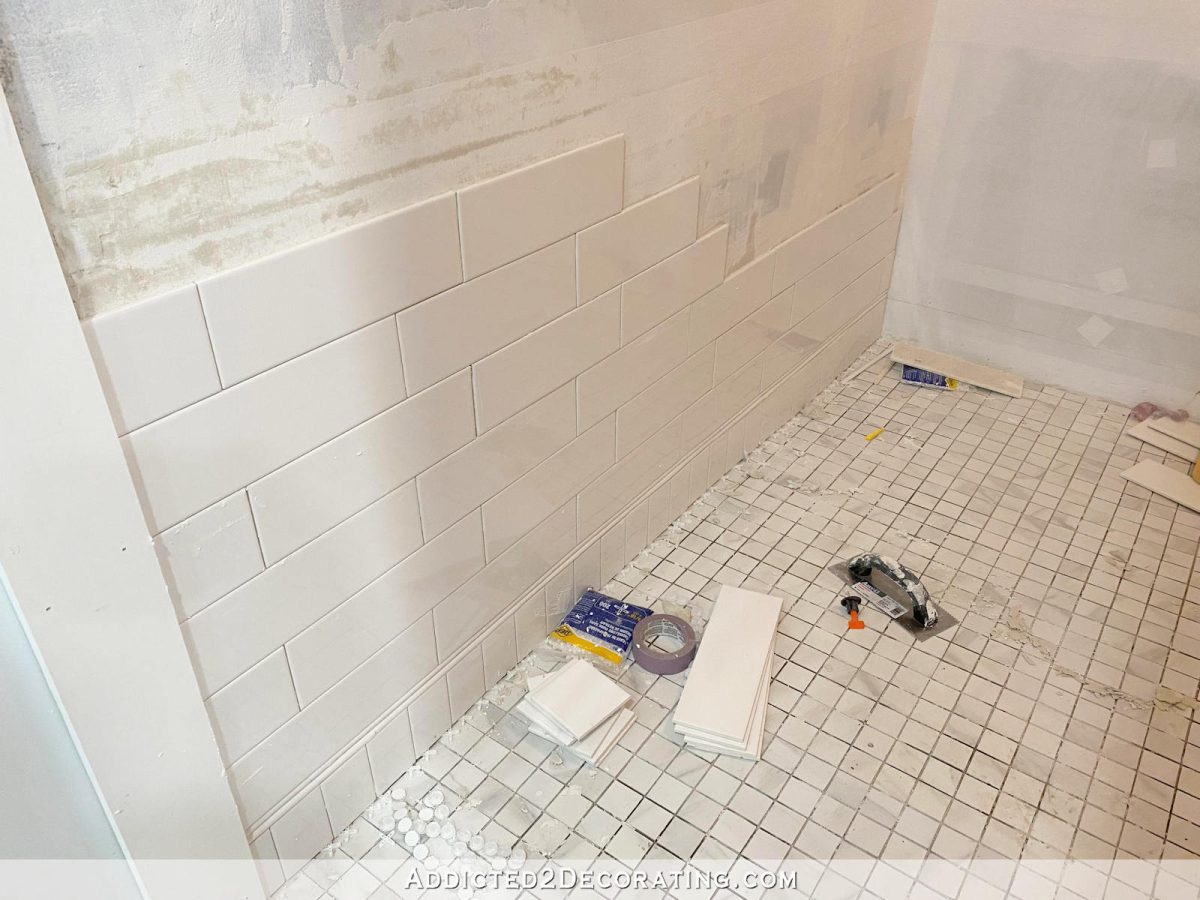
That’s as far as I got yesterday because the mortar I had mixed up started getting too dry to use. And by the time I got my tools cleaned up and my bucket emptied out, washed out, and ready to reuse, it was too late to mix up more and continue working. (All of that mixing of mortar and then cleanup afterwards takes so much time!!) I was so disappointed, because I had high hopes that I could at least get one wall finished yesterday. But as I almost always do, I way overestimated the amount of work I would be able to get finished in the allotted time.
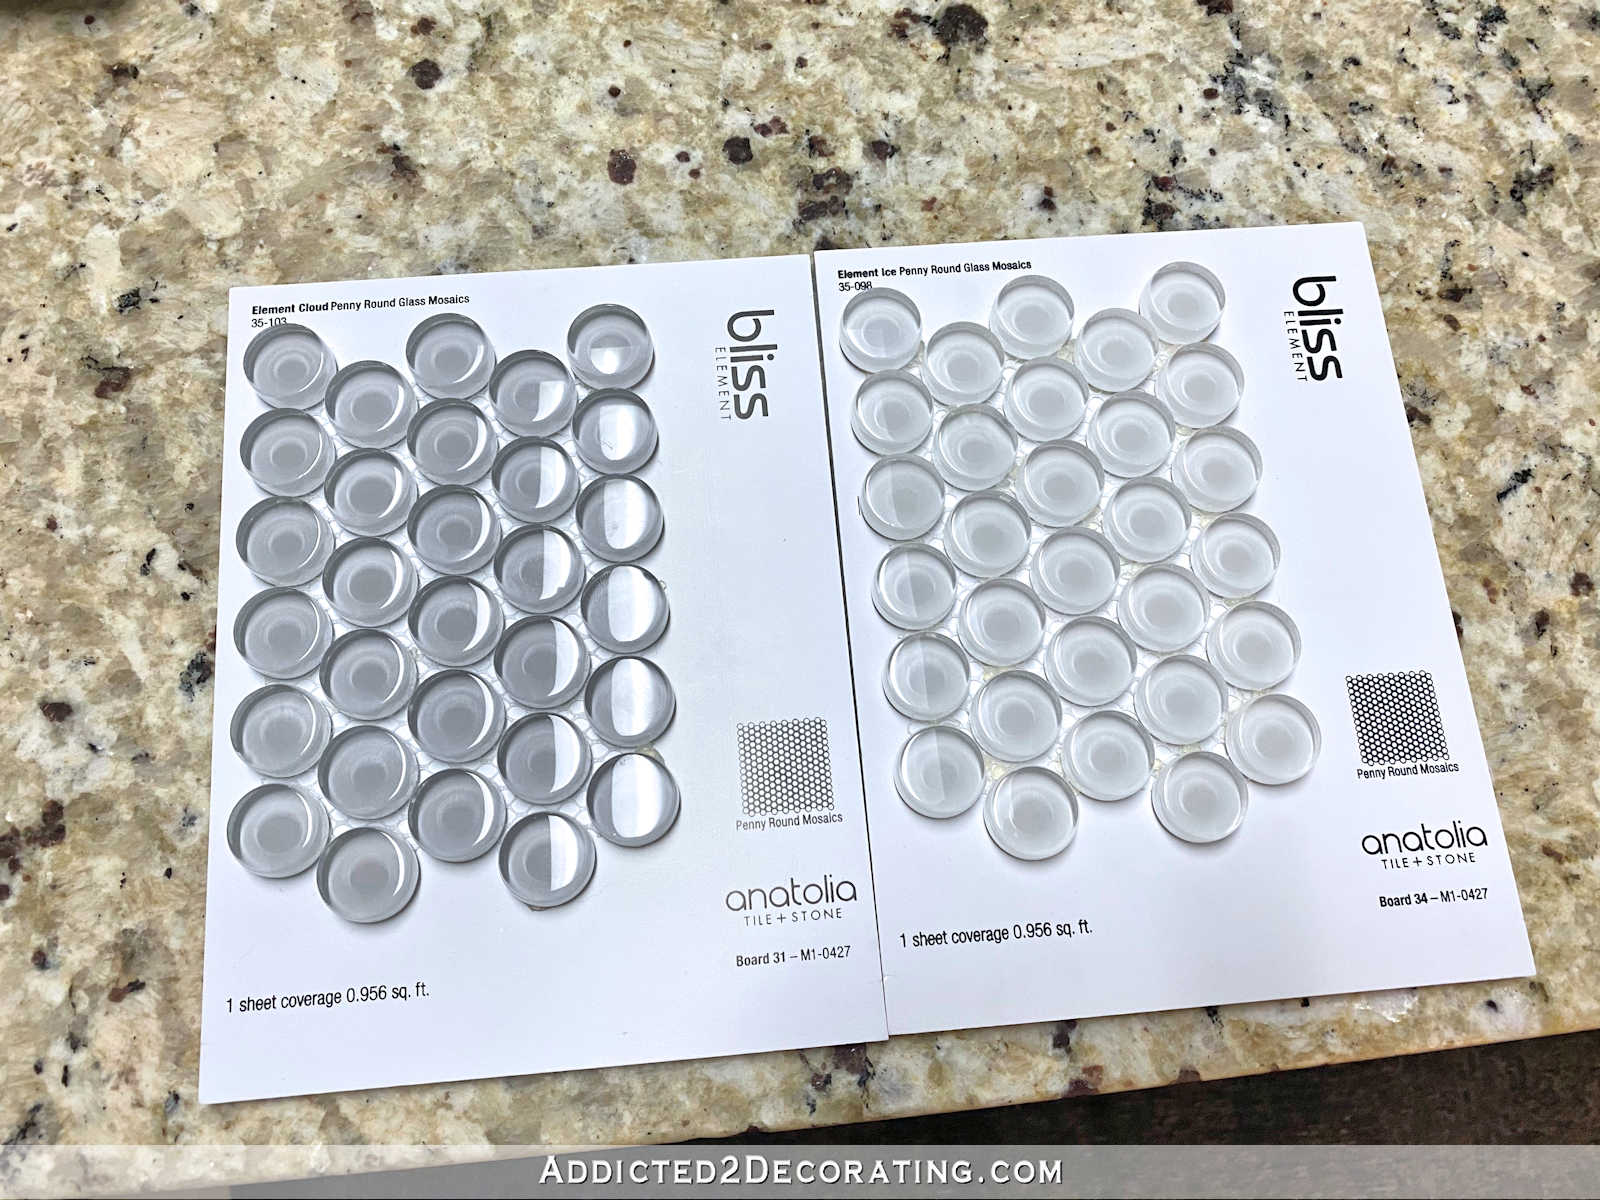
You’ll notice that I have six rows of tiles on the wall, and there’s not a single row of glass tiles. 🙂
After reading your comments, I decided to go with another design. I’m going to keep it to myself for now simply because I don’t want any more ideas that could send me back into a state of indecision. 😀 I have my mind made up now (for sure this time), so hopefully I’ll be able to show y’all the finished design on Monday.
And I’ll leave you with a couple of pictures of my helper yesterday.
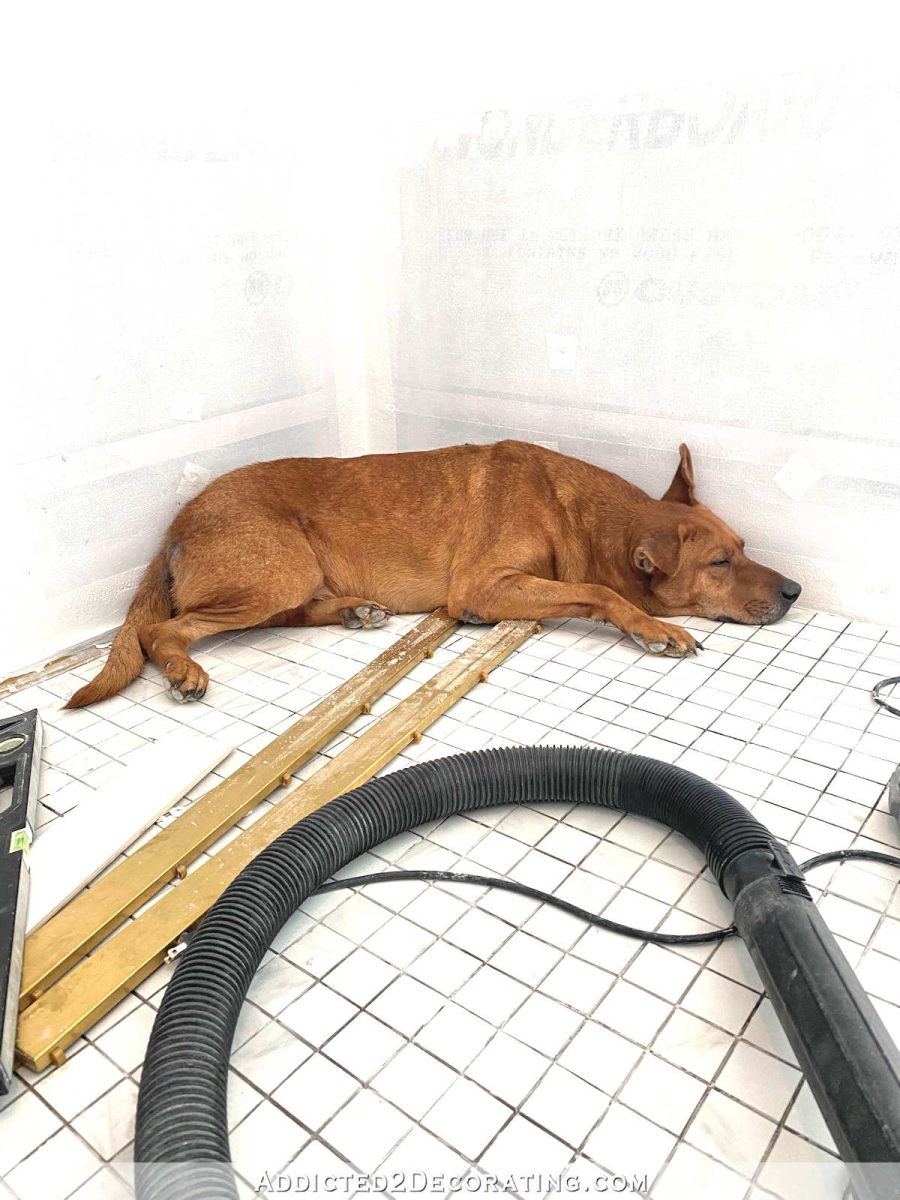
My sweet Cooper. He loves to be with me (or at least to have free access to me) at all times. While I’m working, I keep the back door open, which goes out to his fenced in yard where I have my tile saw set up. So he’ll go out for a while, and then come in for a while. And of course, when he’s inside, he wants to be near me. So he made himself comfortable in the corner of the shower and took a little nap while I worked.
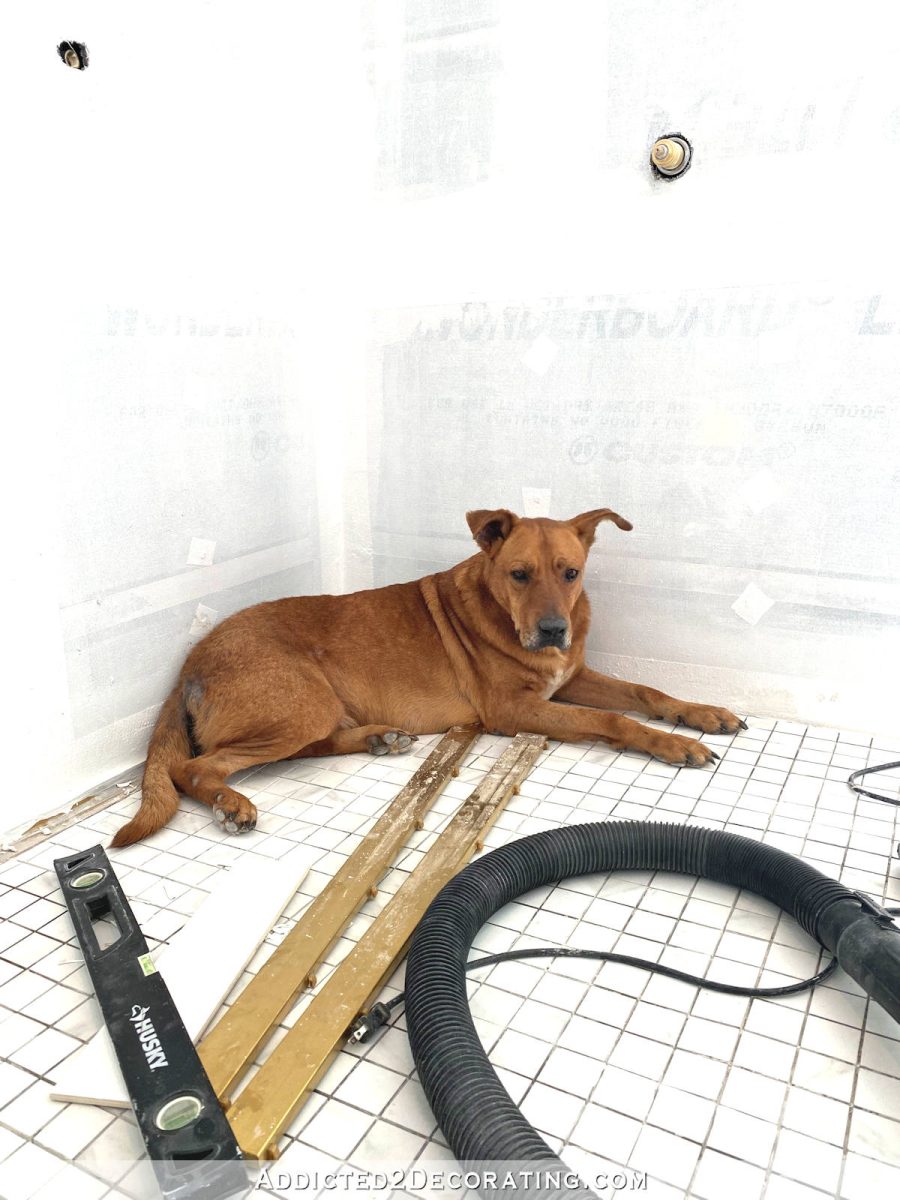
He slows me down a little because he wants to follow me every time I got outside, and then he insists on sniffing all the things several times (I’m convinced he missed his calling as a drug sniffing dog), but I don’t mind being slowed down a bit by him. 🙂 How could I get upset at that cute face?

Addicted 2 Decorating is where I share my DIY and decorating journey as I remodel and decorate the 1948 fixer upper that my husband, Matt, and I bought in 2013. Matt has M.S. and is unable to do physical work, so I do the majority of the work on the house by myself. You can learn more about me here.

The vertical tiles and jolly trim to form a baseboard is genius and looks so so so good, as does the wall tile above it. Looking very very good! It must feel good to have decided on a pattern and to be working on it. It seems that the rest of the shower walls will go very well. Congrats! Once again, you have figured out an elegant solution, so time well spent.
Cooper! Look at those rolls! I have a similar issue with one of my dogs and found that a dog bed in a certain spot allowed the pup to be by me but not in the way. It makes projects so much easier when they have a specific place they can “choose” to go to.
Bathroom looks amazing, thanks for sharing!
I tried that with Cooper. It didn’t work. 😀 We bought him a nice, BIG, thick memory foam bed. It’s in the hallway where he sleeps at night. Every time I go out during the night to use the restroom or get a drink, he’s lying on the bathroom floor. I brought it into this bathroom so he could have a comfy place to lie down while I work, and he won’t use it. I have no idea why he doesn’t like it. It’s big, and nice, and soft! But he’d rather lie on the hard, cold floor. Strange boy. 😀
According to vet google, dogs have a high normal temperature 101.0 to 102.5 so that cool tile probably feels pretty good.
That baseboard design is perfect. Wow. What a great idea!
agree to the max!!!!
Looks wonderful!!
Cool!!!
The baseboard idea is brilliant. Everything looks amazing. You’re well on your way!
The baseboard is FANTASTIC! Love Cooper
Kristi, I know how aggravating cleaning out your buckets can be. I am lazy so I line my buckets with a couple of garbage bags and simply discard when done. Mostly I use the heavy bags meant for trash compactors.
Much heavier than regular trash bags.
OH MY GOSH!!! That is a brilliant idea!!! I’m doing that from now on, because I can’t stand taking all of that time to clean out my buckets!!
I find those Compactor bags are GREAT for so many things because they are so much heavier than the regular garbage bags, and that IS a brilliant idea – thanks in advance for the idea the next time I have a messy project!
Kristi…Meanwhile, I absolutely LOVE the way you worked out the slope…it’s better than any other way to do it – it looks wonderful. I’m glad you settled on how you will finish it all…we all have nothing else to say – just do it your wonderful way, and I know we will be delighted and impressed. And, I LOVE your helper – he is such a sweet looking family member.
Sweet Cooper <3 He loves you very much and is so glad to have a happy forever home where he is loved.
The "baseboard" looks great!!
So nice that Cooper keeps you company while you work! What a cutie
I love the “baseboard” tile! What a great solution. I am anxious to see what design you decided to do on the walls. I was wondering if your head was spinning with all the suggestions you received.
Hi kristie! It is going to look so nice. I think The tiles lined up like that are called a soldier course and they’ll do that at the top as well so that if you have a really thin strip cut of tile you don’t have to do that and you can just make it look intentional with the soldier course! You’re my favorite blog. I love following along!
The baseboard idea is so clever. I doubt I’d come up with that! The shower is looking great. I’m glad you got over your indecision.
well, where there is a will, there is a way! Leave it to you to figure out a solution! I’m happy you have a plan. Now let’s jump ahead 10+ years or so and please tell me your fool proof easy method to keep the tile in the shower are looking clean and not soap scummy or black in the grout lines? After our master bathroom re-do 18 years ago, the tile design is still ok (I tried for a classic style and neutral color) but I guess scrubbing every 2 weeks (with various commercial products and home remedy vinegar and Dawn secret recipes and lots rinsing with clean water after each shower the tile itself is in god condition but has a film on it that I cannot resolve. And that goes for the glass shower door as well. Is there any hope for a really efficient way to keep a shower clean besides never using body soap or shampoo and not having my bathroom smell like a salad from trying vinegar? Im sort of kidding/complaining but if ANYONE has an idea Im game to try… Sigh.
My bathroom redo is not as long as yours, but 7 years is a pretty good length of time. My glass shower enclosure and door look like new. I swear it. No visible soap scum or hard water marks visible. I clean with 1 cup white vinegar heated in microwave 2 minutes using large glass measuring cup. Once finished, I add 1/4 cup of Dawn. It’s hot! I use a nylon scrubby (wearing surgical gloves to protect my hands) and just scrub the walls and tiles and floor in circular motion. I can literally feel the soap scum “melting” as I clean. I can feel the drag of the scrubby at the start and then it is no more. Then I rinse with handheld shower head. The vinegar smell lasts maybe 2 hours. I run the vent fan. I think the short-term smell is well worth the gorgeous like-new look. Do it maybe every 2 weeks, takes about 10 minutes, if that.
Thank you for that Teresa. I tried hot vinegar and Dawn on my fiberglass tub. Works well.
Thanks to Teresa and Rebecca for their ideas to try vinegar again. I will try your secret recipe next! I DO like the idea of the nylon scrubby! I feel renewed with giving it another go!
I’ve got a buddy like that too. 🙂 If I’m working in the garage he lies on the other side of the screen door watching until I come back in. And if I’m around the house a lot he’ll lie on a stair on the staircase to keep out of the way but still keep an eye on me. I’m not sure what they think will happen if they don’t watch, but it’s nice to have them around, right? 🙂 Our other pupper doesn’t need to be quite so close…but if we sit down he’s the first to come snuggle in. Can’t wait to see what you decided with the tile…and don’t blame you a bit for not wanting any more opinions at this time! LOL
Splendid solution!
This looks terrific! While the comments may be helpful sometimes, you have the vision and please try not to let these comments slow you done!
Btw, Cooper is darling!
Aww such a good pupper! And that “baseboard” idea is brilliant!
What a great idea! Creating a ‘baseboard’ at the bottom not only solves your slope cutting challenge but I think it adds a nice touch of sophistication. Well done -as usual!
Love the solution to the problem. It looks terrific. And your helper is beautiful.
Great solution with tile baseboard. Thank you for sharing your journey!
Kristi, that solution is just perfect. Your subconscious must have been whirling during many nights. Well worth the effort.
Good you have a live-in doggie fan who lounges and naps. Is that where Cooper gets his pampering? He’s a big boy to handle.
Omagosh! What a sweet pup! And the shower is looking great too 😛 Dont blame you one bit for not wanting more ideas to confuse. Can’t wait to see it finished.
the baseboard looks fantastic, what a great idea!! Looking forward to whatever you came up with for the penny tiles. You are always so creative! 🙂
I love what you are doing, and I love your helper! I had a GSD Merlin who loved to be with me everywhere I was doing projects as well. Dogs are the BEST!!
Lookin good👌🏻
Be careful with the glass tile, not sure if yours has a backing but I have read that the mortar can show through when dry.
Can I make another suggestion about clean up? A large trash can with bag would be useful so you could throw all debris, sonic cups, etc in and when full just put in your truck to take to the dump, or regular trash. If you don’t have a plan to keep it from getting like it was you’ll end up in the same overwhelming situation 😐
That baseboard tile idea is very clever and looks great, too! How sweet of Cooper wanting to be close to you!
I love what you’ve done with the tiles, but I really came here to say that Cooper is the cutest assistant I’ve ever seen.
I love your Cooper!!!
I love the baseboard tile look too. I never would have thought of that. It is funny how dogs always want to be right in the middle or on top of whatever you are working on. My three are like that too. Gotta love them.
They are so wonderful! Mine is by my side every leap and turn. Takes twice as long to get things done, but who cares.G
I love the baseboard and Cooper too. The shower looks really great!
That was a great solution. I have never heard of Jolly tile so I looked it up. I always learn something new and interesting from your blog
That looks REALLY good!! Good idea to keep your newest design secret until done – I know without a doubt it will amazing! Keep up the good work, you inspire me try things I’m not sure I can do.
Seeing how Cooper likes the tile floor, think how much he will love your (his) new bathtub! He’s a sweetie.
Ingenious idea on the baseboard tile! I can hardly wait to see what you’ve decided to do on the rest of the tile. I know it will be beautiful. I love what you’ve done so far. I wish I had the ability and knowledge to do some of the things you’ve done.
The ‘baseboard of vertical tiles with the decorative jolly trim tile above and then the horizontal tiles above is TOTALLY super beautiful !! A real WOW is an upscale way! You are incredible !!
I’m sure you understand just how much Copper is helping. Tiling is hard physical work, and Copper is resting for you 😴
Hope you’ve been away from the blog because you’re getting SO MUCH done in the bathroom…and not because you’re huddled in a corner hiding from the tile. 🙂 If it’s the latter, hire it done and move on! You’re worth it. Hope it’s all going well for you and Matt!
I think your tile solution is perfect! But I think I have to request more Cooper appearances in your posts – love him!