Finalizing Our Master Bathroom Floor Plan & Design
Twelve days. That’s how long I have to finalize the decisions on our master bathroom project, because we now have an actual start date for this project. The fun begins May 10th. So I’ve been trying to get all of the details worked out in my mind before I meet with our contractor next Monday to go over all of the finalized plans.
A couple of weeks ago, I shared a few wall murals and wallpapers that I could use as a jumping off point in this master bathroom design. You can click here to see the fifteen finalists. I’ve finally selected the winner, and it’s this mural from Photo Wall.
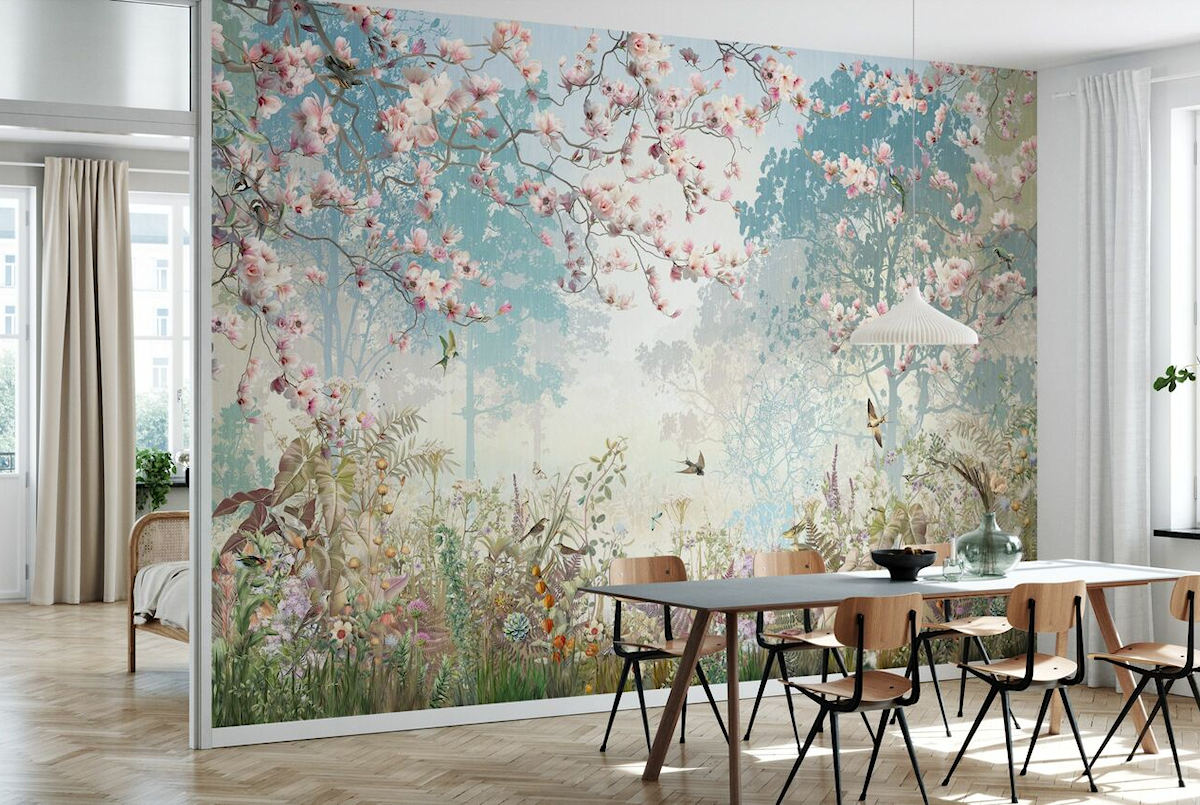
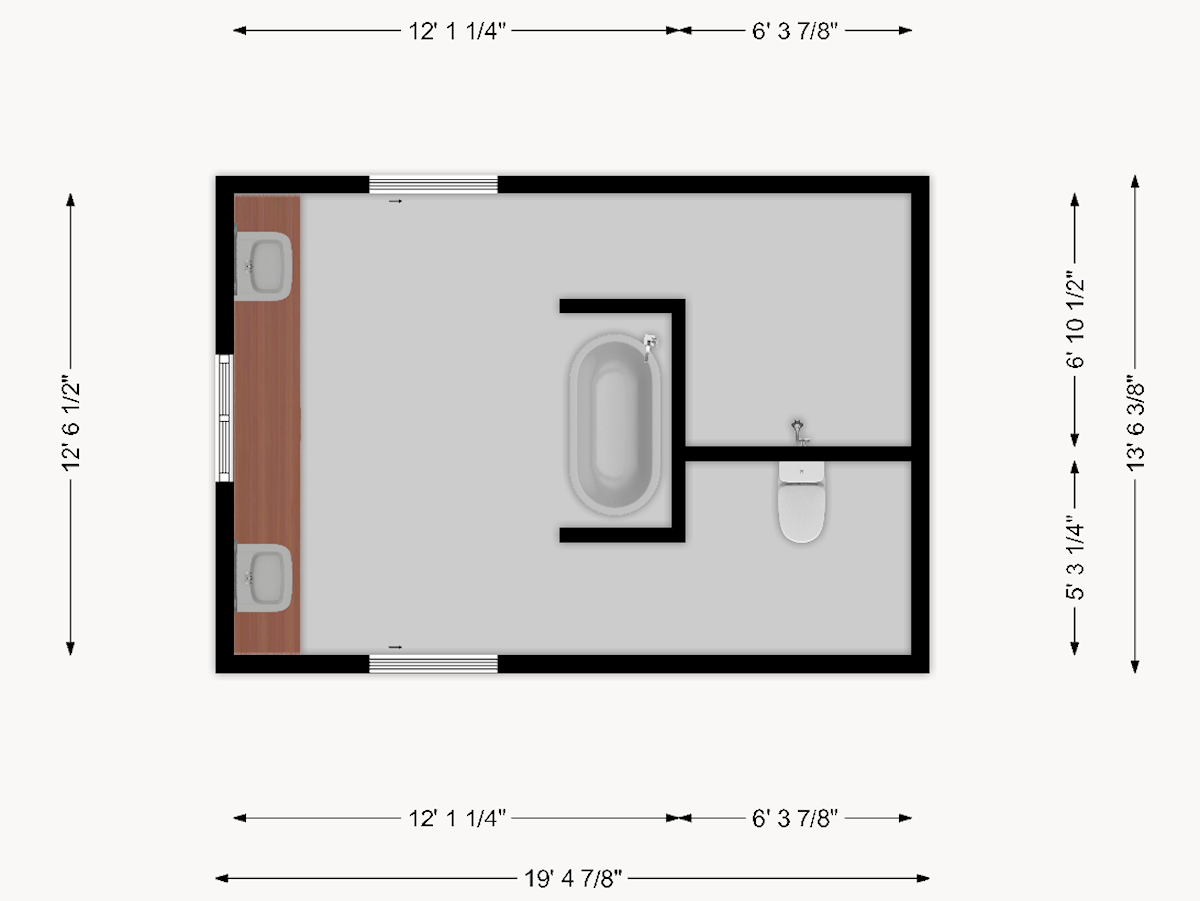
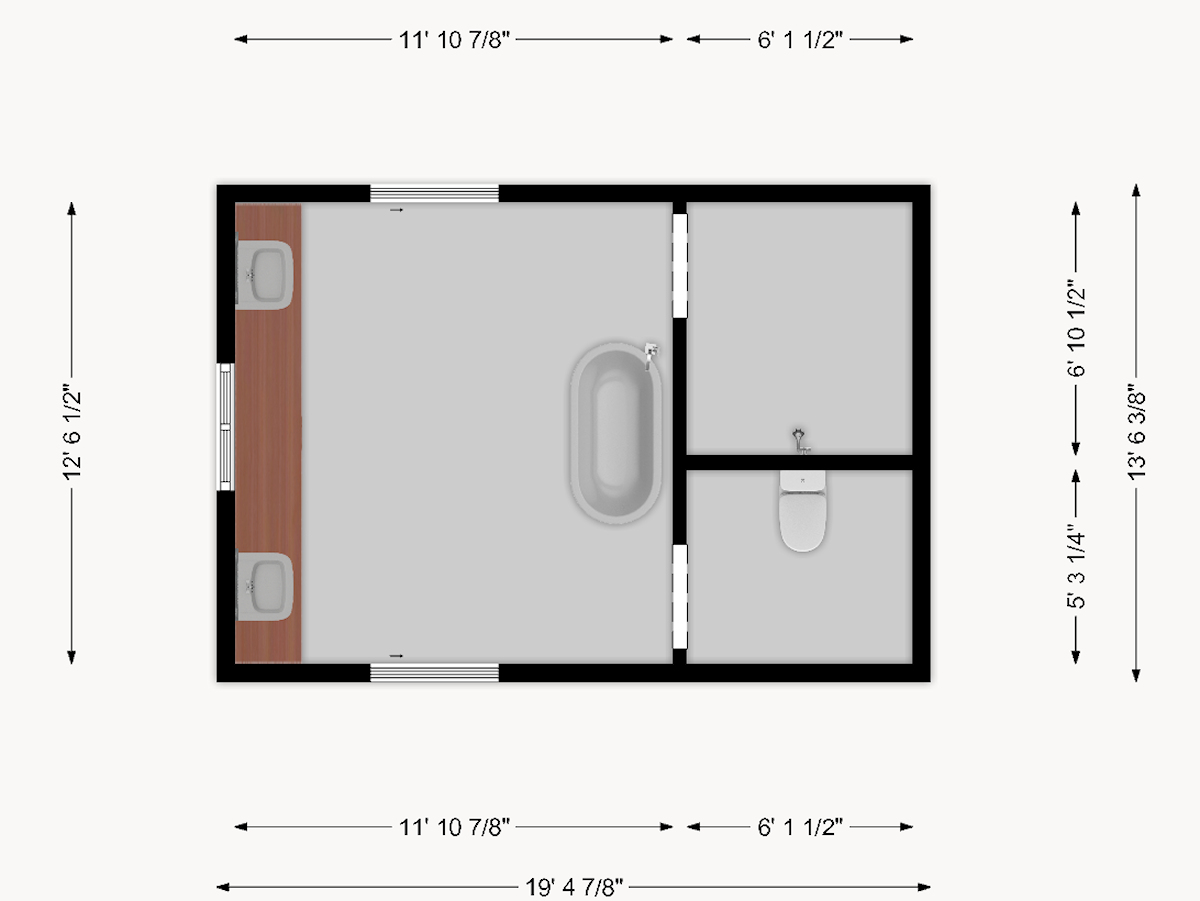
With that decision made, I needed to decide exactly how I want to use it. I took all new measurements of the room to be sure that everything was accurate, and then I used this free online floor plan tool to create a 2D and 3D floor plan of the bathroom.
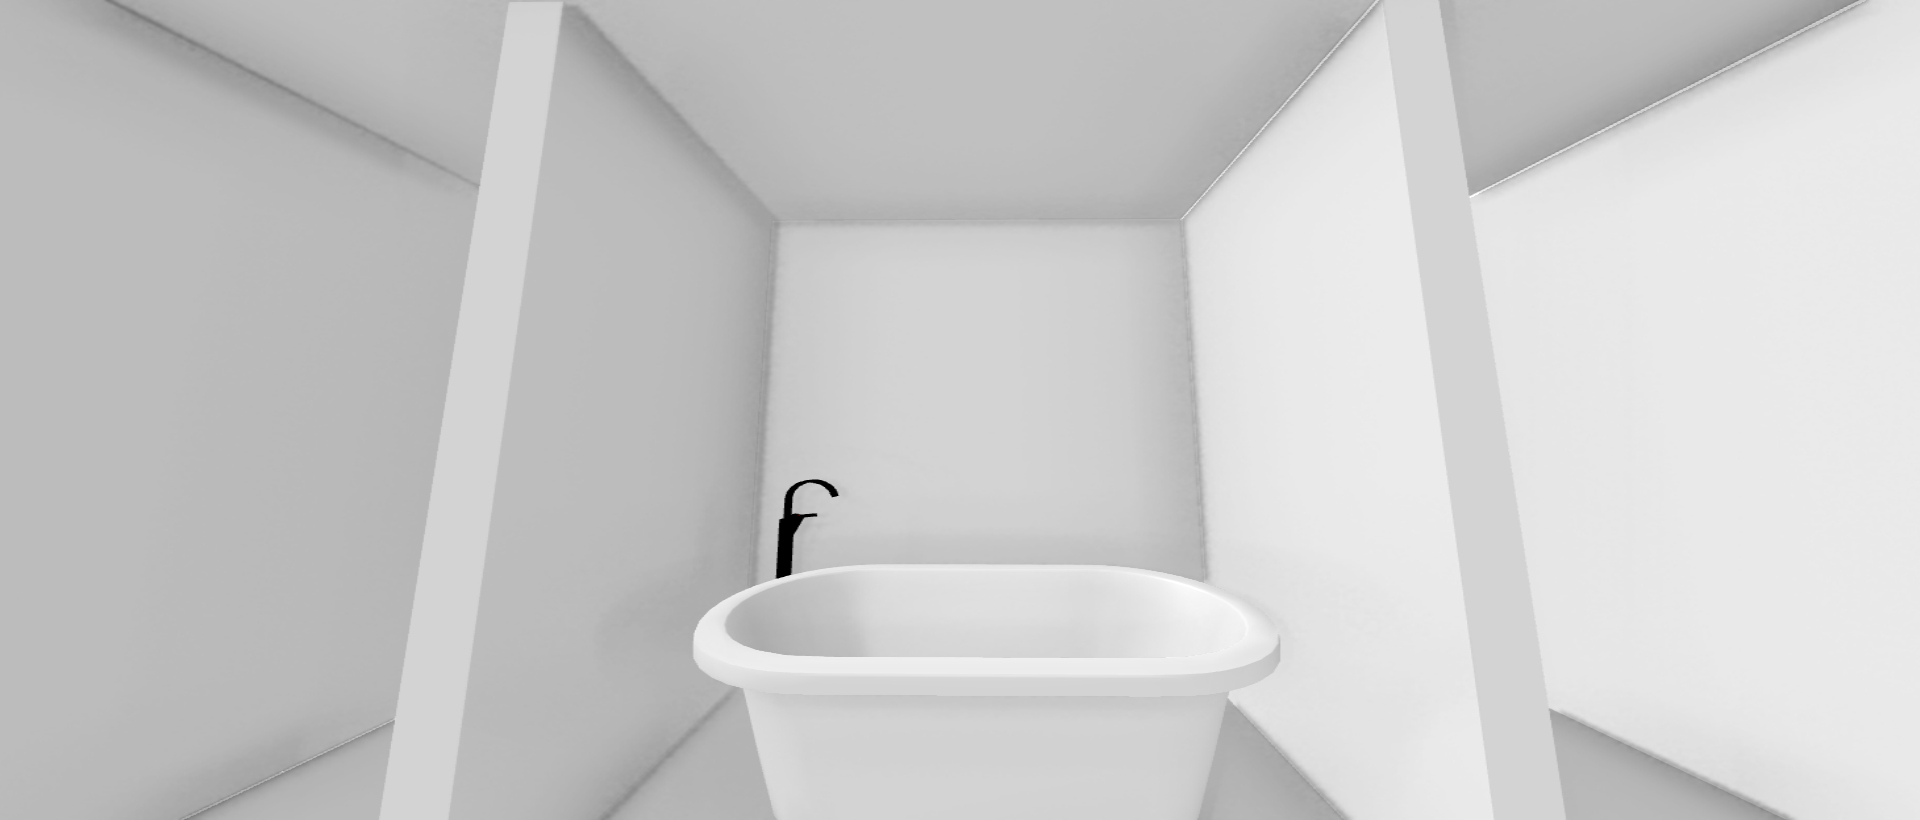
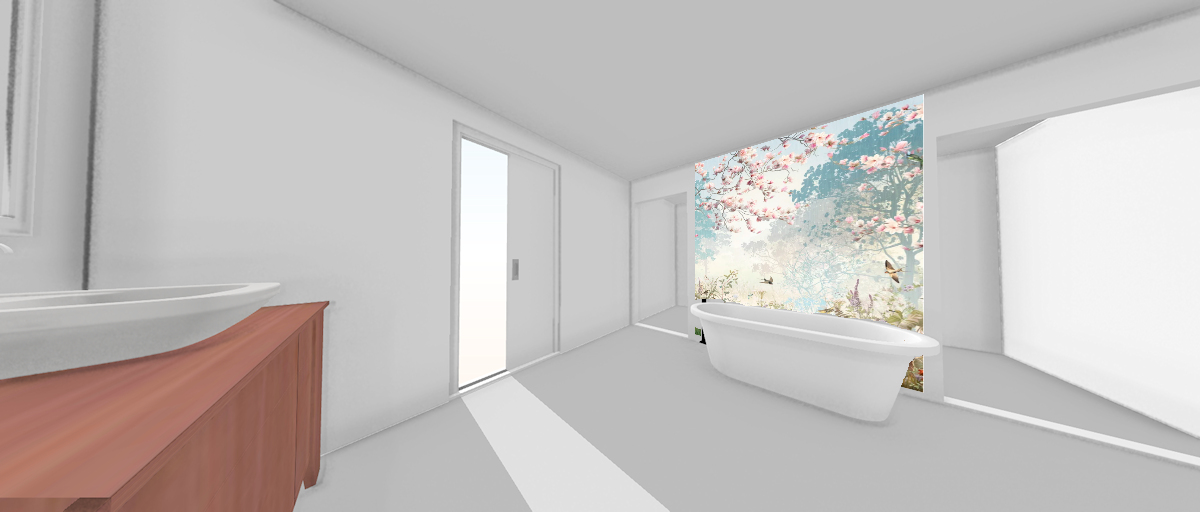
I started with my original plan of having the bathtub in its own little alcove like this…
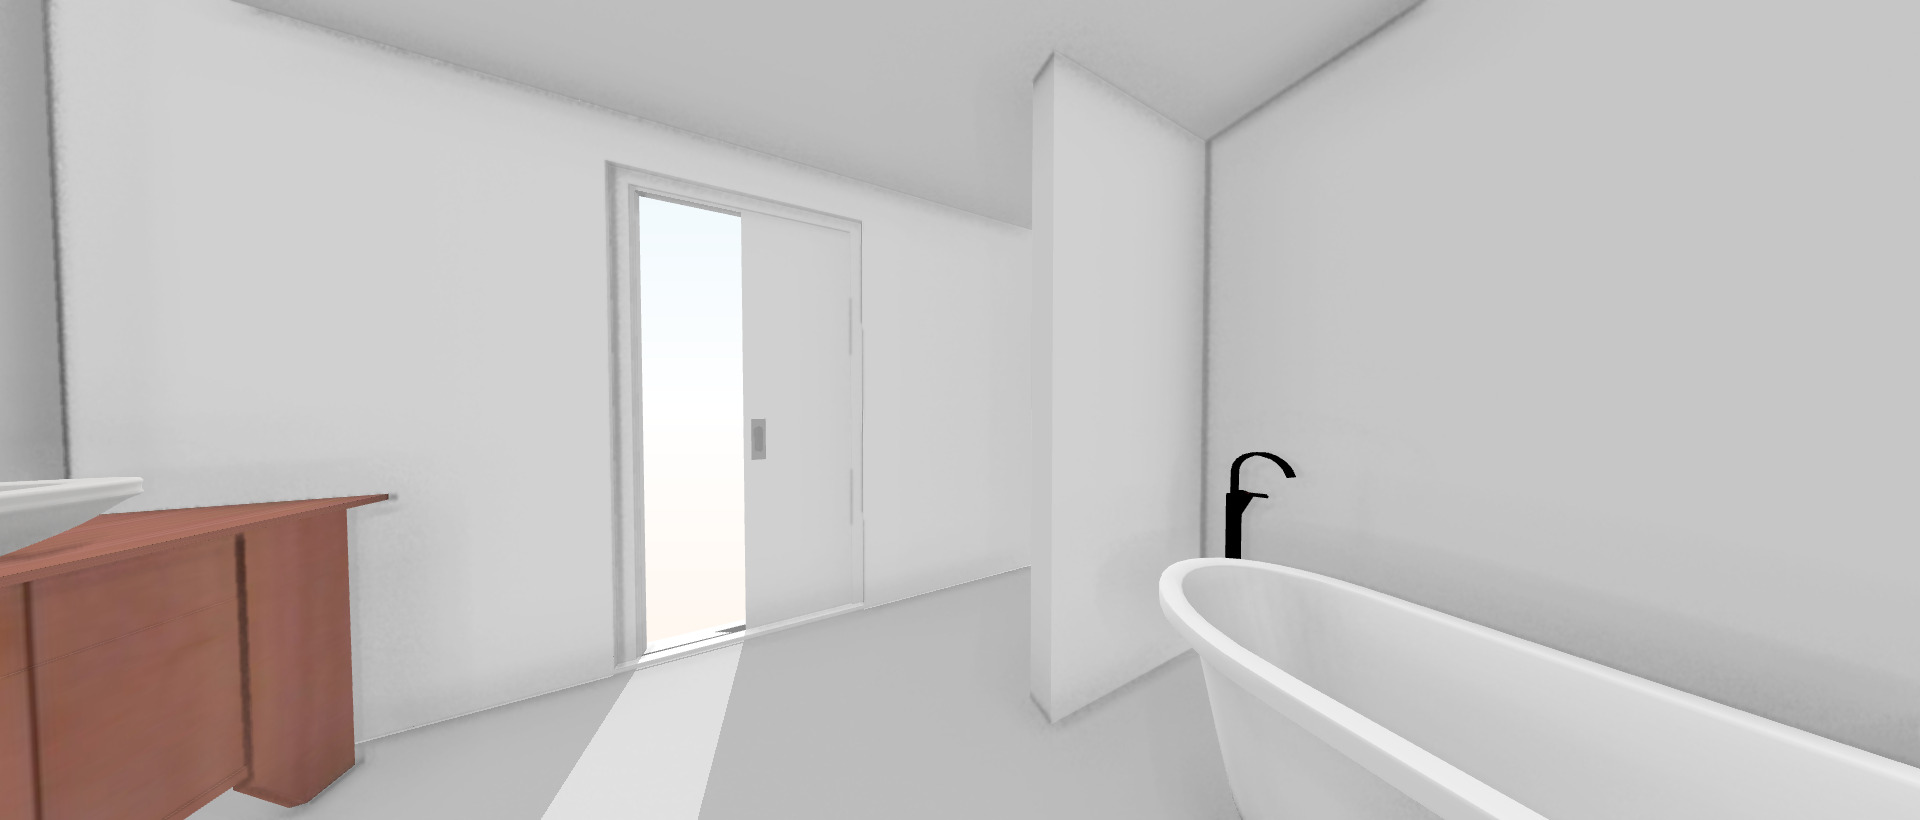
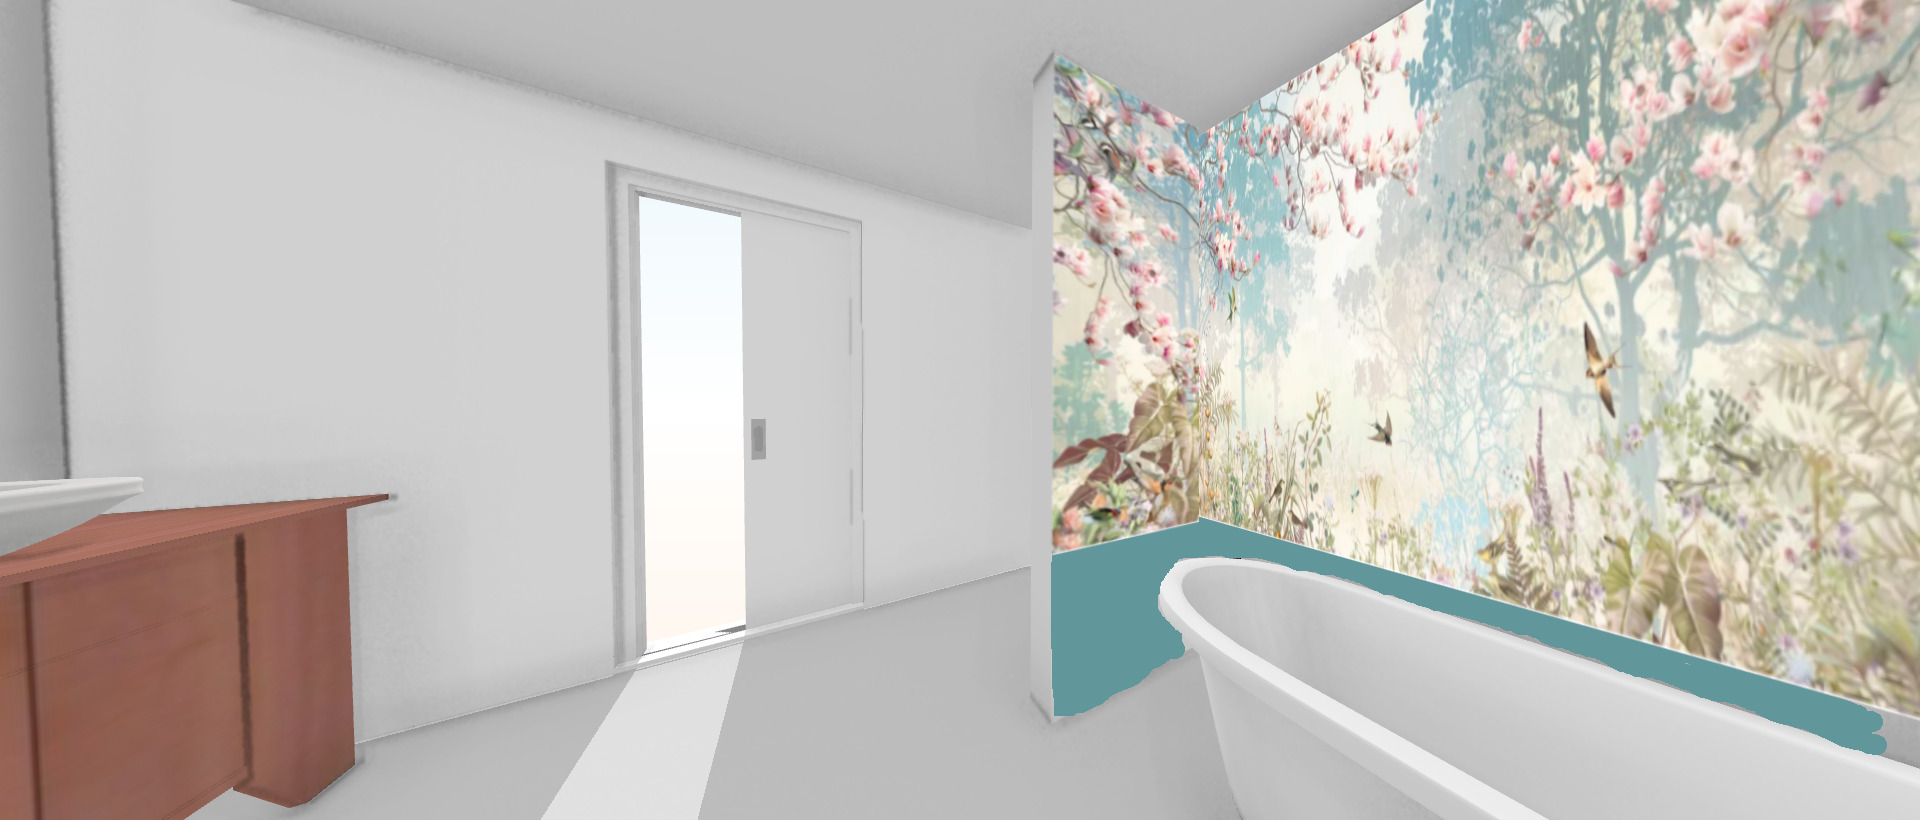
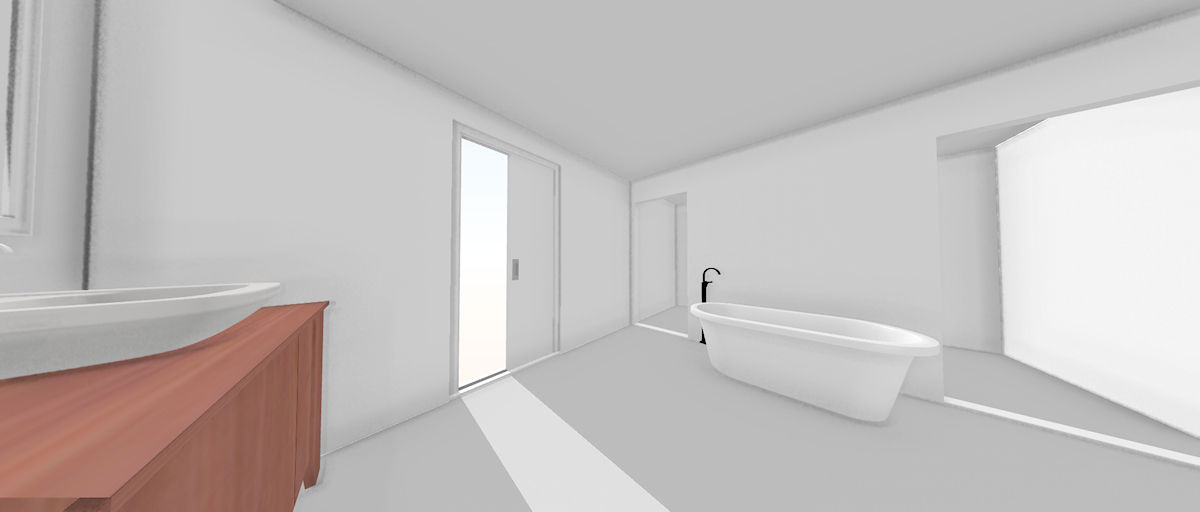
The 3D walkthrough option of that tool makes the perspective look a bit off, but this kind of gives an idea of what that would look like. You can see the long vanity wall (the exterior wall with the window) on the far left. That doorway would go to the master bedroom. And then on the right sits the tub in its little alcove. That area between the tub alcove wall and the bedroom door wall would lead to the shower.
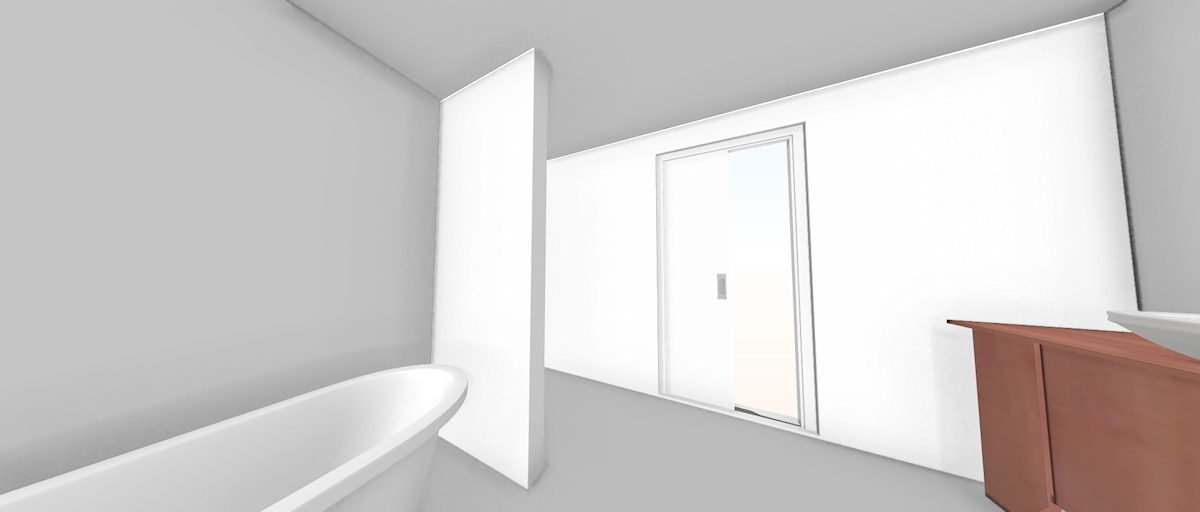
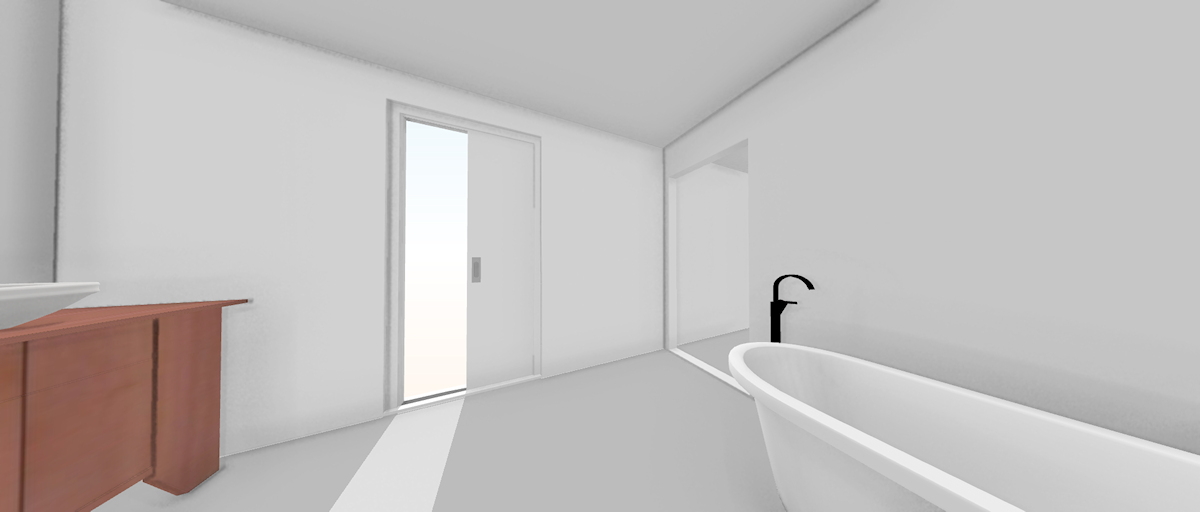
And this is looking the other way towards the door that leads to the home gym.
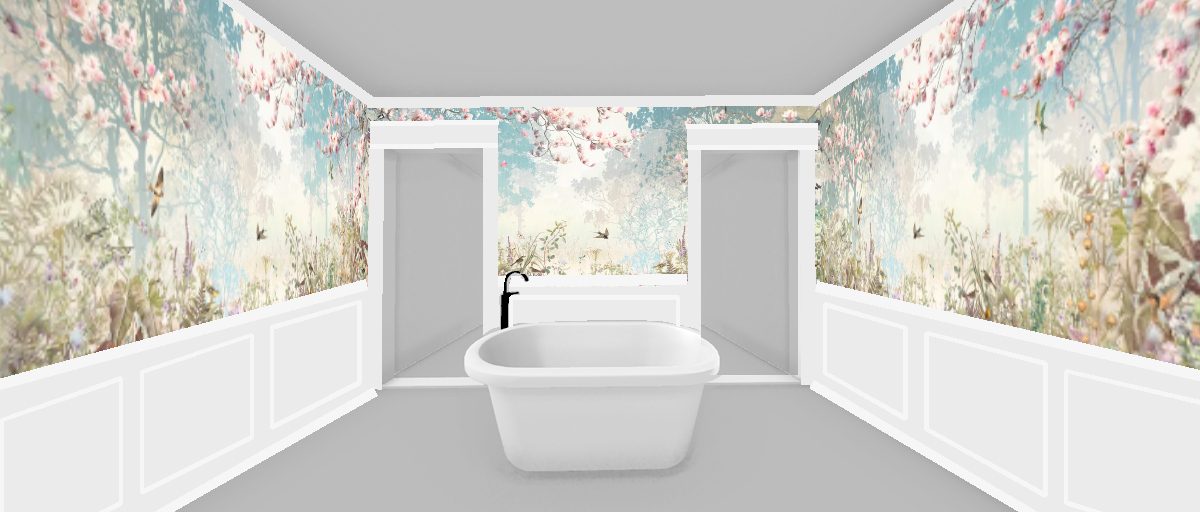
The view looking straight at the tub alcove is where things get a little funky. It makes the tub look so tiny. But the tub that I’m getting is only five feet wide, so it’s really not a big tub (or a wide alcove) at all.
I had imagined that it would look something like this, with the mural on the top of the wall and some wainscoting on the bottom. Don’t pay too much attention to the wall color. That wasn’t really my focus at this point. That decision can be made later.

Or another option would be to use the wall mural from floor to ceiling. Of course, there would be crown molding and baseboards that aren’t shown here.
But on that last post where I shared the fifteen finalist wall murals and wallpapers, a couple of people mentioned that they didn’t like the tub alcove because it felt too closed in. I got to thinking about it, and five feet (which is exactly how tall, or rather how short, I am) just isn’t much space at all. And since I only have 12 feet 6.5 inches of width to work with in this room, which needs to accommodate a bathtub and two doorways, I could save some precious inches by forgoing the side walls of the alcove.
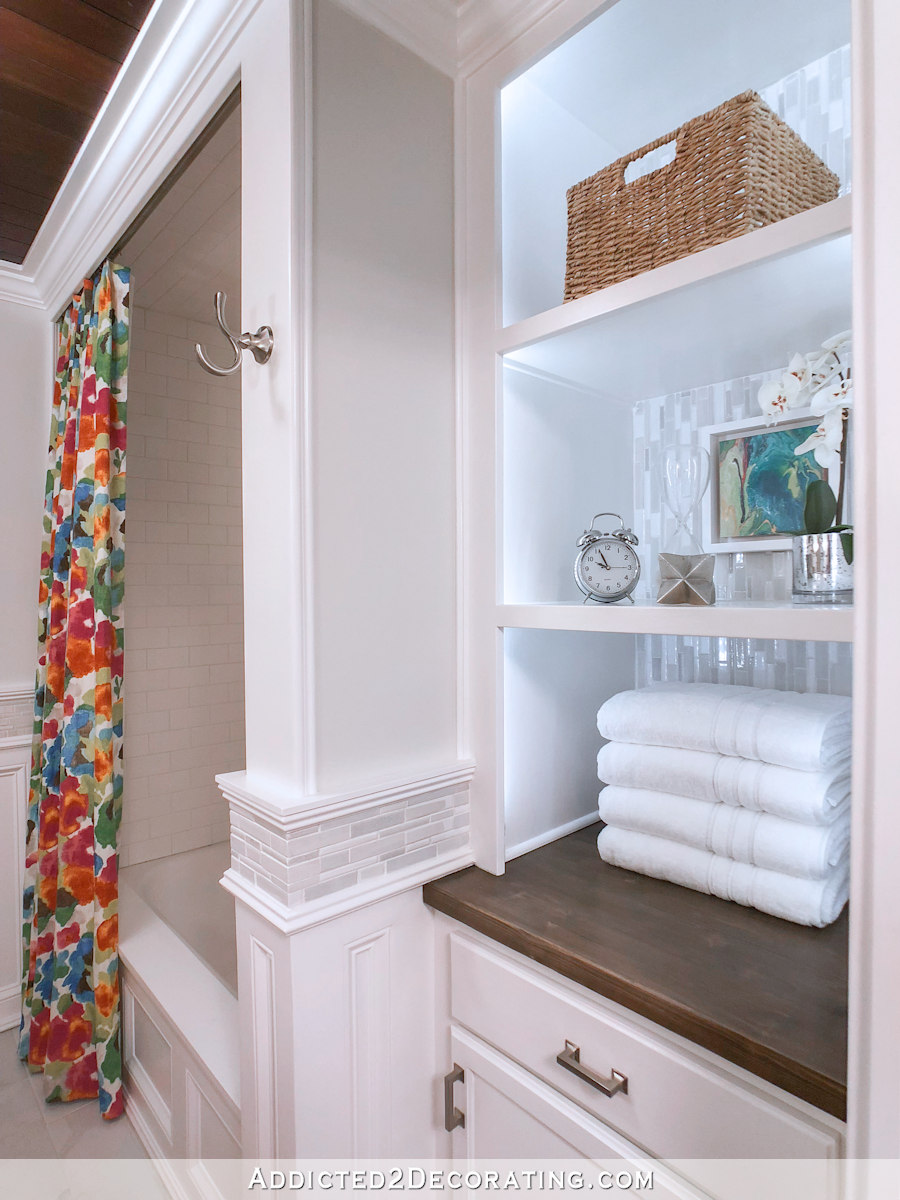
As I was pondering that decision, I saw this picture used on an advertisement for House of Rohl. It was perfect timing, and seemed to be confirmation that I could live without the alcove. It’s the exact setup that I would have with the tub (which looks pretty small in this picture) flanked by two doorways. And then it has a mural on the wall.
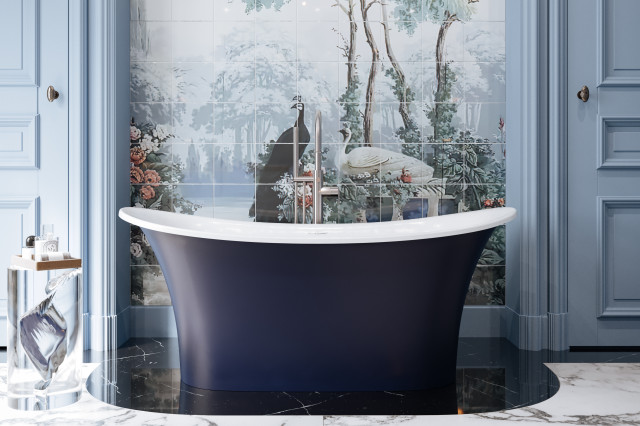
So I think (I’m not sure, but I think) I’ve decided to forgo the alcove. I really liked the idea of an alcove because that’s what I’m used to. I’ve only ever had built-in bathtubs that fit into their own little space, like the one in the hallway bathroom.
It’s very strange to wrap my head around using a bathtub that’s just sitting out in the open. I know it’s done all the time, but it will be new for me.
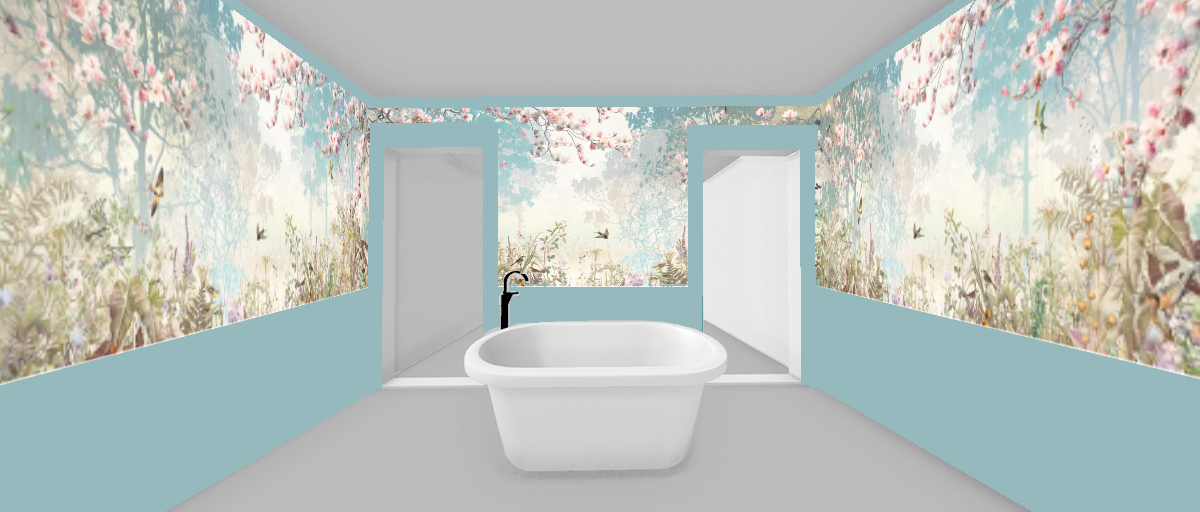
So with that in mind, I went back to the floor planning tool and removed those walls and did a few other little tweaks to see how that would look.
I know it’ll definitely make the room feel more open, but with this arrangement, I also feel like the openings to the shower and the water closet need to be cased openings (doors aren’t user-friendly for Matt), so I don’t plan on doors for either area), which means they have to be moved towards the center of the room about 3.5 inches to leave room against the outer walls for trim around the doorways.
So really, the area that I gained by removing the side walls of the alcove is now taken up by trim. I’m not sure that it really helped anything in that regard. The only net benefit seems to be that the room feels more open.
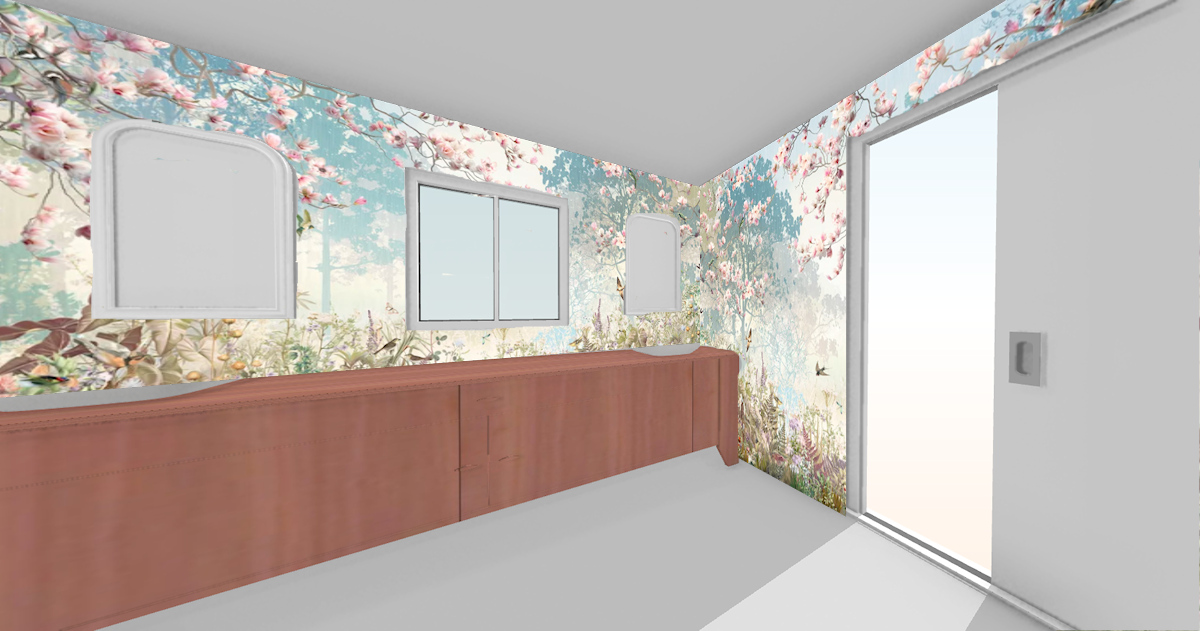
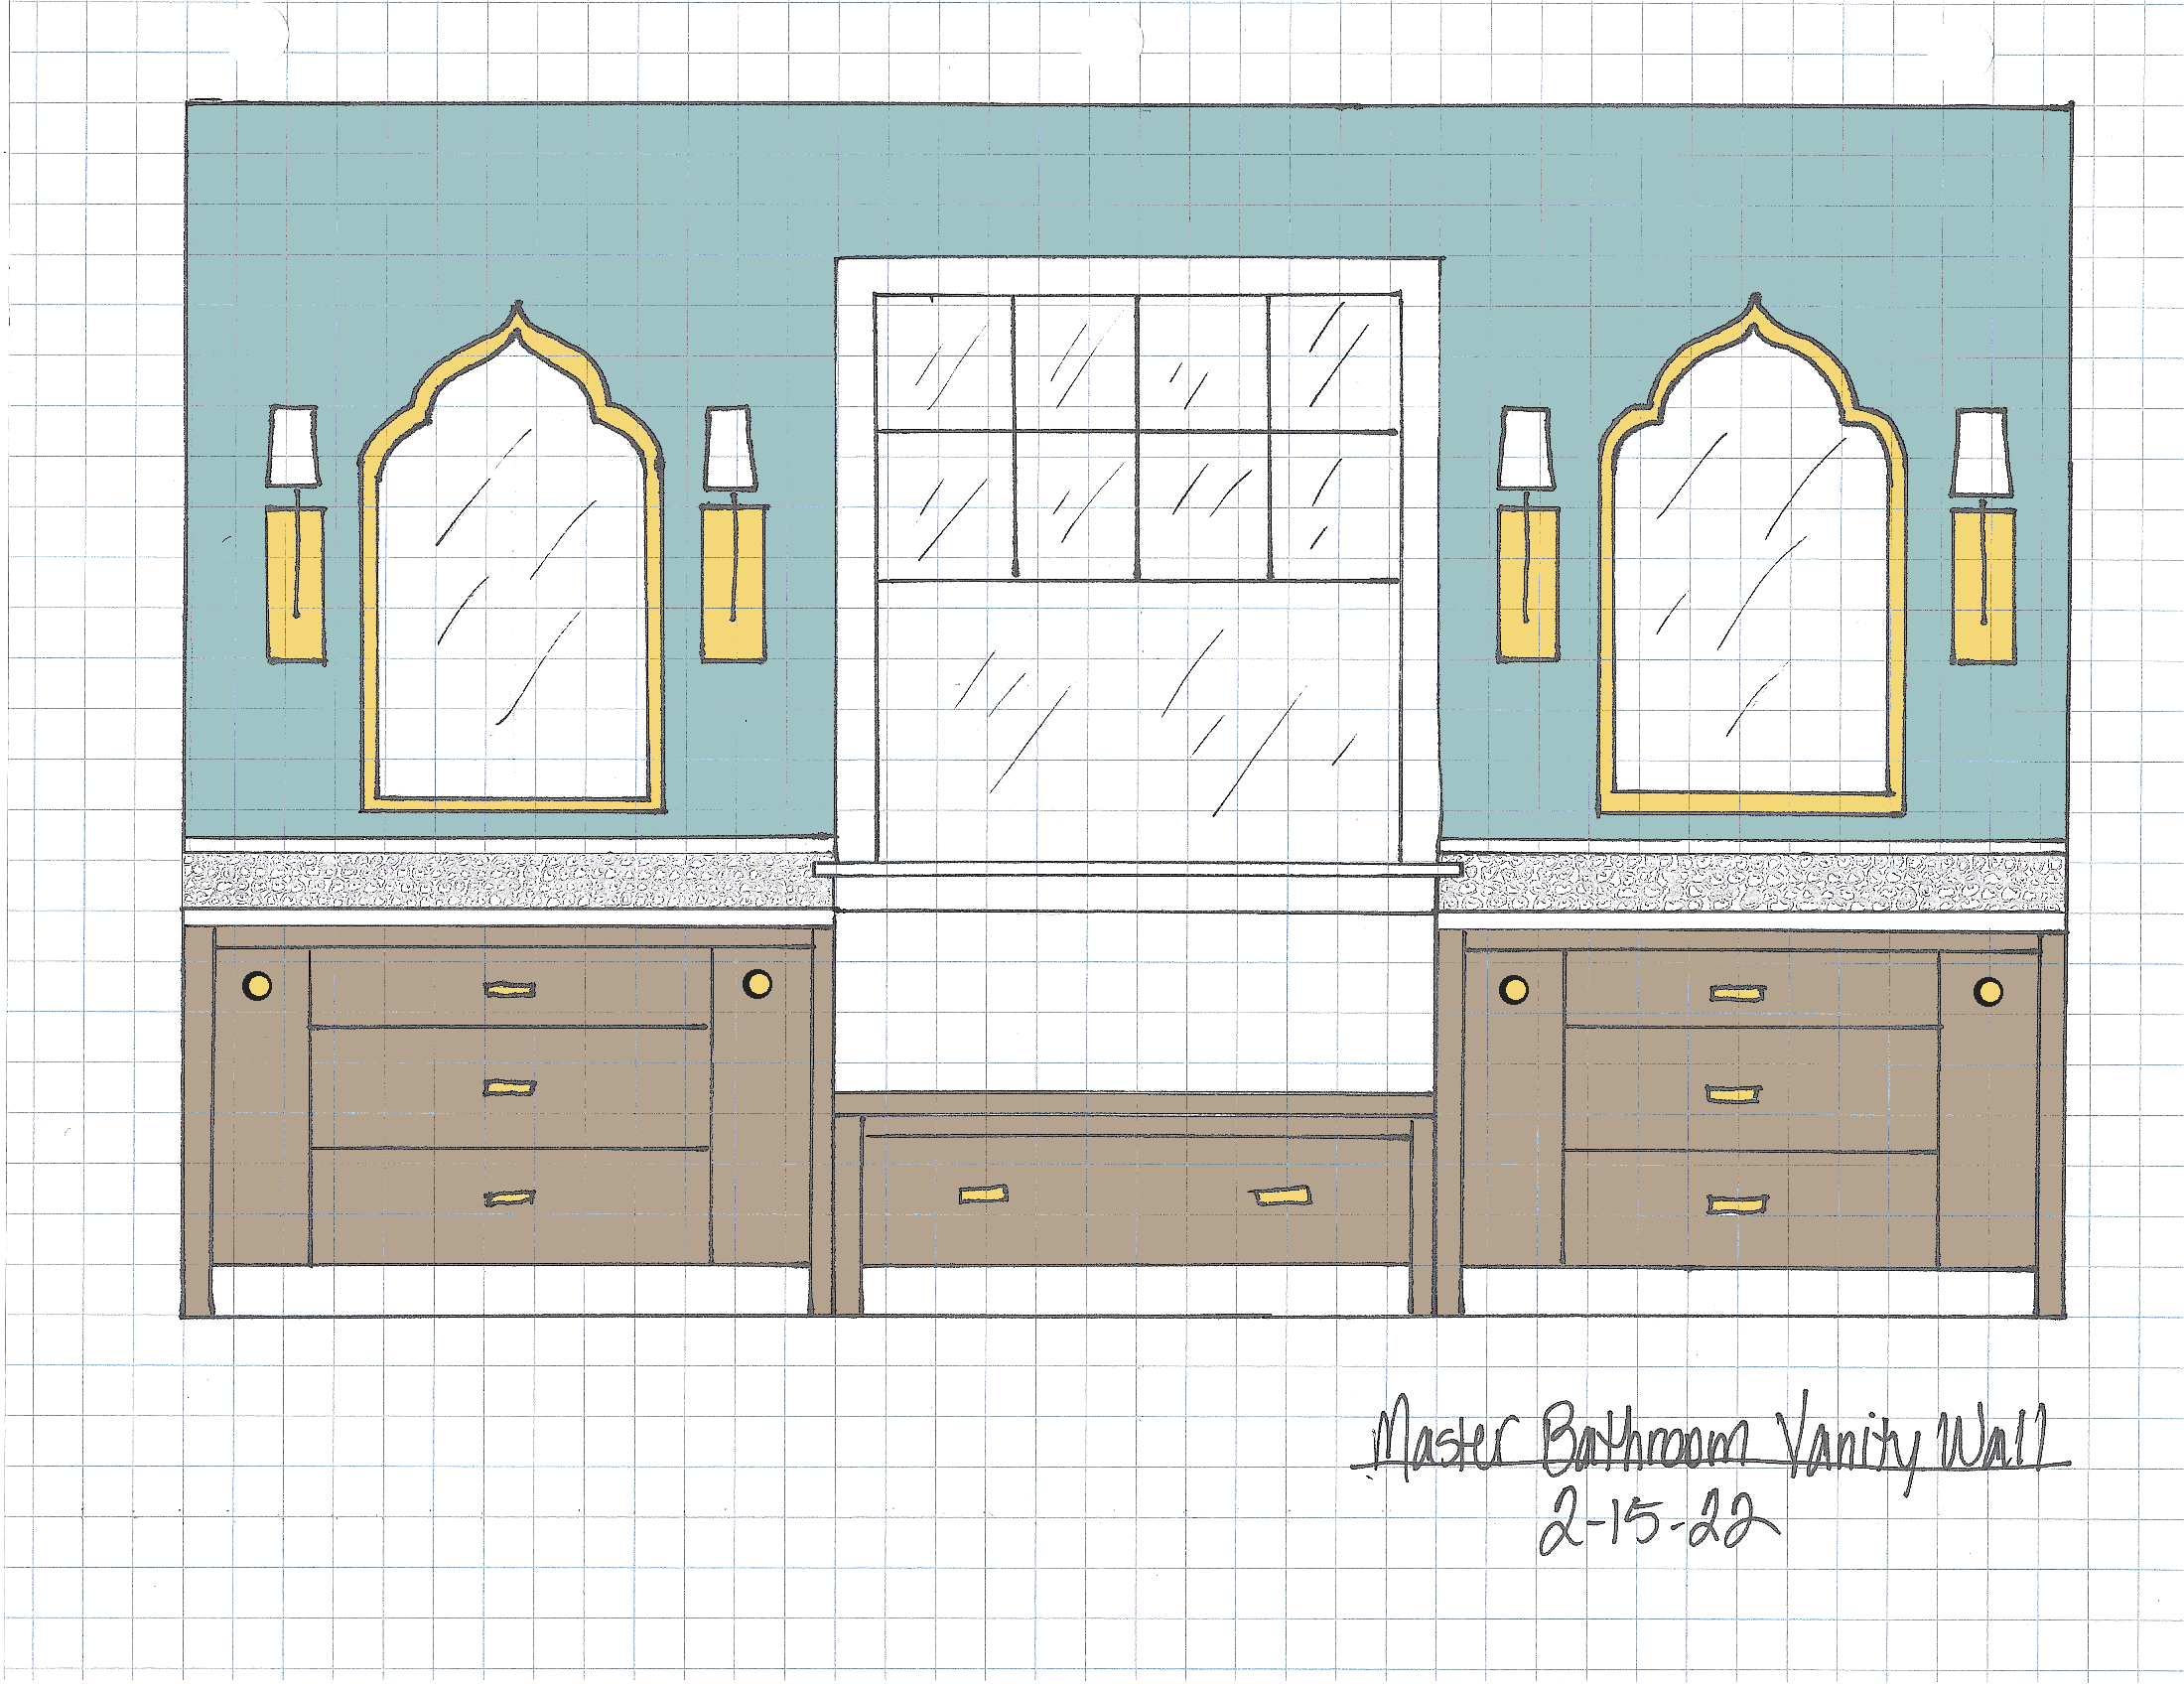
So then I started playing around with some ideas to figure out exactly how and where I wanted to use the mural. If you’ll remember, my original ideas was to use it just on the vanity wall.

But with a vanity, two mirrors, and a window (and possibly some sconces), so much of the mural would be covered up.
So then I tried it just behind the bathtub, like in the House of Rohl picture. But I hit a snag when I couldn’t find any more pictures of that bathroom, so I couldn’t see exactly how they finished off the areas above the doors. Does the mural (which I realize in their bathroom is a tile mural) go just in that area behind the bathtub? Is there actually a tiny little alcove there to set off that area? It kind of looks like there might be one there. So what’s above the molding around their doors? These are all answers I couldn’t find because, as far as I can tell, there’s only that one picture of that wall in that bathroom.
For the life of me, I couldn’t think of a way to only use the mural behind the tub without looking awkward. I’d trim out the cased openings, but what would I do in those few inches above the doors between the door casing and the crown molding? Nothing seemed to work in my mind.
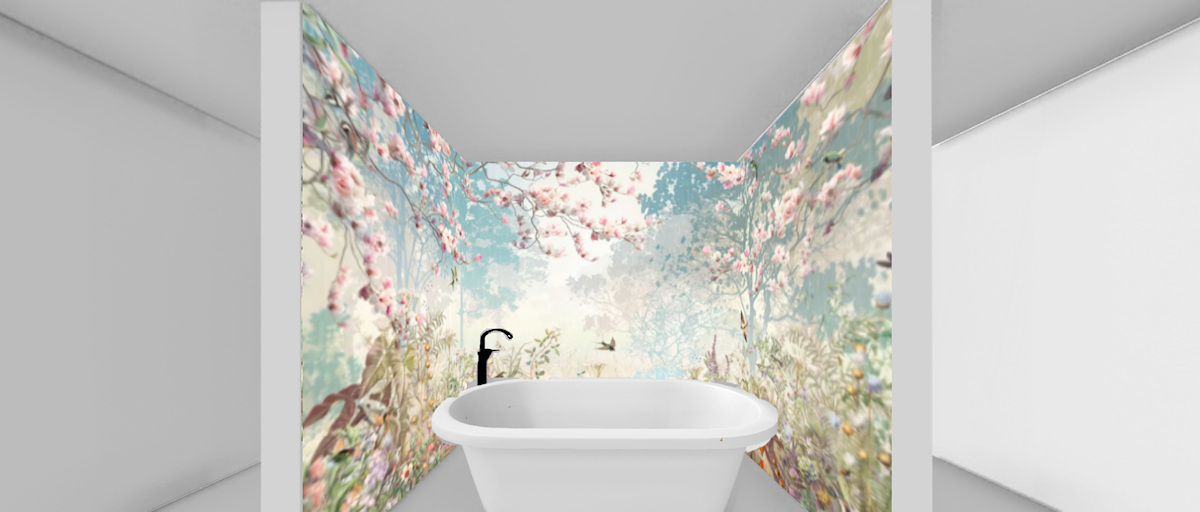
With no clear solution coming to mind, I decided to try using the mural as a wallpaper for the entire room. Because the House of Rohl bathroom with its all blue trim was the inspiration that started me on this path, I decided to try the mural with wainscoting and trim all painted a color other than white. This was my first try…
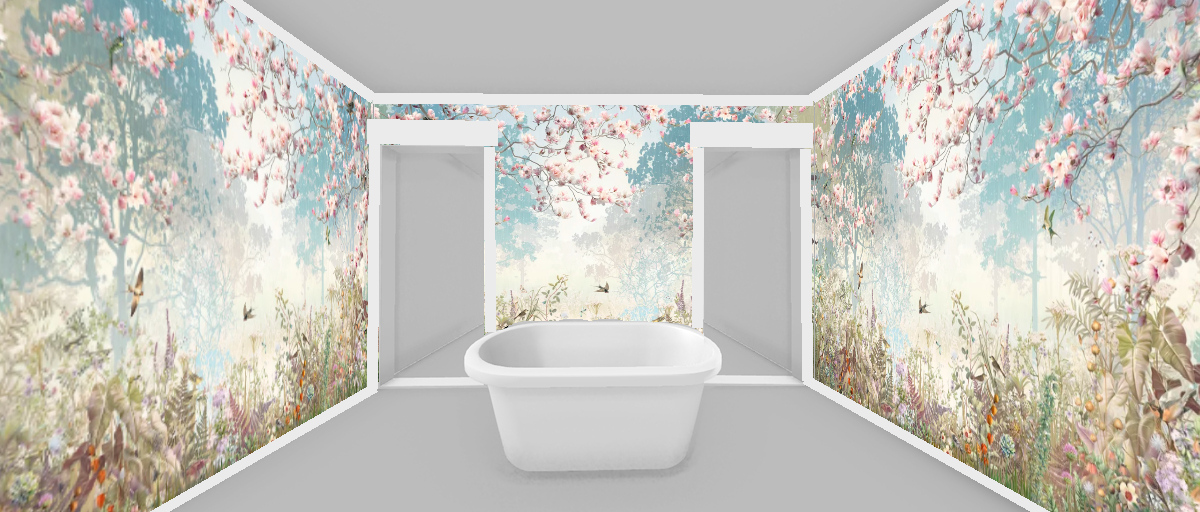
I tried a few other colors that I pulled out of the mural, but none of them really did much for me. Then I tried white…

That one has really grown on me. I also tried it without wainscoting. I know this will be a bit too much for many of you, but I kind of love it.
So at this point, what I know for sure is that I will be using this mural in the bathroom. How? I still don’t know for sure. Will there be a bathtub alcove? I don’t know for sure, but I’m leaning towards no. I’m basically no further ahead than I was when I started playing around with that floor plan tool. (I used my photo editing software to add the wall mural and wainscoting to the wall.
But if I had to make a decision today based on the options above, this is the one I’d choose.
Everything about that seems more “me,” and it also fits with the rest of the house. I have white wainscoting in the music room, hallway bathroom, and studio bathroom, so clearly it’s something that I really like. And using the mural just on the top portion of the walls along with the wainscoting on the bottom adds some calm to the room. While I do love the mural used on the walls from floor to ceiling, I’m afraid it might be a bit overwhelming.
So that’s the direction I’m leaning right now. I’m open to any input right now! Because once I meet with the contractor this next Monday, there really won’t be any room for major changes after that. Now’s the time to consider any and all options!

Addicted 2 Decorating is where I share my DIY and decorating journey as I remodel and decorate the 1948 fixer upper that my husband, Matt, and I bought in 2013. Matt has M.S. and is unable to do physical work, so I do the majority of the work on the house by myself. You can learn more about me here.


I do like the mural you chose. I’m not crazy about using it for the whole bathroom BUT it is your bathroom. Whatever makes you happy, will probably work out for the best, right?
Love it with the white wainscoting. It gives the effect of looking through glass walls to the outdoors. Which to me is a win win. Also the wainscoting would be easier to repair or touch up from bumps, nicks and water mishaps.
Kristi, I love the idea of the white wainscotting – to me it simulates huge windows overlooking a sensational garden view.
I also love the idea of a “mini-alcove” for your bath, just like in the photo, and you could still carry the mural above the doors.
And I love, love, love the mural you have decided on. 🥰🥰
It’s going to be the most beautiful room.
I love the mural, I love the white, you will make the right decision when the time comes, do what speaks to you ☺️
It does feel a bit overwhelming with the mural on all walls. How about the mural on the bath wall and the vanity wall. Even tho you have mirrors/sconce/etc, remember that the idea of the mural will still show thru. Also for above the doors/opening, maybe a miniature of the wainscoting above the door so that the mural is strictly behind the tub. Lastly, since the tub is not long, is it possible to turn it 90 degrees? I feel this would make that wall feel more open.
Oops! Forgot to mention the faucet set could be.mounted on the bathtub mural wall….I ♡ that for a spa feel. Also, would you have enough room for a small table to hold your wine glass?
I have an almost identical layout in my master bathroom…a freestanding tub, sitting in front of a wall, with a door on either side (to a walk-in closet & shower/toilet area). I chose to have pocket doors that both slide into the wall behind the tub. Just an option, if you think you might want to have doors. Looking forward to seeing this project come together for you!
Love this idea with pocket doors!
I think that the tentative plan you’ve landed on is great! It looks really good.
Ditto! Love it
!
Hi Kristy! Great post! So much to consider! So little time. Here’s a video on someone else’s take on your bathroom floor plan. Hope it helps you make your decisions. https://youtu.be/Kuywu9xFmN0
Love it with the white wainscoting
Ditto
Oh I love everything Three Birds do! I think this layout could work well for Kristi….at least it will show yet another option. Wasn’t in favor of the alcove, but in the end, I hope she’ll have no regrets.
Wow! That’s an amazing layout!
Why make doorways to 6’8″? Take the openings all the way to the ceilings. Eliminate that extra trim! Love the mural..
This was my first thought also. No doorways, just floor to ceiling openings with no trim. Love the mural!
I agree – I thought the same thing. Since you aren’t using doors, no need to have “door sized” openings. Trim across the top at ceiling level, or just leave open all the way to the ceiling. But it’s your bathroom, you do what you love most for your space to make yourself happy when you walk in every day 🙂
My thoughts exactly.
Also, I’m wondering how the wallpaper will hold up if you do the whole room, but there is no door to keep the shower moisture contained in its own little space?
Good question. 🙂 It depends on the type of paper it’s printed on. If it’s vinyl, it should be fine. If it’s not vinyl, I might consider a clear coat on top of it.
Leave out the doorways just have full height openings on either side of the tub. No need then for trim
Yes, exactly! You dont need cased openings if there are no doors! Just openings straight to the celing. Then I’d put the mural behind the tub as planned and paint the other walls, wainscoting or not.
YES, that is what I would suggest as well! LOVE this layout!!!!
I agree no doors and just open to the ceiling. You will figure it out and it will be wonderful, just keep doing you!
That’s such a great idea.
That was going to be my suggestion as well.
Side note: I received the email and clicked the link to come here and it said the link was broken, so I just hit the site directly. Not sure if it’s a me problem or issue with the link in the email.
Leaving out the alcove walls will make it so much easier to clean around the bathtub. I love the wallpaper everywhere and the white paint. I always love whatever you finally decide.
I was thinking this too! It seems it would be hard to clean behind the tub with the alcove.
I know you have white wainscoting in the rest of the house but I love the turquoise!! Either way—it will be beautiful. Agree with alcove and difficulty cleaning. Like the idea of transom or no cases opening to the right and left of the tub. My 2 cents.
Just to throw another idea out there…..what if switch the tub and shower? Make the shower the focal point, beautiful floor to ceiling tile, that would coordinate with mural. Then tub would be in its alcove, and could still use the calming, GORGEOUS mural!
I like no alcove walls, wallpaper 3 walls and paint or tile the wall behind the sink. There is too much going on with windows, lights and mirrors, to put such a busy wallpaper on that wall. I also like having the cased opening eliminated and go to the ceiling. Cost is less. More room for Matt to maneuver. I wonder how well the wallpaper will hold up next to the tub. Tile might be a better option.
Amen!!
We previously made foolish “too tight to clean” spacing in a bathroom. Never again!!
Trying to squeeze behind the tub in the alcove to clean sounds like a nightmare.
Exactly my thoughts.
I’m not a lot of pattern “liker,” but I do like the mural used all over in your mock-ups. That said I was going to offer an over the door option. Make transoms over the door with a glass area then you can end the mural against the trim.
Here’s an example that goes all the way to the ceiling: http://www.storefrontlife.com/hallway-update/
I was going to suggest the same! Or to use some sort of panel or picture frame molding to fill the space above the doors. Can’t wait to see your bath come together. We are in desperate need of a bathroom re do and I’m going to live vicariously through you!!
Every time I see a picture of a free standing tub, I wonder what it is like to have to clean the outside of it all the way around and how one cleans the floor in back of the tub. It seems like it would take a lot of scrambling to get to all the places and having walls on three sides would make it even harder. That is a long-winded way to say things look better to me to have no alcove for the tub, though an alcove might be cozier. If you want an alcove, I think building in the tub rather than having it free standing would be soooo much easier to clean!
The murals — it looks beautiful! I don’t think it is too much to have it on all the walls because the space is large and airy, especially if you use wainscoting. It will look lovely no matter what way you decide to install it.
When I viewed the white trim and wainscoting, I had an “ahhh” reaction. It really clicked so I hope you go that direction. And I don’t mind the tub being out there by itself. I can see a tray across it with a basket of towels next to it.
The entrances to the shower and toilet are fine just plain in my opinion if that would give Matt enough room to maneuver.
If you don’t have a cased opening like some have suggested you will run the risk of edges of the paper coming up from getting brushed up against.
Where did you hide the master closets?
They’ll be a part of the addition when we build the master bedroom.
What color are you going to paint the ceiling?
I love the one you picked!!!
I like the option with the trimmed openings and the white wainscoting. The mural choice was my favorite of the ones you shared
I like your choice best of all of them. I have a couple of comments to mull over: I liked Judy’s idea above, just having a full height opening without casings if you decide to just do the tub area. BUT….my concern with not having an alcove is that I would then want a heated tub! In a big, open space like that, the tub water won’t stay warm for very long. You would be always adding hot water to stay warm as you soak. Not very relaxing. So you may consider that factor in your plan. ( also liked the transom idea for added light in shower/ commode areas.)
Do the shower and water closet have to be back to back? If you moved them side by side along one wall with a door, then the bathtub could go on the opposite wall with the other door. Maybe your alcove would work that way. Love the white wainscoting!
Kristi, I love your last plan with wainscoting. Very nice mural choice. Have you considered rotating the tub 90 degrees? I love the door trim. Love it all, actually.
I love where you ended up. It looks crisp and clean…just how I’d want my bathroom to look! Great job…cant wait to follow this project along.
Love the mural and white wainscoting with no alcove. Since it may be too much to have the mural also above the vanity area, what about painted that wall a solid color with that pretty blue in your mock ups? It would kind of feel like a continuation of sky without being too busy. Whatever you choose, you have the touch and everything turns out beautiful!
I love the wallpaper!
I would consider moving the tub so it is perpendicular to the wall. From your measurements, it might give Matt a little more room going into the shower & toilet rooms. It would also make cleaning between the wall & the tub much easier.
If you have an oval tub, I wondered also about making arched door openings to repeat that curve instead of rectangular ones. I also liked the idea of taking the openings to ceiling height. A pocket door for the toilet room would offer some privacy but be hidden unless desired.
You are really a wonderful designer. I love your clear explanations.
*painting the wall
LOVE the mural, but with the white wainscotting! It looks too busy to me for full walls but that’s just my opinion. I know it’ll be beautiful when finished.
Oh, I love it freestanding without the alcove too!!
Personally, I would leave the shower and toilet openings ceiling height. I like the tub alcove idea, but would cut the depth by at least half and place the tub out from the wall far enough to make cleaning easy. I also prefer the mural without wainscoting; more like nature, open and free and way less “choppy,” “fussy” looking. But that’s all me. You and Matt live there so it needs to be what works for you and makes you happy. Love, love the colors in the mural!
Have you considered half walls for the alcove, to come just above bath height? It would make that area a little more cosy than having the tub stood out on it’s own.
I would need some kind of walls around my bathtub, but maybe more like these:
https://www.facebook.com/kilmartincastle/photos/pcb.2803081366624712/2803081276624721
Another view of the tub here:
https://www.dailymail.co.uk/travel/escape/article-8686873/Game-Thrones-mod-cons-review-Scottish-castle-festooned-boutique-comforts.html
I love the mural with the white wainscotting. Just my opinion, I wouldn’t put the mural on the vanity wall – it will be too busy. Maybe give it a color from the mural instead or just white. Love the tub without the alcove. You always have such beautiful taste and style, I love that you go outside the norm. Do what you makes you feel comfortable with, as you are the one who has to live in it, don’t ever doubt yourself, your style is always impeccable.
Here’s a thought in a slight different direction. Instead of the alcove side walls coming out the 2 1/2-3 feet width of the tub and enclosing it, cut it back to 3-4 inches and trim it out . This would give you a designated area for the mural. Allow you the ability to easily clean around the tub because the definition frame will only come out a few inches. I loved the mural you chose.
https://youtu.be/Kuywu9xFmN0
Check out this video, same bathroom layout, looks incredible.
Three Birds Renovations (Australian design group – YouTube channel)
Oh, wow! It’s so similar to what I’m doing! The funny thing is that I got my layout from an Australian woman I follow on Instagram who does walkthrough video tours of new build homes in Australia.
At first I thought you could add linen closets on each side of the tub instead of doors in the Rohl photo. But then when you said you’d wrap the mural all the way around my mind screamed, “no! too busy”!. However combined with the white wainscoting it really looks pretty. Will Matt like such a feminine bathroom? I’m also a fan of a skirted or smooth sided toilet because it’s so much easier to clean around and behind. I first saw one on Karen’s Theartofdoingstuff.
My daughter got the smooth sided toilet when she remodeled, and I’m so jealous!!! I never understood why they have to put all those nooks and crannies in toilets – SO MUCH HARDER TO CLEAN -makes me crazy!!! Love your layout Kristi!
Unless you have plenty of wall space around the smooth sided toilet, it is a nightmare. I fell for the sleek, easier to clean toilet and my plumber hates it. It’s harder to remove if needed to replace wax ring and just a pain in general. The openings on the side to get to the bolts are too small for an adult hand. I’ll never get this type again. Great idea but has many drawbacks.
Love the mural all around the room with the white wainscoting. Regarding the bathtub, I personally do not like completely exposed tubs because the warm air leaves the area around the tub quickly and I get cold. Have you thought about using glass panels on either side of the tub? They would give you a partial enclosure for the tub with leaving the view unimpeded.
I would strongly recommend a pocket door for the toilet room for privacy, just in case. You would not need to use it but it would be there for the future.
Yes to the pocket door!!!! I was thinking the exact thing. Love the mural behind the tub. I think like others cleaning around the tub would be difficult with the side walls. However, this is your home and you should do what makes you the happiest. Whatever you come up with will be beautiful. I look forward to watching the journey.
Glass panels would probably be a pain to keep clean. Just saying.
Kristi, you have great taste! I personally love the wallpaper with the white wainscoting as it’s a great contrast to all the colors in the mural and doesn’t take away from it. I also watched the video someone posted from Three Birds and that was an amazing layout.
My friend and I have been watching Rock the Block (on HGTV, I think) and Leanne Ford did (in the first season, I think) the most amazing bathroom I have ever seen. The shower was a double shower that looked sort of like this —–> I_______I with no doors and nothing to step over to get into the shower. Shower heads were on both side walls. It looked like the vanity was on the wall on one of the long sides of the shower and the tub was on the other long side. It was utterly fabulous and I’d have bought that house just for that bathroom. This is the only link I could find – she’s at the tail end of the video. I know that whatever you do, it will be amazing!
Kristi, as much as I love wainscoting , ( I’m a woodworker), I think the mural is far better without it and gives a more serene atmosphere going all the way to the baseboards. The brilliant transom idea for the shower entryway is a perfect solution because you can never have enough natural light in a bath but if the space is too small just do the other great suggestion except with one modification: take the opening almost to the ceiling, but do leave room for your crown molding. That mural was my favorite and I think leaving off the alcove walls is better for the room and cleaning. That’s going to be an awesome bath!
Sorry about that link . . . . I thought it would just show that first episode of Rock the Block (2019). Hopefully, this link will show you her bathroom. https://images.search.yahoo.com/search/images;_ylt=Awr9DWYeAYtgS3wA9m9XNyoA;_ylu=Y29sbwNncTEEcG9zAzEEdnRpZAMEc2VjA3Nj?p=leanne+ford+bathroom+rock+the+block&fr=mcafee#id=8&iurl=https%3A%2F%2Fna.rdcpix.com%2F281293415%2F3fa40b9b0f0bf8775187a13a097855c7w-c0xd-w640_h480_q80.jpg&action=click
It would be amazing to walk into that bathroom every day. Like a breath of fresh air. So you!
Is Matt going to use the tub at all? It would probably be much easier for you to help him in or out without the alcove.
Yes! Absolutely LOVE the mural on all walls with the white wainscoting! Now all you need is a fabulous chandelier. I’d never leave!
No alcove, wallpaper only on that portion of wall directly behind the tub…them “framed out” like a painting. LOVE that paper but IMO, it loses something when there’s too much of it.
“then” sorry, fumble fingers
I like the last rendering and yes it looks your style. It will be open and light without being too hard and modern. I think it’s a beautiful solution.
I love wainscoting (I’ve put a bunch in my home), so I would definitely want to go with it. I like the mural just on the wall behind the tub, makes it more of an accent wall (sometimes less is more and you actually see it more). What about using the mural on the entire length of the wall behind the tub (above and around the door frames), still keeping the wainscoting on the bottom. Or you could but the mural behind the tub with a frame around it to almost look like a very large painting. But, the best part is you get to do what makes you happy.
I I like the floor to ceiling opening it would save some space on your wall, no need for trim…. also have you considered a pocket door on the W/C? You tuck it into the wall behind the tub, saves space, no swinging door for Matt, but it gives a little more privacy when you might like it. Design is beautiful as always.
I’m lovin’ the whole room, white wainscoating/trim version!!! The white makes the mural in the whole room work without being overwhelming.
And what a room to start your days in!
Contemplative, uplifting, enveloping, heavenly!
No alcove, and definitely no pony walls. Just one more thing Matt would need to maneuver around.
There is a reason new bathtubs are shown as freestanding against one wall. They are a bugger to clean behind. It is impossible to get a mop behind them if there is a second wall. And if you are short, climbing into the tub to reach the floor behind it isn’t very successful either. Ask how I know all this? 🙂
Love it! Absolutely beautiful…
I like your plan for the wall paper and wainscotting. If the room were a lot larger it might be over whelming but because it is a divided space I think it would be kind of relaxing…I could see myself soaking in this space. At first I thought “pony wall” but that would not fit I think because of the smaller space…so I really like it and can’t wait to see it in reality…now if it were my bathroom I would have to have some kind of chandelier over the bathtub….well maybe not right over it but close in front of it.
I think that if you were to have walls next to a free-standing bathtub, cleaning would be a problem – you need to clean under it, behind it, the bathtub itself (legs for example)!
Also, I don’t know how well wallpaper would hold to getting wet, so wainscotting may be practical as well as pretty.
I absolutely LOVE your wallpaper btw, in any of those configurations you tried out!
Your plan is gorgeous. Throwing in a ‘wrench’ :o). If you love the feel of an alcove, perhaps consider putting in a pony wall on each side of the tub. Obviously it’s not an alcove in the literal sense, but it would give you the feeling of coziness you might like. You could make it a height you like to achieve the ambience you desire.
You have exquisite taste Kristi so whatever design you choose, it will be spectacular!!!!
Something to be aware of when the tub is in such an open space is that the air is cold. If you want to soak for any amount of time, there needs to be heat or a closed off space to keep the warn humid air in.
Was wondering if you’re planning on a ceiling track lifter for Matt and if that would factor into the door decision.
We’re not planning on that. I have a Hoyer lift that I use to transfer him, so we’ll continue to use that.
All your plans are beautiful. I just can’t imagine soaking in that tub without some kind of surround, though. The thought of it makes me feel cold!
I liked the alcove option – having a free standing tub with two huge gaps either side feels very exposed.
I’m just thinking about safety: getting into, but especially getting out of the tub. Even non slip tubs and surfaces can be slippery. What are you going to use to help you get in and out of the tub? Sometimes those practical things have no esthetics, yet are needed for ease of safety and ease of use. My contractor warned me, that if we didnt have grab bars, the tendency is to lean on the faucet, and that could damage the faucet and tub. We ended up using attrative grab bars that double as towel bars. He had us plan the placement in advance so he could reinforce the walls where they were to be installed, for a secure install. Good luck with your beautiful project!
I’m just thinking about safety: getting into, but especially getting out of the tub. Even non slip tubs and surfaces can be slippery. What are you going to use to help you get in and out of the tub? Sometimes those practical things have no esthetics, yet are needed for ease of safety and ease of use. My contractor warned me, that if we didnt have grab bars, the tendency is to lean on the faucet, and that could damage the faucet and tub. We ended up using attractive grab bars that double as towel bars. He had us plan the placement in advance so he could reinforce the walls where they were to be installed, for a secure install. Good luck with your beautiful project!
Hmmm…that’s a good point. I’ll have to think about that!
Kristi, I love the white wainscoting! You get the beautiful mural but with the simplicity of the white beneath it. I think it also helps keep the bathroom from feeling too busy. And I like it without the alcove. I personally think you could add the wallpaper across that whole wall, above the doors. With the trim around the doors, it would just be a little bit and would eliminate the problem of where to stop the wallpaper. Whatever you decide, I know it will be beautiful. It always is. <3
This is going to be exciting. I sure hope we get daily updates because it’s fun to see the daily progress on a new room. This is going to look fantastic whatever you decide.
Love the design with the wainscoting and no alcove! The mock up looked great but the mural wallpaper just seemed a bit too much (it was my favorite BTW). Why not try the mock up with a few other paper choices just to see how it looks? Also, I thought about something like this that has a mural feel without being so overwhelming. https://www.etsy.com/listing/753056130/samples-wild-blue-wall-flowers-corners?ref=shop_home_active_23
Another thought, I loved your guest room wall and I think you could create your own design and it would be fabulous too!
I would definitely think about a pocket door for the toilet room. In our home there is no door between the master and the bathroom, which includes the closet. I would dearly love some additional privacy there. Having my morning bathroom time while hubby is trying to get ready is not ideal. We’ve been married for 20 years now…so there’s not much mystery left…but some things we just don’t need our spouses to be part of! LOL
I really liked the version with the mural everywhere and the wainscoting. The wainscoting does feel very “Kristi”. I wonder what it would look like to just paint the vanity wall though? A white or pale aqua? The walls opposite of the vanity (in the shower and toilet room) wouldn’t be muraled (assuming). I think having the same color “bookend” the mural would be nice and would avoid the visual chaos of the mural broken up by the windows and mirrors.
Am assuming you will be using pocket doors. How about 1/2 walls for the tub enclosure? I like the pic with the white bottom with molding. The full wall mural is too much for me.
I suggest enlarging the toilet area so it is fully accessible (including open 5 foot diameter turning area). At least one sink area should be fully accessible also. You may have guests that require accessibility and Matt’s capabilities may change over time, or even when he’s had a strenuous day or is ill. For the tub area, I suggest leaving it open but adding a soffit to help the area feel sheltered and special — perhaps with some sort of mood lighting. And the tub will need convenient storage for bath products, book, wine, candles, towels, etc.
Agreed. It makes no sense to not make this bathroom fully wheelchair accessible now that the chance is here.
And the shower and toilet alcoves are far too small to provide proper wheelchair access. Likewise with the vanity leaving the sink unaccessible.
ADA standards for a shower require a minimum of 5 feet radius for a shower. This one is 6’4″ x 6’10.5″ I don’t know about “proper” wheelchair access for the toilet, but I do know what Matt requires (i.e., a grab bar right in front of him, which will be unusable in a toilet area that’s too large), so I’ve designed it for his use. I haven’t even designed the vanity yet, so it’s a bit too early to deem the sink unaccessible.
I haven’t designed the vanity yet, but his sink will be accessible.
Hi Kirsti, We needed to install a downstairs bathroom suitable for my mother who was a wheelchair user and while the decorating part was left up to us, everything else was decided by the Occupational therapist. From the positioning of the toilet and shower, down to the type of faucets used – even the placement of the toilet roll holder! – everything had to be approved by her. I’m in Europe so things are probably different in the US. I love the mural idea and I have every confidence in your ability to make it work for you both. Best of luck with this very important project, I’ll be very excited to watch the progress!
The mural looks like the image was “flipped” for one wall—a mirror image of the other. It looks so symmetrical this way, but in real life will that happen? Will that bug you? I didn’t see anyone else mention this…
I did flip it, because the mural company actually gives you the option to have the mural flipped before printing.
Kristi, I LOVE your taste! The wainscoting style you chose, in white, with the mural you chose on 3 walls would be GORGEOUS. I would not put the mural or the wainscoting on the vanity wall though — a solid color on that wall (a blue shade from the mural) would be so relaxing, and would make your sconces stand out more. To me, wall sconces are like jewelry. 🙂 I would not install doors though — you can have the cased openings without having doors on hinges. It’s going to look so beautiful and I can’t wait to see the final results!
Looks great . The only thing I would add is a hanging light centered above the tub . A not too fantasy chandelier would be nice .
I agree with you, Kristie. I would choose the wall paper with the white wainscoting. I’m not sure why, but this option doesn’t feel as exposed as the other open options. It’s like your own little paradise. I’m looking forward to seeing this completed. Oh my goodness, it’s going to be stunning.
Wheel chairs..bath chairs…transfer benches…etc chew up wall paper if its full length on the wall. The least little ding and boom problem.
The lower portion of your walls would benefit greatly from durable wainscoating of some type…get a ding? Wood filler sand paint or touch up is an easy fix. Torn or dinged wall paper um not so much.
If no alcove you can set the tub apart and make it a feature by using a diff flooring under and around it like in your picture where they used the black marble..so it anchors-grounds the tub in the space and not just floating in the room. The new geo tiles…lazer cut marble…would be awesome with your design asthetic….
Above the doors..just beef up trim and make it taller..an above door lintel…..and then use a neautral paint..same color as the tub… in the tiny space above so it disappears in background. Will also make tub area pop.
🙂
A lovely design for your new master bath. I would suggest you consider extending white trim on both sides of the tub wall with a small white painted panel with picture frame moulding, like your wainscot panelling. Run this up to your crown.It will reiterate the design and bring it up to a different level.
For the vanity and window wall, I think doing it all in tile up to the crown moulding, perhaps also in white, will be more restful for the eye than extending the mural to that fourth wall. I just did this in a small bathroom for our guest cottage, and it makes the bathroom seem much larger than its actual size. Another idea is to do smooth wood panelling and picture frame moulding on this wall as well, framing around your two vanity mirrors.
Last suggestion is to put skylights or Solatubes into the ceilings of the shower and the room with the toilet. And while you may not need a door to the shower, depending on the location of the sprayers, it would be a good idea to put a pocket door on the room with the toilet.
https://www.qualitybath.com/victoria-albert-to1-toulouse-freestanding-soaker-tub-with-void-59-3-4-l-x-2914-w-x-2512-h-product-338445.htm
short video shows a bit more.
Awesome! Thank you!